Thick hair is a gift that often comes with a specific set of management challenges. When you have an abundance of hair, finding a style that feels lightweight yet structured is the ultimate goal. Pattern hairstyles—which incorporate shaved designs, intricate braids, or geometric partings—can break up the bulk of dense hair, creating movement and visual interest where there was once just a heavy, uniform mass. If you have ever felt like your hair is weighing you down or losing its shape, adding a pattern is one of the most effective ways to reclaim control while making a bold statement.
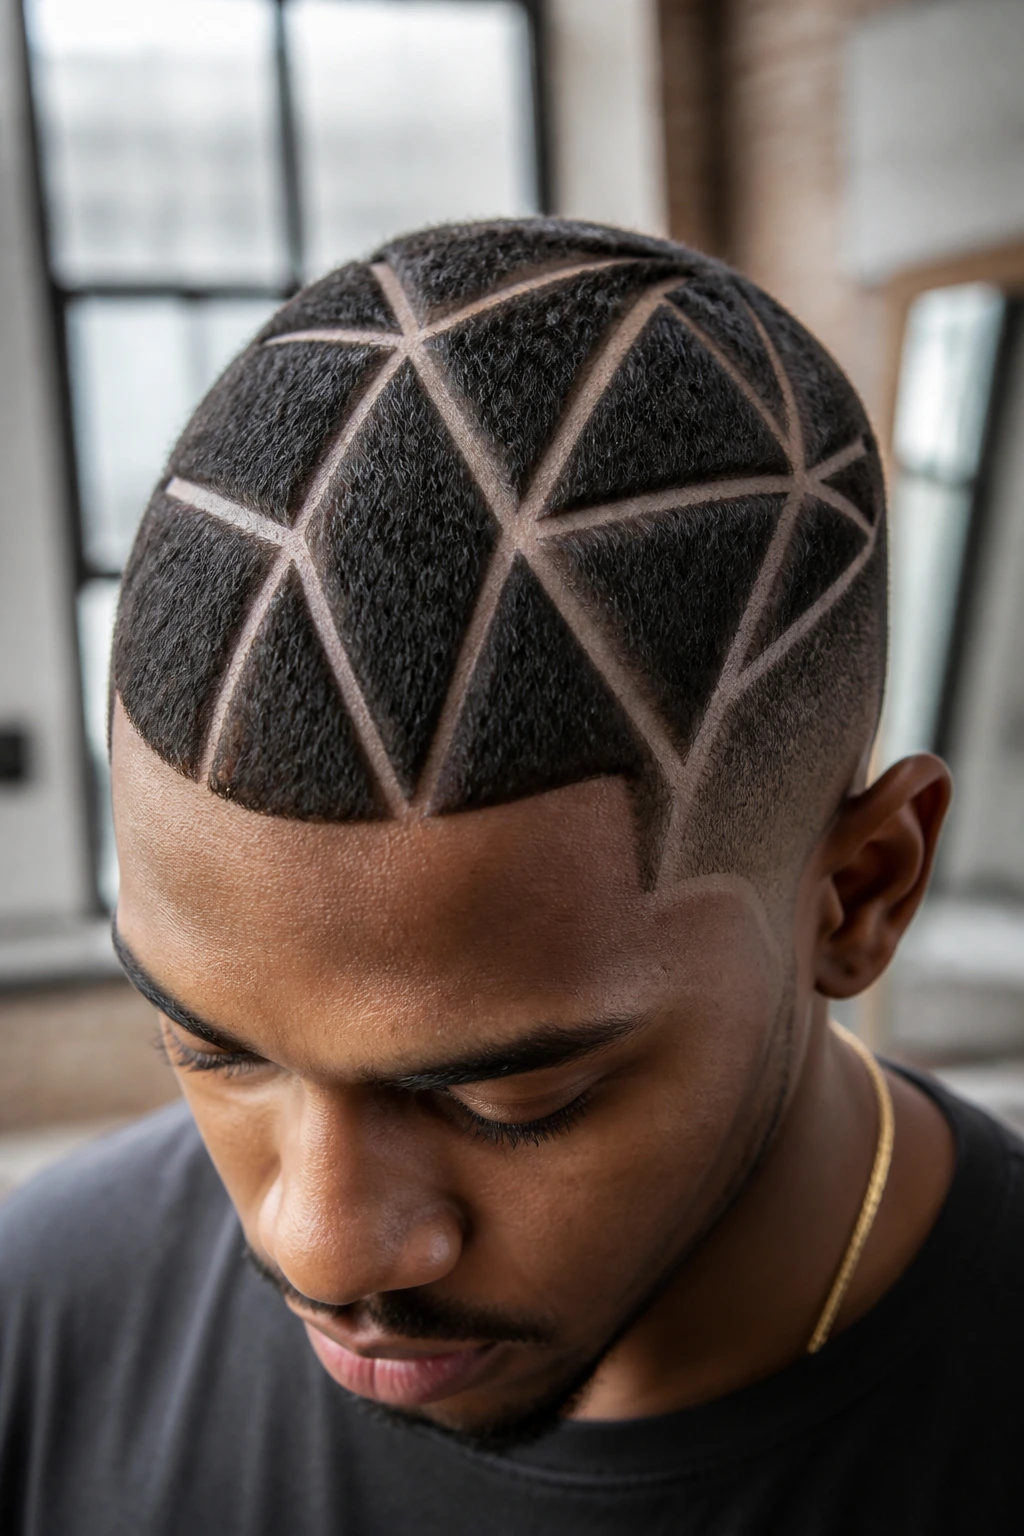
1. The Classic Geometric Side Fade
When you have thick hair, a high-contrast side fade serves a dual purpose: it removes the unwanted bulk around the perimeter while providing a clean, empty canvas for artistic expression. Geometric patterns, such as sharp triangles or parallel lines, work best here because the density of your remaining hair creates a stark shadow against the skin, making the lines pop.
Why This Style Works for Density
The primary struggle with thick hair is the “poof” effect at the hairline. By buzzing the sides down to a near-skin fade, you effectively eliminate the friction that causes that volume. The geometry isn’t just aesthetic; it is a structural modification that lightens the overall load on your scalp.
Getting the Lines Right
- Request a taper that transitions from a zero-guard at the bottom to a slightly longer length at the temple to provide depth.
- Use a professional-grade trimmer with a T-blade to carve the patterns; the smaller blade allows for sharper corners and more intricate detail than a standard clipper.
- Keep the design simple initially—three clean, parallel lines are easier to maintain than a complex star or swirl.
Pro tip: Because your hair grows quickly, you will need a touch-up every two weeks to keep the patterns from looking fuzzy or overgrown.
2. Intricate Mandala Nape Undercut
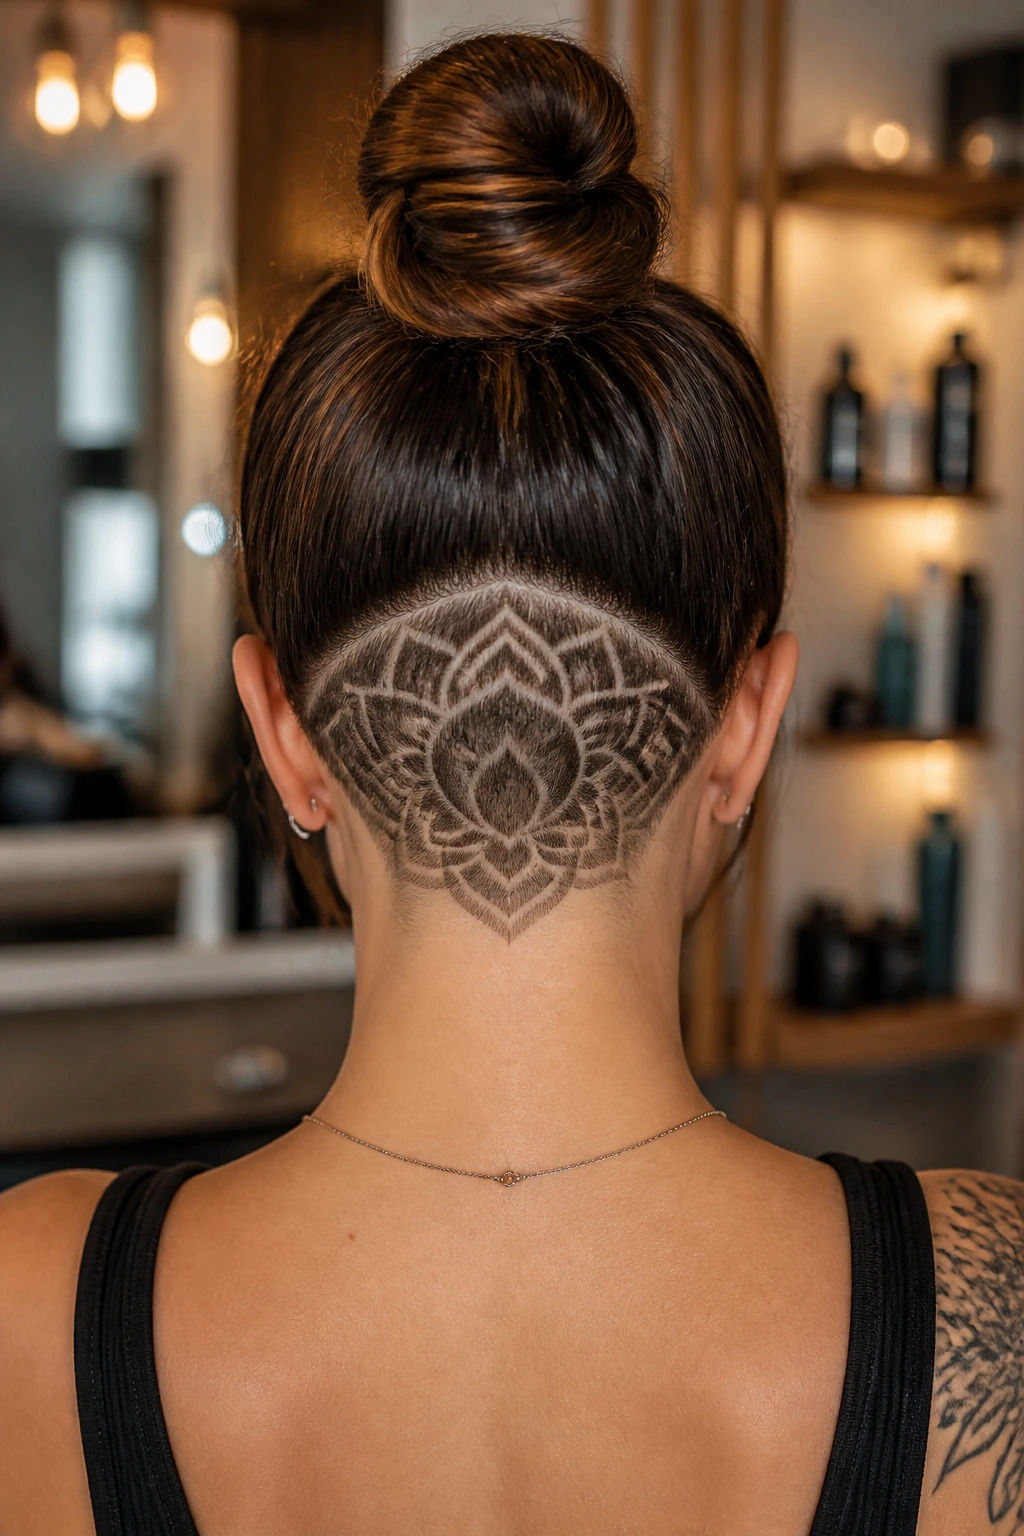
The nape of the neck is the perfect “secret” location for a pattern because it allows you to hide the design with your hair when you need to, or reveal it with a high ponytail or bun. For those with dense, coarse textures, a mandala pattern—which relies on circular, repeating motifs—looks incredibly striking.
How to Style the Rest of Your Hair
Because the undercut is tucked away, you can treat your hair as you normally would. A top knot is the natural companion to this style, as it pulls the bulk of the weight off your neck and puts the design front and center. Use a lightweight styling cream or a bit of oil to tame flyaways so the hair lying over the nape stays sleek and doesn’t obscure the pattern.
Maintenance Considerations
- If you opt for a deep undercut, ensure your stylist uses a cooling blade to avoid razor burn in the sensitive nape area.
- Moisturize the skin under the hair regularly; shaved skin tends to dry out and can become itchy as the hair begins to grow back through the pattern.
3. The Tribal-Inspired Zig-Zag Parting
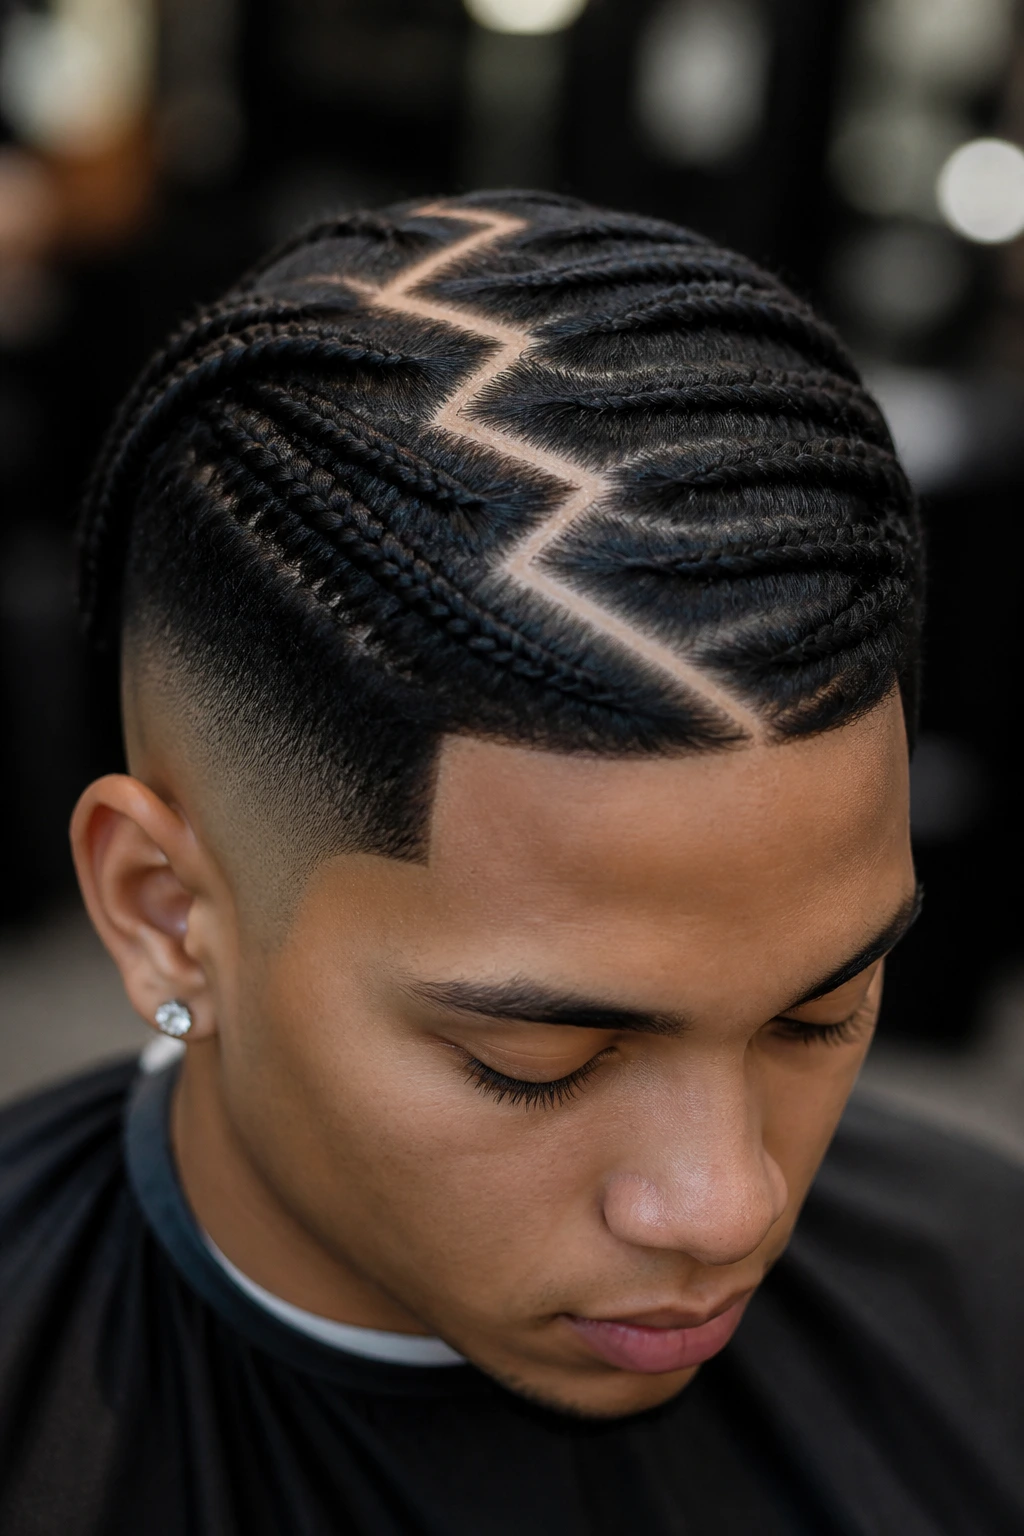
Moving away from shaven designs, you can incorporate patterns into the scalp itself through precise, creative parting. A zig-zag parting is a classic, but for thick hair, you want a “tribal-inspired” wide-set zig-zag that creates distinct sections of hair. This breaks up the solid wall of hair and allows individual sections to lay flatter against the head.
The Impact on Hair Distribution
Thick hair often has a mind of its own regarding where it wants to fall. By forcing a jagged, deep part, you physically redistribute the volume. This prevents the hair from “mountain-topping”—the tendency for thick hair to build up height in the middle—and encourages it to drape more evenly across the sides.
Techniques for Setting the Part
Use the handle of a metal tail comb to trace your pattern. The metal tip is thin enough to create razor-sharp divisions. Once the part is set, use a firm-hold pomade along the edges of the part to “glue” the strands in place so the design remains visible throughout the day.
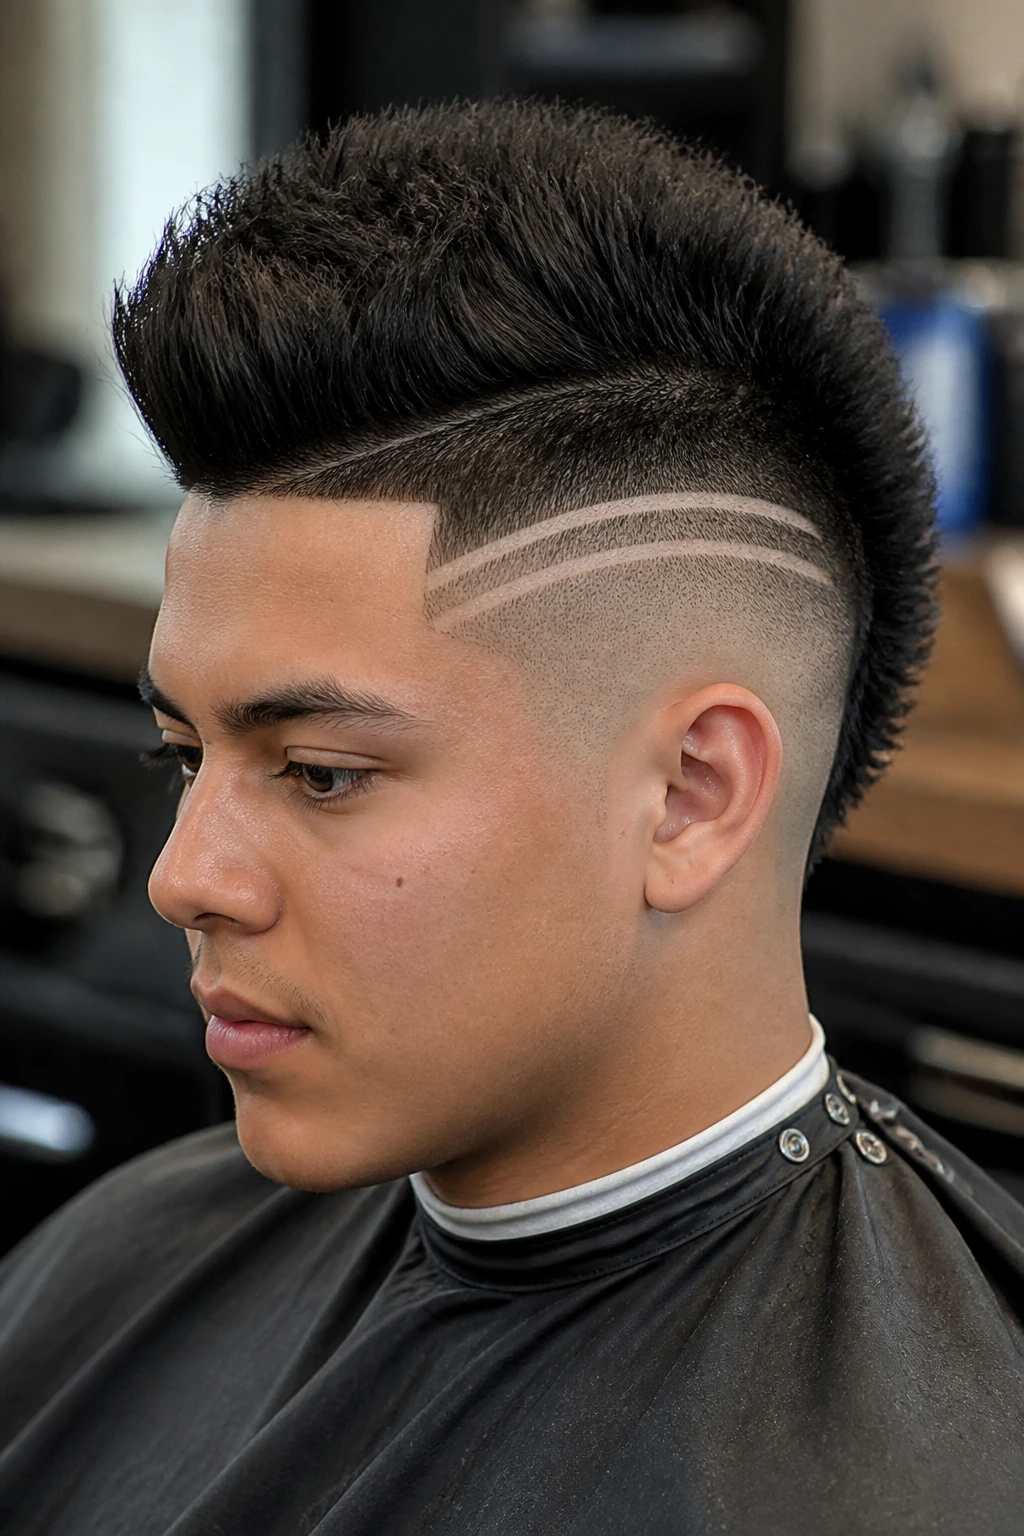
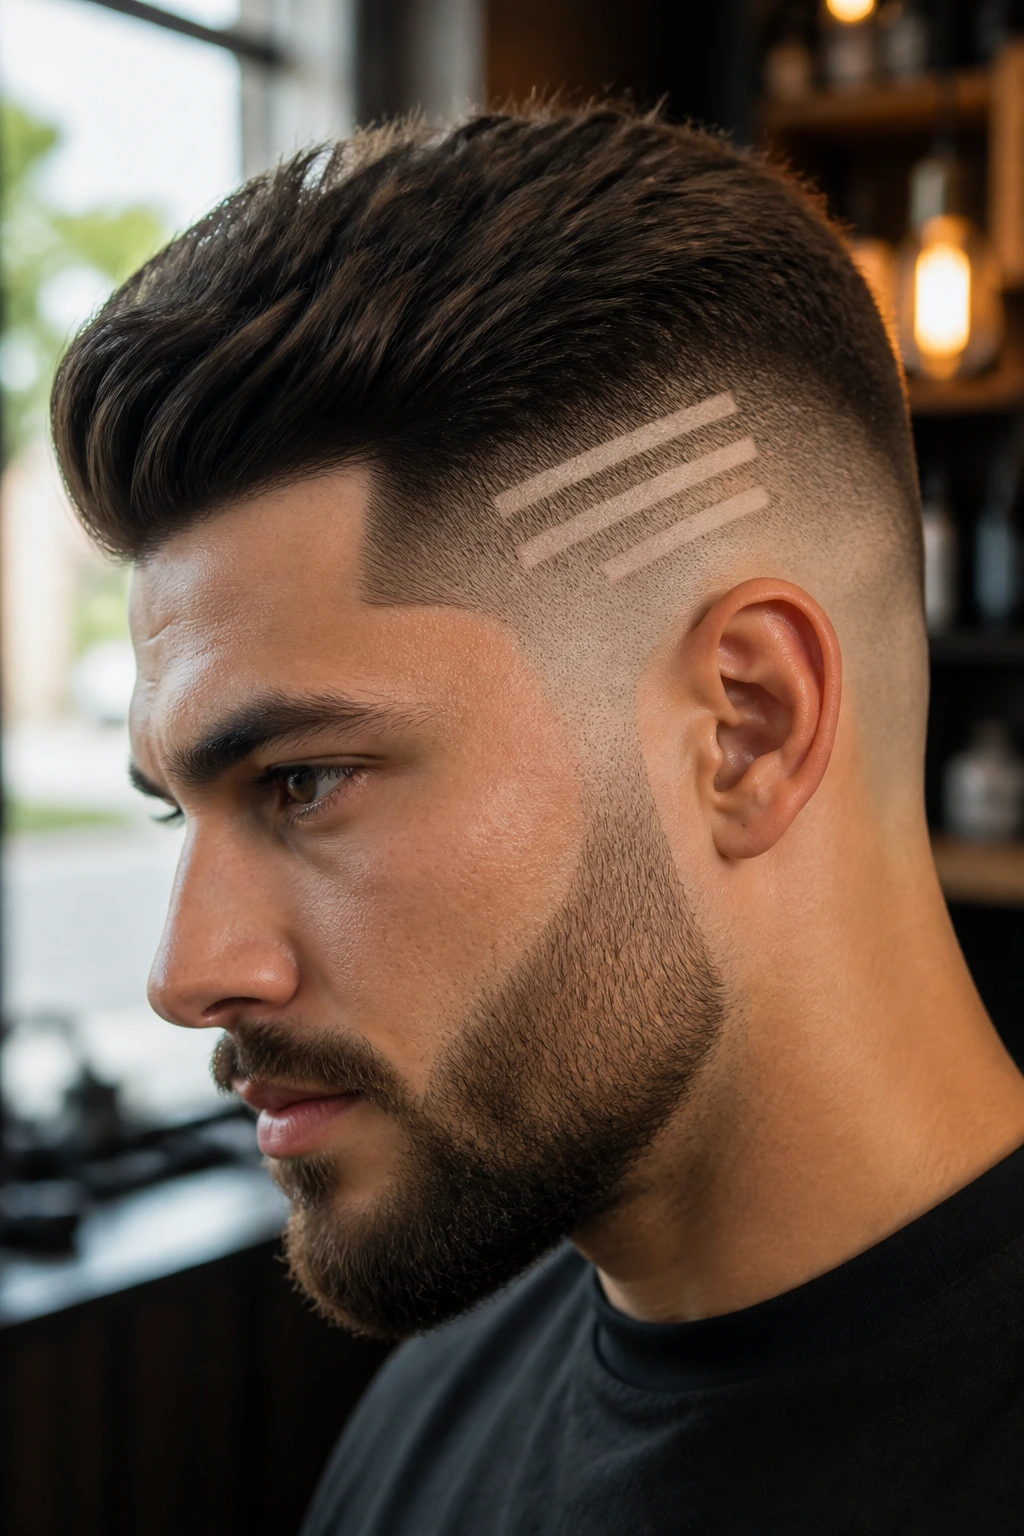
4. Horizontal Parallel Lines on a High Fade
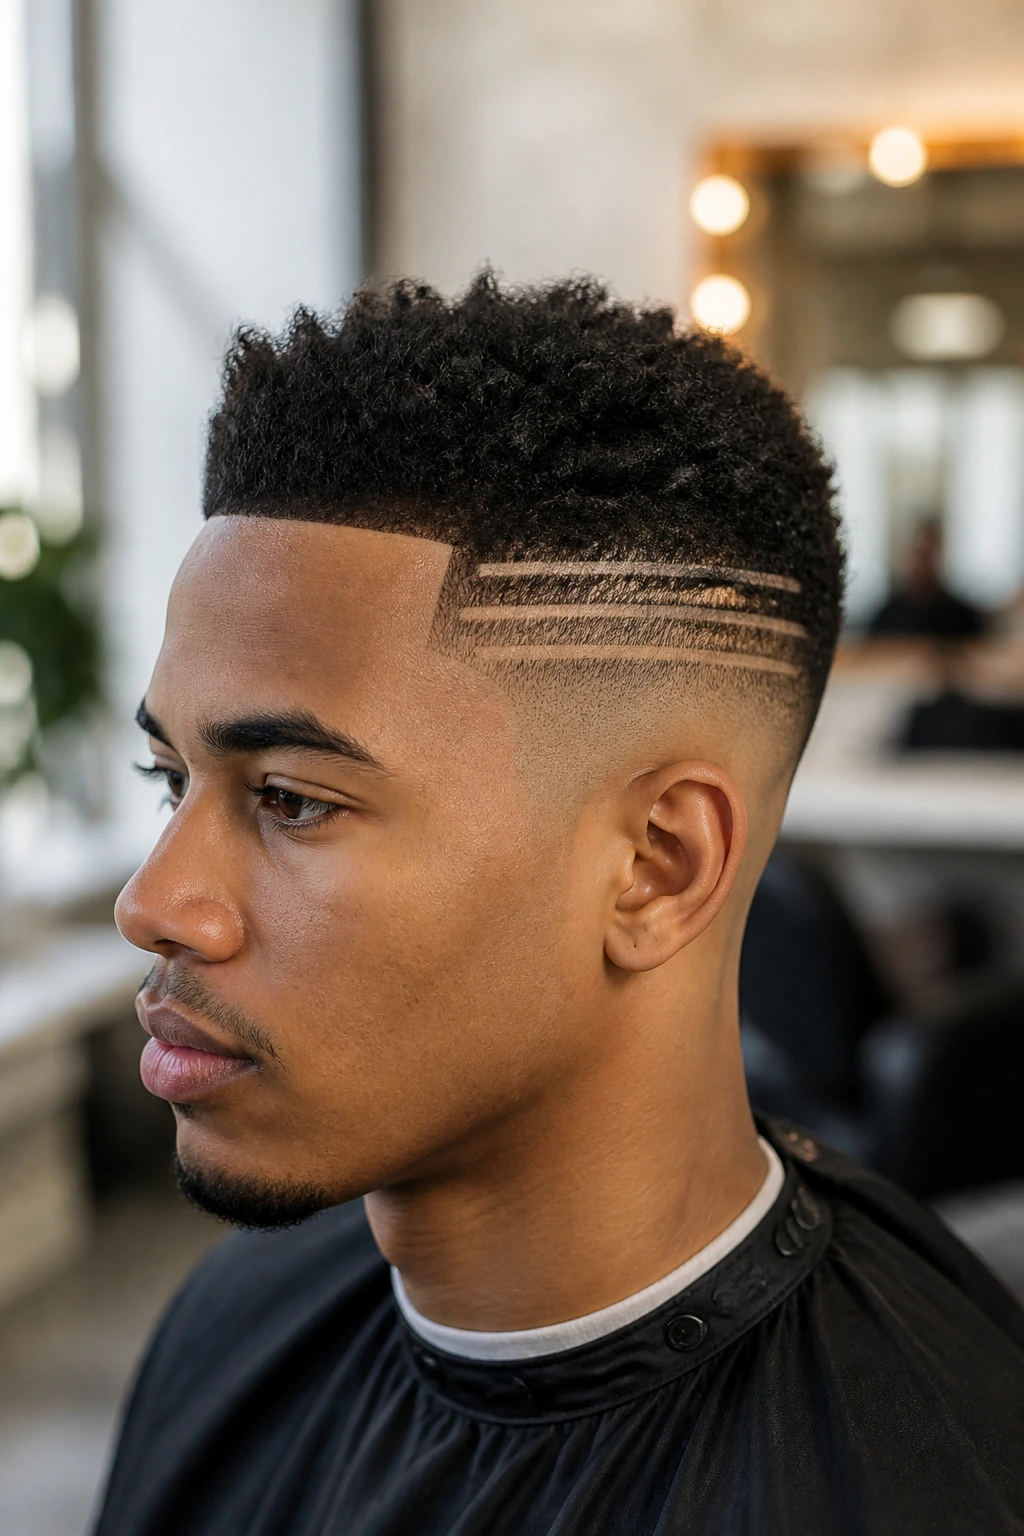
Sometimes the most effective design is the one that follows the natural curvature of the skull. Horizontal lines carved into a high fade add a sense of motion and athleticism to the look. This is a popular choice for individuals who want an edgy appearance without committing to an overly ornate or busy pattern.
Understanding the Visual Flow
Horizontal lines mimic the movement of the hair as it flows from the crown down toward the neck. When your hair is thick, these lines create a “ladder” effect that visually dissects the density, tricking the eye into seeing a leaner, narrower profile.
Pairing with Texture
- If you have naturally curly, thick hair, keep the hair on top slightly longer so it spills over the lines, creating a soft, natural contrast.
- If your hair is straight, let it grow to a medium length to create a “disconnected” undercut look where the patterns are clearly defined by the abrupt change in length.
5. The “Waterfall” Curving Design
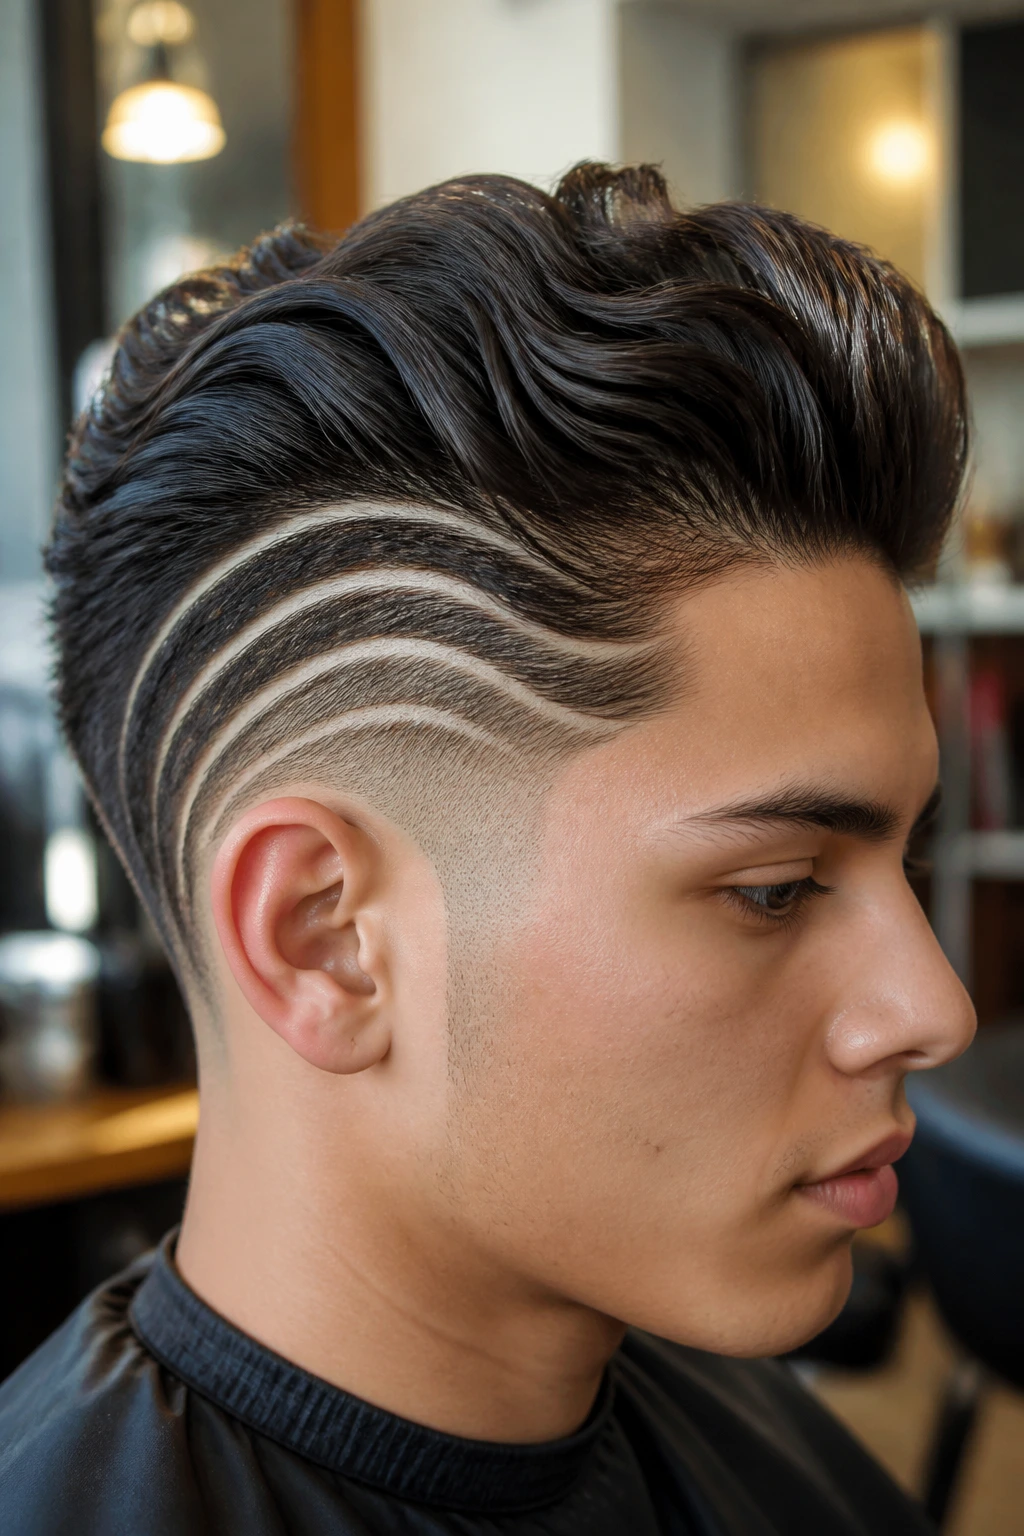
This design mimics the natural flow of water, using long, sweeping curves that start from the temple and wrap toward the back of the head. It is a more fluid and artistic alternative to the sharp, aggressive angles of straight-line patterns.
Why Curves Are Forgiving
Sharp, straight lines in a fade show every mistake. If your hair grows in even slightly unevenly, straight lines lose their crispness. Curves are more forgiving; as they grow out, they simply transition into a softer, more organic pattern that doesn’t look “messy” as quickly as a geometric shape would.
How to Style for Impact
- Use a matte finish clay to style the top hair. A matte finish prevents the hair from looking greasy, which is a common problem when using heavy products on dense, thick hair.
- Focus on texture at the roots to maintain lift, ensuring that the “waterfall” lines remain the primary focal point of the style.
6. The Celestial Star Burst Fade
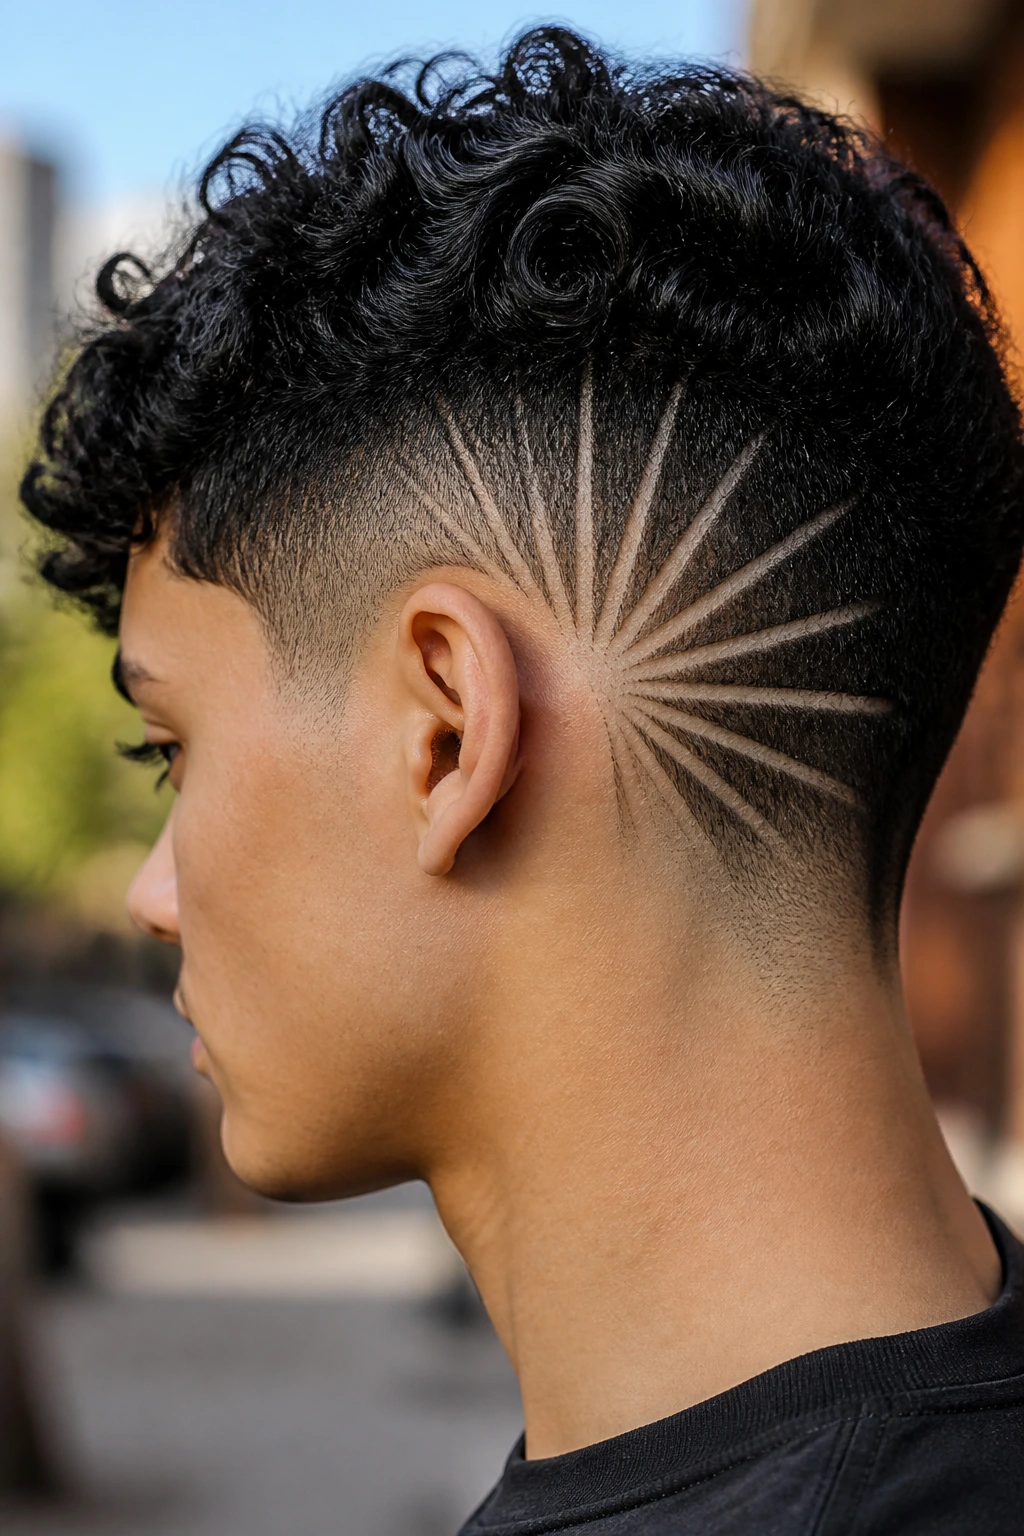
For a more daring approach, a star burst pattern centered behind the ear draws the eye to a specific point, creating a focal anchor. This is particularly effective for thick-haired individuals because it requires a significant amount of “clearing” around the ear, which is exactly where most people experience the most unwanted bulk.
Creating the Anchor
You need to map out the center of the star burst carefully. A skilled stylist will use the top of your ear as a reference point. The lines should radiate outward like light rays. This creates an optical illusion of space, making the area around the ear look significantly more airy.
When to Choose This Style
- Choose this if you wear glasses or statement earrings; the pattern acts as a frame for your accessories.
- Skip this if you work in an extremely conservative professional environment, as it is difficult to hide even when wearing your hair down.
7. The Double-Tracked Mohawk Fade
A double-track design features two parallel lines carved into the sides of a mohawk or faux-hawk. This style is built for thick hair because it relies on the density of the center strip to provide the height, while the lines on the sides create the necessary “tunnel” of shaved space.
Engineering the Mohawk
With thick hair, you do not need to tease or heavily gel the center strip to get it to stand up. The natural density does the work for you. Simply use a high-hold wax to pull the strands toward the center, then use your trimmers to carve the tracks on both sides, ensuring they mirror each other exactly.
Maintenance for Symmetry
- Always have someone check the back of your head with a mirror, or use a handheld mirror to ensure the tracks align.
- Symmetry is the lifeblood of this style. If one track is deeper or wider than the other, the entire aesthetic falls apart.
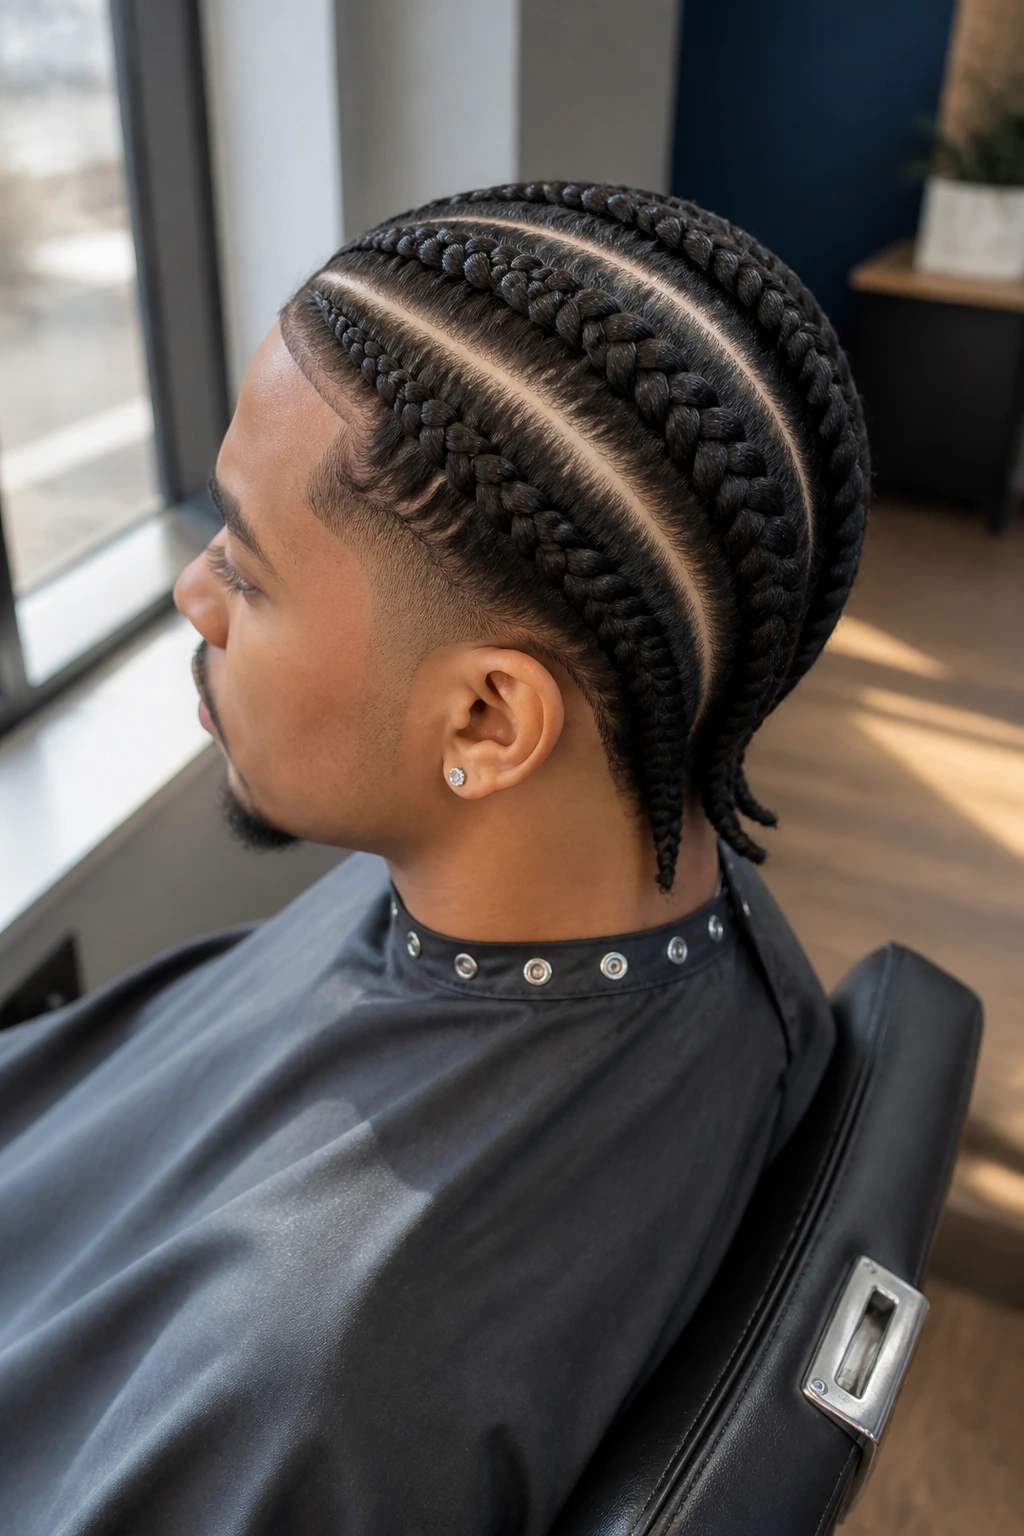
8. Braided Parting Patterns
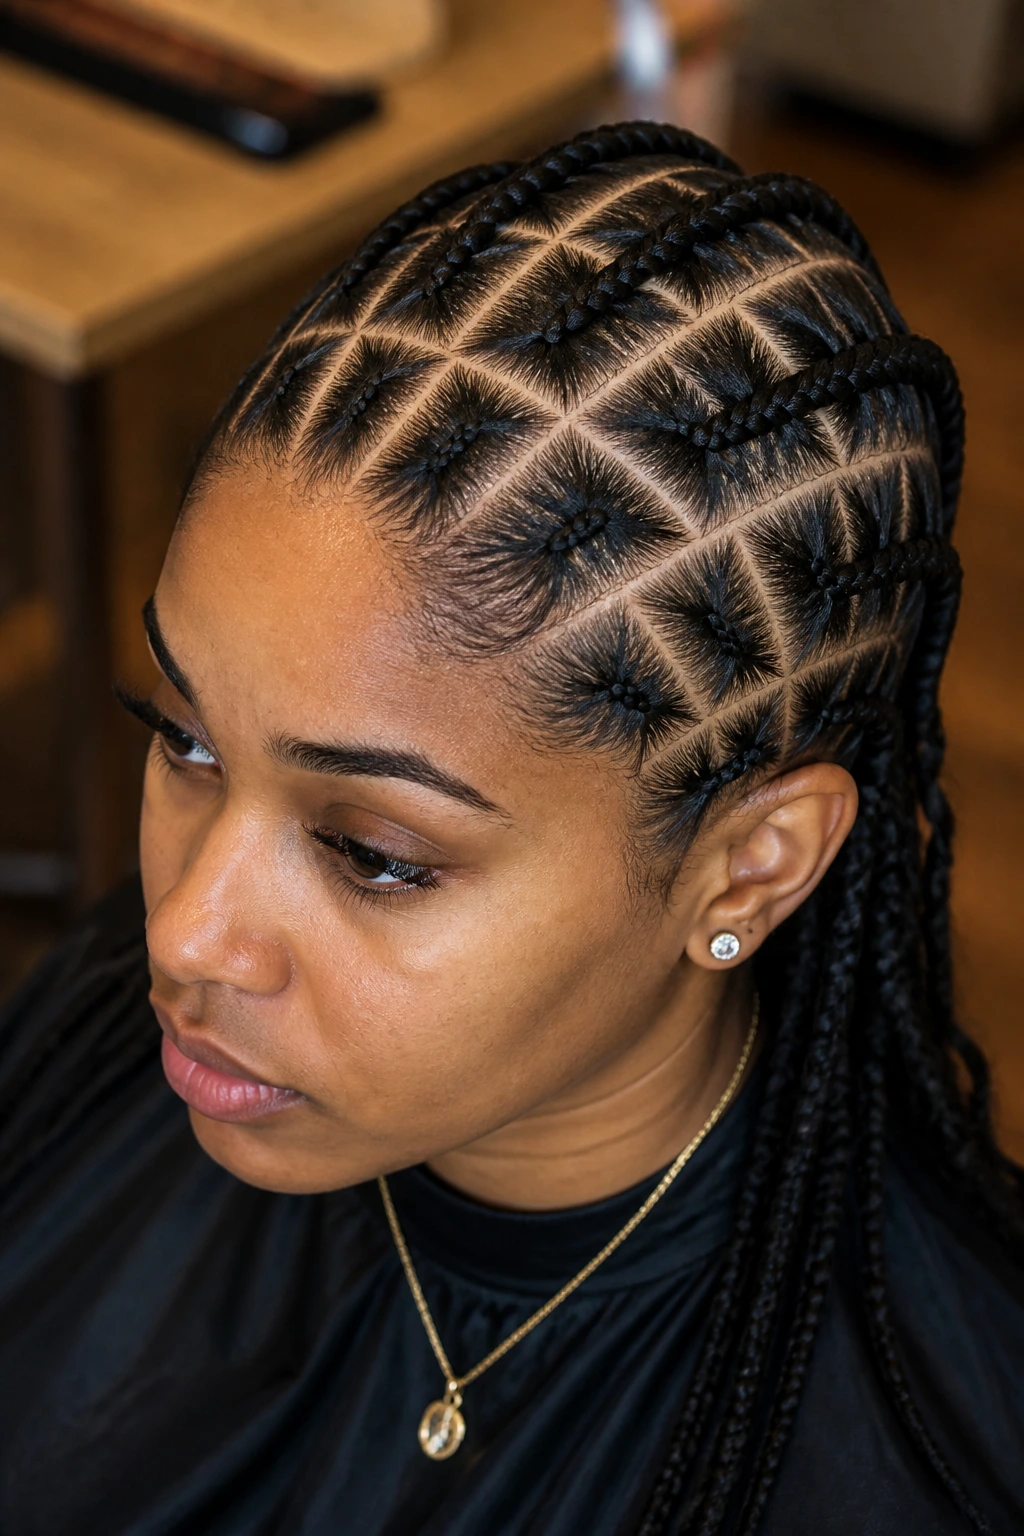
If you are hesitant to pick up the trimmers, you can use cornrows or tight, scalp-hugging braids to create “negative space” patterns. By parting your hair into specific, intricate grid patterns before braiding, you create a design that looks like an elaborate map on your head.
The Benefit of Braids for Density
Braiding is the ultimate way to manage thick hair. By confining the hair into small, tight sections, you reduce the volume by roughly 50% while the style is in. The pattern created by the parts between the braids remains visible for weeks, provided you sleep with a silk bonnet to prevent frizz.
Styling Tips for Longevity
- Use a clear edge-control gel to keep the parts sharp.
- Avoid braiding too tightly near the hairline, as this can cause tension alopecia, especially with thick, heavy hair that pulls on the roots.
9. The Subtle “C” Shape Temple Fade
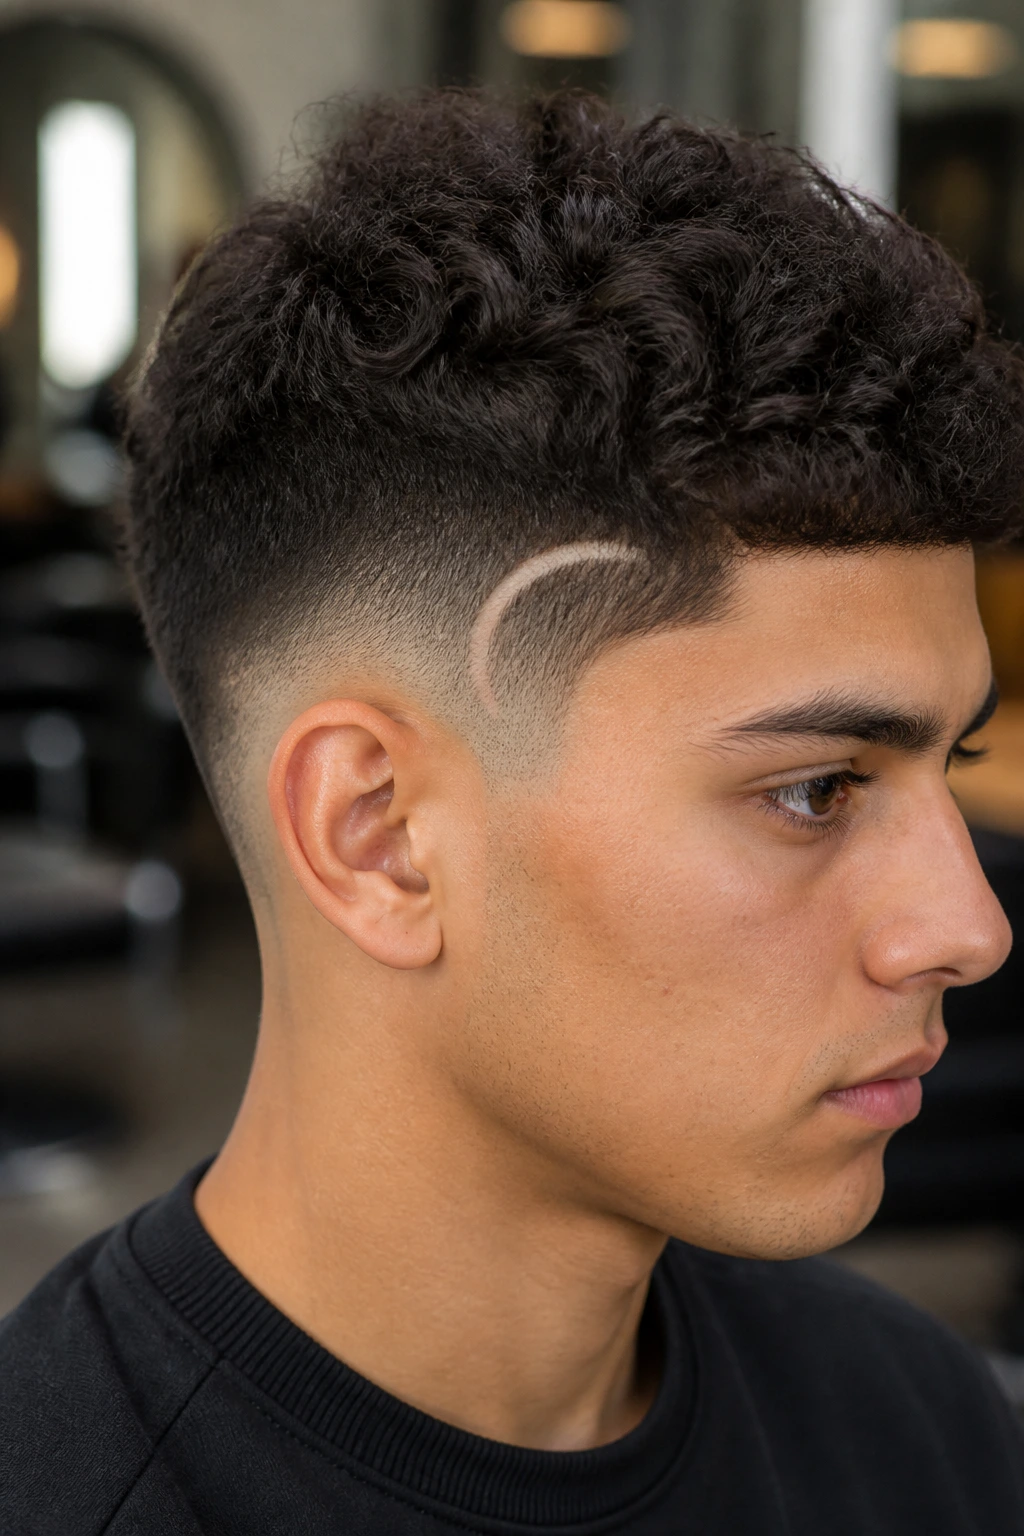
Sometimes, less is more. A simple “C” shape carved into the temple area can provide just enough edge without taking over your entire look. This style works beautifully with professional attire and is much easier to maintain than a full-head pattern.
Balancing Professionalism and Style
The “C” curve follows the natural bone structure around the temple. It is subtle enough to go unnoticed from a distance, yet it provides that touch of intentional styling that shows you care about the details. It is a great “entry-level” pattern for those who aren’t ready to commit to complex geometric work.
Maintaining the Curve
- Because this pattern is located on the temple—a high-growth area—you will likely need a touch-up every ten days.
- Ensure the fade surrounding the “C” is blended smoothly; if the transition is too harsh, the curve will look like a mistake rather than a design.
10. The Checkerboard Grid Fade
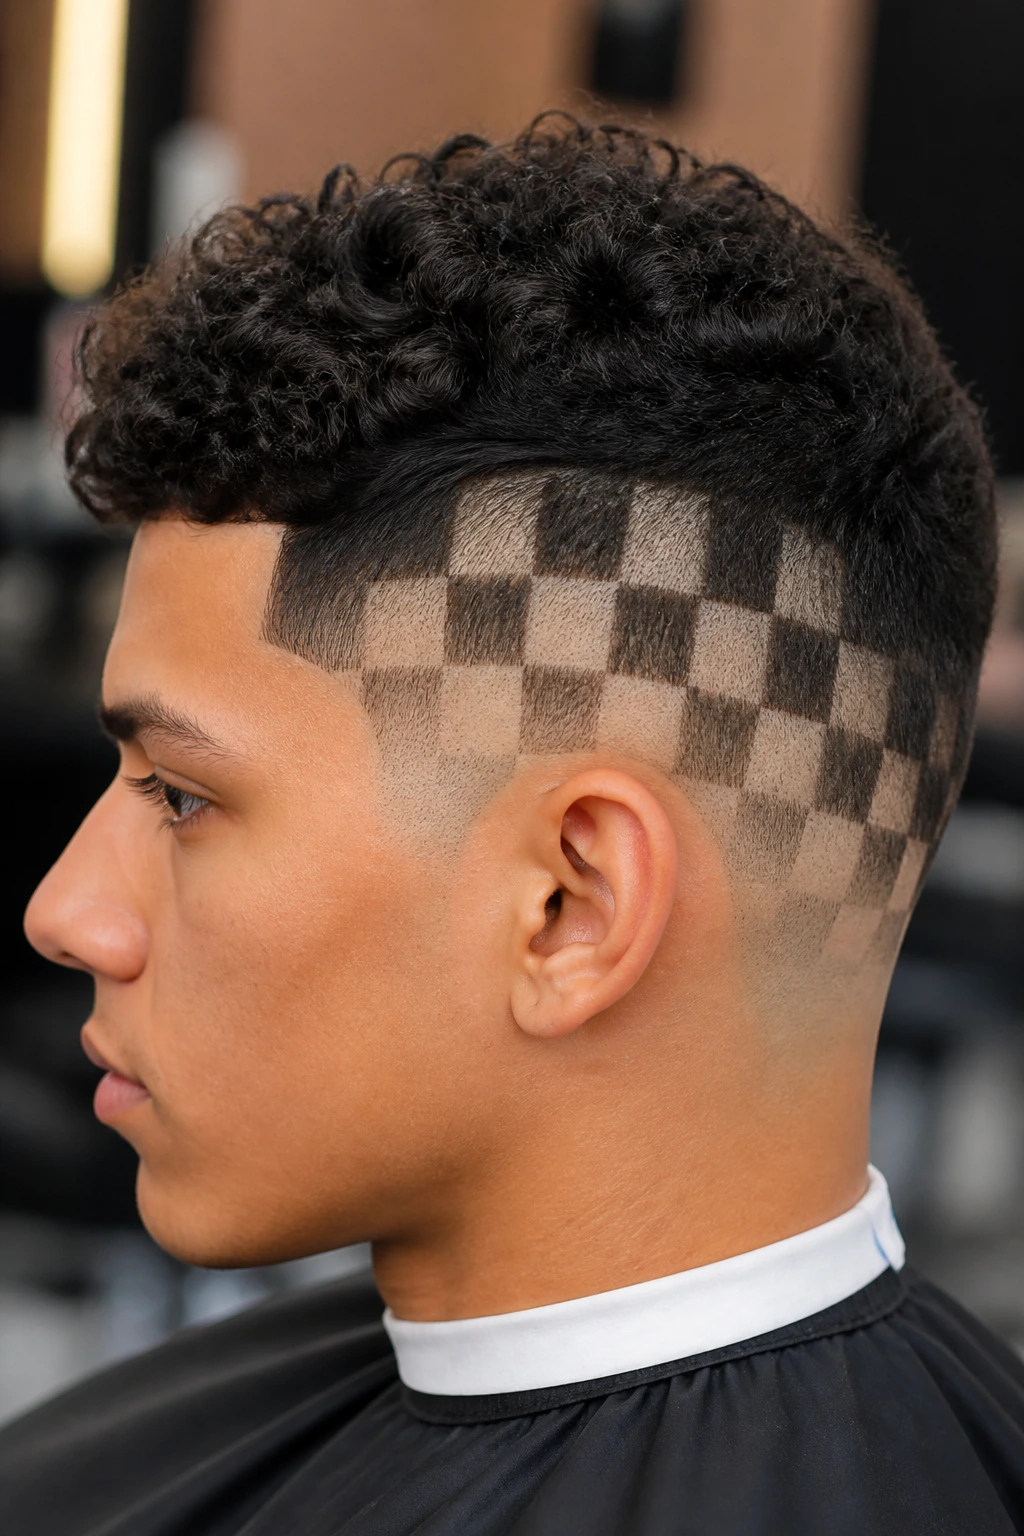
A checkerboard pattern involves carving a grid of squares into the side of a fade. This is an advanced look that requires a very steady hand. For thick-haired individuals, this creates a fascinating contrast where the “squares” show skin, and the hair between them represents the dense, dark density of your natural color.
Why Grids Are Difficult
Squares are notoriously hard to get right on a curved surface like a human head. The skin of the scalp is mobile, and the curvature changes constantly. This pattern works best on a “box fade” or a very flat side transition, as it minimizes the distortion caused by the skull’s shape.
Avoiding the “Wobble”
- Look for a barber who specializes in “hard parts” or “graphic fades.”
- If the squares start to look uneven after a week, don’t try to fix them yourself—the risk of cutting a chunk out of the fade is too high.
11. The Lightning Bolt Accent
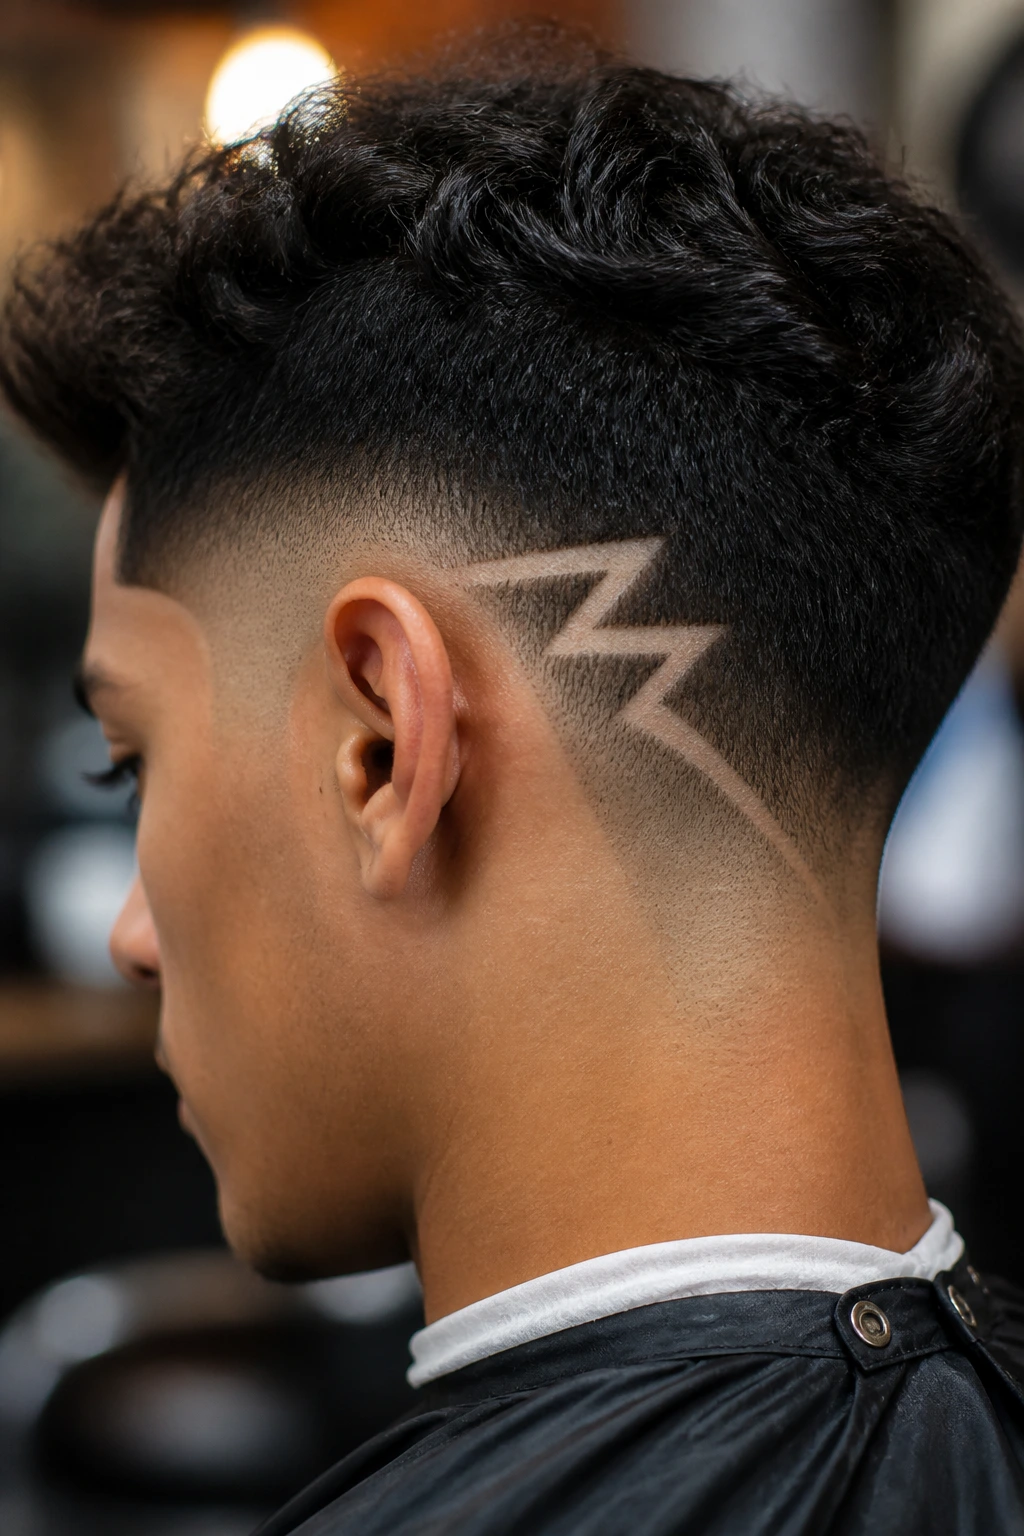
A single, sharp lightning bolt carved behind the ear or on the nape is a high-energy design. It provides a quick burst of visual interest and is very easy to grow out. Since it covers a small surface area, it’s an excellent way to test how you feel about patterns before moving to something more extensive.
Creating Impact with Depth
The lightning bolt looks best when it has a “drop shadow” effect. This is achieved by fading the skin slightly differently around the bolt—perhaps a zero-guard inside the bolt and a 0.5-guard around the immediate perimeter. This extra bit of effort adds a 3D quality to the design that simple lines lack.
When to Refresh
- Once the edges of the bolt start to blur, the design loses its “sharp” look.
- Plan on a refresh every two weeks to keep the impact of the bolt consistent.
12. The Woven Cross-Hatch Design

This pattern looks like a woven basket or a lattice. It involves intersecting lines that create a sense of depth and complexity. For thick hair, the “x” shapes provide a cool aesthetic that breaks up the heaviness of the side hair without requiring a massive amount of shaved space.
The Complexity Factor
The cross-hatch design is best suited for the sides of the head where the hair is short. If you try to do this on the top of your head, the hair will quickly grow over the lines and obscure the design. Keep this one restricted to the faded areas.
Styling the Top
Because the cross-hatch is busy, keep your top hair clean and simple. A classic pompadour or a side-swept fringe provides the right amount of balance, allowing the detail on the side to serve as the “accessory” to your main haircut.
13. The Heart or Icon Shape
For those who want to express a bit of personality, a small icon—like a heart, a musical note, or a simple star—is a fun choice. These patterns are small, contained, and highly personal.
Strategic Placement
- Place the icon above the ear where the hair is naturally thinner.
- If you have very thick hair, avoid placing this in the center of the crown; the weight of the hair falling over it will make the shape look distorted and unclear.
Maintaining the Edge
- Icons require a high level of precision. A small error in a heart shape is much more obvious than a small error in a line.
- Use a white pencil to mark the design on your skin before the barber starts clipping, so you can confirm the size and placement.
14. The Abstract “Slash” Fade
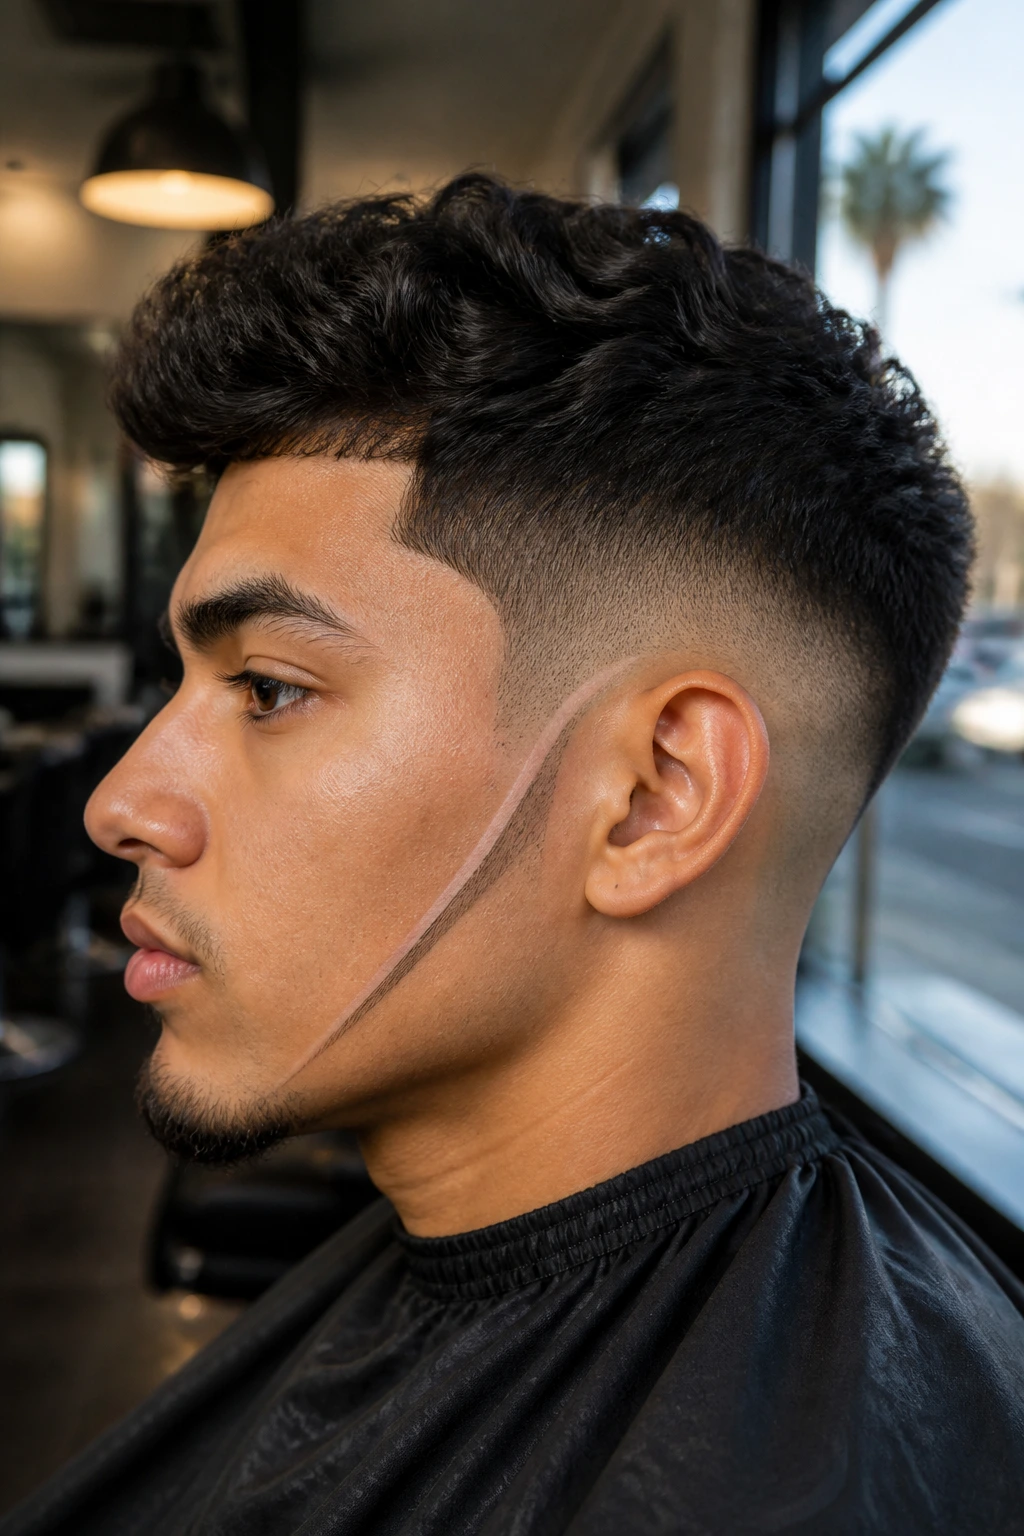
The slash is a bold, aggressive, long line that runs from the temple down toward the jawline. It is meant to look raw and unfinished, like a scratch or a clean cut. It is a fantastic option for thick hair because it is essentially a high-capacity bulk removal tool disguised as a design.
Emphasizing the Raw Aesthetic
Unlike a geometric design, which is all about precision, the slash is about attitude. You want it to look sharp but purposeful. It pairs exceptionally well with a “taper fade,” which keeps the length longer toward the top and gradually brings the hair down to nothing near the ear.
Styling for the Slash
- Use a salt spray on the top of your head to create a messy, beachy texture that complements the “raw” look of the slash.
- The contrast between the soft top and the sharp, aggressive line on the side creates a very modern, balanced profile.
15. The Faded Tribal Swirl
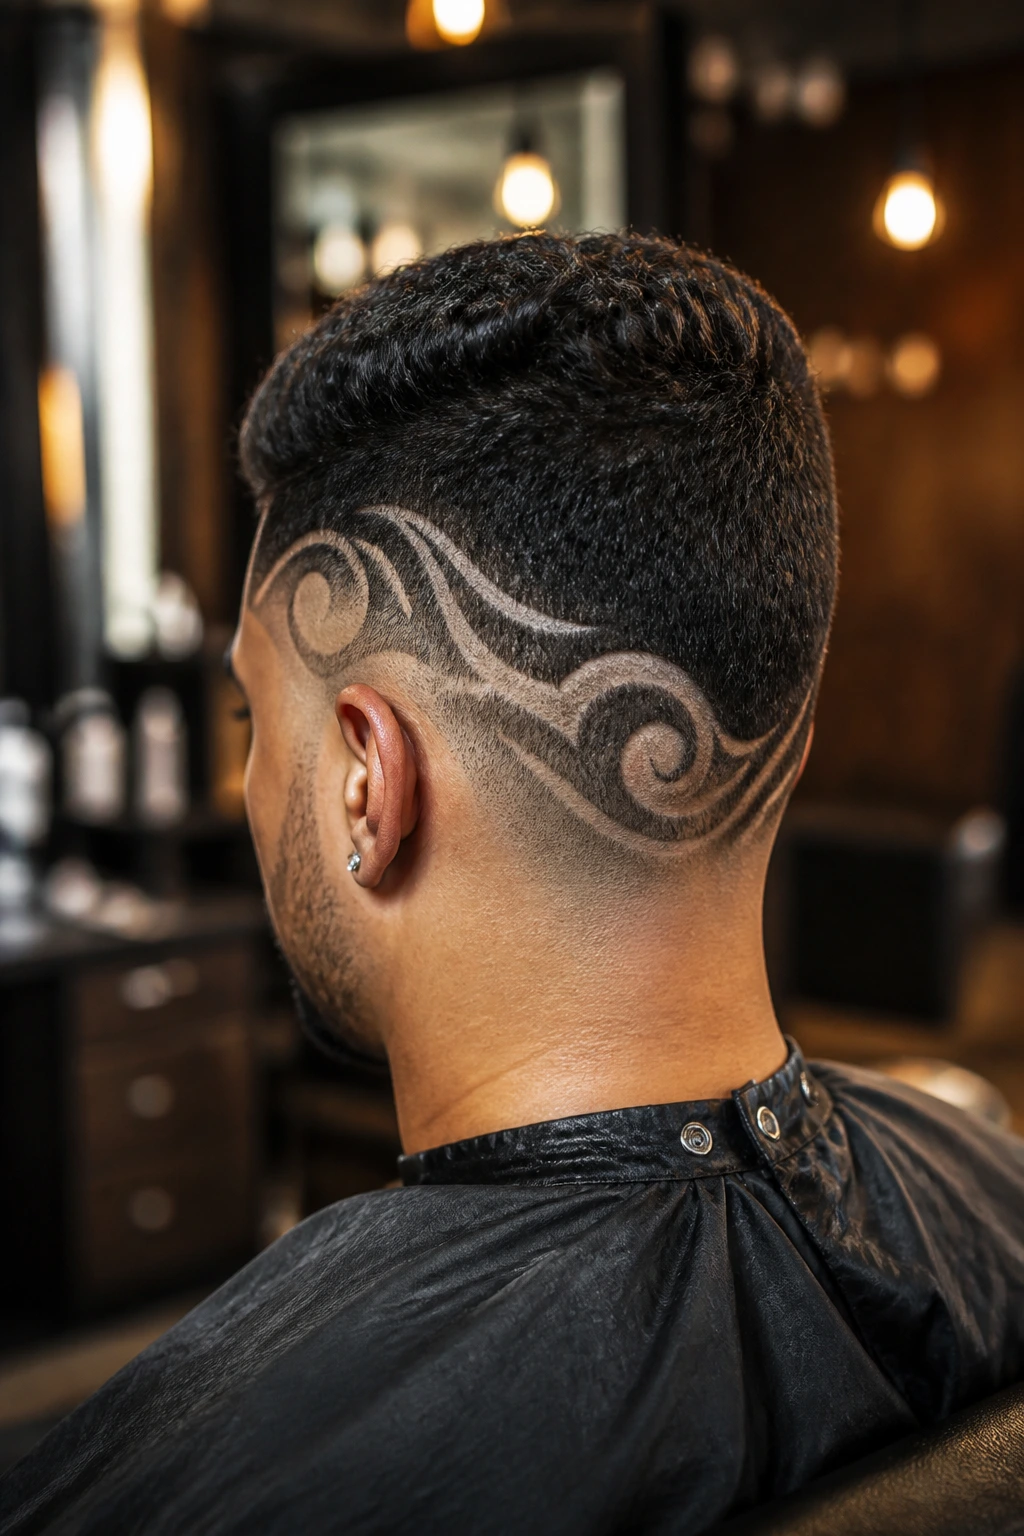
A tribal swirl involves a series of linked, curved lines that wrap around the back of the head. It is reminiscent of traditional Pacific Islander tattoo patterns and is a deeply cultural and artistic design.
Working with Skull Curvature
The swirl is perhaps the most natural pattern to carve into a head because it follows the round shape of the skull rather than fighting against it. For people with thick hair, this pattern is great because it can be extended or shrunk depending on how much hair you want to remove.
Choosing Your Density Level
- If you have super-thick hair, ask for a wider swirl design, which allows more scalp to show through and provides more ventilation.
- If your hair is just moderately thick, a thinner, more intricate swirl will look better and provide more subtle detail.
16. The “Broken Glass” Geometric Look
This involves several disparate, angular lines that meet at odd angles, creating a look that mimics shattered glass. It is a high-fashion, editorial style that looks incredibly sharp and edgy.
Creating the Illusion of Sharpness
The trick here is to ensure that the lines meet at sharp vertices. A rounded junction ruins the “glass” effect. Because your hair is thick, ensure the hair between the shards is kept very short—perhaps a 0.5-guard—so the darkness of the hair doesn’t overwhelm the clean lines of the design.
Maintenance and Growth
- This design grows out in a very scattered, “random” way.
- After three weeks, it may look like random bald patches, so be prepared for a shorter maintenance cycle—aim for every 10-12 days to maintain that precise “shattered” look.
17. The Parallel “Road Map” Design
The road map design consists of two thick, long lines that run parallel to each other from the front hairline to the nape. It effectively acts as a side-part on steroids.
Directing the Flow
The “road map” lines act as a visual guide for how your hair should fall. By carving these, you effectively create a permanent “parting” that tells your hair exactly where it needs to sit. This is a massive time-saver for anyone with thick hair who usually spends 20 minutes with a hairdryer trying to force their hair to lay flat.
Styling Ease
- Simply comb your hair away from the lines.
- Because the design is so bold, you don’t need much product—the architecture of the hair does most of the heavy lifting.
18. The Constellation Fade
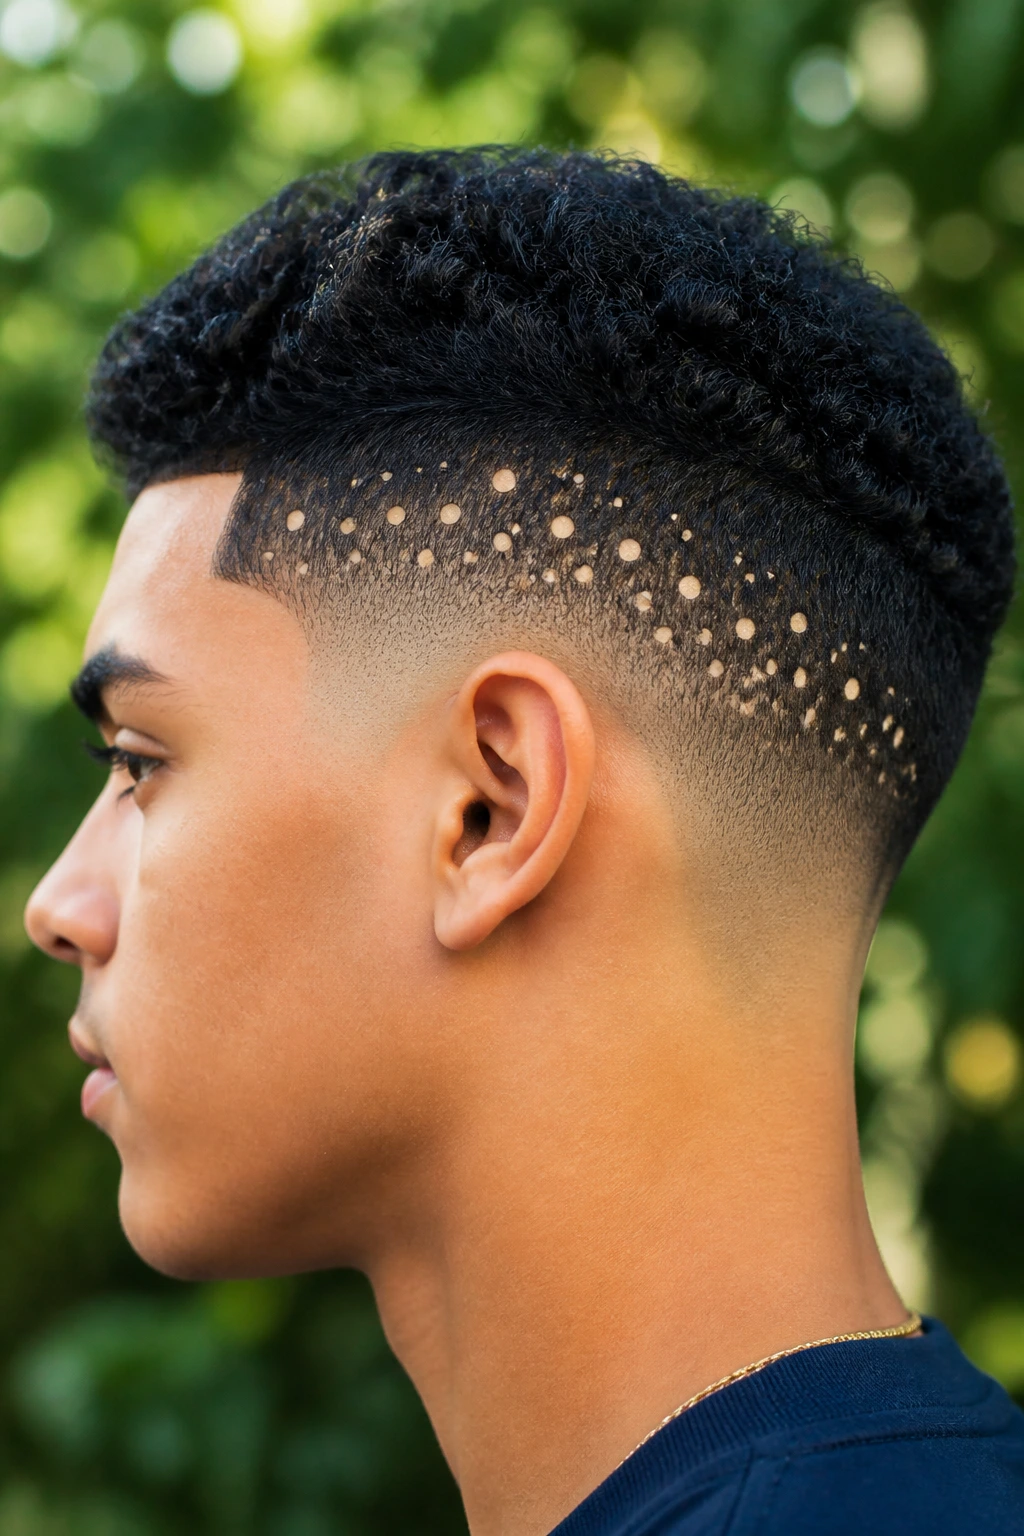
For a whimsical and unique look, a constellation pattern—random dots of different sizes carved into the fade—can be surprisingly cool. It looks like a starry night sky on your head.
Achieving the Dot Effect
This requires a very specific tool: a single-point detail trimmer. You don’t just carve lines; you create small “stamps” in the fade. It is a great way to hide thinning spots or simply to have a design that is truly one-of-a-kind.
When to Avoid This Style
- If you have any scarring or uneven skin texture on your scalp, the dot pattern can highlight these areas.
- Stick to clear, healthy skin if you want the constellation to look clean and intentional.
19. The “Steps” Fade
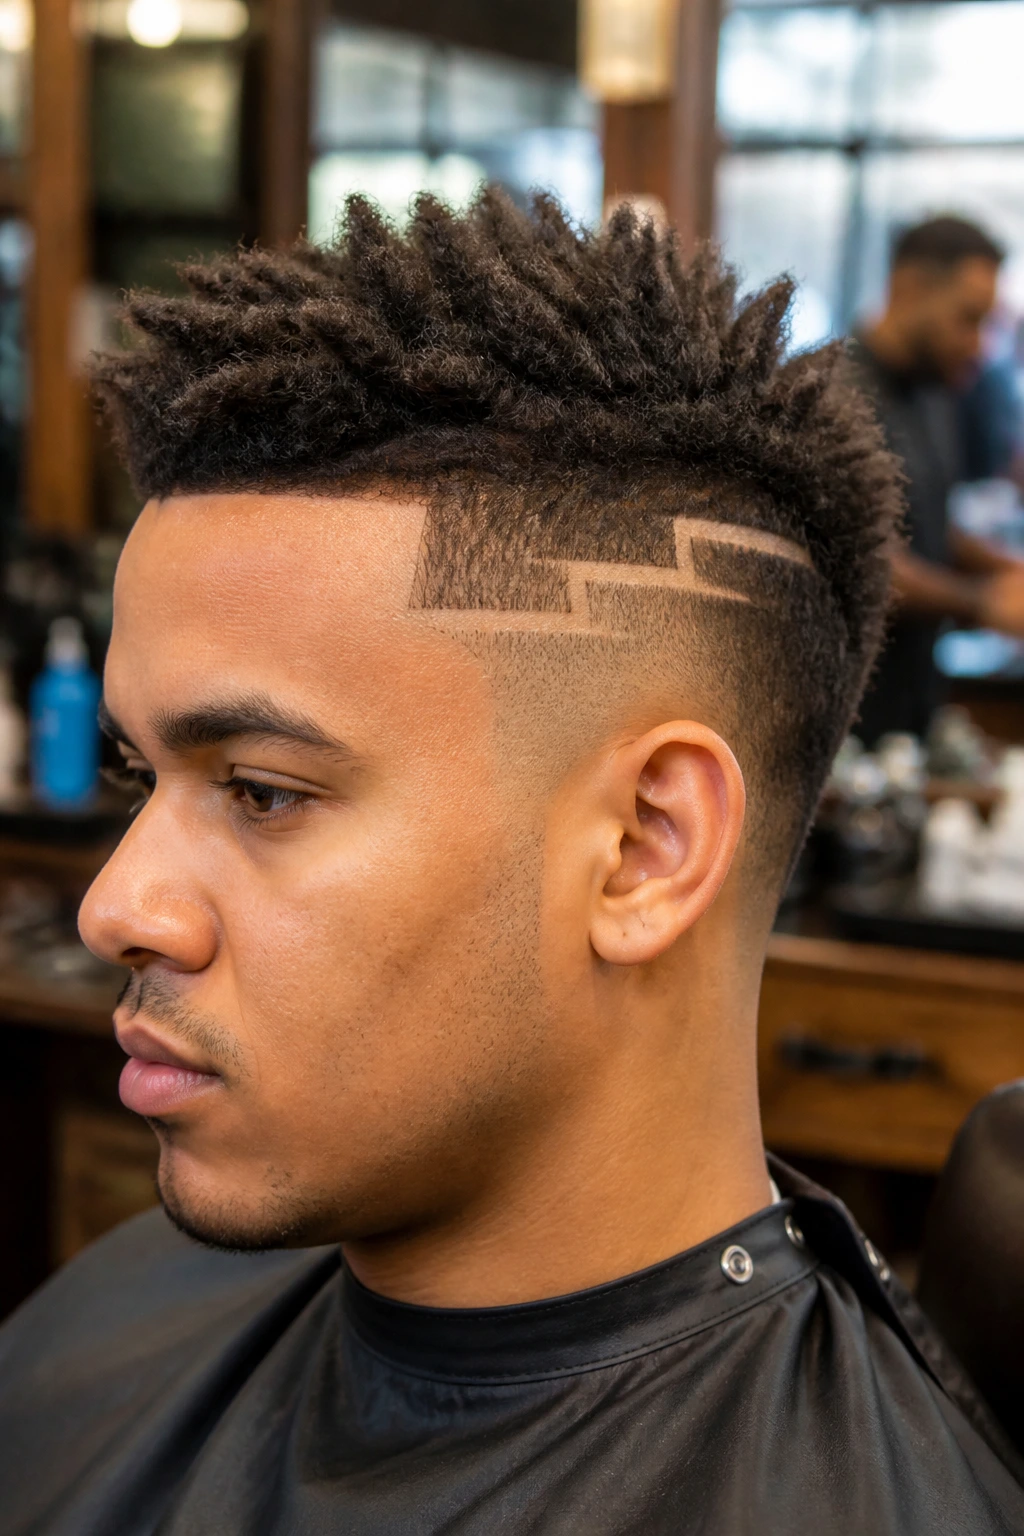
A steps fade uses the hair itself to create a physical tiered effect. You essentially leave distinct “steps” of hair length as you move up the fade, which creates a very geometric, architectural look.
How it Manages Weight
This is arguably the best pattern for extremely heavy, coarse hair. By physically reducing the thickness in tiers, you create a “staircase” of hair that lays perfectly flat. The weight is distributed evenly across the head, preventing the bulk that usually accumulates above the ears.
Managing the Transition
- You need a very skilled barber to ensure each “step” is blended correctly so it doesn’t look like a series of accidental chunks.
- The goal is to make the steps look like they were carved by a machine.
20. The Herringbone Pattern

The herringbone is a classic, sophisticated pattern that looks like the bones of a fish. It consists of diagonal lines meeting at a central spine. It is highly detailed and looks amazing when kept very short.
Why It’s Great for Fades
The diagonal nature of the herringbone draws the eye upward, which gives the head a more elongated, slim profile. If you feel like your thick hair makes your face look too round or wide, the herringbone is a perfect corrective measure.
Styling Notes
- This design works best on high-contrast fades (skin fade at the bottom, medium length at the top).
- Keep the spine of the herringbone perfectly straight; any deviation in the center line will make the fishbone look “twisted.”
21. The Circular “Orbit” Design
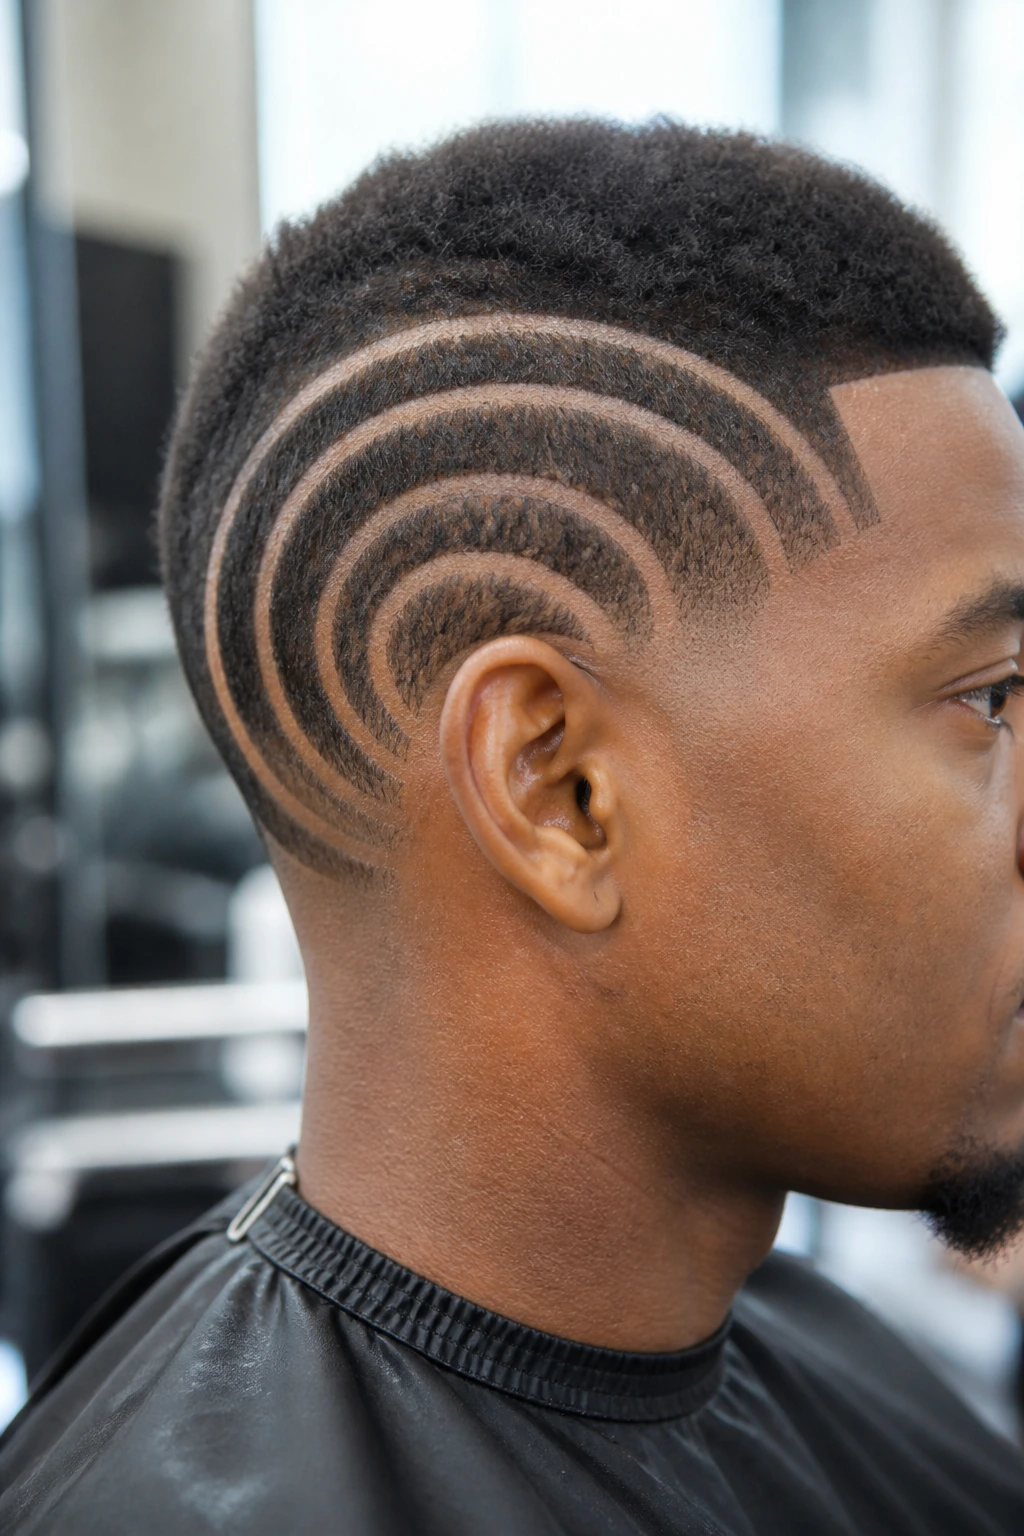
An orbit design features a series of concentric circles around the ear or crown. It’s a very meditative, balanced look that feels symmetrical and clean.
Why Symmetrical Designs Work
Symmetry is calming. For thick hair, which can often look chaotic or unruly, a symmetrical design like an orbit provides a sense of order. It makes the overall hairstyle feel more intentional and groomed, even if the hair on top is worn in a messy, textured style.
Tips for Success
- Measure the placement carefully.
- Use a guide comb to ensure the circles are the same width all the way around; if one side is thicker than the other, the eye will immediately pick up on the lack of balance.
22. The “Barcode” Design

The barcode is a series of varying-width vertical lines at the temple or nape. It is incredibly sharp, modern, and mimics the look of a digital label. It is a very “minimalist” approach to patterns, perfect for a modern, sleek aesthetic.
Minimalist Impact
The barcode doesn’t fight with your clothes or your overall style. It is a quiet detail that rewards those who look closely. For thick hair, it provides a nice bit of “empty space” at the temple, preventing that heavy, rounded look that often plagues dense haircuts.
Keeping It Crisp
- The barcode relies entirely on the sharpness of the lines.
- If your trimmers aren’t perfectly sharp, don’t attempt this. Use a fresh blade, and make sure to pull the skin taut while carving to ensure the lines don’t “stutter” or blur as you go.
Final Thoughts
Choosing a pattern for your thick hair is about more than just looking cool; it is about functional engineering. By removing weight, creating visual pathways, and using geometric shapes, you can transform a dense, heavy head of hair into something sleek and highly structured. Whether you go for the sharp, aggressive lines of a barcode or the fluid curves of a waterfall fade, the key is consistency. A well-maintained design can make you feel more confident and in control, turning your “difficult” hair into the ultimate accessory. Remember, the best design is the one that fits your personal style, so do not be afraid to start small and adjust as you get comfortable with the maintenance.