The soft, romantic pull of a French braid has long been a staple for wedding styling, and it remains one of the most versatile choices for anyone walking down the aisle. Whether you are aiming for a look that feels like a garden party in the countryside or something sleek enough for a formal black-tie ballroom, the French braid acts as a structural foundation that never goes out of style. It brings a level of elegance that is both practical and beautiful, holding hair securely in place from the morning preparations until the final song of the night.
Many people assume that wedding hair must be hyper-complicated, involving hours of teasing and layers of hairspray that leave the head feeling heavy and stiff. In reality, the best bridal looks often lean into the natural texture of the hair, using a classic French braid to frame the face or sweep strands back into an intricate updo. It is a style that works across almost every hair length—from chin-length bobs to waist-length waves—and provides a clean, polished canvas for accessories like silk ribbons, fresh baby’s breath, or delicate pearl pins.
Choosing the right braid involves looking at your dress’s neckline, the formality of the venue, and your personal comfort level with having hair pulled back. Some brides prefer the tightness of a traditional tight braid, while others find the modern, “lived-in” aesthetic of a slightly loosened, pancaked braid to be more flattering. This guide explores the different ways you can incorporate this classic technique into your wedding day look, ensuring you find a version that feels entirely like you.
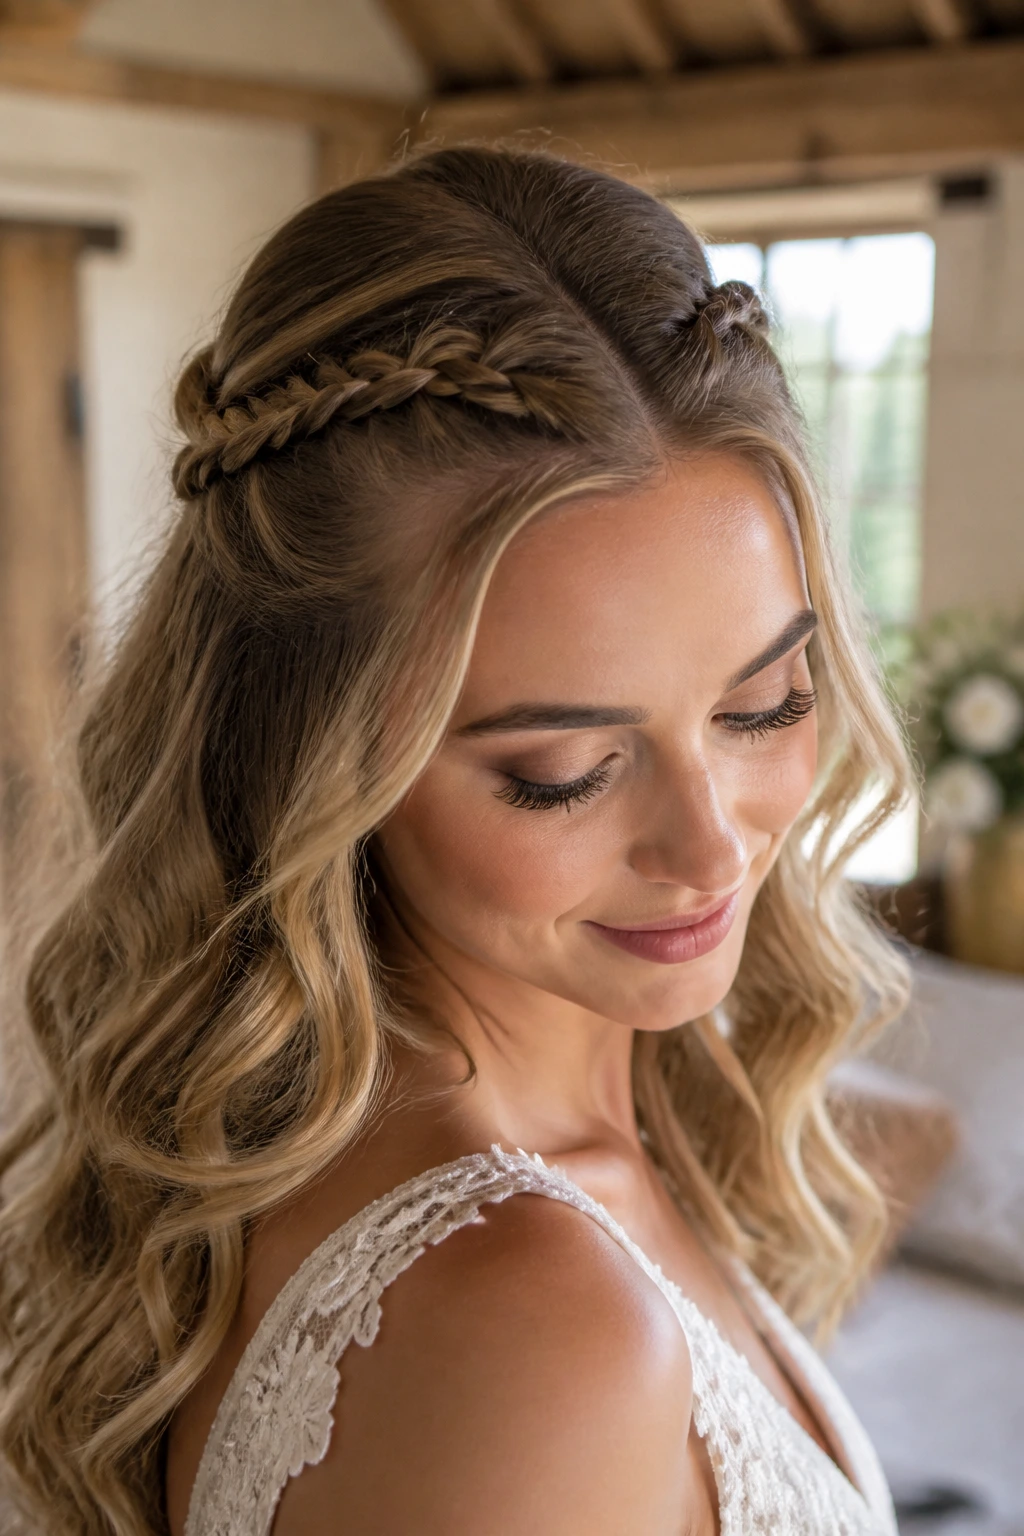
1. The Classic Half-Up French Braid
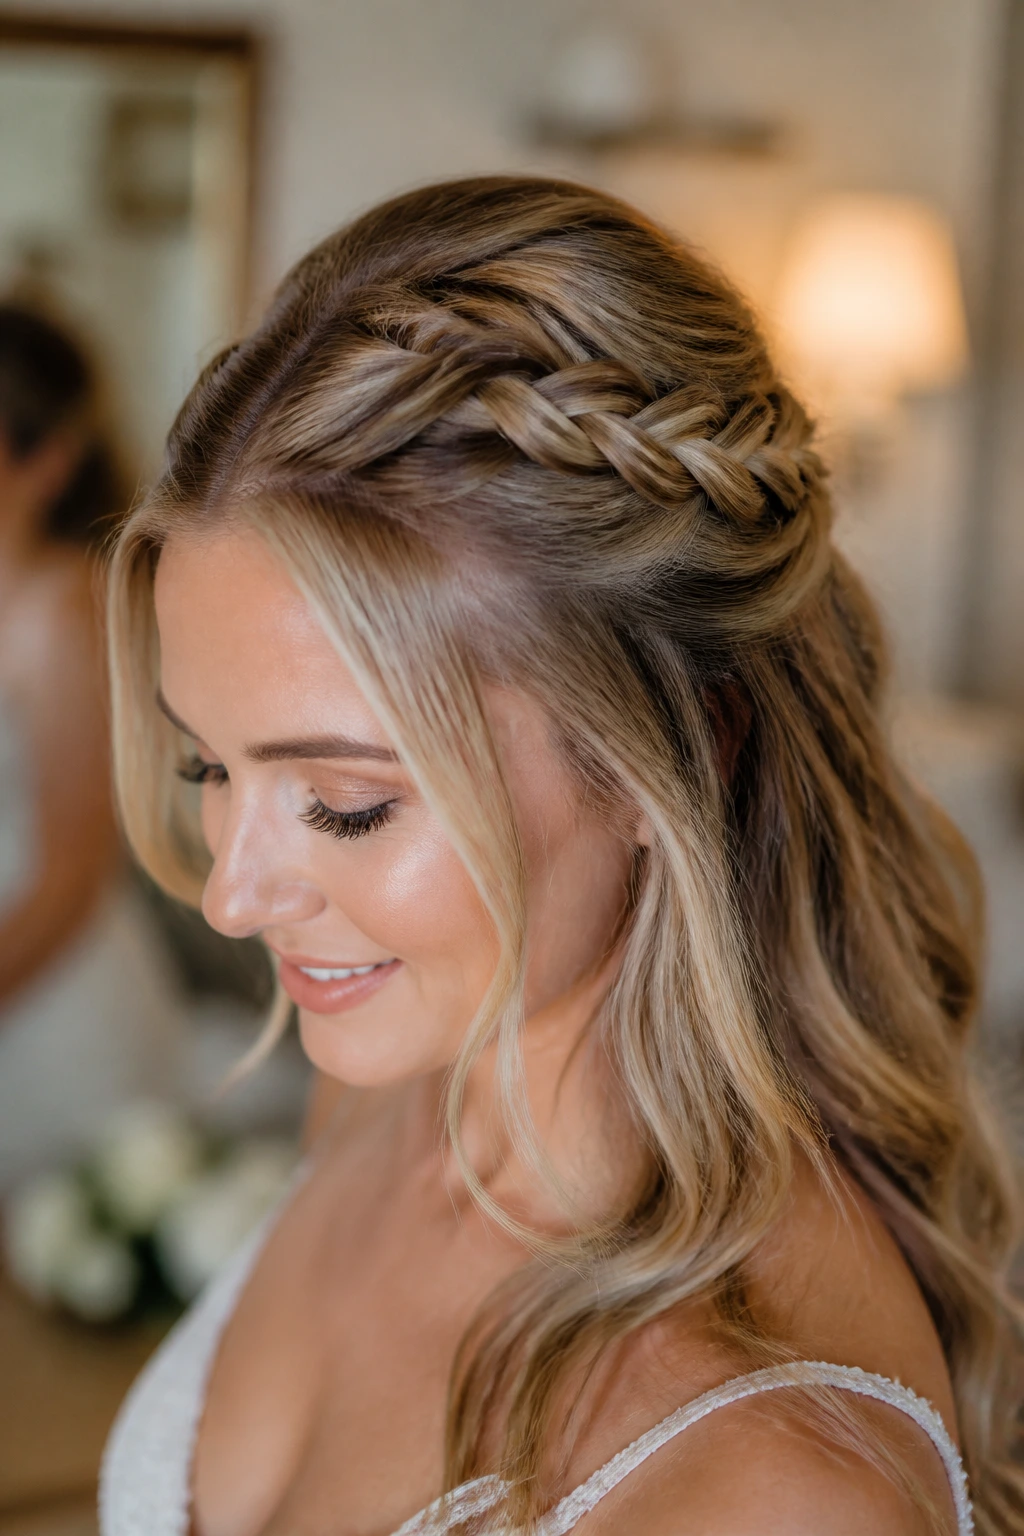
This style is the ultimate go-to for brides who want the best of both worlds: the structure of an updo and the romance of flowing, loose hair. By starting the braid at the hairline and moving toward the crown of the head, you create a natural frame for the face. It keeps bangs or shorter layers tucked securely away, which is a massive relief when you are busy greeting guests or laughing during the reception.
Why This Style Works
The secret here is volume at the crown. Before you start braiding, use a light texturizing spray to give the hair some grip, then gently pull at the edges of each loop once the braid is secured. This “pancaking” technique makes the braid look wider, fuller, and significantly more intentional. It takes a style that could look like a standard gym-day braid and elevates it into something bridal.
Best Pairing for Accessories
Because the hair is half-down, this style provides the perfect anchor for a veil. Pin your veil just beneath the bottom of the braid, or weave a small, dainty vine of silver leaves through the length of the plait. It feels effortless and sophisticated without looking like you are trying too hard.
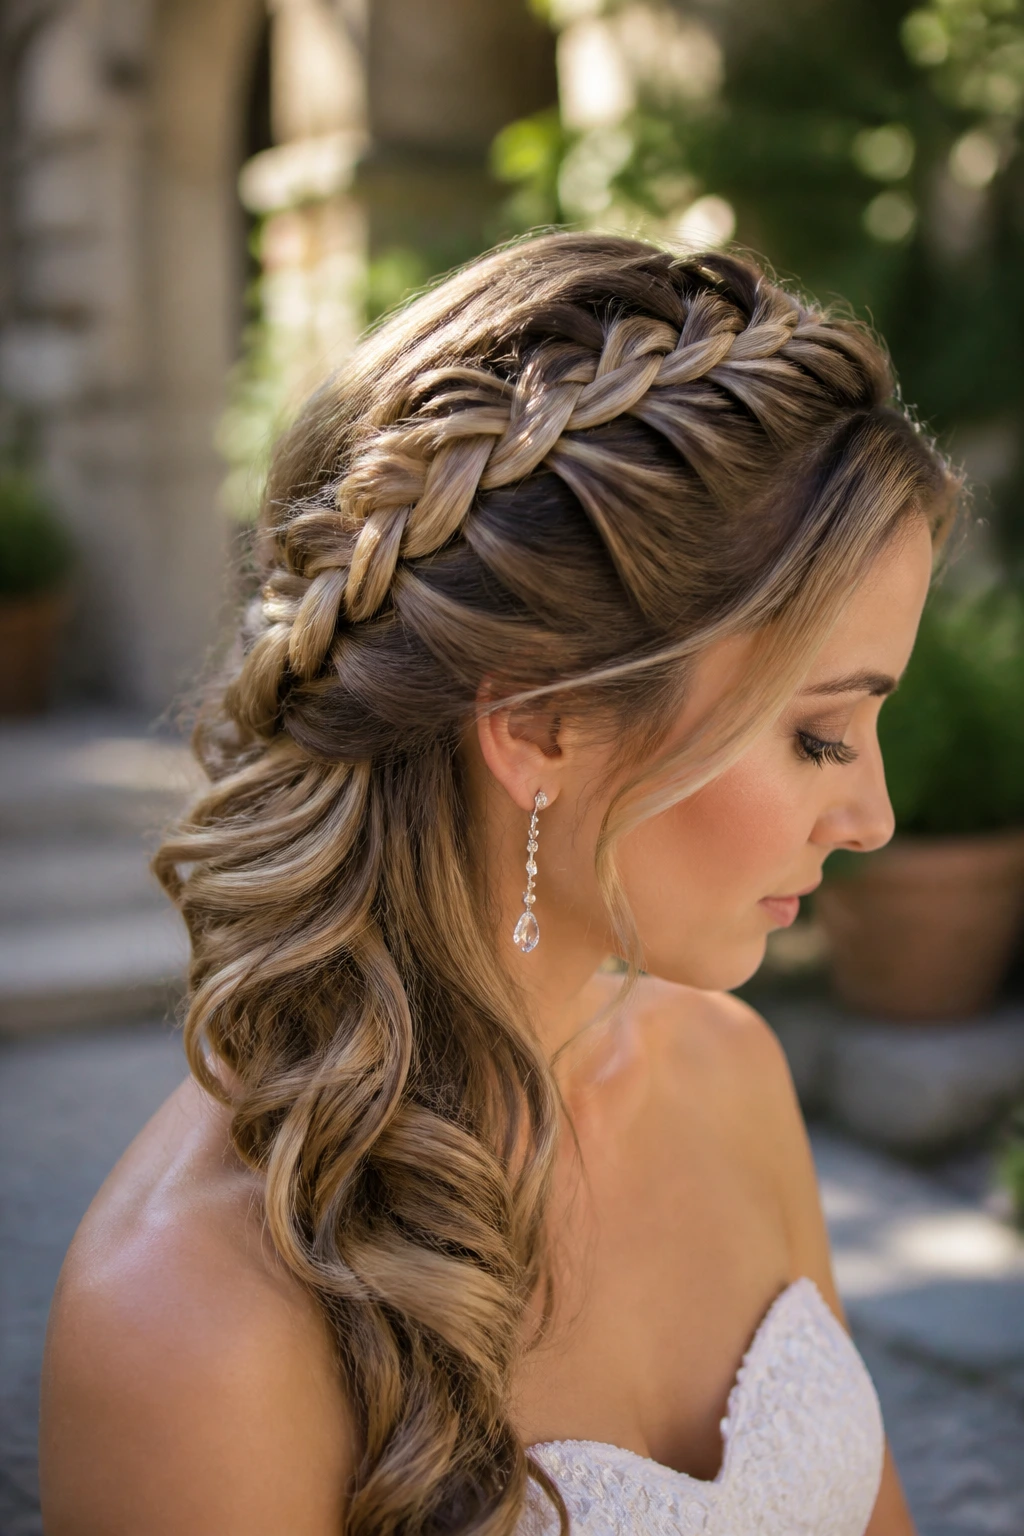
2. The Messy Bohemian Side Braid
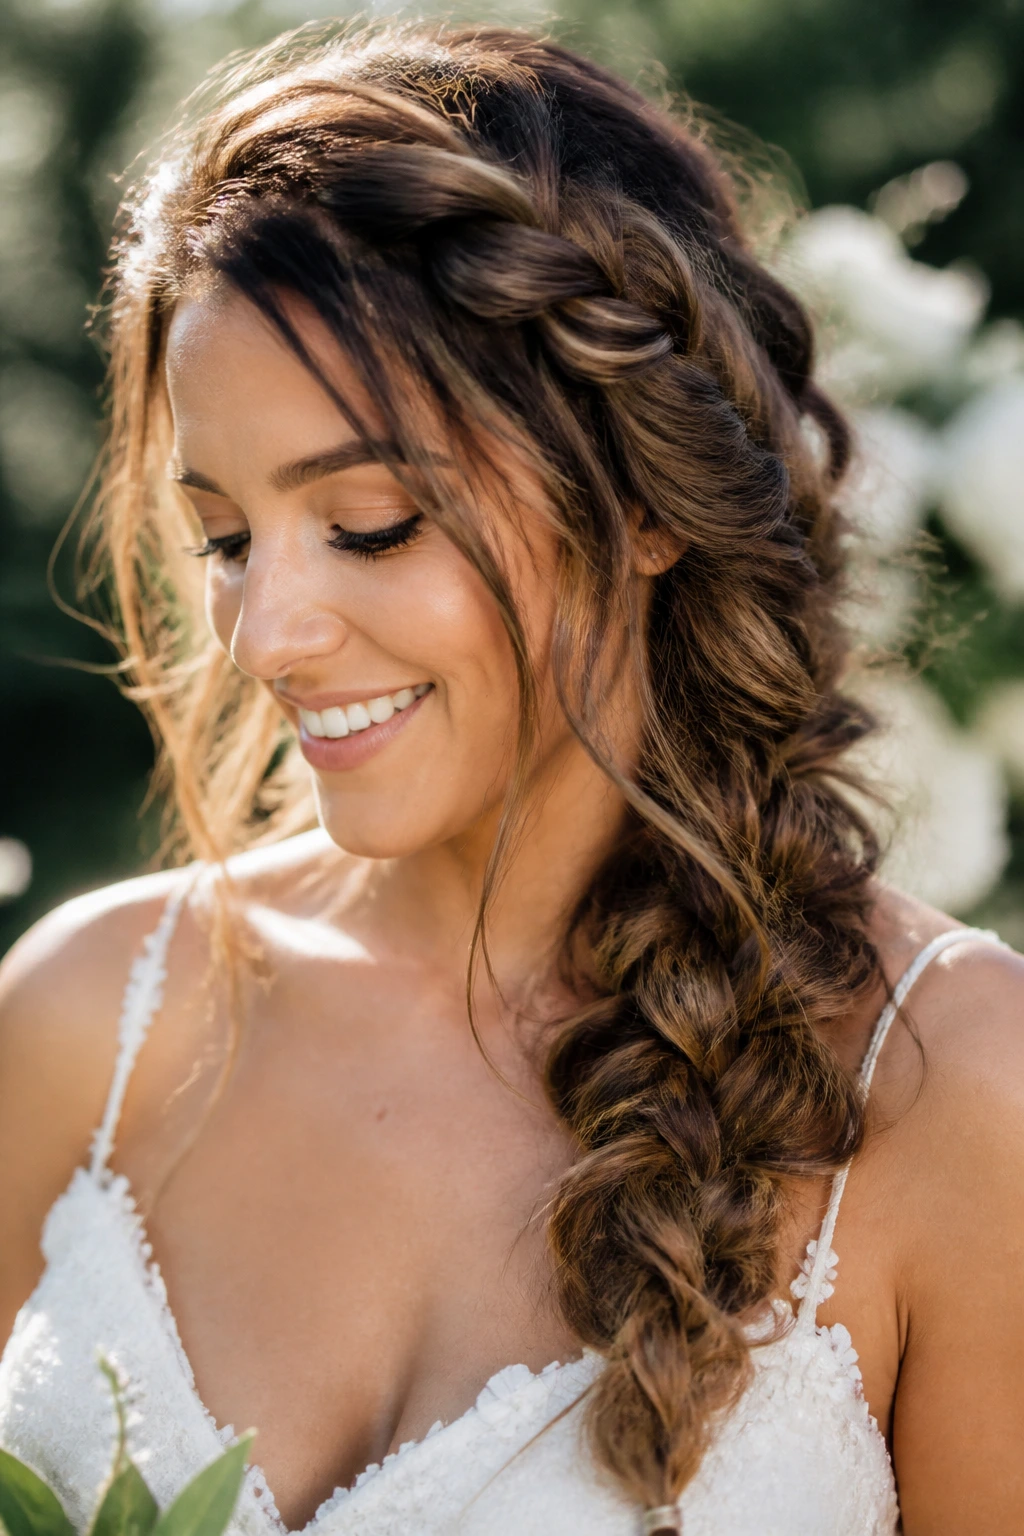
If your wedding venue is a rustic barn, a beach, or a lush garden, a messy side braid is going to be your best friend. This look is intentionally undone, featuring soft wisps of hair pulled out around the temples to frame the jawline. It feels incredibly relaxed, which helps bridge the gap between “I’m the bride” and “I’m here to have a great time.”
Achieving the “Undone” Look
Don’t worry about perfect parting or seamless sections here. Start by curling your hair into loose, beachy waves before you even begin the braiding process. This adds the necessary texture so that when you pull pieces loose later, the hair doesn’t fall flat. Use a dry shampoo or a matte sea salt spray to keep the braid from looking too shiny or “schooled.”
Styling Notes
- Use clear elastic bands to secure the ends so they remain invisible.
- Tuck a few real sprigs of lavender or wildflowers into the braid right before the ceremony begins.
- If your dress has lace sleeves, this style complements the intricate patterns without competing for visual attention.
3. The Double-Braid Crown
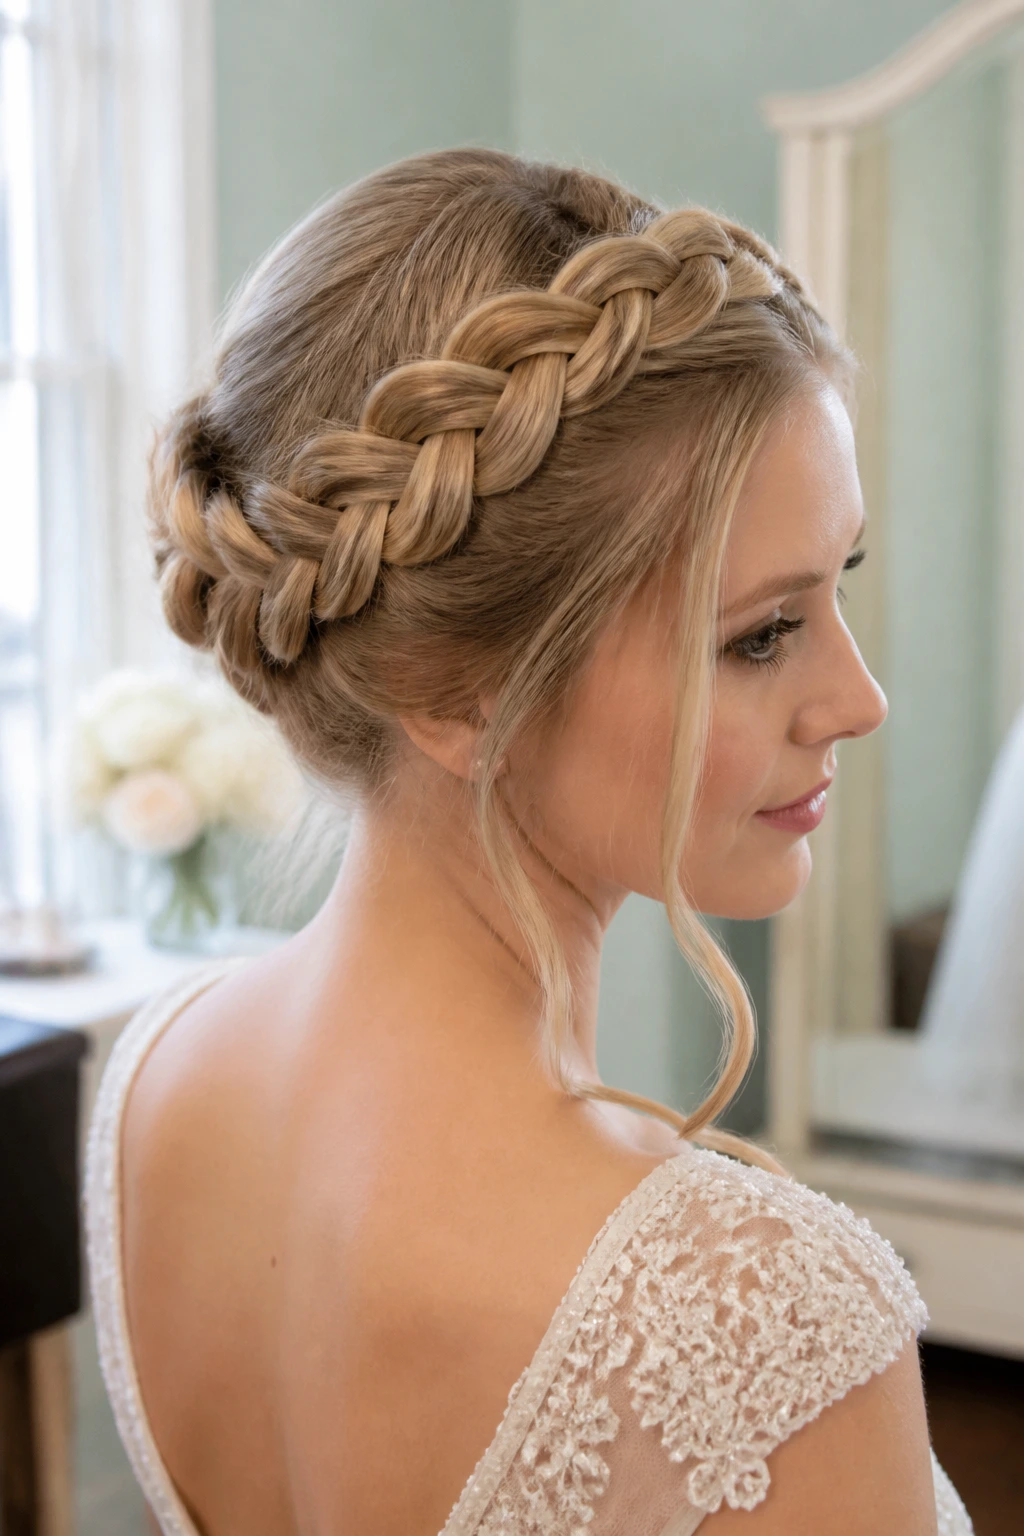
Two French braids meeting at the back of the head provide a regal, ethereal appearance. This style is fantastic for brides with thick hair who struggle with the weight of a full updo. By splitting the hair into two sections, you distribute the weight evenly, making it much more comfortable to wear throughout a long day of photos, dinner, and dancing.
Managing the Connection Point
The trickiest part of the double braid is the transition where they meet in the back. Use a small, decorative hair comb or a custom-made flower clip to bridge the gap. This hides the ends of the braids and creates a polished, finished look that looks just as good from behind as it does from the front.
Who Should Choose This?
This is an excellent option if you are planning to wear a gown with an open back or a plunging neckline. The braids frame the shoulders and neckline, drawing the eye upward. It is also a very secure style; if you are worried about your hair falling flat in humidity, the double-braid construction keeps everything locked in place.
4. The French Braid Into a Low Bun
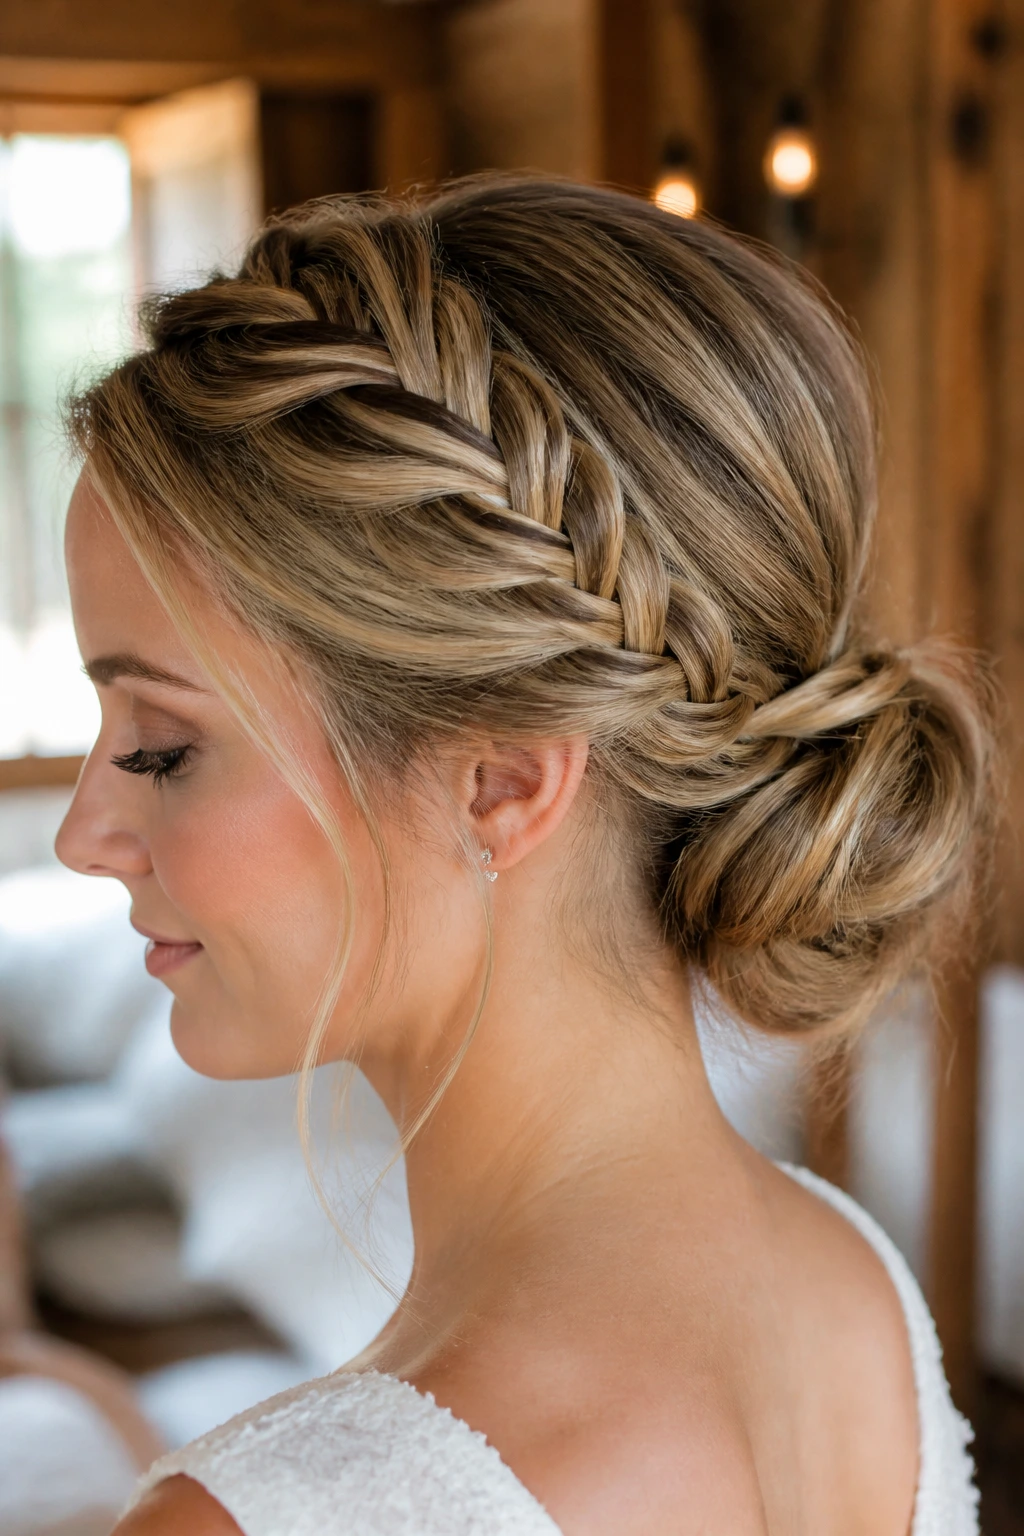
There is something inherently timeless about combining a braid with a classic low bun. It’s elegant, it’s clean, and it handles the neck area beautifully if you are wearing a high-collared dress. The French braid starts at the front and weaves back, tapering into a soft, textured knot at the nape of the neck.
Technical Tips for Smoothness
Use a fine-tooth comb to ensure your sections are clean if you want a sleek, formal look. If you prefer a soft, romantic look, use your fingers to section the hair instead. The difference in tools will determine whether the braid looks “sculpted” or “whispy.”
Practical Advice
Keep a small kit of bobby pins that match your hair color. The weight of a bun can occasionally pull at the braid, so it is helpful to reinforce the connection point at the nape with a few hidden pins. You don’t need an excessive amount, but a few strategically placed anchors will provide peace of mind.
5. The Faux-Hawk French Braid
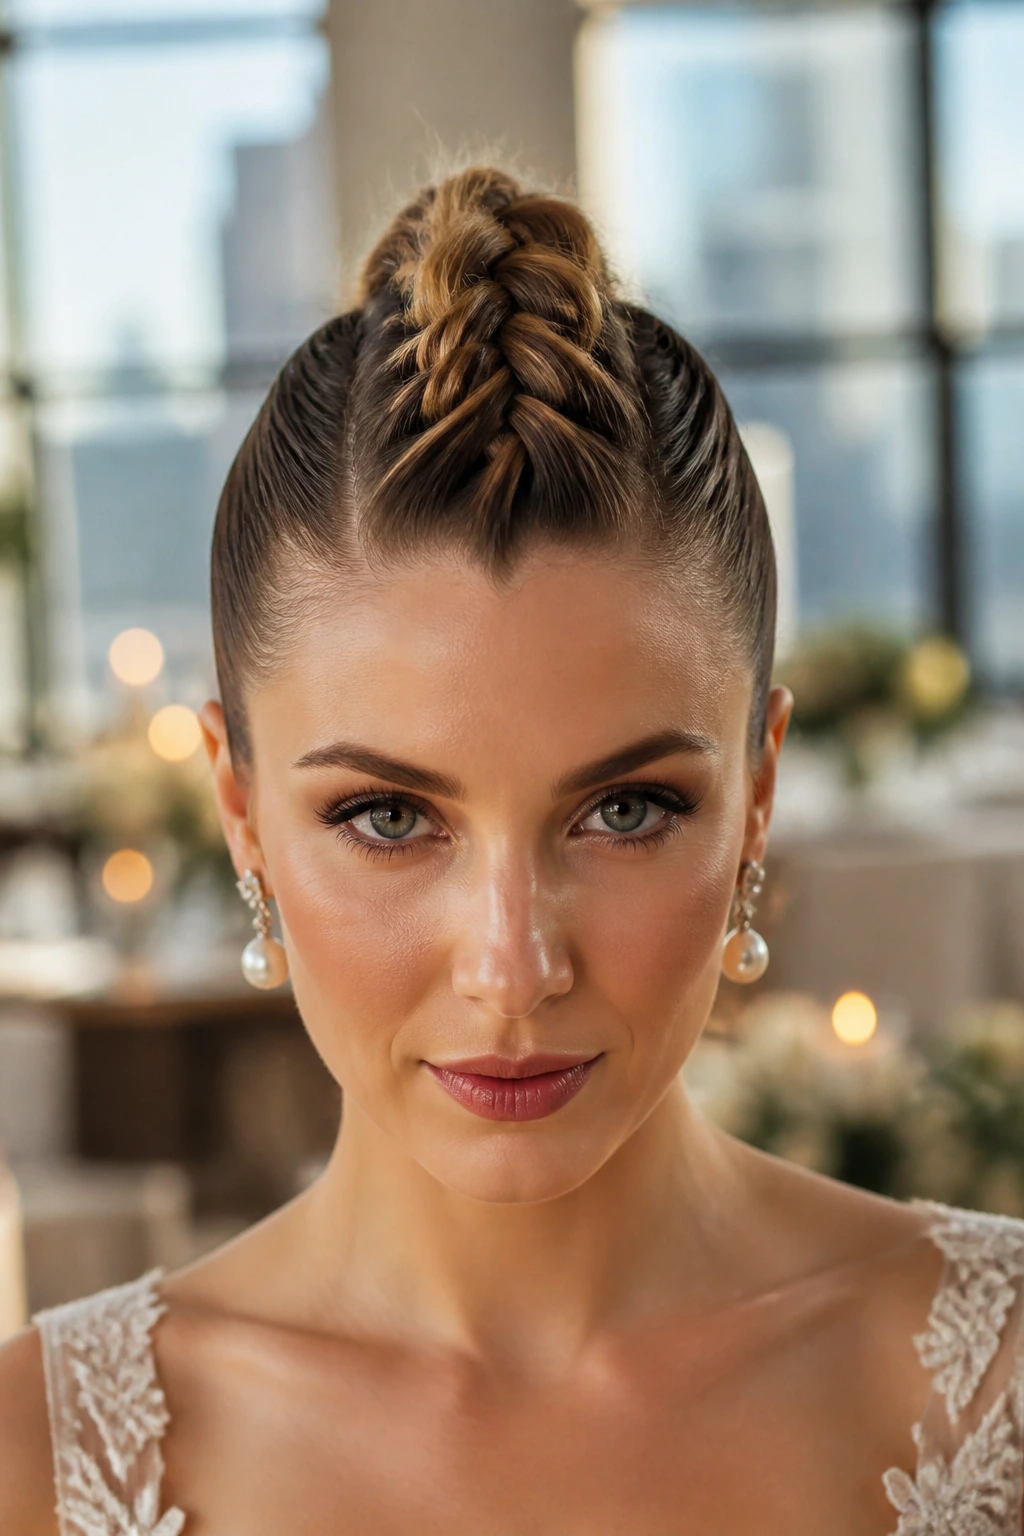
For the modern, edgy bride who wants to steer clear of traditional, soft, or romantic tropes, the faux-hawk French braid is a bold statement. By braiding the hair tightly against the scalp in a central column and then pulling the remaining length into a series of interconnected loops, you create a dramatic silhouette that commands attention.
Styling for Maximum Drama
This style thrives on clean lines and shine. Use a smoothing serum or a light pomade before you start to make sure every stray hair is tucked into the braid. It’s a bold architectural look that works perfectly with minimalist, high-fashion wedding gowns that don’t have a lot of lace or embellishment.
When to Consider This
Choose this for an urban wedding, perhaps in an industrial loft or a modern art gallery. It pairs beautifully with bold, structural earrings—think large gold hoops or geometric studs—because the hair is pulled completely away from the ears and face. It’s a powerful, confident look that rejects the idea that bridal hair must always be “pretty” in the conventional, soft sense.
6. The Braid With Oversized Silk Ribbons
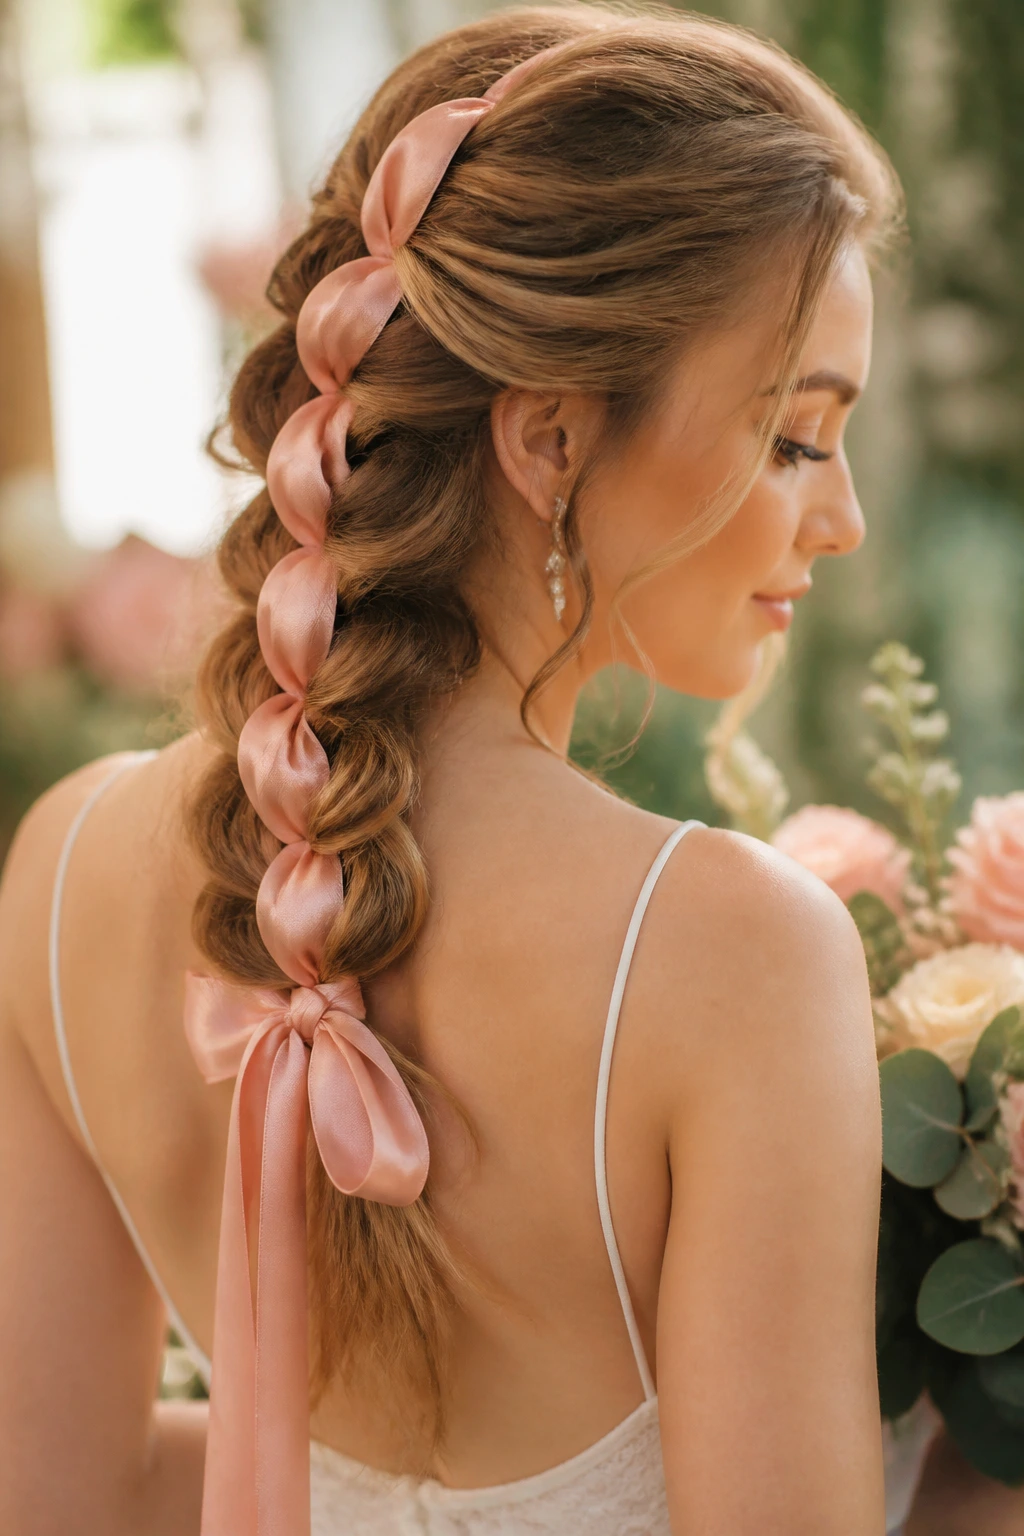
Sometimes the braid itself doesn’t need to be overly complicated; the magic lies in how you finish it. A simple, tight French braid that runs down the center of the head can look plain until you introduce a wide silk ribbon woven through the segments.
Matching Your Ribbon to the Theme
Silk adds a touch of luxury, while velvet feels more winter-appropriate and cozy. Match the color of the ribbon to your bridesmaid dresses or your bouquet’s accent colors. It’s an incredibly inexpensive way to personalize your look without needing professional help for hours.
The “How-To”
Secure your hair in the braid first, then take a long piece of ribbon and feed it through the loops using a large plastic sewing needle or simply by tucking it under the braid sections with a bobby pin. Tie the ends in a delicate bow at the bottom, letting the extra length drape over your shoulders. It is a stunning, high-impact choice for photos.
7. The Side-Swept French Braid With Hollywood Waves
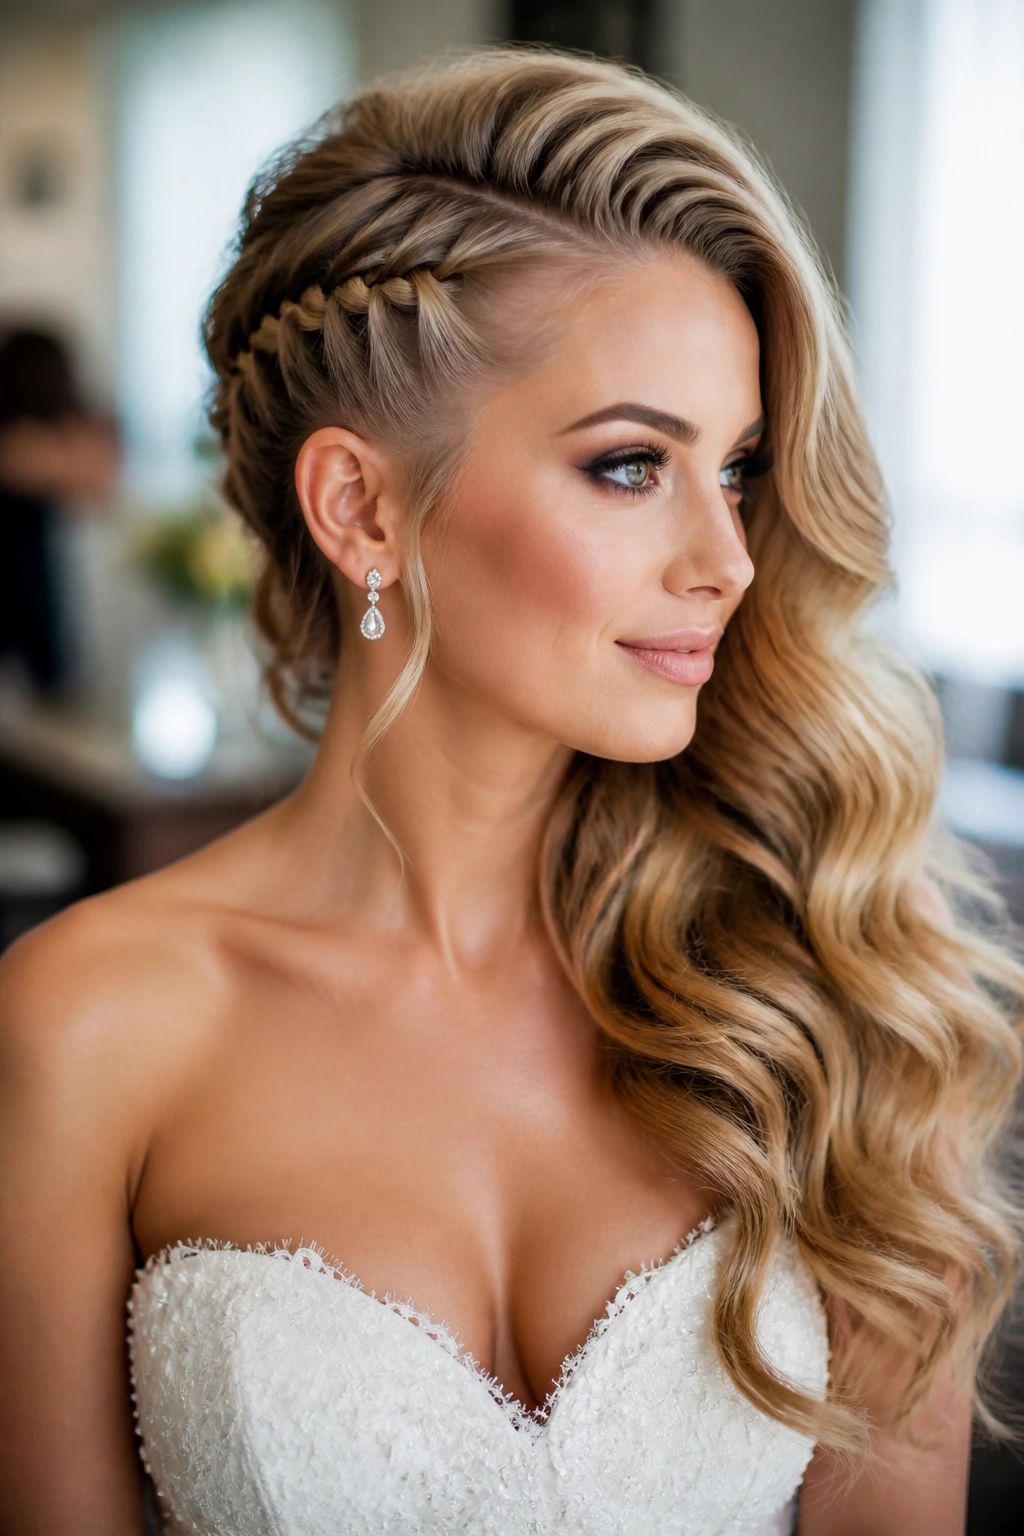
This style blends the old-school glamour of the silver screen with the practicality of a braid. Imagine a deep side part where the hair is tightly braided along the smaller side, acting as a “side-shave” illusion, while the rest of the hair cascades over the other shoulder in lush, glossy waves.
Why It’s a Photographer’s Favorite
The side-shave effect creates a high-contrast look that looks incredible in profile shots. It forces the hair to sit in a specific, intentional way, which ensures that your face is never obscured during the ceremony. The waves add softness, balancing out the structure of the braid.
Maintenance Tips
This style requires the most maintenance regarding hold. Ensure your stylist uses a strong-hold hairspray on the braided side to keep the “shaved” effect tight. If the braid loosens, the illusion of the side-shave disappears, so don’t be afraid to ask for extra reinforcements in that specific area.
8. The Waterfall French Braid
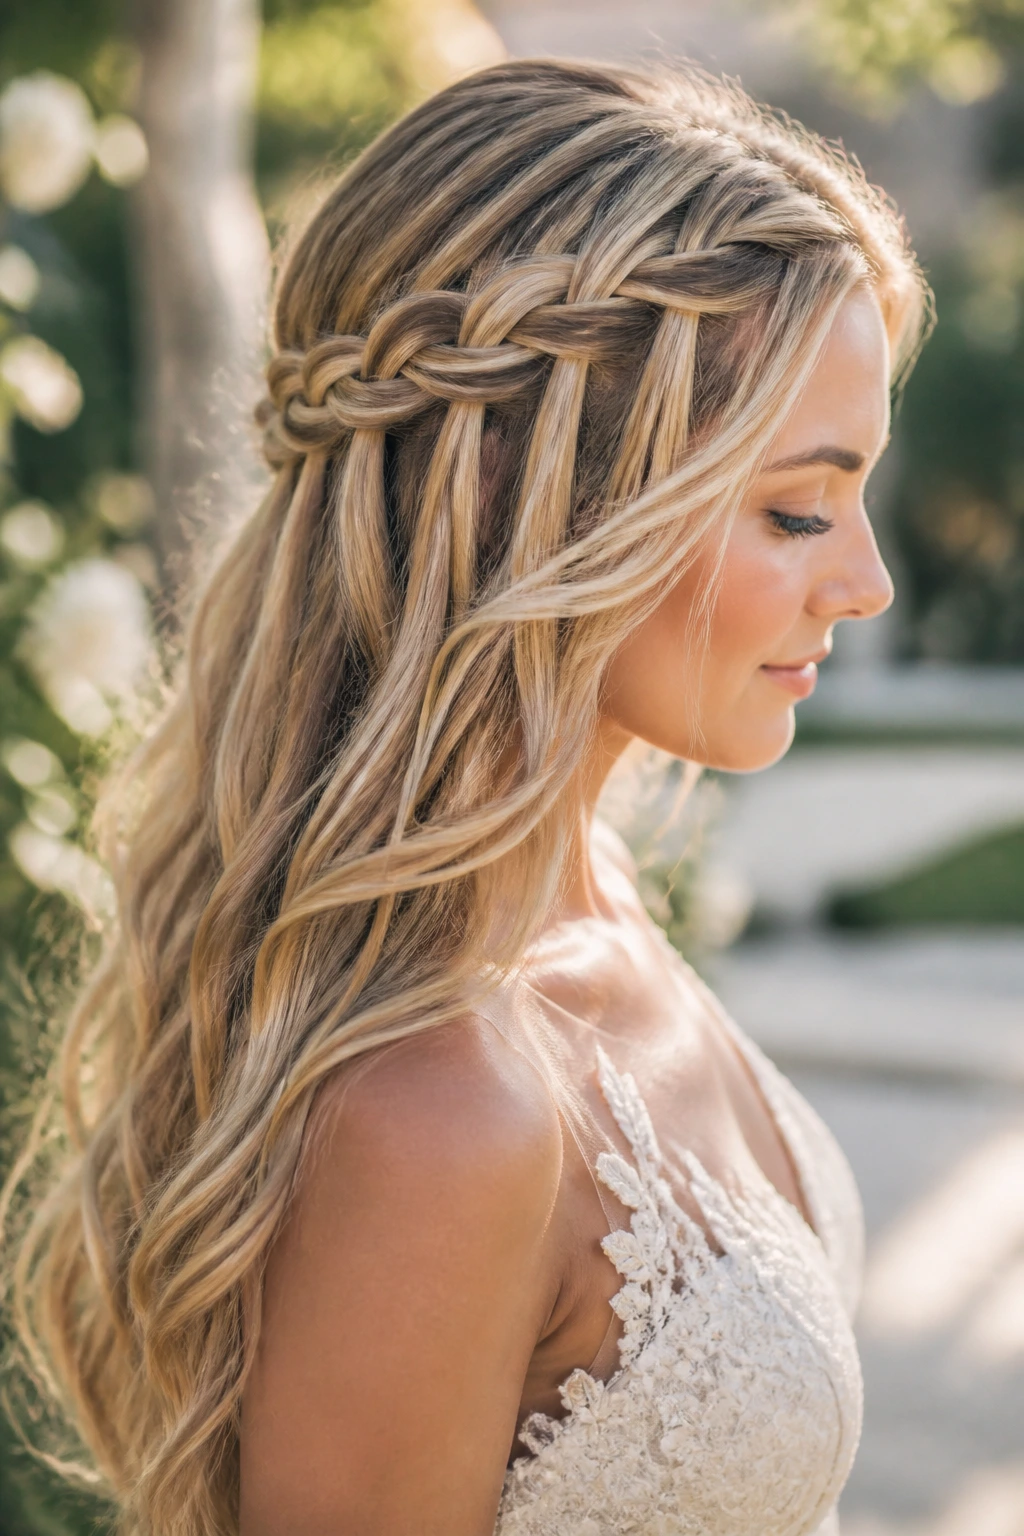
The waterfall braid is a variation where you drop pieces of hair as you move through the braid, creating a cascading effect. It looks like a crown of lace sitting on your head. This is perhaps the most romantic, delicate version of the French braid, making it a perfect choice for outdoor ceremonies.
Why It’s Different
Most braids keep all your hair contained; this one lets most of it hang free. It is essentially an accessory made out of your own hair. It requires a bit more length to execute properly, as you need enough hair to create the “waterfall” effect without it looking sparse.
How to Style It
Because this braid is very airy, it can look a bit “bare” if left completely alone. Consider adding tiny pearl clusters or pins into the braid where the pieces are dropped. These small details catch the light when you turn your head, adding a subtle sparkle that really shines in natural sunlight.
9. The Dutch Braid (Inside-Out) Crown

While not technically a traditional French braid—as it is inverted—the Dutch braid is a cousin that every bride should consider. The braid sits on top of the hair rather than tucked underneath, creating a 3D effect that looks much more substantial and defined.
Creating Volume
If your hair is thin, the Dutch braid is your secret weapon. Because the braid sits proud of the scalp, it creates the illusion of twice as much volume. You can gently tug on the edges to make it look even bigger, which is a great way to make sure your hair doesn’t get lost in the overall wedding aesthetic.
Styling Tip
The Dutch braid looks best when it’s slightly tousled. Once you’ve finished the braid, don’t just leave it tight. Go through the loops with your fingers and pull them apart in different directions. This creates a soft, hazy look that feels much more natural for a wedding day.
10. The French Braid With Tiny Braided Inserts
If you like the idea of a loose, natural style but are worried about it looking too “ordinary,” use the French braid technique for small, intentional inserts. Keep most of your hair down in waves, but braid two small French sections near the front of your head, pinning them back so they disappear into the rest of your hair.
The Value of Subtle Detail
This is for the bride who loves detail but hates a heavy, pinned-up style. It’s an “if you know, you know” kind of detail. It adds texture and interest without the fuss of a full head of braids. It’s also extremely easy to DIY if you’re a confident braider.
Pairing with Headpieces
Because the hair is mostly down, you have plenty of room for a statement headpiece, like a crown or a decorative headband. The hidden braids act as anchors for the headpiece, ensuring it stays centered throughout the night. It is a win-win for both comfort and aesthetic.
11. The Wrapped French Braid Chignon
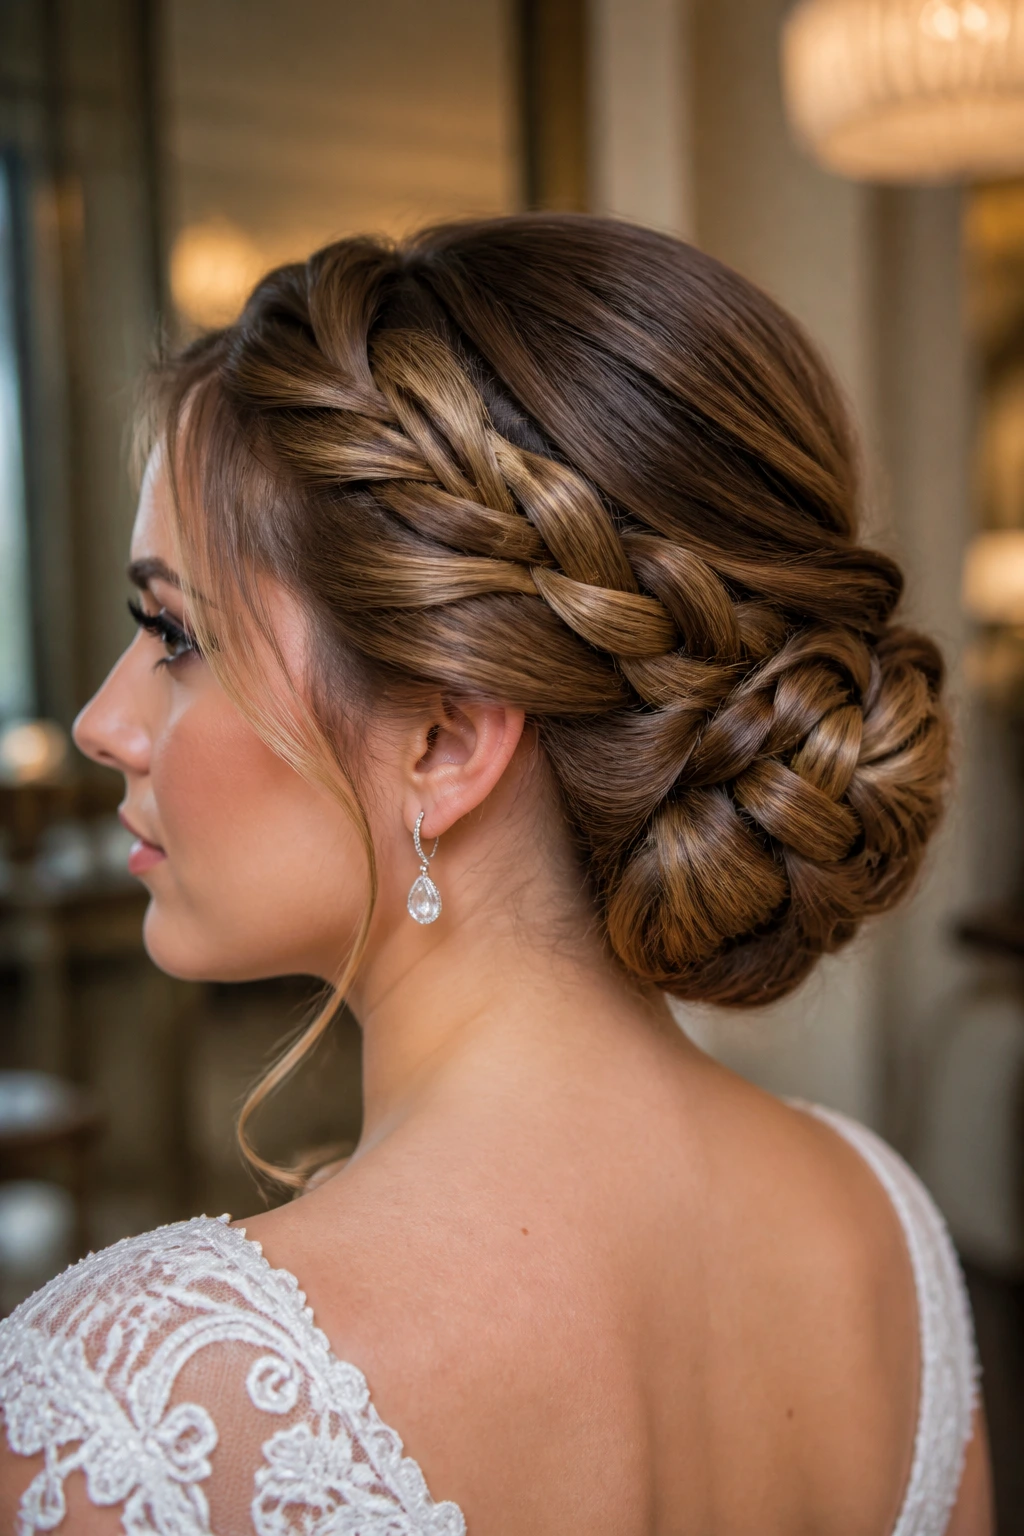
Imagine a low, neat bun, but instead of the hair being twisted, it is wrapped in layers created by a French braid. This style is exceptionally chic and looks like it was executed by a high-end salon professional. The key is in the layering.
Achieving Symmetry
This style is all about balance. You want the braid to wrap evenly around the bun. Start by braiding the hair from the crown to the nape, then take the ends and begin wrapping them around the base of the hair. If you have layers, you might find that the hair wants to poke out; keep some lightweight bobby pins handy to tuck the ends seamlessly into the bun.
Who Should Choose This
This is a fantastic option for brides wearing a minimalist silk gown. The braid provides texture and interest, which breaks up the simplicity of the dress. It’s a very “architectural” look that pairs wonderfully with long, drop earrings.
12. The Braid With Floral Pins
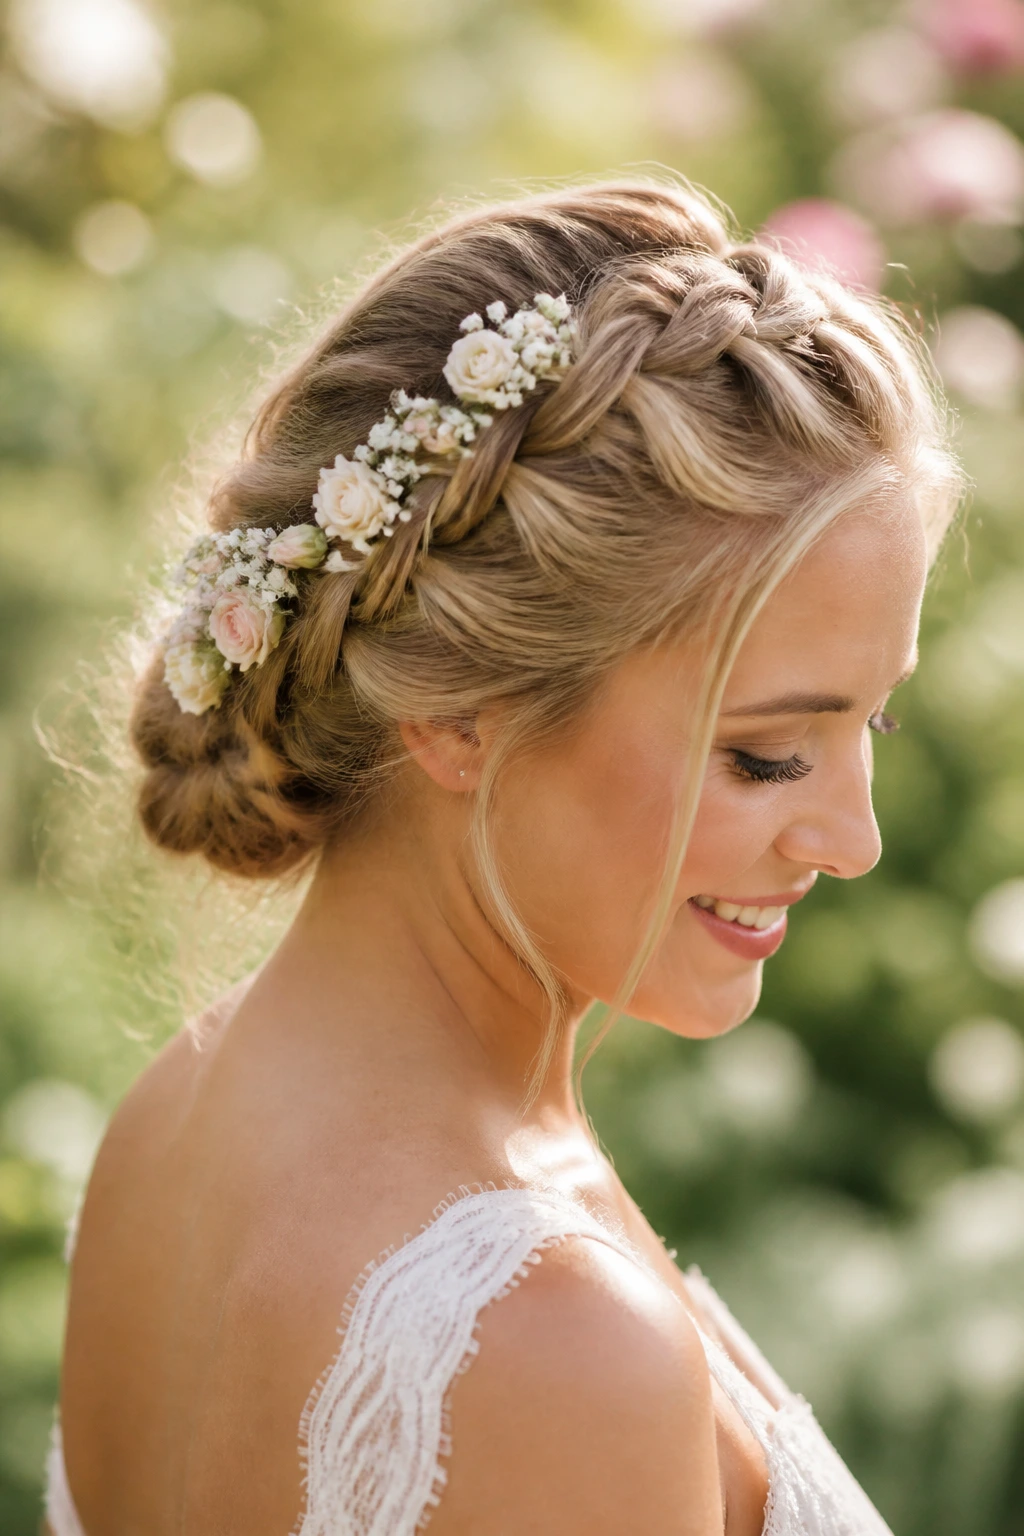
Floral pins are perhaps the easiest way to elevate a standard French braid. Whether you are using individual sprigs of baby’s breath, wax flowers, or silk blossoms, they turn a simple, functional style into something inherently festive and bridal.
The Art of Placement
Don’t just stick the flowers anywhere. Try to follow the line of the braid. If you have a braid running down the side of your head, placing the pins along the “ridge” of the plait creates a beautiful, trailing effect. It turns your hair into a living accessory.
Tips for Fresh Flowers
If you choose fresh flowers, talk to your florist about which ones hold up best without water. Flowers like orchids, spray roses, and wax flowers are sturdy. Avoid delicate flowers that wilt within an hour, like gardenias, unless you have a backup plan. Always keep them in a cool, damp place until the very last moment.
13. The French Braid With a High Ponytail
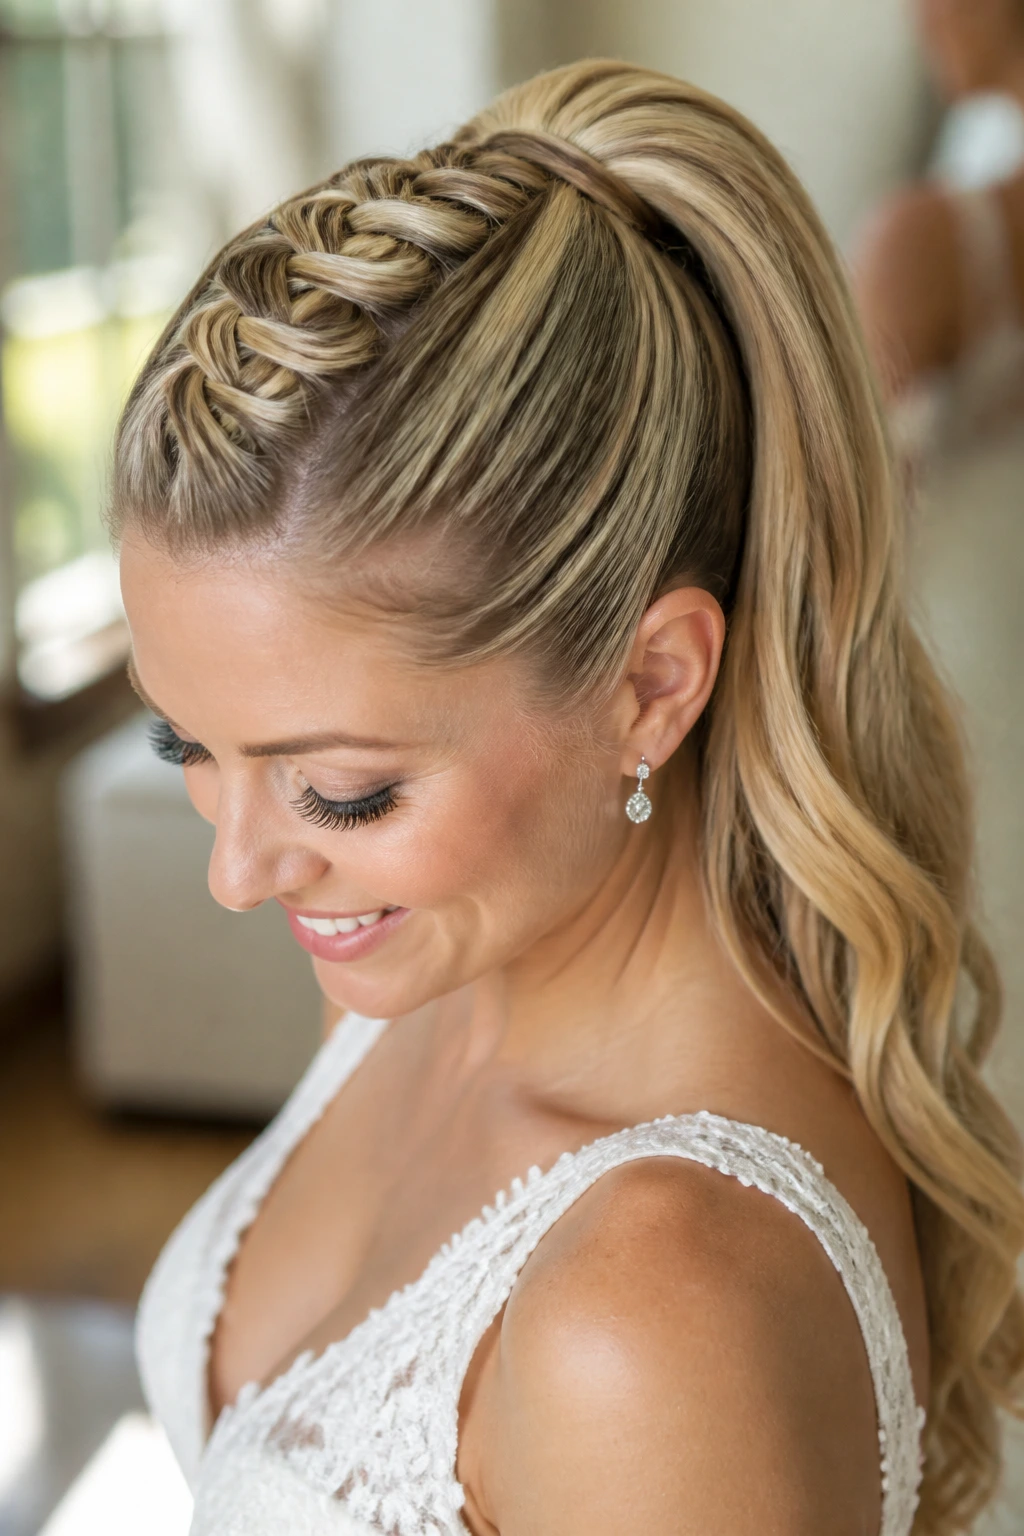
Want the security of a braid with the swing of a ponytail? Start a French braid at the hairline and stop right at the crown, then gather all the remaining hair into a high, sleek ponytail. This is a very youthful, energetic look that is perfect for brides who are planning to dance all night.
Balancing the Textures
The contrast between the tight, intricate braid on the head and the loose, flowing ponytail creates a really interesting visual dynamic. You can curl the ponytail into tight ringlets or keep it straight and glossy. Both work, but curly hair often blends better with the braided portion if you have any flyaways.
Styling Tip
Wrap a small piece of hair around the elastic at the base of the ponytail to hide it. It’s a small trick, but it makes the difference between a style that looks like it belongs in the gym and a style that looks like it belongs at the altar.
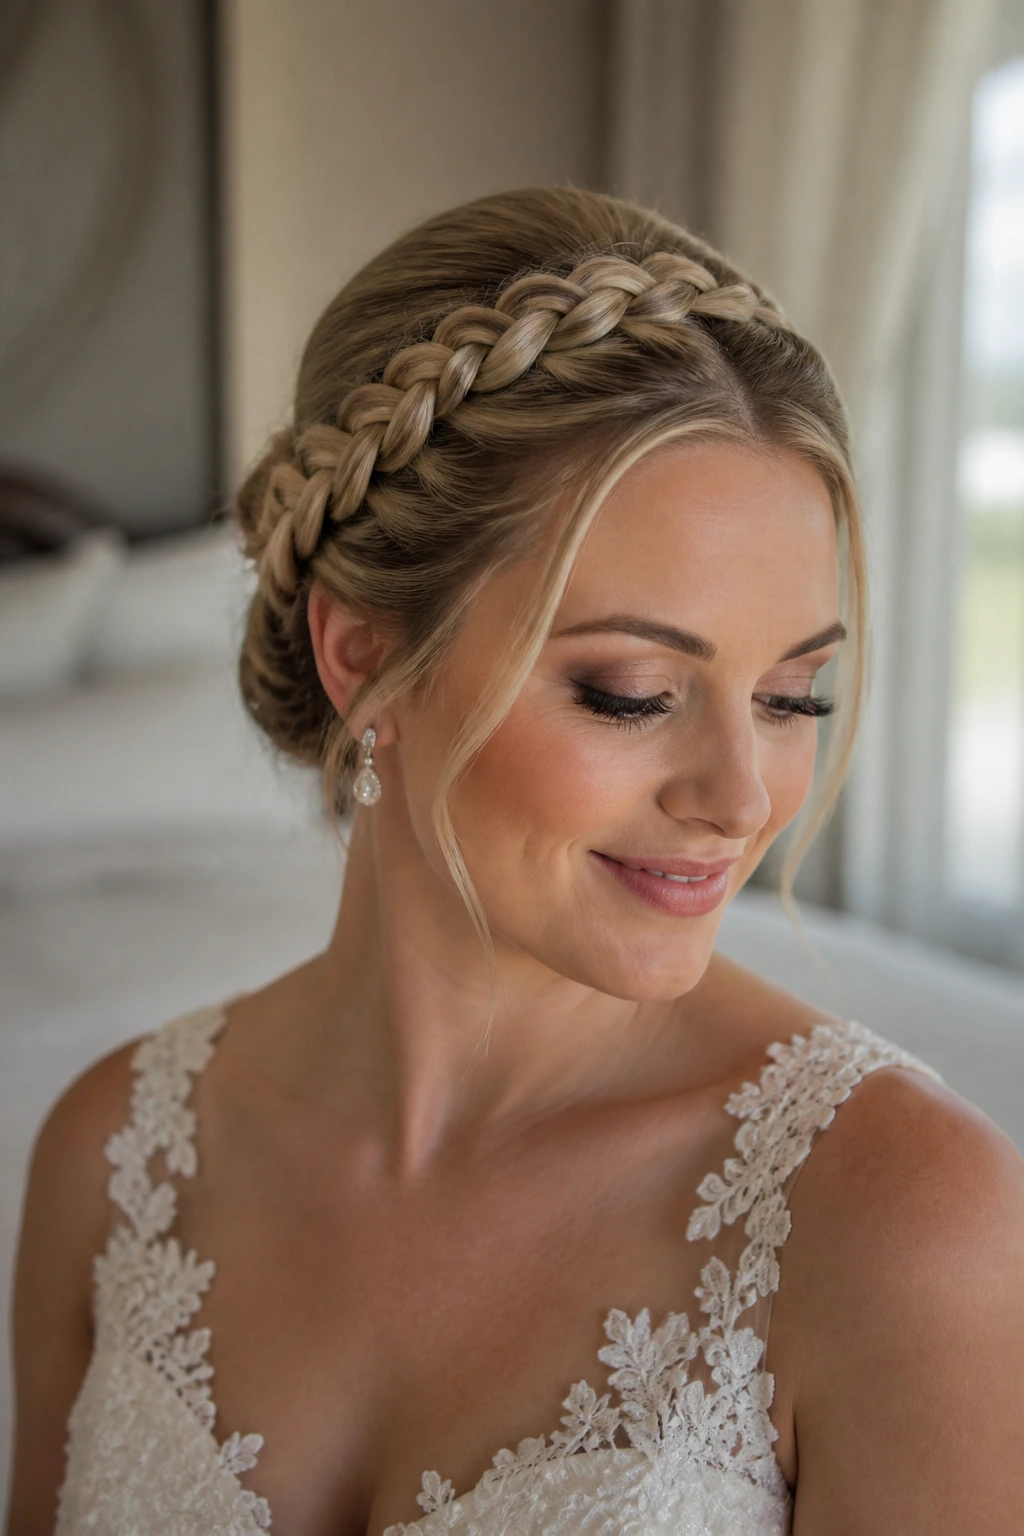
14. The “Crown” Braid
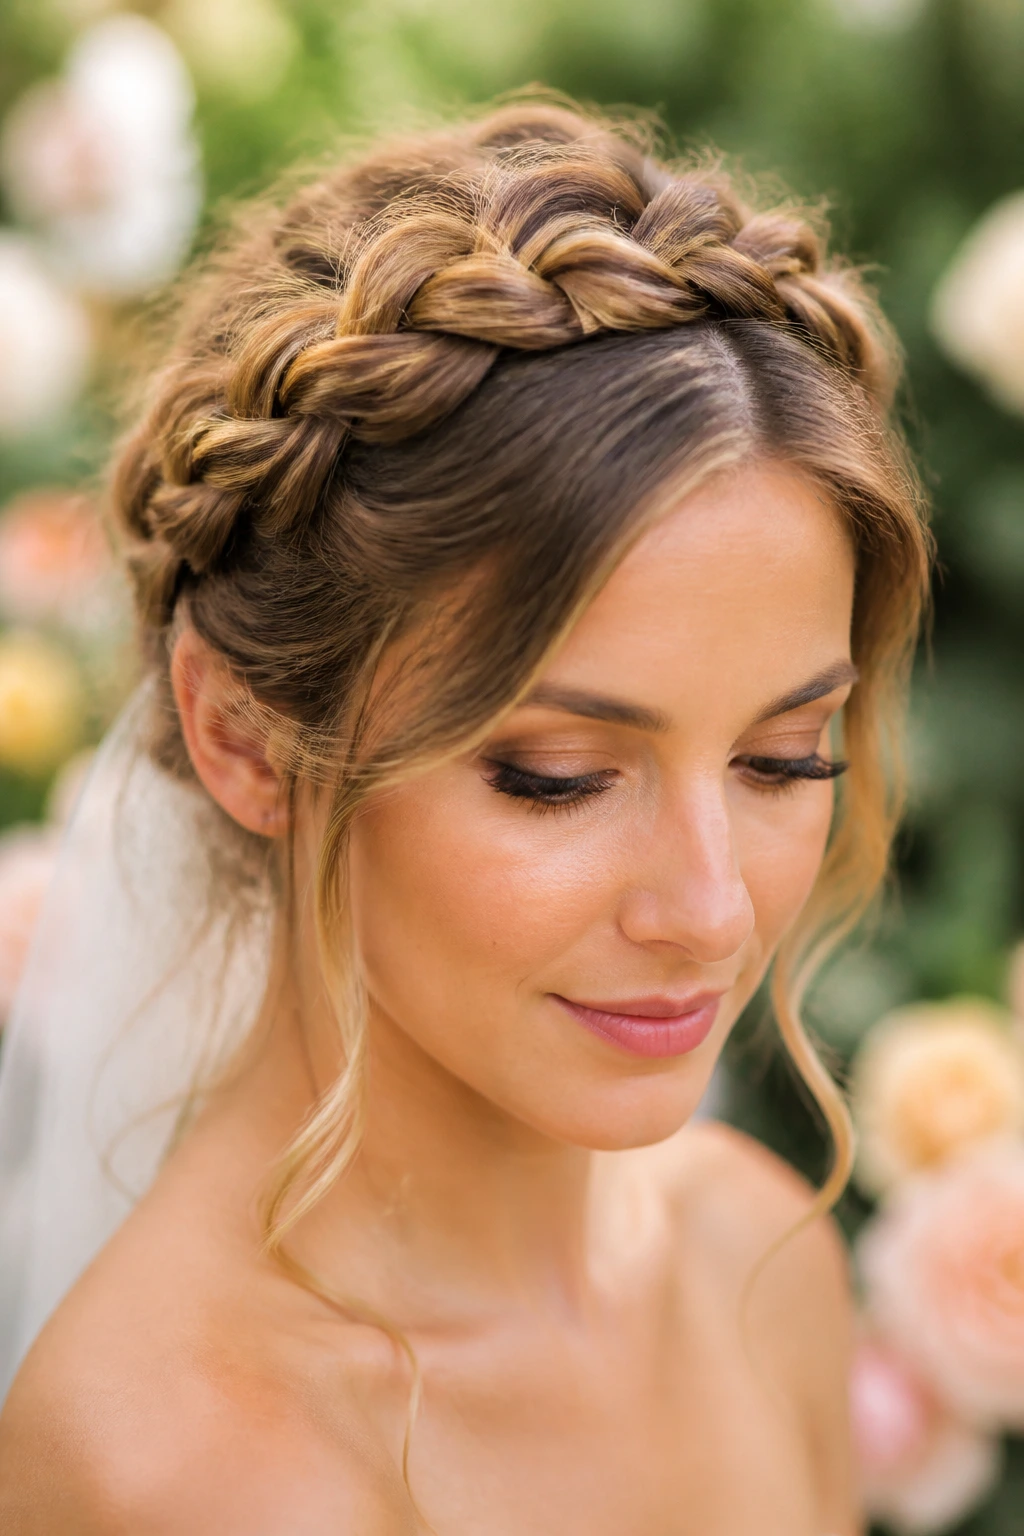
For the bride who wants a storybook-princess feel, the crown braid is the ultimate choice. This style involves braiding the hair all the way around the head in a circle, securing it so it forms a halo. It’s incredibly elegant and frames the face in a way that feels soft and classic.
Achieving the Halo
You will need a fair amount of hair length for this to work effectively without a lot of extension work. If your hair is on the shorter side, you can “cheat” by creating two separate braids and pinning them to meet in the middle at the front and back, creating the illusion of one continuous loop.
How to Soften It
To ensure it doesn’t look like a schoolgirl’s hairstyle, pull a few tendrils of hair out around your temples. This prevents the look from feeling too tight and gives it that soft, romantic “bridal” edge. The goal is a look that feels ethereal, not too uniform.
15. The Fishtail-French Hybrid
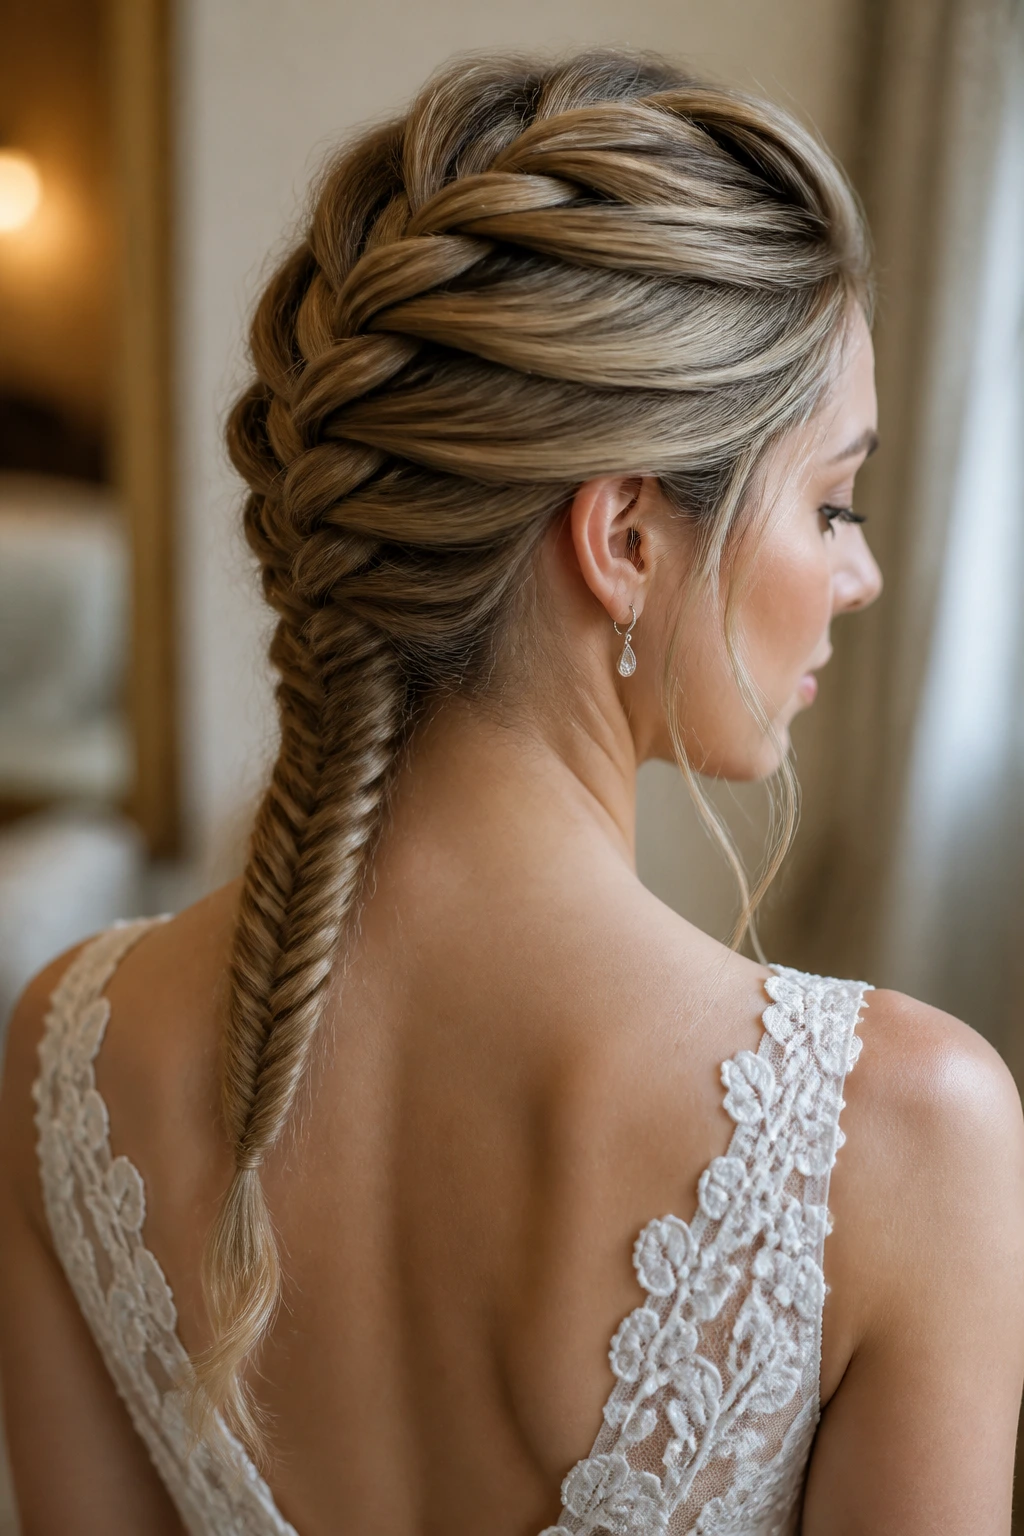
Combine the tight, structured nature of a French braid with the intricate, woven aesthetic of a fishtail braid. Start with a French braid at the top to secure the roots, then transition into a fishtail once you reach the nape of the neck. It’s a sophisticated, complex look that screams “professional styling.”
Why This Style Rocks
Fishtail braids take time to do, but they look incredibly delicate. By using a French braid to handle the heavy lifting at the scalp, you save yourself the time and frustration of trying to fishtail-braid from the hairline, which can be messy and uncomfortable.
The Finishing Touch
Fishtail braids are known for being a bit thin. Once you finish the fishtail portion, use your fingers to pull at the outer edges of the weave. You will be shocked at how much wider and more intricate it suddenly looks. It transforms a thin, tight braid into a lush, full-bodied plait.
16. The French Braid With Glitter Accents
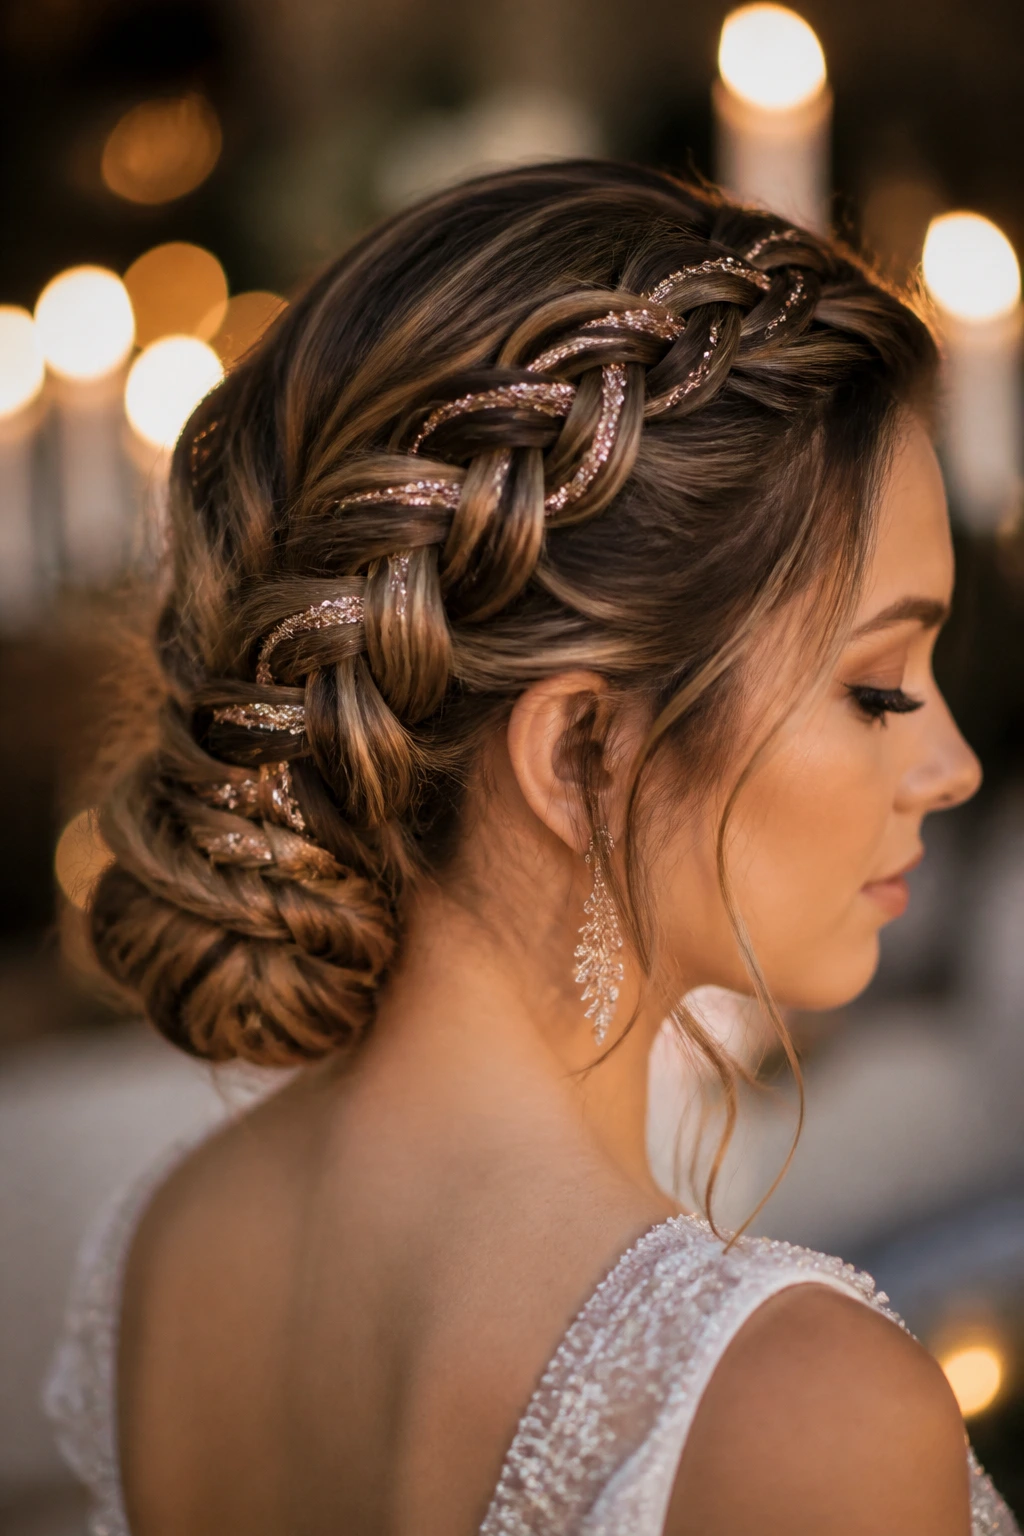
If your wedding is in the evening or has a “starry night” or glamorous vibe, adding a bit of hair glitter or metallic thread into your French braid is a bold, modern move. You can weave a gold or silver thread through the hair while braiding, which catches the light when you turn your head.
Keep It Refined
Avoid the chunky glitter of your childhood. Look for fine, cosmetic-grade glitter sprays or gold-leaf flakes that can be applied with a bit of hair wax. The goal is a subtle shimmer, not a messy, shedding disaster. It’s about catching the light, not being visible from space.
When to Use This
This is perfect for winter weddings, especially if you have a gown with metallic embroidery or sequin detailing. It ties the whole look together without needing to add extra jewelry, keeping your accessories focused on your dress and your hair.
17. The Asymmetric French Braid
Instead of a centered or perfectly side-parted braid, go for an asymmetric look that pulls all the hair toward one side. This is wonderful for brides who have a favorite side of their face. It keeps the hair sleek on one side and adds texture and volume to the other.
The Power of Asymmetry
Asymmetry is naturally more interesting to the human eye than perfect symmetry. It feels more intentional and “designed.” Start the braid low on one side and work it diagonally across the head. It provides a unique silhouette that looks stunning from every angle in your wedding album.
Styling Tip
Because the hair is pulled to one side, make sure to consider your earrings. An asymmetric style looks incredible with one statement earring and one more understated stud, or simply a single large, dangling earring on the side where the hair is pulled back.
18. The Loose “Pancaked” French Braid Updo
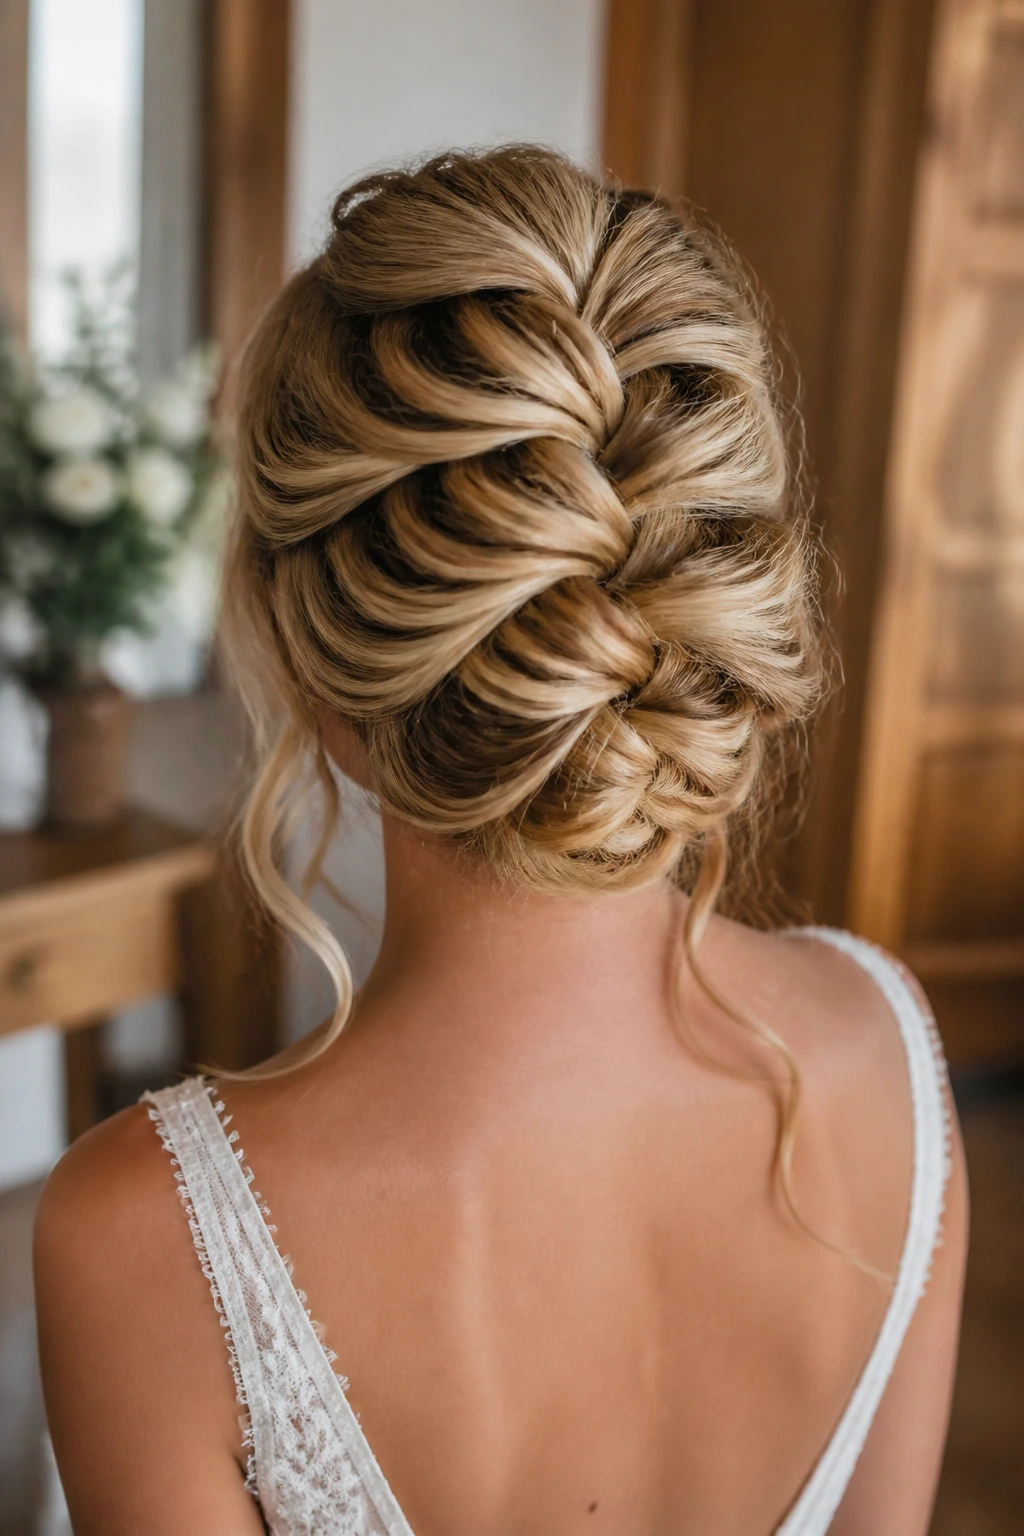
This is the quintessential modern bridal braid. It is the style you see all over professional bridal portfolios. It involves taking a simple French braid and then stretching every single loop until the braid is almost twice its original size, then pinning it into a loose, textured shape.
The Importance of Product
You cannot achieve this without a lot of texture product. Use a heavy-duty texturizing spray or powder before you start. If your hair is too clean or slippery, the loops will just slide right back to their original size. You want the hair to have that “lived-in” grip.
Final Look
The result is a braid that looks soft, voluminous, and effortless. It’s perfect for the bride who wants to look like she could have braided her own hair—even though, in reality, it took forty minutes of careful pinning and shaping. It is the definition of “polished perfection.”
Final Thoughts
When it comes to your wedding day, the best hairstyle is the one that lets you forget about your hair and focus on the moment. Whether you choose a classic, tight French braid or a loose, bohemian-inspired weave, the key is to ensure the style is reinforced properly so you aren’t constantly adjusting it.
Always schedule a trial with your stylist a few weeks before the big day. Take photos from the front, side, and back, and—most importantly—wear the style for a few hours to see how it holds up to movement. If you’re a DIY bride, practice is your best friend. A French braid is a skill that improves dramatically with repetition, so don’t be afraid to try the same look five or six times until you know your hair’s personality and exactly where you need to add extra pins. Regardless of the choice, a braid provides a level of elegance that balances perfectly with the weight of a wedding dress, creating a cohesive, intentional look that will look beautiful for years to come.