Choosing a hairstyle for intense movement often feels like a losing battle against gravity and sweat. You want something that stays secure, doesn’t whip around in your face, and—let’s be honest—doesn’t look like a chaotic bird’s nest the moment you finish your last set of burpees. While long hair usually ends up in a messy, strained top knot, the bob offers a unique, structured alternative. When you incorporate braids into a shorter cut, you aren’t just styling your hair; you are locking it into a functional frame that handles high-intensity interval training, heavy lifting, or long-distance running with ease.
The beauty of the bob braid lies in its versatility. It works for those with thick, textured hair as well as those with fine, straight strands, provided you have the right technique. Forget the notion that you need waist-length hair to pull off a complex-looking plait. Shorter lengths are actually easier to control, preventing the dreaded “heavy braid” sensation that can pull at your scalp during a jump rope session or a sprint. Whether you are aiming for a sleek, clinical look for the yoga studio or a rugged, locked-in style for the boxing ring, there is a configuration that works for your specific hair type and activity level.
Beyond just staying in place, these styles protect your hair from the friction caused by equipment, headbands, and constant movement. Sweat can be incredibly drying, and keeping your hair braided limits the tangles that often form when loose strands are exposed to moisture and heat. It is time to move past the simple ponytail and embrace styles that combine professional discipline with the grit required for a serious workout.
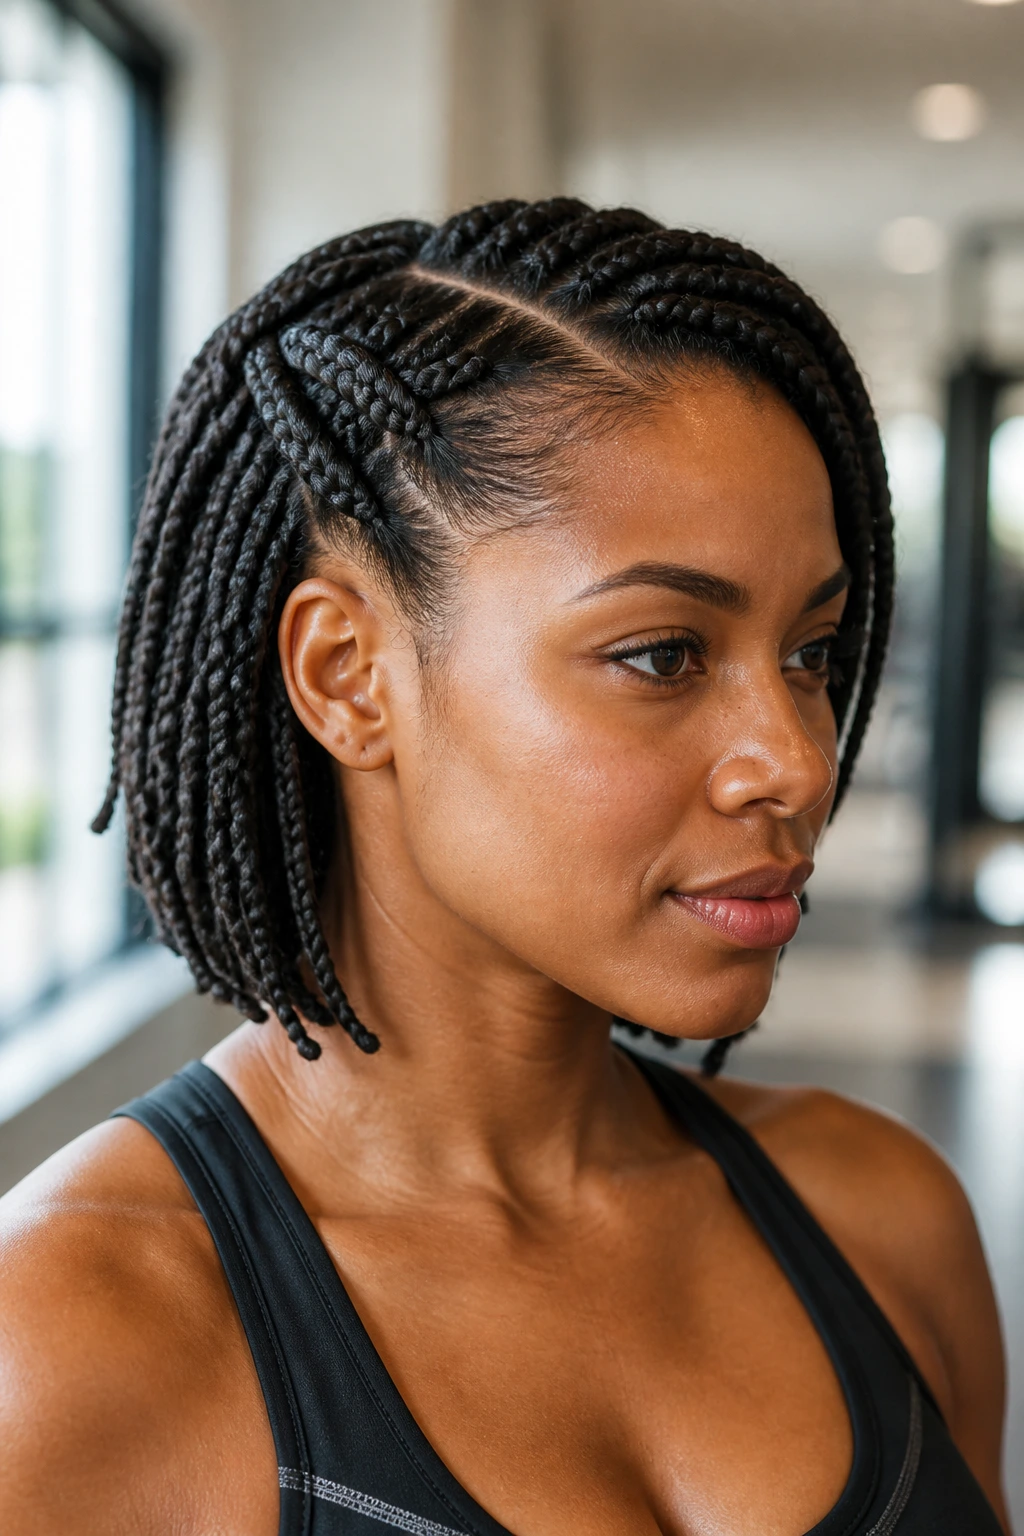
1. The Single Side-Swept Dutch Braid
This style is the gold standard for anyone with a classic chin-length bob. By starting the braid at your temple and pulling hair back along the hairline, you effectively lock away all the pieces that usually fall into your eyes mid-workout. Because a Dutch braid sits on top of the head—rather than woven underneath like a French braid—it provides a structural barrier that keeps your hair flat against your scalp, minimizing movement.
Why It Works for High-Impact Movement
When you are moving quickly, friction is your enemy. A Dutch braid creates a raised, firm ridge that stays tight even as you move through dynamic ranges of motion.
- Use a small amount of lightweight styling gel or texturizing spray before you start to give your hands better grip on the hair.
- Secure the end with a small, clear silicone elastic that won’t snag or break delicate strands.
- If your hair is layered, keep the braid slightly loose near the roots to prevent that uncomfortable “tight-scalp” feeling during inversions or downward dogs.
How to Style It
Start with a deep side part. Begin weaving the braid at the heavy side of the part, incorporating small sections as you travel toward the nape of the neck. Once you reach the ear, transition into a standard three-strand braid, letting the end trail behind your ear or pinning it securely at the base of your hairline.
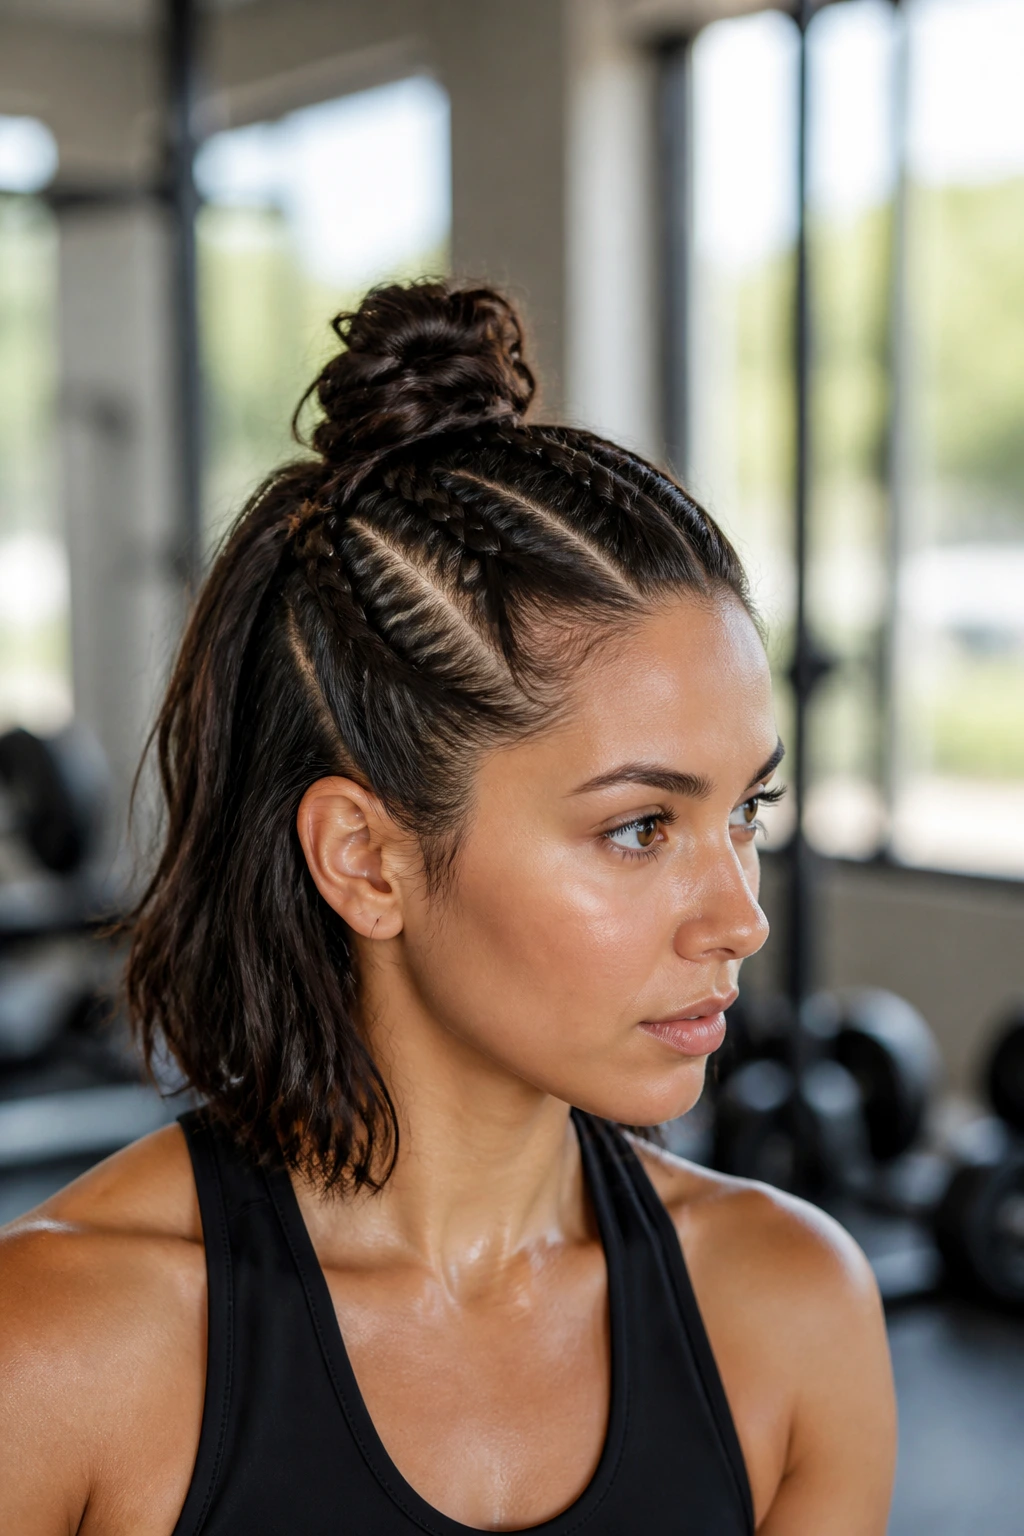
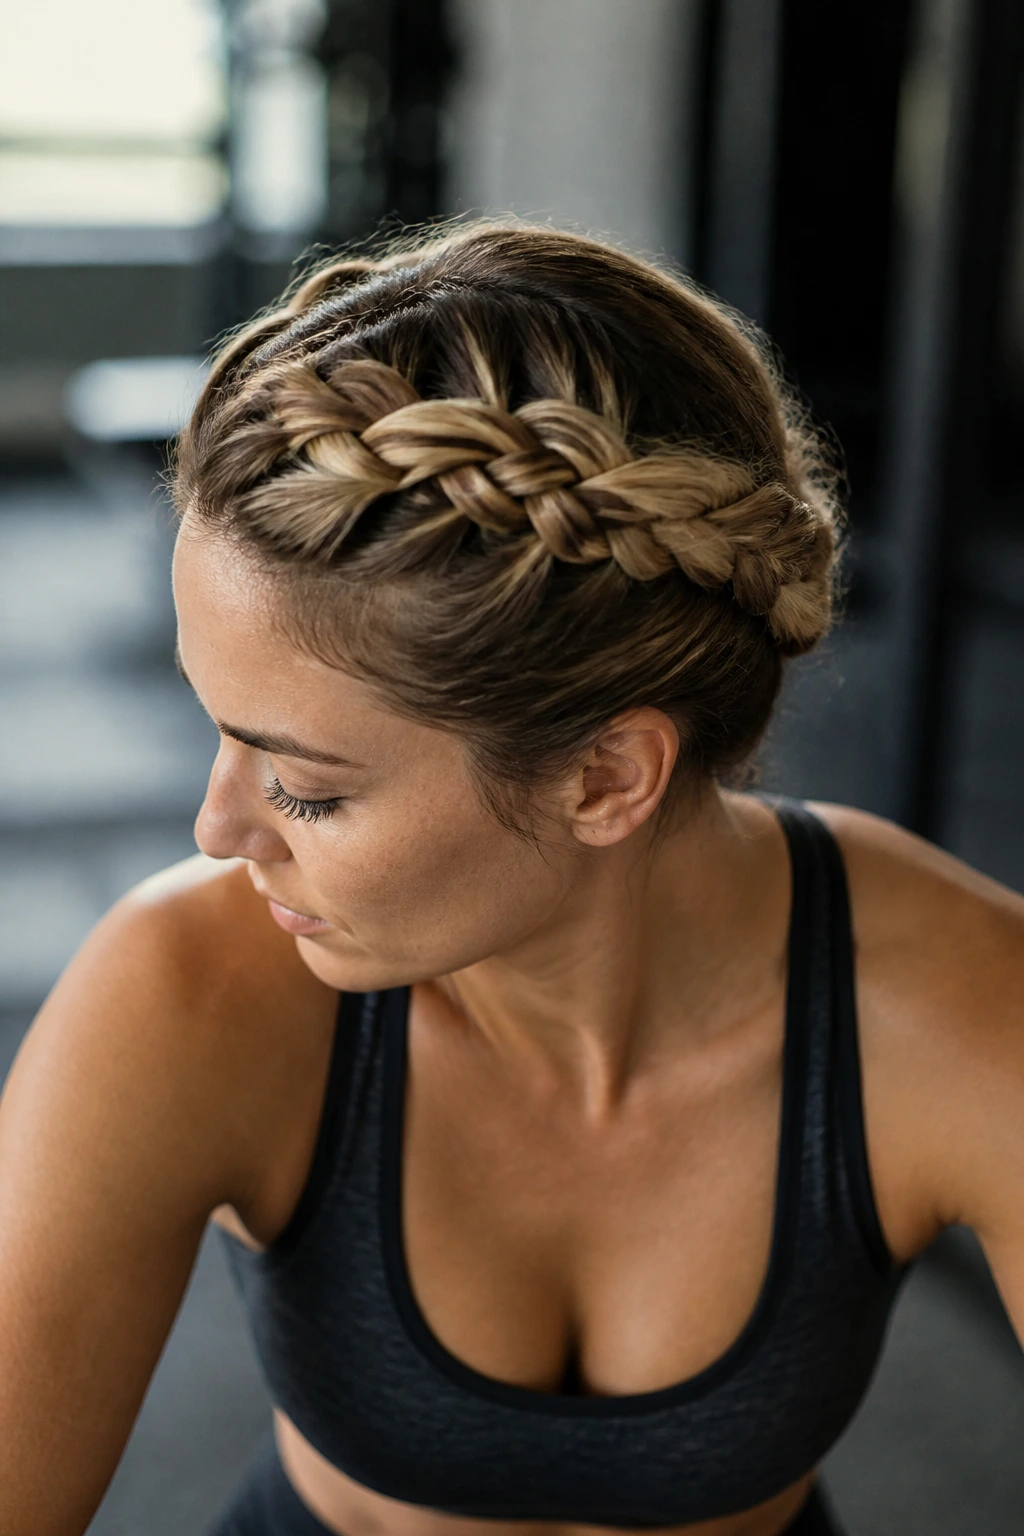
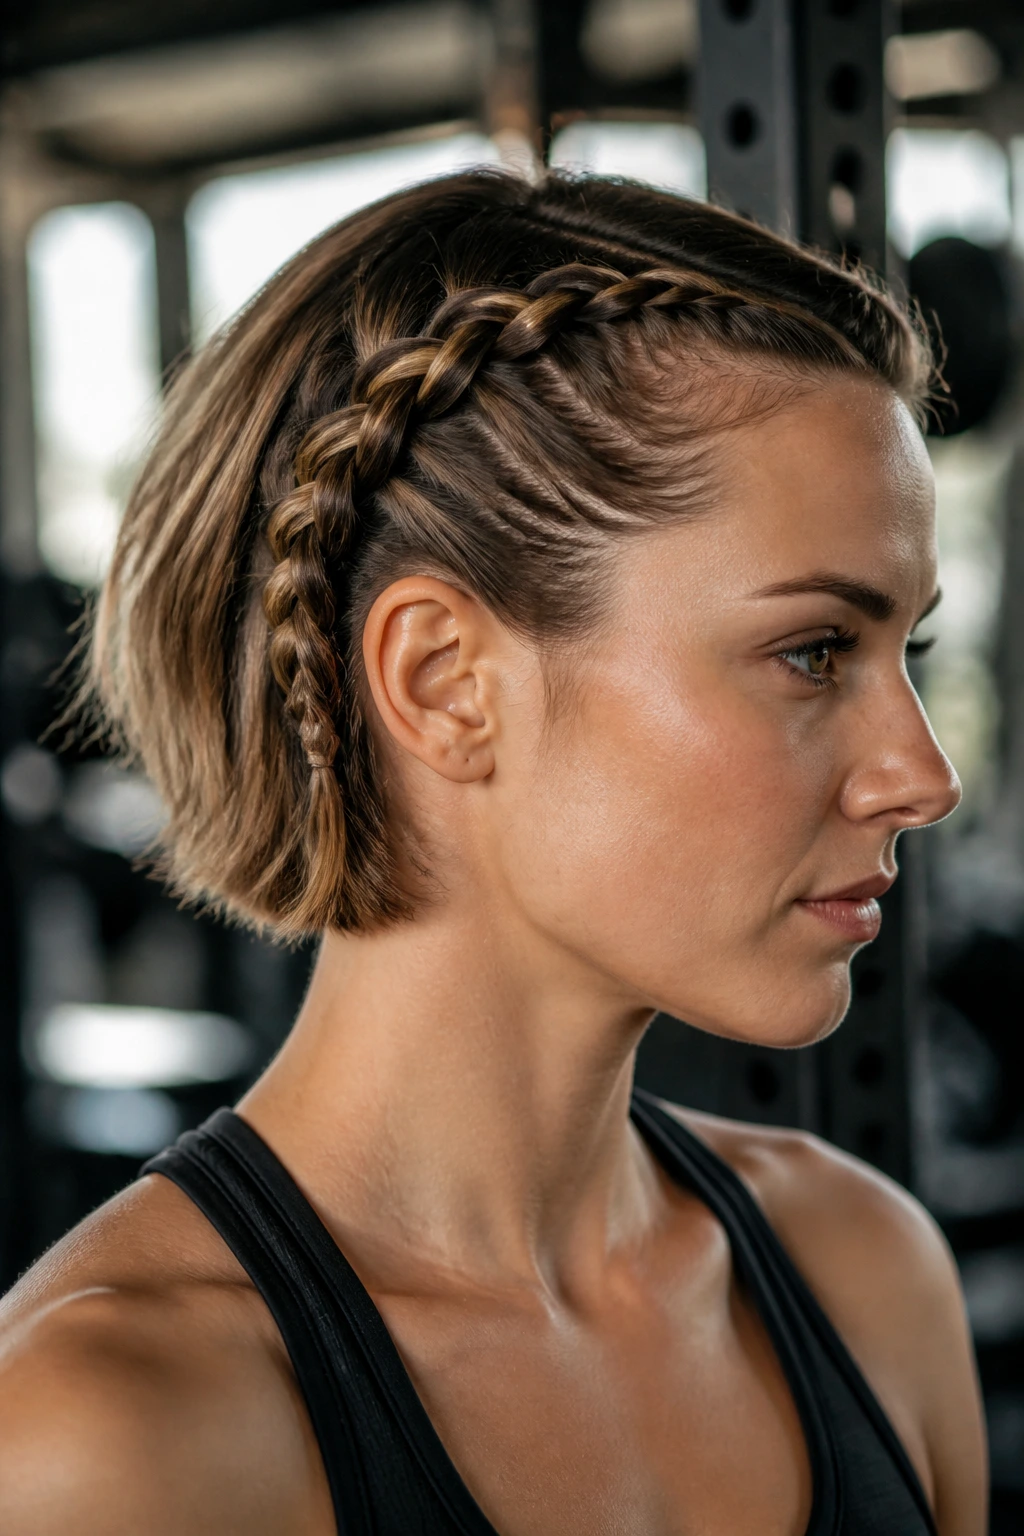
2. Double Crown French Braids
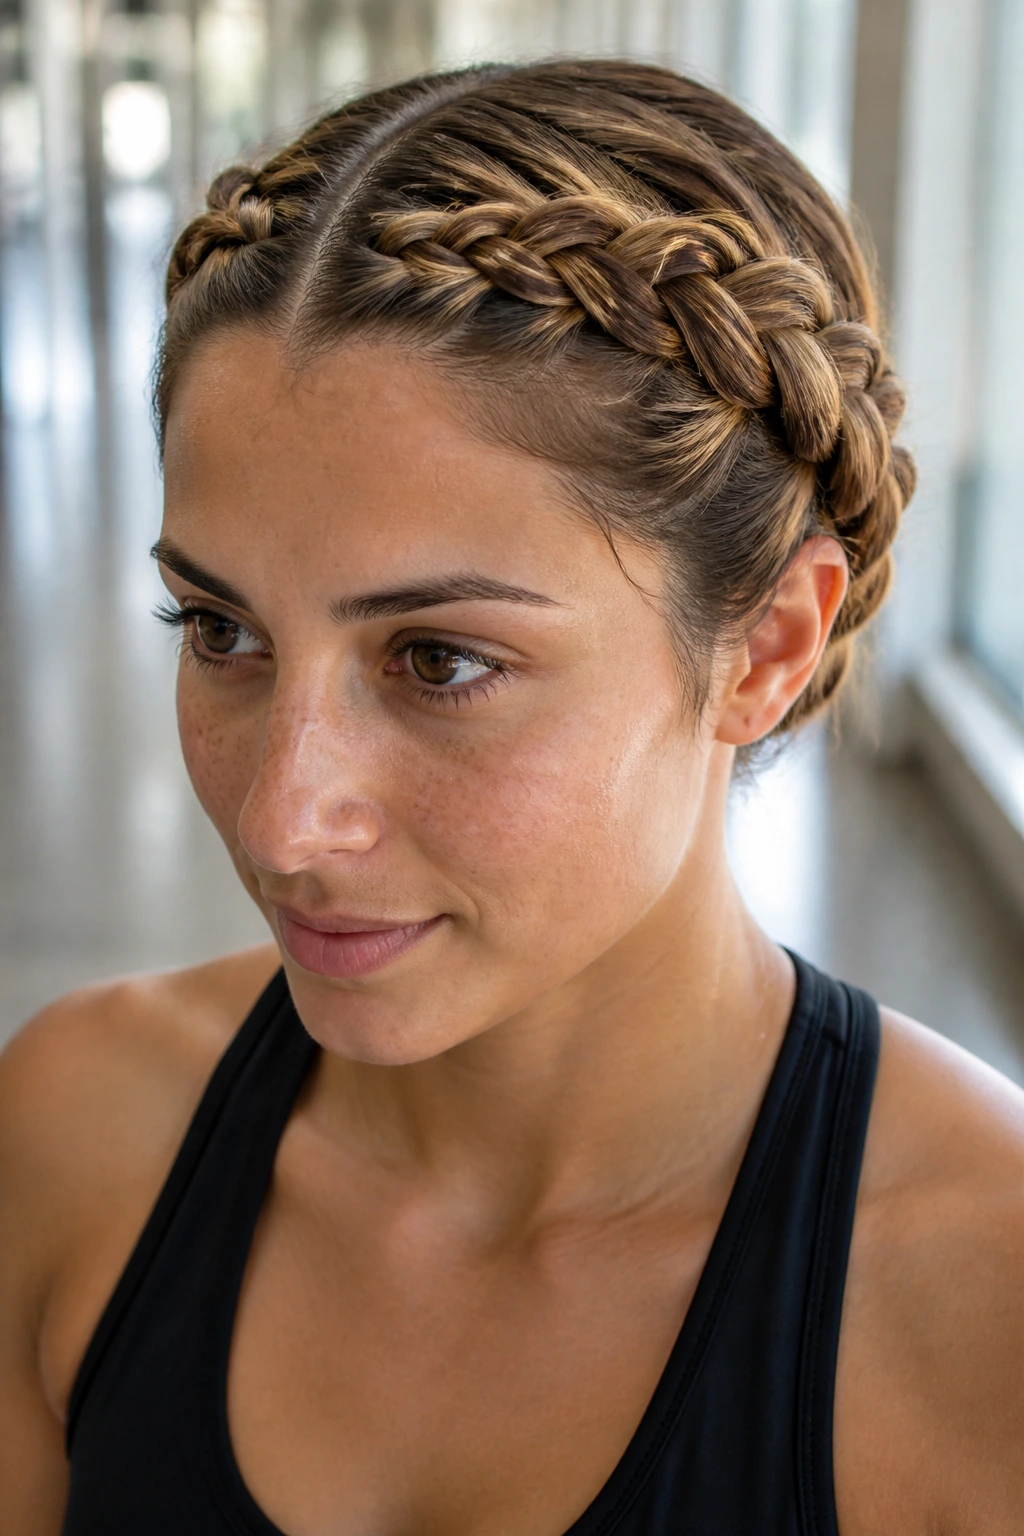
If you prefer total symmetry, two French braids running from your forehead to the nape are an excellent choice. This style essentially acts as a headband, keeping every single flyaway contained. It is particularly effective for those with layers, as the repetitive weaving of a French braid secures shorter, face-framing pieces more reliably than a simple ponytail ever could.
Managing Layers and Flyaways
The challenge with a short bob is that the bottom layers often want to escape the braid as you reach the back of your head.
- Apply a light-hold pomade to your palms before you begin to smooth out the surface of the hair.
- If you have very short layers at the nape, use a tiny bobby pin to tuck them into the final braid structure before you secure the end with an elastic.
- For a more polished look, take the two resulting tails and twist them into a small bun at the base of your neck for a “braided halo” finish.
3. The Pinned-Back Waterfall Braid
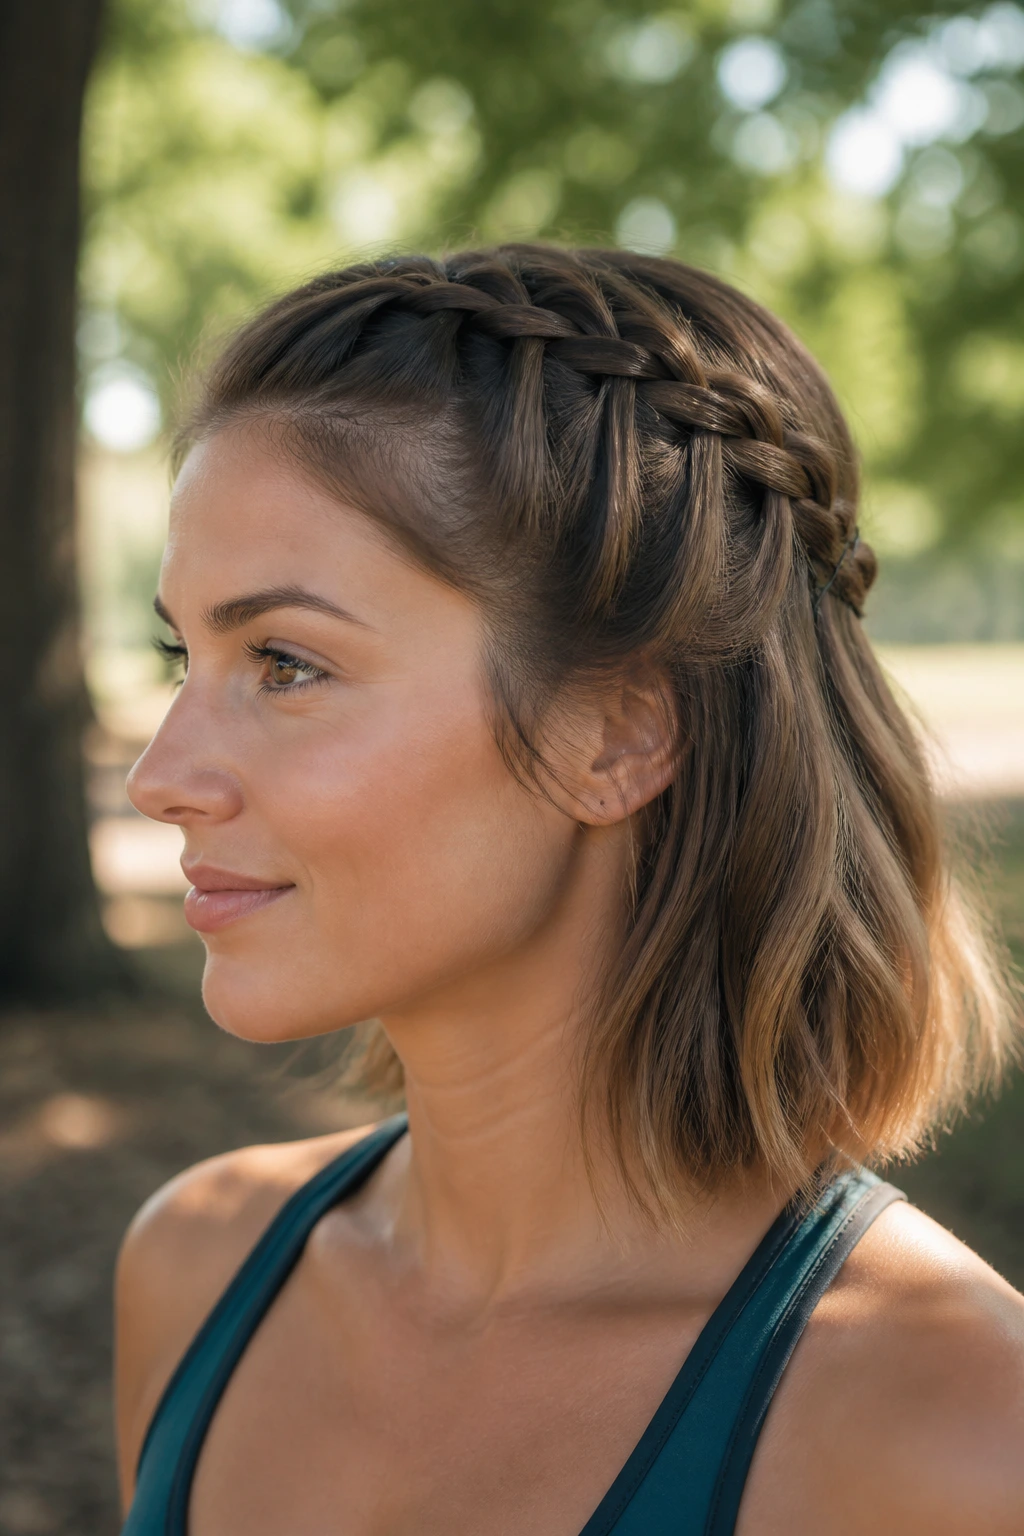
Not every workout demands a full-scalp lockdown. If you are doing lower-impact activities like cycling or Pilates, a waterfall braid can keep the front of your hair out of your face while leaving the back loose or half-up. This provides airflow to the back of your neck, which can be a significant comfort advantage during long, sweaty sessions.
Why This Style Stays Put
The waterfall technique works by dropping strands of hair after each crossover, which seems counterintuitive for a workout.
- You must pair this with a secondary anchor. Once the waterfall braid reaches the back of your head, secure it with a series of crisscrossed bobby pins.
- Use matte-finish bobby pins that match your hair color to ensure they disappear into the braid.
- Do not attempt this if your workout involves excessive tumbling or heavy equipment that might catch on the loose strands.
4. The Messy Center-Part Rope Braid
Rope braids, or twists, are deceptively simple but incredibly strong. Instead of weaving three strands, you divide your hair into two sections and twist them tightly in the same direction before wrapping them around each other in the opposite direction. For a short bob, two thick rope braids starting from the center part offer a modern, clean look that mimics the durability of a rope.
The Science of the Twist
A rope braid creates a very tight, compact spiral that doesn’t loosen as easily as a standard three-strand plait.
- Ensure your twist is tight at the base; if the base is loose, the entire braid will sag within twenty minutes of activity.
- If your hair is fine, mist it with a dry shampoo or salt spray before twisting to add the necessary friction that prevents the hair from slipping.
- You can end these twists at the mid-point of your head and secure them into a mini-pigtail, keeping the rest of your hair free for a relaxed look that still manages your bangs.
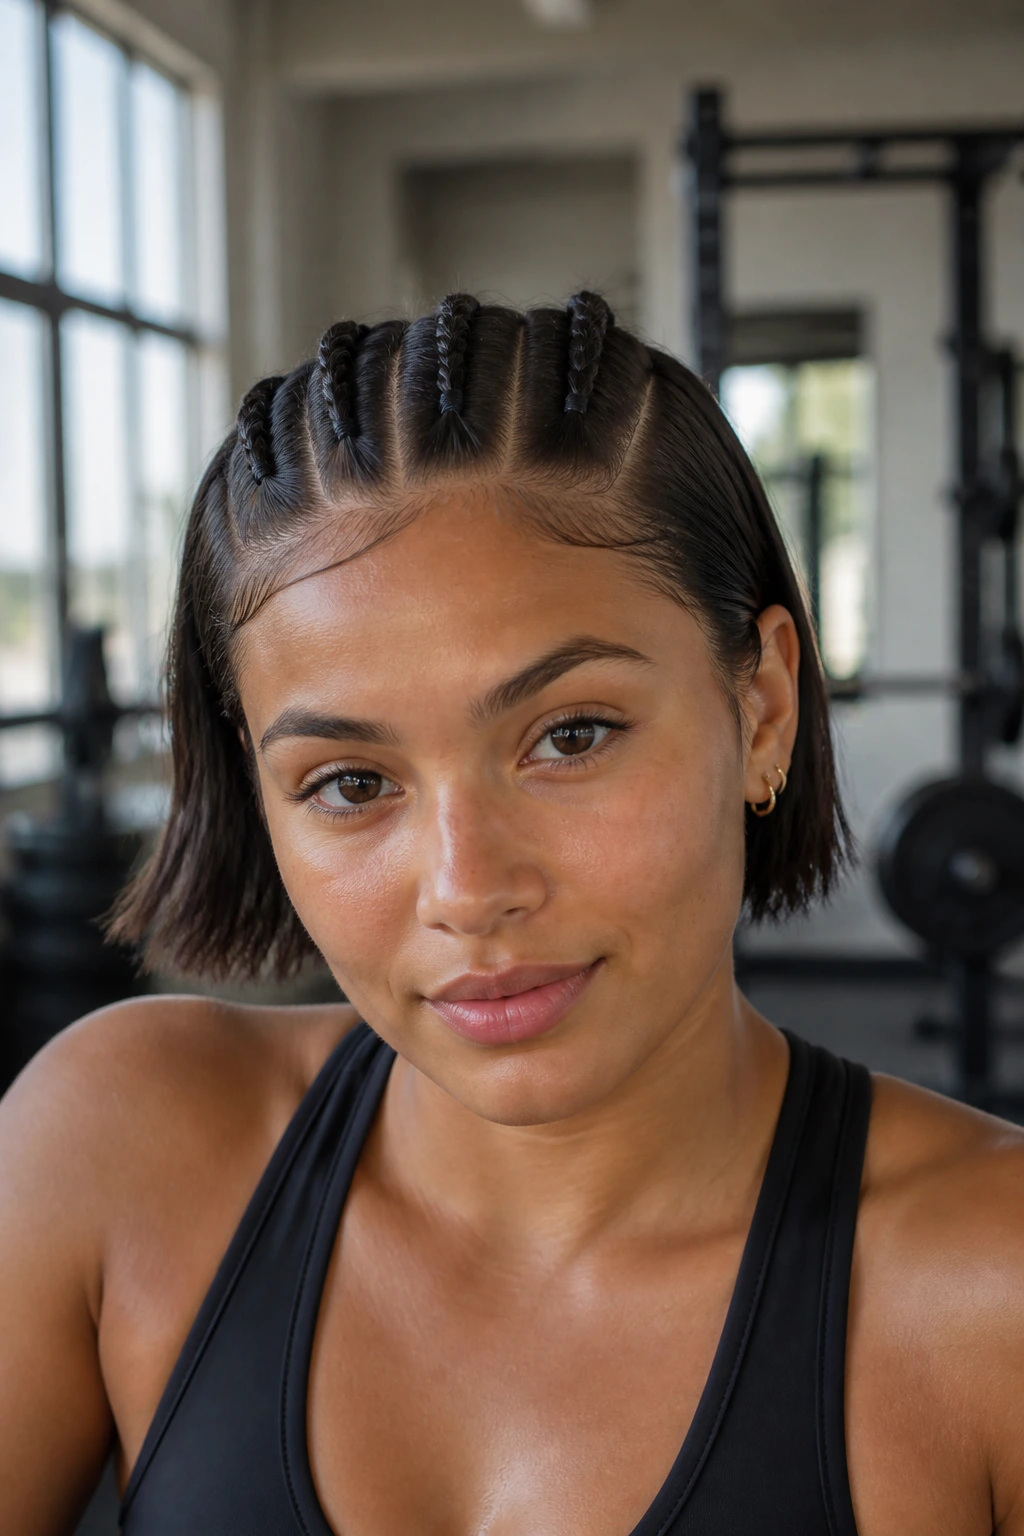
5. Micro-Braid Accents
Sometimes you want to keep your hair mostly down but need to prevent that one pesky section of bangs from flopping over your face. Micro-braids are essentially tiny, tight cornrows or plaits placed along the hairline. They are practically indestructible, serving as a permanent solution to hair-in-face syndrome during a high-intensity workout.
How to Integrate Them
You can place three or four micro-braids starting from the forehead and running back toward the crown.
- Use the tail-end of a comb to create perfectly straight parts for each micro-braid; crisp lines add to the athletic aesthetic.
- Since these are small, they won’t weigh your hair down or cause headaches, even after hours of wear.
- If you have curly hair, these are especially useful, as they stretch the hair slightly and prevent the “shrinkage” effect that can make shorter bobs feel unmanageable during a cardio-heavy session.
6. The Half-Up Braided Top-Knot
For the athlete who loves the security of a top-knot but finds that a full bun pulls too hard on their bob’s shorter layers, the half-up approach is the perfect middle ground. You braid the top section of your hair—the part that usually gets in your eyes—back into a small, tight knot at the crown.
Balancing Weight and Security
The goal here is to distribute the tension so that no single point of your scalp feels strained.
- Separate the top third of your hair from ear to ear.
- Braid this section backward, incorporating hair as you go, until you reach the crown.
- Wrap the remainder of the braid around its base to form a small, tight knot and secure it with a spiral pin, which is far more effective at holding buns than standard bobby pins.
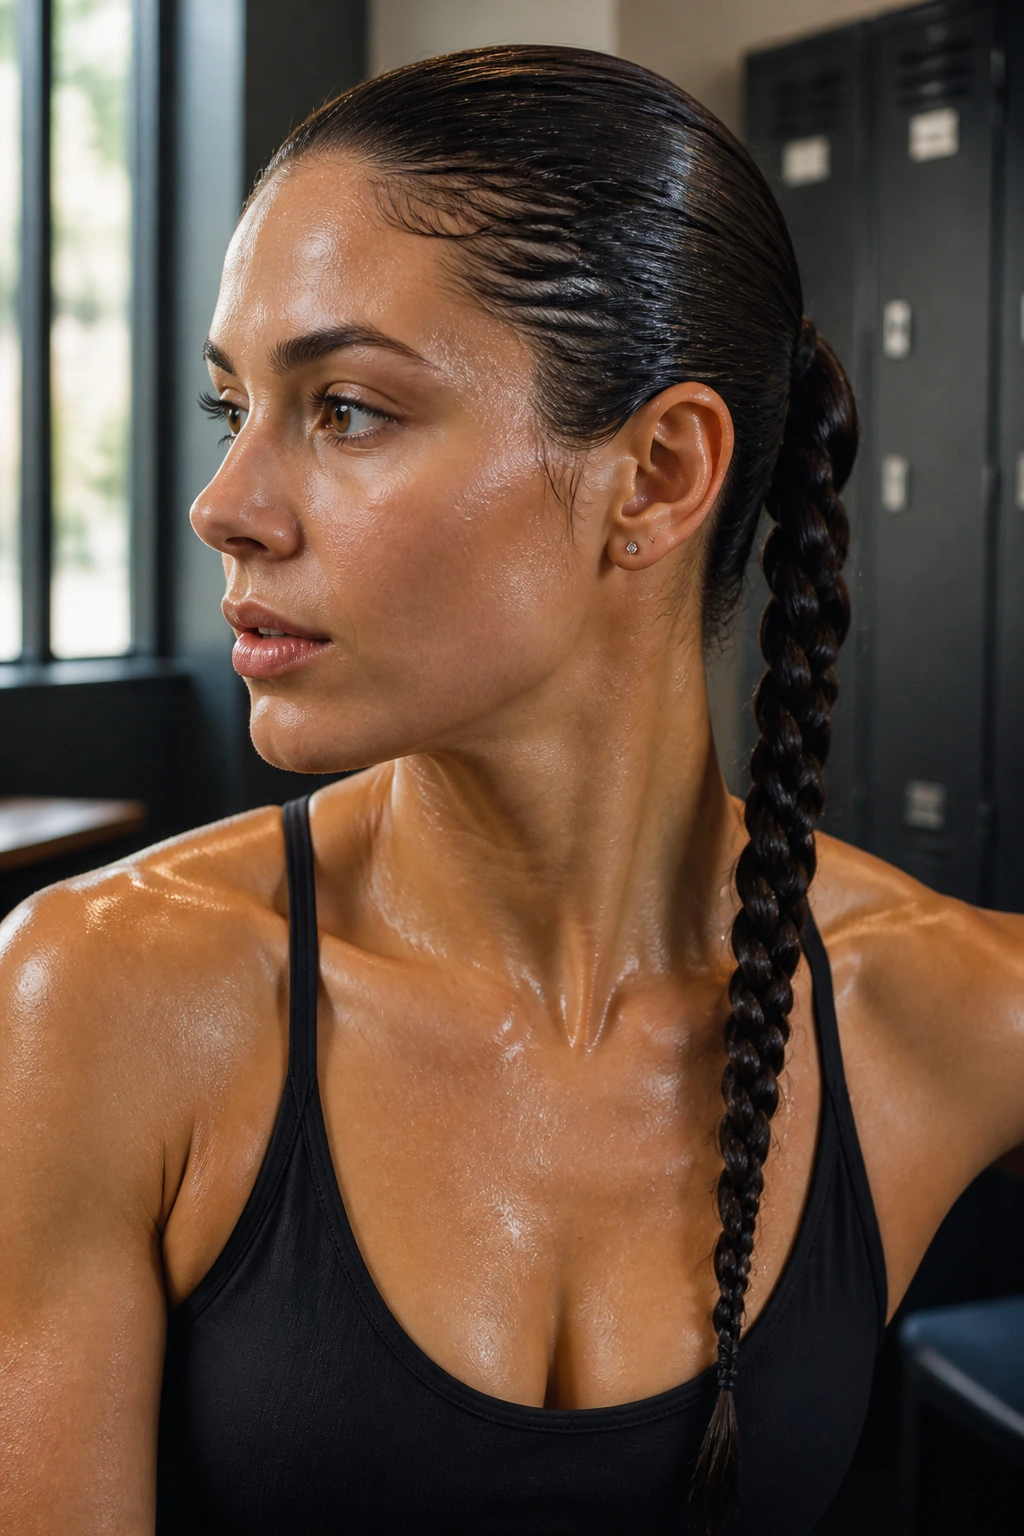
7. The Slicked-Back Braid Tail
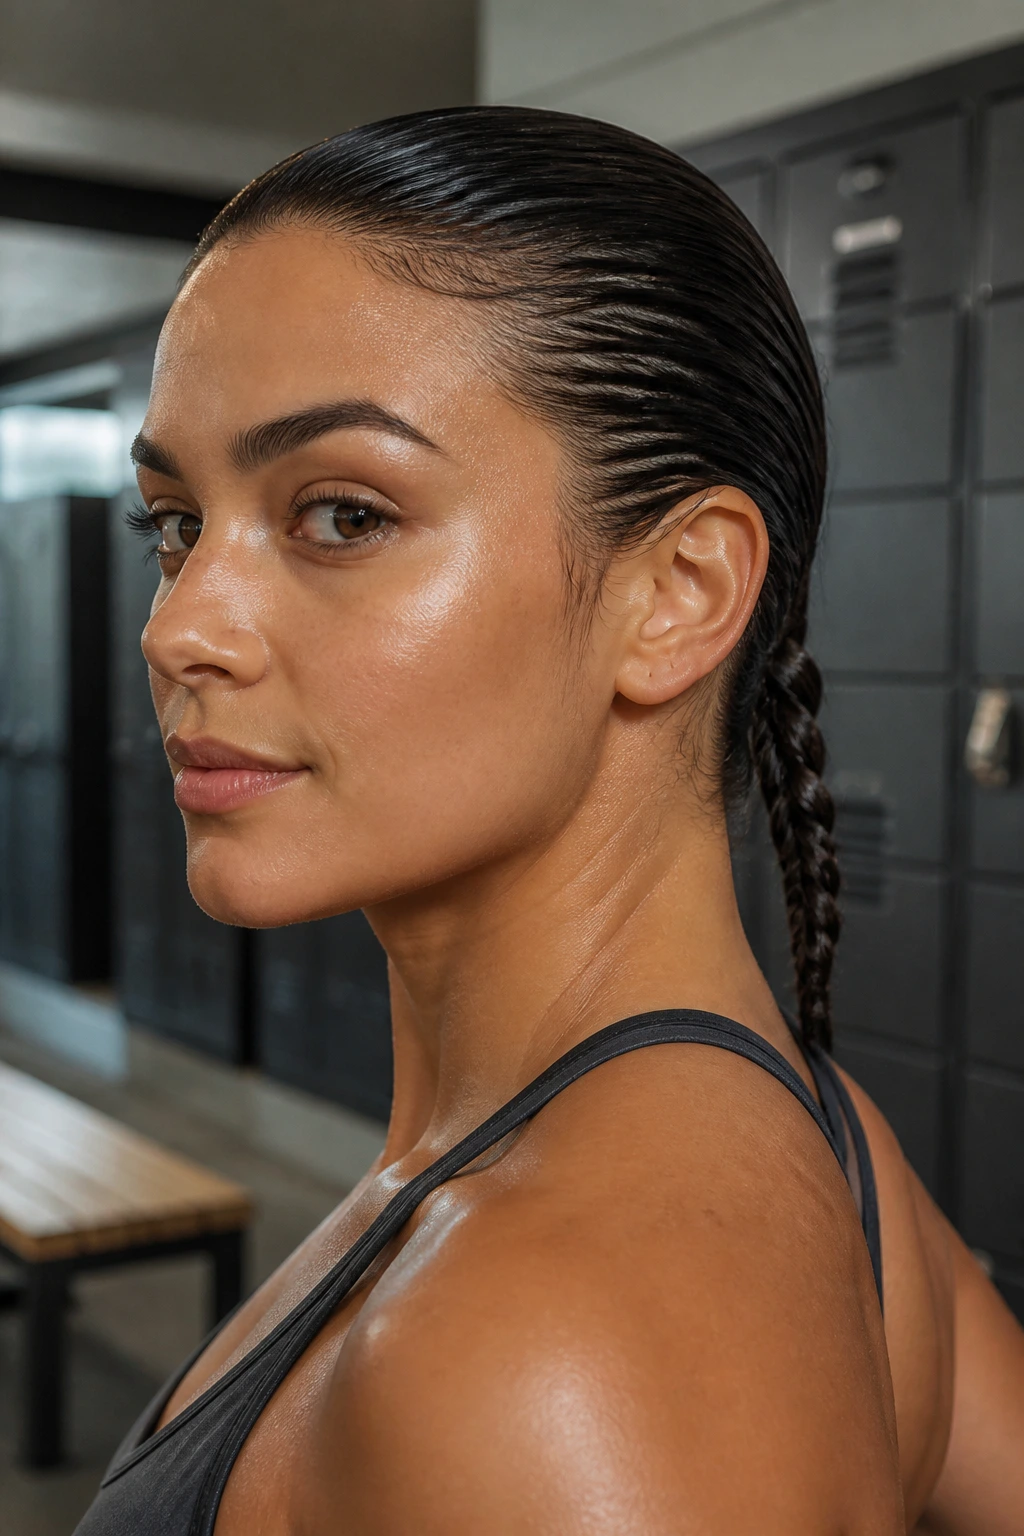
If your bob is just long enough to gather at the back, start with a heavy application of gel or pomade to slick your hair back into a low, tight base. Once the hair is smooth and secure against your scalp, finish with a single, ultra-tight braid at the nape. This creates a “sleek-meets-tough” look that is common in professional sports.
Why Slicking Matters
The product acts as a glue, preventing flyaways from escaping the braid as you sweat.
- Choose a non-flaking gel so you do not have to worry about white residue appearing as the product dries.
- This style is incredibly resilient against gym headbands, which often displace loose hair.
- If you are heading to a heavy lifting session, this is the safest option to ensure your hair never touches your face or equipment.
8. The Boho-Chic Side Braid with Headband
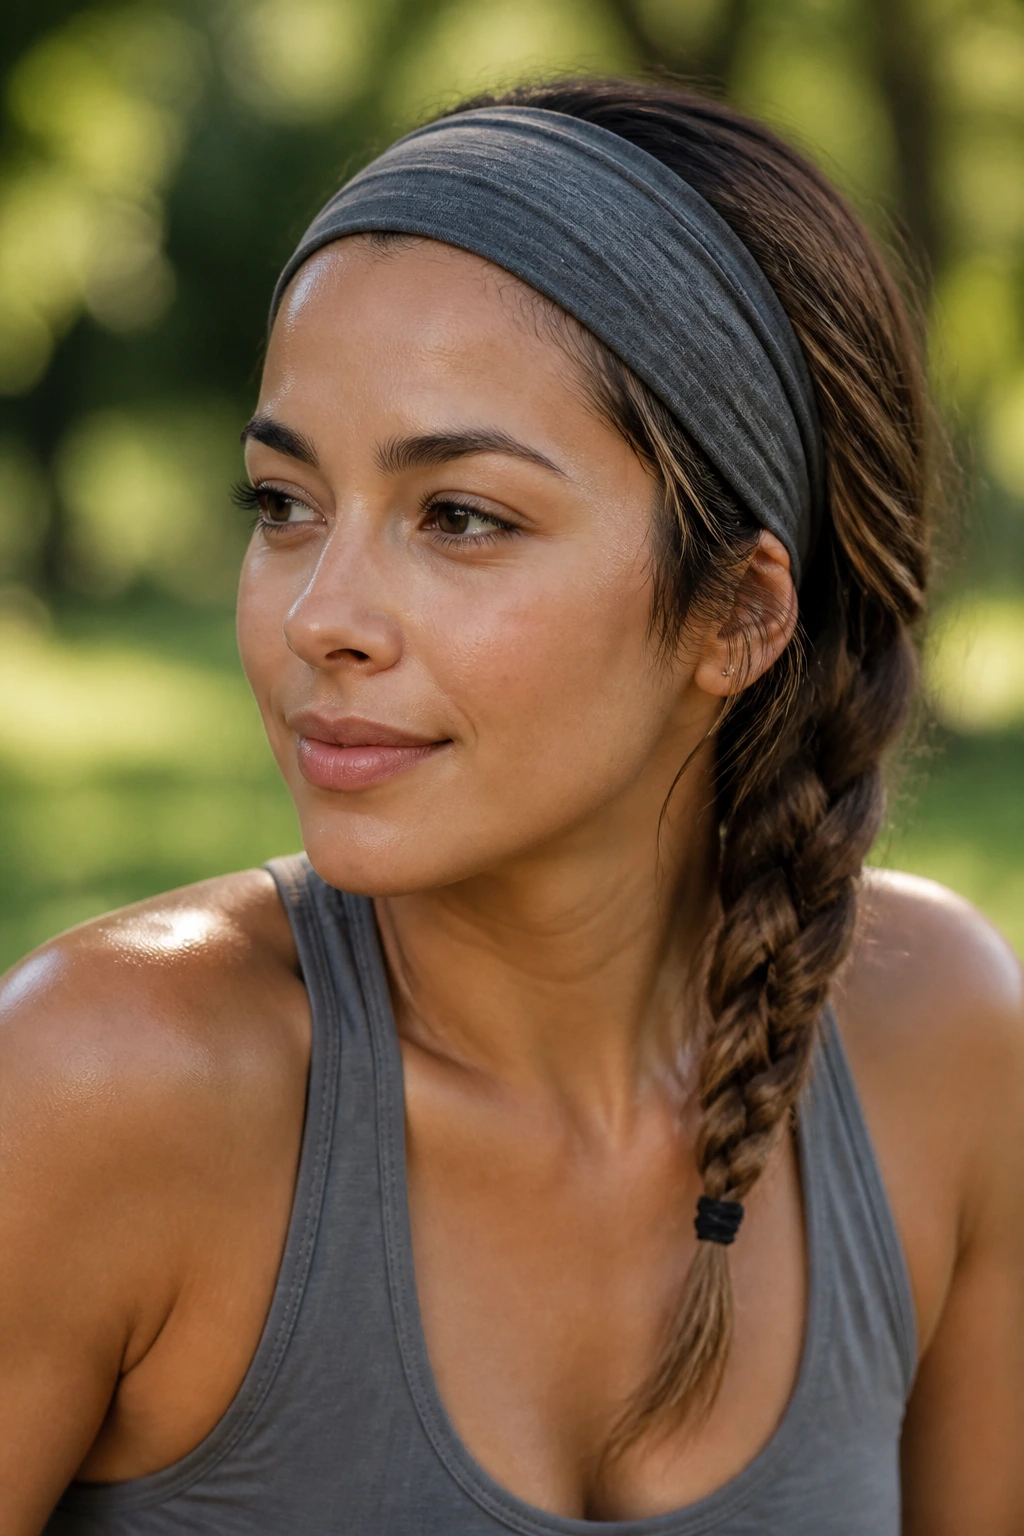
Sometimes the simplest solution is to use a high-performance accessory to help your hair stay put. A wide, moisture-wicking headband paired with a single, loose braid to one side allows for a relaxed look while keeping the hairline secure. This is ideal for lower-impact outdoor activities where you want to look put-together without an overly restrictive hairstyle.
The Role of the Accessory
The headband acts as the primary anchor for the front layers, while the braid provides the necessary structure for the length of the bob.
- Opt for a headband with a silicone grip on the inside to ensure it doesn’t slide backward when you lean forward.
- When braiding, incorporate small pieces of hair from under the headband to lock it into place.
- This combination is excellent for those who find that tight braids directly against the scalp cause irritation during long periods of movement.
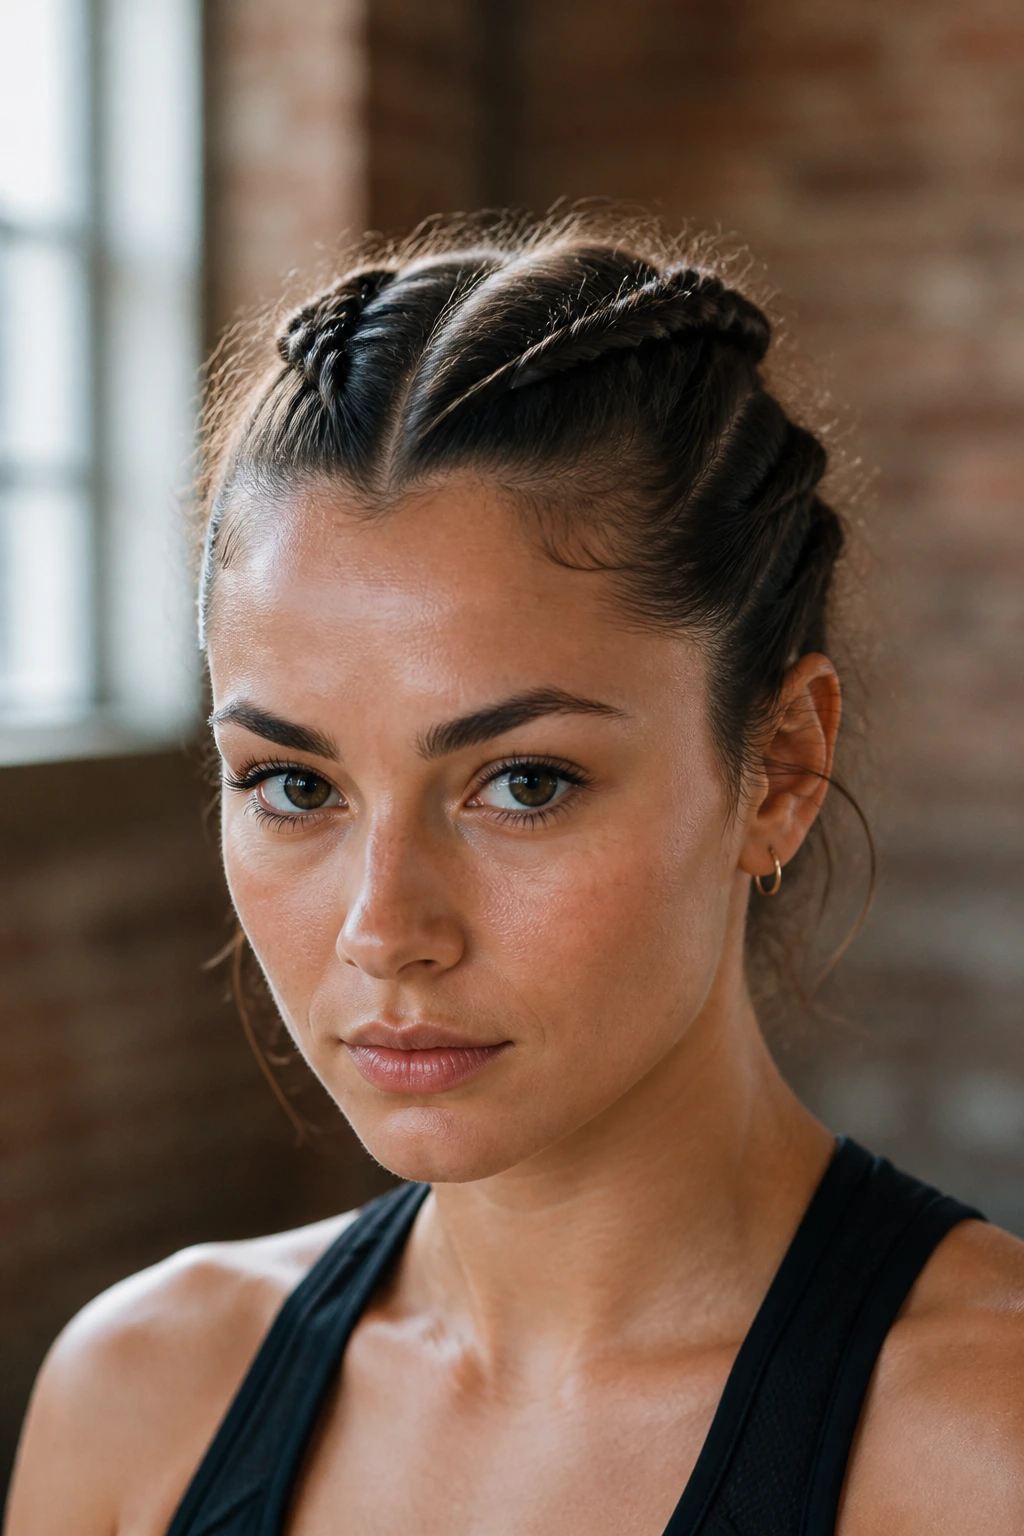
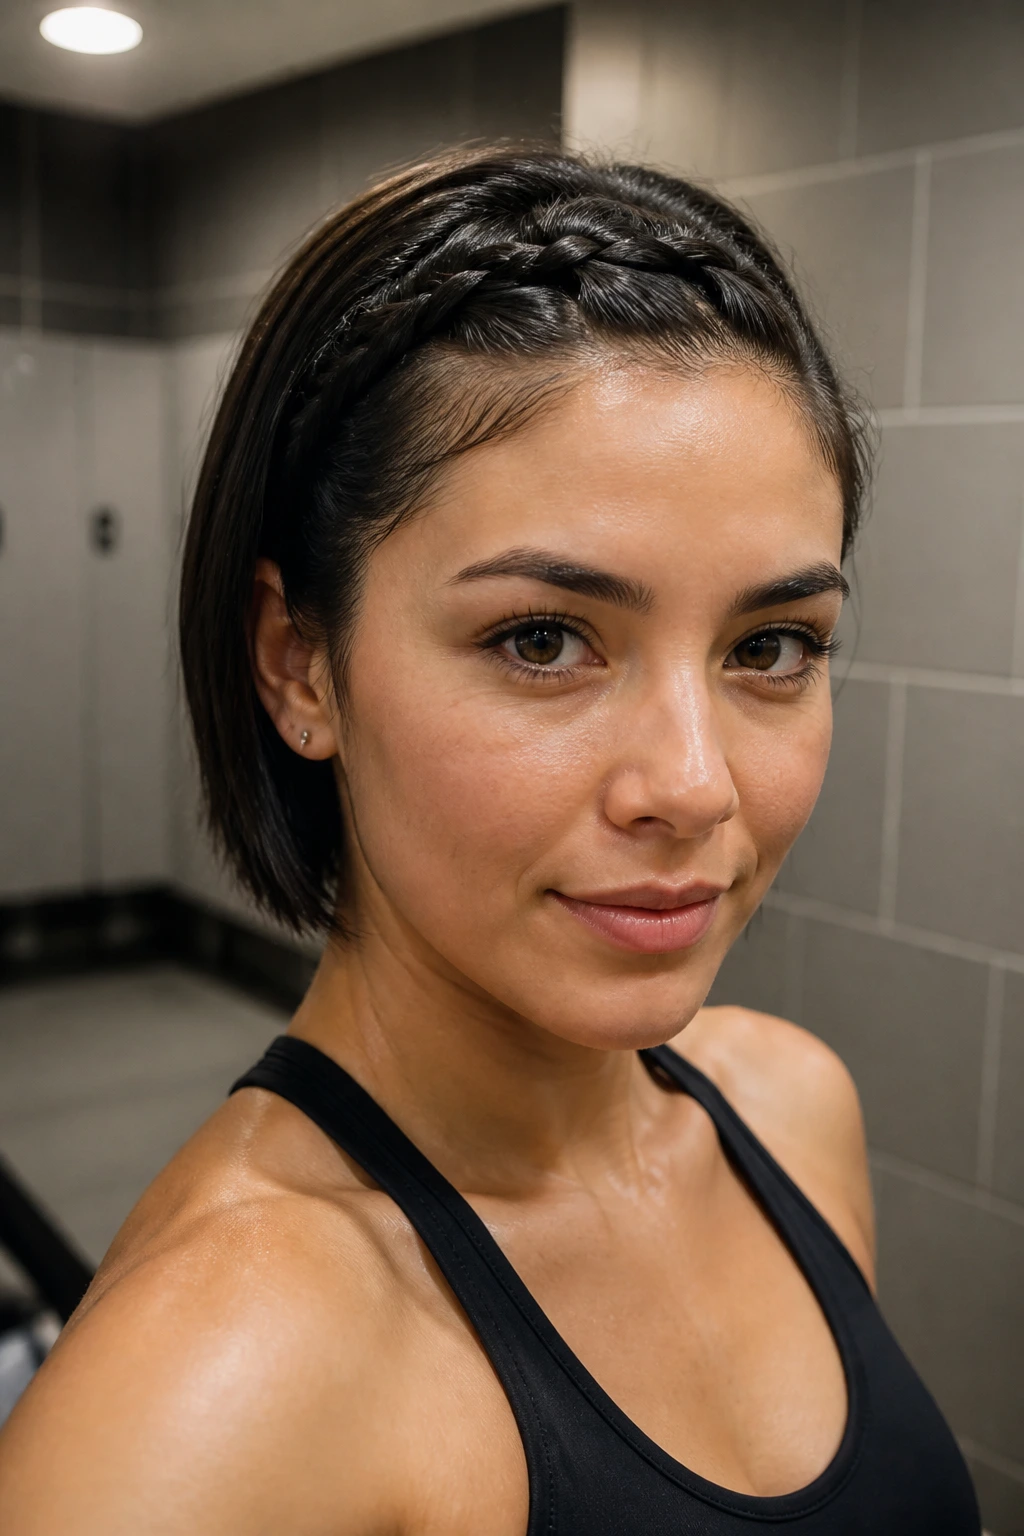
9. The Zig-Zag Parted Dutch Pigtails
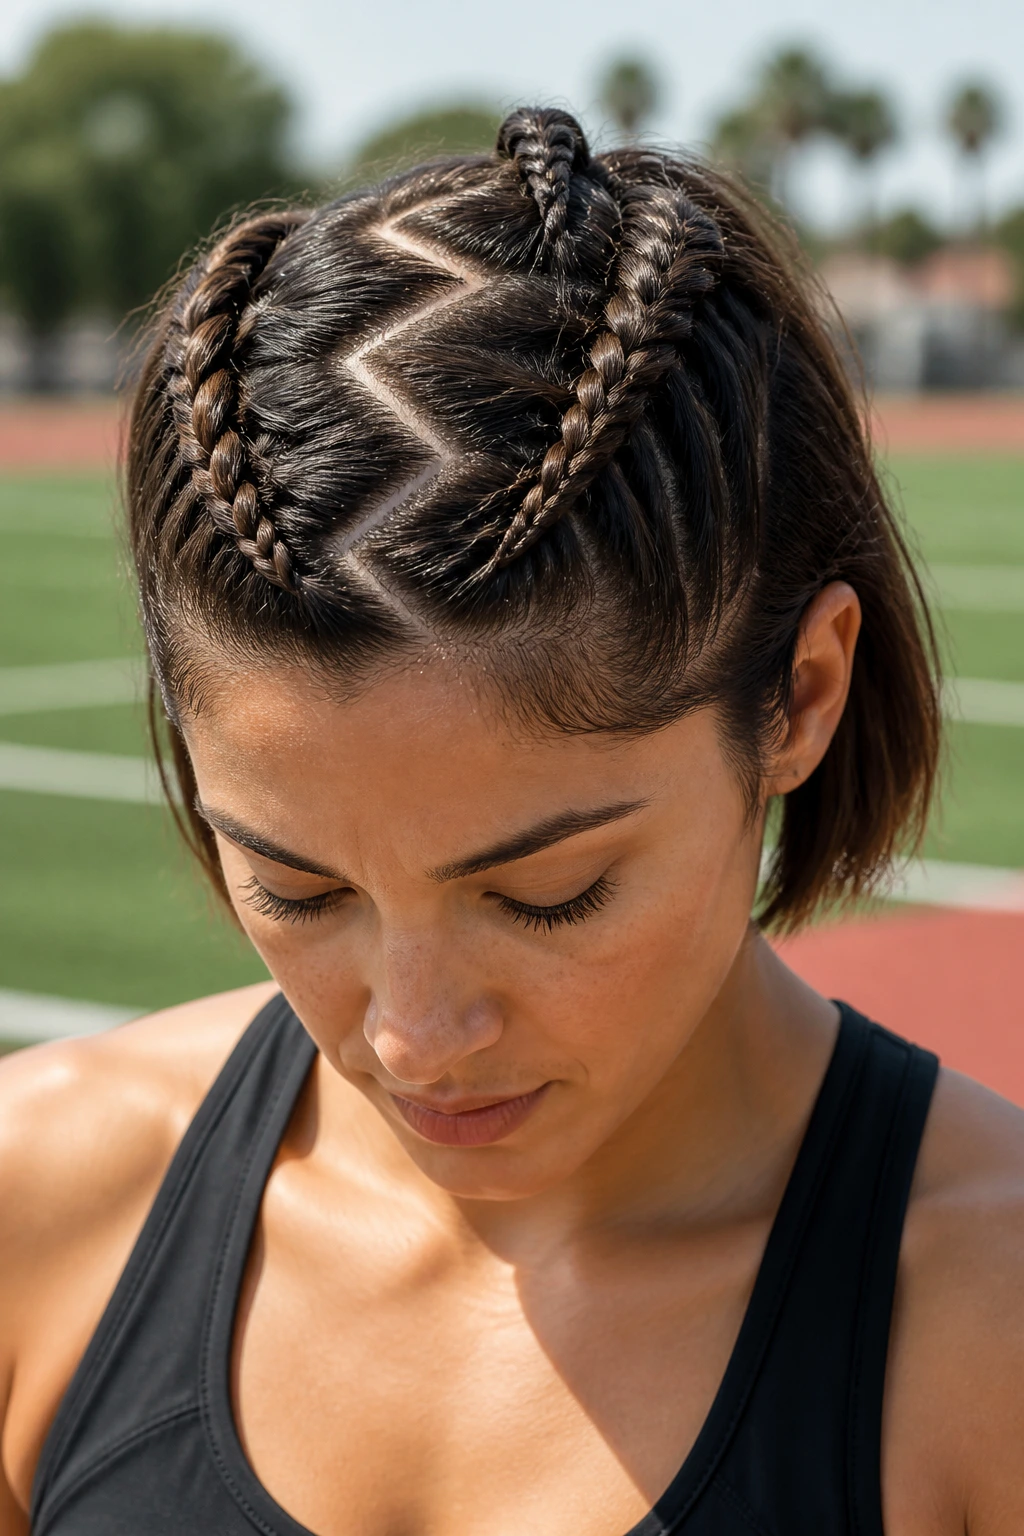
A zig-zag part is not just a style choice from a bygone decade; it is a tactical way to hide your scalp lines and add volume to your braids. By splitting your short bob into two sections with a diagonal, zig-zagging line, you ensure the weight of your hair is distributed evenly on both sides of the head.
Achieving the Precision Look
Precision parts help maintain tension and prevent the “saggy middle” look that often happens with shorter, layered cuts.
- Use the metal end of a teasing comb to draw the zig-zag.
- Keep the braids tight, but avoid pulling them so hard that they lift off the scalp, which makes them susceptible to getting caught on equipment.
- This is a fantastic look for team sports or activities where you want your hair to look intentional and well-styled rather than “gym-rushed.”
10. The Inverted Crown Braid
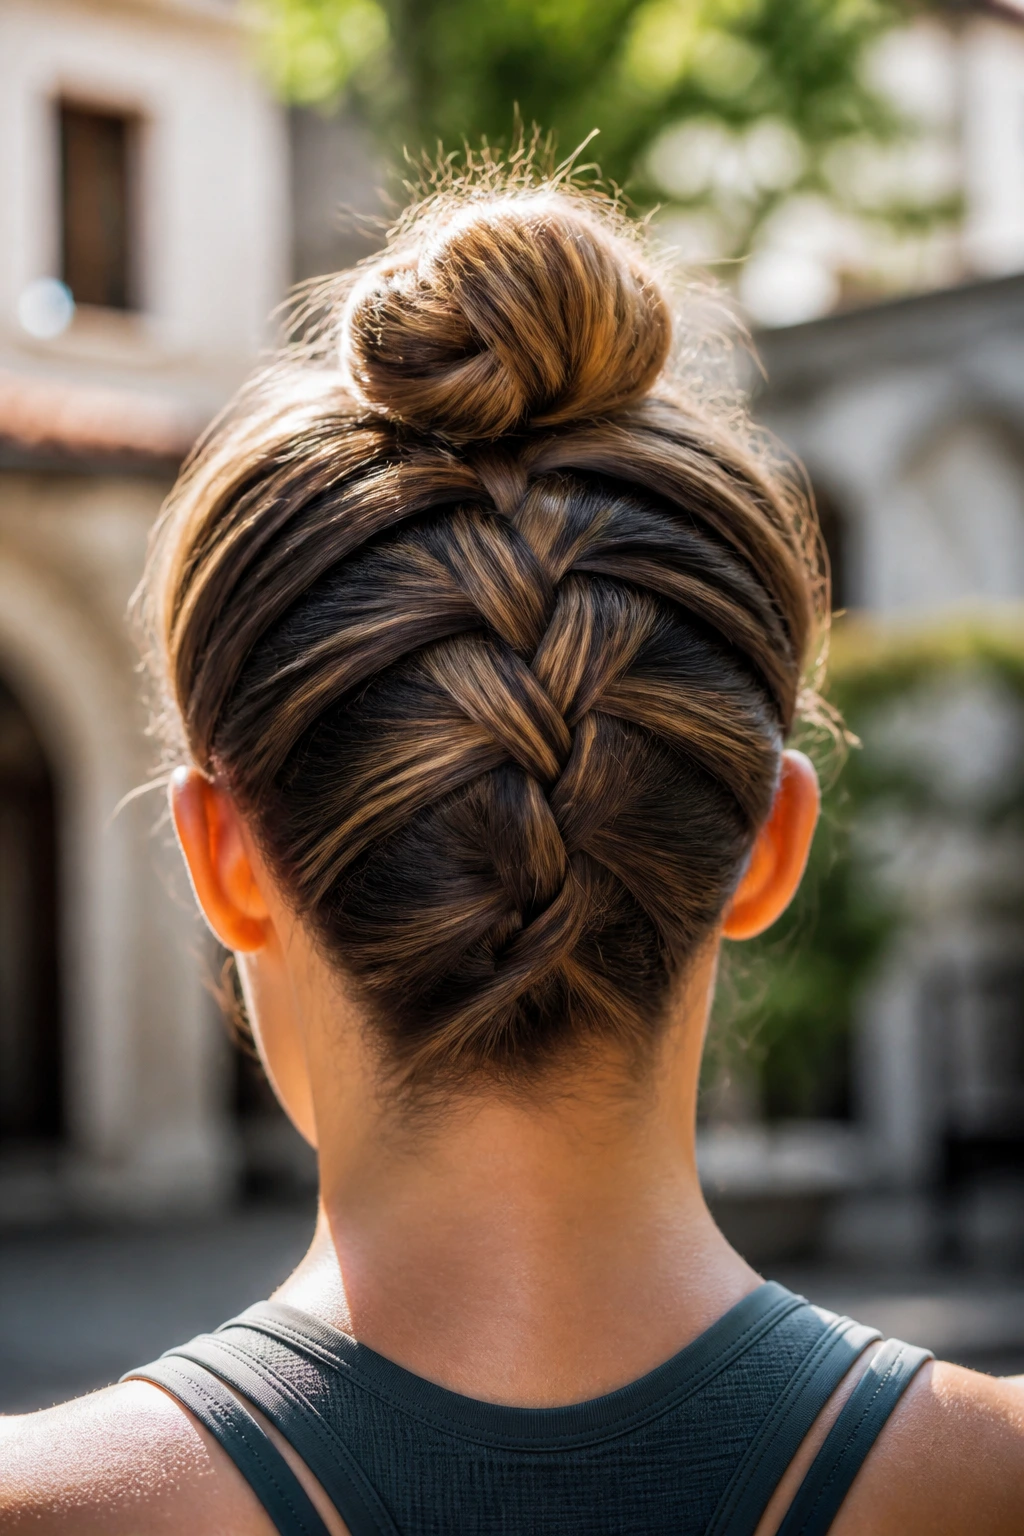
Most people braid from the forehead toward the back, but starting at the nape and braiding upward toward the crown—the “inverted” or “upside-down” braid—is a great way to secure the shorter layers at the back of a bob. These layers are usually the first to fall out of a standard style.
Mastering the Upward Weave
This requires a bit of practice. You essentially flip your head upside down, start your braid at the hairline near your neck, and work toward the top of your head.
- Once you reach the crown, gather the remaining length of the hair and secure it into a small bun.
- This style removes all hair from the neck, which is a game-changer for those who find hair on their skin distracting during intense cardio.
- The inverted weave is inherently tighter, making it one of the most secure ways to wear a shorter cut during high-motion exercises like boxing or jump rope.
11. The Single Braided Bang
If your bob features bangs or face-framing layers, they are often the most frustrating part of a workout. They get stuck to your forehead, they get in your eyes, and they require constant adjustment. A single, tight French braid that starts at your part and runs horizontally across your forehead—integrating only your bangs—solves this immediately.
Why It Beats Clips
Clips and bobby pins eventually slide out as your hair gets damp with sweat.
- A braid is woven into the structure of your hair, meaning it cannot “slide out” until the braid itself is loosened.
- Keep this braid small and tight to ensure it doesn’t flop over your eyes during downward-facing movements.
- You can pin the tail of this braid behind your ear, completely removing it from your visual field for the duration of your session.
12. The Multi-Strand “Boxer” Braids
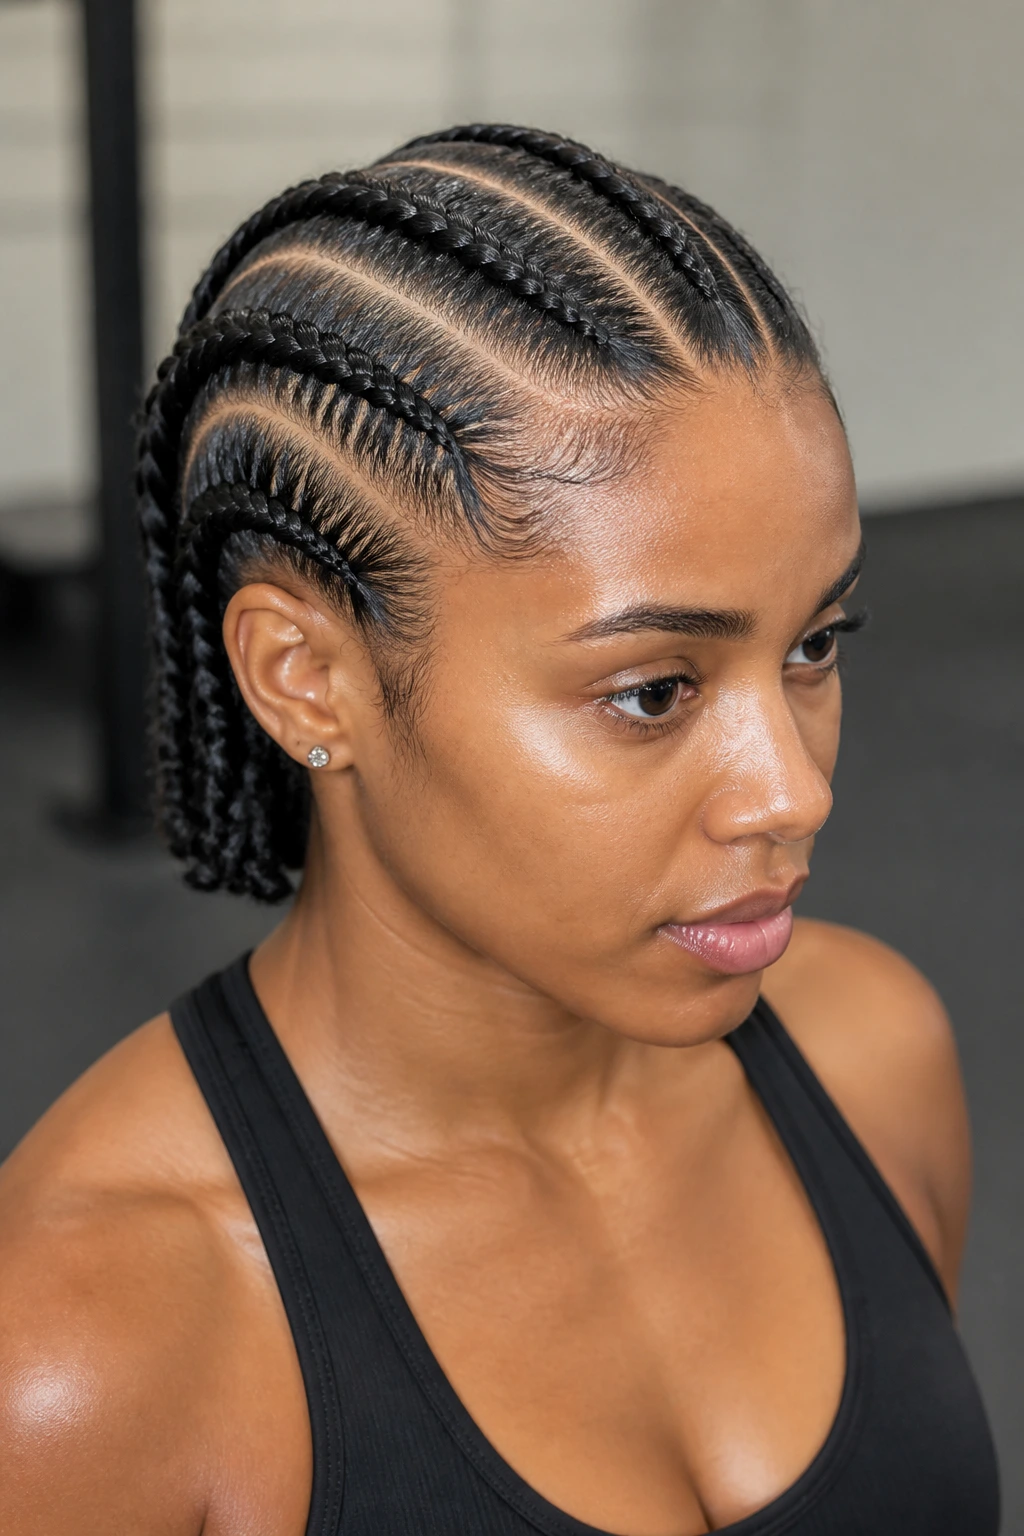
For a bob that is just long enough, three or four small, tight braids running from the front to the back provide an intense level of security. Think of them as a customized version of professional boxer hair. The more braids you have, the more the tension is spread across your scalp, which actually makes the style more comfortable over long periods.
Distribution of Tension
Many people think one big braid is the most secure, but for shorter hair, multiple smaller braids are far more stable.
- You have less hair per braid, which means the “anchor” (the elastic at the end) isn’t under as much stress.
- This style allows for a very sleek, high-fashion look that transitions perfectly from the gym to the rest of your day.
- To keep the parts looking clean, use a dab of hair oil on the scalp between the braids, which helps keep the skin hydrated and the parts visible.
13. The Braided Mohawk-Style Bun
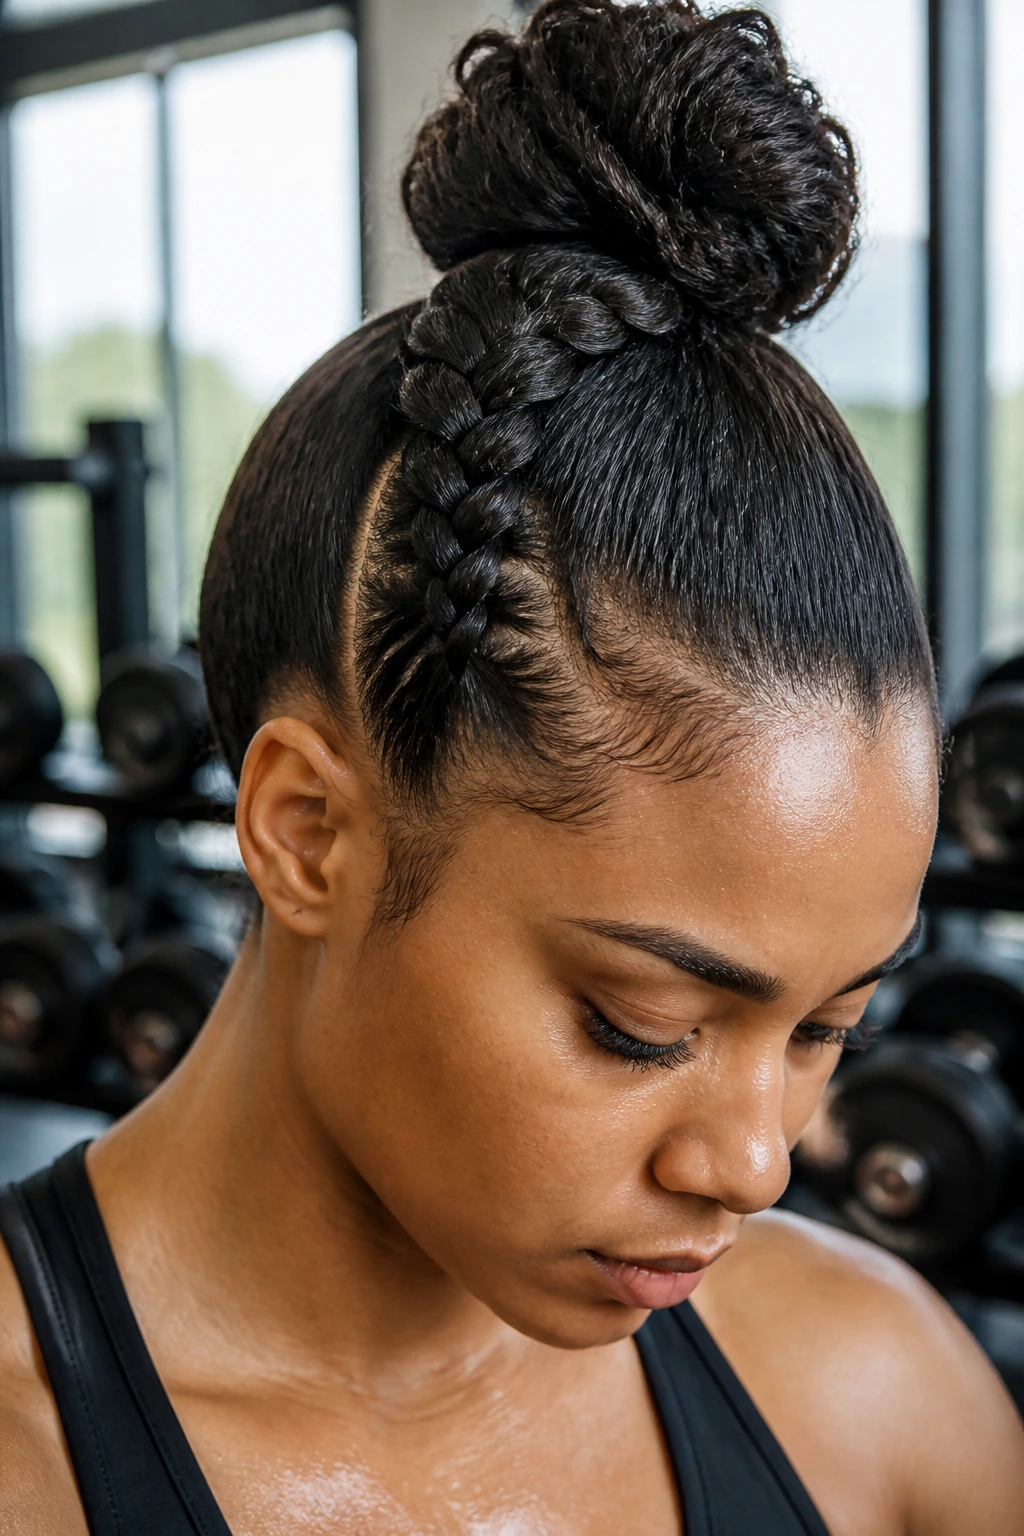
If you want to inject some personality into your workout look, a single, thick, inverted braid down the center of your head that leads into a top-knot is a strong, bold look. This keeps the sides of your head clean and tight, while the center braid keeps your hair contained and elevated.
Constructing the Mohawk
The key here is starting the braid exactly at the hairline and keeping it extremely tight.
- You want the braid to sit high, almost like a ridge, which helps keep the hair away from your ears and sides of your face.
- Once you reach the crown, coil the remaining hair into a tight, secure bun.
- This style works exceptionally well for thick-haired individuals whose bob might otherwise feel too bulky during a workout.
14. The Loose Side-Part Twist
Sometimes a full braid is overkill for a 30-minute light workout. A simple, tight twist starting at the side part and moving toward the back of the head is a quick way to keep your hair off your face. It takes about thirty seconds to execute, making it ideal for those who head to the gym directly from a busy morning.
Improving the Grip
A twist needs more help than a braid to stay in place.
- Use a small amount of texture paste—not a cream, which can be too slippery—to ensure the hair sections “grab” each other.
- Secure the twist with a single, high-quality bobby pin rather than an elastic for a more “undone” and stylish look.
- This style is best for activities where you won’t be doing constant jumping, as the twist can relax over time.
15. The Criss-Cross Braided Headband
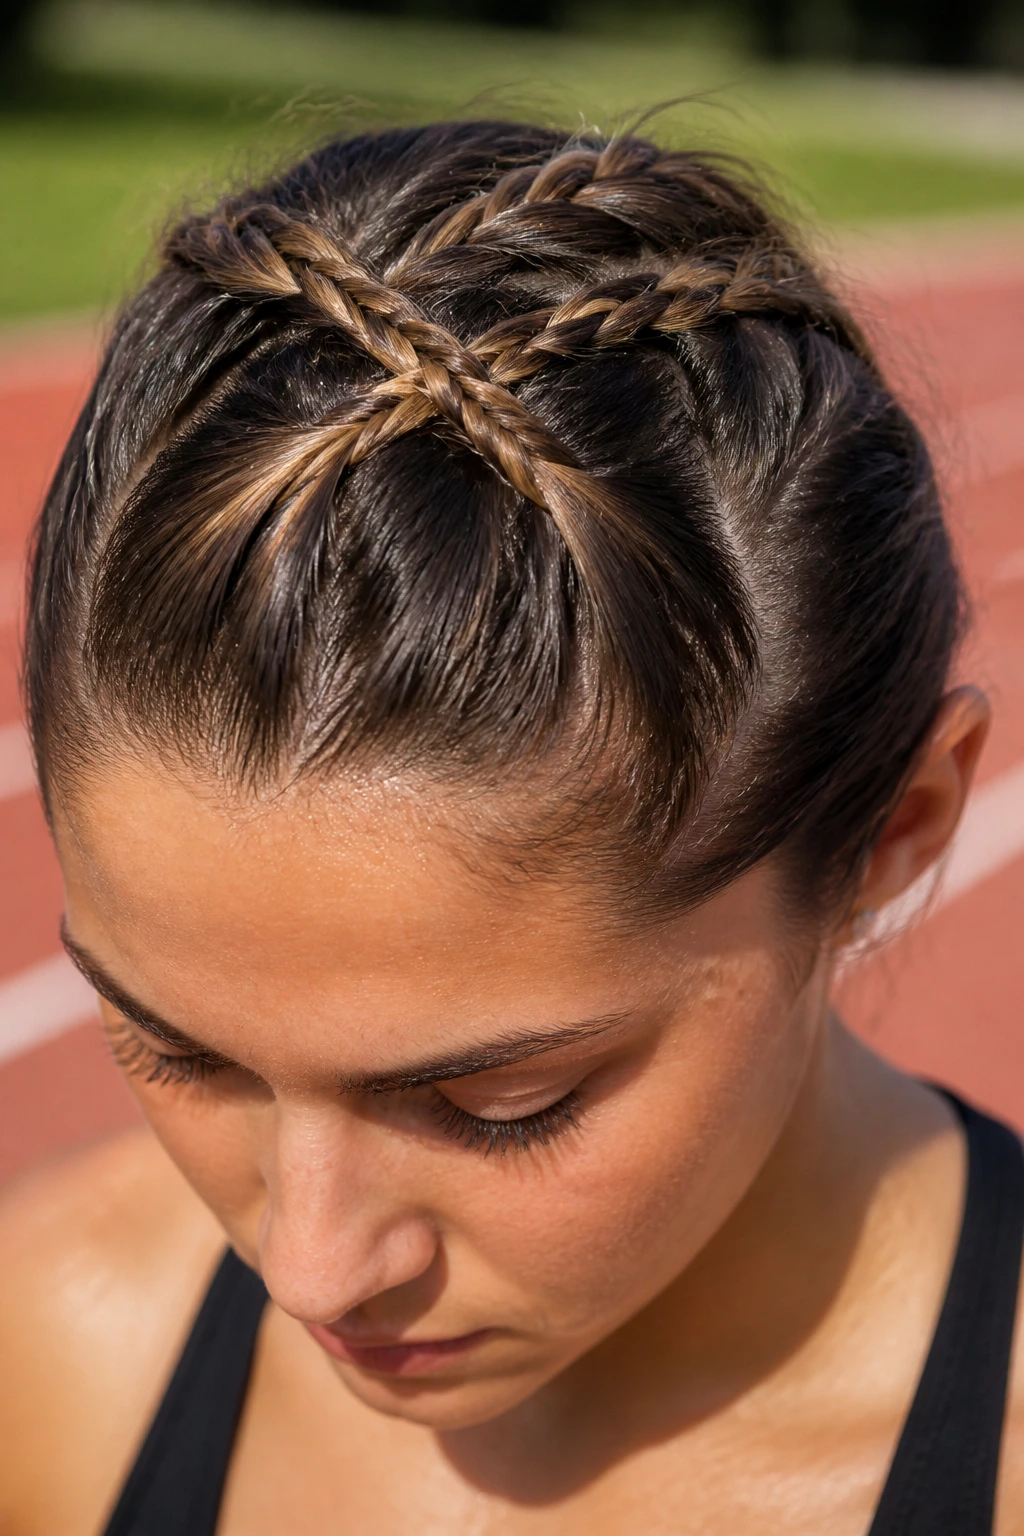
Create an “X” pattern with two small braids on the top of your head to act as a permanent, non-slip headband. This is a highly functional style for those with bobs who are tired of plastic headbands that constantly slide off mid-workout.
Designing the “X”
Part your hair in the middle, then take a section from the left side to braid toward the right, and vice versa.
- The intersection point should be right at your crown, where you can secure the two braids with a small, discreet elastic.
- This style creates a built-in frame for your face, keeping hair away from the eyes while maintaining a stylish, intentional look.
- It is particularly effective for outdoor runners who need to keep hair out of their face in windy conditions.
16. The “Bubble” Braid Pigtails

If you aren’t a master braider, “bubble” braids are your best friend. Instead of weaving, you use a series of small elastics to create “bubbles” of hair down the length of your pigtails. This creates a similar aesthetic to braids but is much faster and often holds up better for those with slippery, fine hair.
Creating the Bubbles
- Start by putting your hair into two low pigtails.
- Add an elastic every two inches down the length of the pigtail, pulling the hair between the elastics outward to create the “bubble” effect.
- This keeps the hair compressed and secure, preventing the movement that usually causes bobs to tangle during a workout.
- The use of multiple elastics means that even if one breaks, the rest of the style holds.
17. The Braided Nape-Twist

This is an excellent option for a very short bob that cannot be fully braided. By braiding just the bottom layer of hair at the nape of the neck—where you would usually get hot or irritated—and twisting the top section back into a pin, you create a cool, ventilated style that stays put.
Focusing on the Nape
- This prevents that “sweaty neck” feeling which is a common complaint for those with bob haircuts.
- By combining the braid with a twist or a clip for the top layers, you ensure the style looks intentional.
- This is a fantastic “hybrid” style that utilizes the best of both braiding and pinning.
18. The Crown Braid with a Modern Tuck
Take your bob, create a standard crown braid, but instead of finishing the ends, tuck them securely under the braid itself. This eliminates the need for elastics entirely, which can sometimes be the weakest point of a hairstyle during a high-intensity workout.
Mastering the Seamless Tuck
- You will need a significant amount of bobby pins to keep the ends hidden and secure.
- Use high-tension pins that are slightly wider than standard ones to grab more hair.
- This look is extremely polished, almost like a formal updo, but it handles a workout session with the resilience of a military-grade style.
19. The Wet-Look Braid
If you are worried about your hair being unruly, embrace the “wet look” by applying a strong-hold styling gel before braiding. The gel doesn’t just hold the style; it creates a protective barrier that keeps your hair together through sweat, humidity, and movement.
Choosing the Right Gel
- Look for gels that contain proteins, which can actually strengthen your hair while you are exercising.
- The wet look is a deliberate style choice that looks great even after you have finished your workout and are heading to get a smoothie or run errands.
- It removes all “fuzz” and flyaways, giving you a sharp, clean-cut appearance that is very popular in modern athletic fashion.
20. The Micro-Pigtail Braids
For a youthful, high-energy vibe, divide your hair into four sections and create four small, tight braids. This is perhaps the most secure style possible for a short bob. The small volume of hair in each braid means there is almost zero “swing” or “pull,” making it the ideal choice for activities like gymnastics or high-level CrossFit.
Maximizing Security
- Because you have four separate anchors, the hair is under very little stress per section.
- You can pull these braids into a single low ponytail at the end for an extra layer of stability.
- This style is virtually unbreakable, ensuring that no matter how much you flip, jump, or move, your hair remains exactly where you put it.
Final Thoughts
The transition from a standard bob to a workout-ready, braided masterpiece is less about skill and more about understanding how your hair reacts to tension and movement. Whether you choose the structural strength of a Dutch braid or the ease of bubble pigtails, the key is to prioritize security over aesthetics. If your hair is locked down correctly, you can stop focusing on your appearance and put that energy exactly where it belongs—into your workout. Remember to work with your hair’s natural texture, use the right amount of product to give yourself the necessary grip, and never underestimate the power of a well-placed bobby pin. Once you find the style that fits your specific hair length and your preferred activity, you’ll never have to worry about your hair getting in the way of a new personal best again.