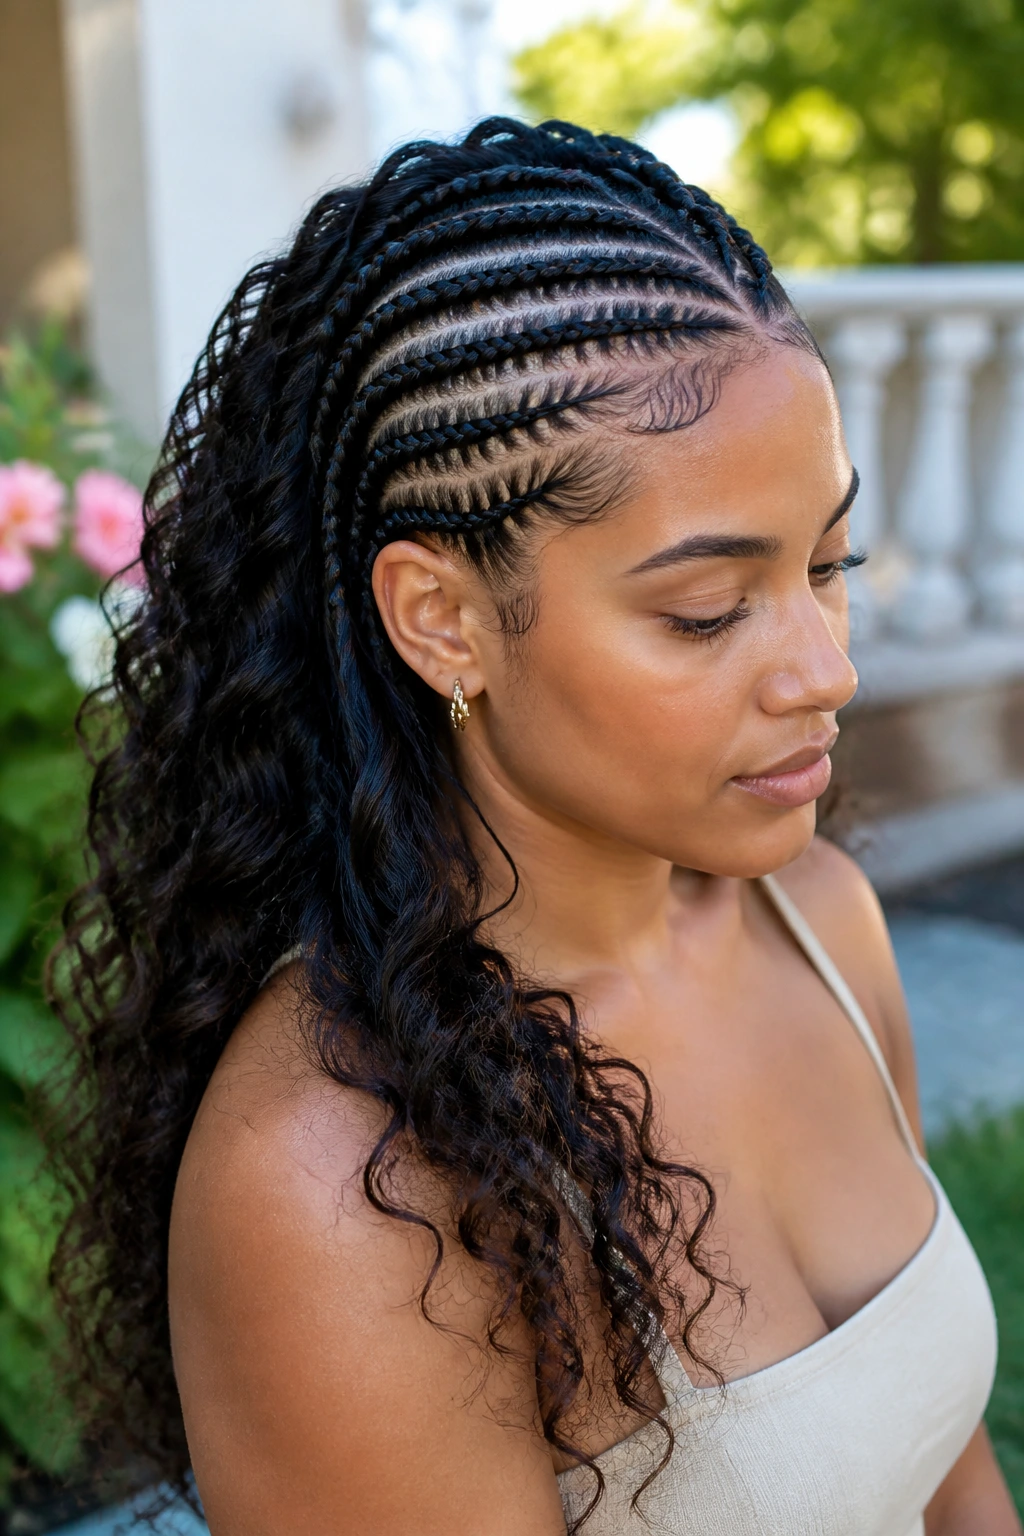
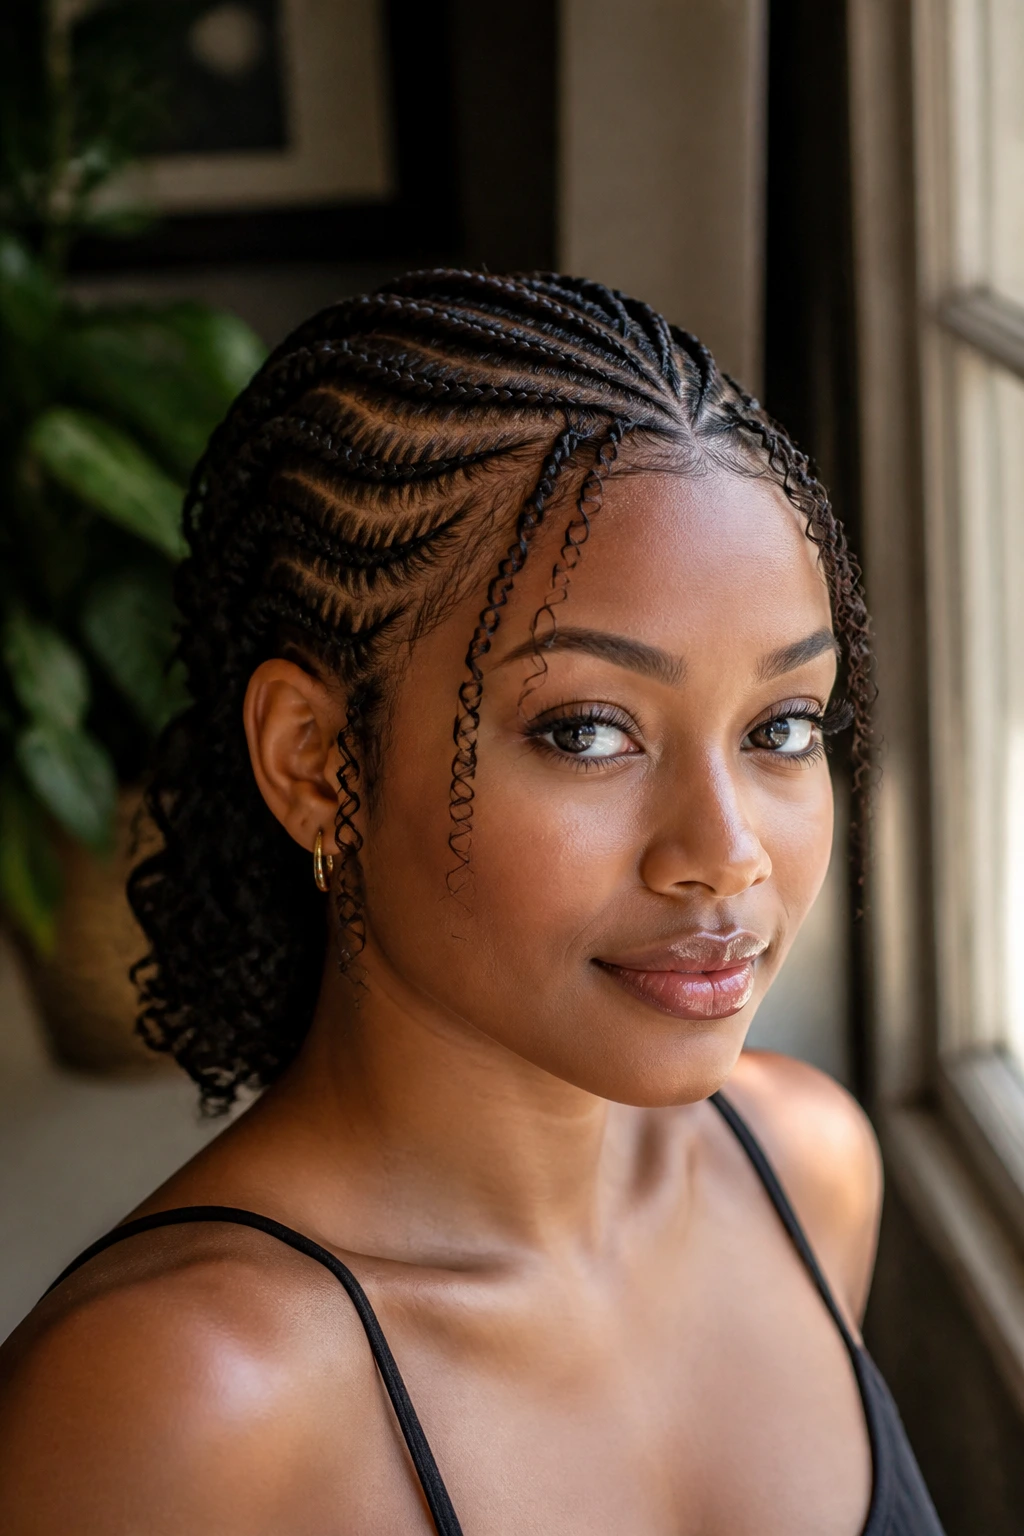
The allure of freehand cornrows lies in their ability to bridge the gap between structured protection and pure artistic expression. When you work with curly hair textures, you are not just managing strands; you are navigating a landscape of natural volume, coil patterns, and varying density. Traditional cornrows often demand rigid, geometric partings that can pull too tightly on the delicate edges or scalp. Freehand designs, however, favor fluidity. They allow the stylist to follow the natural growth direction of the hair, leading to less tension and a look that feels far more organic to the wearer.
Many people shy away from intricate braiding because they fear the damage that comes from excessive pulling or the “stiff” look that often follows a day at the salon. If you approach this with a light touch and an understanding of hair health, freehand cornrows become one of the most versatile tools in your repertoire. You can transition from a casual gym look to an elegant, evening-ready updo without ever taking the braids out. The key is in the sectioning and the tension control, which we will break down through these twenty-eight distinct design approaches.
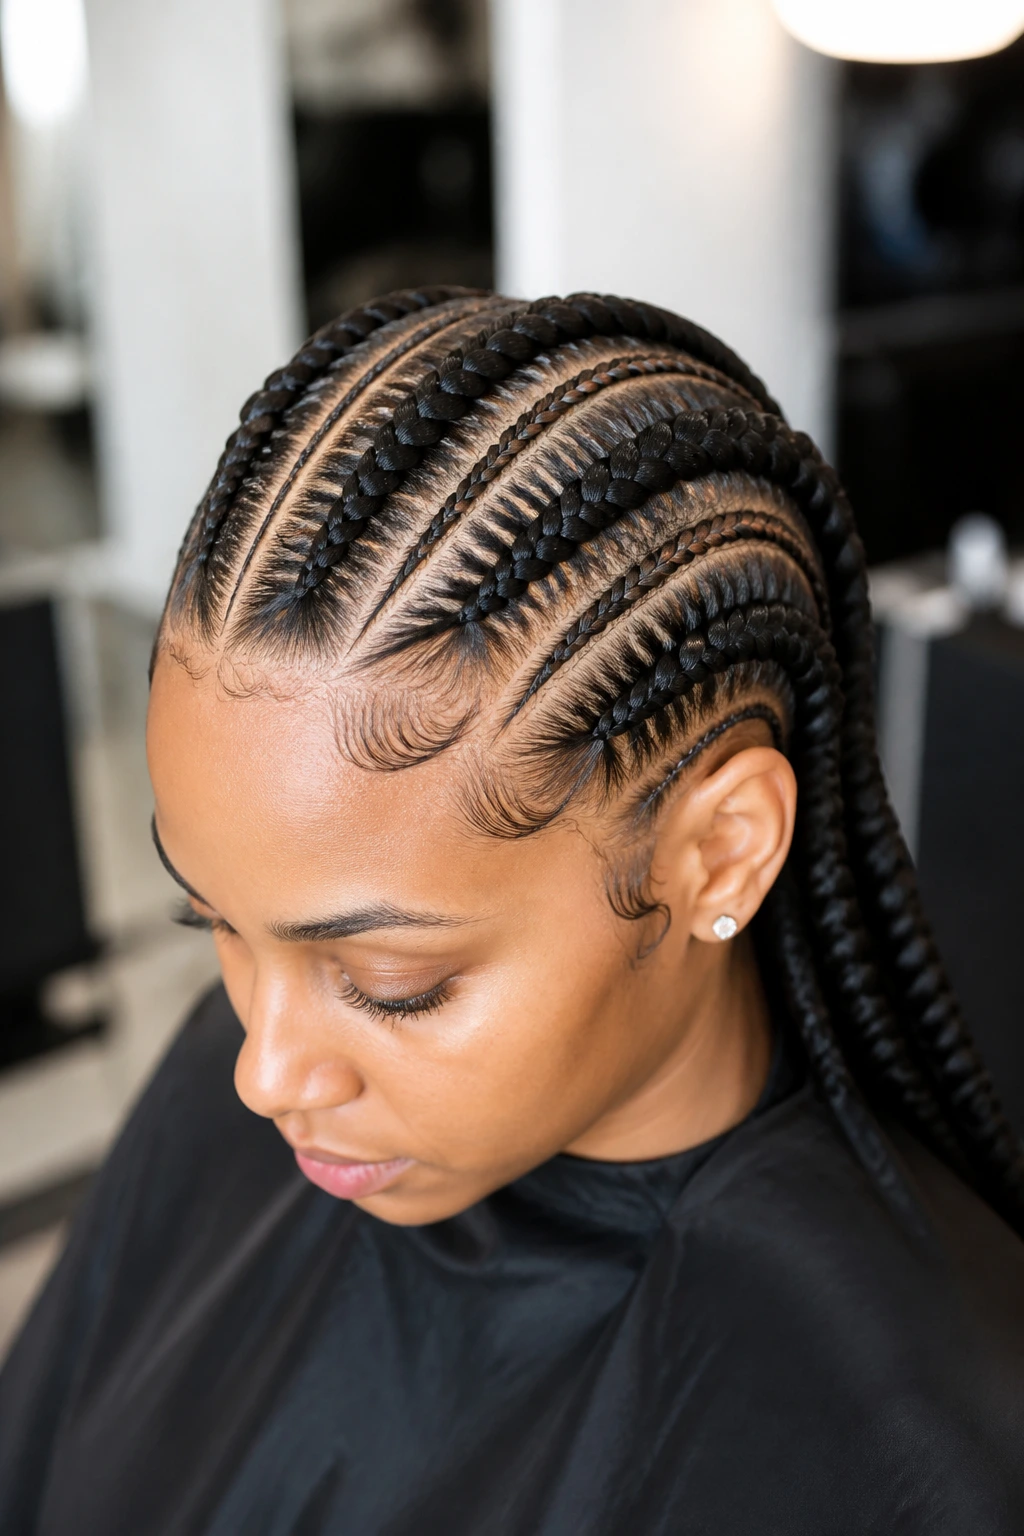
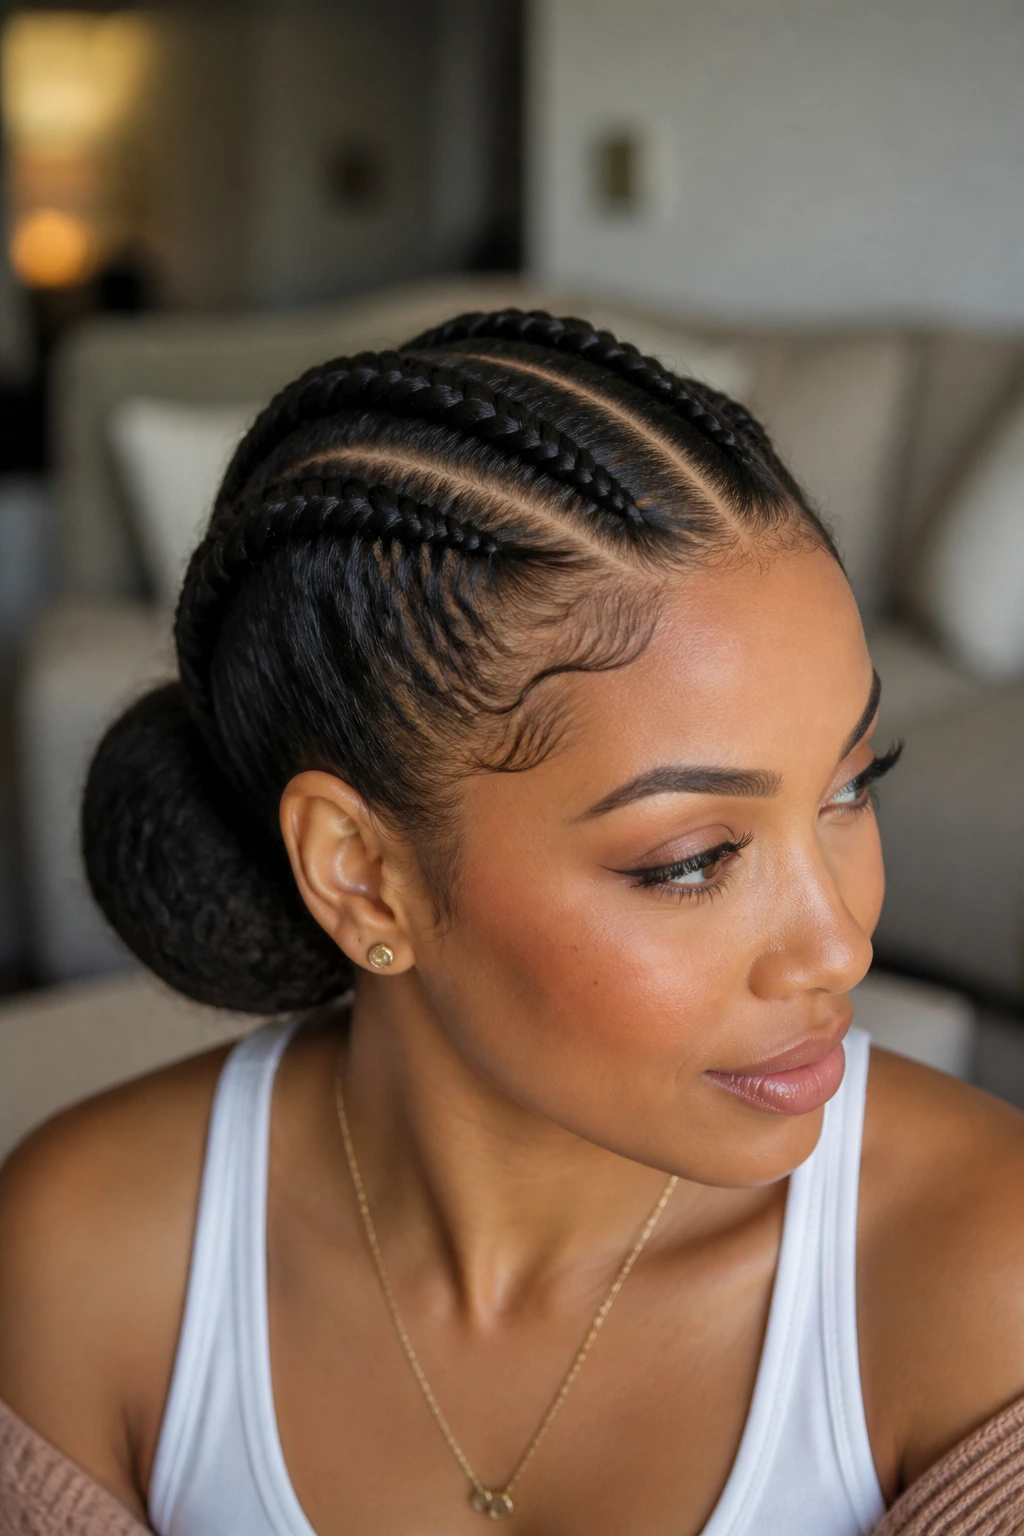
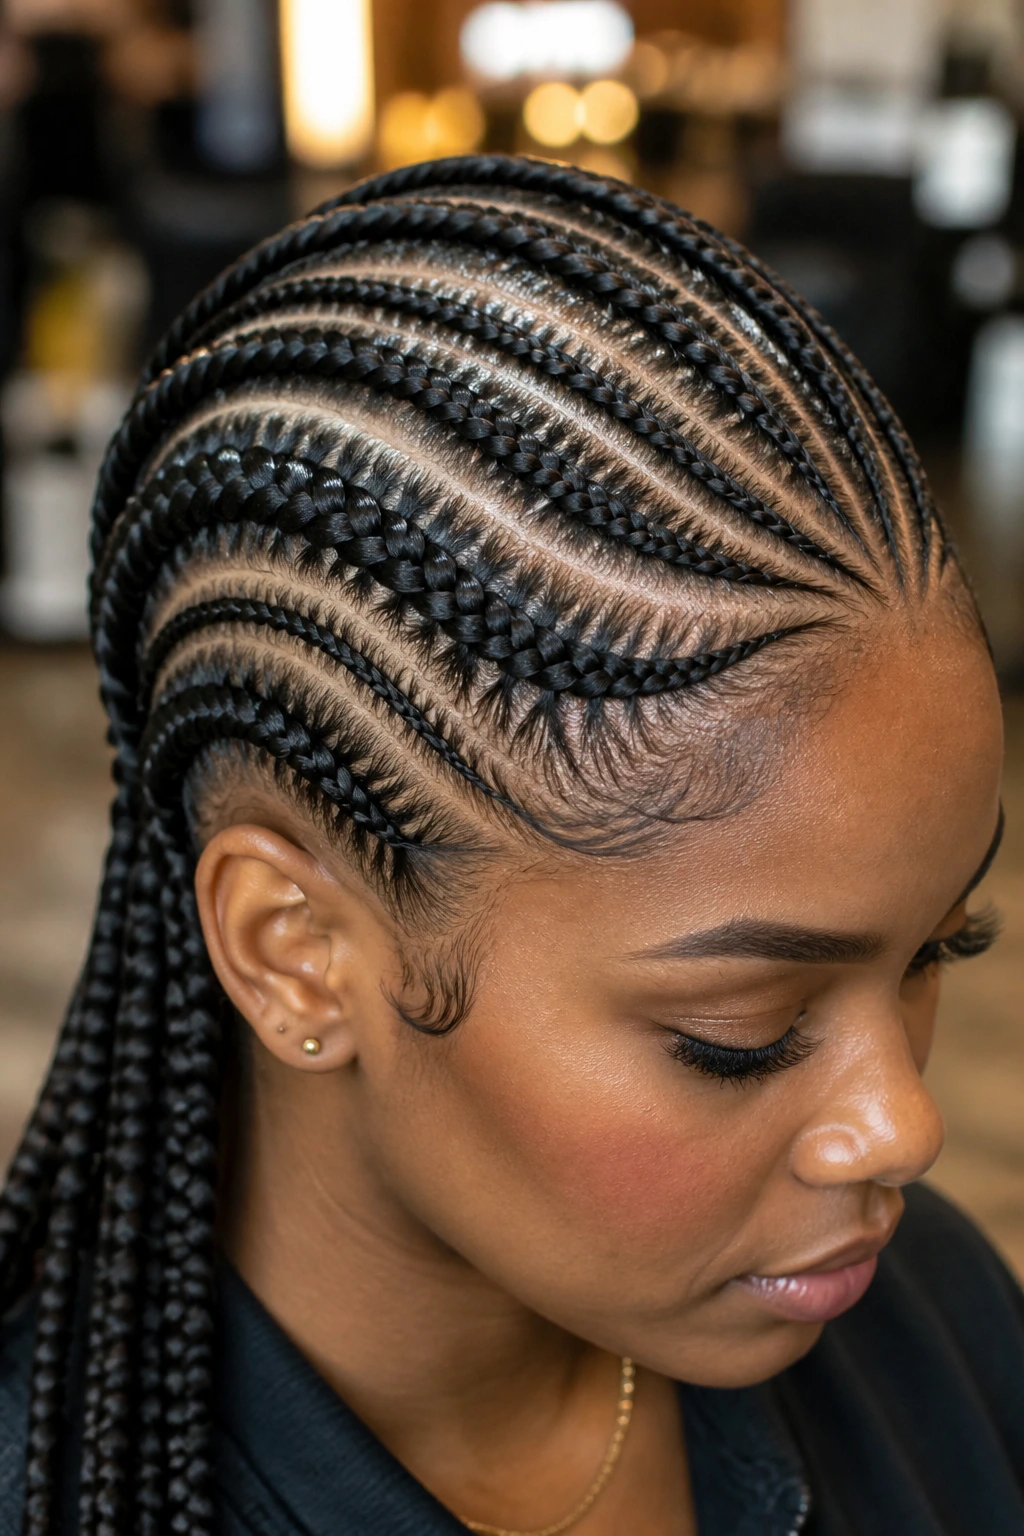
1. The Classic Straight-Back Foundation
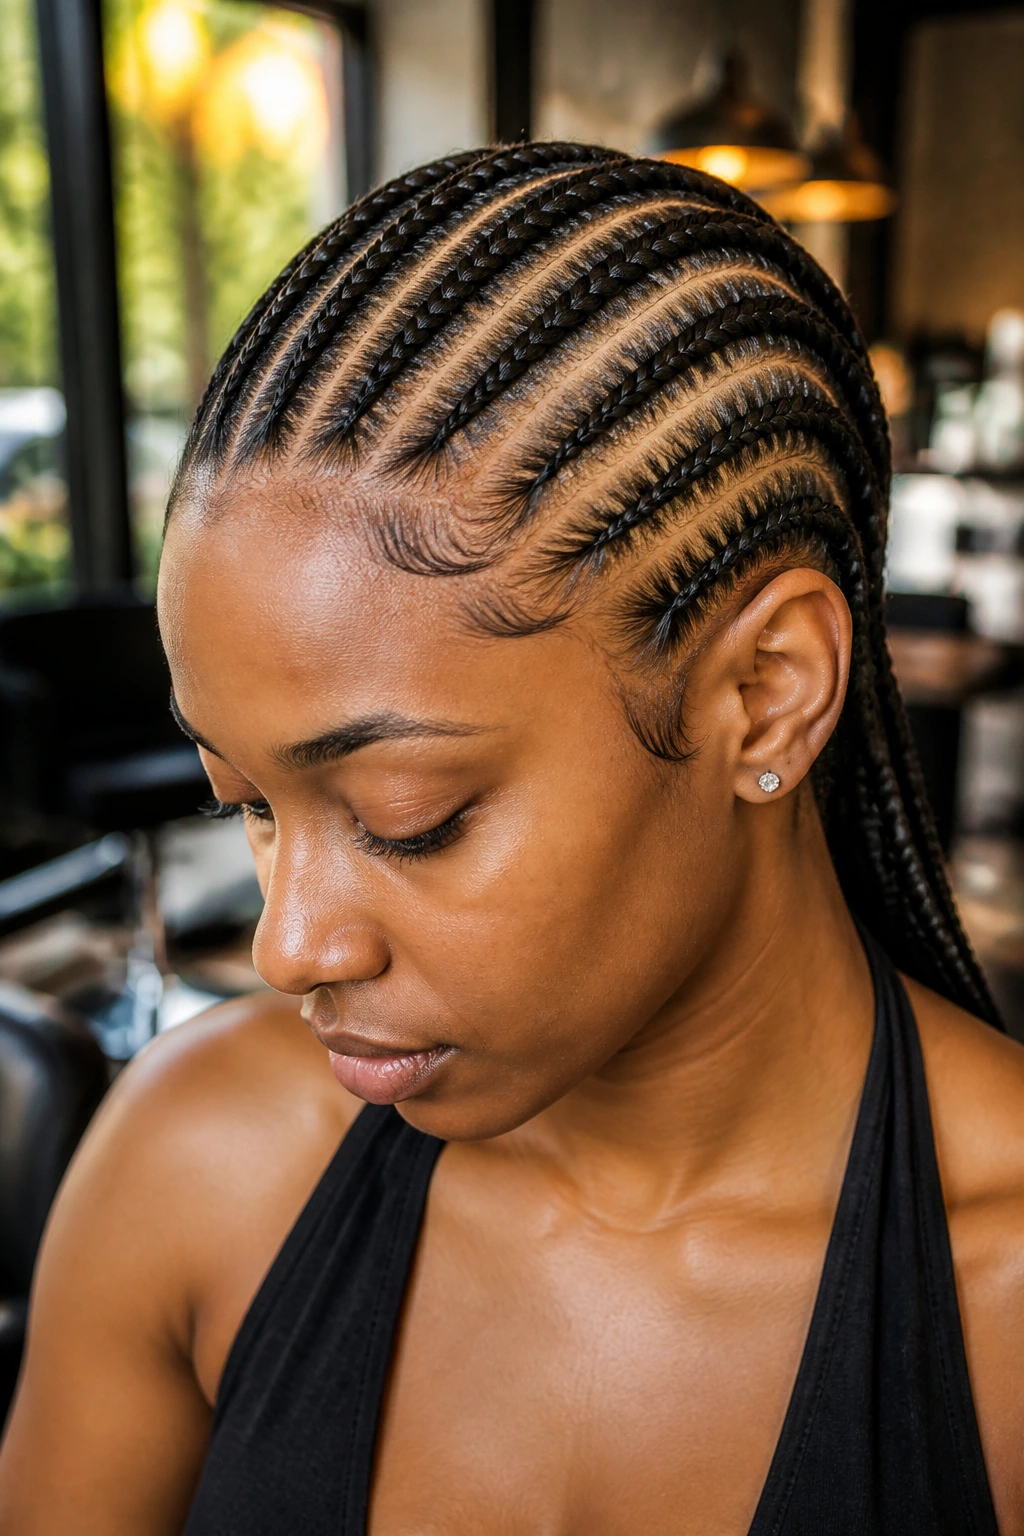
The most fundamental version of freehand braiding relies on clean, parallel lines that move from the front hairline to the nape of the neck. While it sounds simple, the precision of the parting is what determines the quality of the finish. By using a metal rat-tail comb, you create depth by sectioning consistent, quarter-inch strips of hair.
Why Straight-Backs Never Go Out of Style
Consistency is the hallmark of a professional-looking braid job. When you keep the width of each braid uniform, the hair lays flat against the scalp, preventing the “bumpy” look that often occurs with uneven tension. For curly hair, this style works as an incredible foundation for wigs or as a standalone look that emphasizes the length of the hair.
Tips for Maintaining Tension
- Always use a light-hold pomade along the parting to keep flyaways at bay.
- Keep your grip firm but never so tight that it lifts the scalp.
- If you notice redness during the process, loosen the braid immediately to prevent follicle trauma.
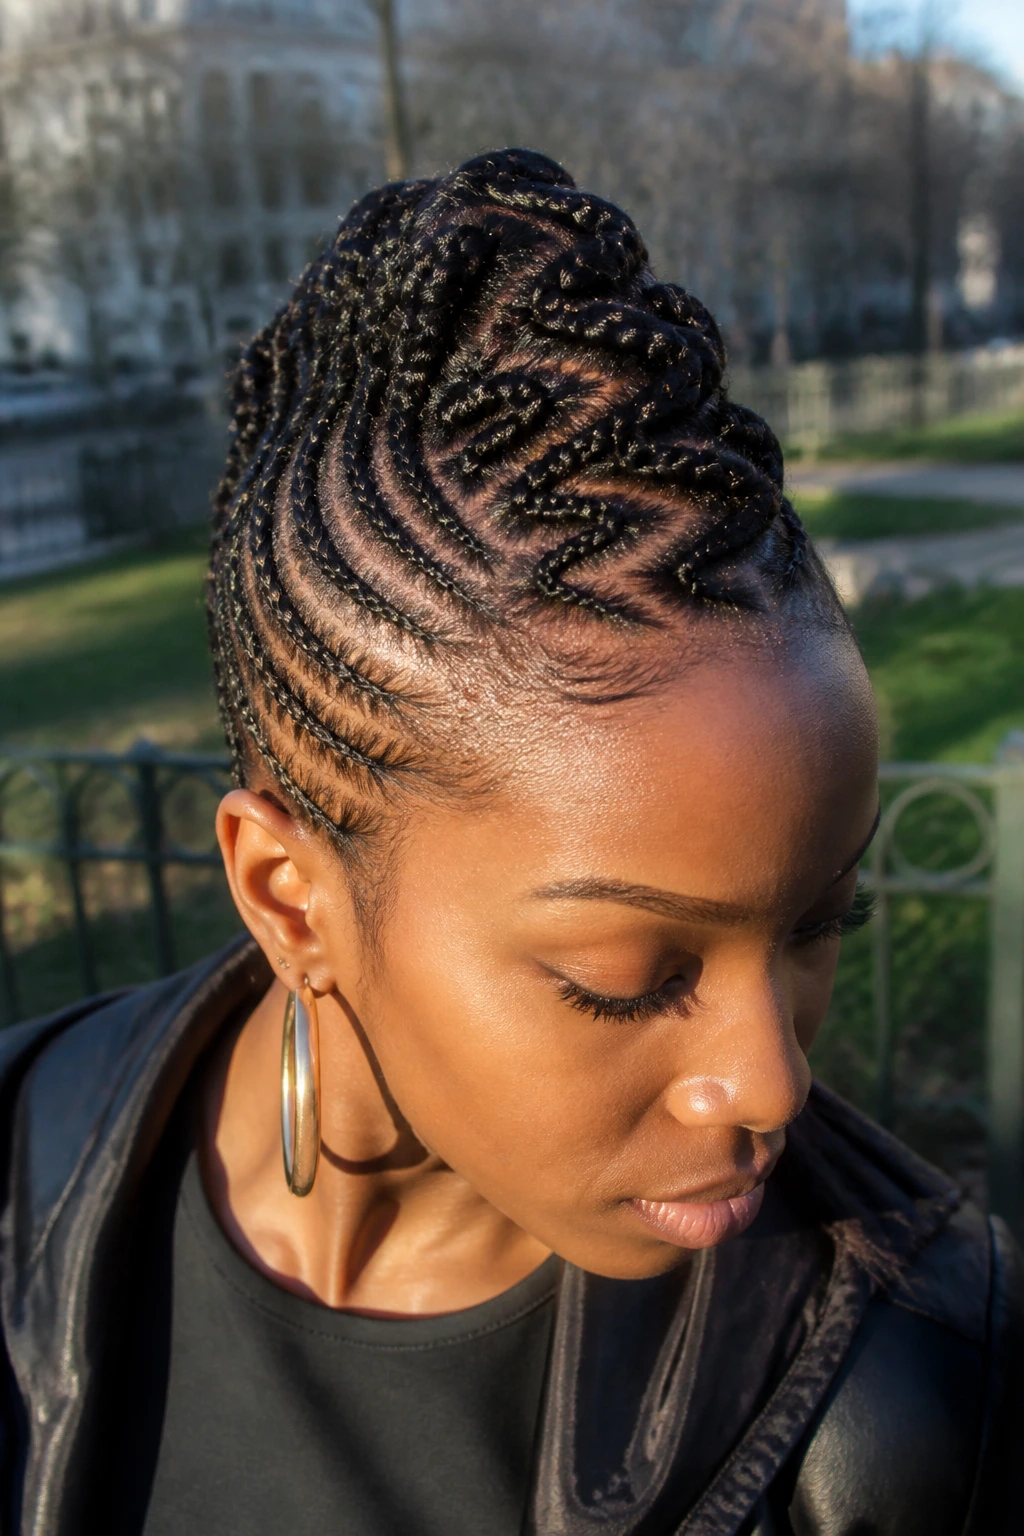
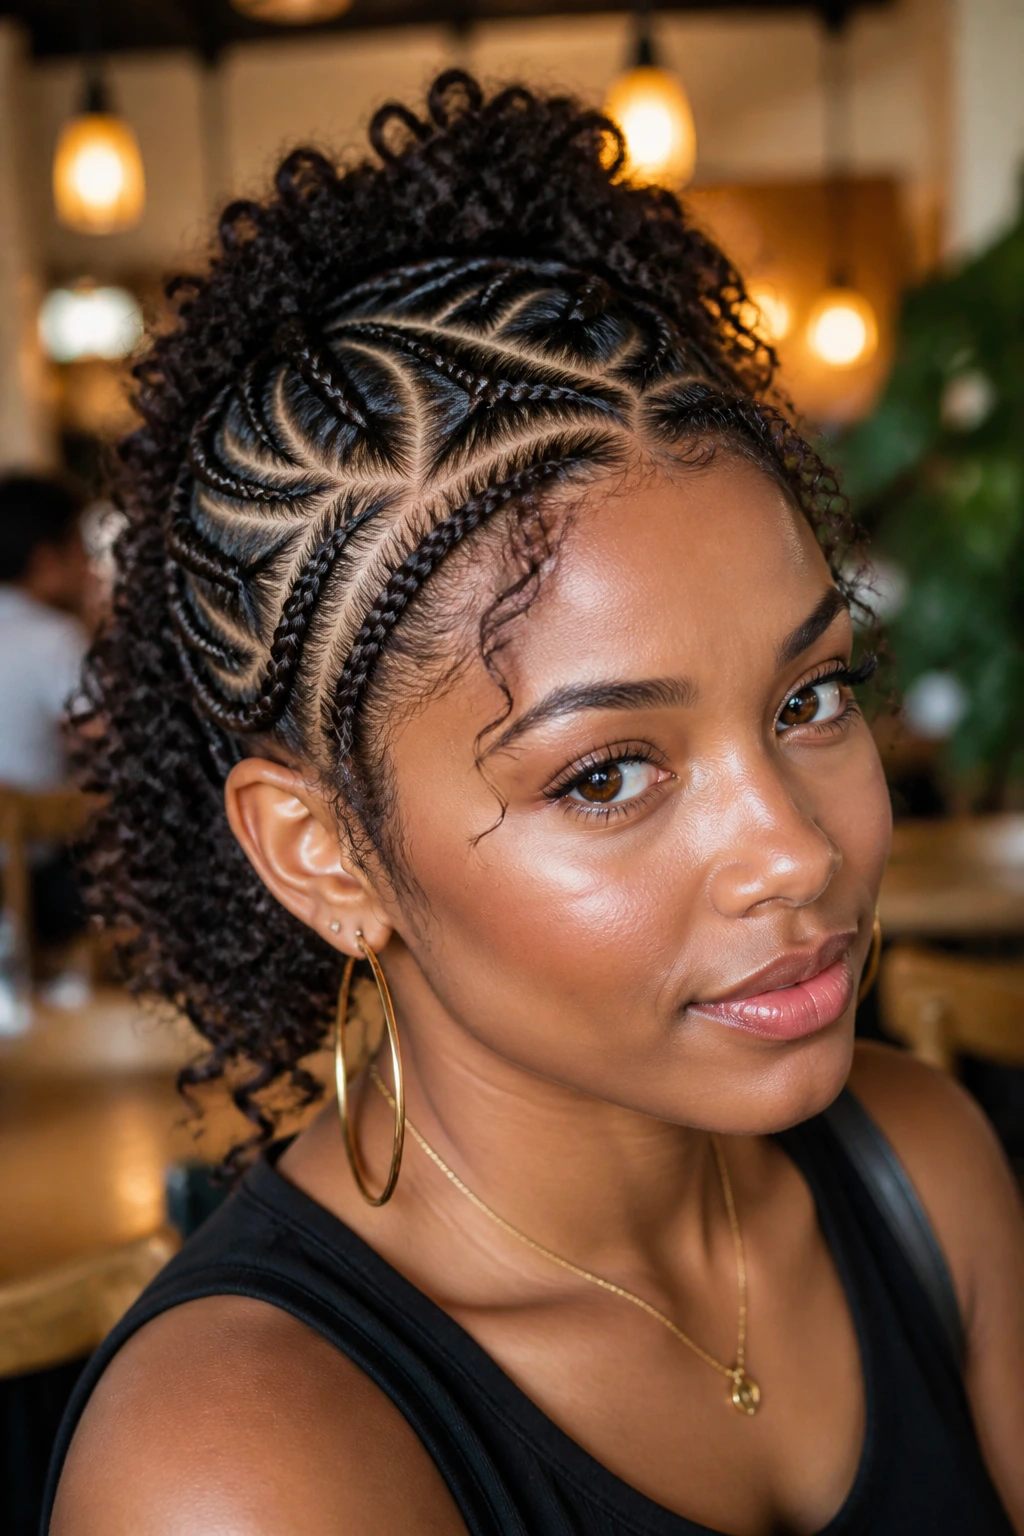
2. The Sunburst Radial Design
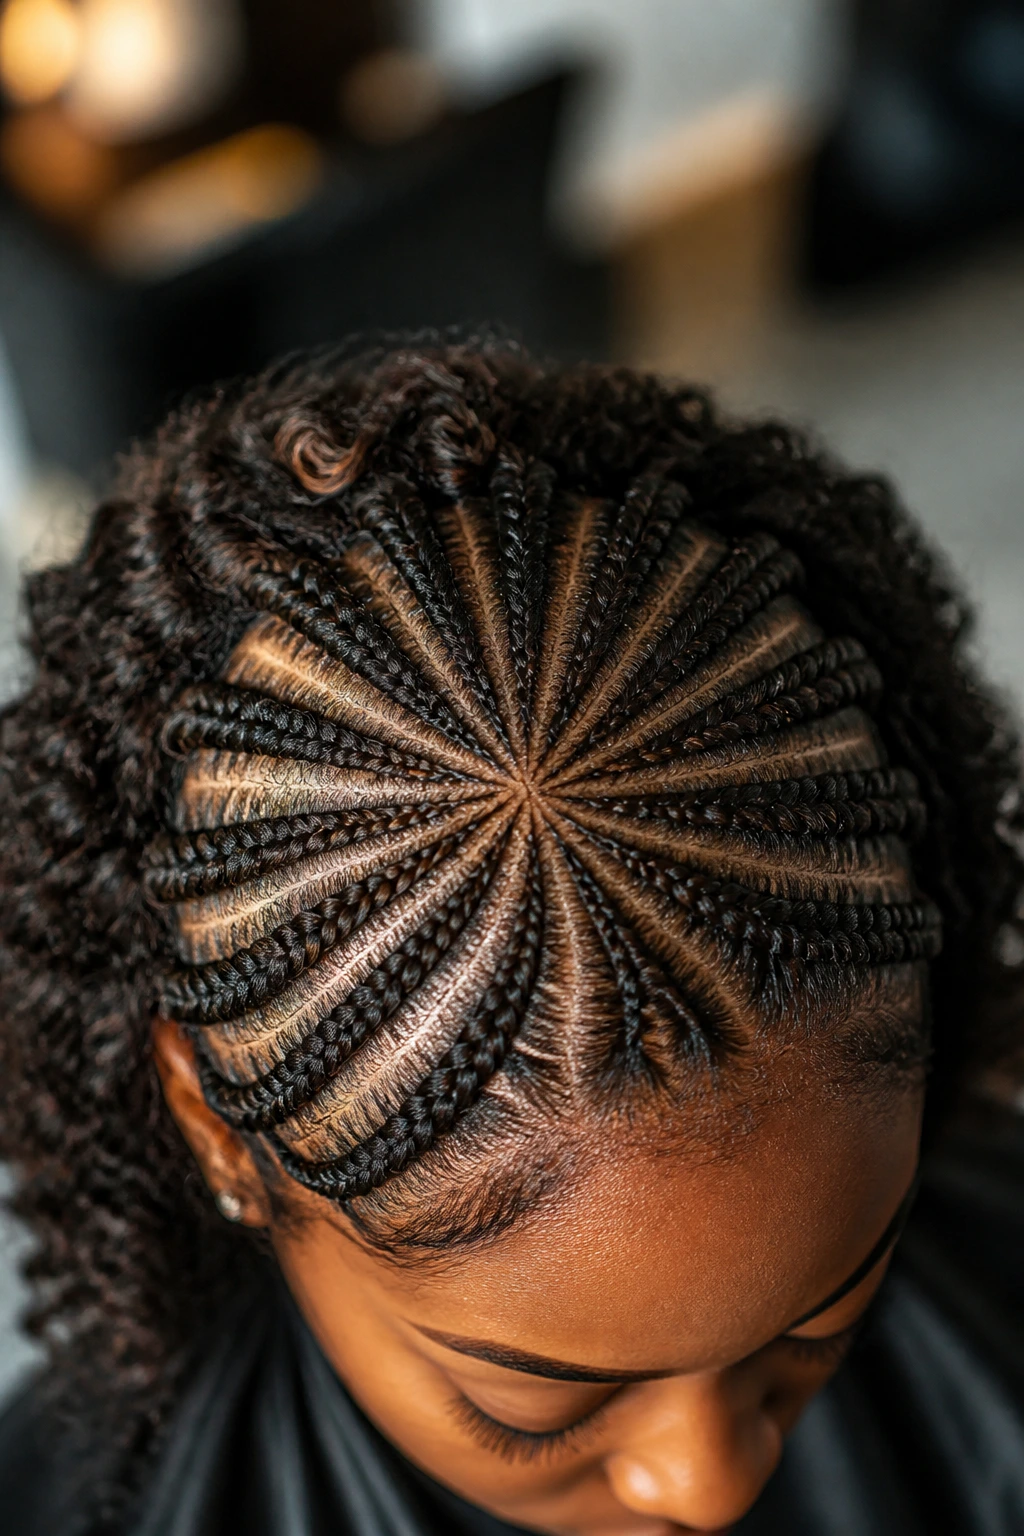
Instead of vertical lines, imagine the scalp as a clock face where all paths lead to a center point. This freehand style requires a high degree of spatial awareness, as you must converge multiple braids toward the crown or a specific off-center spot. It is a stunning visual choice that draws the eye upward, creating an illusion of height.
Constructing the Radial Effect
Start at the very center of the crown. Secure a small section there first to act as your anchor. From that anchor, begin branching out sections like the rays of the sun. The challenge is ensuring the sections remain symmetrical as you move toward the perimeter of the head.
Styling for Maximum Impact
- Use a small amount of shine-enhancing oil once the design is complete to make the partings pop.
- You can leave the ends loose in a ponytail or tuck them under to maintain a sleek, minimalist aesthetic.
- This style is best suited for medium-density curls that don’t become overly bulky at the ends.
3. The Interlocking Zigzag Path

If straight lines feel too predictable, introduce a series of sharp, diagonal partings that create a jagged “S” or “Z” pattern. This is a brilliant way to disguise thinning areas, as the shifting lines break up the scalp visibility. It is a more complex freehand technique because it requires you to visualize the pattern before you lay the first section of hair.
Mastering the Geometry
Don’t try to draft the whole head at once. Focus on one zigzag at a time, moving across the scalp in a rhythmic fashion. Use the corner of your comb to pivot the parting at every turn, ensuring the lines remain crisp rather than rounded or fuzzy.
Why It Works for Curly Textures
Curly hair has a mind of its own, and the zigzag pattern allows for better integration of natural texture. The irregular partings prevent the braids from “clumping” together, which creates a fuller, more voluminous appearance that lasts longer than standard vertical styles.
4. The Curved Wave Pattern
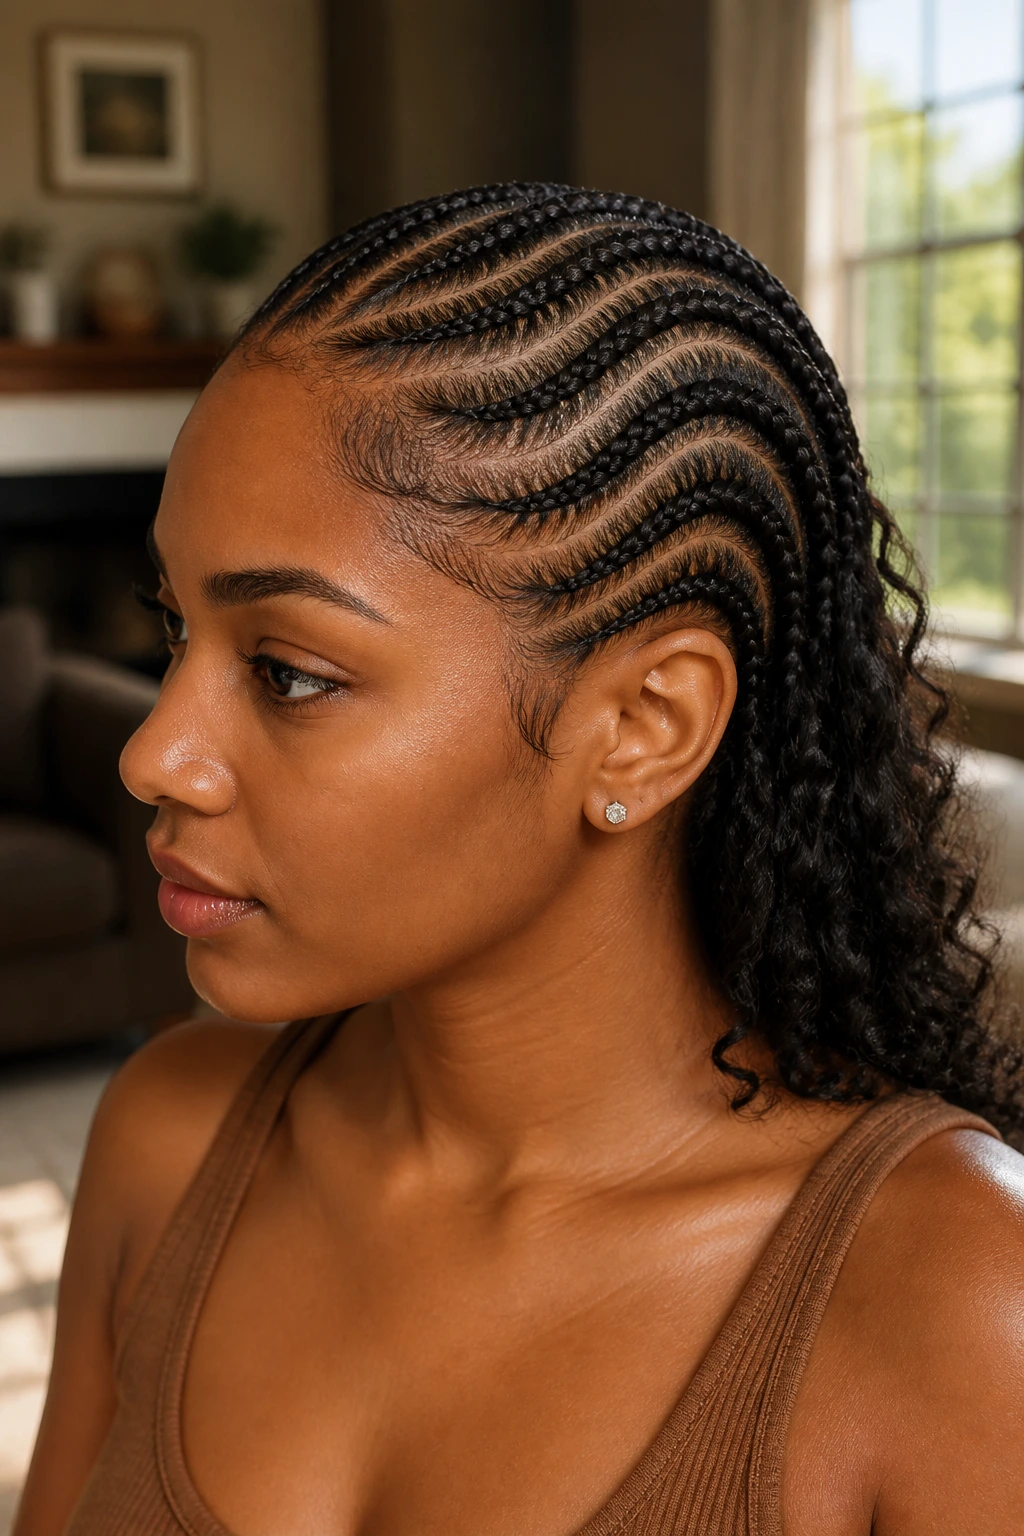
Freehand braiding truly shines when you embrace the curve. By ignoring the traditional rigid grid, you can mimic the flow of water, creating sweeping, side-swept braids that follow the natural shape of the skull. This style is incredibly flattering, as it softens the facial features and provides a more feminine, relaxed silhouette.
The Art of the Sweep
Start near the temple and guide your braid in a wide arc across the side of the head. The secret here is to vary the width of the braid slightly, allowing it to swell in the middle of the curve before tapering off. This gives the hair a natural, fluid movement that looks intentional rather than stiff.
Keeping the Curve Consistent
- Place your hands in a lower position than usual to maintain the angle of the arc.
- Avoid trying to force a sharp turn; let the hair naturally settle into the bend before securing the braid.
- This is a fantastic protective style for those who wear glasses, as the curved paths can be adjusted to bypass the ears comfortably.
5. The Double-Layered Geometric Hybrid
This design mixes large, wide cornrows with smaller, intricate “feeder” braids nested in between. The contrast in size provides a modern, high-fashion look. You are essentially creating a layered effect where the hair looks denser and more complex than it actually is.
Executing the Layering
First, map out your primary, thicker cornrows with wide partings. Once these are secured, go back in and pull small, thin strands from the remaining scalp space to create the thinner accent braids. This requires patience, but the result is a textured, multifaceted look that stands out in a crowd.
Best Occasions for This Style
- High-stakes events where you want a style that feels like art.
- Summer months, as the layered design keeps the scalp cool while maintaining a tight hold.
- Pair with gold or silver hair cuffs to highlight the transition between the thick and thin braids.
6. The Heart-Shaped Nape Accent
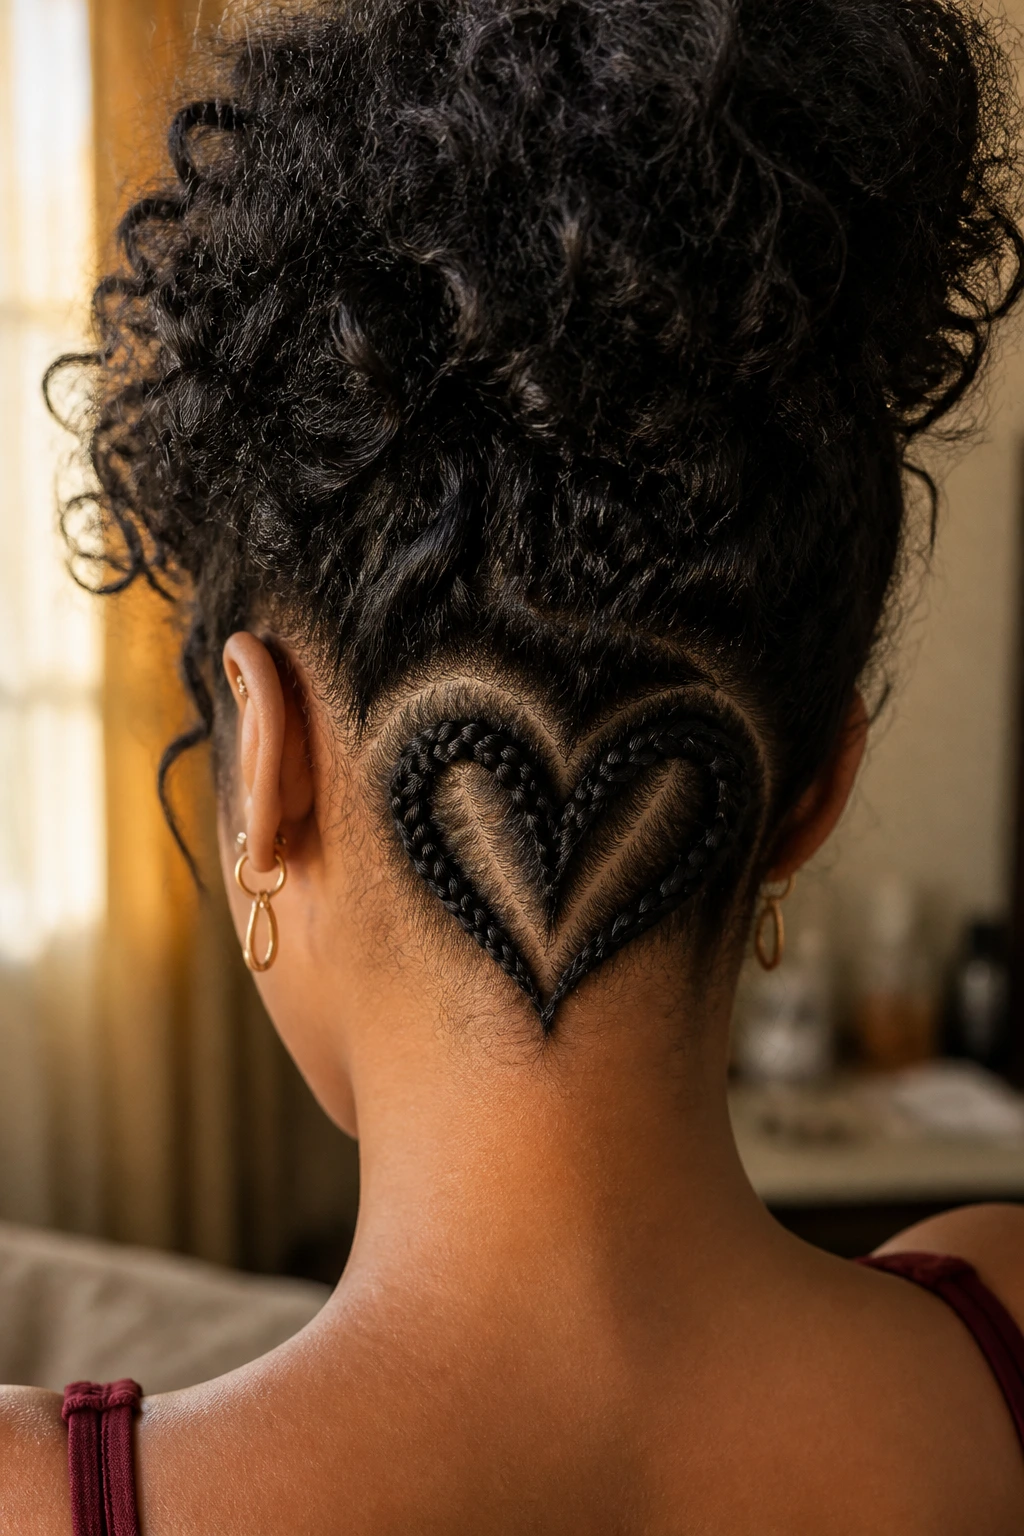
Sometimes, the best part of the style is hidden at the back. By freehand shaping the hair at the nape into a heart, you add a touch of personality to an otherwise standard head of cornrows. It is a delicate detail that becomes visible whenever the hair is worn up in a bun or high ponytail.
Designing the Shape
Start from the center of the nape and work outward to create two rounded arches that meet in the middle. It takes a steady hand with the tail of the comb to get the symmetry right. Once the outline is established, braid the hair into those shapes first to lock the pattern in place.
Maintaining the Detail
- Use a clear hair tie at the base of the heart to prevent the shape from unraveling.
- Keep the surrounding braids slightly looser to ensure the heart stands out as a clear focal point.
- This is a perfect “hidden gem” style for those who want a fun surprise in their hair design.
7. The Halo Crown Braid
This style frames the face completely, circling from one ear, over the forehead, to the other ear. It is an elevated take on the traditional cornrow, focusing on the perimeter rather than the interior scalp. It mimics the look of a crown and provides a clean, open face that highlights your natural features.
Constructing the Perimeter
Start by sectioning off the front hairline. Braid horizontally, picking up hair only from the crown side to keep the edge of the braid tight and flat. As you move toward the temple, begin to curve the path upward and backward to sweep toward the nape.
Why This Style Succeeds
- It keeps hair out of the eyes entirely, making it an excellent choice for active days.
- You can add subtle beads or gold rings along the top of the halo for a royal, ornate feel.
- The tension is distributed evenly around the head, reducing the risk of hairline breakage.
8. The Scattered Starburst Detail
Instead of a full radial design, scatter small starburst motifs across the scalp, connected by long, flowing braids. This is an abstract, freehand masterpiece that feels less like a traditional hairstyle and more like a permanent hair accessory.
Placing the Motifs
Pick three or four “anchor points” on the head. Create a small star or asterisk shape at each point. Then, run your cornrows from these stars in different directions, allowing them to intersect or run parallel. The complexity comes from the transition points—make sure you tuck the ends of the star braids into the connecting rows.
Advice for First-Timers
- Start with fewer stars to avoid overwhelming the scalp.
- Keep the connecting braids fairly straight to ensure the overall look stays organized.
- Use a light leave-in conditioner on the ends of the curls before braiding to prevent breakage during the intricate shaping phase.
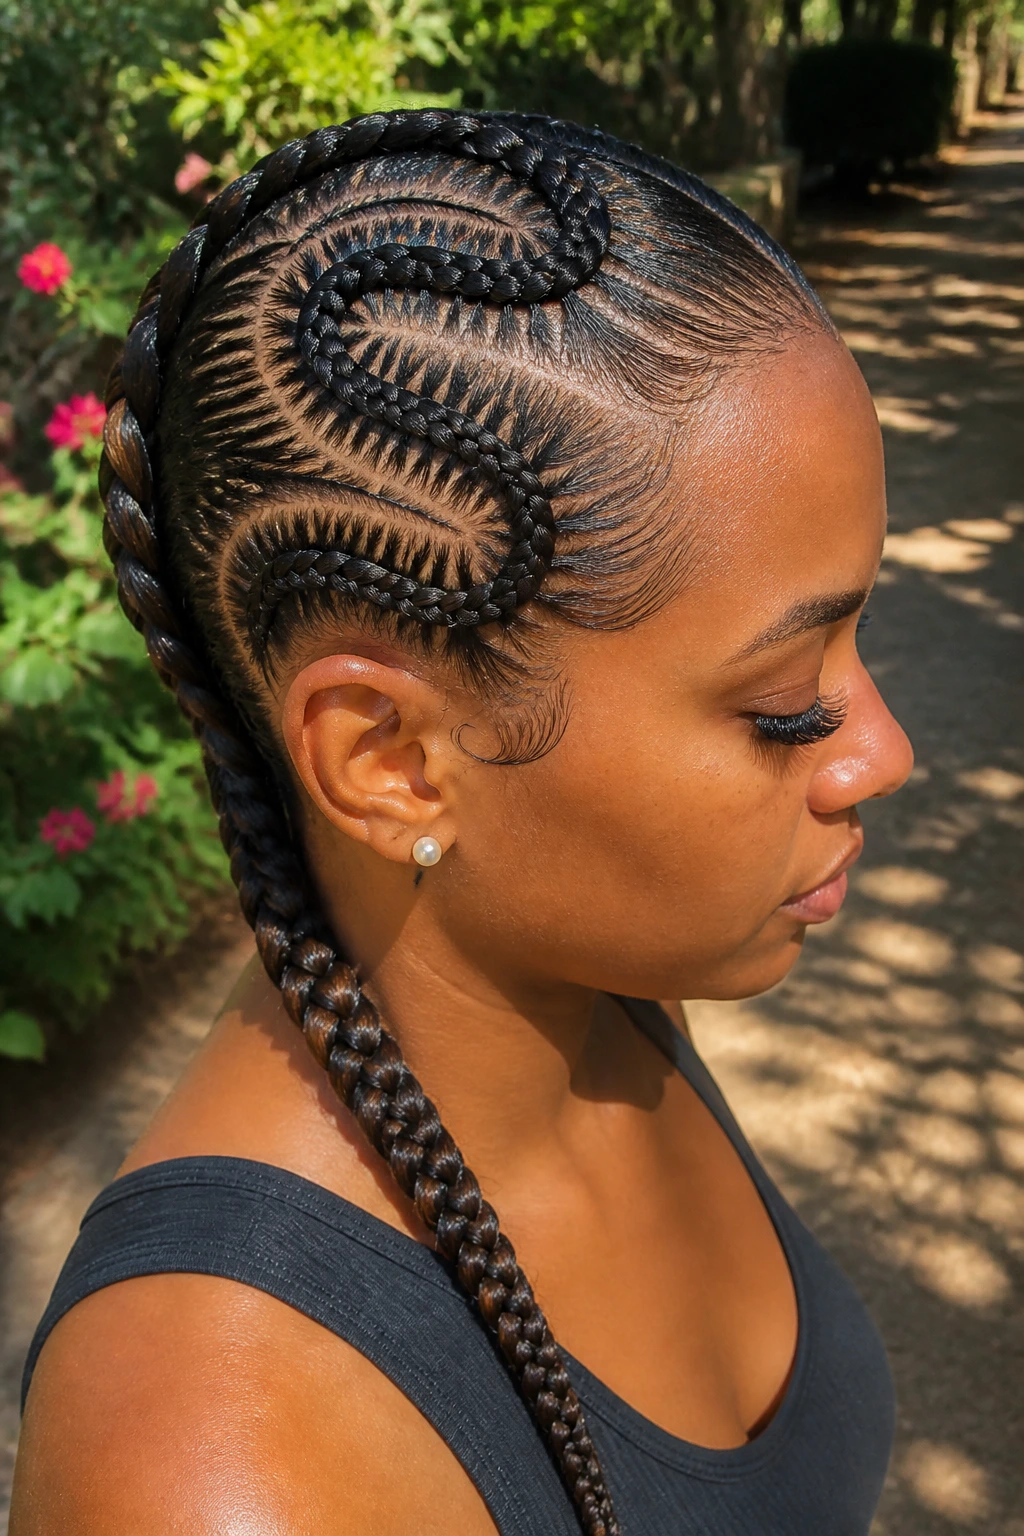
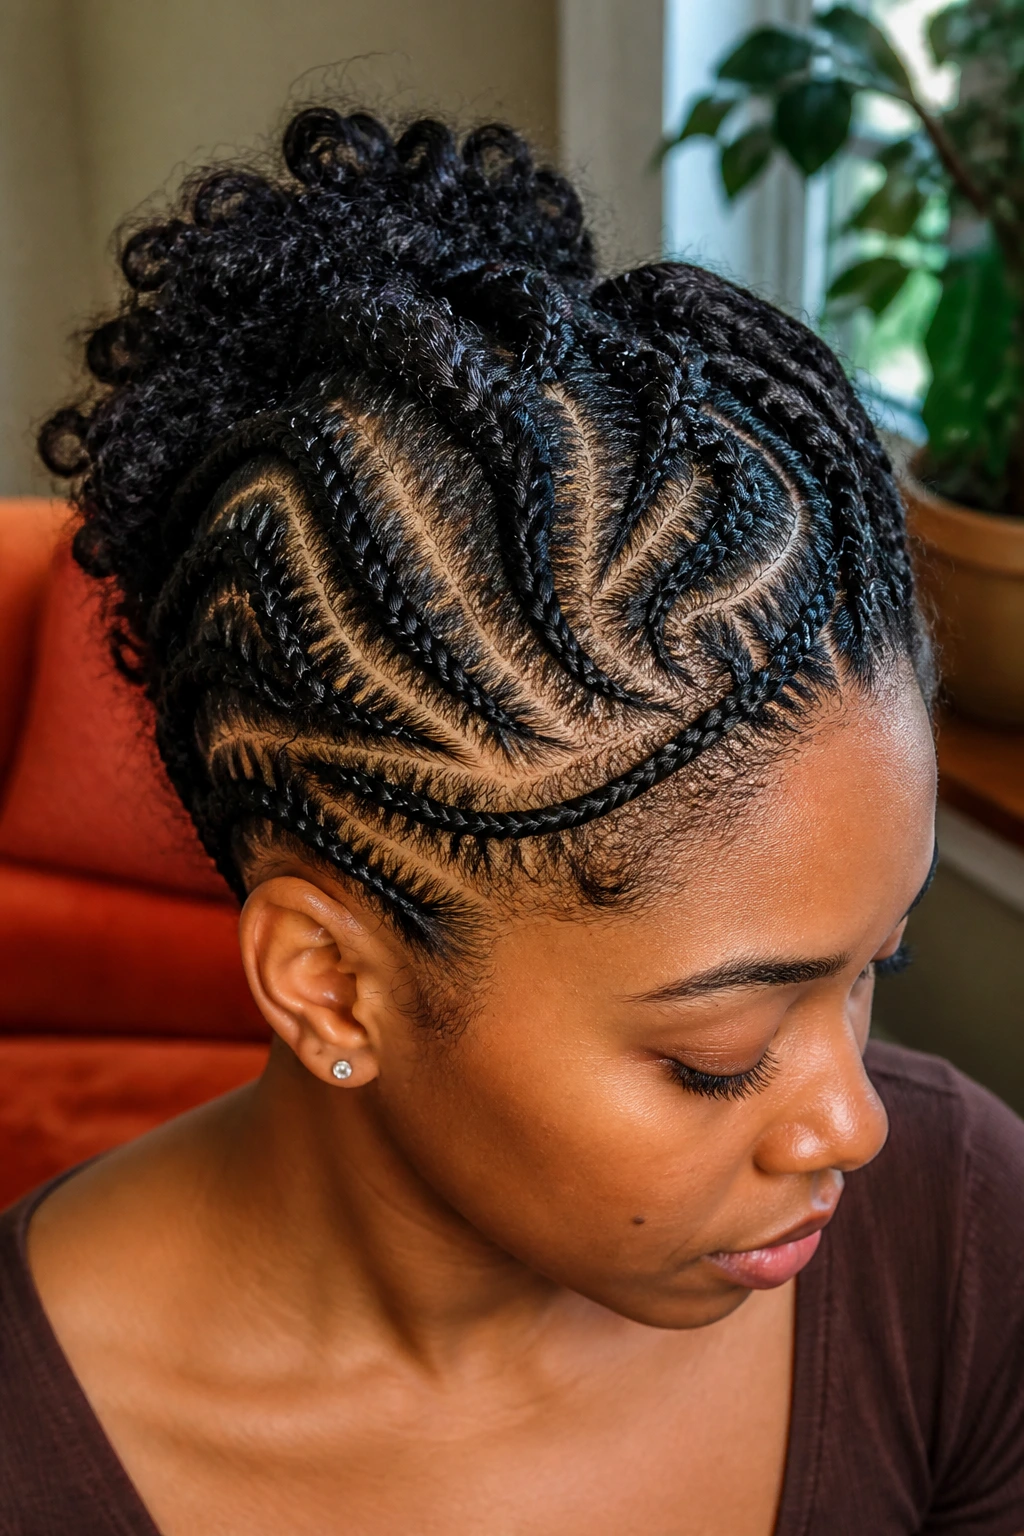
9. The Swirling Vortex
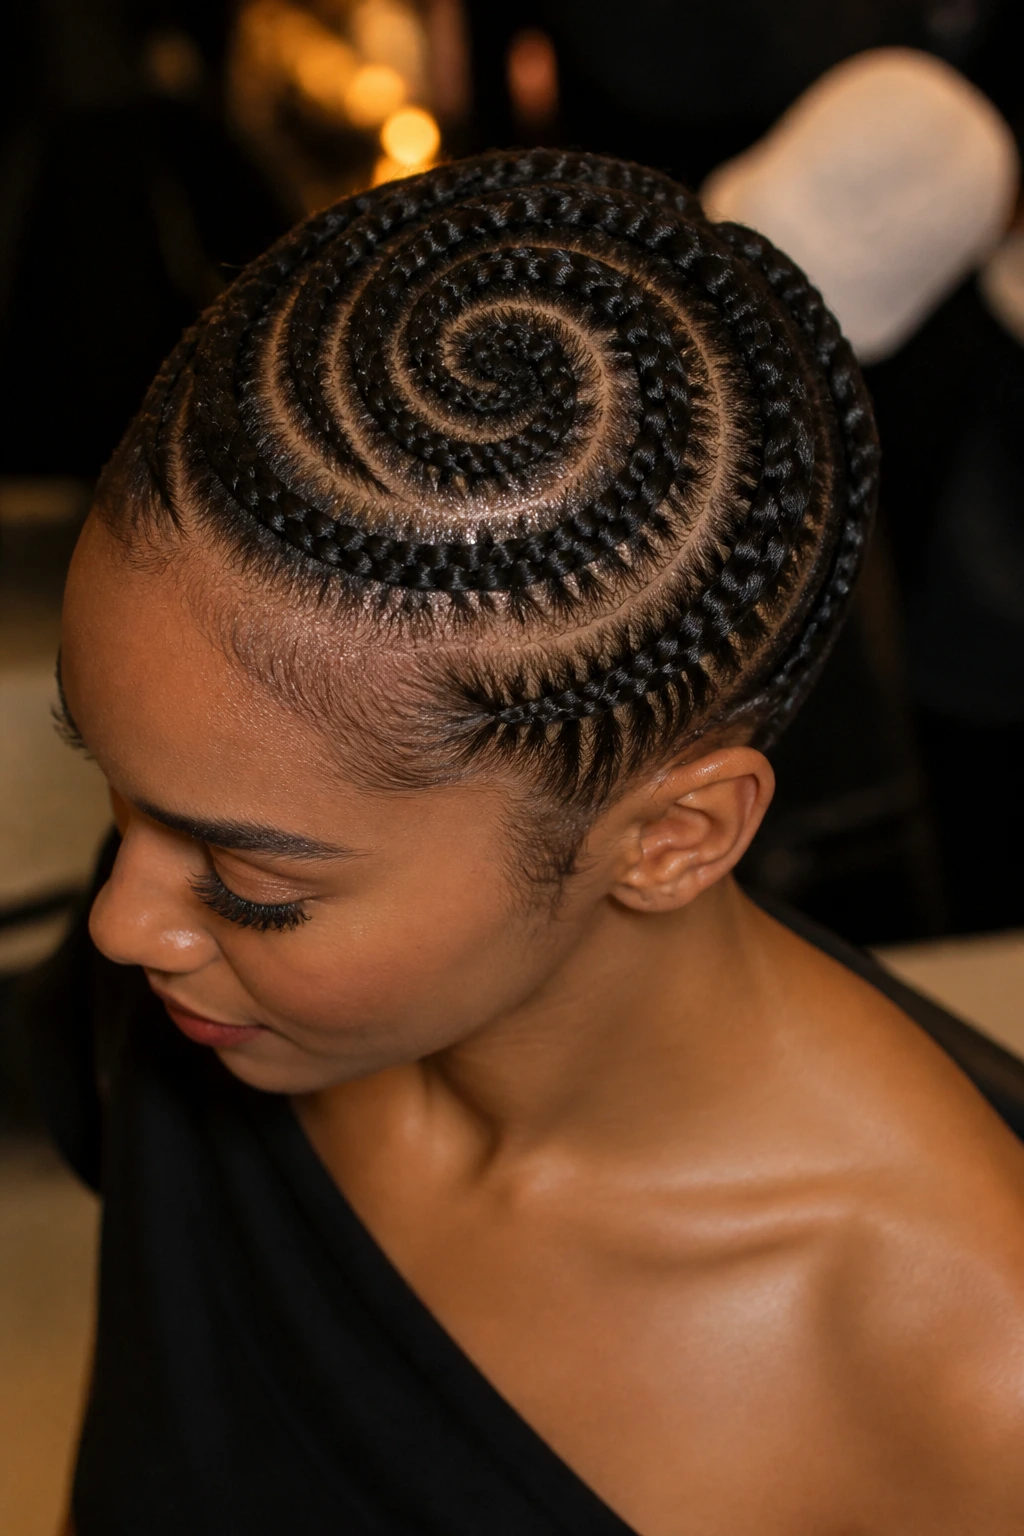
This style involves one continuous braid that circles the entire scalp, tightening as it reaches the center. It is a hypnotic, modern design that is perfect for those who want a truly singular piece of art on their head. Because it relies on a single continuous path, it requires very little parting of the hair once the process begins.
The Technique of the Spiral
Start at the front hairline and work your way back, winding the hair in a gradual inward spiral. The trick is to ensure you pick up equal amounts of hair throughout the entire length of the braid, or the spiral will look lopsided. Consistency is your best friend here.
Care and Longevity
- Because the braid is continuous, it tends to hold up very well over time.
- Avoid sleeping with a rough cotton pillowcase; a silk bonnet is essential to prevent frizz from developing along the spiral path.
- If you notice the braid getting loose, a light mist of setting spray can help keep the hair strands tucked in place.
10. The Basket-Weave Effect
By creating horizontal and vertical braids that overlap, you can simulate the texture of a woven basket. This is a very tight, protective style that excels at keeping shorter, coarser hair textures firmly in place for long periods. The pattern is dense and looks incredibly sophisticated when done with precision.
How to Weave
Begin by braiding all your vertical lines first, keeping them relatively flat. Then, weave the hair in between the vertical rows using a horizontal approach. This is essentially a manual simulation of an under-and-over pattern, requiring you to lift and tuck as you go.
Why You’ll Love It
- The density of the braids creates a natural padding that feels secure and sturdy.
- It is a highly durable style that handles sweat and humidity without losing its shape.
- The visual depth of the woven pattern is unparalleled by simpler braiding techniques.
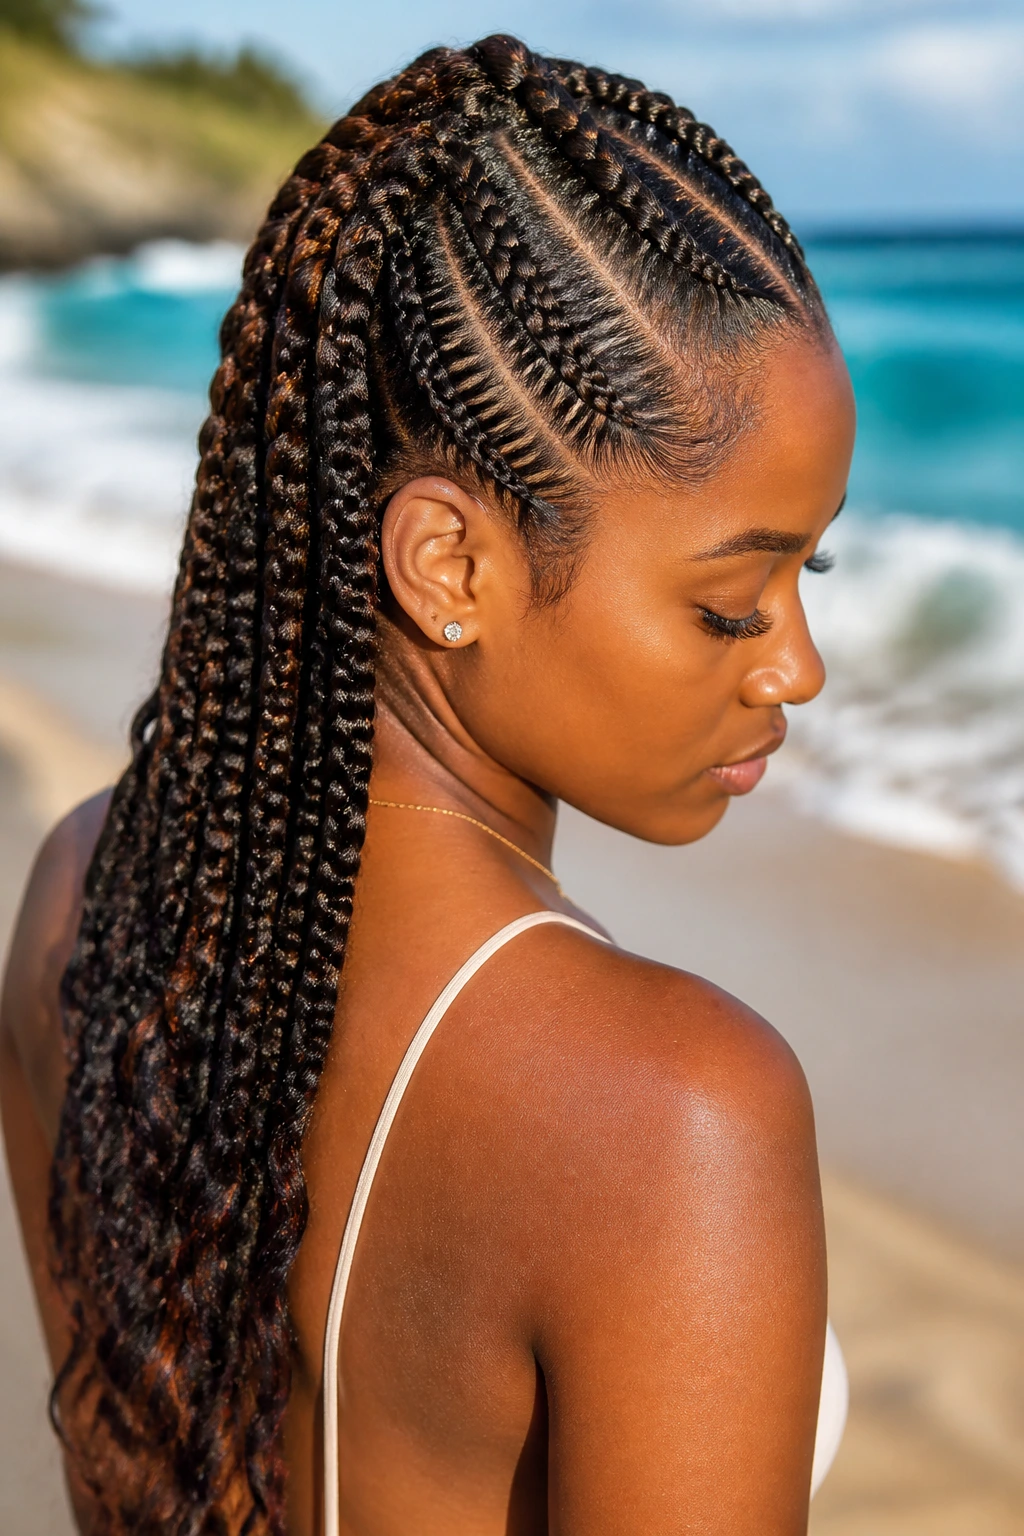
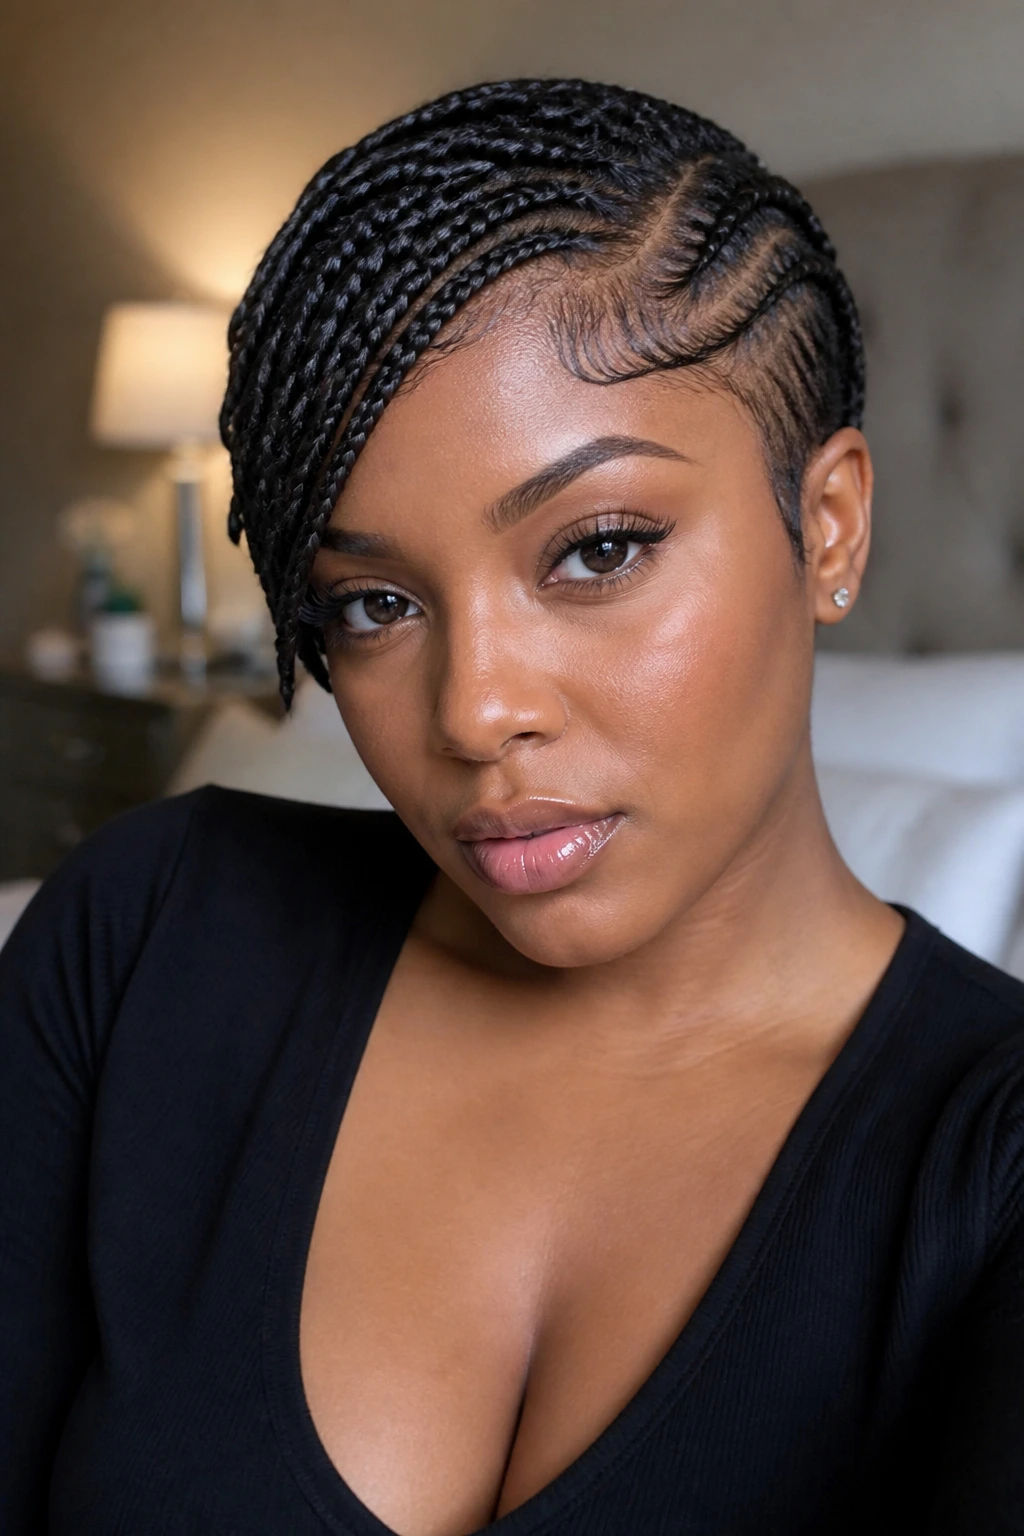
11. The Asymmetric Side-Sweep
Sometimes balance is overrated. An asymmetric design pulls all the hair toward one side, creating a dramatic, sweeping effect that looks like a high-fashion runway look. It is bold, confident, and works exceptionally well for those with strong facial structures who want to draw attention to their profile.
Achieving the Asymmetry
Section the hair so that two-thirds of the scalp is directed toward the left or right ear. The braids should radiate from the opposite temple, fanning out as they move toward the heavy side. The result is a natural, elegant lean that frames the face in an unexpected way.
Styling for Balance
- Since the volume is weighted to one side, you can balance the look with a bold earring on the side with less hair.
- This style works wonderfully with added length (synthetic or human hair extensions) for those who want the braids to hang down past the shoulders.
- It is a versatile choice that looks just as good in a professional setting as it does on a night out.
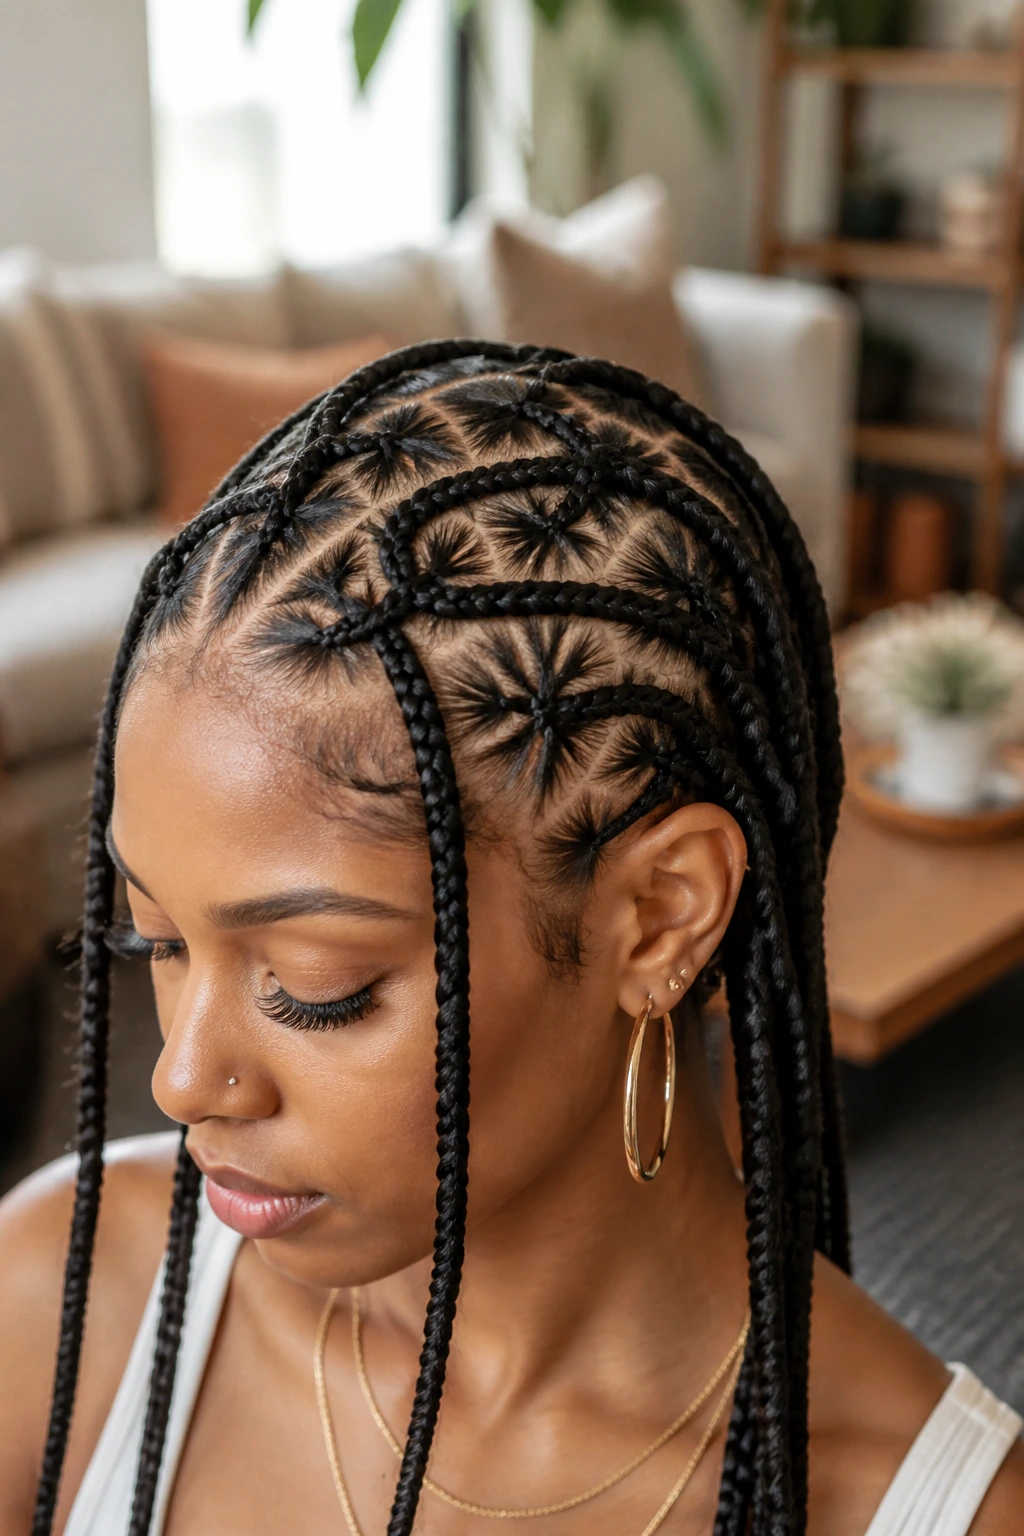
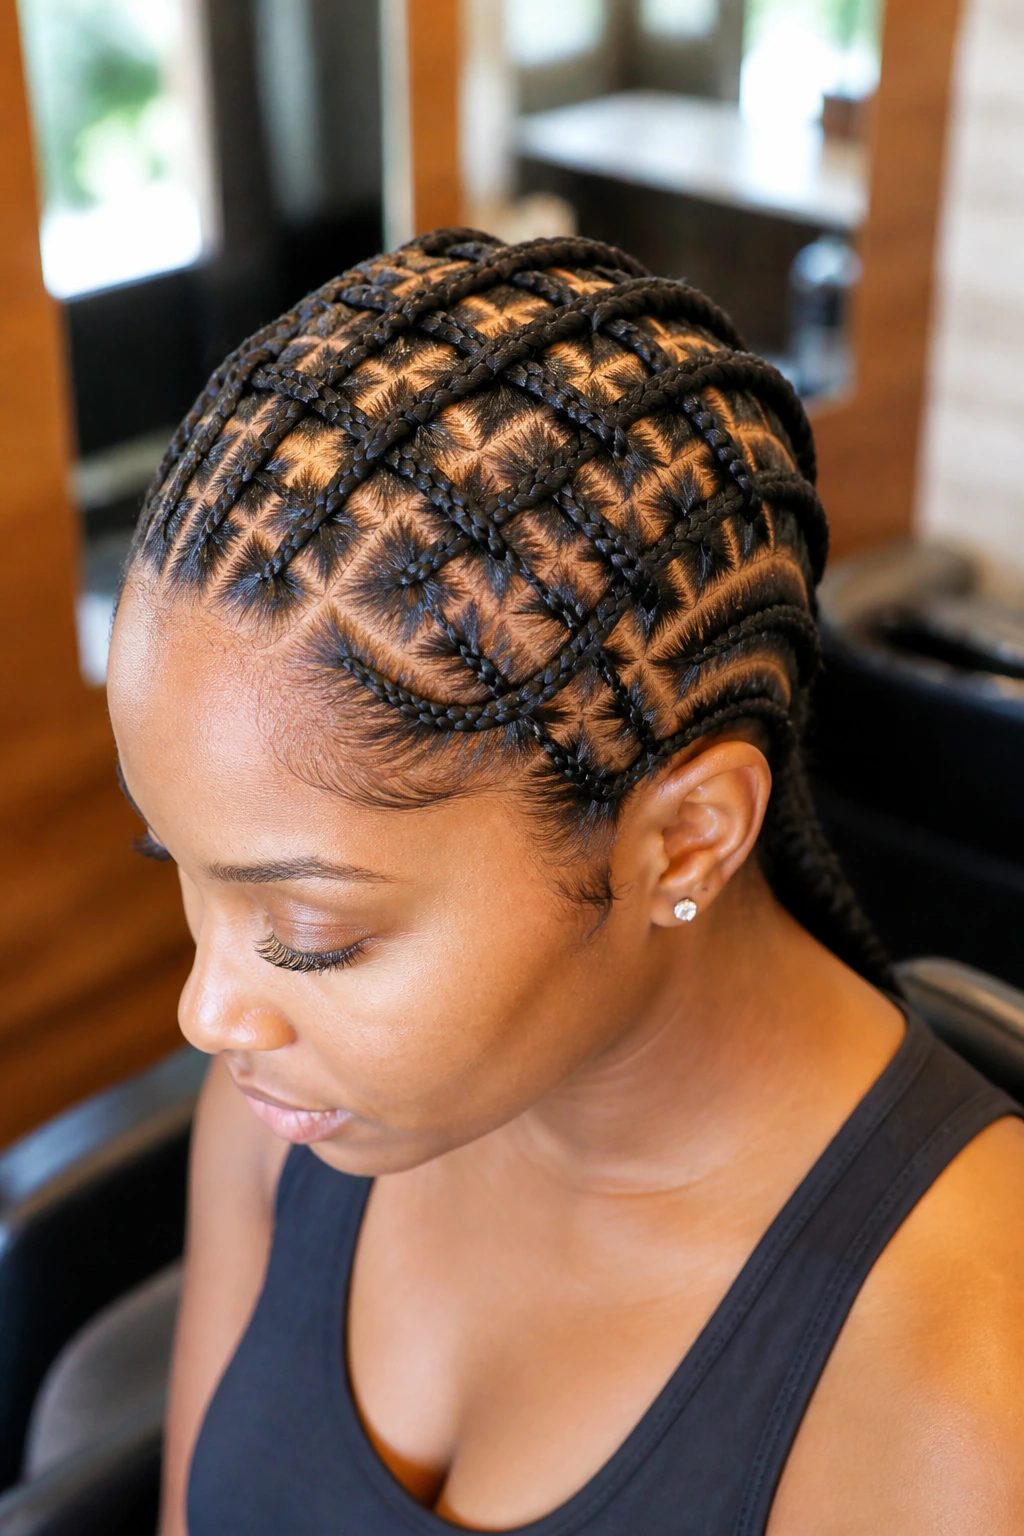
12. The Criss-Cross Diamond Pattern
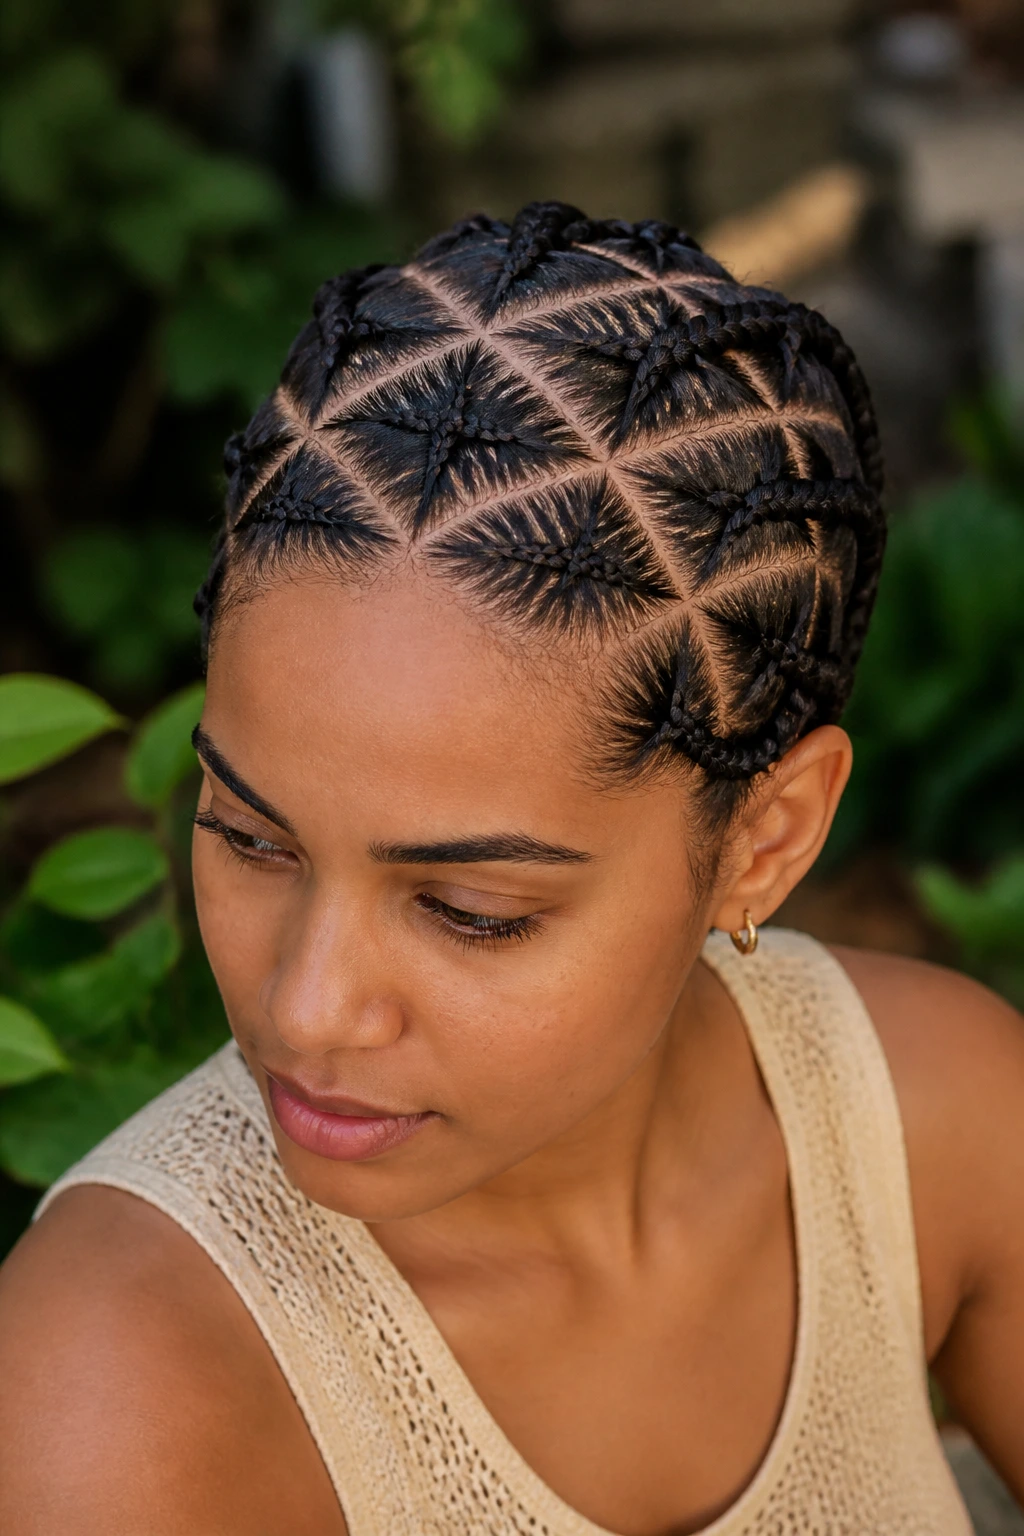
This is perhaps the most technical of the freehand styles, involving diagonal partings that intersect to create a diamond lattice effect. It is a classic for a reason: it looks incredibly clean and sharp. You will need a steady hand and a fine-toothed comb to ensure each diamond shape is identical in size.
Building the Grid
Divide the scalp into a series of diagonal lines first. Once these lines are set, create a second set of diagonal lines that cross the first ones at a 45-degree angle. This creates the diamond shape. Braid along the lines of the diamond to lock the shape into place.
Essential Tools
- Use a high-quality edge control gel to sharpen the lines of the diamonds.
- Take your time during the parting process; rushing this stage will lead to uneven shapes.
- Consider adding small, clear beads to the intersections to emphasize the diamond grid.
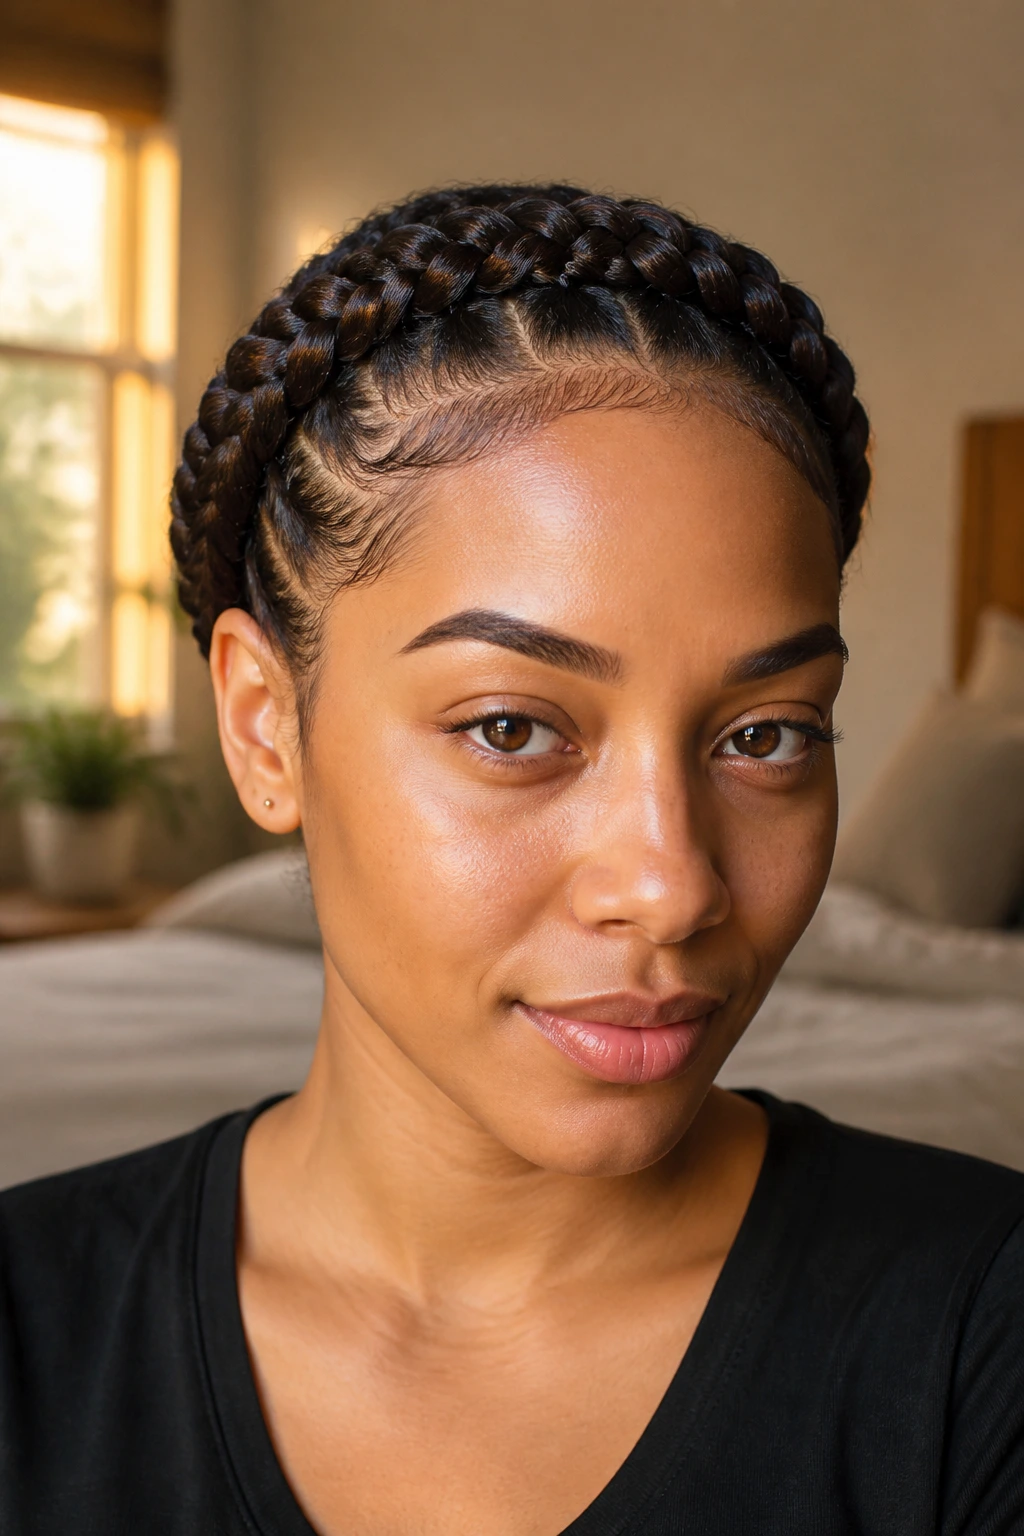
13. The Minimalist Part-Line Design
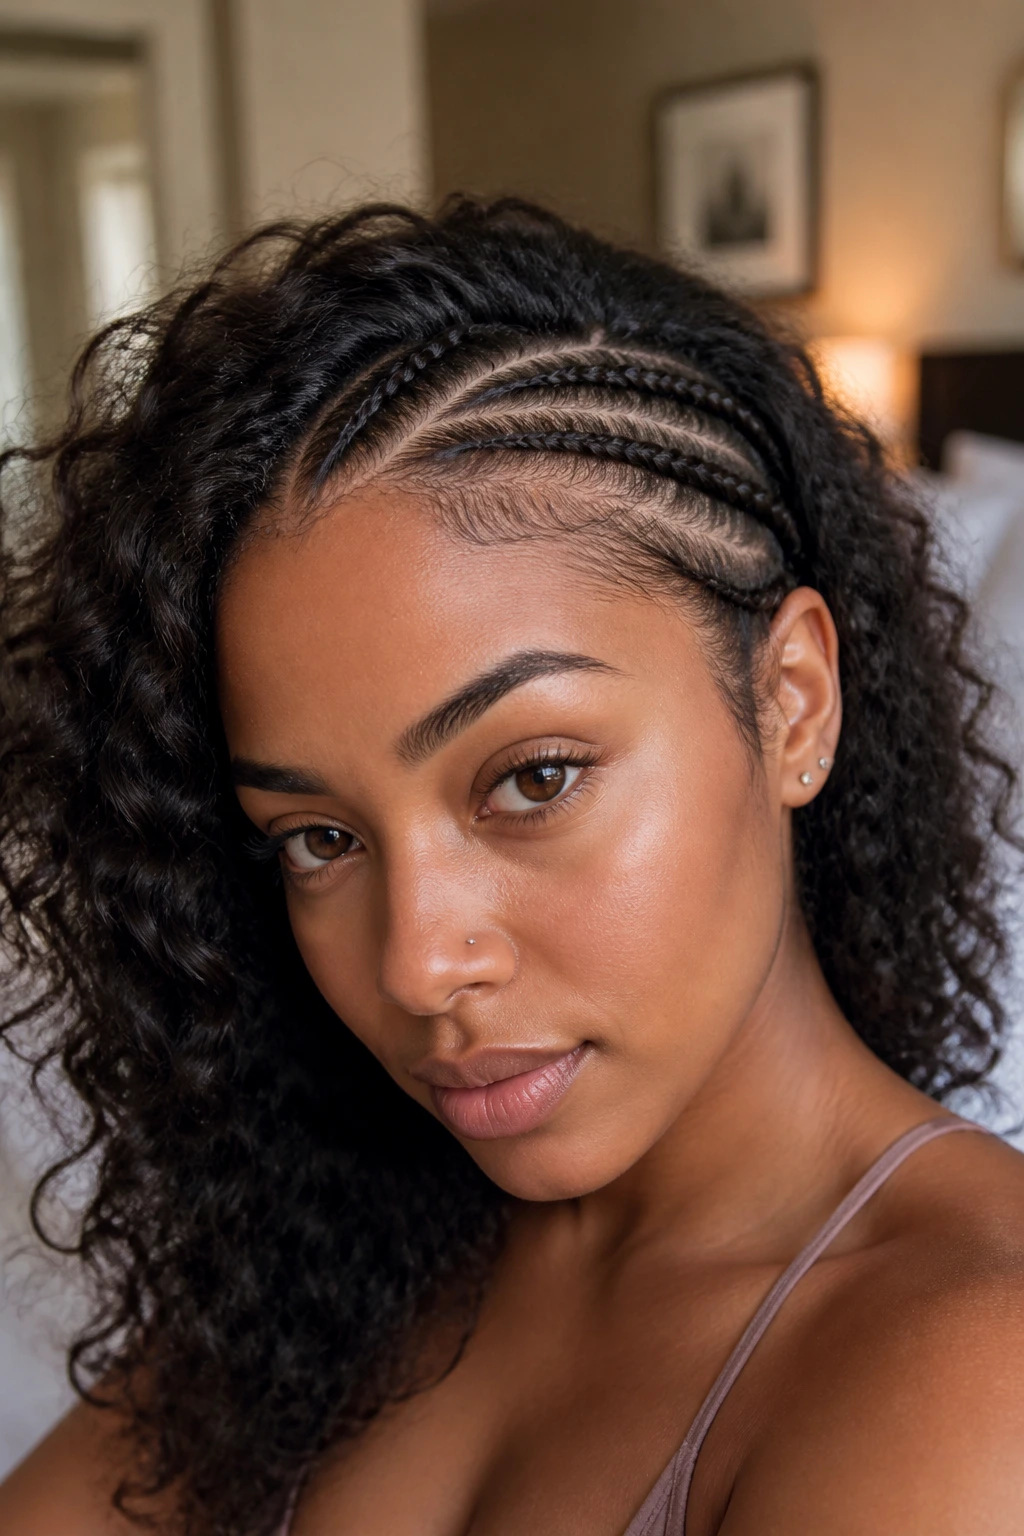
If you aren’t ready for a full head of complex patterns, consider a design that uses only three or four long, sweeping braids positioned near the hairline or the part. This style allows you to showcase your natural curl pattern on the rest of your head while still enjoying the neatness of cornrows.
Where to Place the Parts
Look at your natural parting. Place one braid directly on the left side of the part and one on the right. Add a third one near the temple for symmetry. This creates a “headband” effect that is both stylish and incredibly low-maintenance.
Why This Style Works
- It provides all the benefits of protective styling without having to braid your entire head.
- It is the fastest style to complete, often taking less than an hour.
- You can easily undo these braids if you decide you want to wear your hair fully out for a different event.
14. The Triple-Threat Crown
This style utilizes three large, thick cornrows that sit atop the head like a crown, with the rest of the hair tucked underneath or flowing into a low ponytail. It is a bold, structural look that stands out for its simplicity and elegance.
Sculpting the Crown
Part three wide sections from the front hairline to the middle of the crown. Braid them tight, but ensure the volume is consistent so the braids don’t pull against each other. The goal is a uniform, thick appearance that demands attention.
Styling the Ends
- Gather the remaining hair at the back and secure it in a low bun or a sleek ponytail.
- You can add hair extensions to the ponytail for a voluminous, flowing finish.
- This is a fantastic option for a formal event where you want a style that is both regal and practical.
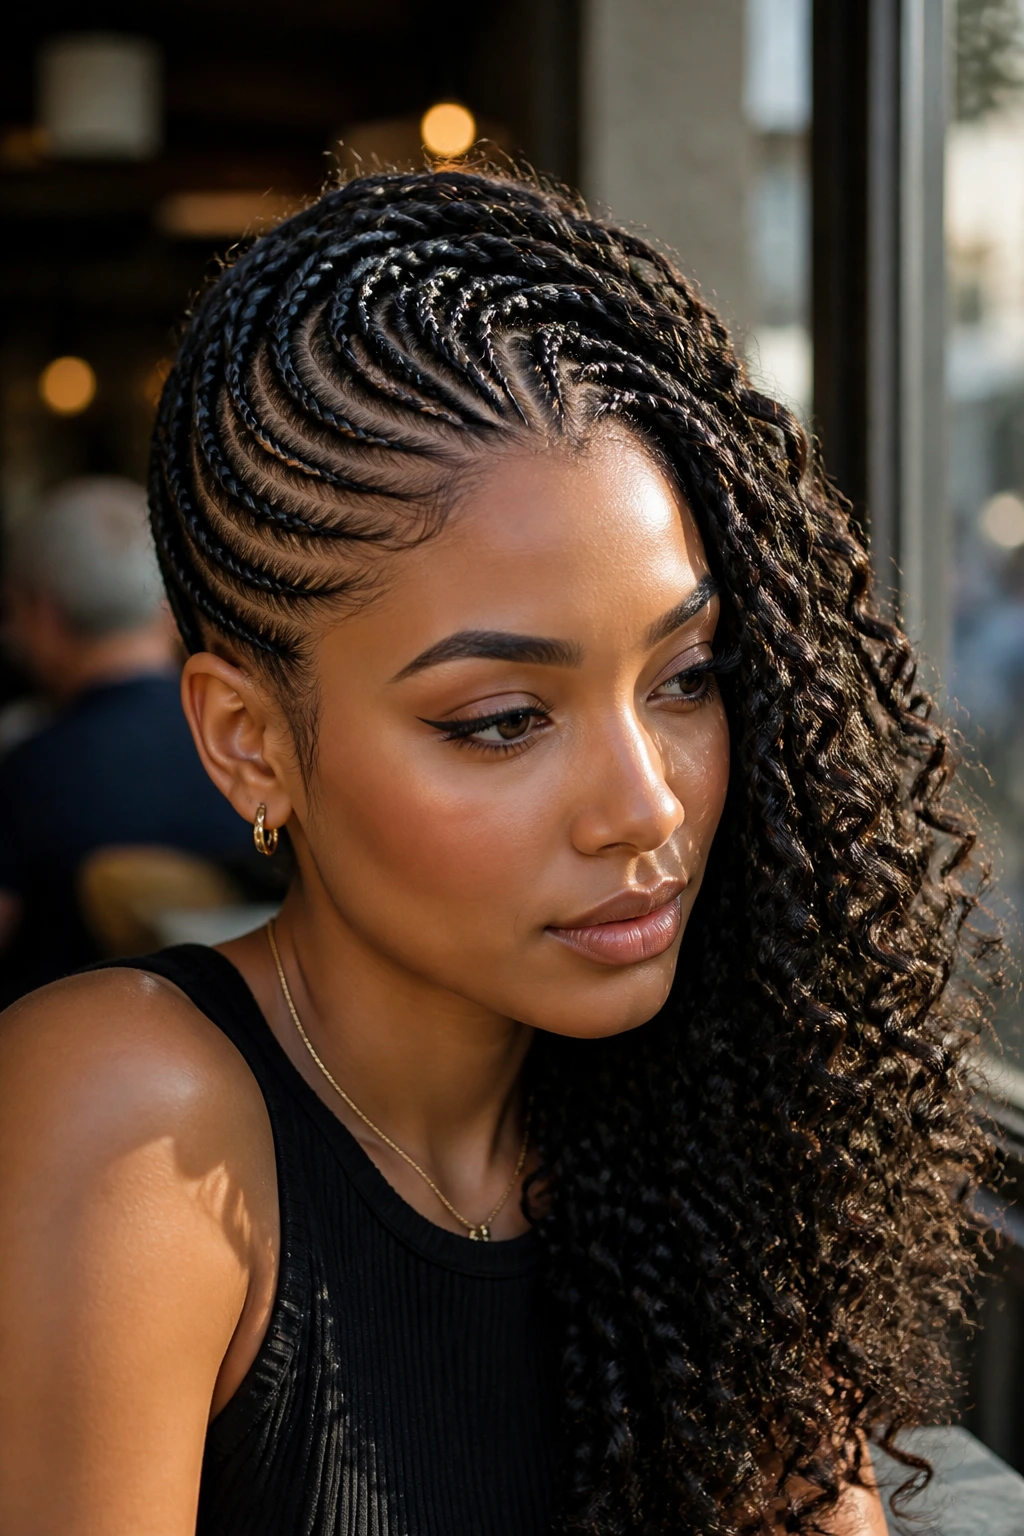
15. The Waterfall Flow
This freehand technique involves braiding only the top section of the head, leaving the ends of the braids to “drop” and merge with the loose curls at the back. It is a perfect blend of style and natural texture, allowing you to show off your curl pattern while keeping the front area clean.
The Transition Point
Braid from the forehead to the middle of the scalp, then stop. Secure the braids with a small, clear elastic and let the remaining length of the hair blend into your natural curls. This creates a soft, romantic look that is effortless to achieve.
Care for the Loose Ends
- Use a curl-defining cream on the loose sections to ensure they blend seamlessly with the braided parts.
- Refresh the loose curls with a light water mist every morning to maintain their bounce.
- This is an excellent style for those with tight curl patterns who want to emphasize their natural volume.
16. The Zigzagged Mohawk
For those who want an edgy, dramatic look, the zigzag mohawk cornrow style is unmatched. By gathering the hair toward the center of the head, you create a tall, ridge-like effect that mimics the aesthetic of a mohawk without the need for shaving the sides.
Creating the Ridge
Part the sides of the head toward the center. Braid from the bottom up to the middle ridge, creating a sharp angle. The center ridge should be thick and raised, which can be accomplished by adding a bit of braiding hair for volume.
Making It Stand Out
- Use bright, vibrant colors in your braiding extensions to make the mohawk even more intense.
- The sharpness of the zigzags is the secret to this look—don’t be afraid to take your time with the parting.
- This style is a personal favorite for festivals or creative work environments where bold self-expression is encouraged.
17. The Mermaid Braid Cluster
By grouping braids together and letting them fan out at the ends, you can create a look that resembles the flowing tail of a mermaid. This style relies on the grouping of three or four braids into a single, cohesive design that focuses on movement and length.
Clustering Technique
Group four braids together in a tight cluster at the crown. As they move toward the nape, let the braids slightly separate. The aesthetic should be fluid, graceful, and long. It’s a softer look that feels very organic.
Styling Tips
- Add shells or pearls to the ends of the braids to lean into the mermaid theme.
- Ensure the braids are kept long, using extensions if necessary to get that dramatic, trailing effect.
- This is a fun, whimsical style that works beautifully for photoshoots or vacations.
18. The Abstract Architecture
Sometimes, you just need to let the hair lead. Abstract architecture is a freehand technique where you simply create paths that look good to you in the moment. No symmetry, no grid, just a series of intersecting lines that form a unique, one-of-a-kind pattern.
How to Be Creative
- Start at the hairline and just let your comb wander.
- Try crossing one braid over another to create a sense of layering.
- The beauty of this style is that it cannot be copied—it is yours alone.
19. The Side-Parted Pixie Braid
This style mimics the shape of a short, side-parted pixie cut. It pulls the hair tight to the scalp on one side, fanning out toward the other. It is incredibly sophisticated and a fantastic way to transition into shorter styles without actually cutting your hair.
The Sweep
Part the hair deeply on one side. Braid the smaller side tightly toward the ear, then sweep the braids from the front across the larger side, creating a sleek, layered effect. This creates a very flattering frame for the face.
Best for…
- Those who want a bold, “short hair” look for a few weeks.
- Framing strong jawlines and cheekbones.
- Adding a modern, sleek touch to a casual outfit.
20. The Parallel Horizon
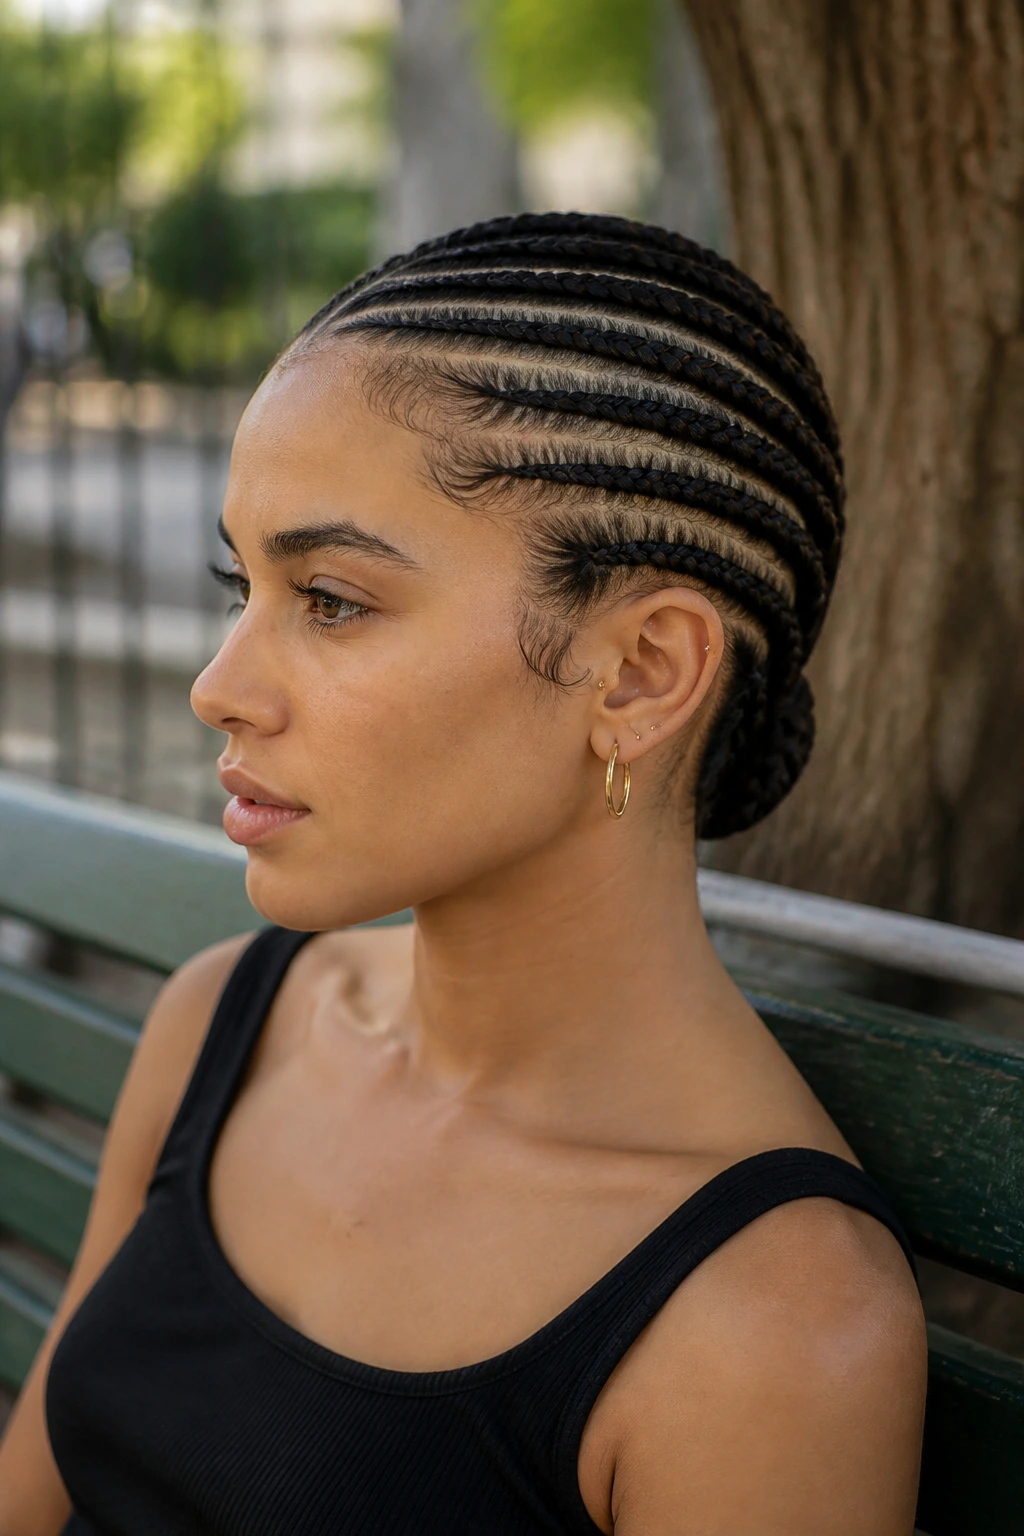
Horizontal cornrows—often called “straight-backs” when vertical—work wonders when done horizontally. This design features braids that run from ear to ear, creating a sense of width and grounding. It is a very structured, disciplined style that looks polished and clean.
Execution
Begin from one side of the head and work your way across to the other. To keep the horizontal lines straight, use a mirror to check your progress frequently. The tension must be very even across the entire horizontal span to prevent the braids from sagging in the middle.
Why This Style Works
- It is visually very different from the common vertical designs.
- It highlights the symmetry of the face.
- It is a very durable style that holds up well during physical activity.
21. The Braided Headband
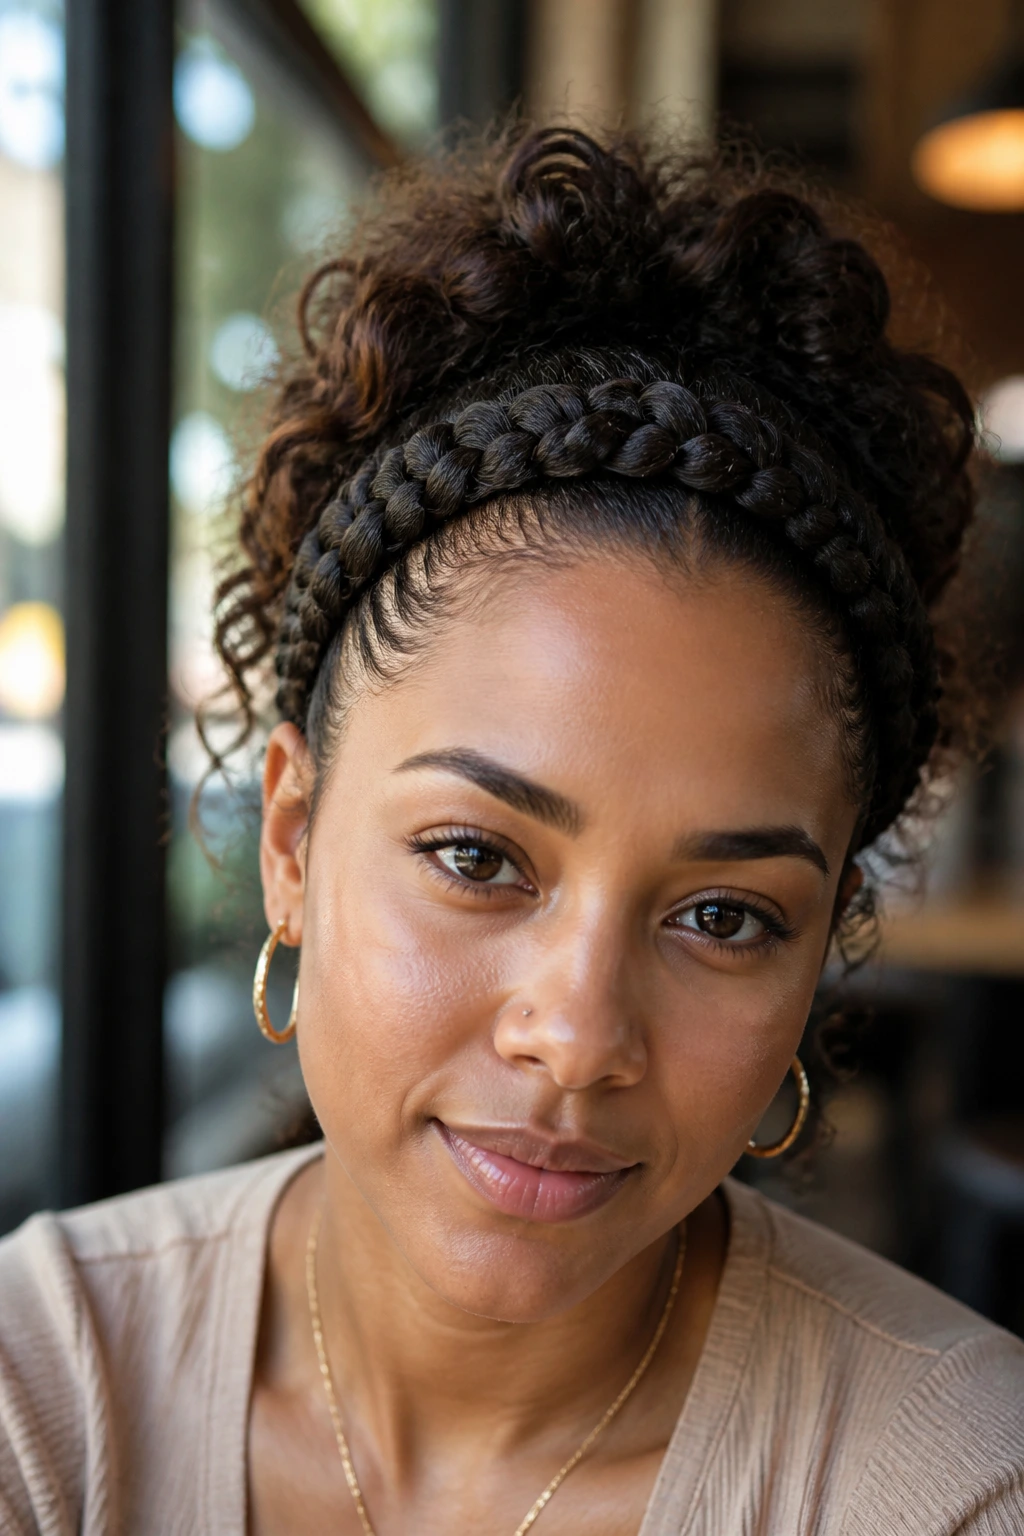
This is the ultimate protective style for the front hairline. It creates a thick, comfortable braided band that sits across the forehead, holding back your curls without causing any strain on the delicate edges.
Shaping the Band
Start at one temple and braid horizontally toward the other. The braid should be thick, perhaps incorporating a bit of added hair for extra volume. This creates a clean, tidy border that keeps hair away from the face all day.
Maintenance
- Use a satin-lined headband over the braids at night to prevent frizz.
- Keep the edges moisturized with a light oil so they don’t break under the tension of the band.
- This is a fantastic “everyday” look for busy professionals.
22. The Serpent Spiral
Inspired by the movement of a snake, this style features one long, winding braid that coils across the scalp. It is incredibly intricate and requires a lot of patience, but the final result is a beautiful, fluid, and highly artistic design.
The Serpent Path
- Start at the front and let the braid wind in a back-and-forth snake motion.
- Keep the turns sharp to emphasize the “serpent” look.
- This is a great choice if you enjoy complex, detailed hairstyles.
23. The Knotted Crown
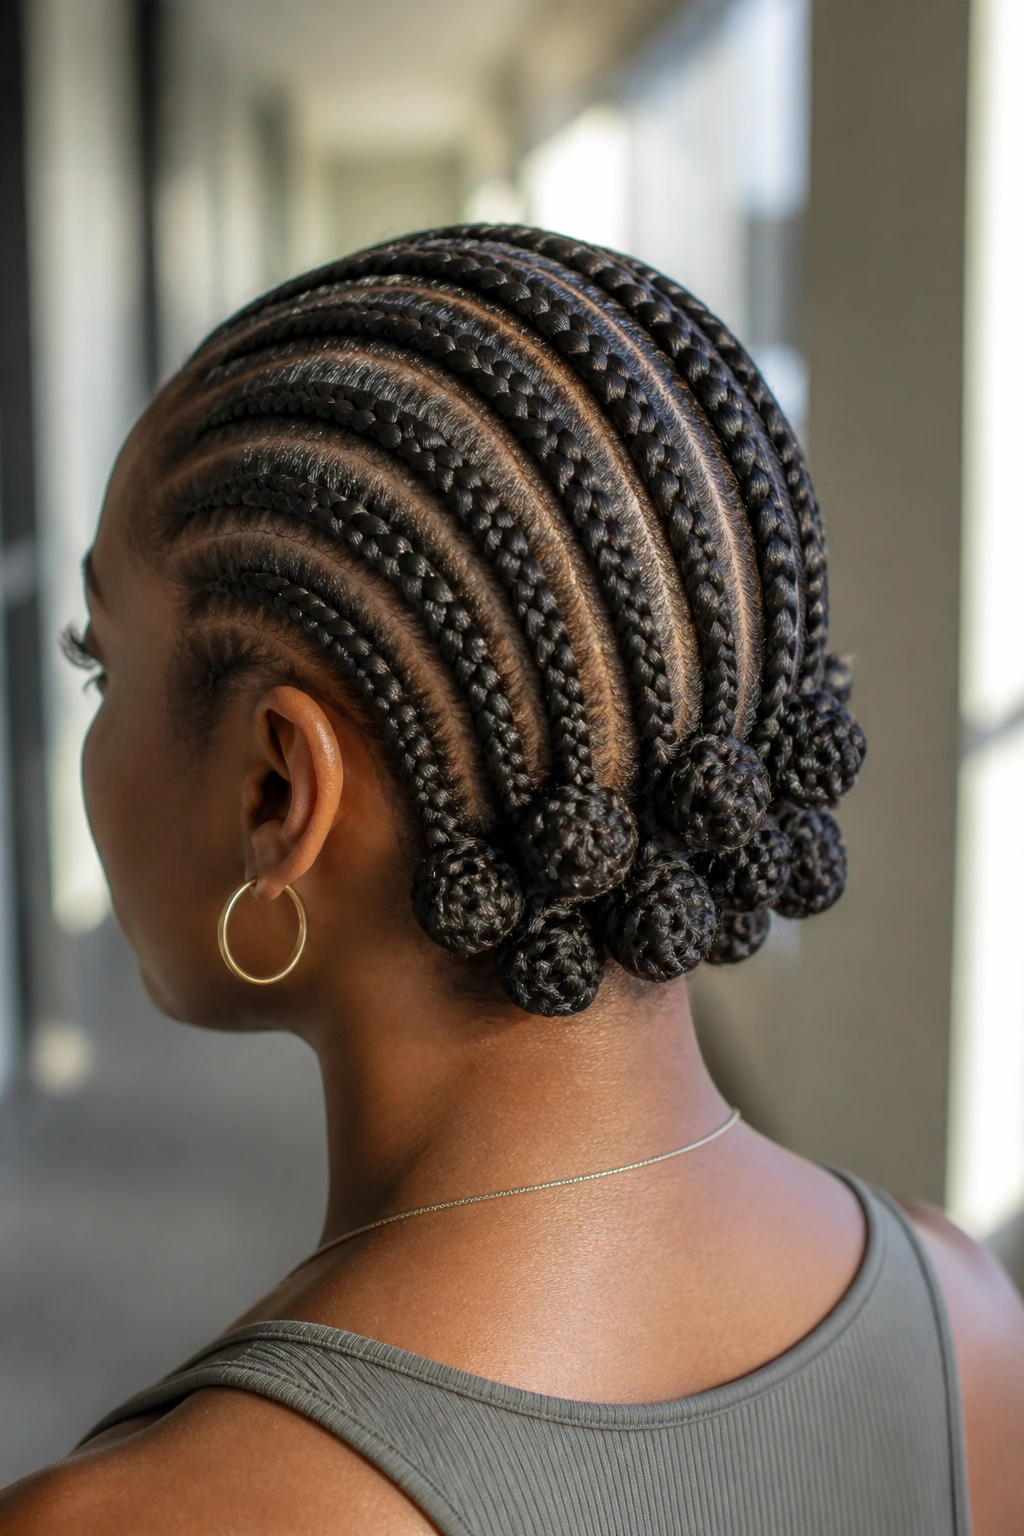
This is a hybrid between cornrows and Bantu knots. At the end of each cornrow, instead of letting the hair hang, you coil the excess length into a small knot. This adds a sculptural element to the head that is both functional and very chic.
Creating the Knots
- Braid the hair to the nape.
- Take the remaining hair and wrap it tightly into a knot, securing with a small elastic.
- The result is a series of small, uniform buns at the back of the head.
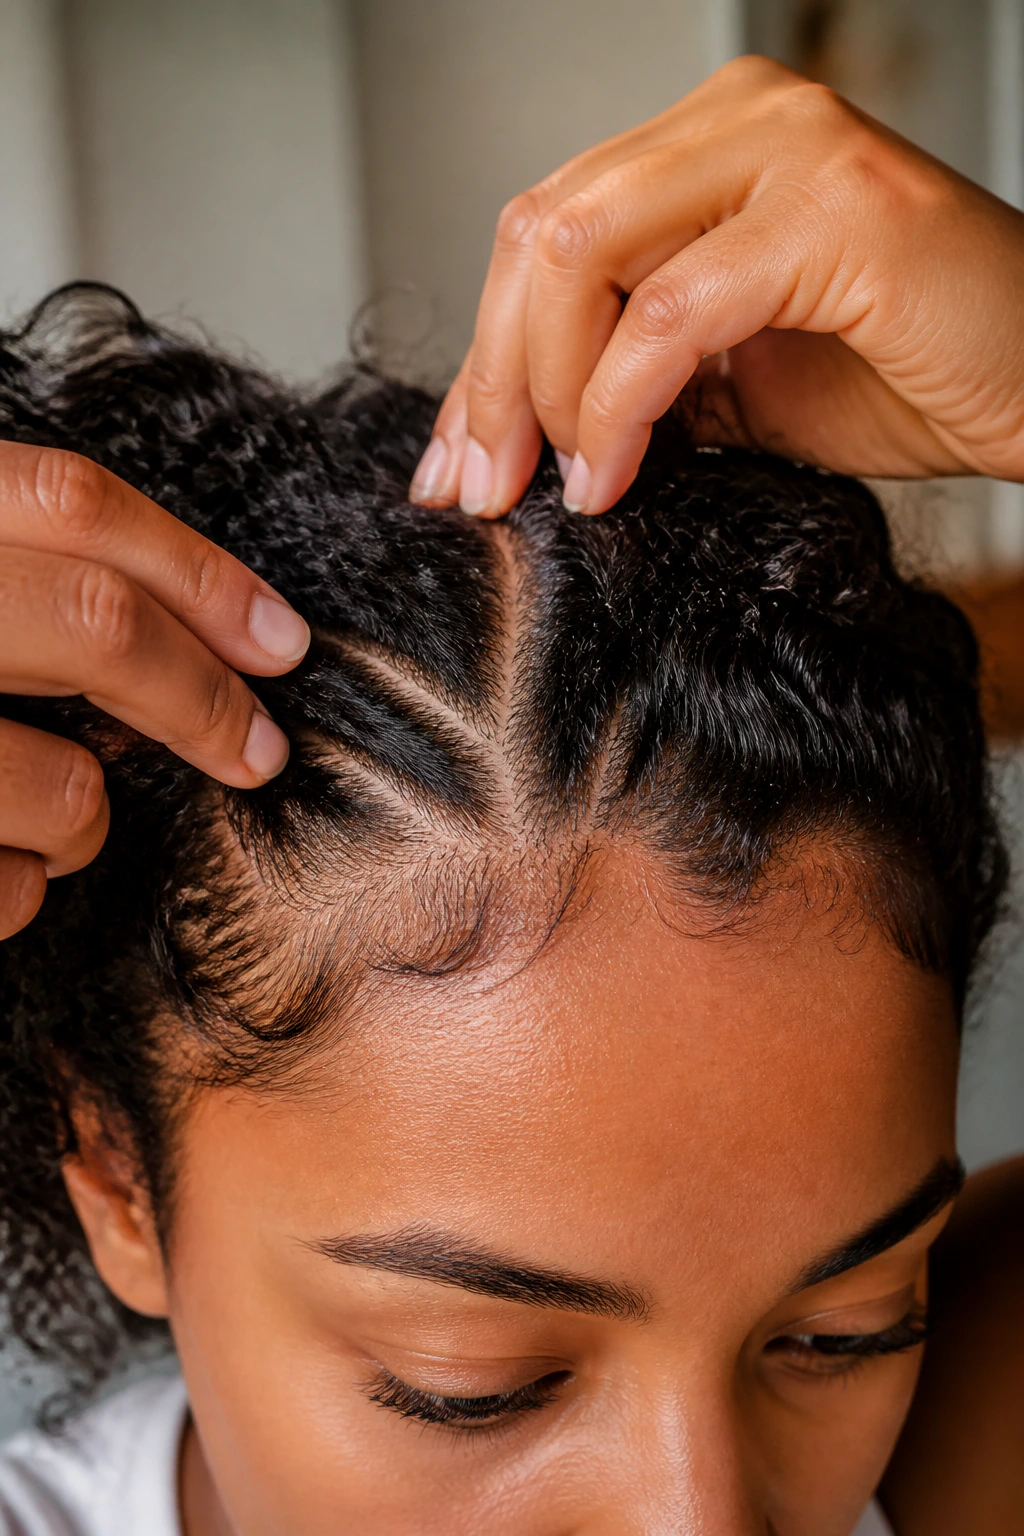
24. The Double-V Design
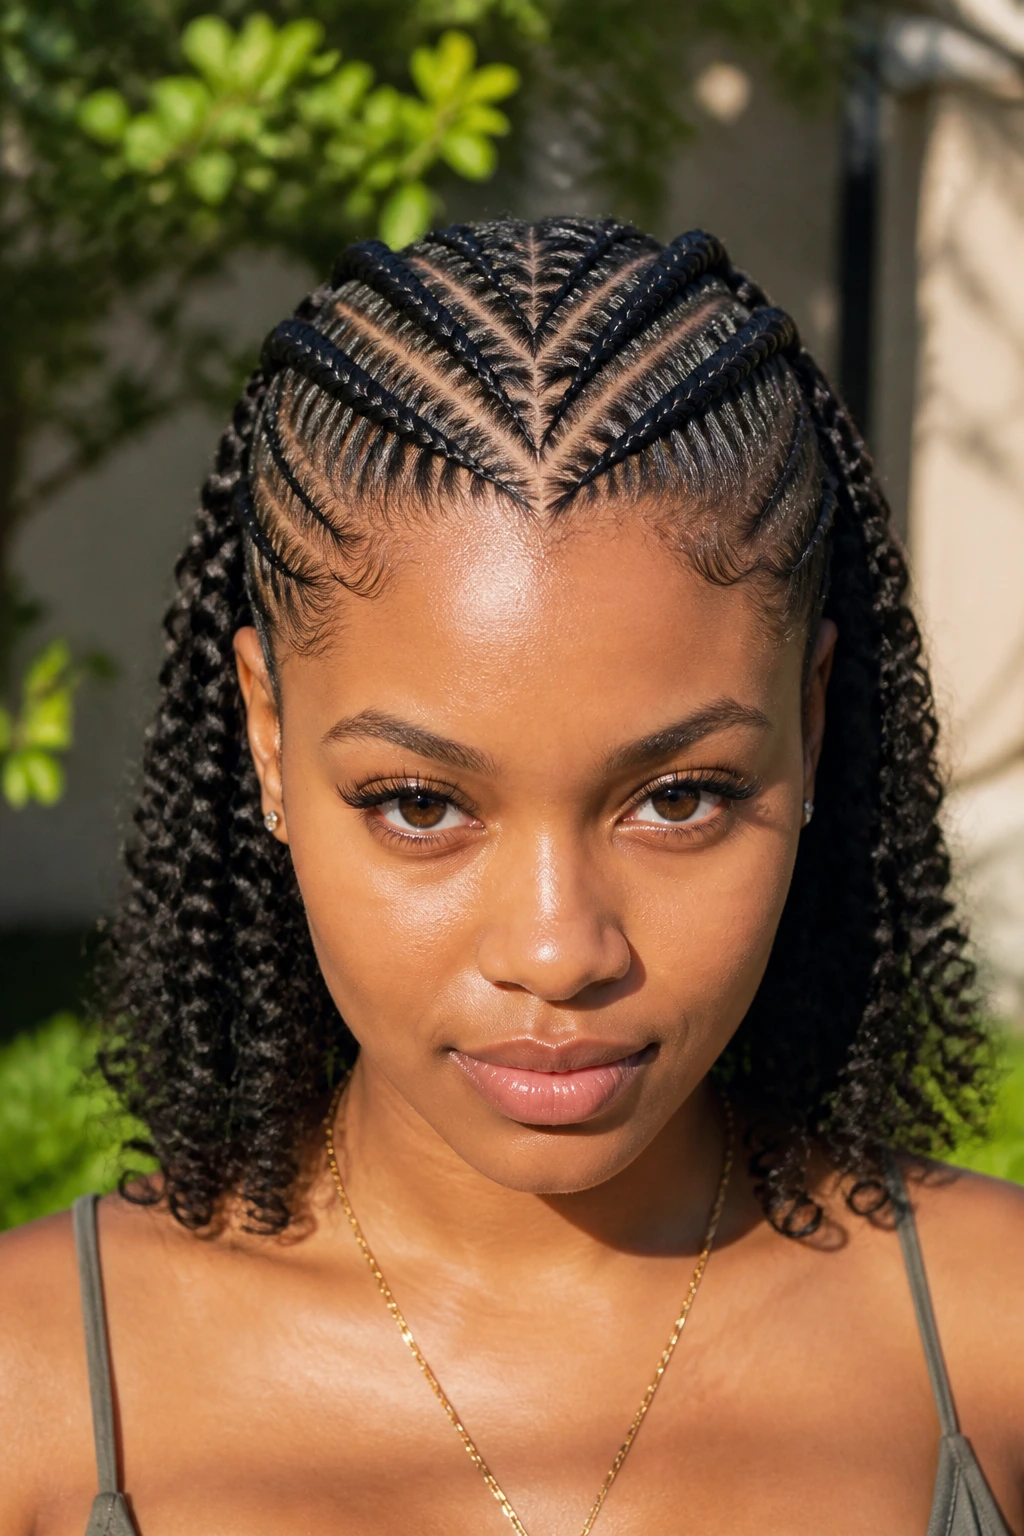
This pattern features two “V” shapes meeting in the center of the head. It is a highly symmetrical style that looks very clean. The point of the V can be positioned at the crown, creating a sharp, intentional center piece.
Getting the V
- Part the hair diagonally toward the center point.
- Ensure the two sides of the V are equal in length and angle.
- This is a great choice for those who love order and geometric precision.
25. The Spoked Wheel
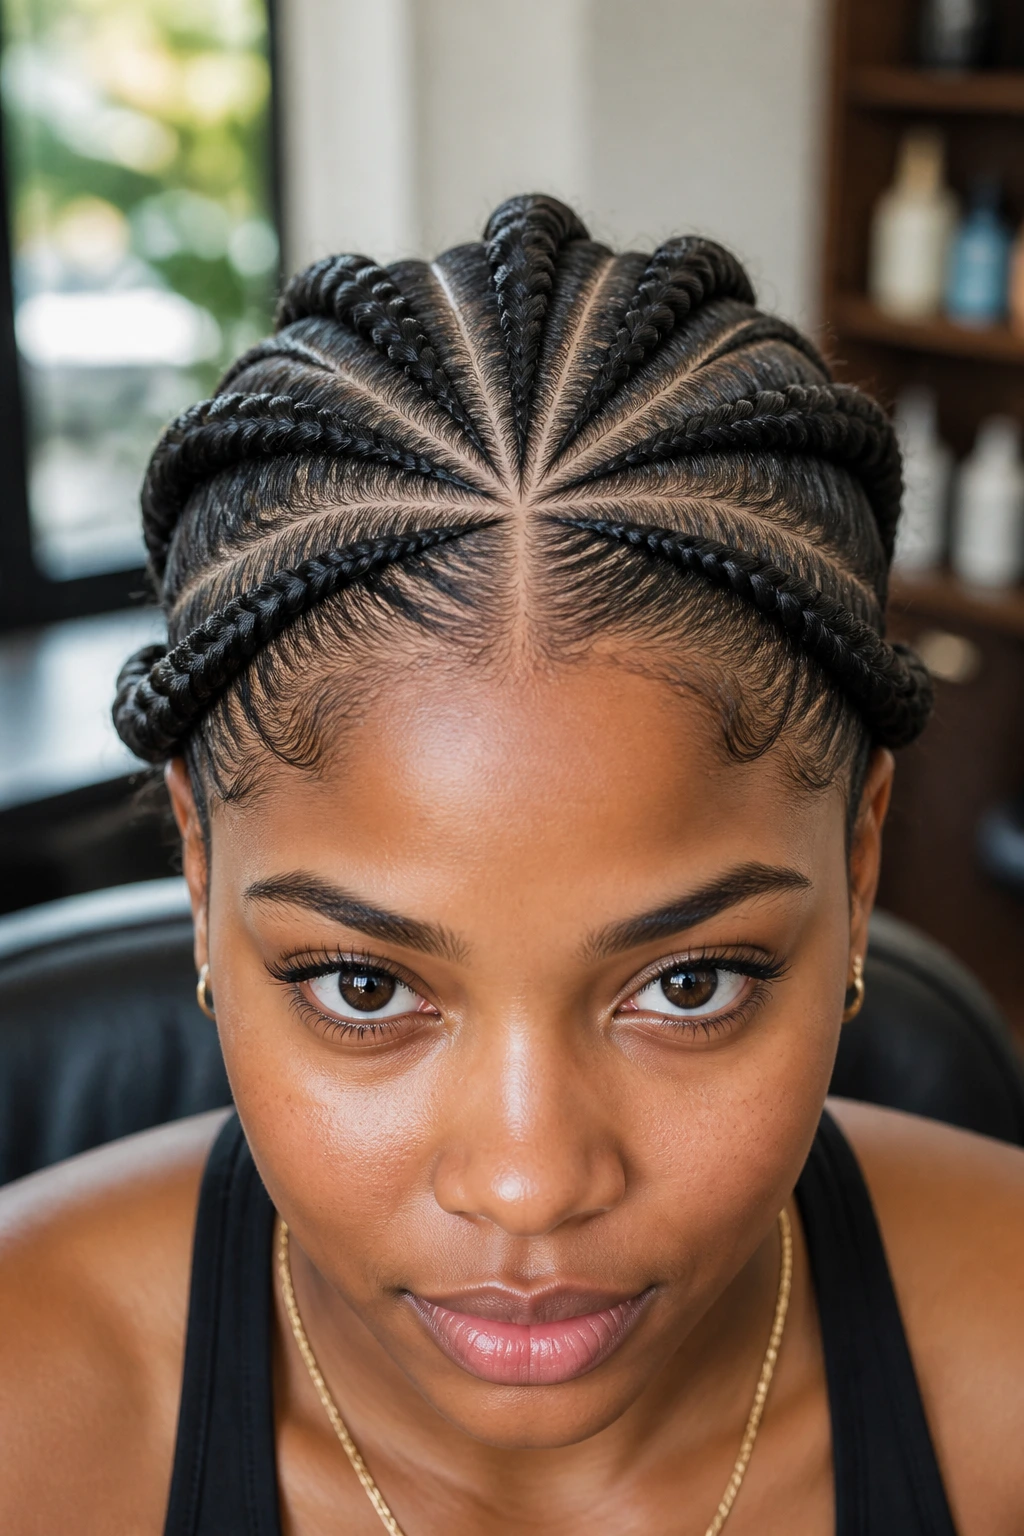
Similar to the sunburst, this style features braids that look like the spokes of a bicycle wheel. It is highly detailed and creates a very “complete” look for the scalp. It is a more complex version of the radial style and takes more time to execute.
Spoke Construction
- Use eight to ten spokes originating from the center.
- Ensure the distance between spokes is identical around the head.
- This is a very visually dense style that looks excellent from every angle.
26. The Layered Sweep
By layering smaller, thinner braids over larger, thicker ones, you create a sense of depth. This style is about textures and sizes, making the head look like a complex layered structure. It is very fashionable and high-impact.
The Layering Technique
- Braid the large base rows first.
- Carefully add the thinner braids on top or in the gaps between the rows.
- This style is best done with a stylist who has a keen eye for detail.
27. The Star-Pattern Perimeter
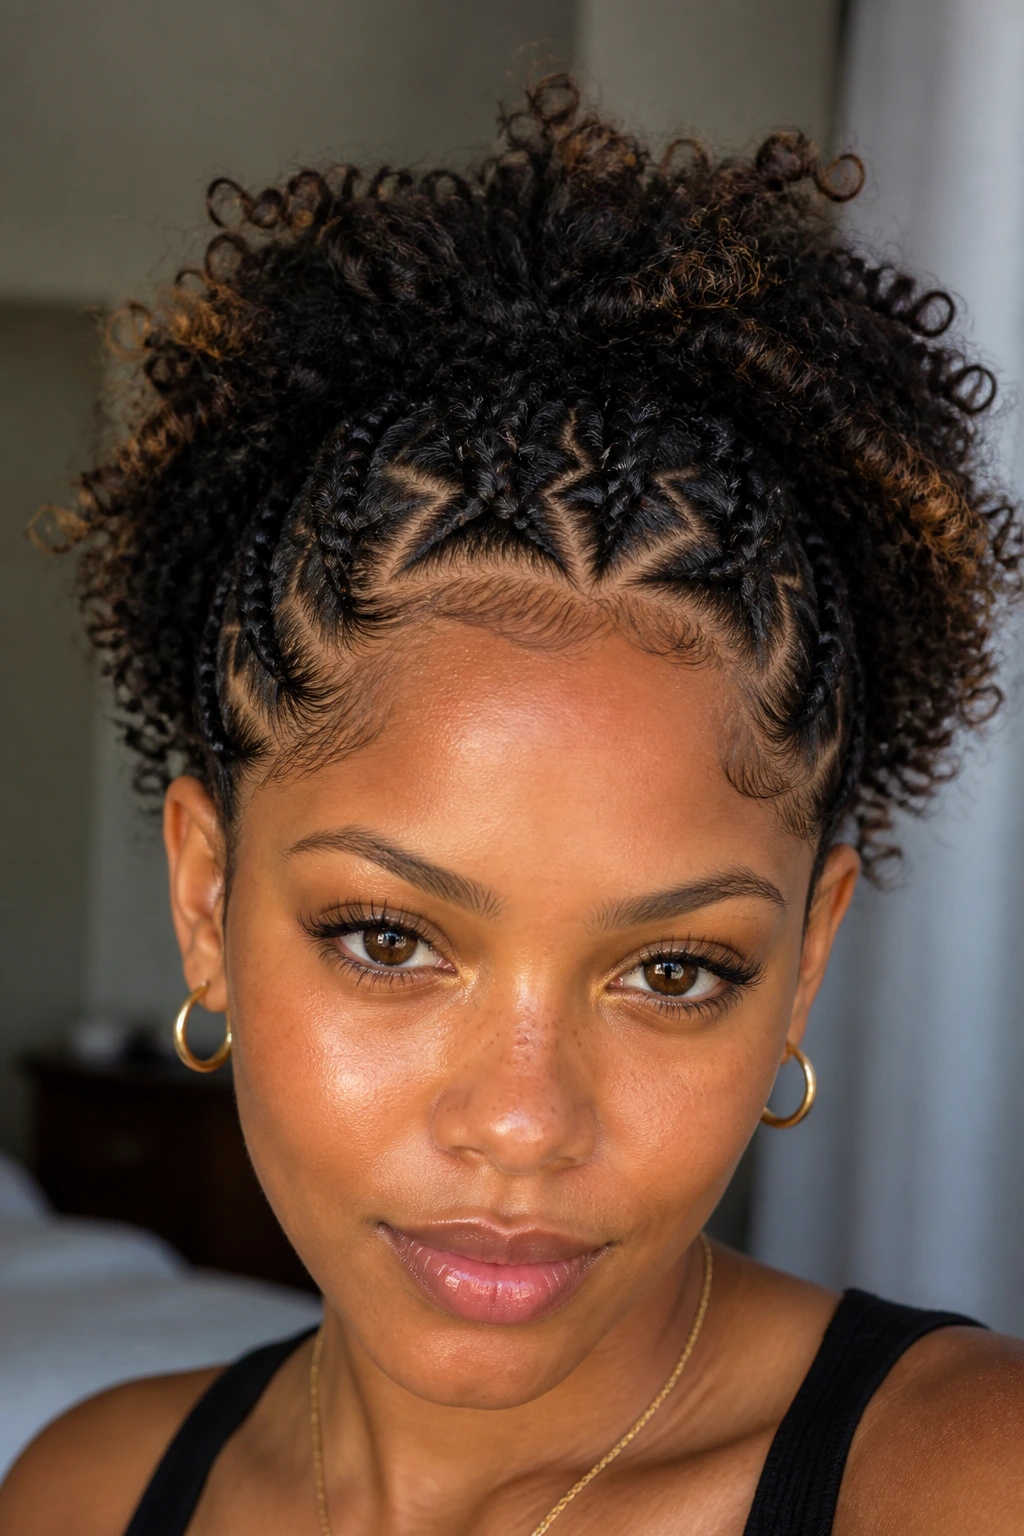
This style features star motifs placed only around the perimeter of the head, leaving the center area for natural curl volume. It is a fun, playful style that gives you the best of both worlds—braids and natural curls.
Positioning the Stars
- Space the stars evenly around the hairline.
- Keep the center of the head free of braids so the curls can bloom.
- This is a perfect style for those who want to experiment with braids without committing to a full-head style.
28. The Final Flourish: The Free-Form Crown
This is the ultimate freehand style. You don’t follow a grid. You don’t follow a pattern. You just let the braids follow the contours of your head. It is the most organic and “curly-hair friendly” of all the designs, as it respects your natural growth patterns above all else.
Why This Wins
- No tension on the scalp because the hair is flowing in its natural direction.
- The most comfortable and longest-lasting of all the options.
- It celebrates the natural uniqueness of your curl pattern.
Practical Tips and Common Mistakes to Avoid
Working with freehand cornrows requires more than just technique; it requires a deep respect for your hair’s limits. The biggest mistake people make is ignoring the health of their scalp. Always start with a clean, moisturized scalp. If your hair is dry, the friction of the braid will cause snapping. Use a water-based leave-in conditioner before you even pick up your comb.
Another common pitfall is over-tensioning the hairline. If you see the skin around your temples turning pale or feeling tight, stop. You are causing long-term damage that is difficult to reverse. Instead of pulling tight, focus on the grip of your fingers—firm enough to secure the braid, but loose enough to prevent pain. Finally, avoid “braid fatigue.” Don’t leave these styles in for more than six to eight weeks. Your scalp needs to breathe, and your curls need to be detangled, hydrated, and allowed to rest before the next installation.
Variations and Adaptations
You can always adapt these styles to suit your specific hair texture or density. For those with thinner curls, incorporating high-quality braiding hair is a great way to add volume and longevity to the style. If you have thicker, more coarse hair, you might find that using a heavier pomade or edge control is necessary to keep the parts sharp.
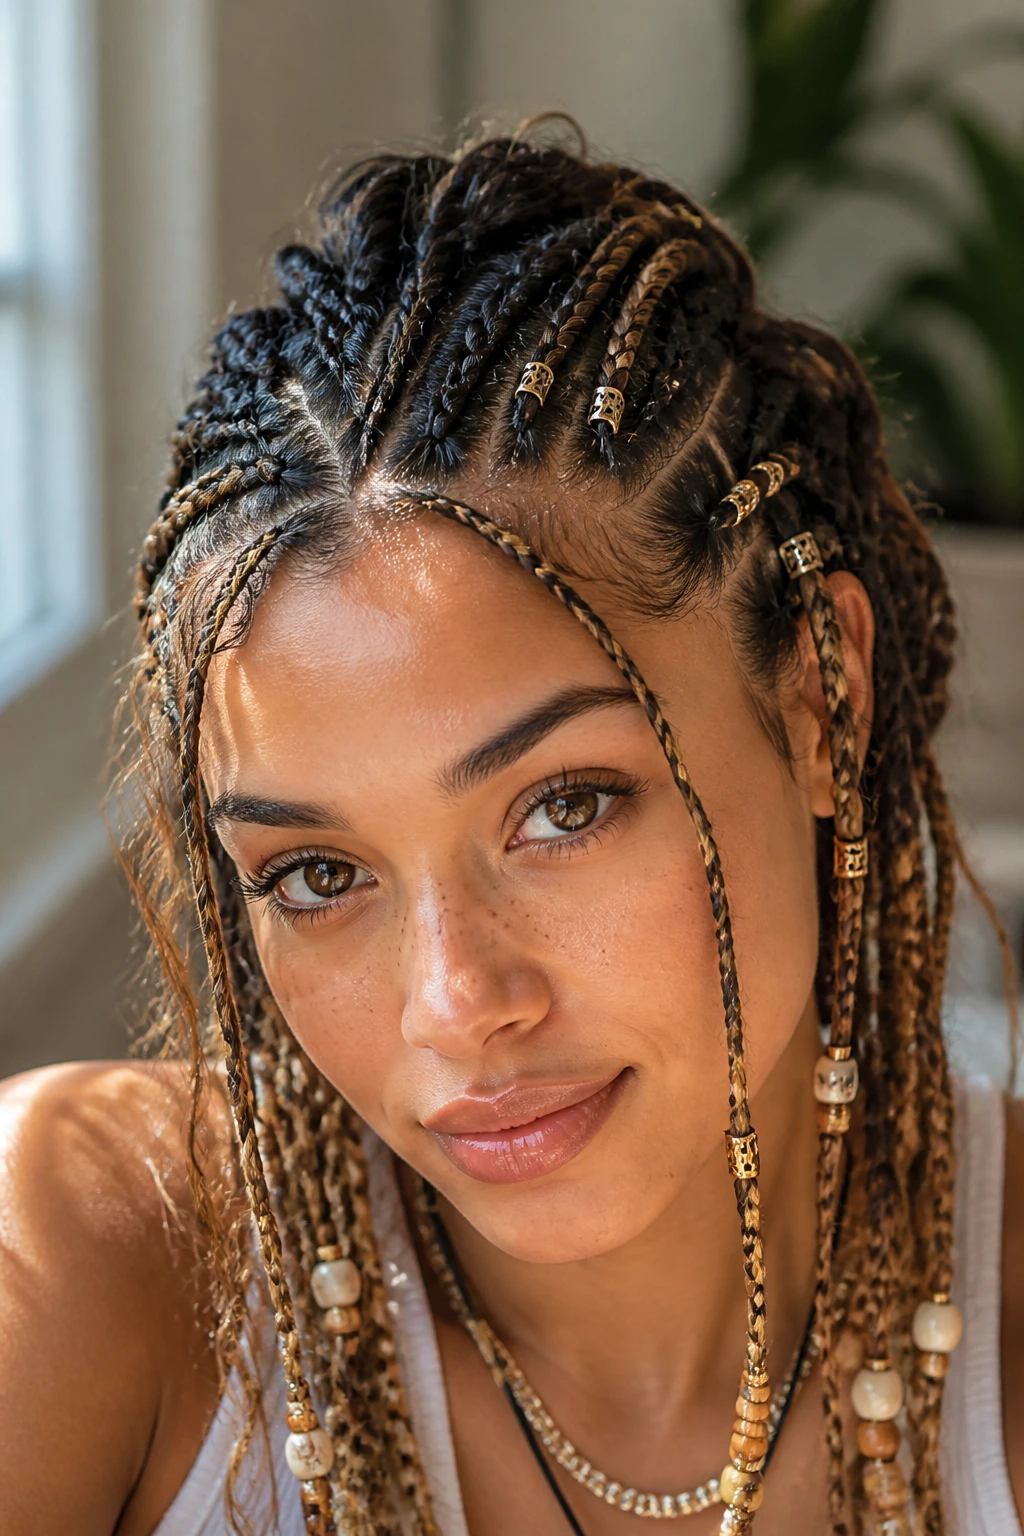
Don’t be afraid to change up the finish. Adding gold cuffs, wooden beads, or even colored synthetic strands can completely change the personality of a basic cornrow design. If you are doing this at home, start with the simpler styles like the parallel horizon or the minimalist part-line design before moving on to the complex radial or zigzag patterns.
Storage, Reheating, and Make-Ahead Guidance
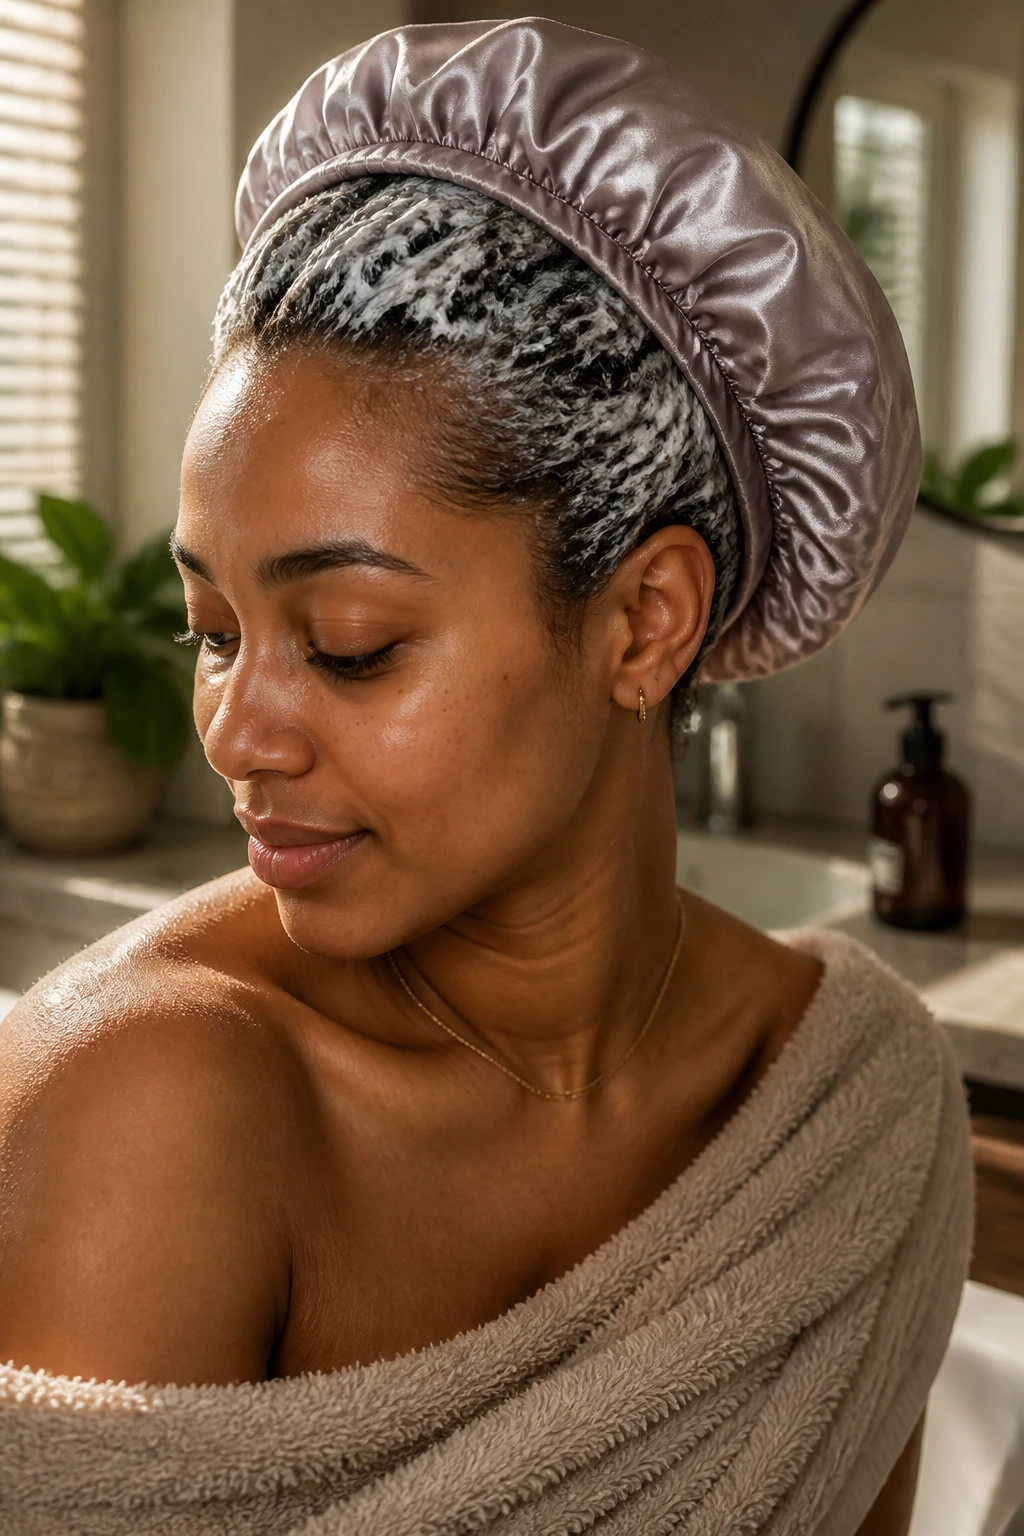
While these are hairstyles rather than food, the concept of “preparation” applies. Before you start your braiding session, prepare your hair by deep conditioning it the day before. A well-moisturized head of hair is much easier to work with, and the braids will naturally look shinier and tighter.
At night, protect your style. A silk or satin bonnet is not a luxury; it is a necessity to keep the frizz down. If you notice a few braids getting slightly messy after a couple of weeks, use a small amount of edge control and a soft toothbrush to smooth the flyaways. This small act of maintenance will buy you an extra week or two of wear without having to redo the entire head.
Serving Suggestions and Pairings

These hairstyles pair best with confidence and simple, clean silhouettes. Because freehand cornrows are visually complex, they act as an accessory themselves. You don’t need heavy makeup or busy patterns to make them work. Simple hoop earrings, a solid-colored top, and a confident walk will make your hair the star of the show. Whether you are hitting the gym, heading to the office, or enjoying a night out, these styles adapt to your needs, proving that protective styling can be both healthy and high-fashion.
Final Thoughts
Freehand cornrows are a beautiful reminder that our hair is an extension of our creative spirit. By moving away from the rigid, factory-like grids of standard braiding, we allow ourselves the freedom to work with the unique topography of our own heads. Choose the style that feels like it fits your personality today, and remember that the healthiest braids are the ones where your scalp feels supported, not strained. Your hair is an asset, treat it as such, and enjoy the process of watching your own unique patterns come to life.