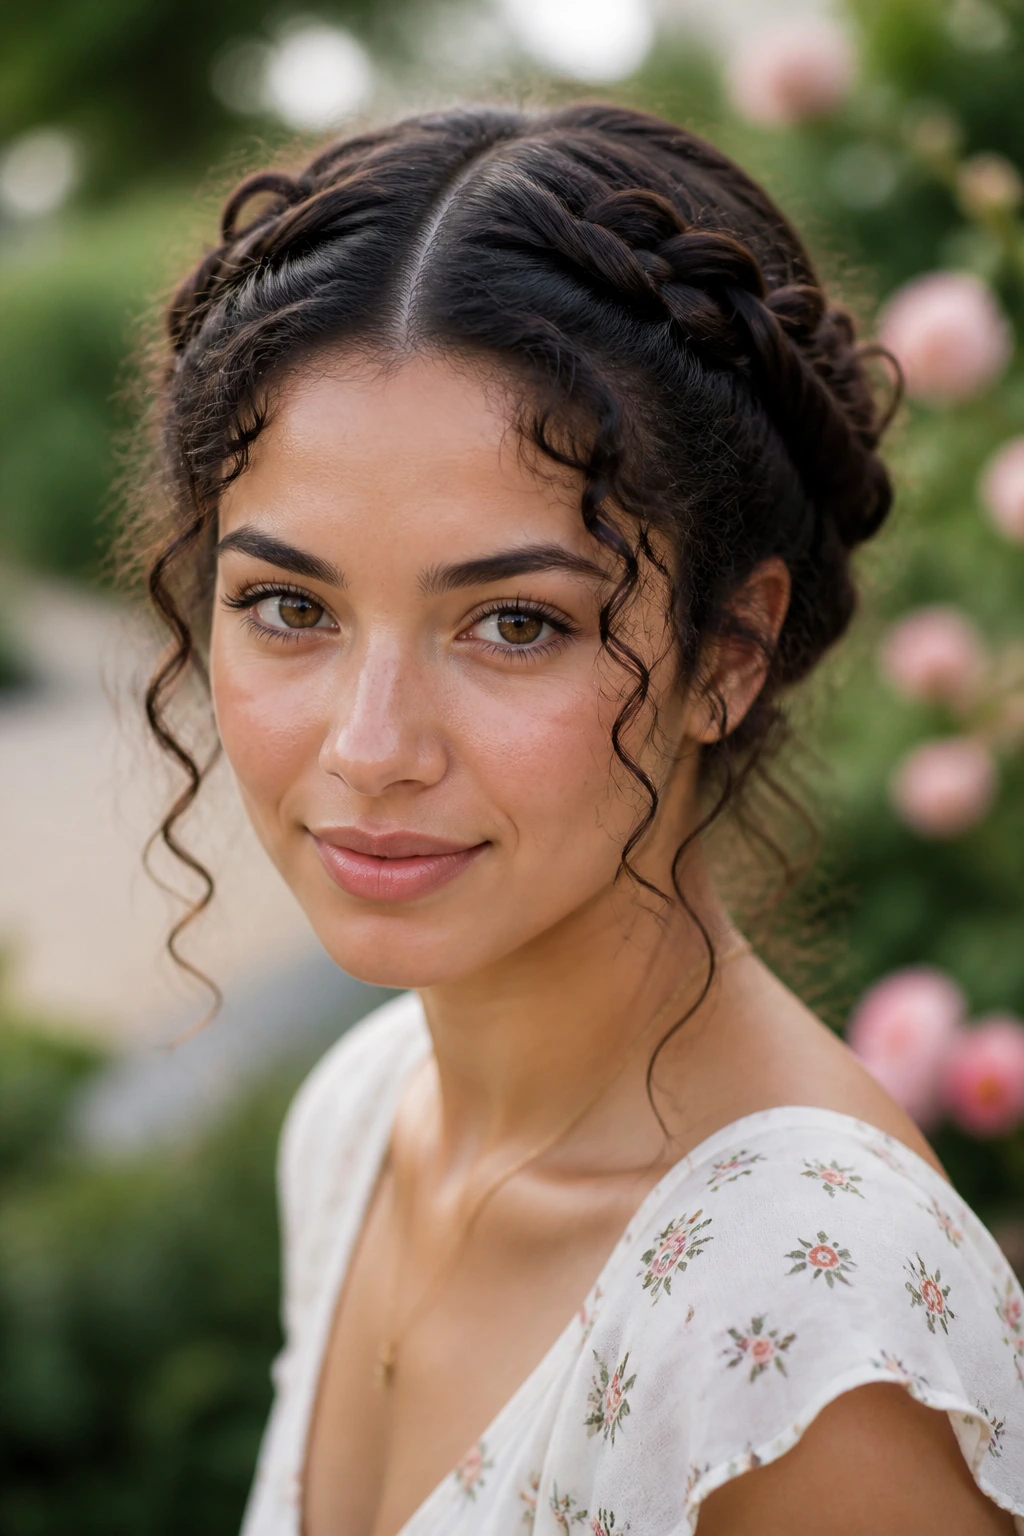
Curly hair is never a single, static texture; it is an evolving ecosystem of spirals, coils, waves, and zig-zags that shift with the humidity, the product you use, and the way you slept the night before. If you have been living your life with one go-to style—or worse, trying to force your hair to behave like someone else’s—you are missing out on the architectural potential of your own crown. The secret to living with curls isn’t about finding the one perfect look, but rather about mastering the art of the mix-and-match.
You want versatility? You have to move past the idea that curls only look good when they are perfectly defined in a wash-and-go. Sometimes you need a high-fashion structural moment; other times, you need something that keeps the hair off your neck during a humid afternoon. By combining techniques like pinning, braiding, twisting, and knotting, you can create looks that are uniquely your own.
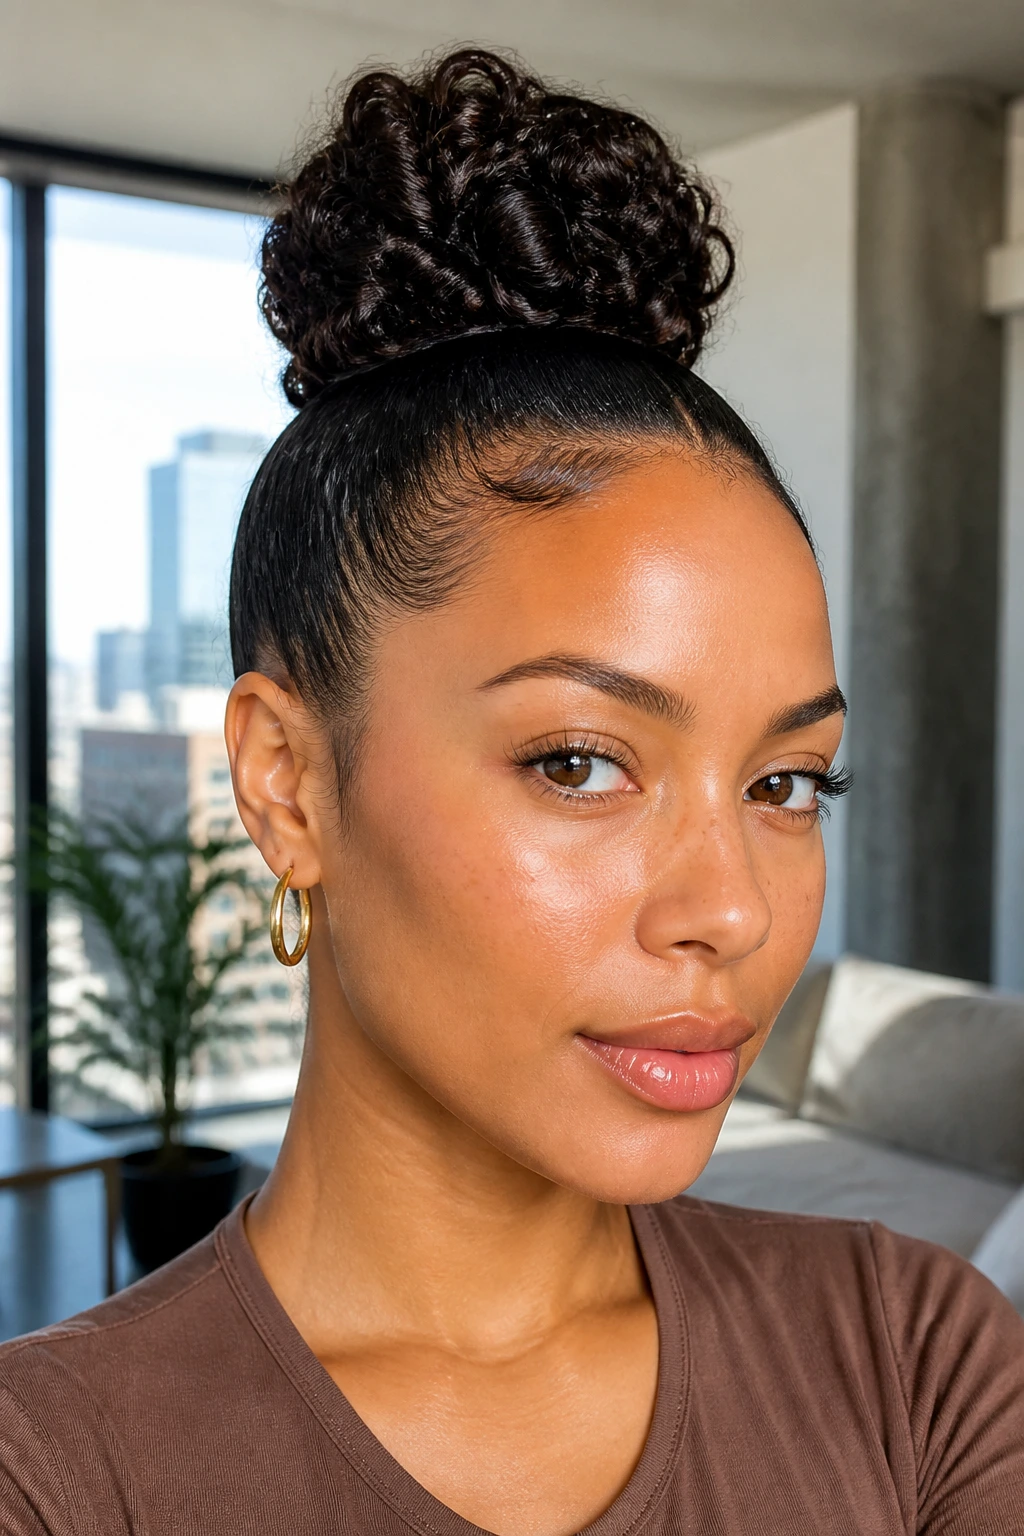
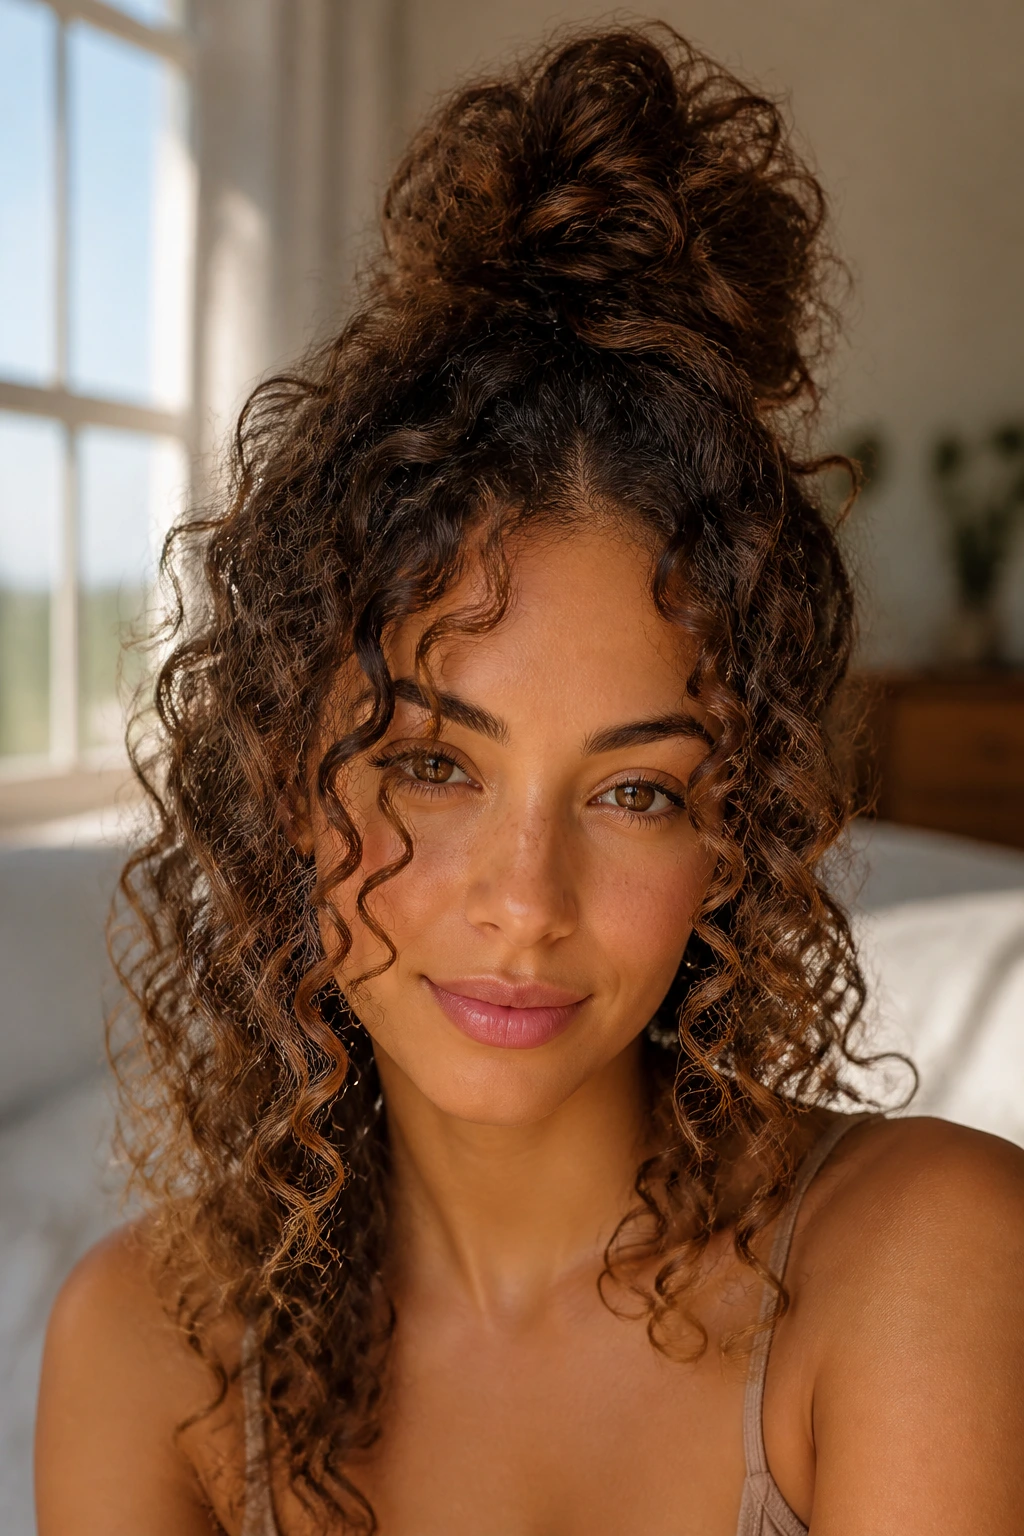
1. The Half-Up Top Knot with Cascading Spirals
This style is the ultimate bridge between polished and undone. You take the top third of your hair—specifically the section from the temples to the crown—and gather it into a high, slightly messy bun. The key here is to leave the rest of your hair completely loose, allowing those curls to frame your face and fall freely over your shoulders.
Why It Works for Curls
The tension at the crown creates a visual lift, while the loose ends provide the volume that naturally accompanies curly hair. It is a fantastic option when your roots feel a little flat or if your curl pattern is slightly looser toward the top of your head.
Pro Technique for Volume
Instead of pulling the hair tight to the scalp, use a wide-toothed comb to gently lift the hair at the roots before securing the bun. Use a silk or satin scrunchie to minimize friction and prevent the dreaded “dent” in your delicate ringlets.
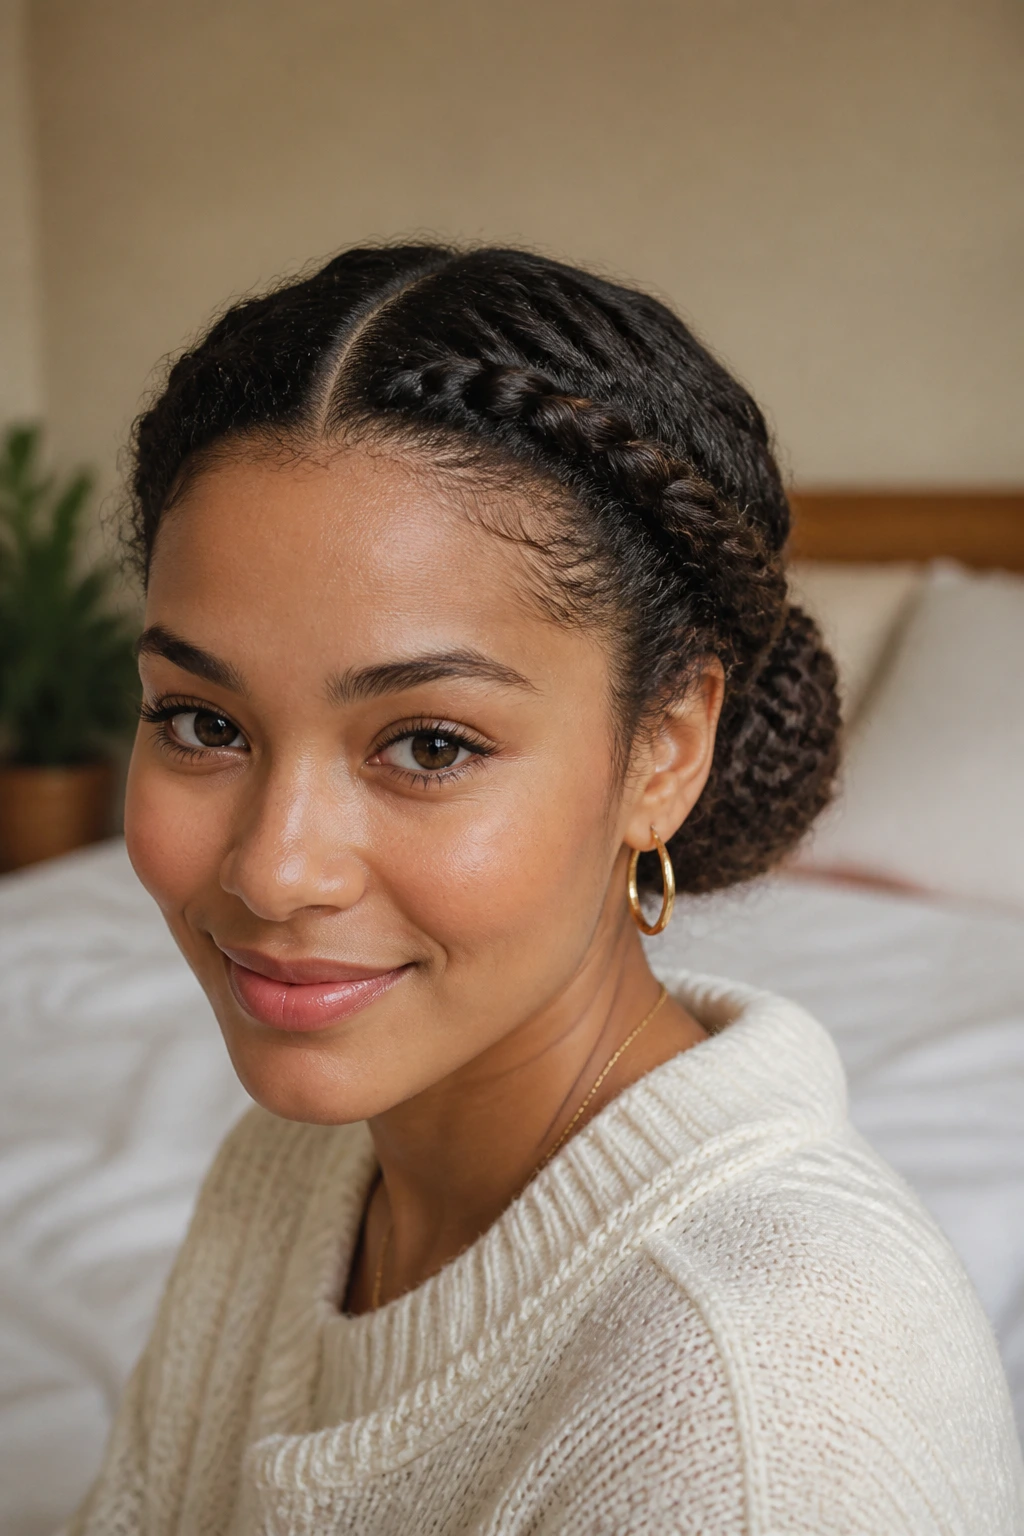
2. Dutch Braided Crowns with Loose Tendrils
Braids and curly hair are best friends. A Dutch braid involves crossing the strands under, rather than over, which makes the braid sit on top of the head like a literal crown. It is a protective style that looks like it took three hours of professional work, yet you can knock it out in ten minutes.
How to Achieve the Look
Part your hair down the center and begin braiding from the hairline toward the nape of the neck on both sides. Once you reach the back, secure the ends with small clear elastics and pin them behind your ears.
The Finishing Touch
For a more romantic, lived-in feel, gently pull at the loops of the braid to pancake them, making them look wider and more effortless. Leave a few curls loose around the temples to soften the framing of your face.
3. The Low Sleek-Front Pony
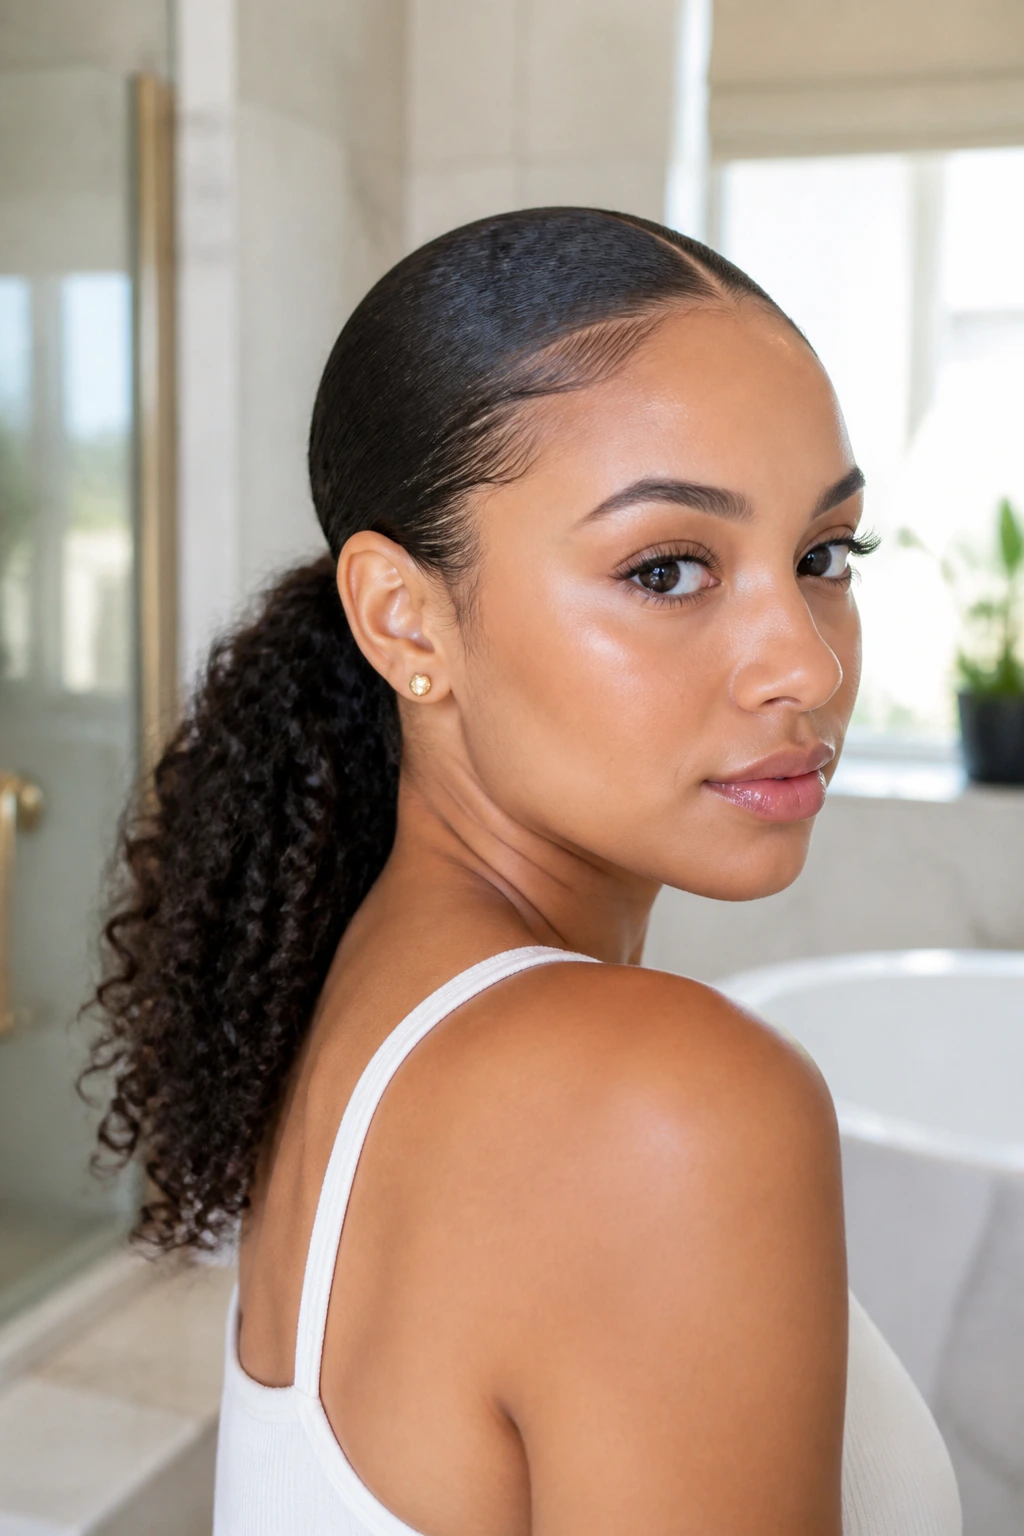
If you want to highlight your facial features while showcasing the length of your curls, the low sleek-front ponytail is your best bet. This style relies on the contrast between a controlled, smooth hairline and a wild, voluminous tail.
The Smoothing Secret
Use a small amount of a firm-hold gel or pomade on the front section, from your forehead back to the ears. Brush it back with a boar bristle brush to ensure every strand is laying flat.
Securing the Style
Gather the remainder of your hair into a low ponytail. Because curly hair has so much body, you do not need to tease the tail to get that “wow” factor; the natural curl will do the heavy lifting for you.
4. Double Space Buns with Face-Framing Curls
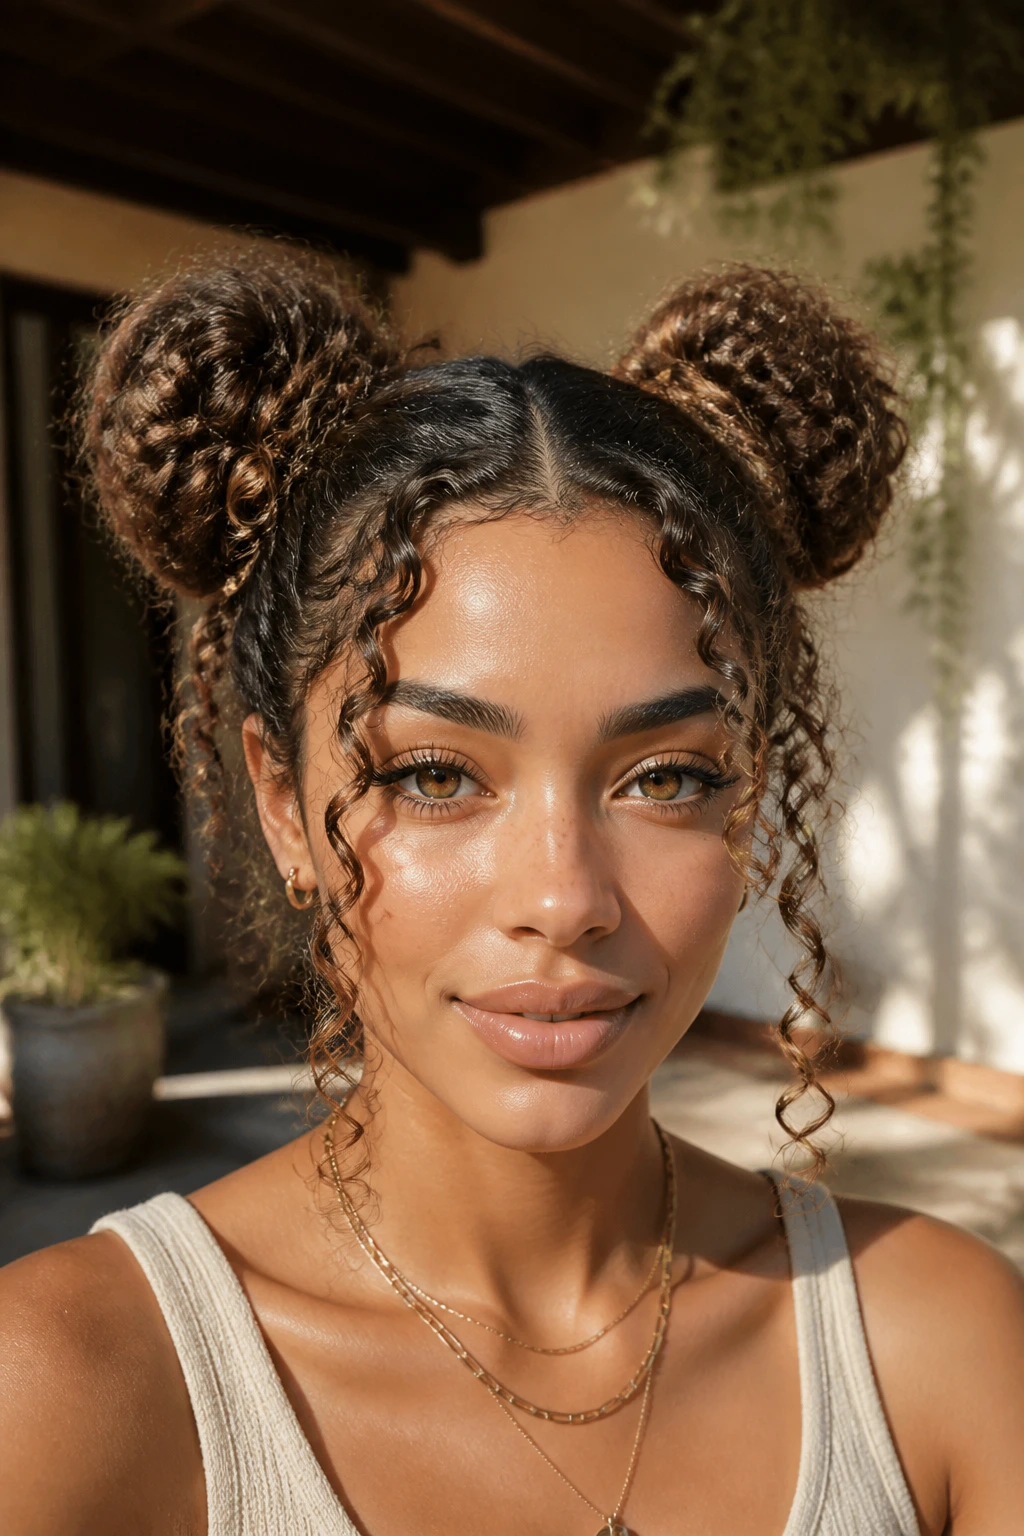
Space buns are not just for festivals; they are a practical way to manage curls that have started to frizz on day three or four. By splitting your hair into two sections—either a perfect center part or a jagged, undone part—you create a symmetrical base that feels youthful and fun.
How to Create Texture
Twist each section into a bun, but don’t worry about being precise. Let the ends of your curls poke out of the bun. This gives the style a textured, organic shape that feels much more natural than a tight, ballerina-style donut bun.
Styling the Forehead
Pull two thick, spiraled ringlets out in the front. These act as natural highlights for your eyes and break up the symmetry of the buns.
5. The Twisted Side-Sweep

When you want to look elegant without the effort of an updo, the twisted side-sweep is a lifesaver. You gather all of your hair to one side and use bobby pins to secure it against the back of your head.
The Twist Technique
Starting from the temple on the non-swept side, take small sections of hair and twist them toward the back. Pin them as you go. This creates a faux-undercut look that is both edgy and sophisticated.
Why This Style Lasts
Because you are pinning the hair in place, this style holds up better than a simple side-part during long days. It works particularly well for formal events where you want to show off earrings while keeping the back of your hair secure.
6. Half-Up Claw Clip Cascade
The humble claw clip is arguably the greatest invention for curly hair. Unlike elastics that can pull and tangle, a large, sturdy claw clip gathers your hair in a way that preserves the integrity of each curl.
The Styling Method
Gather the top half of your hair—don’t worry about perfect lines—and twist it once before clipping it against the back of your head. The goal is to allow the curls in the clip to fall over the top, cascading down like a waterfall.
Selecting the Right Tool
Always opt for a matte-finish clip rather than a slippery plastic one. Matte clips have more grip, which prevents the heavy weight of thick curls from causing the clip to slide down over the course of the day.
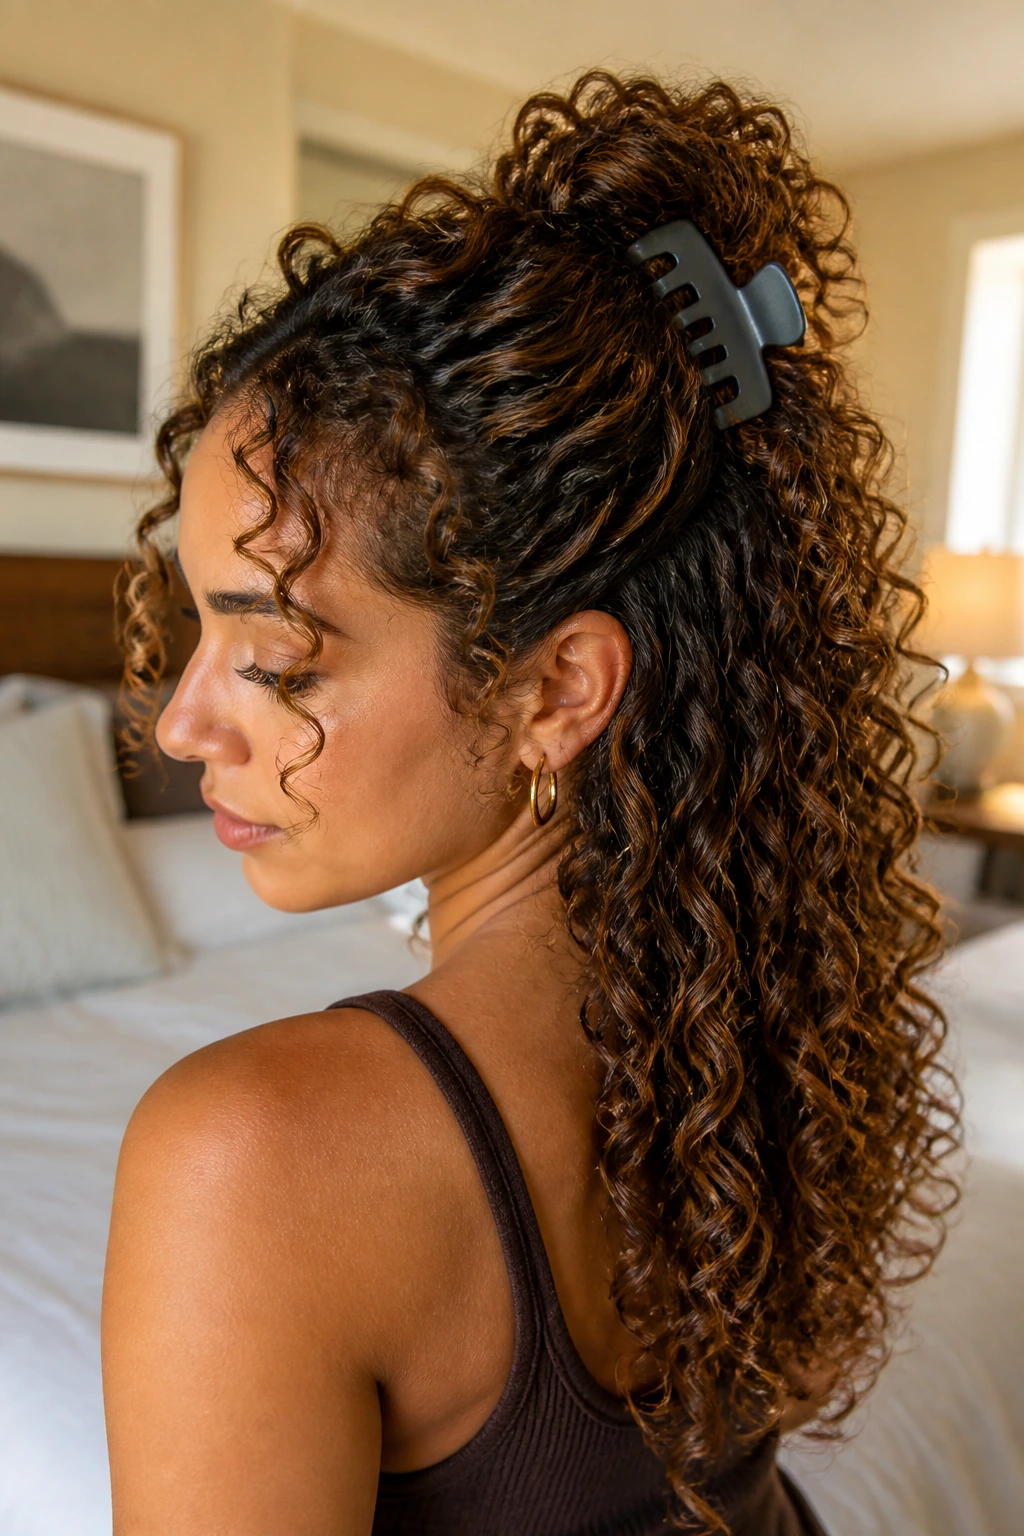
7. The High Pineapple Pony

The pineapple is the gold standard for curly hair preservation at night, but it is also a killer look for the day. By bringing all your curls to the very top of your head, you maximize volume and let the curls tumble forward.
Enhancing the Shape
Use a fabric-covered coil tie to secure the ponytail. These ties are designed to hold the weight of heavy hair without creating pressure points or breakage.
Adding a Scarf
To turn this from a “sleeping style” to a “daytime look,” tie a silk scarf around the base of the ponytail. A vibrant print or a classic neutral color can elevate the look from casual to chic in seconds.
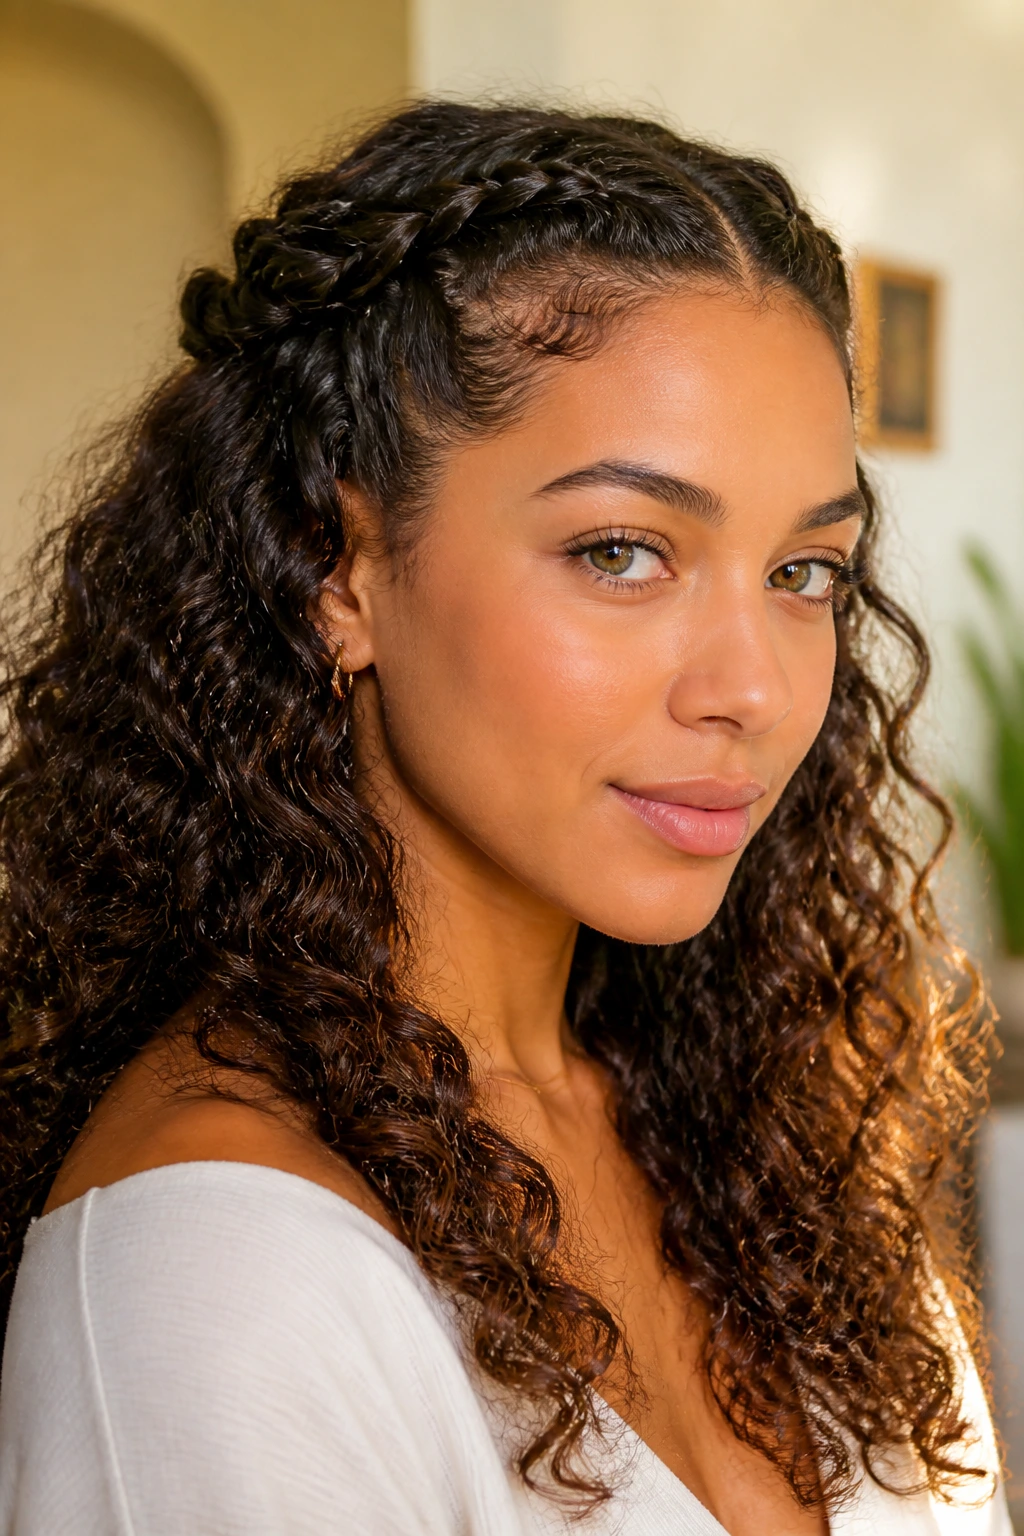
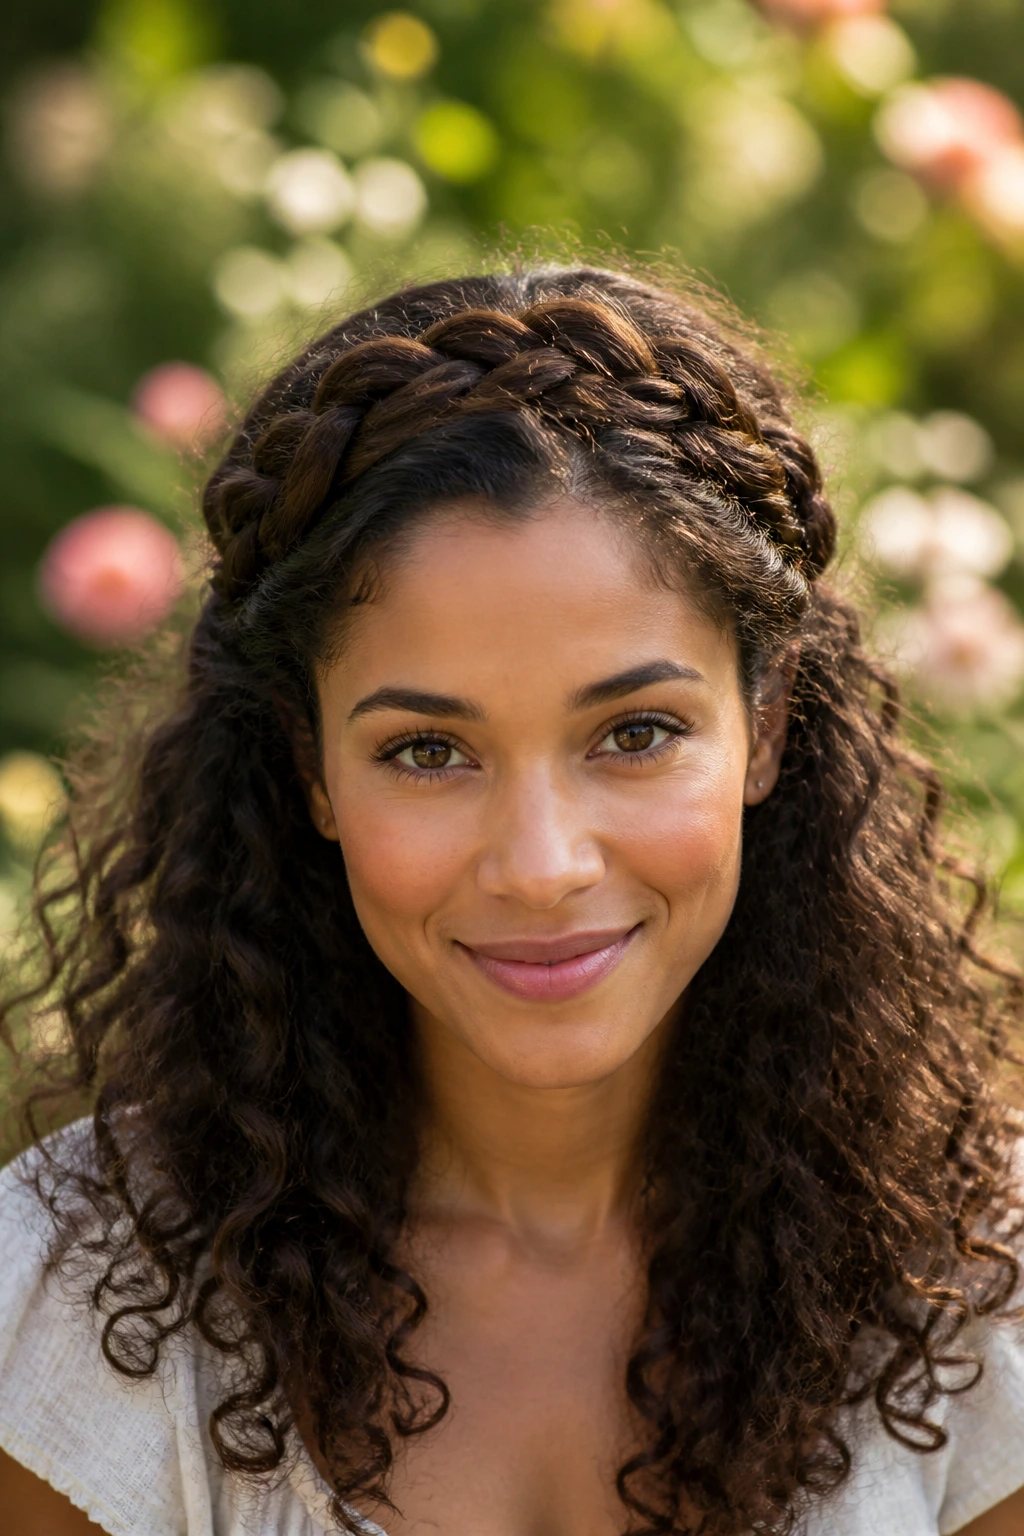
8. Braided Headband with Loose Ringlets
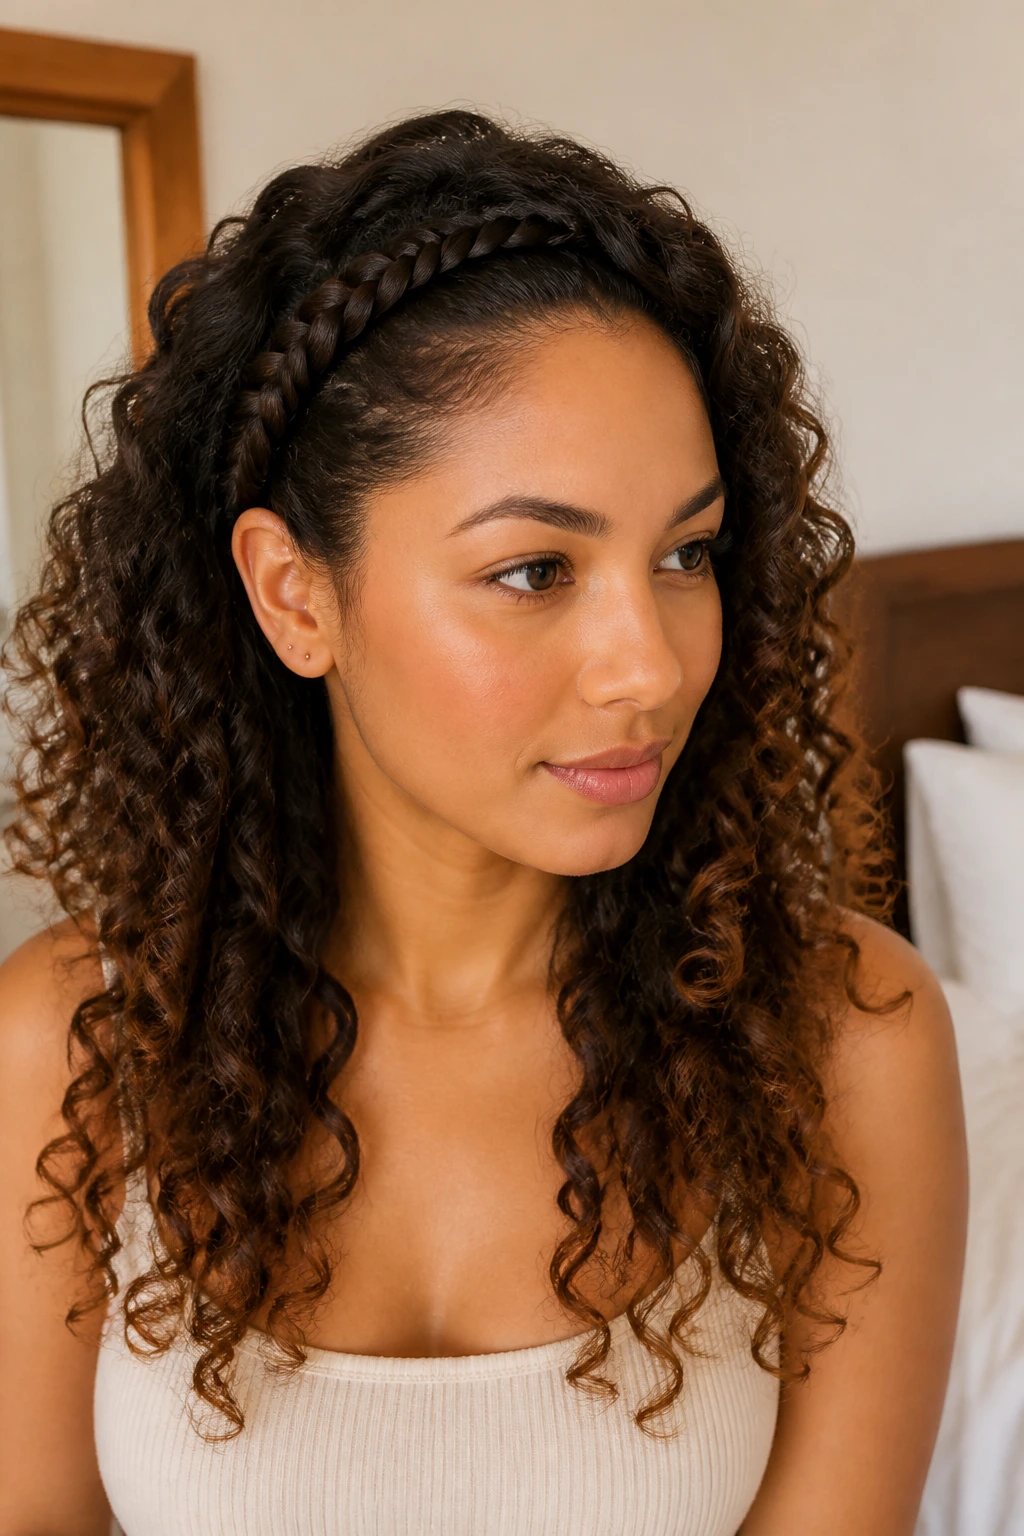
If you miss the days of wearing headbands but hate the pressure they put on your scalp, a braided headband is the perfect alternative. You create the headband using your own hair, which means zero headaches and a custom-fitted look.
Constructing the Braid
Start by taking a two-inch section of hair from behind one ear. French braid it diagonally toward the opposite temple, grabbing new hair as you go.
Finishing the Look
Once you reach the opposite side, pin the end of the braid underneath your loose hair. The rest of your curls will fall naturally over the pin, hiding your tracks completely.
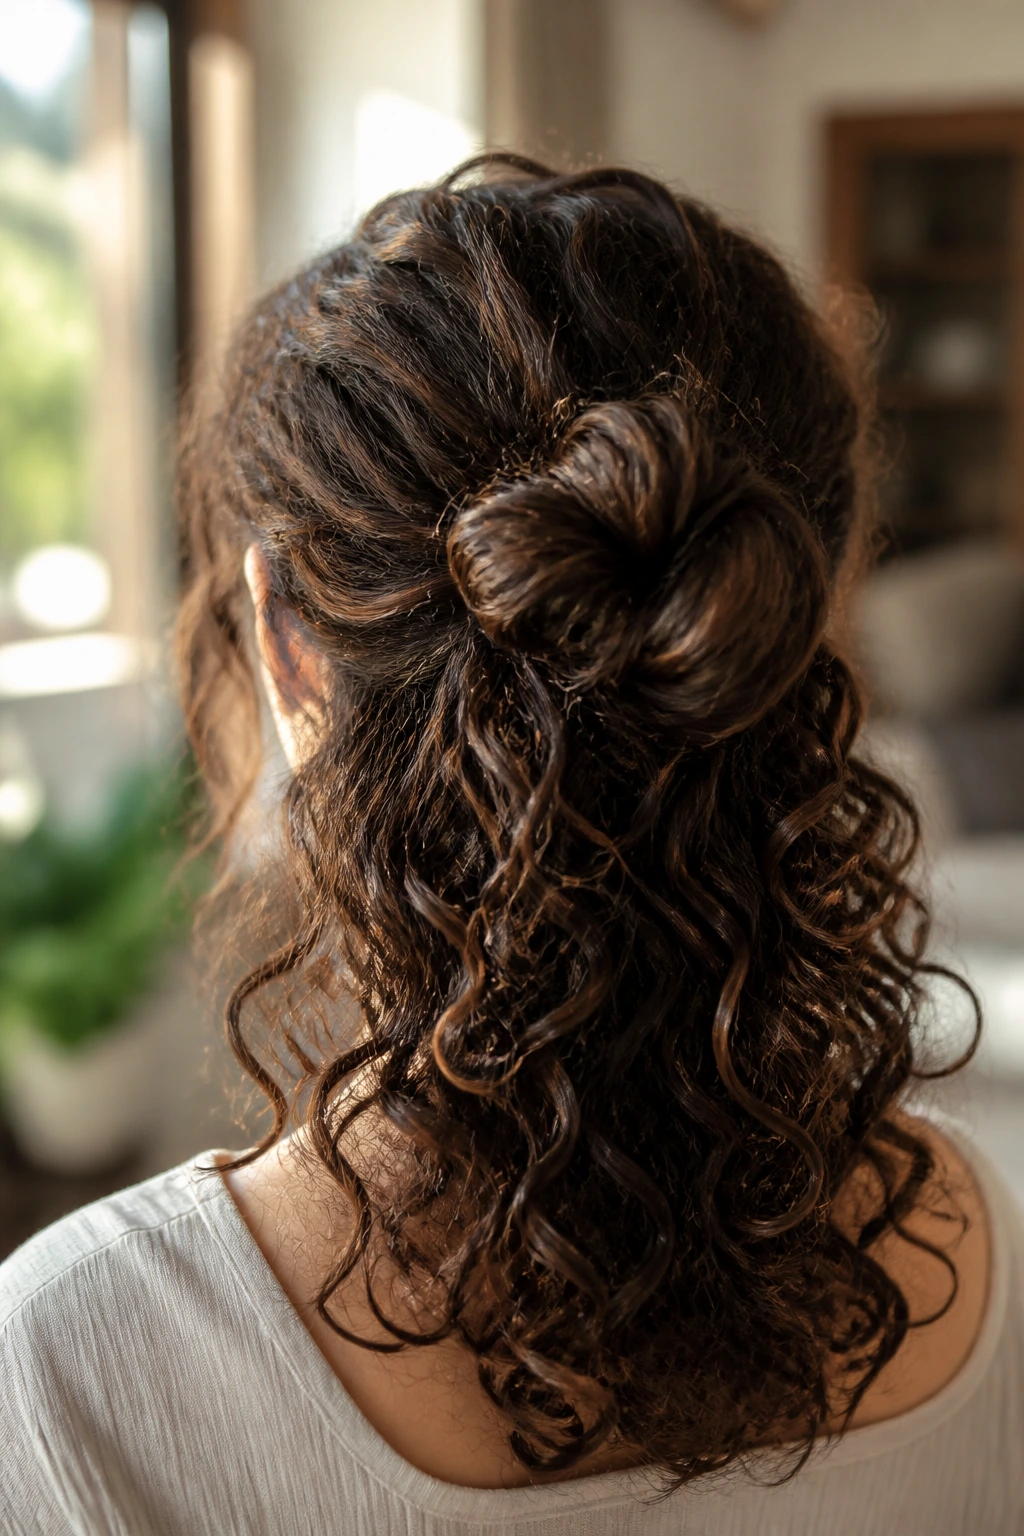
9. The Messy Chignon with Hair Sticks
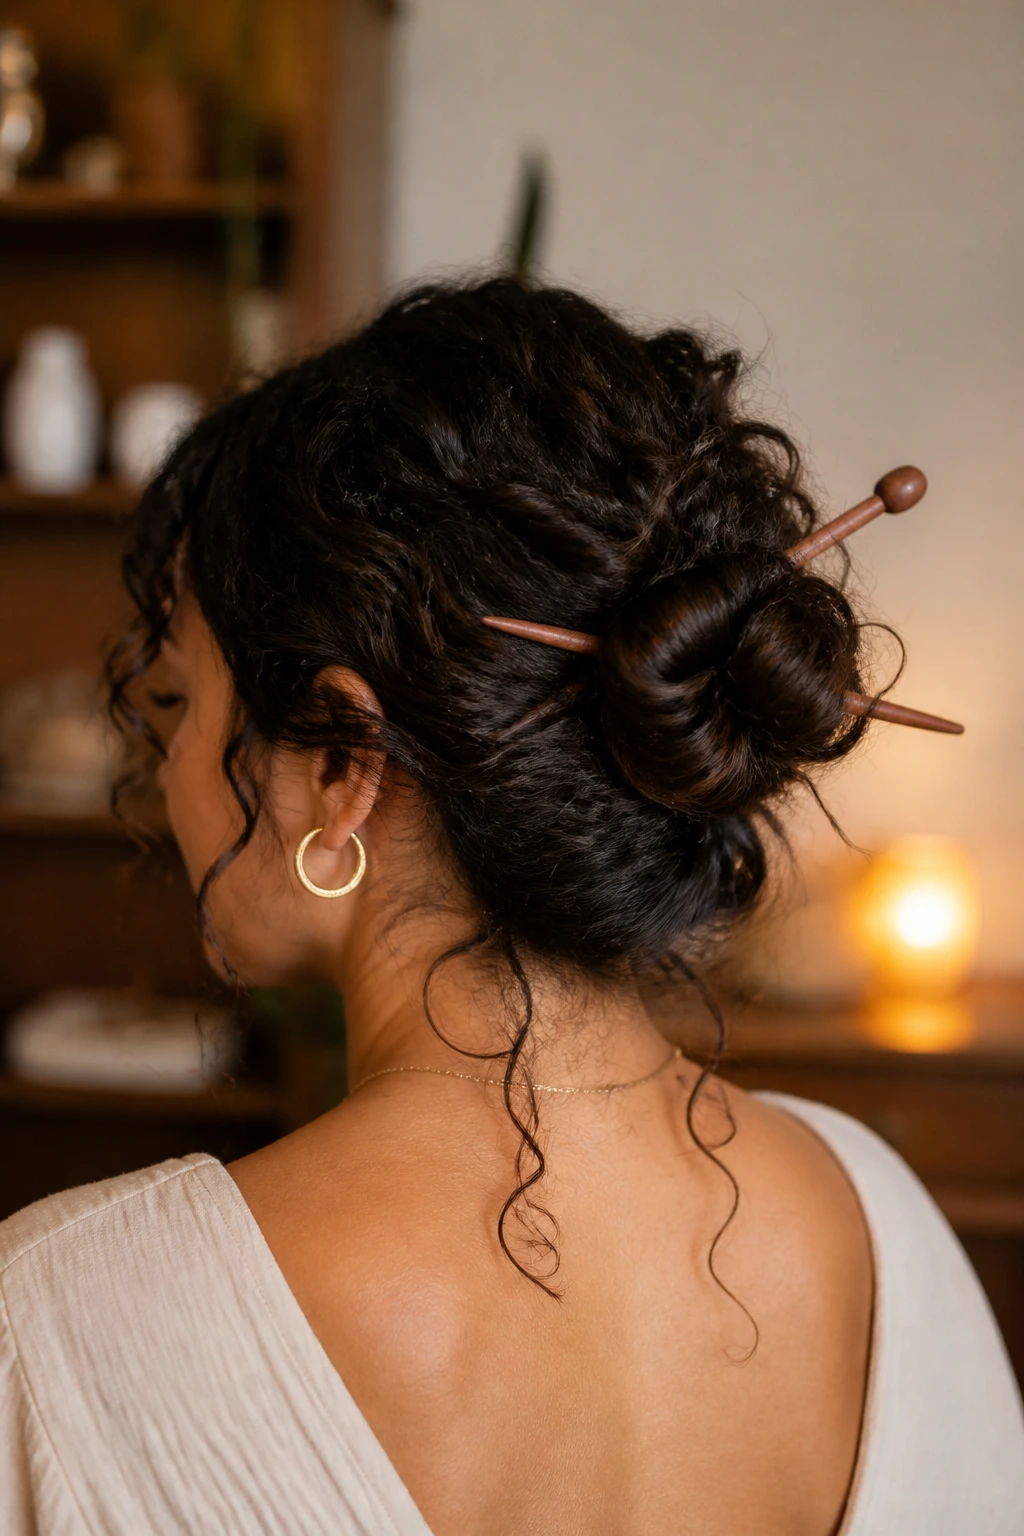
Hair sticks are vastly underrated. They hold a massive amount of hair without the need for elastics, and they look incredibly intentional. A chignon is simply a low bun gathered at the nape of the neck.
The Assembly
Gather your hair into a low ponytail but do not pull it all the way through on the final loop. Instead, twist the remaining length around the base and secure it by sliding a pair of wooden or metal hair sticks through the bun.
Why It Feels Modern
This style has a slightly “done” but not “perfect” vibe. If a few curls escape, let them fall. The messiness is exactly what makes the style look so intentional and artistic.
10. The Bubble Ponytail for Long Curls
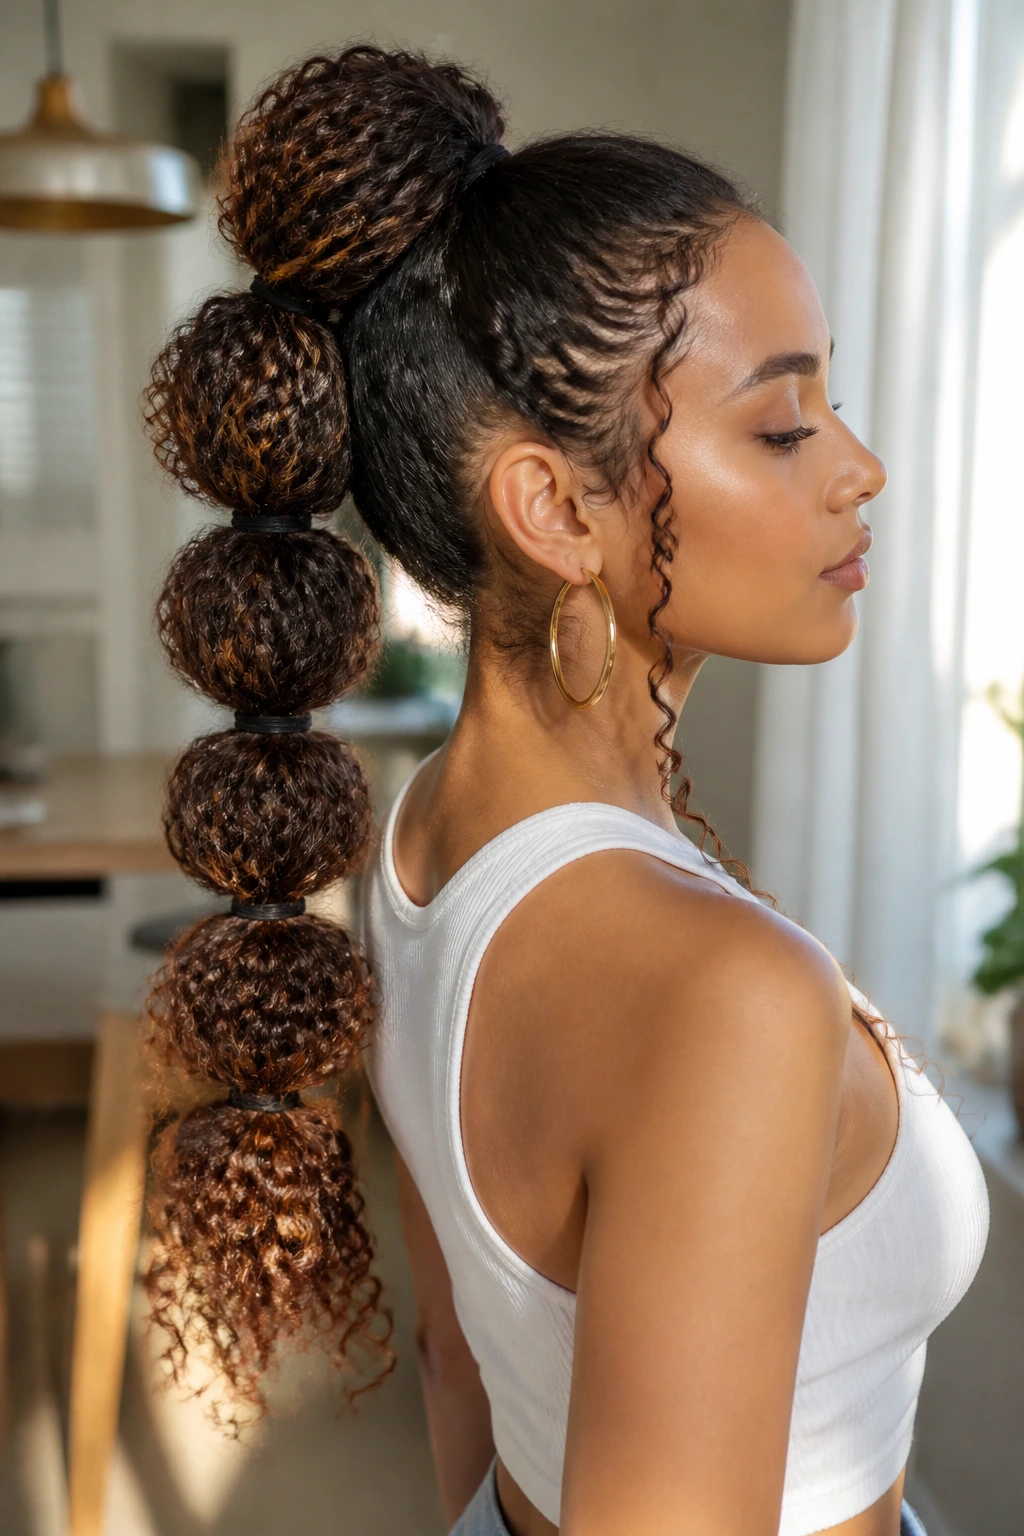
The bubble ponytail is one of the few styles that works exceptionally well on curls because the “bubbles” hold the volume of the hair in place. You take a high ponytail and place elastics every two inches down the length of the tail.
Creating the Bubbles
Gently tug on each section between the elastics to pull it outward, creating a rounded, voluminous “bubble.” The texture of curly hair makes these bubbles look larger and more sculptural than they would on straight hair.
The Secret to Longevity
Use tiny, clear polyurethane bands, as they are strong enough to hold the weight of curly hair without snapping. If you have thick curls, make sure you don’t over-tighten the bands near the base.
11. The Faux-Hawk with Side Pinning
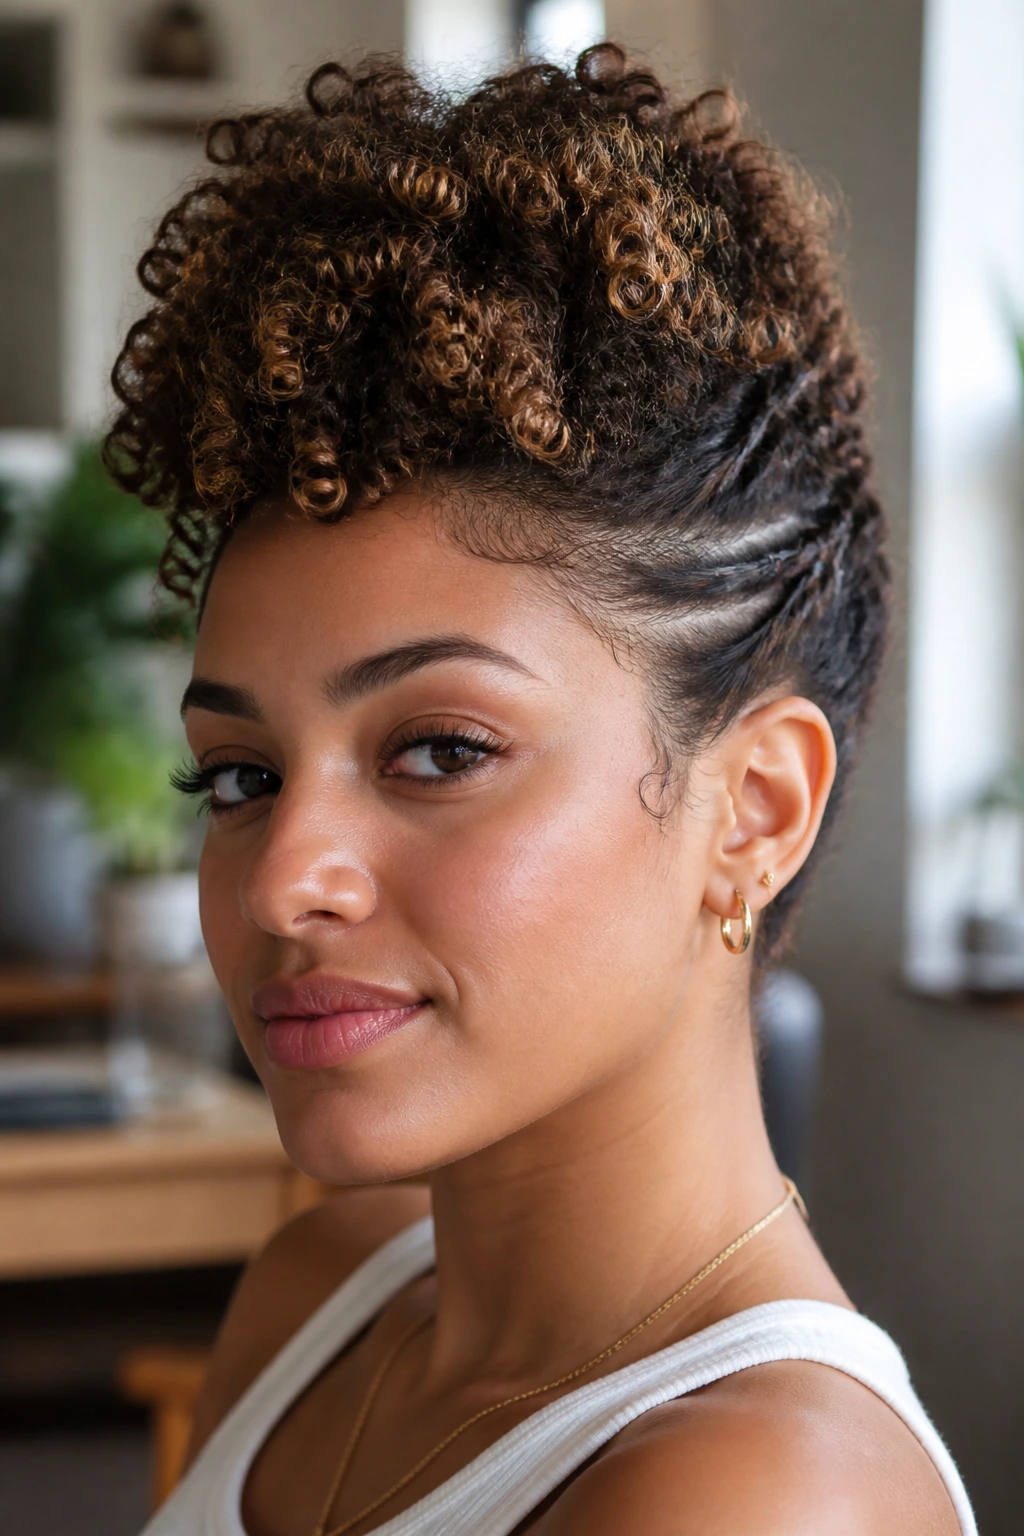
You don’t need to shave the sides of your head to achieve a rock-and-roll faux-hawk. By pinning the hair tightly against the sides of your scalp and leaving the center curls to run wild, you get all the edge with none of the commitment.
The Pinning Strategy
Use bobby pins that match your hair color to pin the sides upward toward the center of your head. Start at the hairline and work your way back.
Managing the Center
The remaining hair in the center will naturally pile up into a series of coils. Apply a small amount of curl-defining cream to these center pieces to ensure they look intentional rather than just frizzy.
12. Half-Up with a Bow
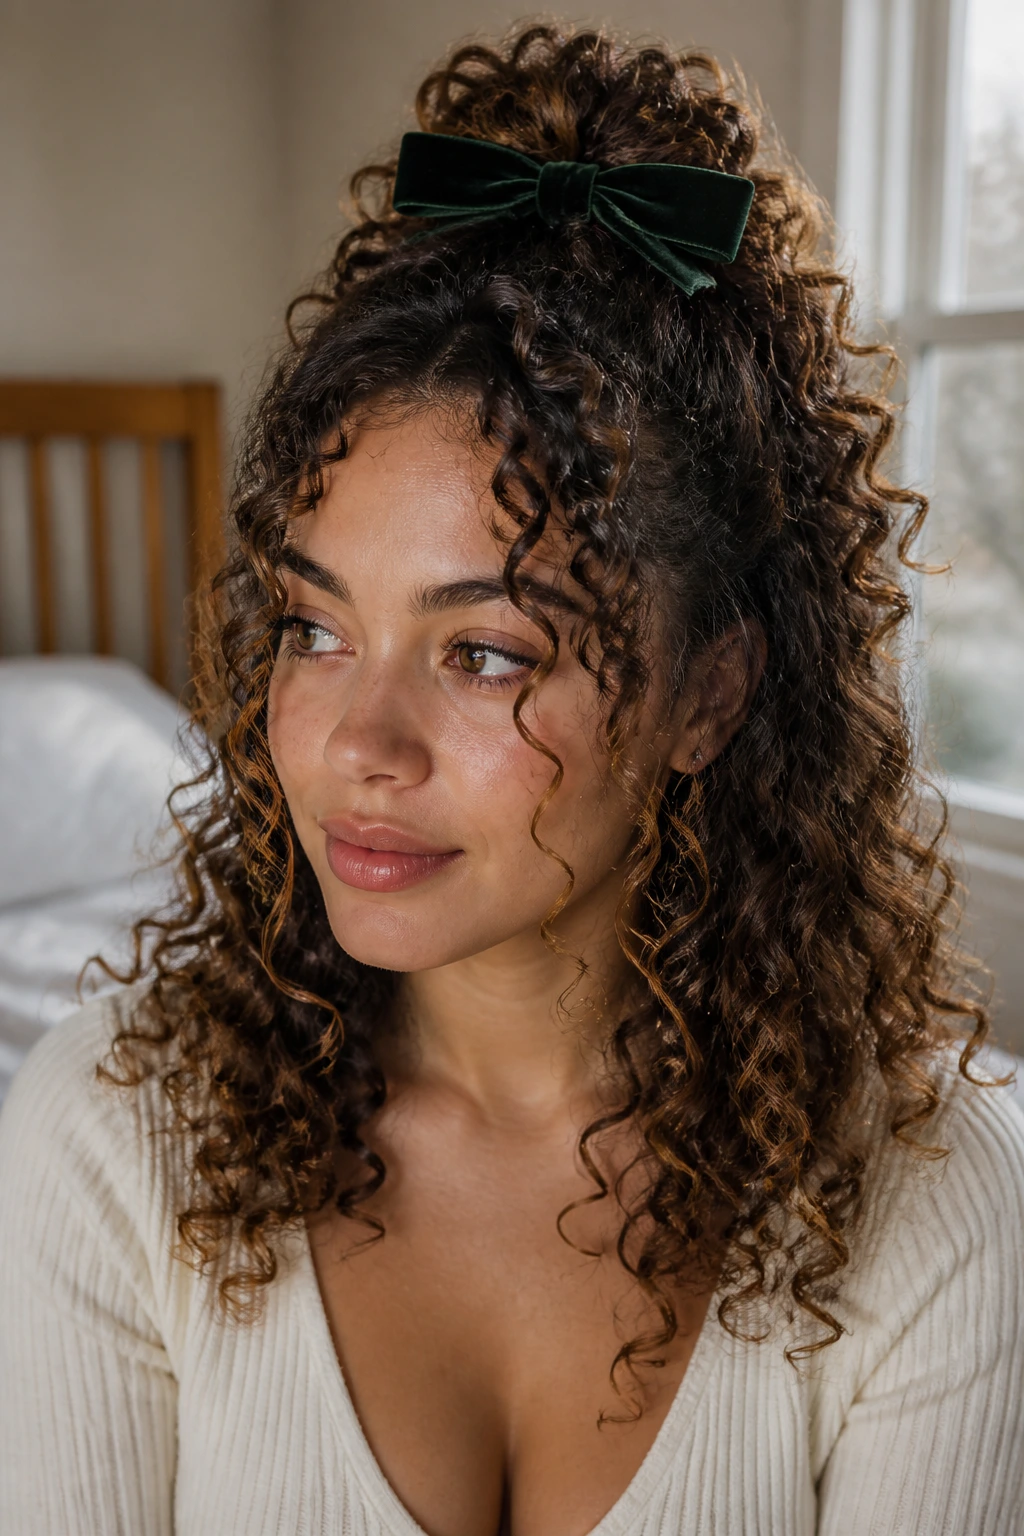
Accessories are having a major moment, and a velvet or silk bow is the quickest way to make a curly half-up style feel polished. Bows provide a soft, feminine contrast to the angular, springy nature of curly hair.
Positioning
Tie the half-up section at the crown rather than the back of the head. This gives your curls more height and prevents the bow from getting lost in the thickness of your hair.
Styling Tip
Match the texture of the bow to your outfit. Velvet bows feel elevated and wintery, while light silk ribbons are perfect for warmer months or more casual settings.
13. The Twisted Crown Bun
This style combines the halo effect of a braided crown with the ease of a simple bun. You create two small twists starting from your part and working your way back toward the nape of the neck.
Building the Bun
Once the two twists meet at the back, gather all the remaining hair into a loose bun. Because you started with twists, the hair leading into the bun looks much more structured and detailed.
Maintenance
Use a light-hold setting spray to keep the twists from unraveling as you move throughout your day. If your hair is particularly dry, a light mist of water with a drop of leave-in conditioner can help keep the twists smooth.
14. The Low Side-Braid with Ribbon
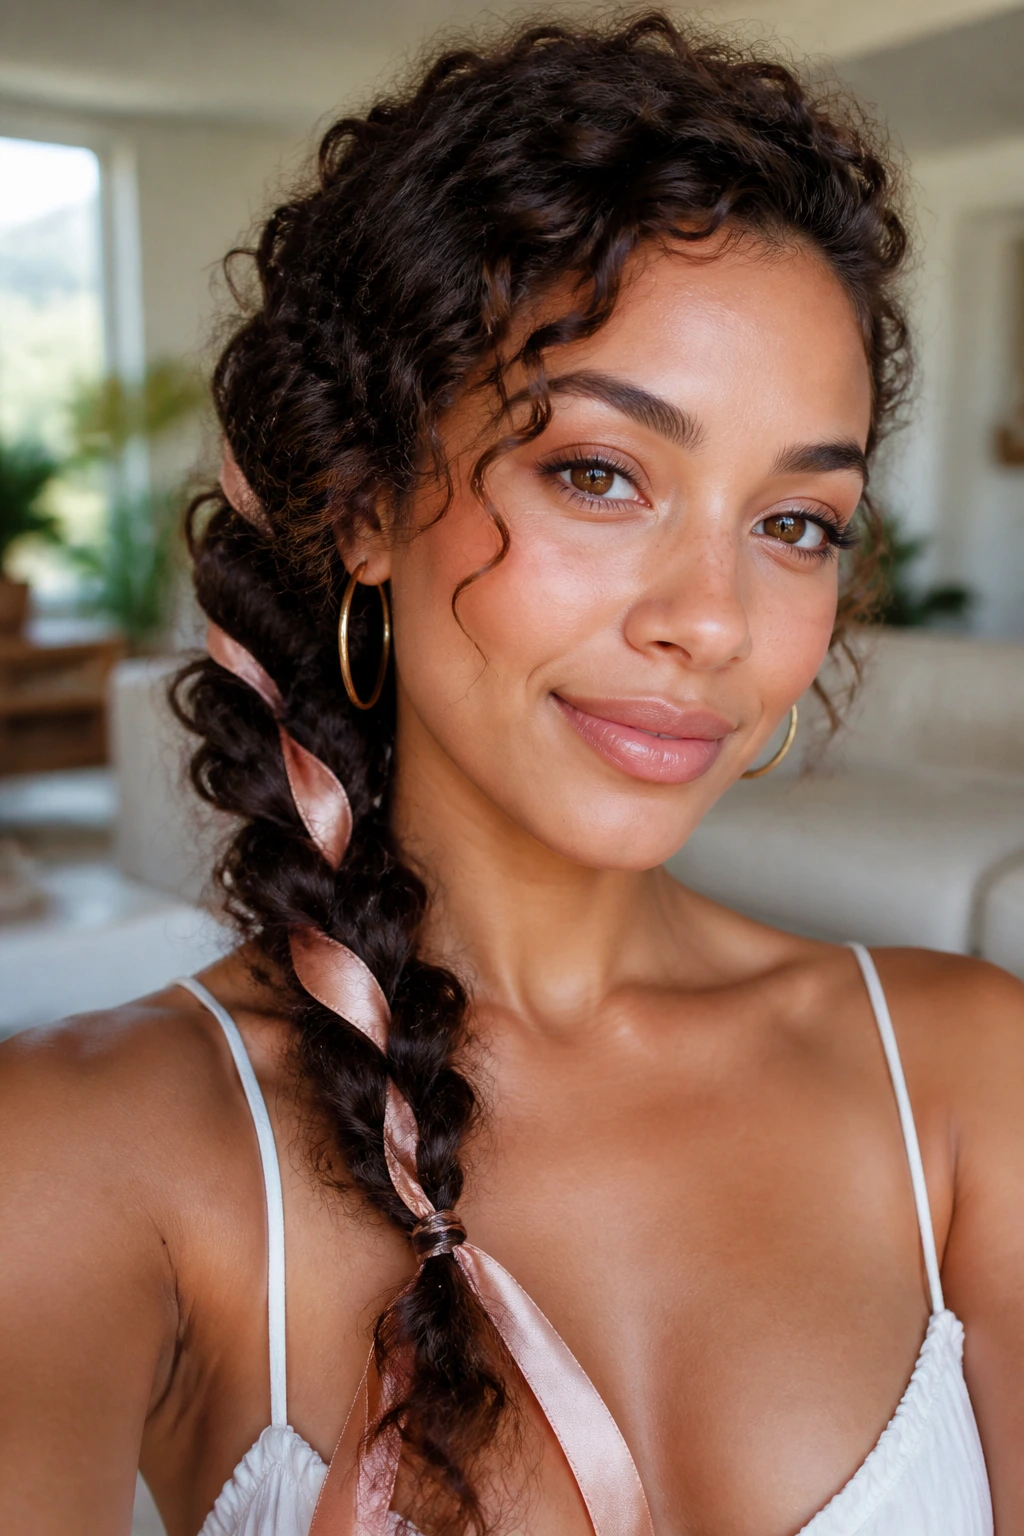
Integrating a ribbon into your braid is a timeless trick that adds color and depth to your curls. Start a side braid at your temple and feed a piece of ribbon into the weave as you go.
Choosing the Ribbon
Pick a ribbon that is about half an inch wide. If it is too thick, it will overwhelm your curls; if it is too thin, it might disappear into your hair.
The Final Effect
Leave the ends of the ribbon slightly longer than your hair. This creates a visual trail that draws the eye toward the texture of your curls and makes the style look like a professional braid design.
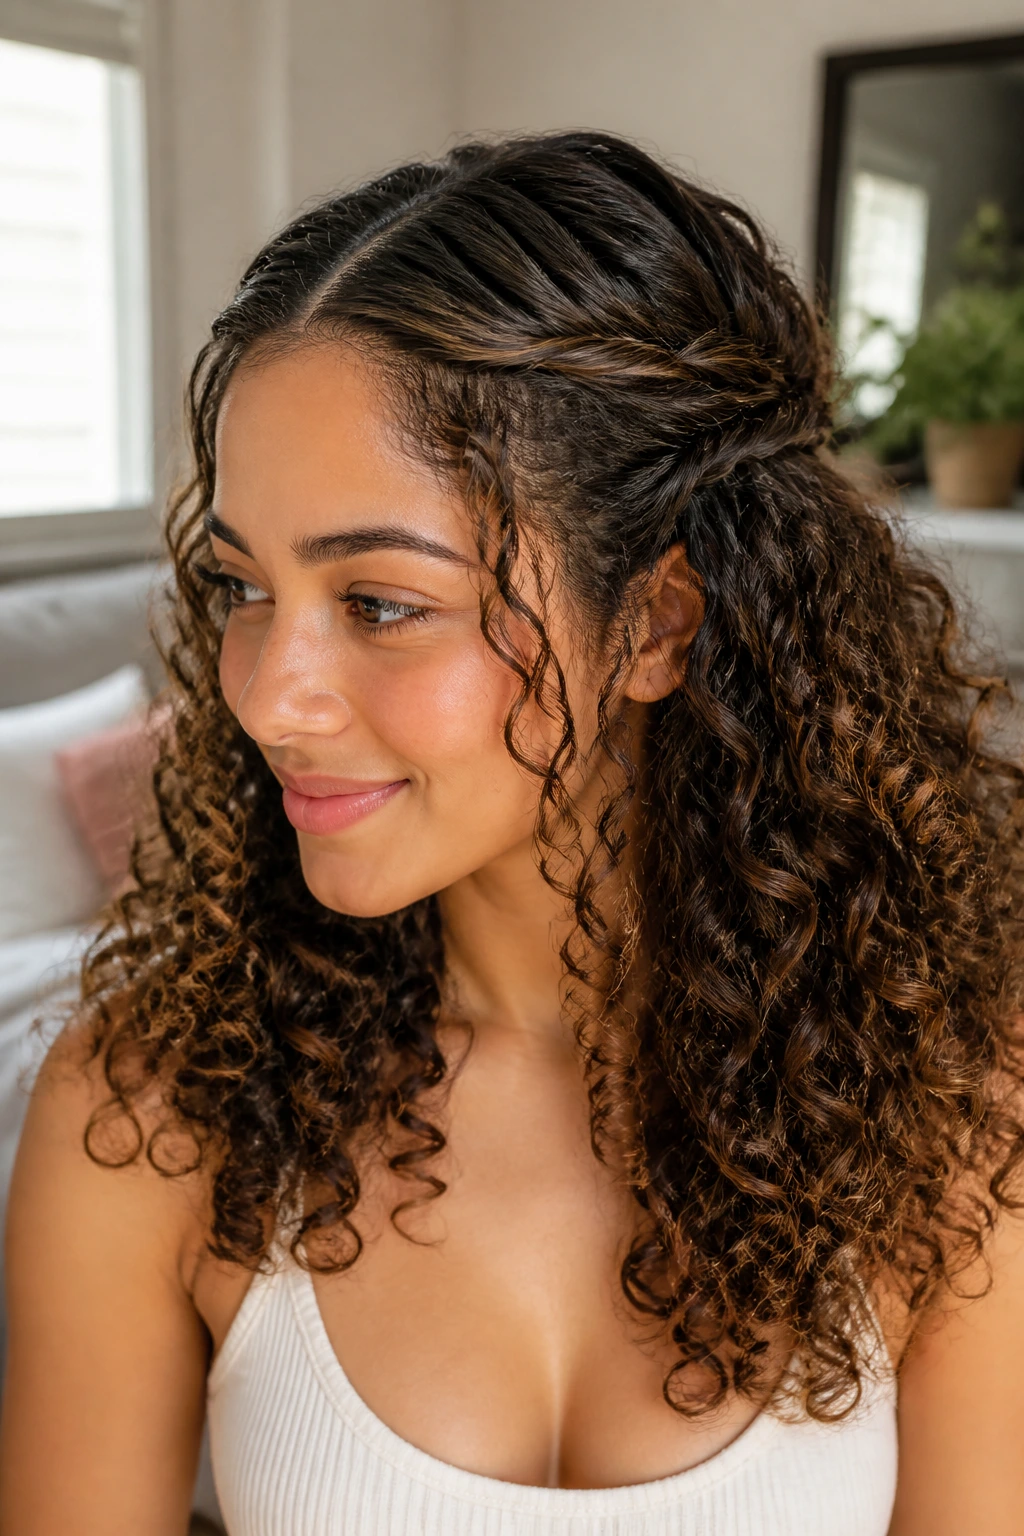
15. The Waterfall Twist
A waterfall twist is perfect for those who want their hair down but need to keep it out of their eyes. You take small sections from the front, twist them, and pin them toward the back of the head, letting the rest of the hair hang loose.
The Technique
Take a small section from your part, twist it back, and pin it. Then, pick up a new section, twist it, and pin it right underneath the first. Repeat this until you have enough sections to frame the top of your head.
Why This Style Works
It effectively manages the “front poof” that many curly-haired people experience. It keeps the hair looking sleek around the face while letting the back maintain its natural, free-spirited volume.
16. The High Sleek-Bun
Sometimes, simplicity is the most sophisticated option. A high, sleek bun is the polar opposite of a loose, curly style, and that contrast is exactly what makes it so powerful.
The Prep
Use a generous amount of curl-smoothing cream and a stiff brush to slick the hair back into a ponytail. Make sure the tension is even all the way around your head.
The Twist
Once you have the ponytail, twist the hair around the base and secure it with pins. The result is a clean, sculptural shape that highlights your jawline and cheekbones.
17. The Criss-Cross Half-Up
This style looks incredibly complex but is actually just a series of overlapping sections. Take two small sections from the front, cross them over the back of your head, and pin them.
Adding Depth
Repeat this process with two more sections directly below the first set. By overlapping them, you create a beautiful woven pattern that feels much more expensive than a basic half-up style.
Final Touches
Tuck the ends of the pins deep into the hair so they are invisible. If you have the right technique, this style can stay secure for an entire day without needing readjustments.
18. The Loose Side-Chignon
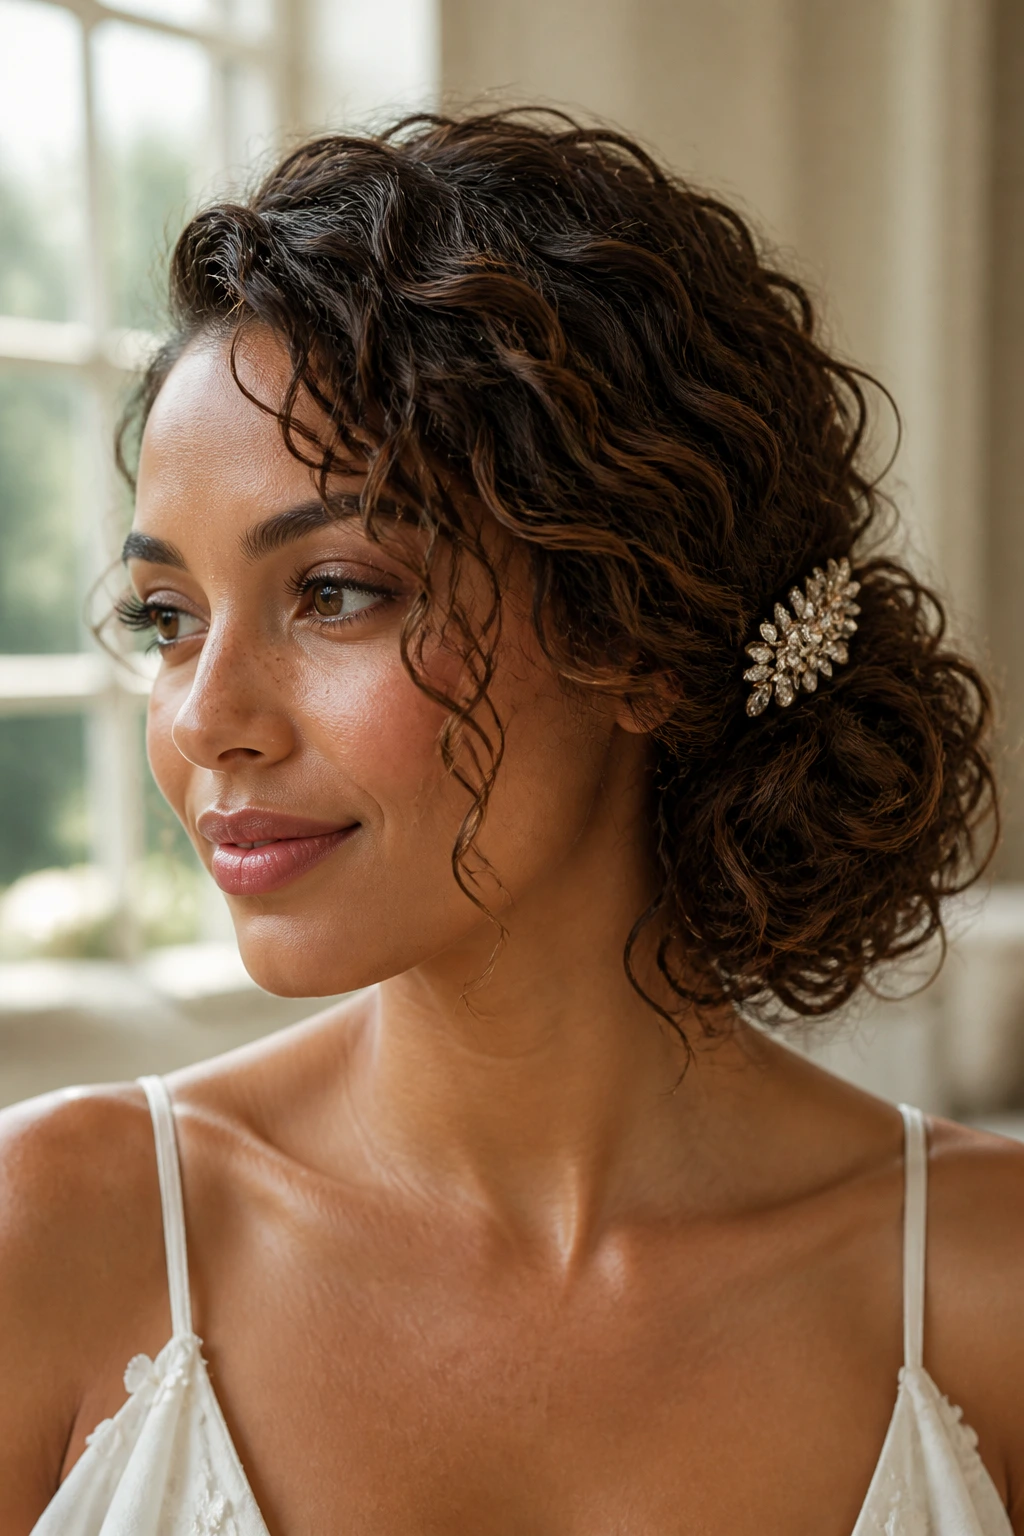
A side-chignon is the perfect style for a wedding or a formal dinner. By pinning your hair to the side instead of the back, you create a more asymmetric, modern profile.
Creating the Shape
Gather your hair to one side, twist it loosely, and pin it into a rounded shape. Don’t worry about tucking in every single curl. A few loose ends contribute to a “romantic” aesthetic.
Accenting the Style
Add a jeweled comb or a simple flower at the base of the chignon. Because your hair is pulled to the side, these accessories will be perfectly visible from most angles.
19. The Knotted Half-Up
Knots are essentially a softer version of a bun. By tying two sections of your hair together in a simple overhand knot at the back of your head, you create a unique, structural look that doesn’t require any hair ties.
How to Secure the Knot
Once you have made the knot, use a few discreet bobby pins to keep it from slipping. The friction of your curls will actually help the knot stay in place better than it would on straight hair.
Why This Is Different
It feels more “designed” than a ponytail. It’s a great way to showcase the individual texture of your curls, as they remain loose and visible both above and below the knot.
20. The Scarf-Woven Braid
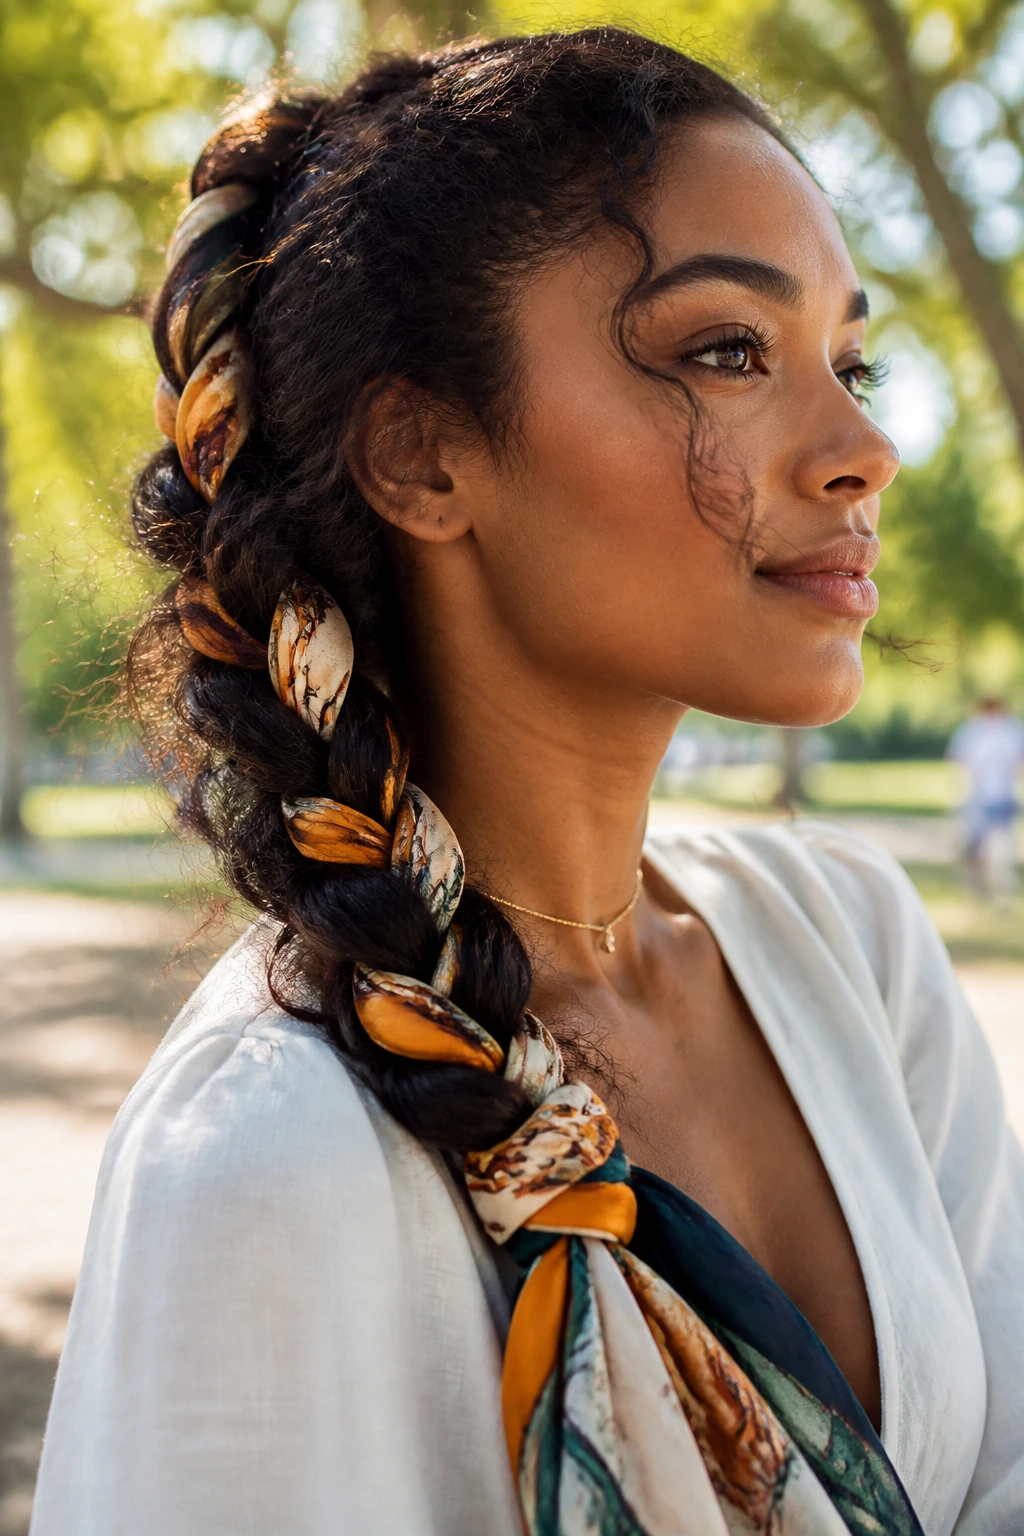
If you have a silk scarf, you have a hairstyle waiting to happen. Fold a square silk scarf into a long, thin strip and tie it around your ponytail.
Weaving the Scarf
As you braid your hair, treat the two ends of the scarf as the other two strands of the braid. The result is a thick, colorful, and highly textured braid that stands out.
The Result
This is a fantastic way to protect your hair from the elements. The scarf acts as a barrier against wind and humidity, keeping your curls shielded while you look put-together.
21. The Crown-Braided Headband
This is a more intensive version of the earlier braided headband. Instead of just one braid, you create two—one at the hairline and one an inch behind it.
Layering
By layering two braids, you create a wide, architectural headband that is fully made of your own hair. It is a bold look that works best for people with a high volume of curls.
Finishing
Pin the ends of the braids behind your ears and let your loose hair cover the pins. This look is incredibly sturdy, making it perfect for long days or windy weather.
Final Thoughts
The beauty of curly hair lies in its inherent resistance to being told what to do. When you stop fighting the volume and start leaning into the texture, you realize that your hair is a medium for creativity, not a problem to be solved. Whether you are pinning it up, braiding it down, or tying it into a knot, the best hairstyle is the one that makes you feel like yourself.
Do not be afraid to experiment with accessories like clips, ribbons, and silk scarves. These are not just decorative; they are tools that help you manage your curls while adding a signature touch to your look. Keep your hair moisturized, handle it with care, and remember that every day is an opportunity to try a new combination. Your curls are resilient, adaptable, and—above all—entirely unique to you.