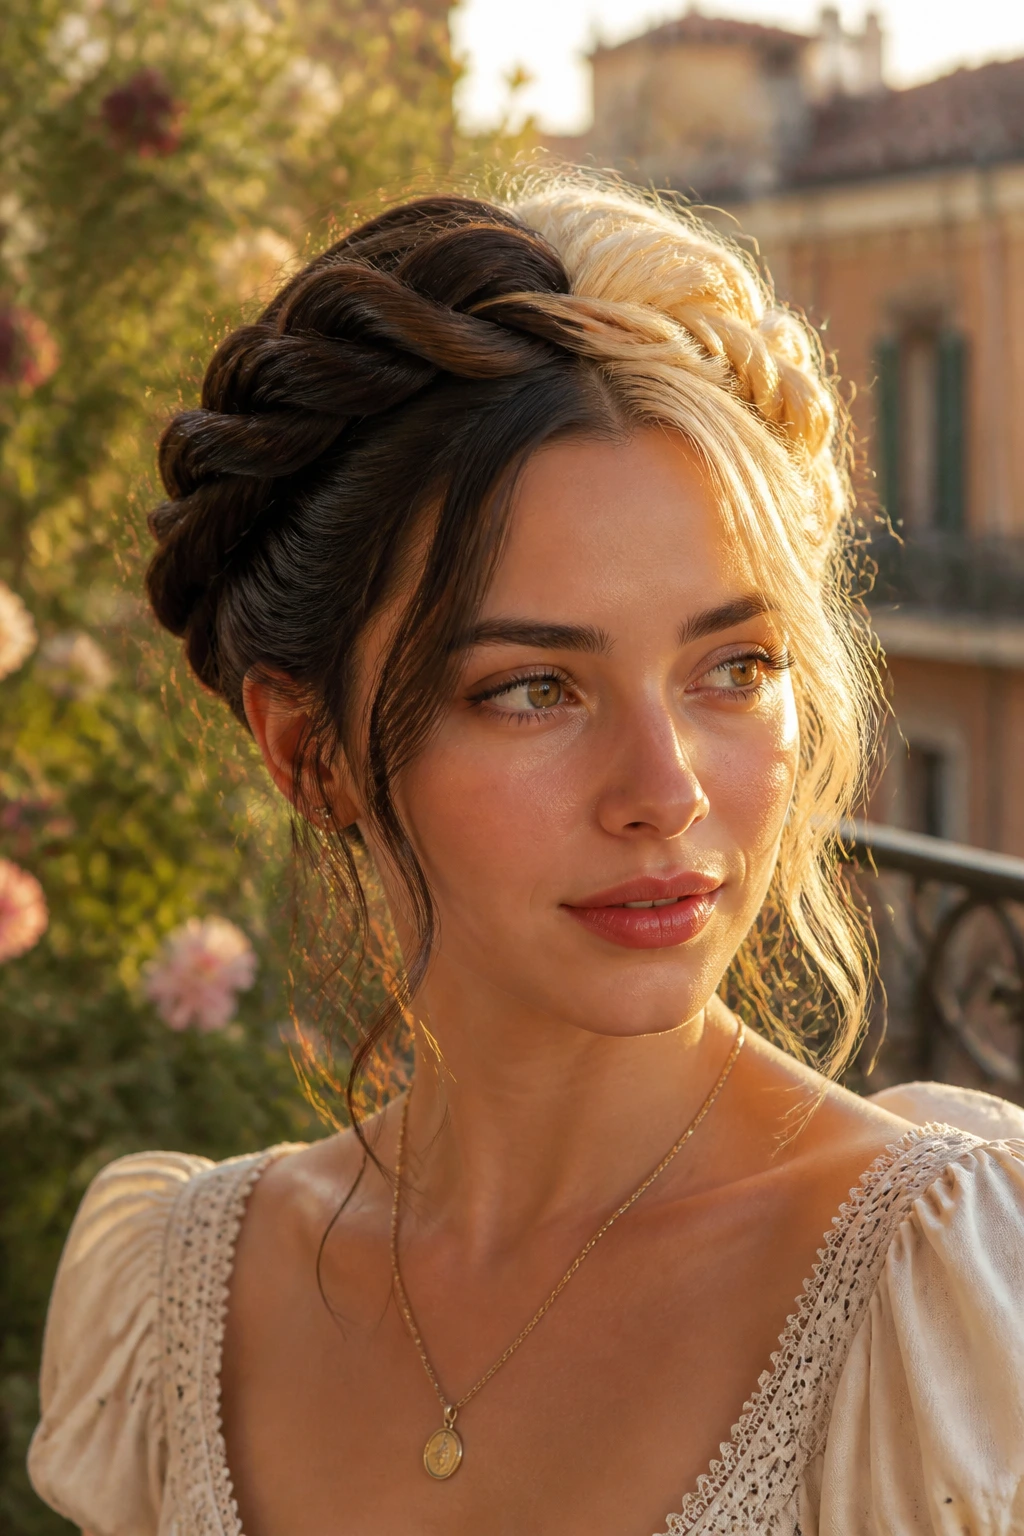
The alarm clock rings, the coffee is still brewing, and you have exactly fifteen minutes before you need to walk out the door. If you have been bitten by the hair-color bug—specifically the high-contrast, dual-toned aesthetic of Gemini hair—you might worry that your vibrant split-dye job requires a full glam squad just to look presentable. It does not. In fact, the beauty of a split-tone style is that it inherently adds visual intrigue, meaning you can pull off significantly more relaxed styles than someone with a single, flat shade. Whether you are rocking neon pink and jet black or a more subtle sage and slate, the key to mastering these looks is leveraging the color transition as your main accessory.
Most people assume that vibrant color requires heat styling or intricate braids to look intentional. That is a myth I have spent years dismantling. When you have two distinct colors framing your face, your hair is already doing the heavy lifting for you. The contrast creates an illusion of volume and intentional styling that a monochromatic head of hair simply cannot achieve without hours of work. If you have been struggling to make your split-dye look polished while rushing to catch a bus or log into a meeting, you are likely overthinking the process. We are going to strip away the fuss and focus on techniques that work with your natural texture to keep your morning routine under the ten-minute mark.
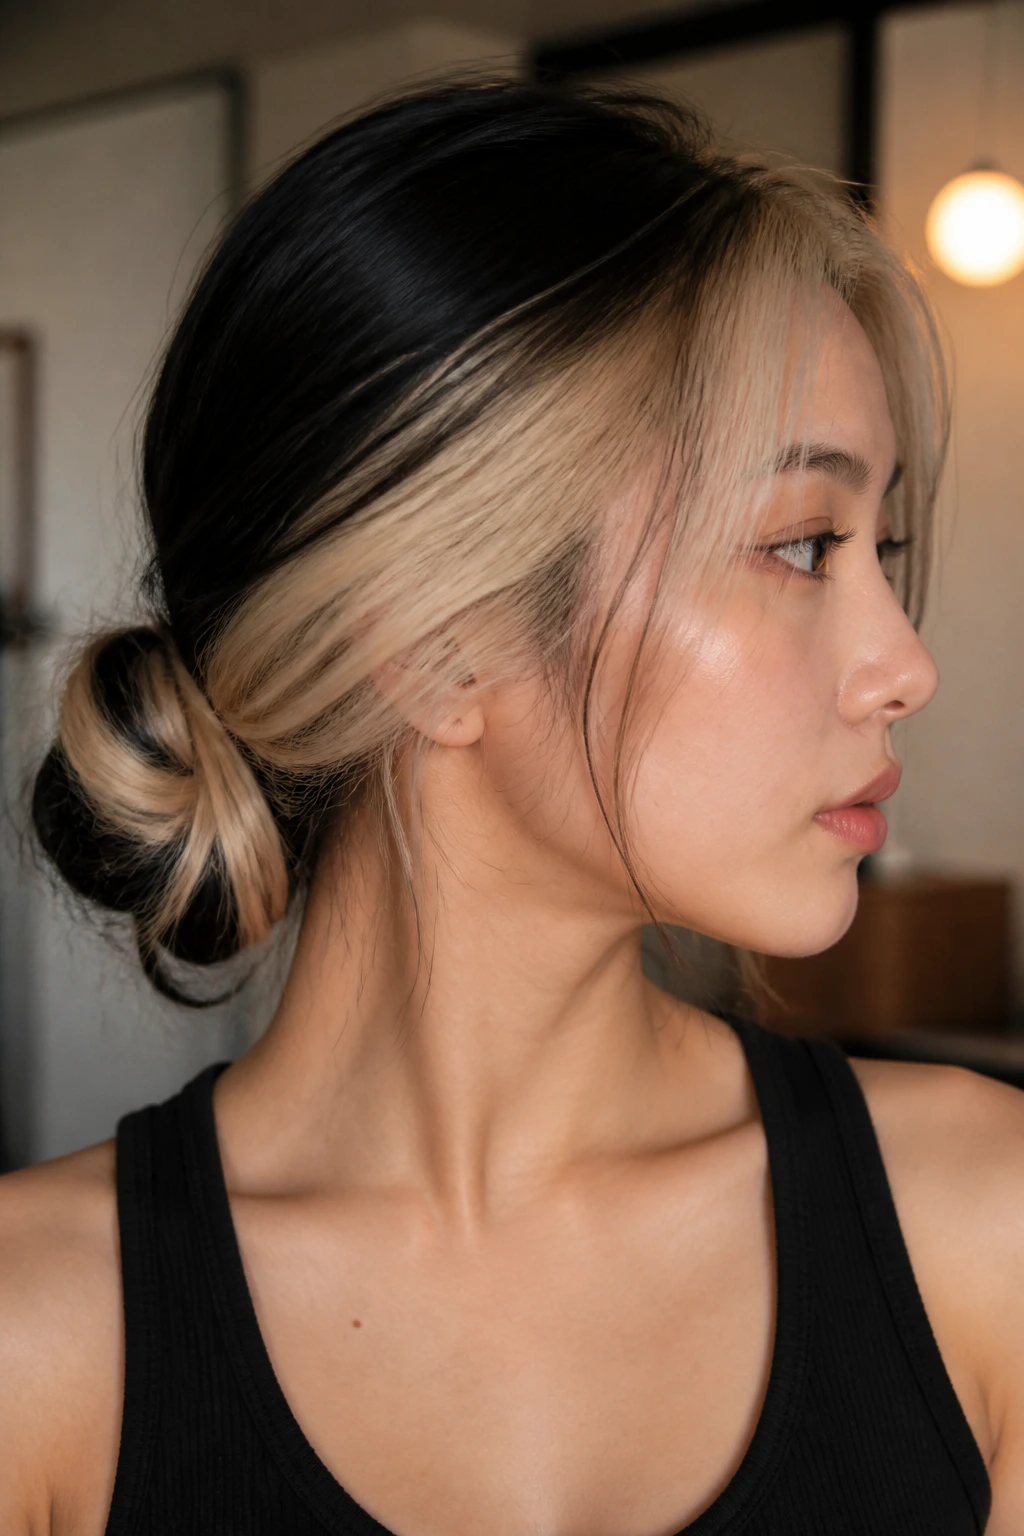
1. The Low Messy Bun with Face-Framing Tendrils
This is the ultimate professional-yet-effortless look for a split-dye. By keeping the bun low at the nape of your neck, you allow the two colors to meet and blend at the base, creating a sophisticated sweep of contrast. The trick here is to pull out just two thin strands at the front—one from each color section—to frame your jawline. This highlights the split right at your face, making the color choice look deliberate and sharp even if the rest of your hair was put up in five seconds flat.
Why This Works for Busy Mornings
Because the bun is messy by design, you do not need to worry about flyaways or perfect smoothing. In fact, a bit of texture works in your favor. If your hair is slightly oily from sleeping, the damp look only adds to the “chic, lived-in” vibe. Use a claw clip rather than an elastic to reduce breakage and save yourself the seconds of wrestling with tangled bands.
Styling Steps
- Gather your hair at the nape of your neck into a loose, low ponytail.
- Twist the length of the ponytail once before wrapping it into a loose coil.
- Secure with a medium-sized matte claw clip, leaving the ends poking out slightly for a relaxed finish.
- Pull out two face-framing pieces and use a drop of hair oil to smooth them downward.
2. The Half-Up Claw Clip Sweep
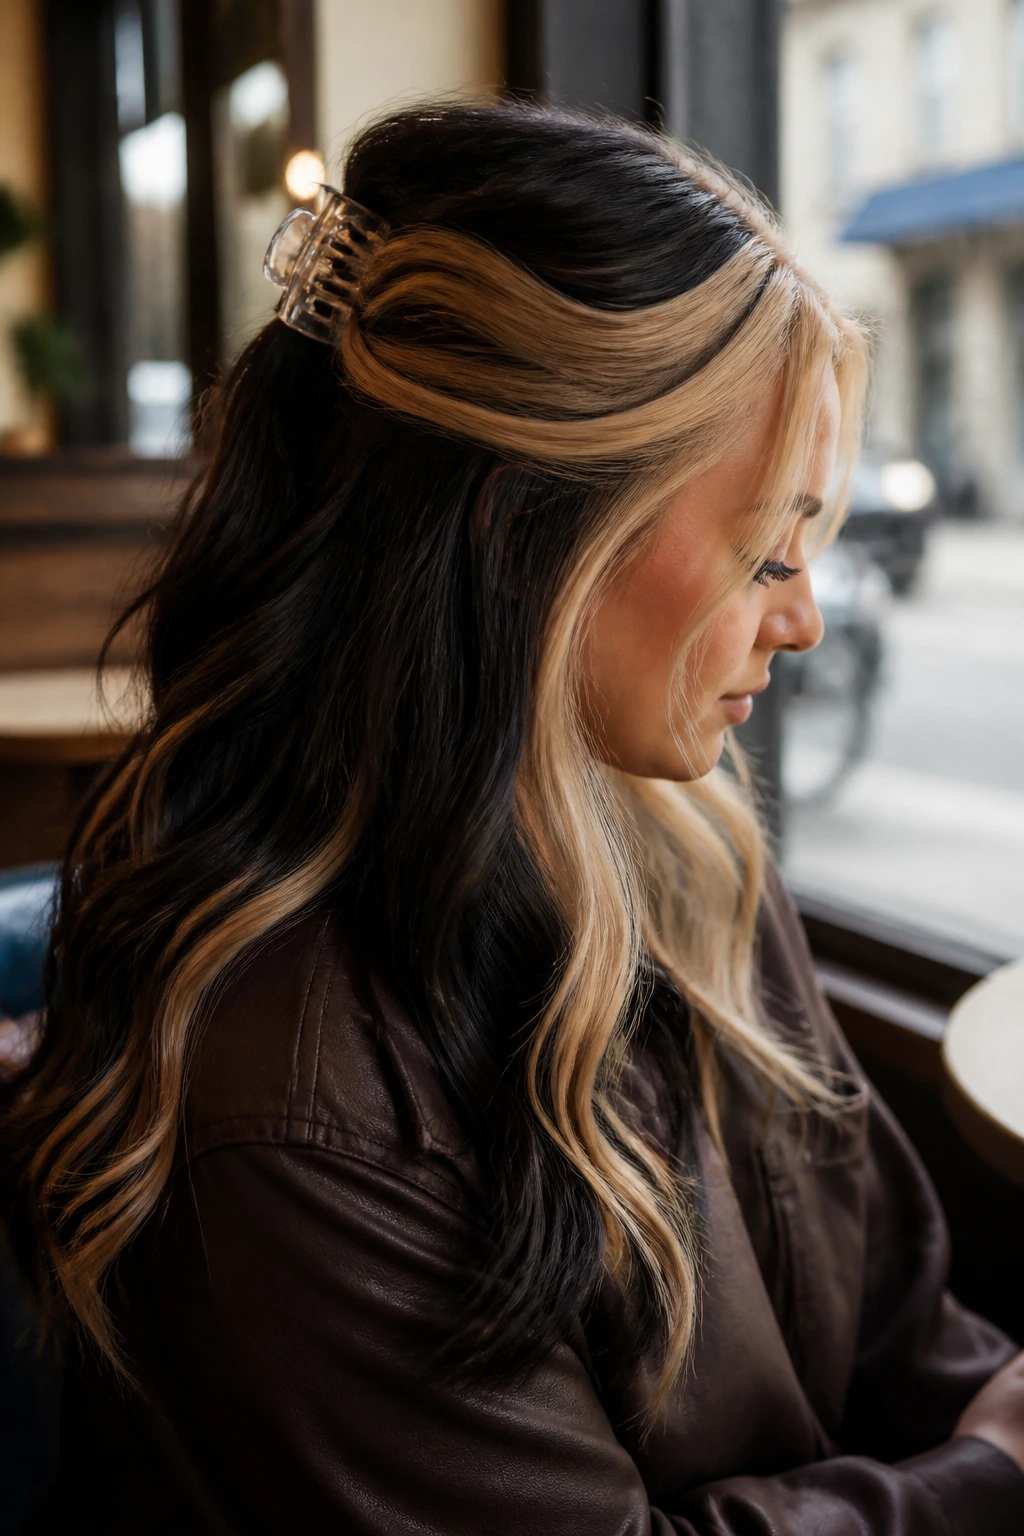
Half-up styles are a lifeline for those who want to keep hair out of their eyes while still showing off the length. With Gemini hair, this style is particularly effective because it creates a vertical plane of color where the two halves meet. You get the benefit of a clean face while allowing the majority of your hair to hang loose, showcasing the interplay between your two chosen tones.
Choosing Your Clip
I always recommend a translucent or tortoiseshell claw clip for this look, as it doesn’t distract from the hair colors themselves. If you have particularly thick hair, opt for an oversized rectangular clip; it grips more surface area and won’t slip during a long commute. The goal is to gather just the crown section, starting from the temples and pulling back to the crown of the head.
Pro Tip for Added Volume
Before clipping, give the crown section a very gentle back-comb or use a root-lifting spray. This prevents the hair from looking flat against your skull and gives the split-dye a more dynamic, voluminous silhouette.
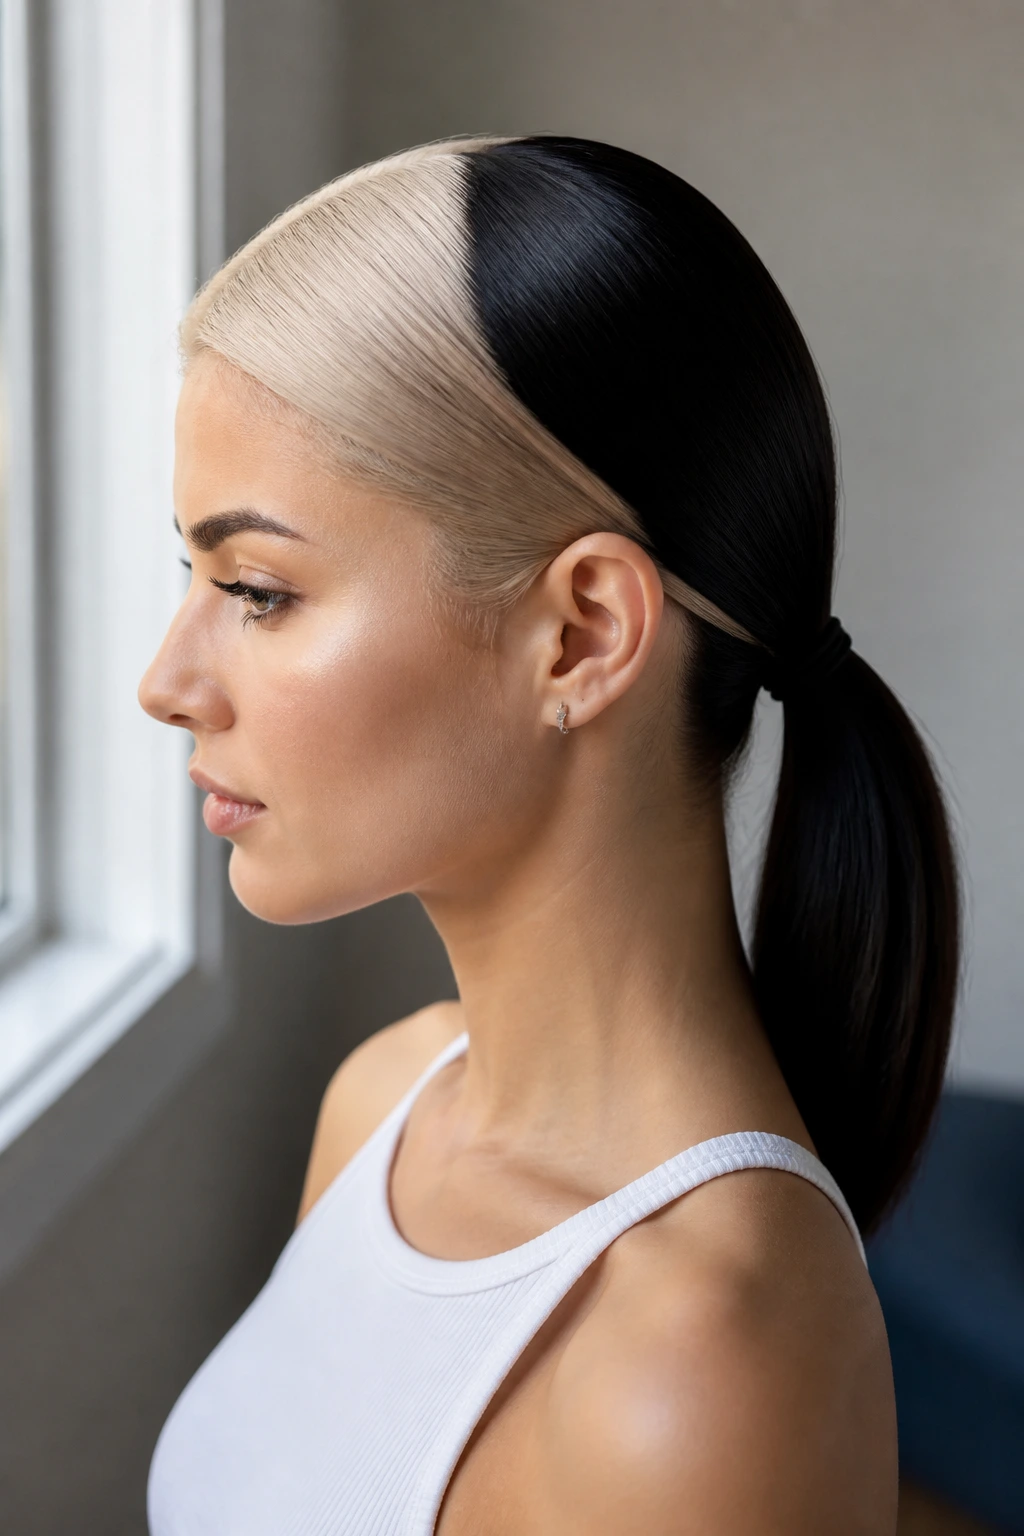
3. The Classic High Pony with a Twist
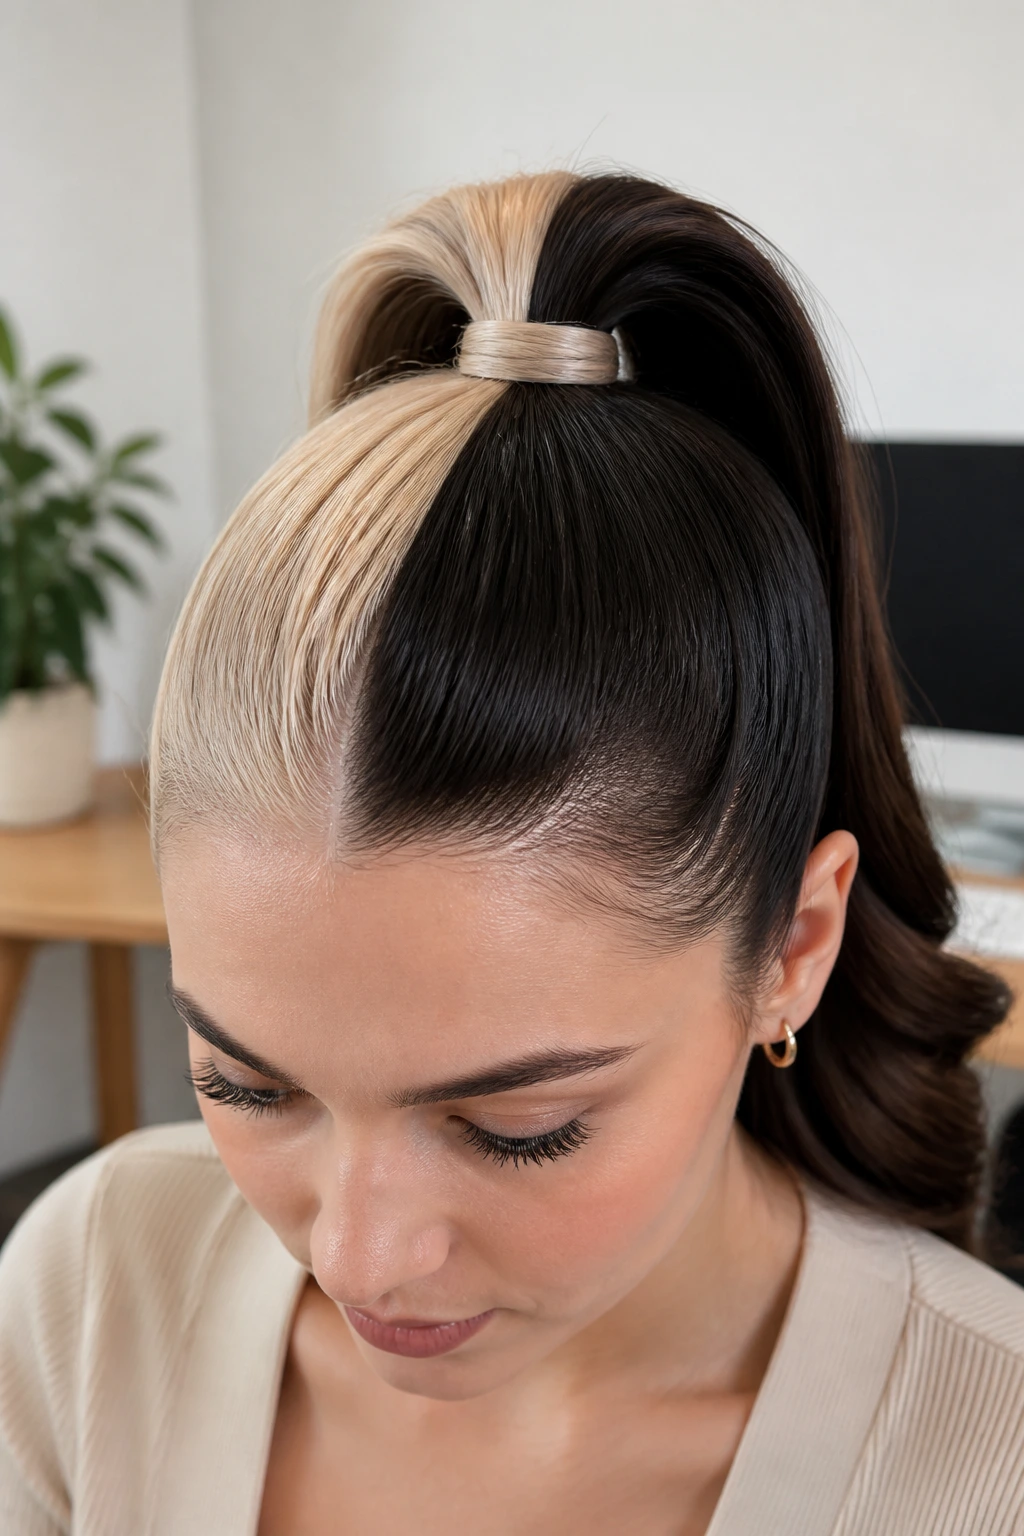
A high ponytail is often dismissed as a “gym style,” but when done with clean lines and a bit of height, it becomes a sharp, editorial look. The key for Gemini hair is ensuring the base of your ponytail doesn’t blur the line where your hair is parted. If your hair is split down the middle, your ponytail base should align perfectly with that center part. This makes the color transition look incredibly crisp, almost like a structural design choice.
Maintaining the Color Line
If your hair is dyed in a way that shifts colors at the middle part, use a fine-tooth comb to ensure the part is straight. A crooked part can make a split-dye look sloppy. Once you have tied the pony, take a thin strand of hair from the underside and wrap it around the hair tie. Secure it with a bobby pin tucked underneath. This small, ten-second detail hides the elastic and elevates the entire look from casual to intentional.
4. The Deep Side Part with Sleek Tuck
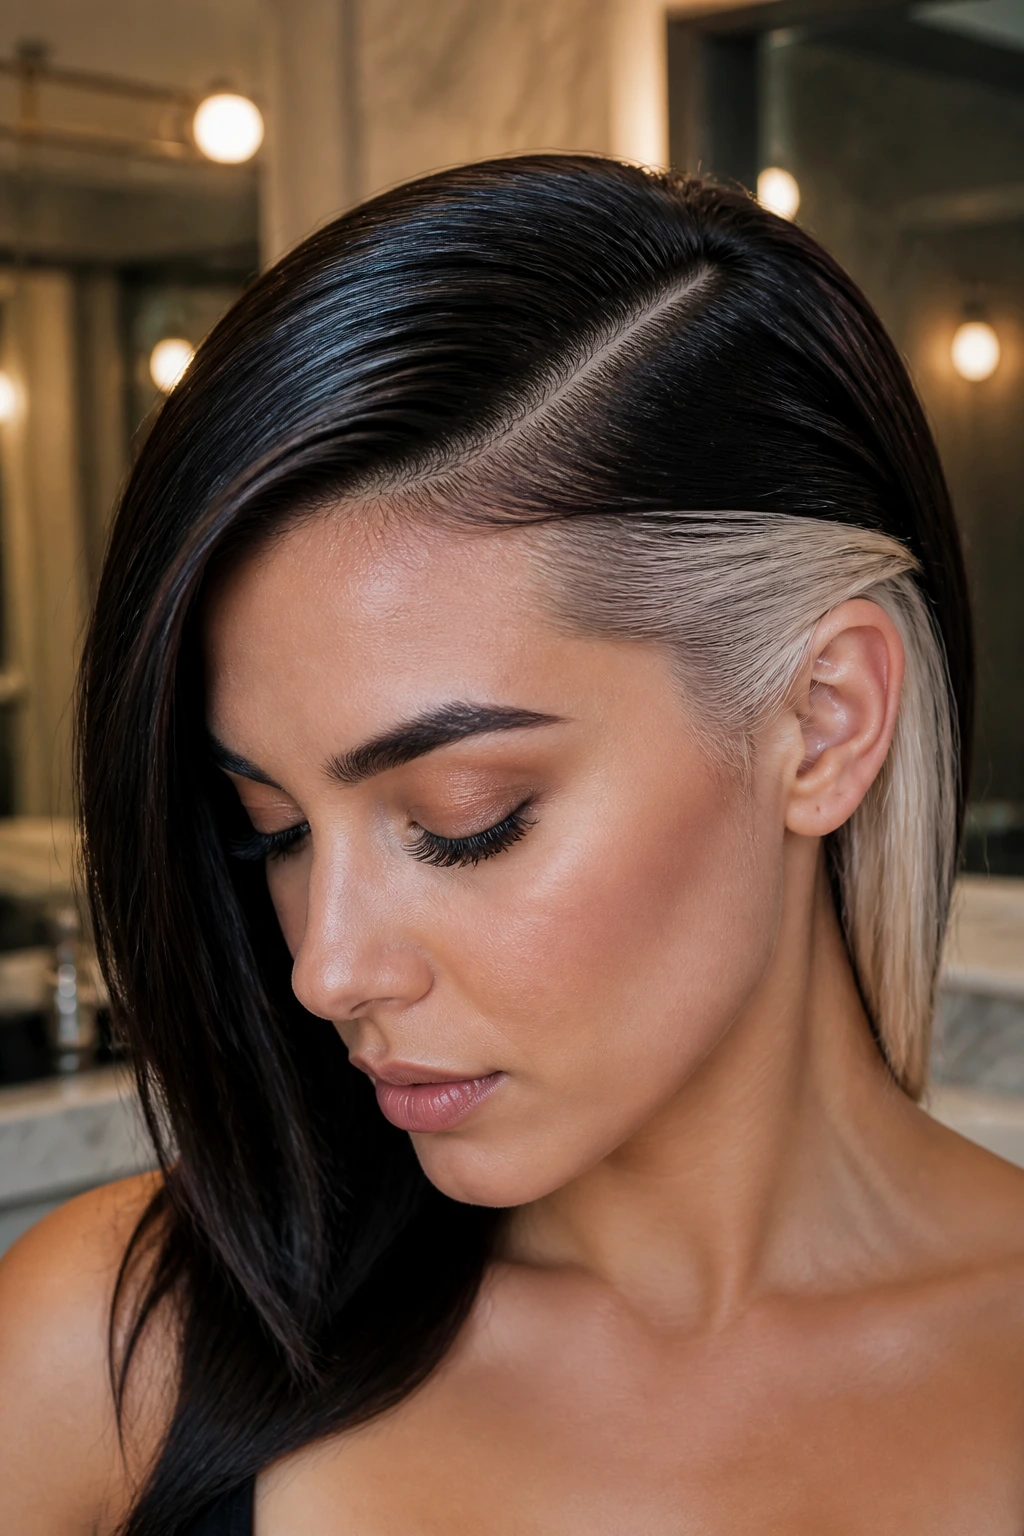
Sometimes, the best way to handle a busy morning is to lean into the drama. Instead of a middle part, flip your hair into a deep, extreme side part. This forces one color to dominate the top section, while the other color peeks out from underneath, creating a subtle “reveal” effect. It is a more mature, refined way to wear split-dye that feels entirely different from the typical punk-inspired center-part styles.
Managing the Flyaways
When you are moving quickly, frizz is the enemy of a deep side part. Keep a small tube of finishing pomade or even a clear brow gel in your bag. A quick swipe of gel along the roots of the side part will keep the hair locked in place for the entire day. It creates that “glass hair” look that makes any split-dye color combo look expensive and well-maintained.
5. The Messy Top Knot with a Silk Scrunchie
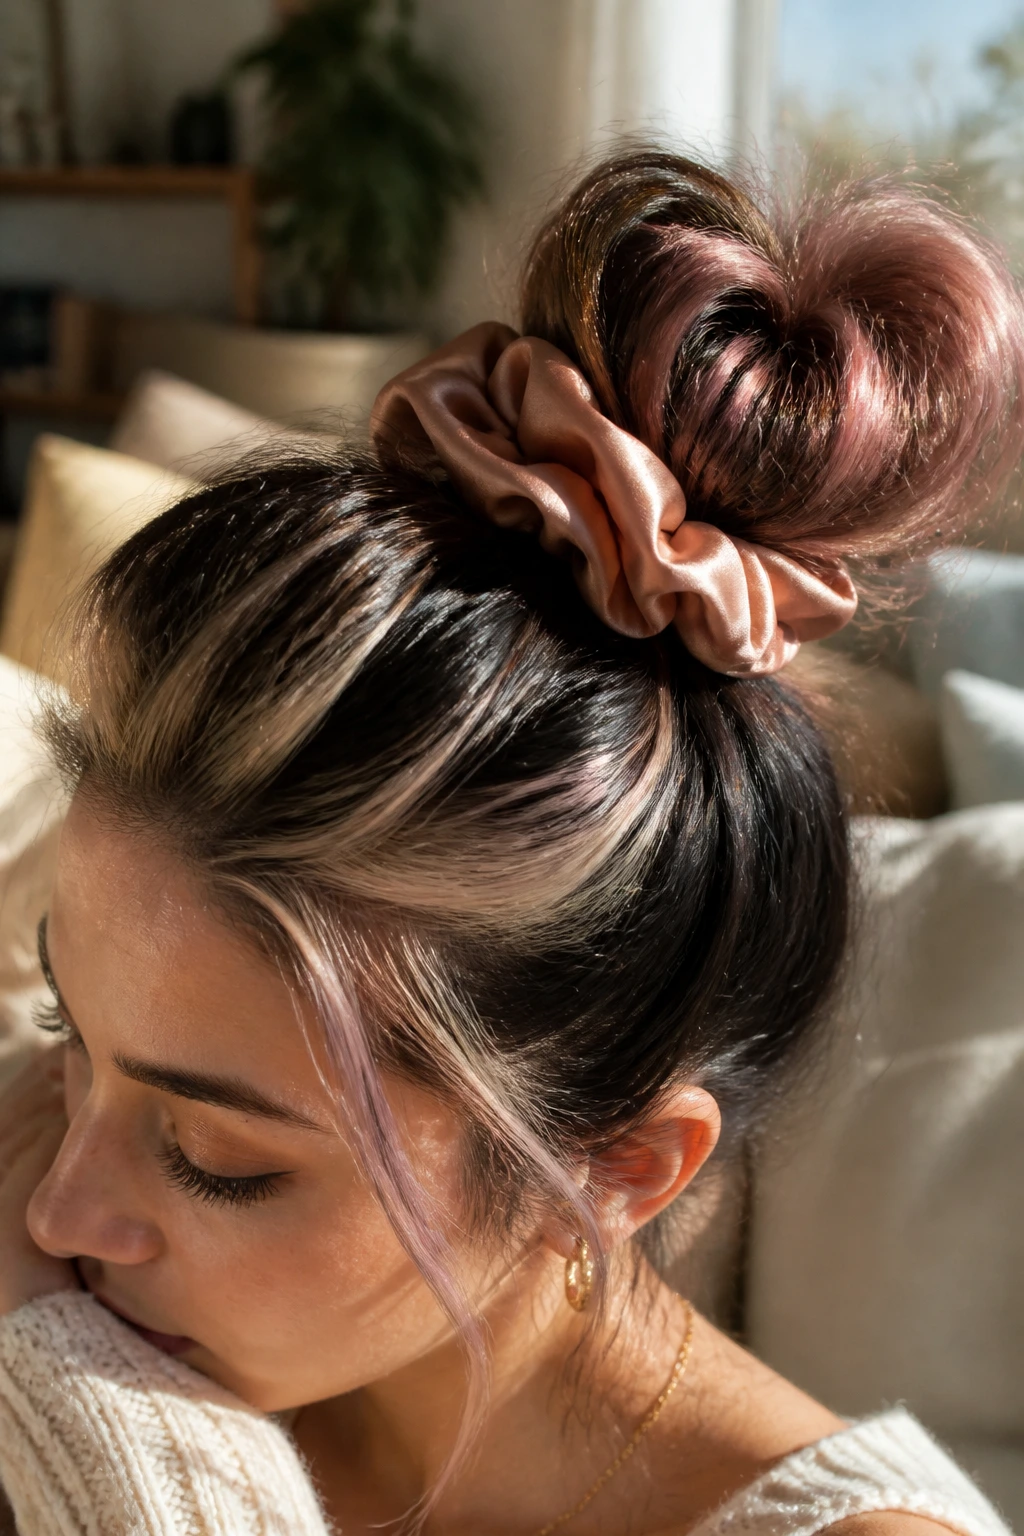
On days when your hair is truly refusing to cooperate, a top knot is the only answer. The difference here is the use of a silk scrunchie. Silk reduces friction, which is vital for maintaining the vibrancy of your hair color—friction can cause color fade and frizz, especially if you have processed or bleached one side of your head.
The “Gemini” Adjustment
To make this look like a deliberate style choice, place the knot slightly off-center. When you have two distinct colors, centering a bun can sometimes look too uniform. Placing it slightly to the side allows one color to dominate the visual field of the bun while the other provides a subtle highlight at the base. It’s a small, artistic shift that makes a standard bun feel like a curated choice.
6. The Braided Headband
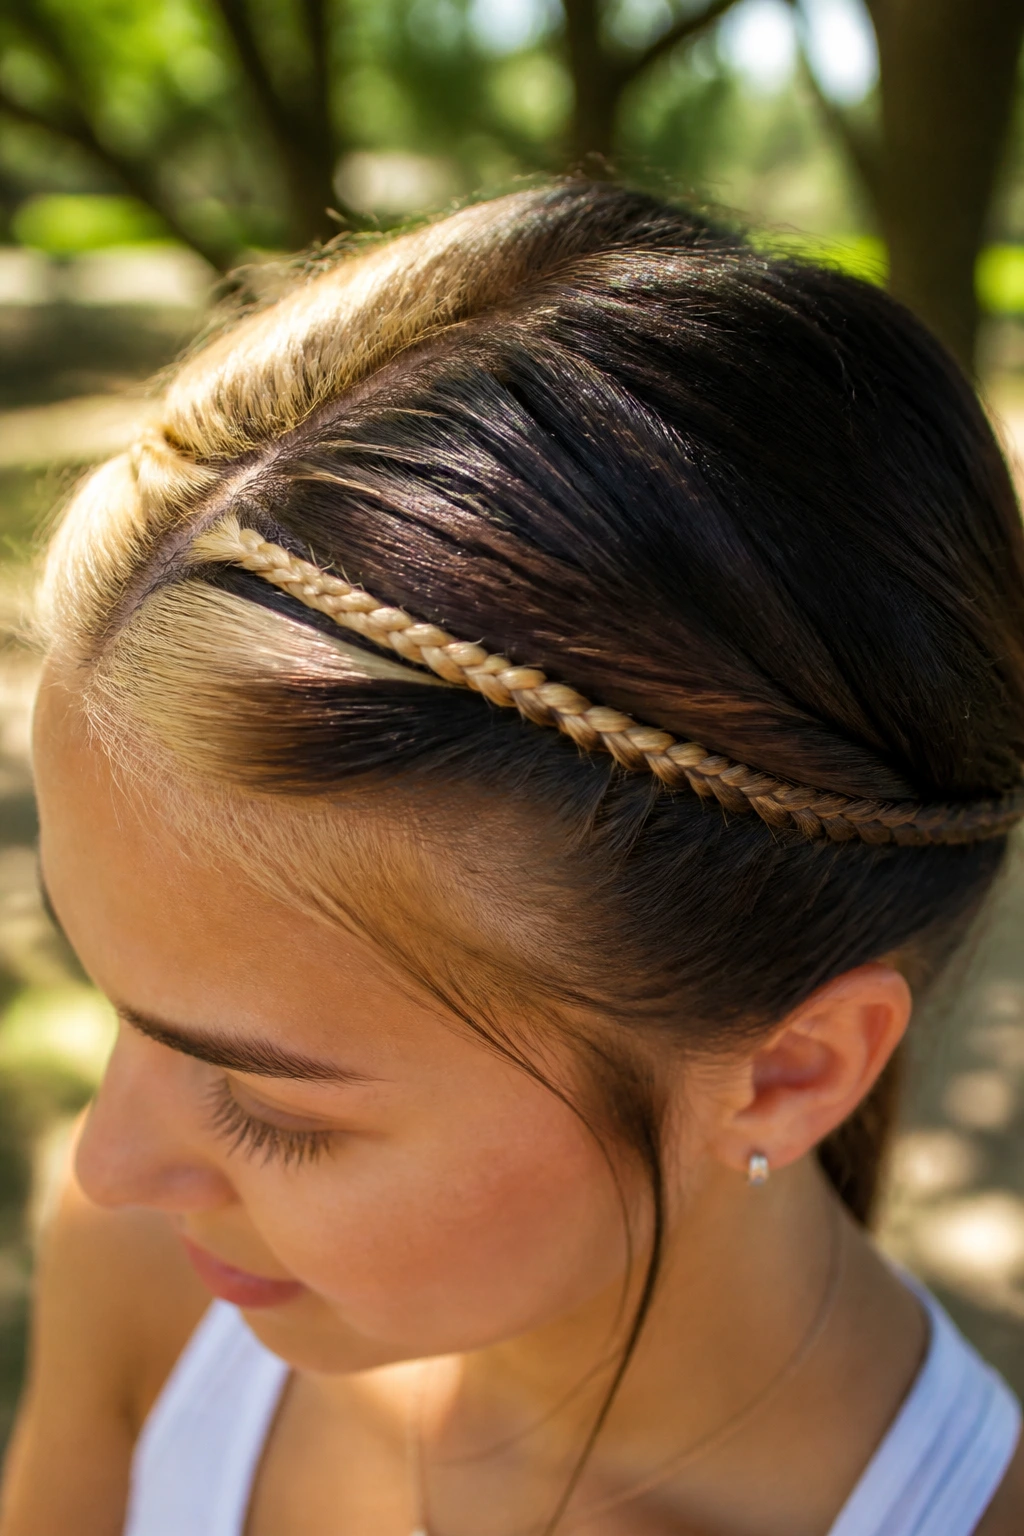
This is a fantastic way to handle second-day hair. By braiding a section from your temple across your forehead, you create a physical barrier between the two colors. It looks like a complex, bohemian style, but it actually takes about ninety seconds to execute once you get the hang of it.
How to Style It
- Take a one-inch section of hair near your left temple.
- French braid it back along the hairline toward your ear.
- Secure with a clear mini-elastic.
- Repeat on the right side.
- Pull both small braids together at the back of your head and pin them under your loose hair. The braids keep your bangs out of your face and create a beautiful transition where the two colors meet at the center-back of your head.
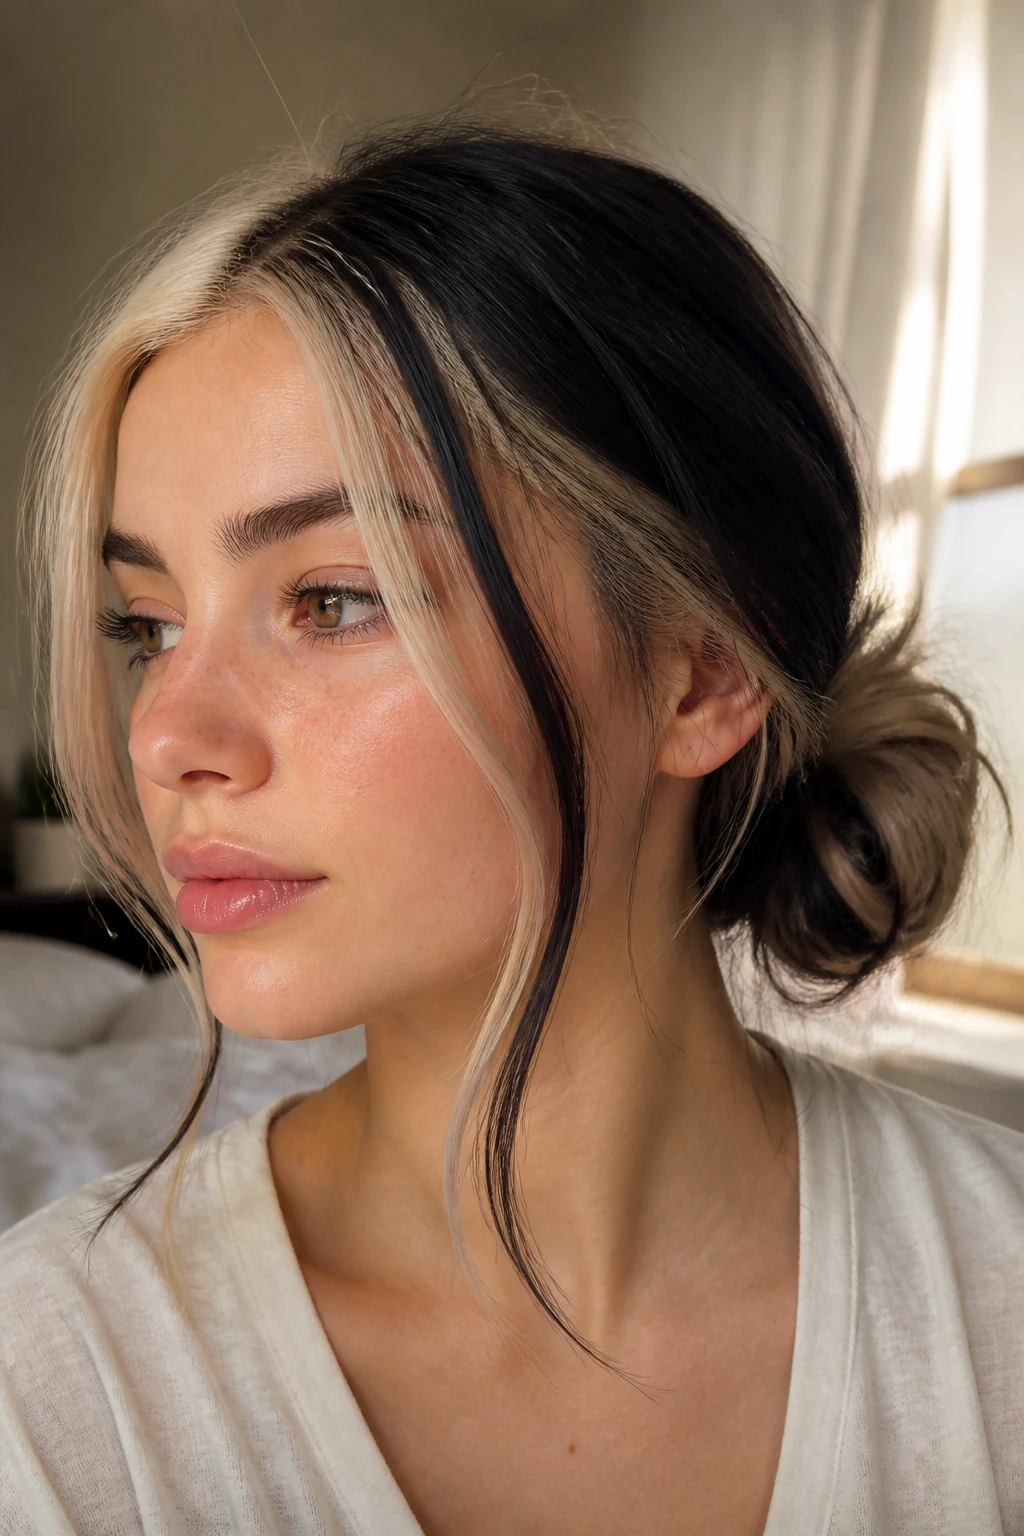
7. The Low, Polished Chignon
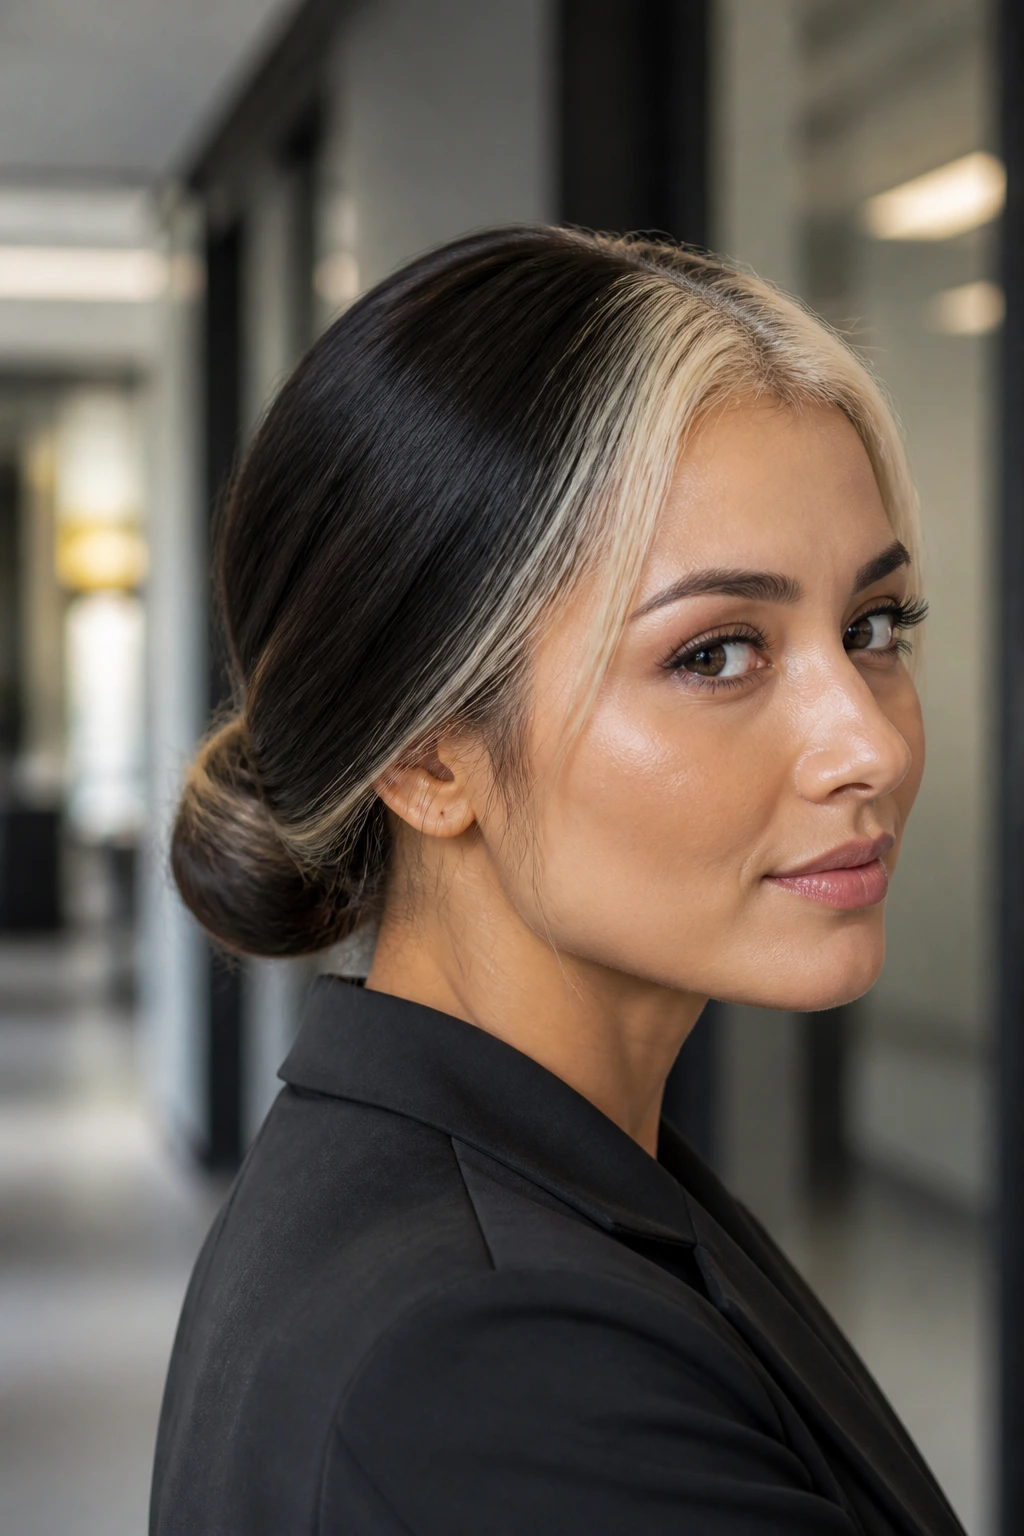
If you have a high-stakes meeting or a morning presentation, go for a low, tight chignon. This is a very clean, professional look that keeps the split-dye colors organized and contained. It works best if you have a straight-cut bob or long, layered hair. The chignon hides the uneven layers that might occur during the growing-out phase of a vivid color job.
Why It’s Great for Maintenance
Keeping your hair in a low, secure bun protects the ends from heat damage and environment-related drying. For those who have bleached their hair to achieve high-contrast split colors, this style is essentially a protective style. It minimizes the need for heat tools, which should be avoided whenever possible to prevent the colors from turning dull or brassy over time.
8. The “Boho” Scarf Wrap

When you are really pressed for time, a silk scarf is a Gemini hair owner’s best friend. You don’t need to worry about how the colors are sitting or whether your roots are showing. Fold a square silk scarf into a long band and tie it around your head, with the knot at the nape of the neck or on top of your head for a retro look.
Matching the Scarf to Your Colors
Choose a scarf that features at least one of the colors in your hair. If you are doing a black-and-white split, a scarf with a bold geometric print looks incredibly modern. If you are doing a pastels combo, look for a silk scarf in a matching shade. The scarf acts as an anchor for the two colors, making the whole head look unified and thoughtfully put together.
9. The Bubble Braid Ponytail
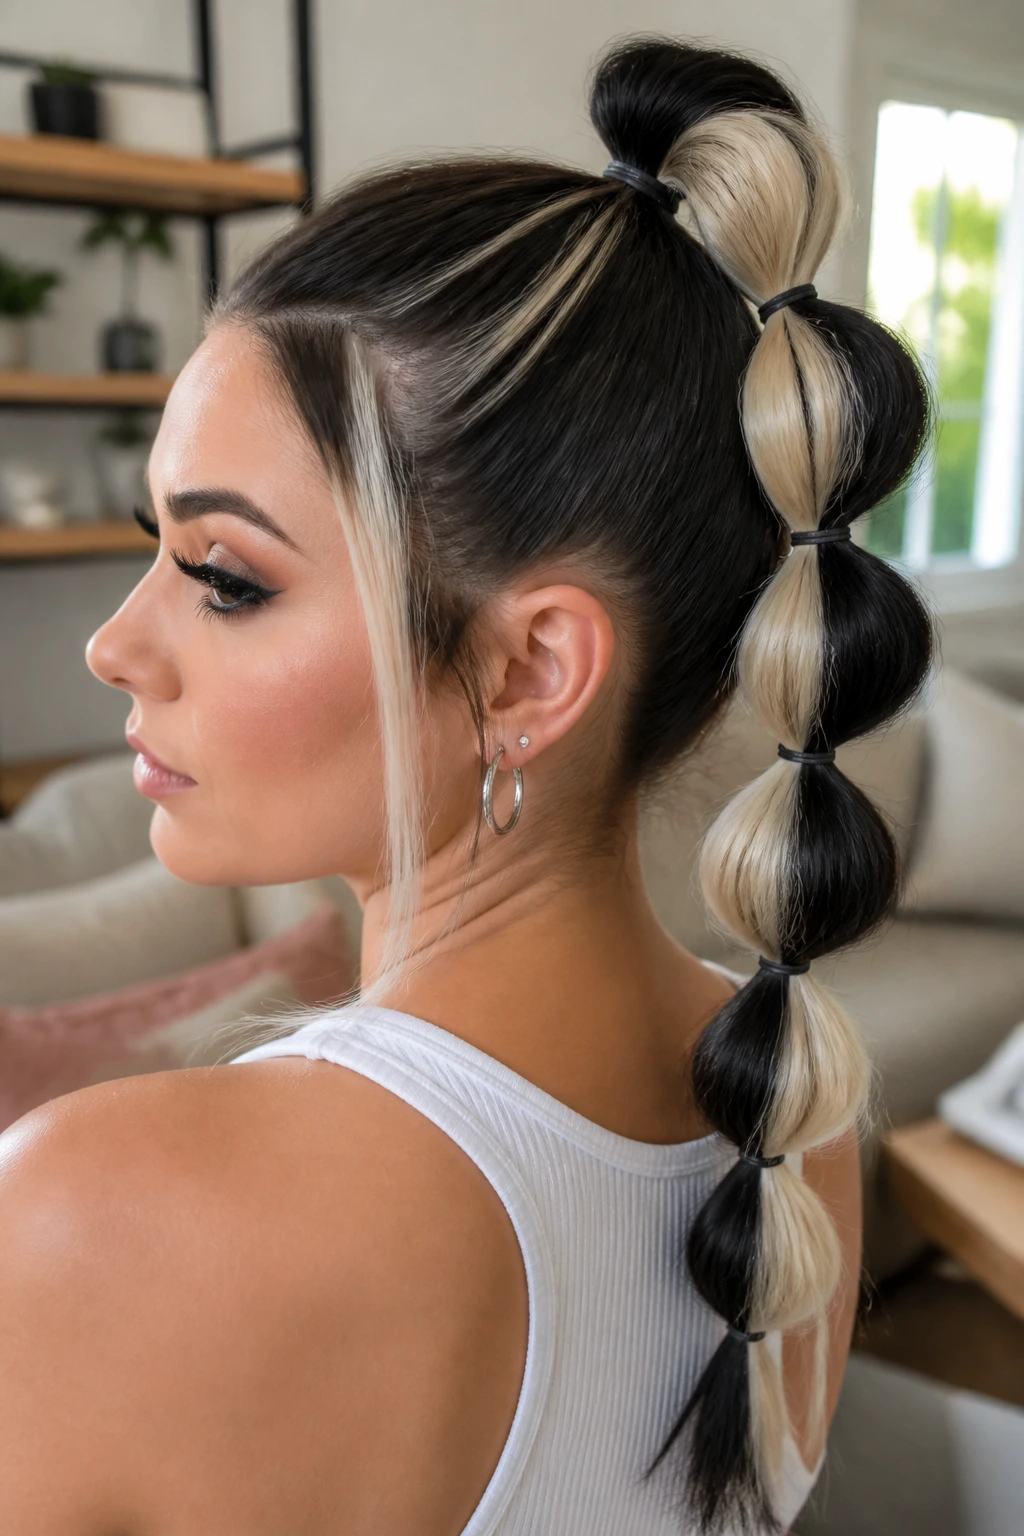
Bubble braids are trending because they are incredibly easy to create but look like you spent hours on your hair. For Gemini hair, this style is a game-changer because each “bubble” creates a new segment where the colors interlock. It highlights the contrast in a way that hanging hair simply cannot.
Creating the Bubbles
- Start with a high, secure ponytail.
- Place small elastic bands every two inches down the length of your ponytail.
- Gently pull the hair between the bands to “puff” it out into bubbles. If your colors alternate in segments, the bubble braid becomes a work of art. It’s a great way to showcase the transition between colors without needing to heat style or use complicated techniques.
10. The Slicked-Back “Wet” Look
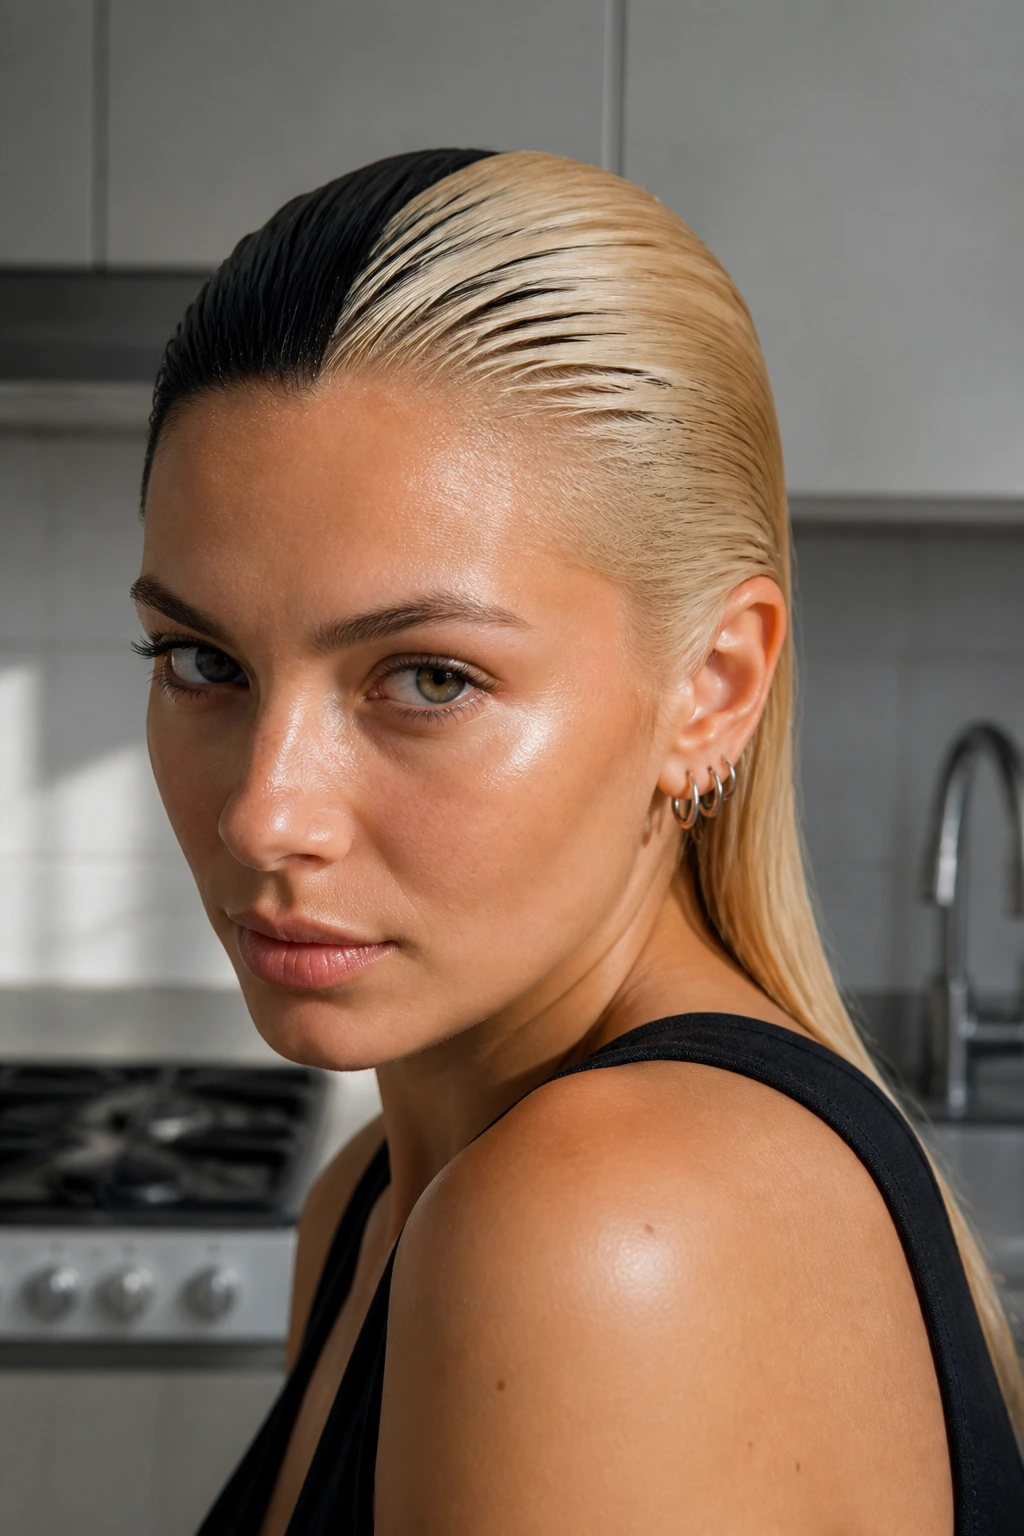
This is the ultimate edgy style for an early morning shift. Using a generous amount of styling gel, slick your hair straight back from your forehead, tucking the sides behind your ears. This pulls both colors into a single, cohesive wash of color at the front and keeps the transition line very sharp.
Product Selection
Do not use a standard hairspray for this; it will flake. You need a dedicated “wet look” gel that provides a high-shine finish without getting crunchy. A little bit of argan oil mixed into the gel can help add shine, which is particularly helpful if your bleached side is feeling a little dry.
11. The Double Low Pigtails

Pigtails aren’t just for children; when worn low at the nape of the neck, they are incredibly chic and surprisingly easy to style. For a Gemini-haired person, this style is a dream because it naturally separates the two colors. You get a solid chunk of Color A on one side and Color B on the other. It is the most “obvious” way to show off your split-dye, which is great if you want to make a bold statement.
Keeping It Mature
To avoid looking like a schoolgirl, make sure the pigtails are parted precisely in the middle and keep them tight rather than loose and messy. You can also leave a small piece of hair out of the elastic to wrap around and hide the band, which adds a touch of polish that pulls the whole look together.
12. The Twisted Crown
This looks like an intricate updo, but it is actually quite fast. Simply twist a two-inch section of hair from each side of your part, twisting them toward the back of your head. Secure them with bobby pins where they meet at the back. It’s a delicate, romantic look that softens the harsh lines of a high-contrast split dye.
Why It Works for Busy Mornings
It takes about sixty seconds. It is much faster than braiding, and it provides a great way to hide day-three hair. If your roots are starting to look a little dark, the twists provide a great visual distraction that draws the eye toward the movement of the hair rather than the scalp.
13. The Half-Top Knot (The Hun)

The half-top knot, or “hun,” is the perfect middle ground between the half-up and the full-up. It keeps the hair out of your face but maintains the volume of your length. For split-dye, this style is excellent because it creates a “mixed” zone at the top of your head where the two colors meet in a messy swirl.
Styling for Maximum Texture
Don’t brush your hair before doing this style. A bit of bedhead adds to the charm of the half-top knot. Use a small scrunchie to secure the bun. If you have fine hair, use a mini-claw clip instead to give it more height. This style is all about embracing the casual, “I woke up like this” aesthetic that Gemini hair naturally leans into.
14. The Low Side-Swept Braid
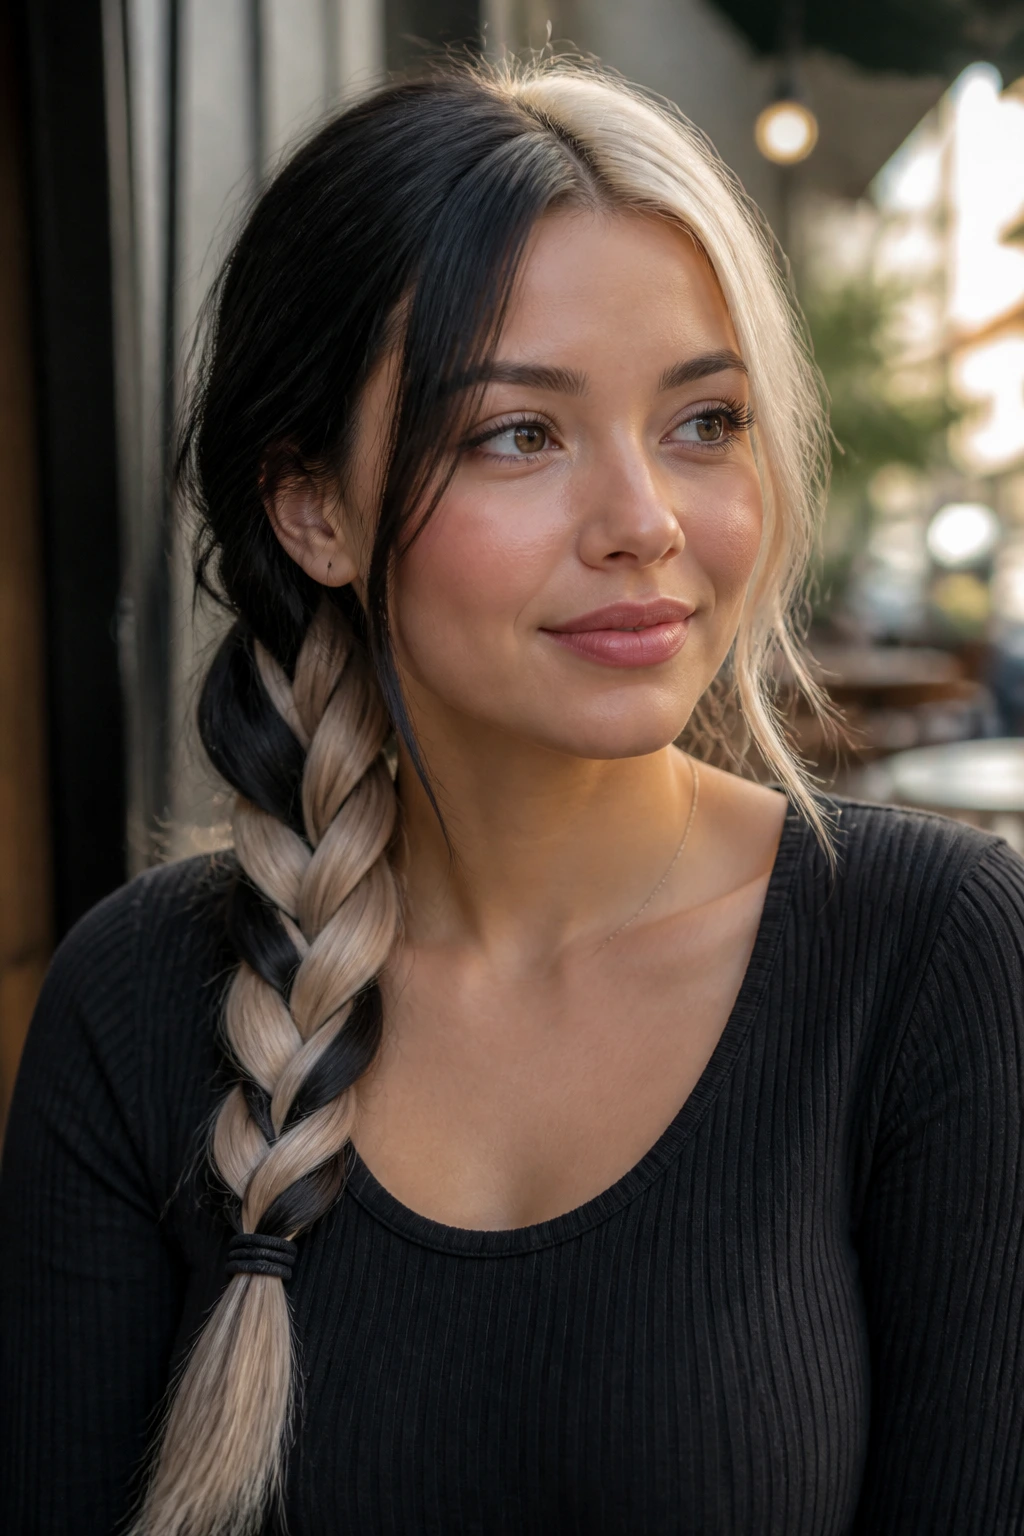
A single, loose side braid is a classic, but for a Gemini-haired person, it’s a way to mix the colors into a marled effect. As you braid, the colors will weave into each other, creating a unique pattern that changes every time you style it. It’s a very low-maintenance look that actually looks better as it gets a little messier throughout the day.
The “Loosening” Technique
Once you have finished the braid, do not leave it tight. Use your fingers to pull at the loops of the braid, starting from the bottom and working your way up. This “pancaking” technique makes the braid look much thicker and more deliberate. It also helps the colors blend together more visually, which can soften the transition if you aren’t a fan of a hard line.
15. The “Claw Clip Twist”
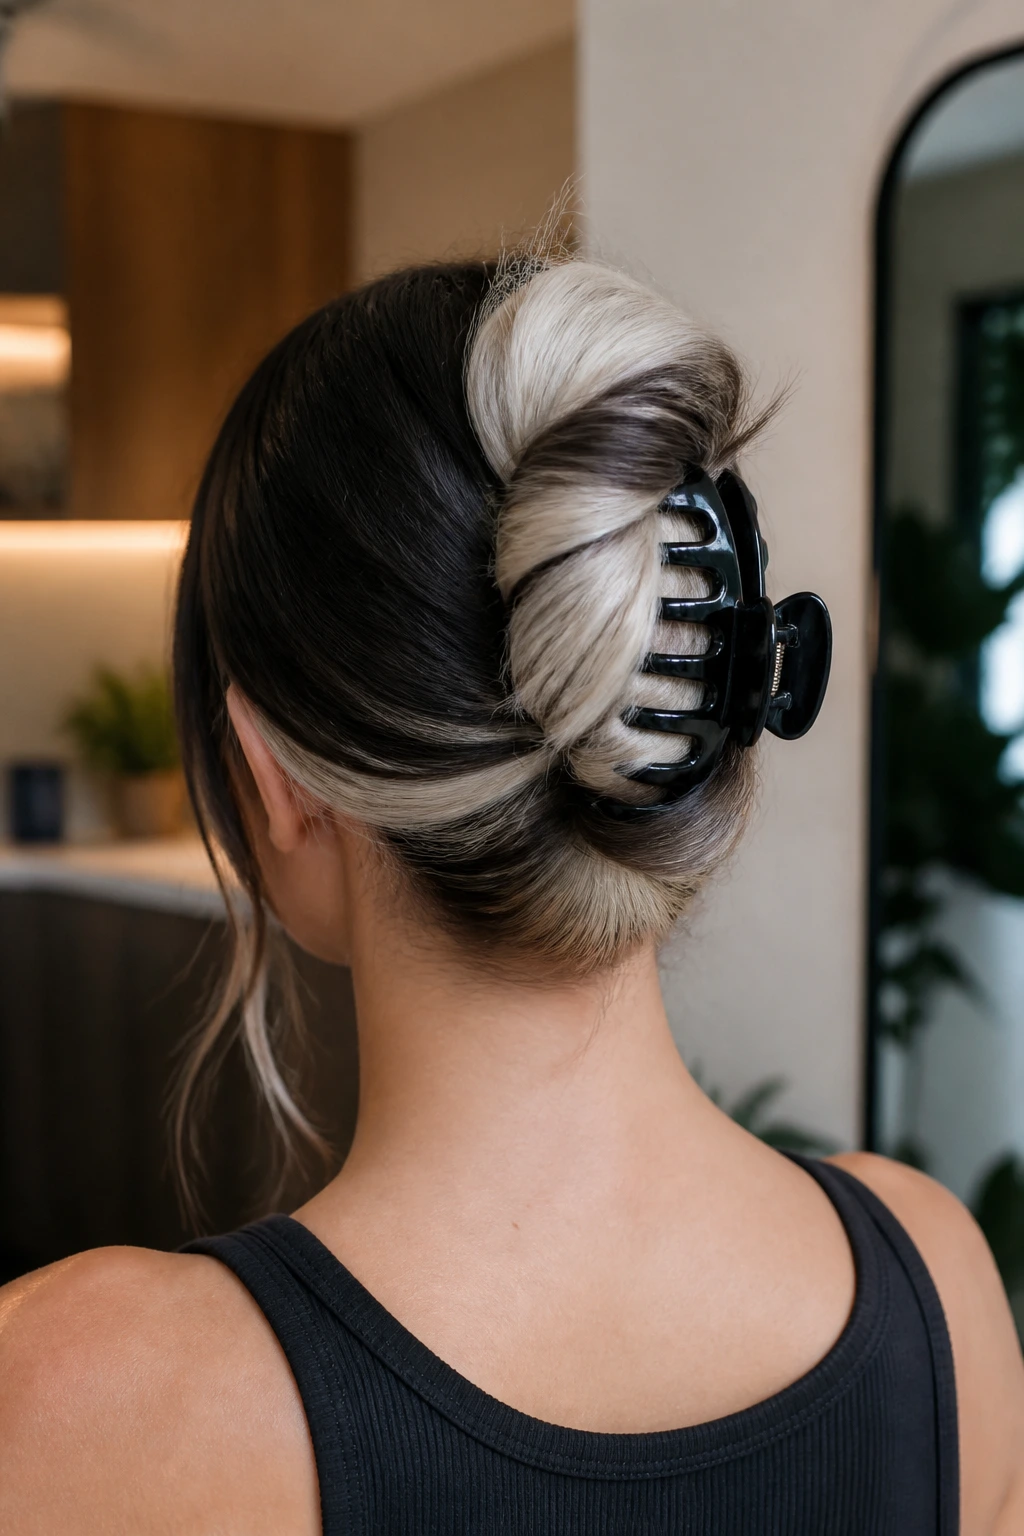
This is the fastest updo in existence. Twist your hair into a long rope, fold it against the back of your head, and secure it with a large claw clip. It takes about five seconds. Because the twist involves all your hair at once, the two colors will spiral together, creating a beautiful marble effect.
Handling Layers
If you have layers, this style is very forgiving. The ends of the layers will poke out in a way that looks like a textured, intentional design. If you have very long hair, you might need a slightly larger clip to ensure the weight of the hair doesn’t pull the clip down over the course of the day.
16. The Headband and Pony Combo
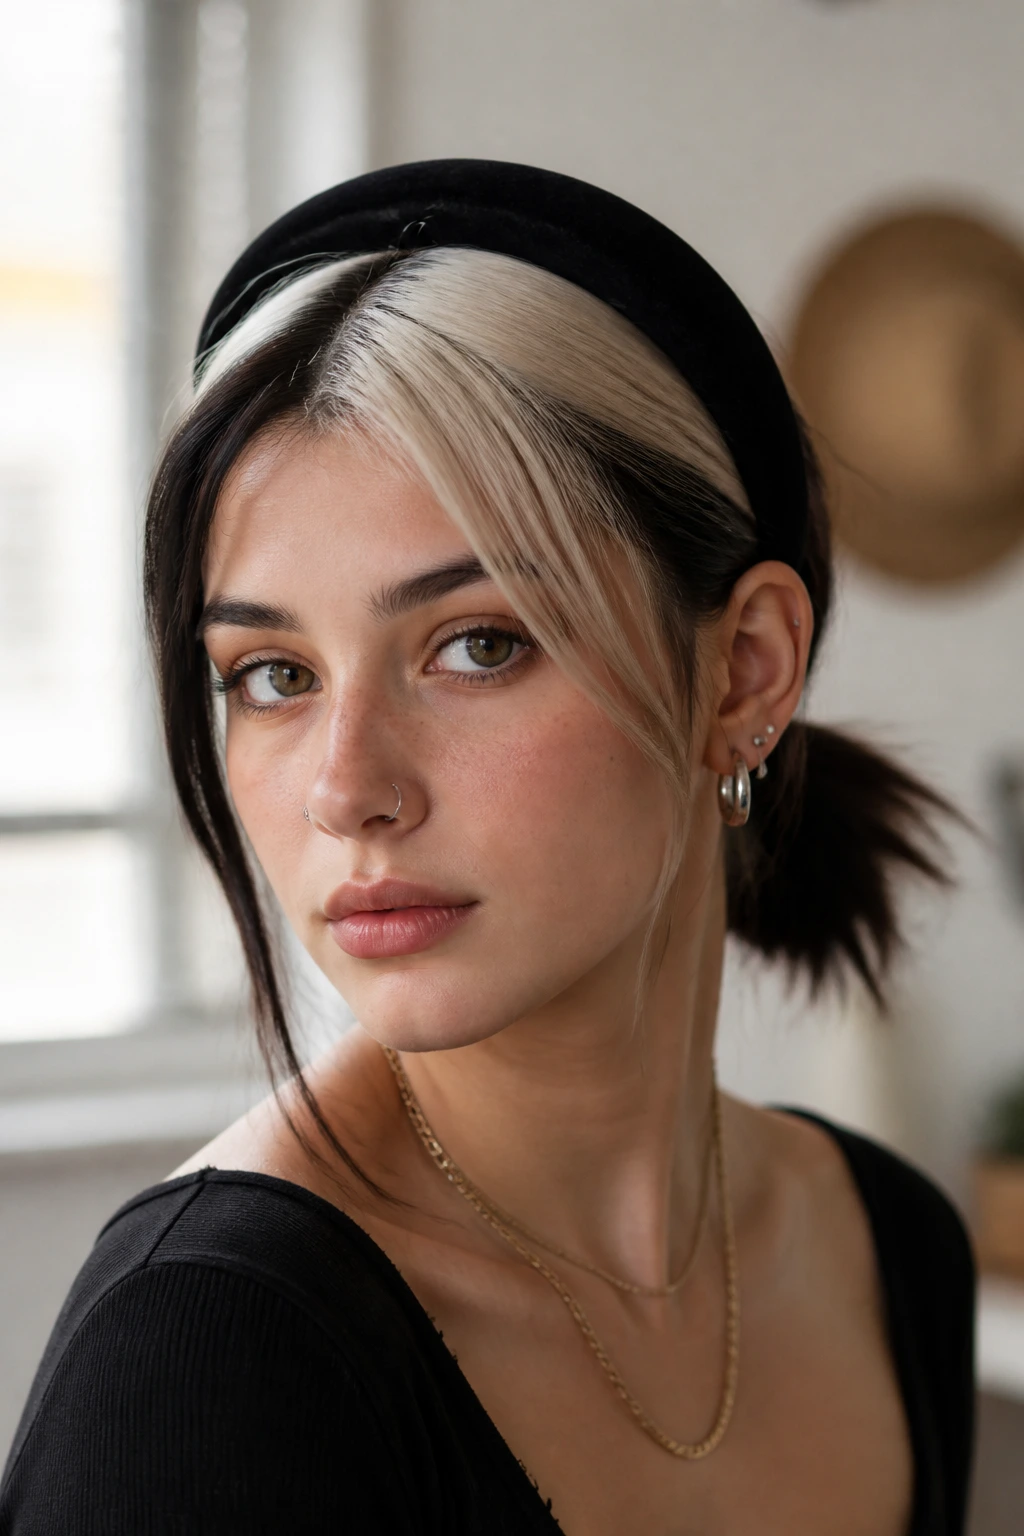
If you are really struggling with your hair, a thick velvet or fabric headband is the best way to hide a bad hair day. Pair it with a low ponytail, and you have a polished, preppy look that requires zero effort. The headband also acts as a visual frame, making your split-dye colors look like they belong in a well-designed package.
Why This is Effective for Split-Dye
The headband masks the hairline, which is where color transitions can sometimes look a bit uneven or grown-out. It draws all the attention to the front of your face and your makeup, allowing the hair to serve as a supporting actor rather than the main feature you are stressing over.
17. The Low Bun with Wrapped Length
This is essentially a low bun where you don’t tuck the ends in. Instead, you leave the ends of your ponytail hanging down over the bun. It is a quirky, modern take on the bun that looks very “runway” but is actually quite simple to do.
Maximizing the Contrast
This look is best for people with high-contrast hair. By having the bun at the base and the loose ends cascading over it, you create multiple points where the colors clash and blend. It is a very visual, dynamic style that makes it look like you put a lot of effort into your morning routine even when you were barely awake.
18. The Sleek Low Pony with a Middle Part
Sometimes, simplicity is the most powerful choice. A razor-sharp center part paired with a low, slicked-back ponytail is incredibly high-fashion. This look is perfect for highlighting the exact point where your colors meet. It’s clean, it’s fast, and it’s undeniably professional.
Achieving the Polish
Use a boar-bristle brush to get your hair as smooth as possible before securing it with an elastic. A quick spritz of shine spray will take this from “I did this in a hurry” to “this is my signature look.” It works exceptionally well with bleached-and-dyed hair, as the shine spray helps hide the porosity of the hair strands.
19. The “Half-Up” Messy Bun

If you are bored of the standard half-up styles, try a messy bun instead of just a clip or a pony. It gives you all the benefits of keeping hair off your face, but with a bit more height and drama. It’s particularly great for those with split-dye hair because the messy bun at the crown of your head acts as a focal point.
Texture is Key
The secret to a good half-up bun is using a bit of texturizing powder at the roots. It gives your hair the grip it needs to stay up all day without sliding down. If you don’t have texturizing powder, a little dry shampoo at the roots will do the exact same thing.
20. The Low Side-Part Pony
Finally, we have the low side-part pony. This is the sophisticated, older sibling of the low center-part pony. By shifting the part slightly to the side, you allow one color to dominate the crown, while the other provides a subtle, unexpected splash of color on the side. It is a very flattering, soft look that is perfect for professional settings.
The Final Touch
Always pull the ponytail through the hair tie on the final loop so that the ends are tucked slightly. This creates a rounded, sleek look that makes the ponytail look more like an extension of your style rather than just a way to hold your hair back. It is the perfect closing note to a quick, stylish morning.
Final Thoughts
The most important thing to remember when working with Gemini hair is that your color choice is already a statement. You do not need to over-complicate your morning routine to make it look intentional. Most of the time, the simplest styles—the ones that emphasize the transition between the two halves of your hair—are the ones that garner the most compliments. Stop trying to fight your hair into submission; instead, work with the natural divide you’ve created.
Spend a few minutes on a weekend practicing two or three of these styles until they become muscle memory. Once you can do a low claw-clip chignon or a bubble pony in your sleep, your morning routine will stop being a source of stress and start being a five-minute ritual that leaves you feeling polished and confident. Your color is bold for a reason—let it speak for itself, and keep the styling simple enough that you have time to actually enjoy that morning coffee.