Creating a mohawk-inspired braid style on straight hair requires a shift in mindset. Unlike naturally curly or coily textures that provide immediate volume and grip, pin-straight hair can be slippery and resistant to structured styling. You are fighting against the natural tendency of the strands to lay flat against the scalp. However, with the right combination of texture-enhancing products and precise sectioning, you can achieve a high-impact, edgy look that stays secure all day long.
The mohawk braid is not a single technique but a silhouette. By concentrating volume and intricate braiding in the center of the head, you draw the eye upward and create the illusion of a bold, faux-hawk profile without needing to reach for the scissors. Whether you are aiming for a tight, polished look or a messy, bohemian vibe, the foundation remains the same: preparation is everything.
1. The Texturized Foundation for Straight Hair
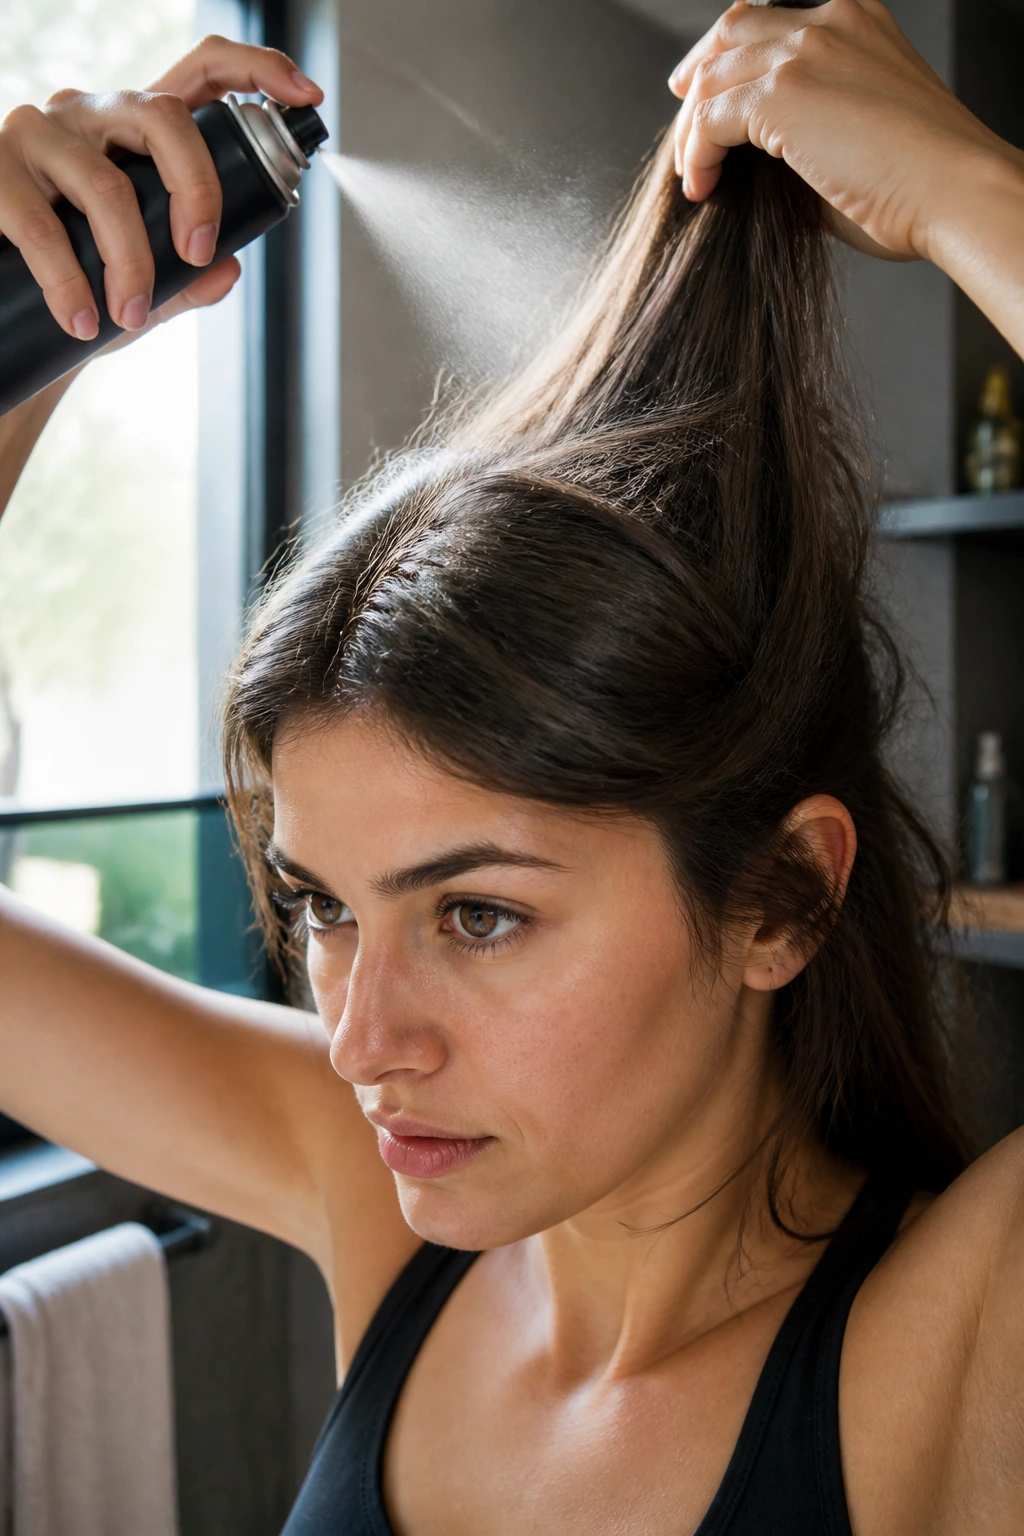
Before you part a single section of hair, you must manufacture grip. Straight hair is naturally shiny and smooth, which makes it slide right out of tight braids. I have found that starting on day-two hair is always better, but if you are working with freshly washed locks, you need to create artificial texture.
Why Texture Sprays Are Essential
Dry shampoo or texturizing salt spray acts like a scaffold for your braids. When you apply a generous misting of a matte-finish texture spray, you are essentially coating the hair cuticle with grit. This prevents your strands from slipping out of the braid pattern and keeps your Dutch or French plaits from sagging under their own weight.
The Prep Routine
- Spray a lightweight dry shampoo from roots to mid-lengths to absorb natural oils.
- Apply a volumizing mousse to damp hair and blow-dry it with your head flipped upside down for maximum root lift.
- Use a fine-tooth comb to backcomb the roots slightly where the braid will sit, giving the hair something to “hook” onto.
Pro tip: If your hair is exceptionally silky, a light dusting of hair powder at the roots will provide more hold than any hairspray ever could.
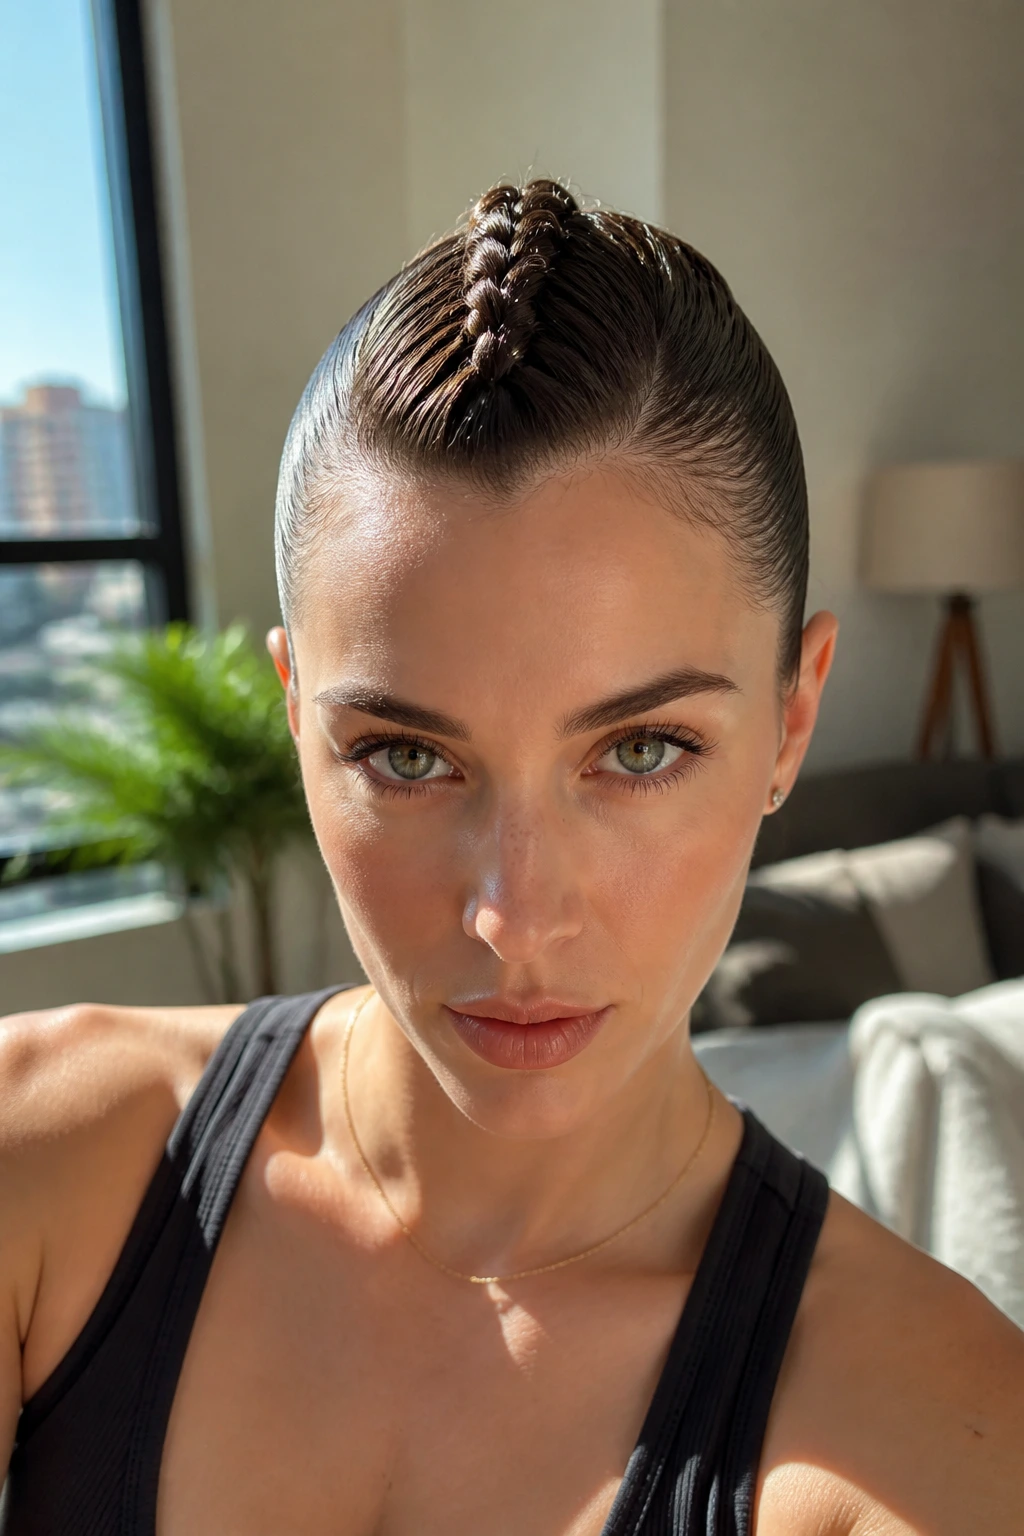
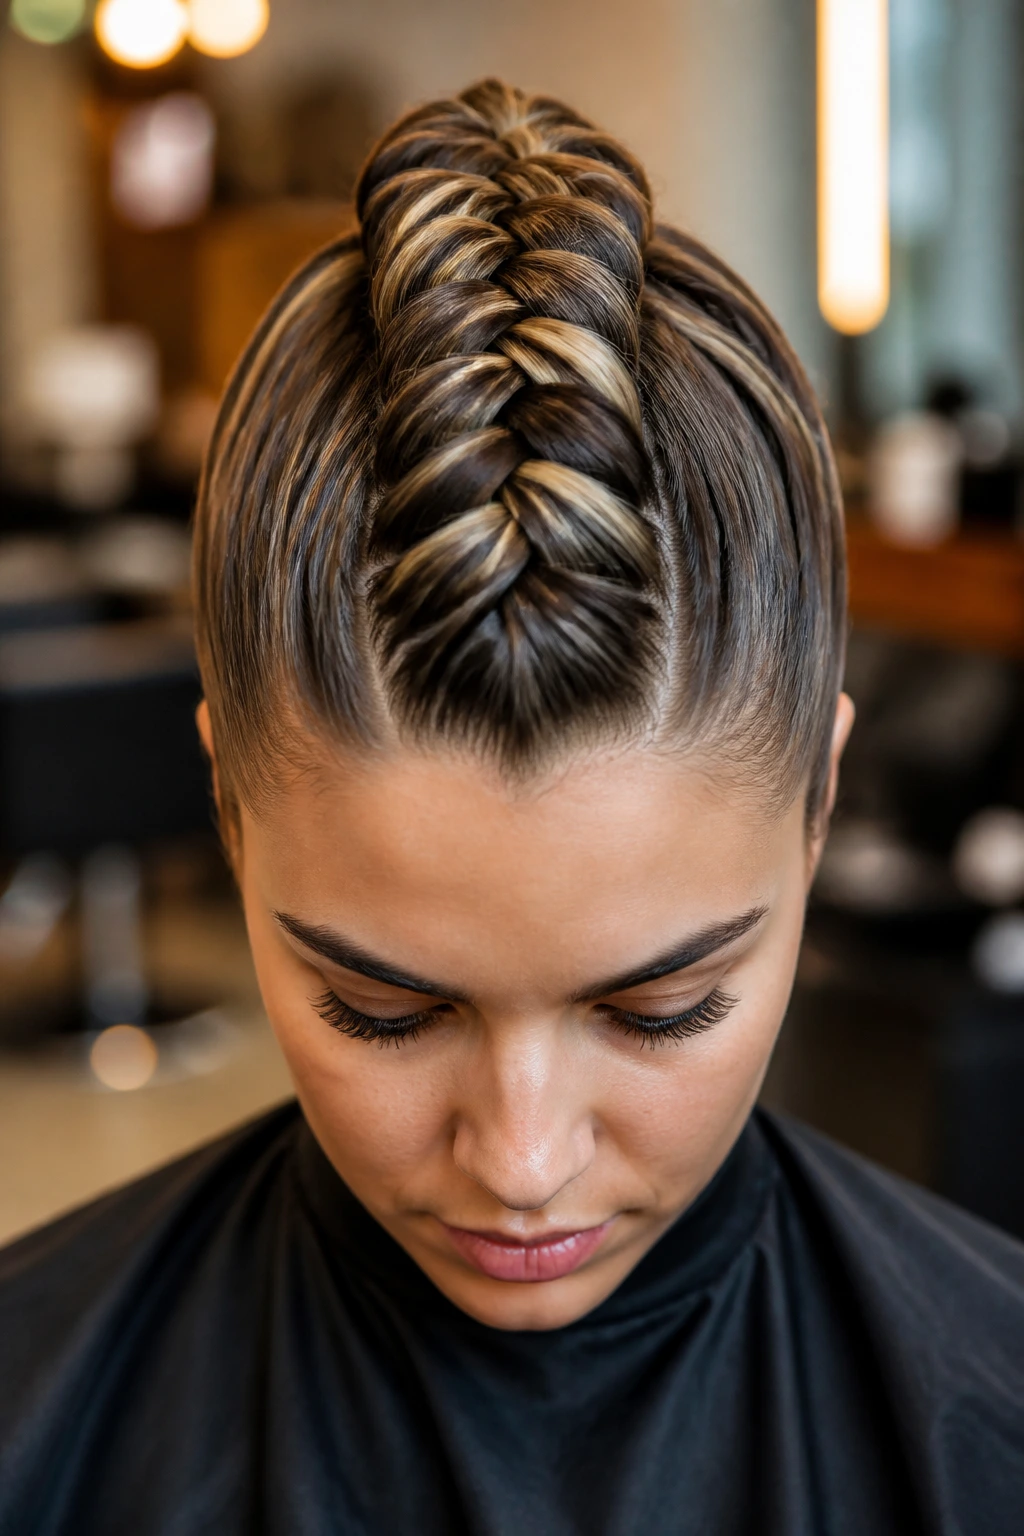
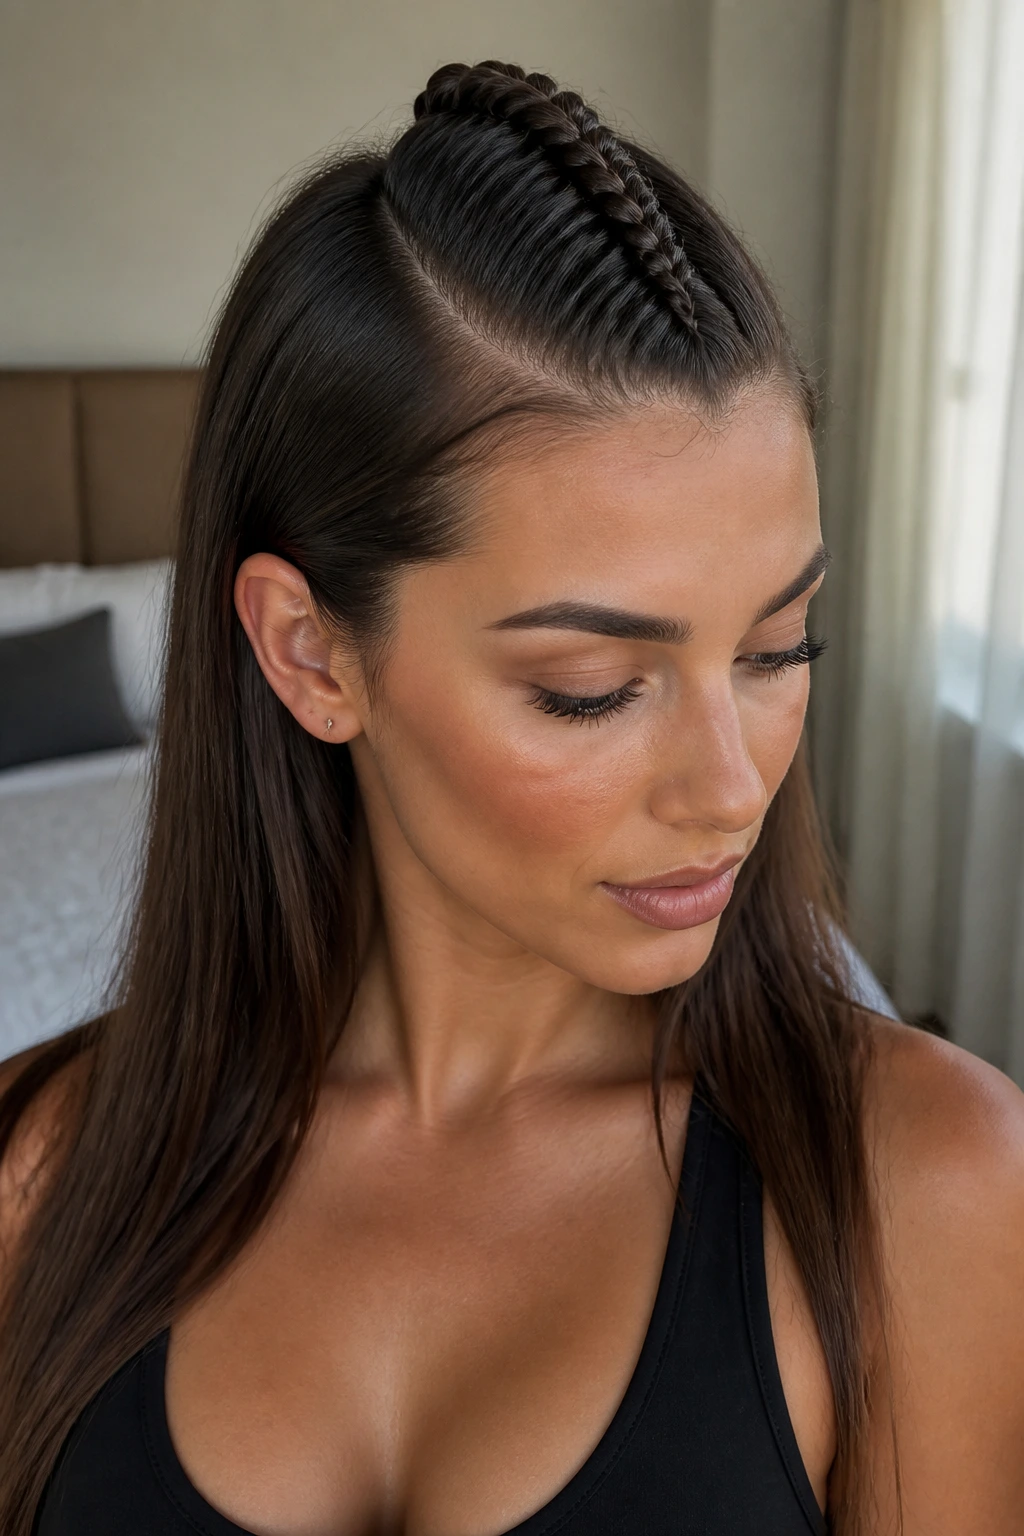
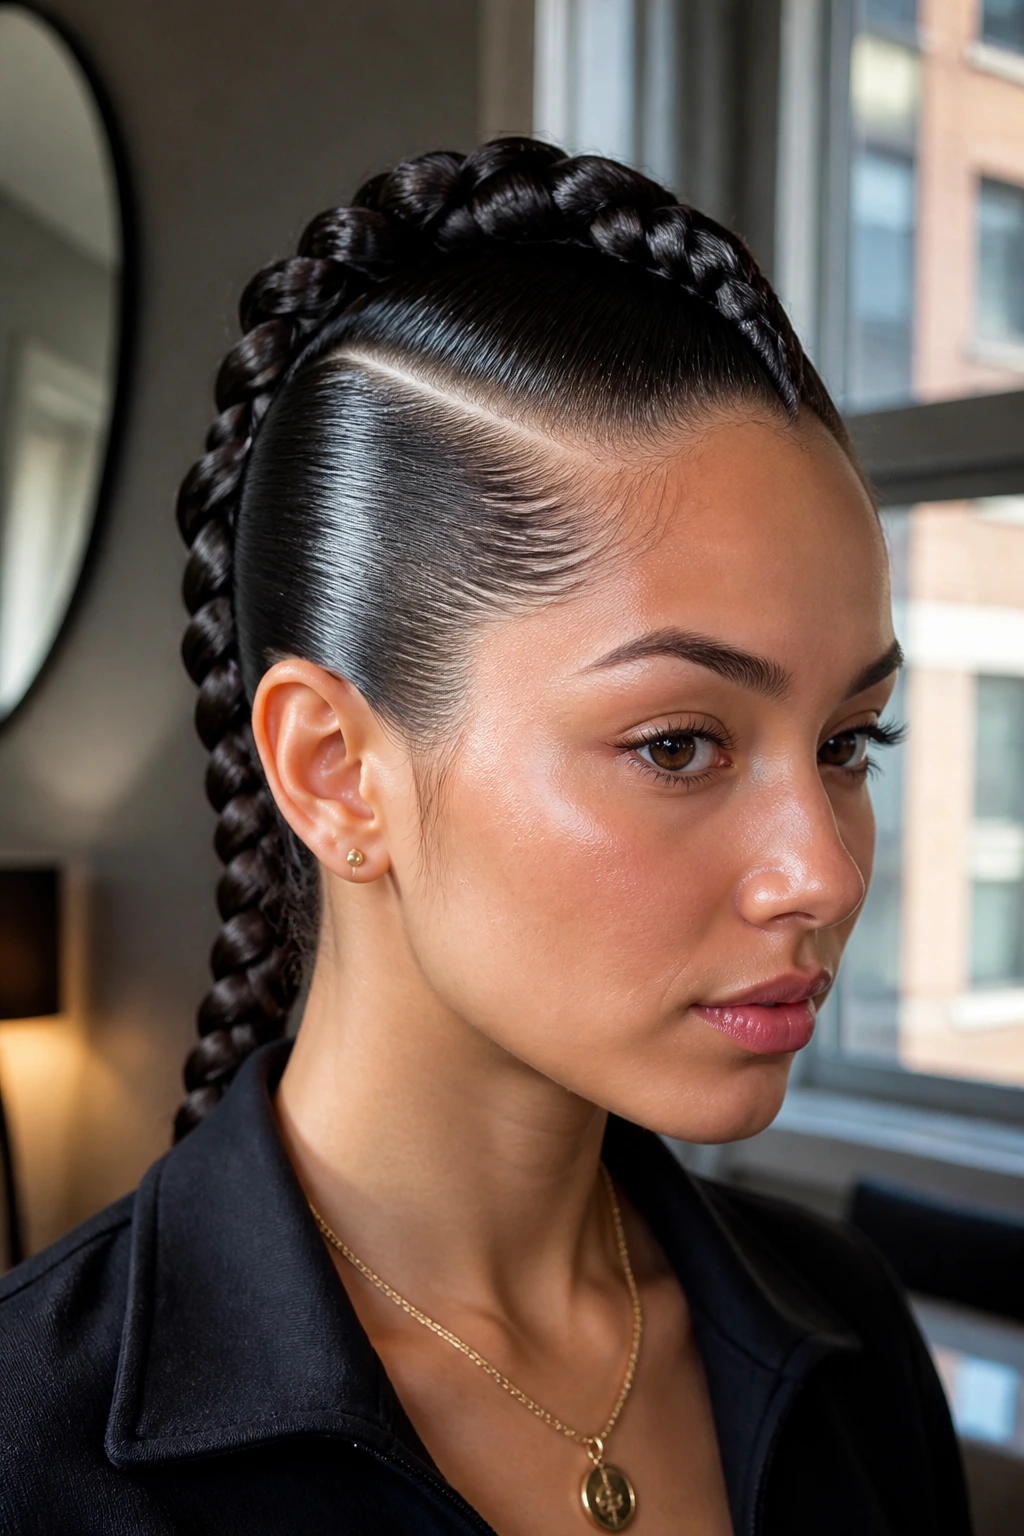
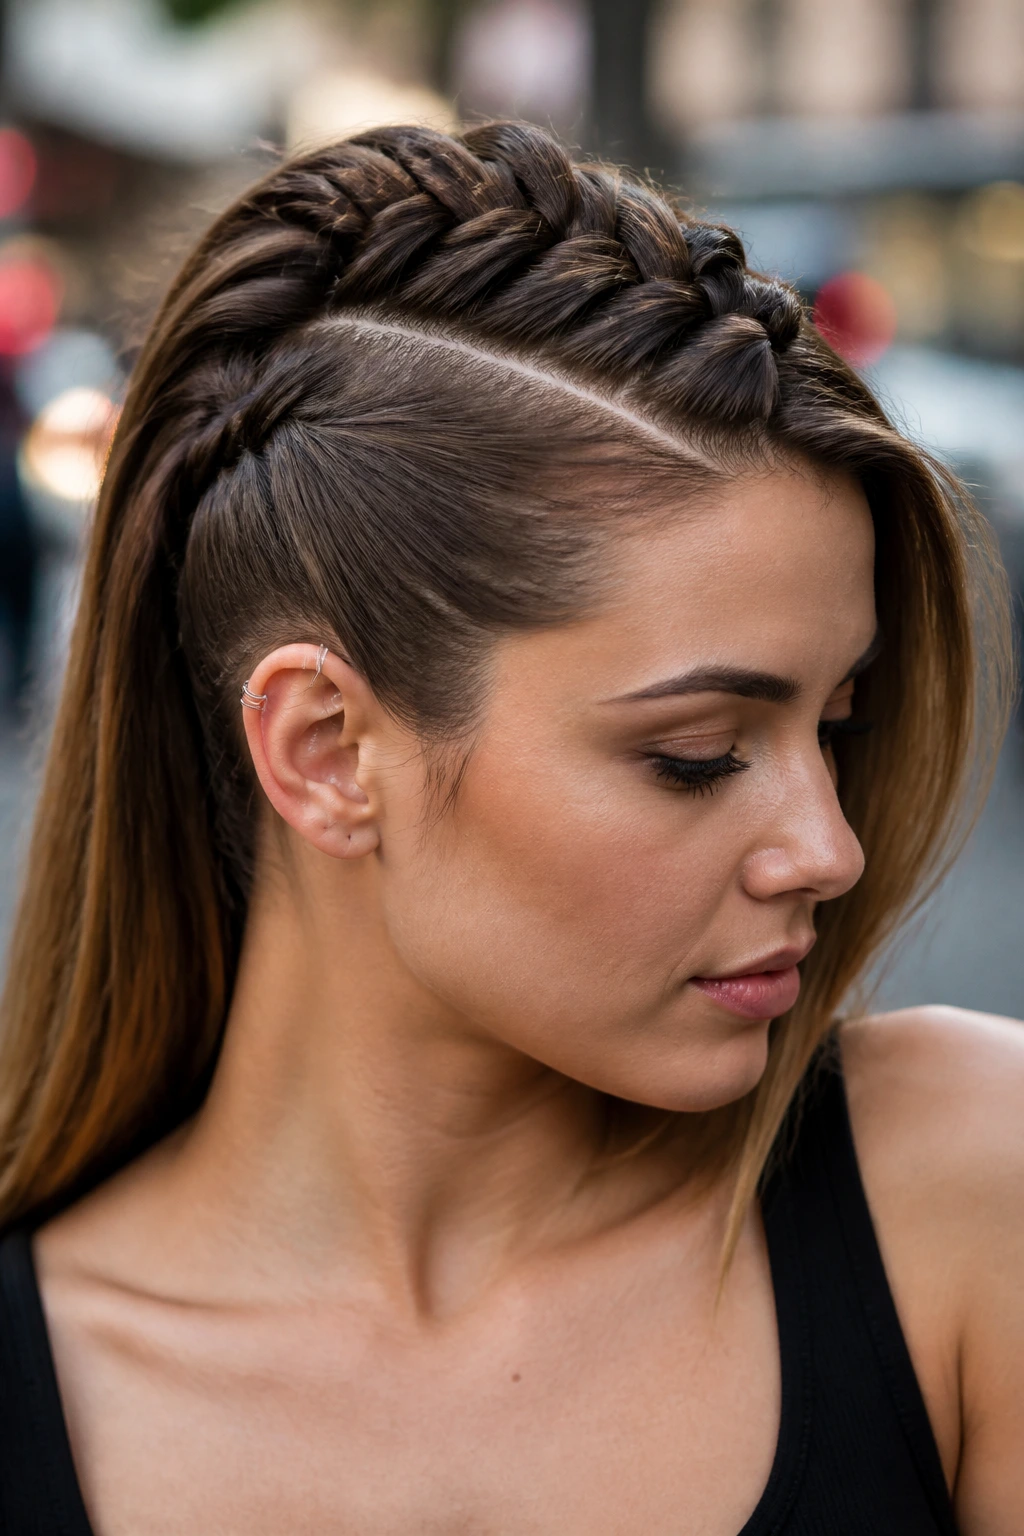
2. Tight Dutch Braid Center Mohawk
The Dutch braid is the classic choice for a mohawk because it stands off the scalp rather than sitting flat like a traditional French braid. For straight hair, the goal is to keep the tension even so the center ridge looks uniform and thick.
Achieving Maximum Projection
When you cross the outer strands under the middle strand—the hallmark of the Dutch technique—pull them outward slightly as you secure them. This gives the braid a “popped” look. With straight hair, don’t worry about the braid looking too perfect. If it looks a bit too tight, you can go back and gently tug on the edges of the loops to fluff it up.
Securing the Look
Because straight hair tends to unravel, secure the end of your braid with a small, clear elastic that matches your hair color. Then, wrap a tiny piece of hair around the elastic to hide it. A quick spritz of strong-hold hairspray is the final step to ensuring that the center ridge remains perfectly aligned from the nape of the neck to the hairline.
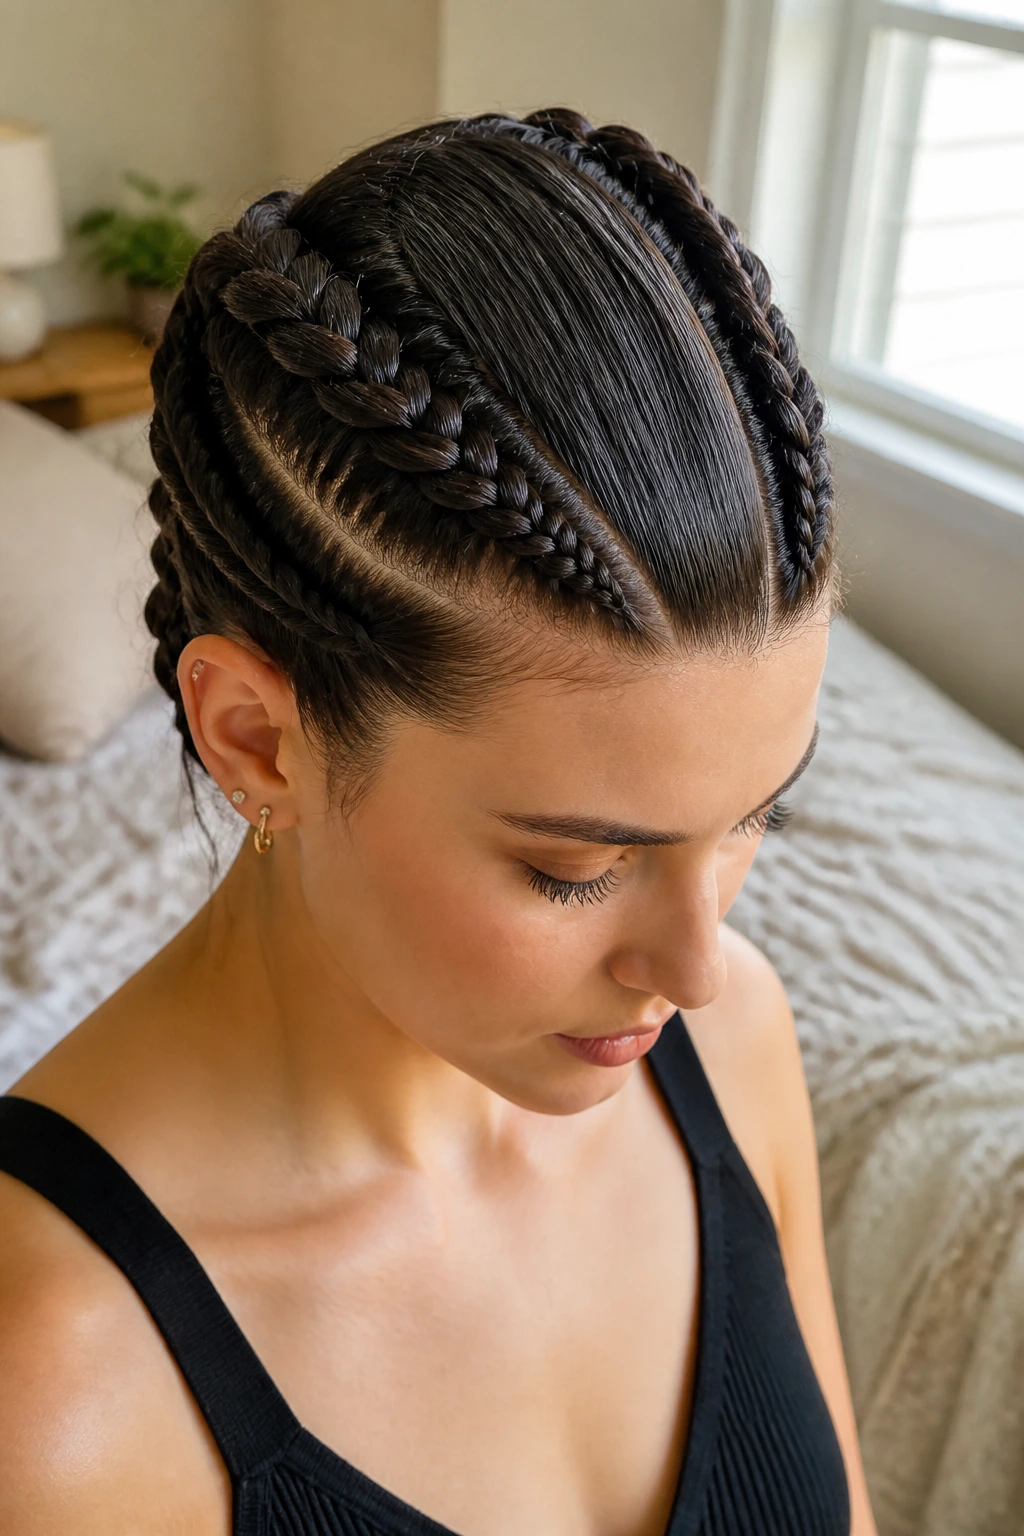
3. Double-Braided Side Twists
If a single, thick center braid feels like too much commitment, consider a double-braided approach. This style involves creating two separate, smaller Dutch braids that flank a middle section of hair. It creates a wider, more substantial mohawk silhouette that is easier to manage if your hair is on the finer side.
How to Section for Symmetry
Use a rat-tail comb to create two clean, parallel parts running from your forehead back to the crown. It is often helpful to clip the hair you aren’t working on so that stray strands don’t wander into your braid lines. Precision here is the difference between a professional look and a messy one.
Enhancing the Middle Section
Once the two side braids are secured, you can leave the hair in the middle straight and slicked back, or you can curl it with a wand to add volume. The contrast between the tightly pulled, braided sides and the soft, voluminous middle section provides a great sense of balance and visual interest.
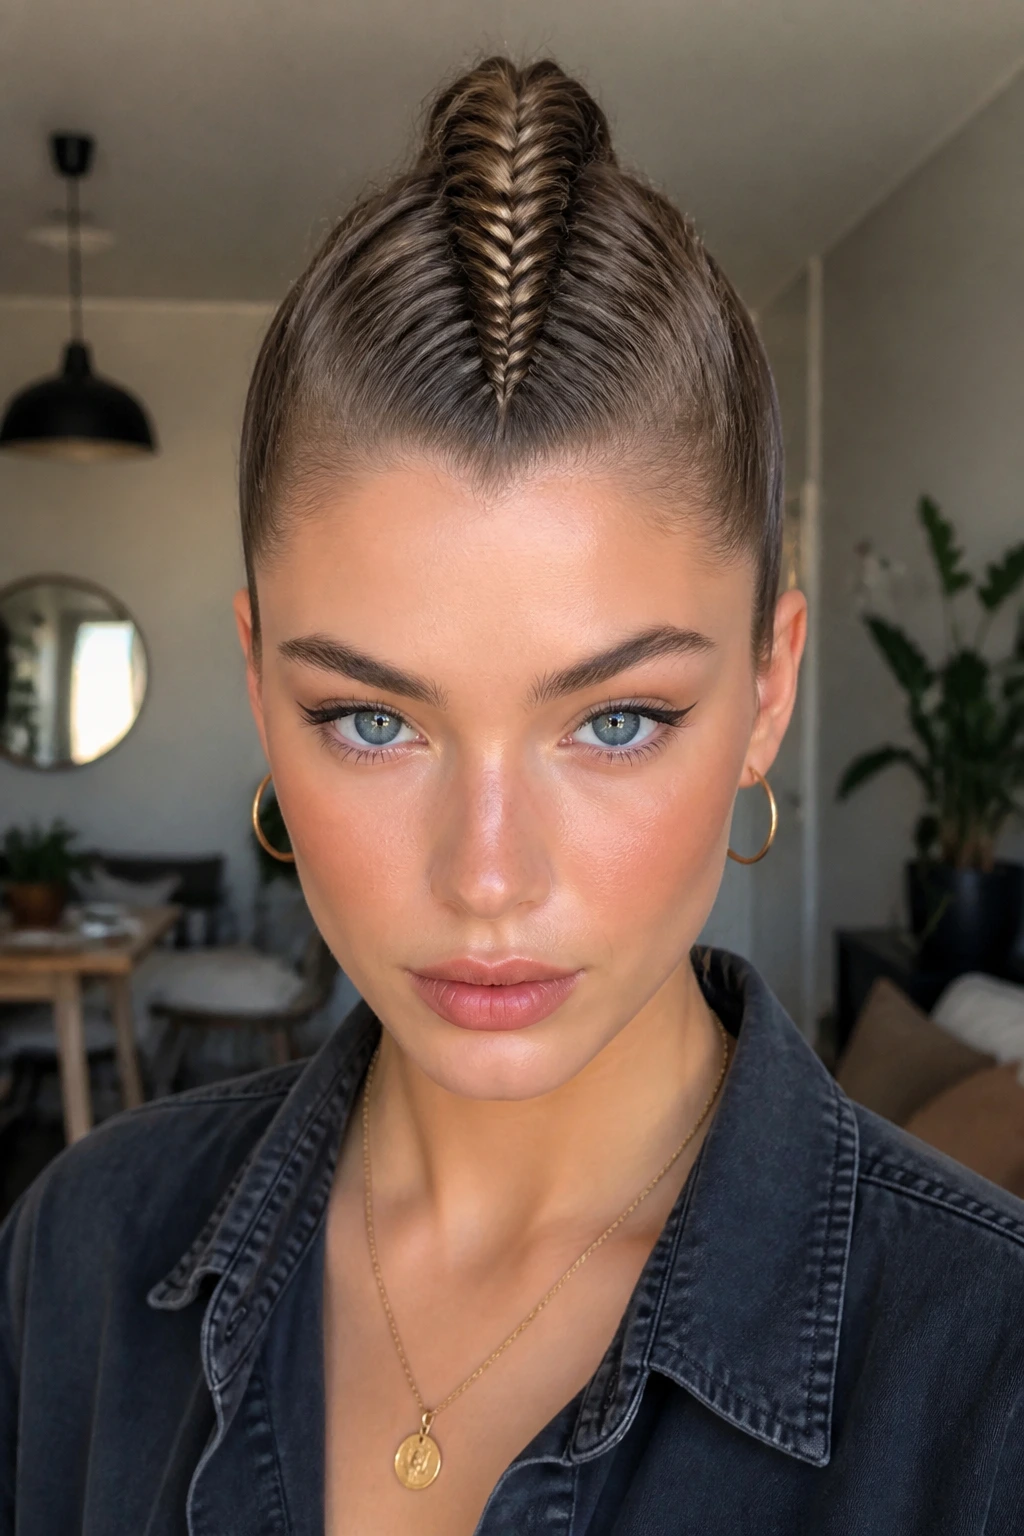
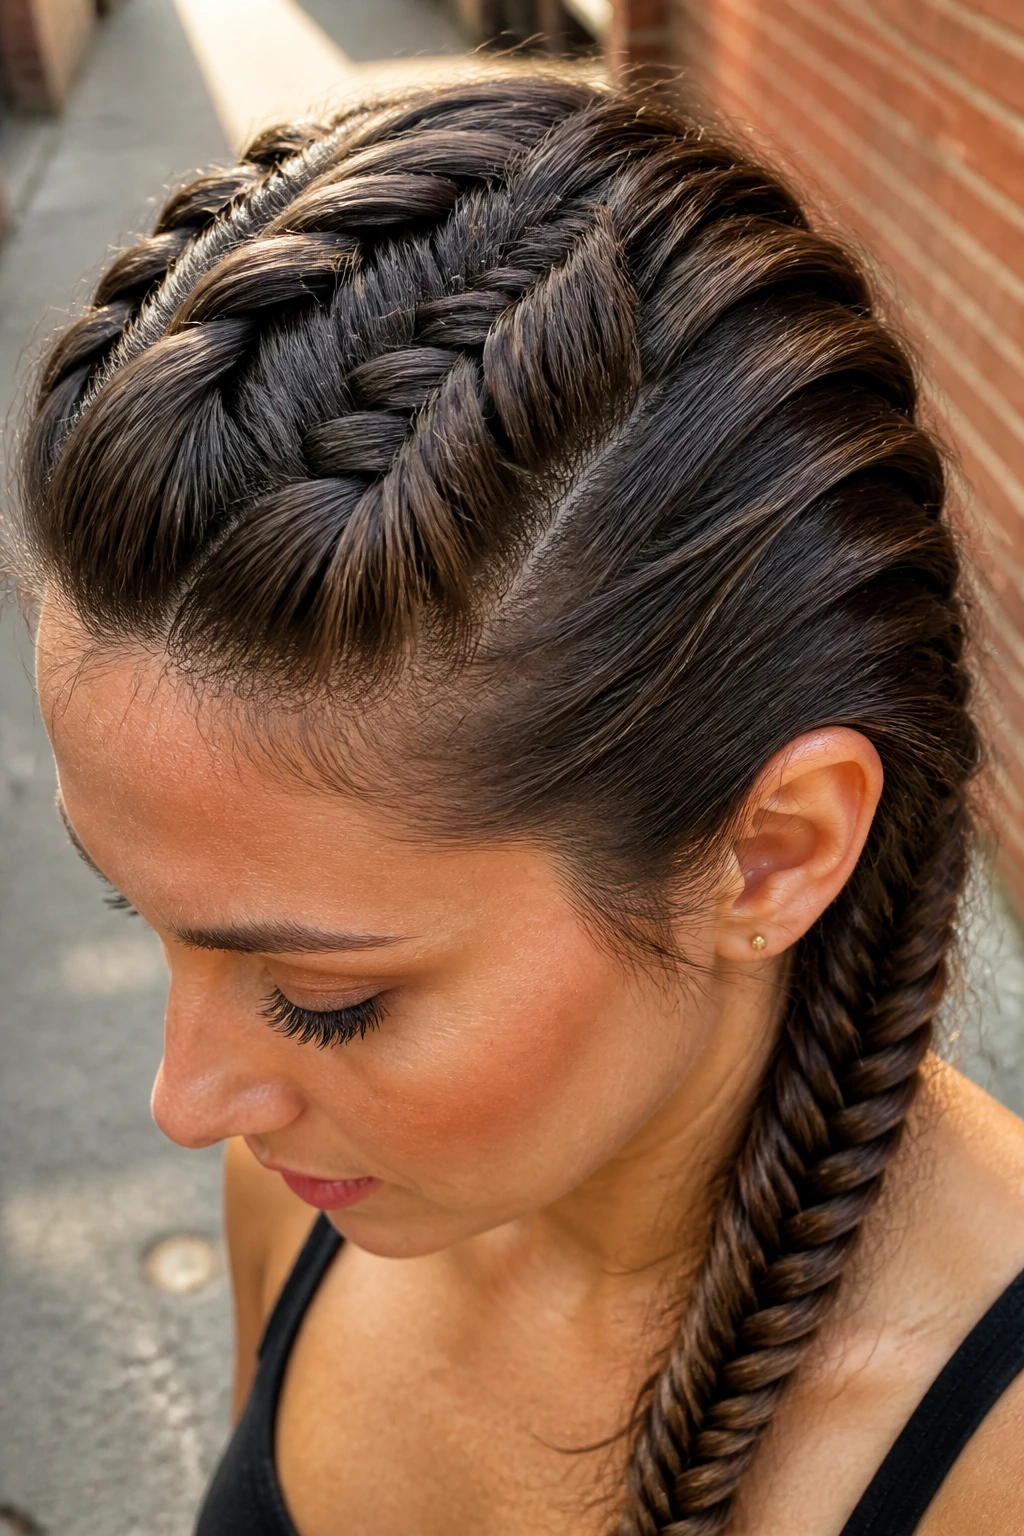
4. The Fishtail Mohawk
A fishtail braid creates a delicate, herringbone-like pattern that looks incredibly intricate but is actually quite simple to execute. On straight hair, the key is to keep the sections small. The smaller the sections of hair you pull from the outside, the more defined and elegant the fishtail braid will appear.
The Mechanics of the Fishtail
Start your braid at the front of the hairline. Divide the hair into two equal halves. Pull a tiny sliver of hair from the outer edge of the right section and cross it over to the inner edge of the left section. Repeat on the other side. You must keep the tension tight as you work, otherwise, the braid will become loose and lose its shape.
Finishing the Braid
Once you have reached the back of the head, tie it off and carefully use your fingers to pull at the sides of the fishtail. Because the braid is woven tightly, “pancaking”—the act of pulling the loops—will make it look twice as wide. This style is perfect for those who want a mohawk that looks sophisticated rather than sporty.
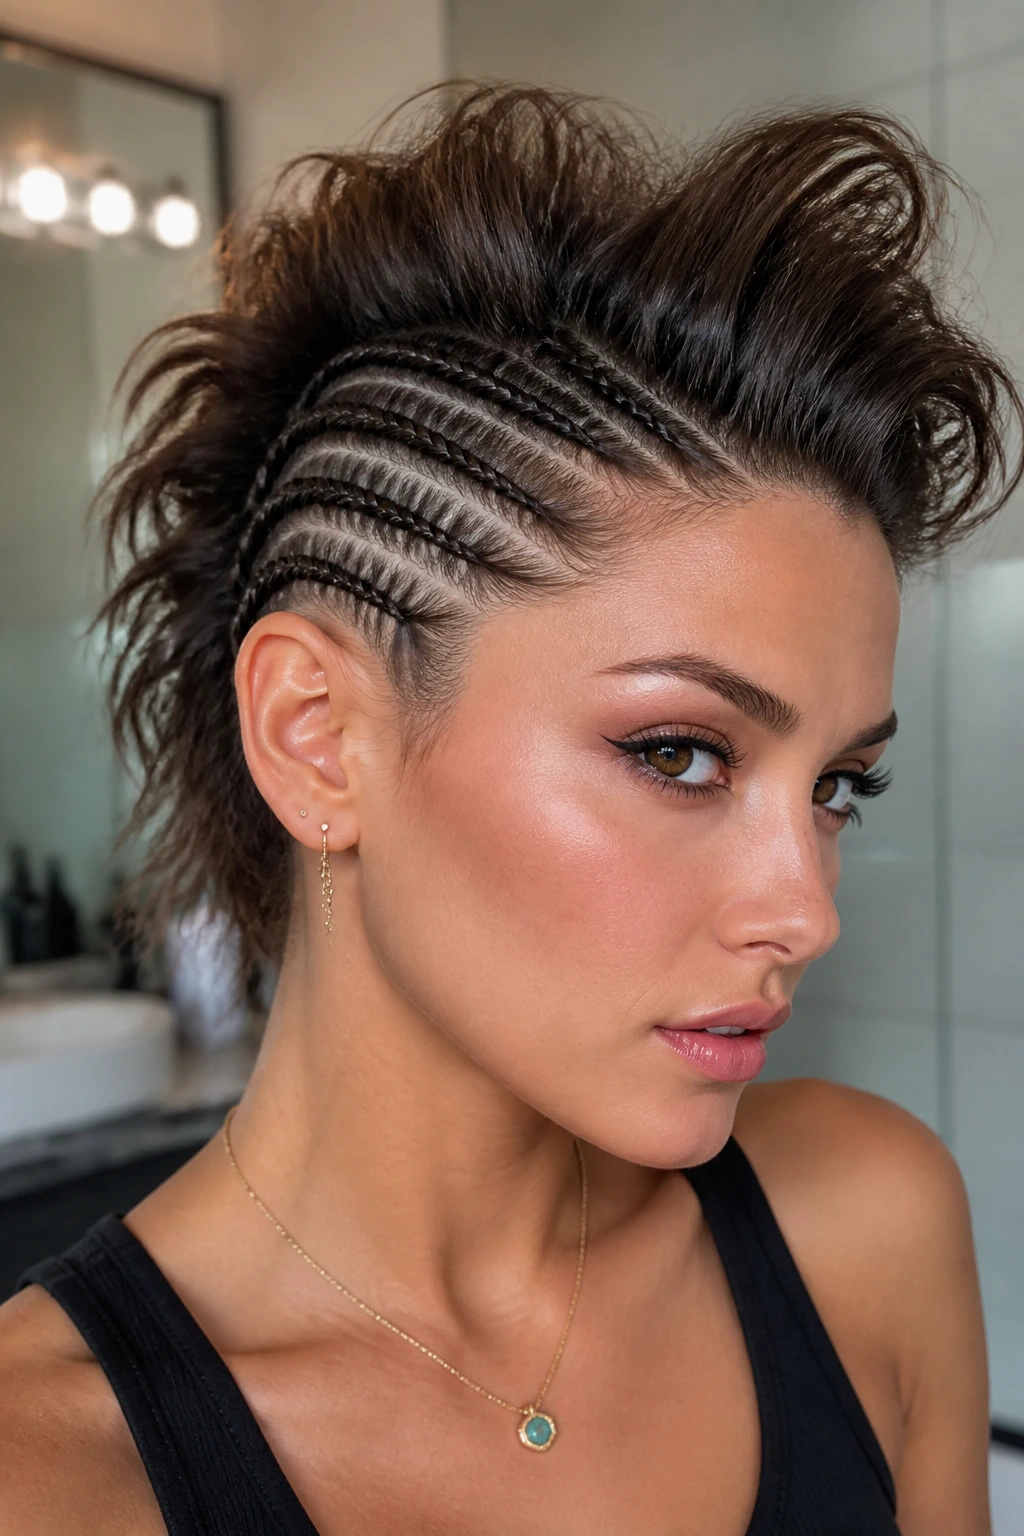
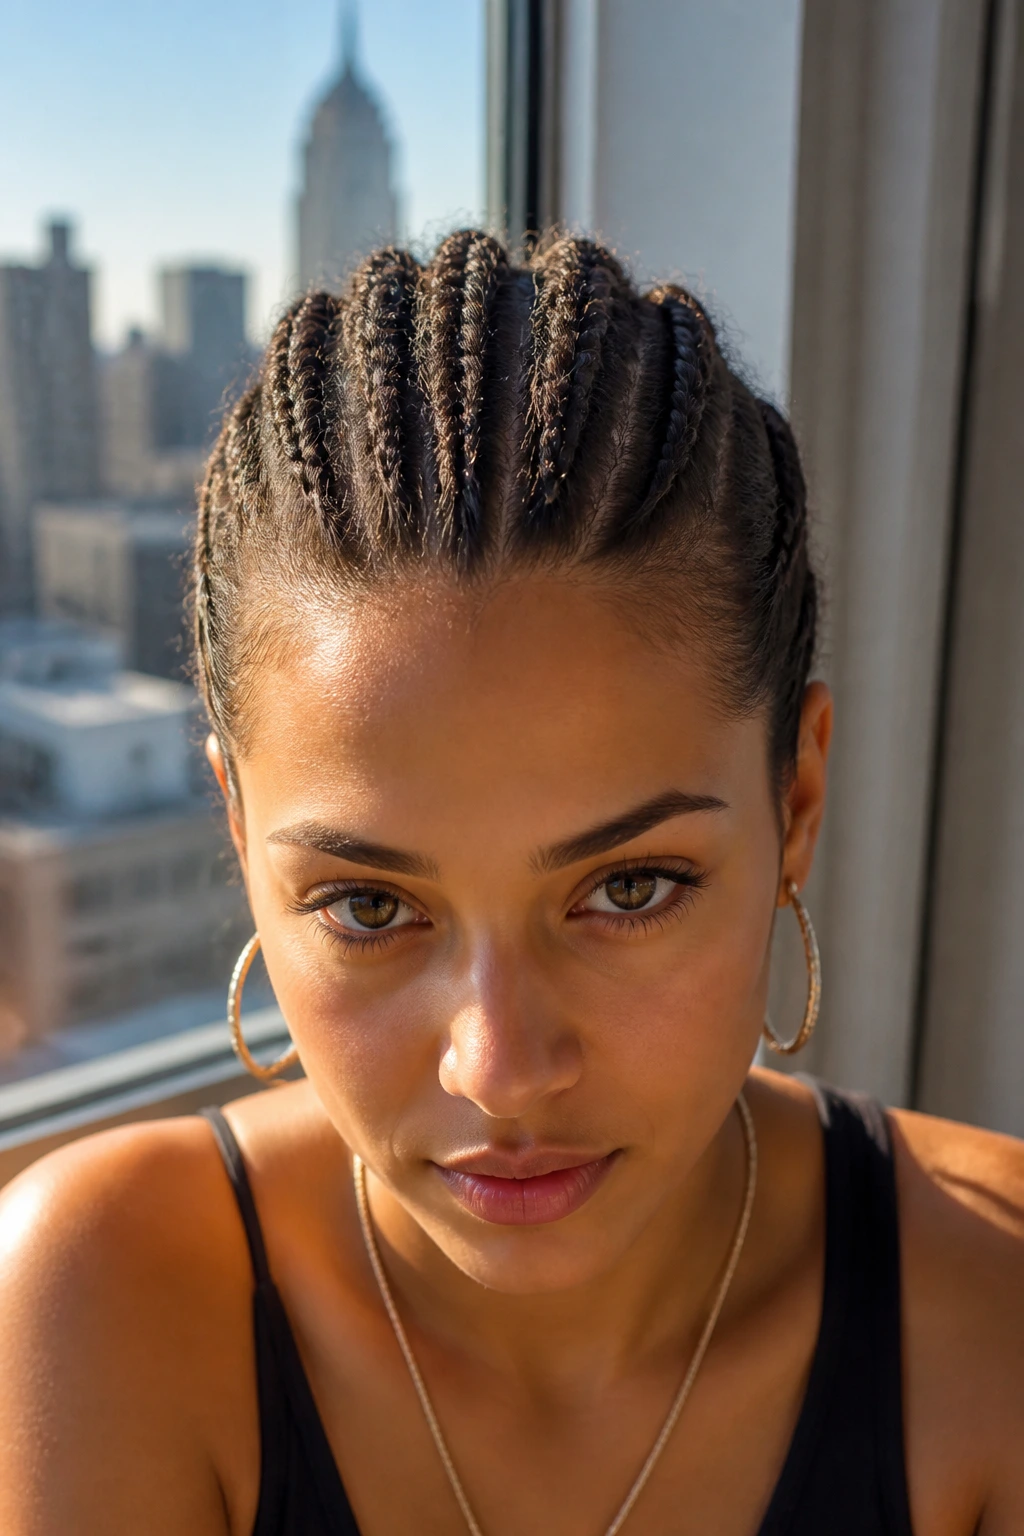
5. Faux-Hawk with Mini Cornrows
This is a high-maintenance look, but it is one of the most effective ways to style very straight hair into a mohawk. By creating multiple thin, scalp-hugging cornrows on the sides, you create a sharp contrast that makes the top of your hair look much denser.
Creating the Cornrow Foundation
- Section the hair on the sides of your head into 1-inch strips.
- Braid each strip tightly against the scalp using the cornrow method, securing with clear elastics.
- Leave the center section of hair untouched for the moment.
Styling the Center
The remaining center hair can be braided into a thick French braid, twisted into bantu knots, or simply teased into a voluminous quiff. By tightening the sides with cornrows, you effectively “shrink” the width of the head, making the mohawk look taller and more exaggerated, which is exactly the aesthetic you want for this style.
6. The Braided Quiff Hybrid
Sometimes you want the look of a mohawk without the effort of braiding the entire head. The braided quiff focuses all the detail on the front, creating a dramatic, sweeping shape that stands tall and proud.
Styling the Front
Take a large triangular section of hair starting at your forehead. French braid this section backward, but stop right at the crown. Instead of continuing down the back, secure it and roll the excess hair into a small, pinned bun or tuck it into the rest of the hair.
The Resulting Silhouette
The rest of your hair can remain loose, or you can pull it back into a low ponytail for a sleek, streamlined finish. The focus is entirely on that front braid, which acts as the “crest” of the mohawk. It is a fantastic option for a night out when you want to look styled but don’t want to spend an hour managing complex sections.
7. Triple-Braided Mohawk
If your hair is very long and you have plenty of volume, a triple-braided style adds a massive amount of texture. By creating three distinct braids—one center and two sides—that meet at the back, you create a complex, interwoven structure that is visually arresting.
Building the Three Strands
Start by dividing the top half of your hair into three horizontal sections. Braid each section separately until you reach the mid-crown. At that point, combine the ends of all three braids into one giant, thick plait that runs the length of the back of the head.
Why This Works
The triple-braid look is incredibly sturdy. Because the hair is divided into three smaller, tighter paths, there is less weight dragging down on any individual part of the scalp. It is one of the longest-lasting styles for straight hair because the internal structure is essentially reinforced by the three separate braid paths.
8. Soft Bohemian Braided Mohawk
Not every mohawk needs to look aggressive. A softer, more romantic version is easily achieved by loosening the braids significantly and incorporating loose, wispy pieces around the face.
The Loose-Braid Technique
Begin with a standard French braid, but keep your hands very loose while pulling the hair. Once the braid is finished, intentionally pull out small tendrils of hair near the temples. Use a wide-barrel curling iron to add soft, loose waves to the unbraided sections of your hair for a dreamy, effortless feel.
Balancing the Look
The goal here is to keep the center of the head raised without making it look like a construction site. It is about texture and volume rather than perfect lines. If you find the hair is falling too flat, use a bit of dry texturizing spray, but skip the hairspray to keep the movement natural and airy.
9. Rope-Twist Mohawk
A rope twist is a fantastic alternative to a traditional braid if you are struggling with the dexterity needed for plaiting. It is essentially two sections of hair twisted around each other, which creates a look that is just as striking as a braid but often sits flatter, making it easier to control on straight textures.
How to Execute the Rope
Divide your hair into two sections. Twist each section individually in the same direction, then cross them over each other in the opposite direction. It sounds counterintuitive, but the friction of the individual twists keeps the whole rope from unraveling.
Styling the Mohawk
Create a series of these rope twists starting from your hairline and moving back. Secure them individually with bobby pins hidden under the twist itself. This creates a textured, segmented look that is reminiscent of a mohawk but with a cleaner, more minimalist appearance.
10. The Mohawk Braid with a High Pony
For a clean, modern aesthetic, consider braiding only the top section of your hair and finishing the back with a high, tight ponytail. This gives you the best of both worlds: the edgy braid detail and the practical, clean-cut look of a high ponytail.
Sectioning for the Pony
Start your braid at the very front hairline, pulling from the sides as you move back. Once you reach the crown, stop the braid and secure it with a hair tie. Gather the rest of your hair, including the end of the braid, and pull everything into a high ponytail.
Smoothing the Base
To make the ponytail look extra sharp, take a small piece of hair from the underside of the pony and wrap it around the elastic to hide the band. This transition from a braided crown to a smooth ponytail is a hallmark of professional styling and looks particularly sleek on straight hair.
11. Side-Swept Mohawk Braid
If you prefer a style that isn’t perfectly centered, a side-swept braid can simulate a mohawk while framing the face more naturally. This is a common choice for those who are new to braiding and want a style that is easier to see in the mirror.
The Angle of the Braid
Start your braid near one temple and work it diagonally toward the center of the head. As you reach the center, continue the braid straight down toward the back. By angling the starting point, you add an asymmetric element that looks intentional and stylish.
Maintaining the Shape
Because you are working on a diagonal, the hair will have more tension than a straight-back style. Make sure to keep your braids tight at the base of the diagonal section to prevent the hair from sagging away from the scalp. This style is surprisingly durable and holds up well through long days.
12. Mohawk Braids with Hair Rings
Sometimes the braid itself is just the canvas. Adding gold or silver hair rings to your mohawk braid can instantly elevate a casual look to something bold and deliberate. Straight hair can sometimes look “too simple” when braided, but the addition of metal accessories adds weight and interest.
Where to Place Accessories
Add the rings to the loops of your braids as you go. For a mohawk look, place them along the very top of the ridge where they catch the light. This draws the eye directly to the center, reinforcing the mohawk silhouette even if the braid itself isn’t incredibly voluminous.
Choosing the Right Rings
Stick to lightweight metal rings so they don’t pull on your hair. If you have fine or thin hair, heavy accessories can cause your braids to slip over time, which is the last thing you want. Always prioritize comfort, as a heavy braid can lead to tension headaches after a few hours of wear.
13. The Half-Up Mohawk Braid
If you aren’t ready to braid your whole head, the half-up mohawk is a great entry-level style. You get the drama of the center braid but retain the freedom of having your hair down in the back.
The Half-Up Split
Use a comb to section off the top third of your hair. This section will be the home of your mohawk. The rest of the hair at the nape and sides remains loose, which helps to ground the style and keep it from feeling too intense for casual settings.
Styling the Loose Ends
Once the top braid is secured, use a flat iron or a curling wand to style the loose hair. Adding some wave to the bottom half provides contrast to the tight, structured braid on top, creating a look that feels balanced and intentional.
14. Upside-Down French Braid
This is perhaps the most challenging braid on the list, but it yields a professional, polished finish that is perfect for a sophisticated take on the mohawk. By starting at the nape of the neck and braiding upward, you get a clean start that builds tension naturally.
Starting at the Nape
Flip your head upside down and begin a tight French braid at the base of your hairline. As you braid upward toward the crown, you are working with the natural direction of gravity. This helps to pull the hair tight against the scalp, which is ideal for straight, slippery hair.
The Crown Transition
Once you reach the crown, stop the braid and secure it in a small bun or a high ponytail. The resulting silhouette is very clean, and because you started from the bottom, the tension is much more consistent than a top-down braid, preventing those annoying bumps that often appear at the back of the head.
15. The Mohawk Crown Braid
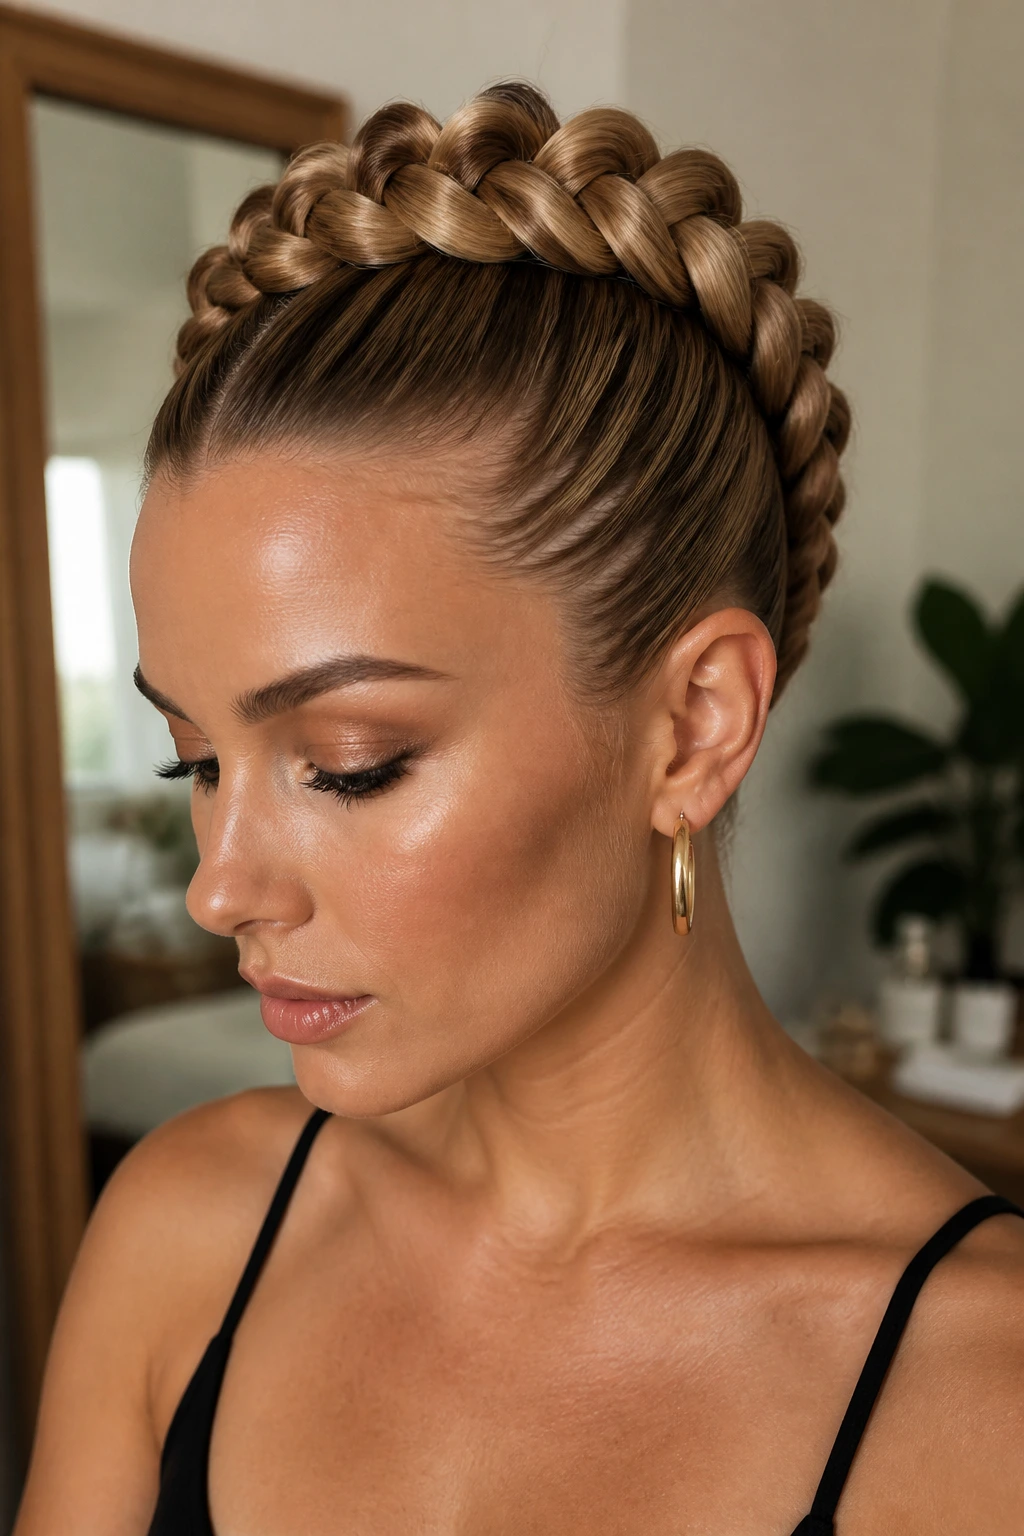
Why stick to the center when you can wrap the mohawk around your entire head? A circular crown braid can be adapted to look like a mohawk by keeping the center section extra thick and pulling the side sections tighter.
Creating the Circular Path
Start your braid at one ear and work your way around the head, incorporating hair from the crown as you go. By the time you reach the starting point, you can tuck the end of the braid underneath for a seamless finish.
Maximizing the Volume
To keep the mohawk vibe, pull the center section of the braid significantly after you finish. This creates a “mountainous” look at the top of the head. It is a very structured, elegant style that works well for formal events where you want to keep your hair completely off your face and neck.
16. Pull-Through Mohawk Braid
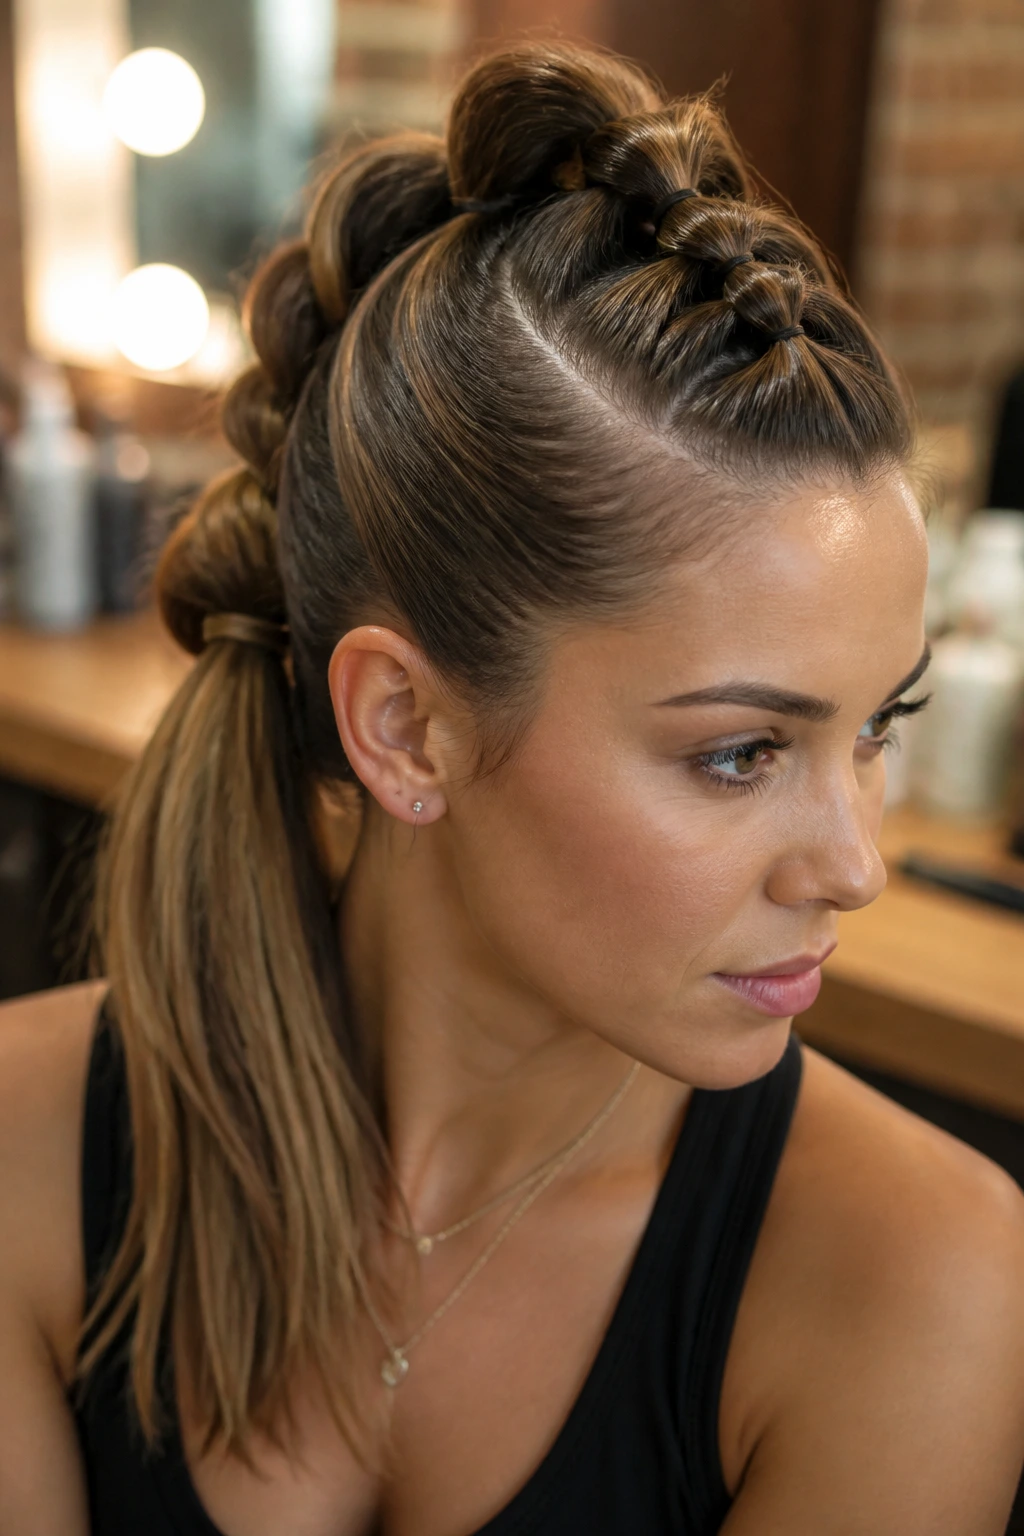
The pull-through braid is a cheat code for volume. It mimics the look of a Dutch braid but uses small elastic bands instead of actual weaving. This is the single best style for people with fine, straight hair who struggle to get the “fullness” of a traditional braid.
The Technique
- Create a high ponytail at the front of your head.
- Split it into two, then tie another ponytail right underneath it.
- Pull the first section through the second section, then add a little more hair to the second section and repeat.
Why It Excels
Each “loop” you create can be pulled and shaped to be as large as you want. Since you are using elastics to hold the structure, it does not matter if your hair is slippery—the elastics do all the heavy lifting. You can make this look incredibly thick and exaggerated, which is perfect for a statement-making mohawk.
17. The Sleek-Back Mohawk Braid
If you have straight hair and want to lean into that natural shine, the sleek-back mohawk is the way to go. This style relies on pomade or styling cream to keep every single hair in place, creating a mirror-like finish.
Preparing the Product
Before you start braiding, apply a dime-sized amount of high-shine pomade to your hands and work it through your roots. This acts as a glue, ensuring that no flyaways break the line of your part.
The Tightness Factor
This look is not about volume; it is about precision. Keep your braids extremely tight to the scalp. The result should look almost like a sculpted piece of art. It is a very sophisticated style that works well for evening wear and requires minimal touch-ups once the product is set.
18. Braided Mohawk with Space Buns

For a fun, youthful take on the trend, combine a center braid with two small buns at the crown. This adds a sense of playfulness to the edgy mohawk silhouette.
The Sectioning
Divide the top section of your hair down the middle to create two small buns. Braid the hair leading up to each bun from the front, or braid a single center line that splits into the two buns at the top.
Maintaining the Buns
Use hair pins to secure the buns so they sit tall. If your hair is too straight to hold a bun, use a small donut insert or a hair sponge underneath the bun to give it that “popped” look. This style is great for festivals or active days where you want your hair to stay put no matter how much you move.
19. The Mohawk Braid with Wet-Look Waves

Combine the structure of a braid with the high-fashion “wet look” by styling the unbraided sections of your hair with a gel-based product. This provides a striking contrast between the matte finish of the braid and the glossy, wet look of the loose hair.
Applying the Gel
Use a strong-hold styling gel on the loose hair near your scalp. Comb it back flat before securing your braids. This creates a very structured, editorial-style appearance that looks intentional and sharp.
Managing the Ends
Ensure the loose ends are styled with a curl or a wave using a large wand. The contrast between the rigid, gelled roots and the soft, wave-filled ends is a professional trick to make straight hair look more dynamic and layered.
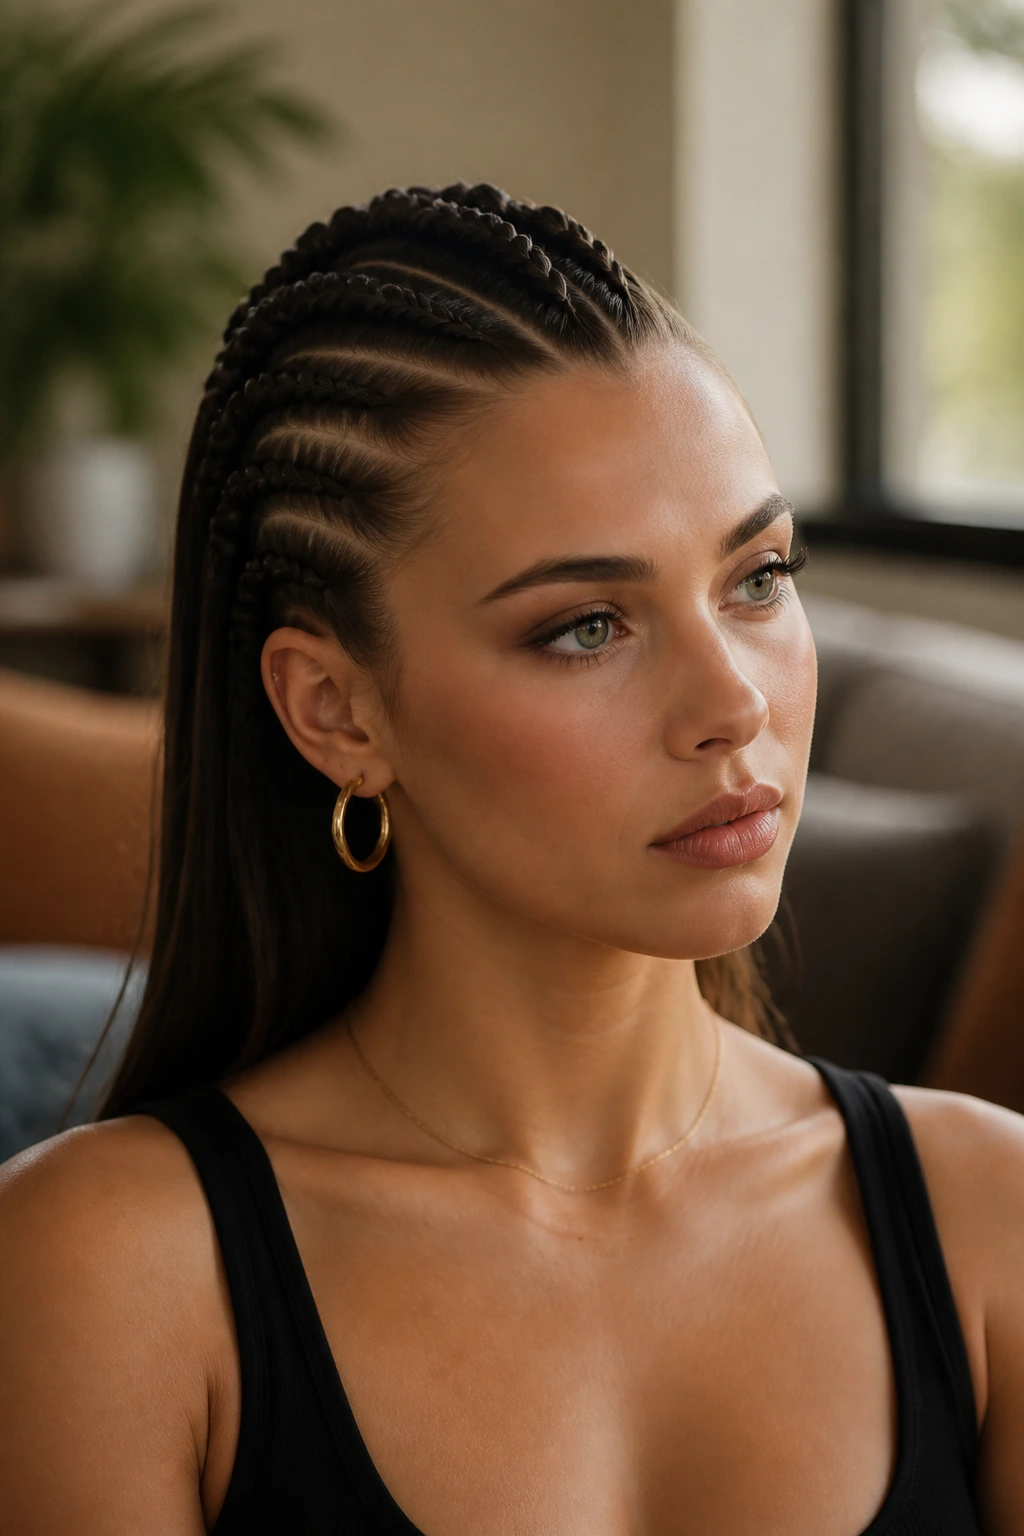
20. Micro-Braid Mohawk
If you want a more subtle, delicate look, use tiny micro-braids to create the mohawk shape. Instead of one giant braid, you use 5 to 7 very thin, precise plaits running back to back.
The Density Effect
When you group several small braids together, they create a wider, denser band that sits nicely on the head. This is a great way to use up all your hair density in the center without having to deal with the bulk of a single, giant, heavy braid.
Finishing the Ends
You can tie all the small braids together at the nape of the neck or leave them loose for a flowy, boho finish. Micro-braids require more time to install, but the result is a beautifully intricate, textured look that stands out because of its complexity.
21. Mohawk Braids with Hair Chains
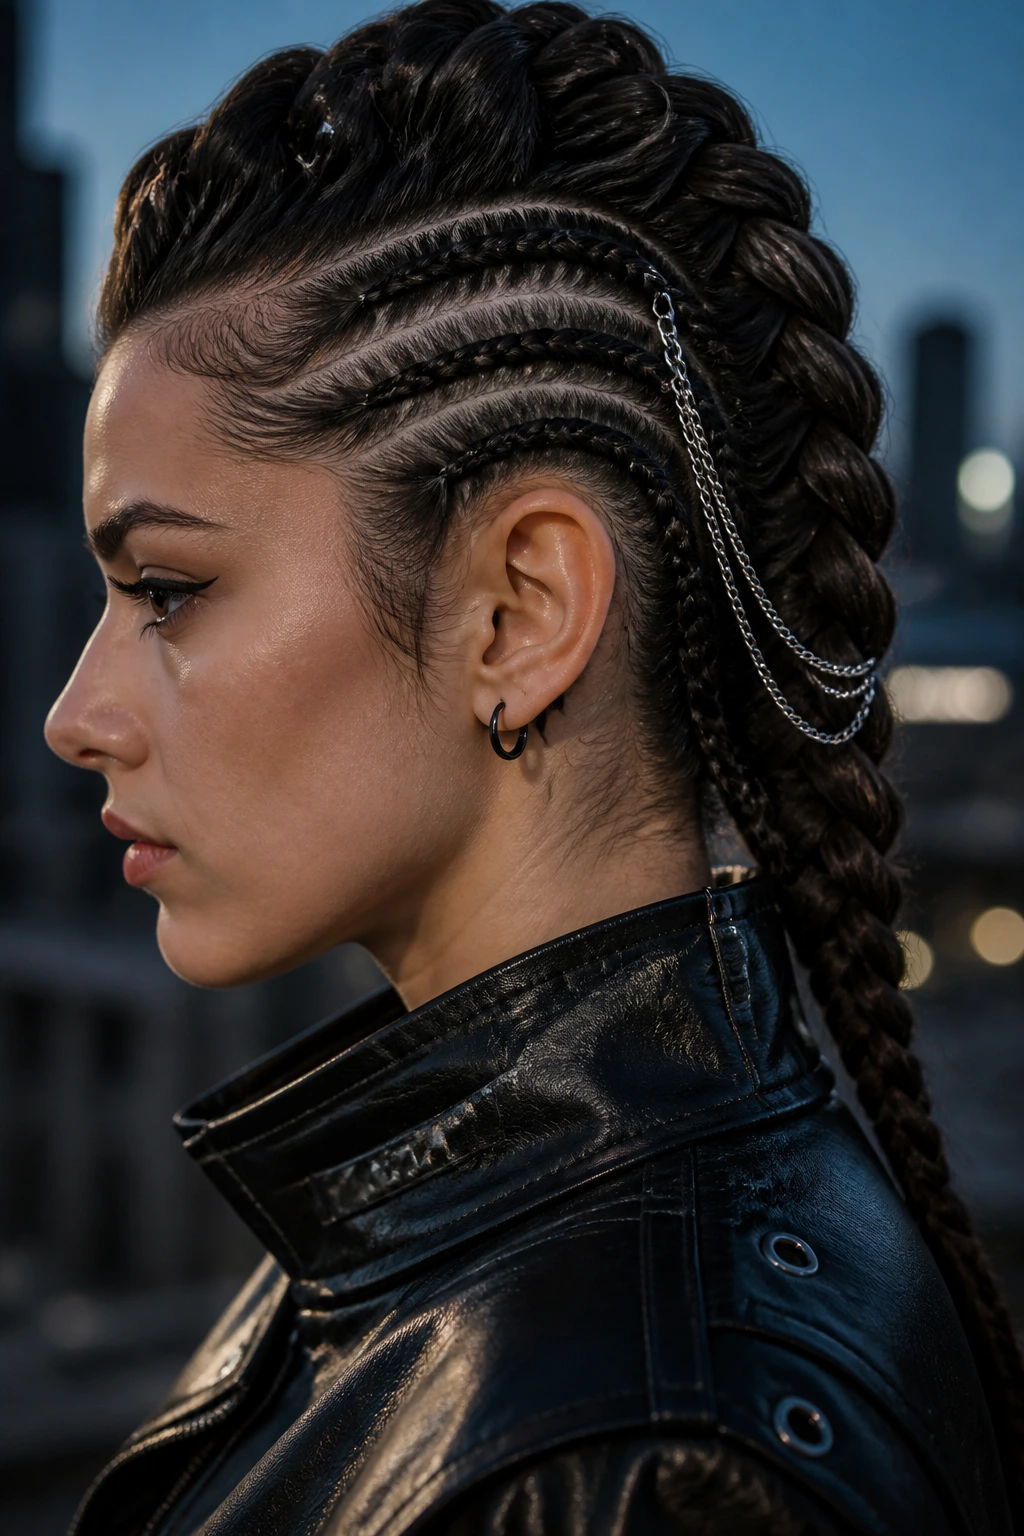
Hair chains are an underrated accessory for braided styles. For a mohawk, you can drape a chain from the front of the braid all the way down to the nape of the neck.
Securing the Chain
Use small bobby pins to anchor the chain at the beginning, middle, and end of the braid. The chain should follow the line of the mohawk perfectly, acting as a structural highlight that emphasizes the shape of your head.
The Aesthetic Value
This adds an architectural element to the braid. It’s perfect for those who want a futuristic or edgy look. Because the chain is metallic and rigid, it provides a nice counterbalance to the natural movement of the hair, making the mohawk feel more permanent and defined.
22. The Mohawk Braid with Extensions

If your natural hair doesn’t have the length or thickness to achieve a high-impact mohawk, don’t hesitate to use synthetic or human hair extensions. They are incredibly useful for adding the grip and weight that straight hair often lacks.
Integrating Extensions
Braid the extensions directly into your natural hair using the feed-in method. By adding hair as you go, you build up the volume of the braid gradually. This ensures that the mohawk looks uniform from the front all the way to the back.
Choosing the Right Type
For straight hair, try to find extensions that match the texture of your natural strands. This makes the transition between your hair and the added length invisible. A well-installed extension braid can last for several days, making this an ideal protective style.
23. Fishtail and Dutch Hybrid
Combine the two most popular braid types for a mixed-texture mohawk. Use a Dutch braid for the front and top, and transition into a fishtail braid once you reach the crown.
The Transition
The Dutch braid provides the lift at the roots, while the fishtail braid adds the delicate, intricate detail at the back. This gives you a mohawk that is tall at the front and slim at the back, creating a very pleasing, balanced silhouette.
Why This Works
The transition point where you move from a Dutch to a fishtail is a great place to add an accessory, like a decorative hair tie or a metal cuff. This signals to the eye that the change in texture was an intentional design choice rather than an afterthought.
24. Side-Parted Mohawk Braid
Who says a mohawk has to be centered? A side-parted mohawk braid can feel a bit more relaxed and wearable for everyday life while still offering that distinct, raised silhouette.
Shifting the Weight
Create a deep side part and braid along the line of the part. Because the braid is pushed toward one side, you have more volume on the “heavy” side of the head, which can actually make the mohawk feel taller and more dramatic than a perfectly center-parted style.
Styling the Remaining Hair
You can tuck the hair on the side opposite the braid behind your ear for a sleek, asymmetrical look. This is a sophisticated way to wear a mohawk that doesn’t feel like you are heading to a sporting event or a concert; it’s refined, modern, and very wearable.
25. The Bubble-Braid Mohawk
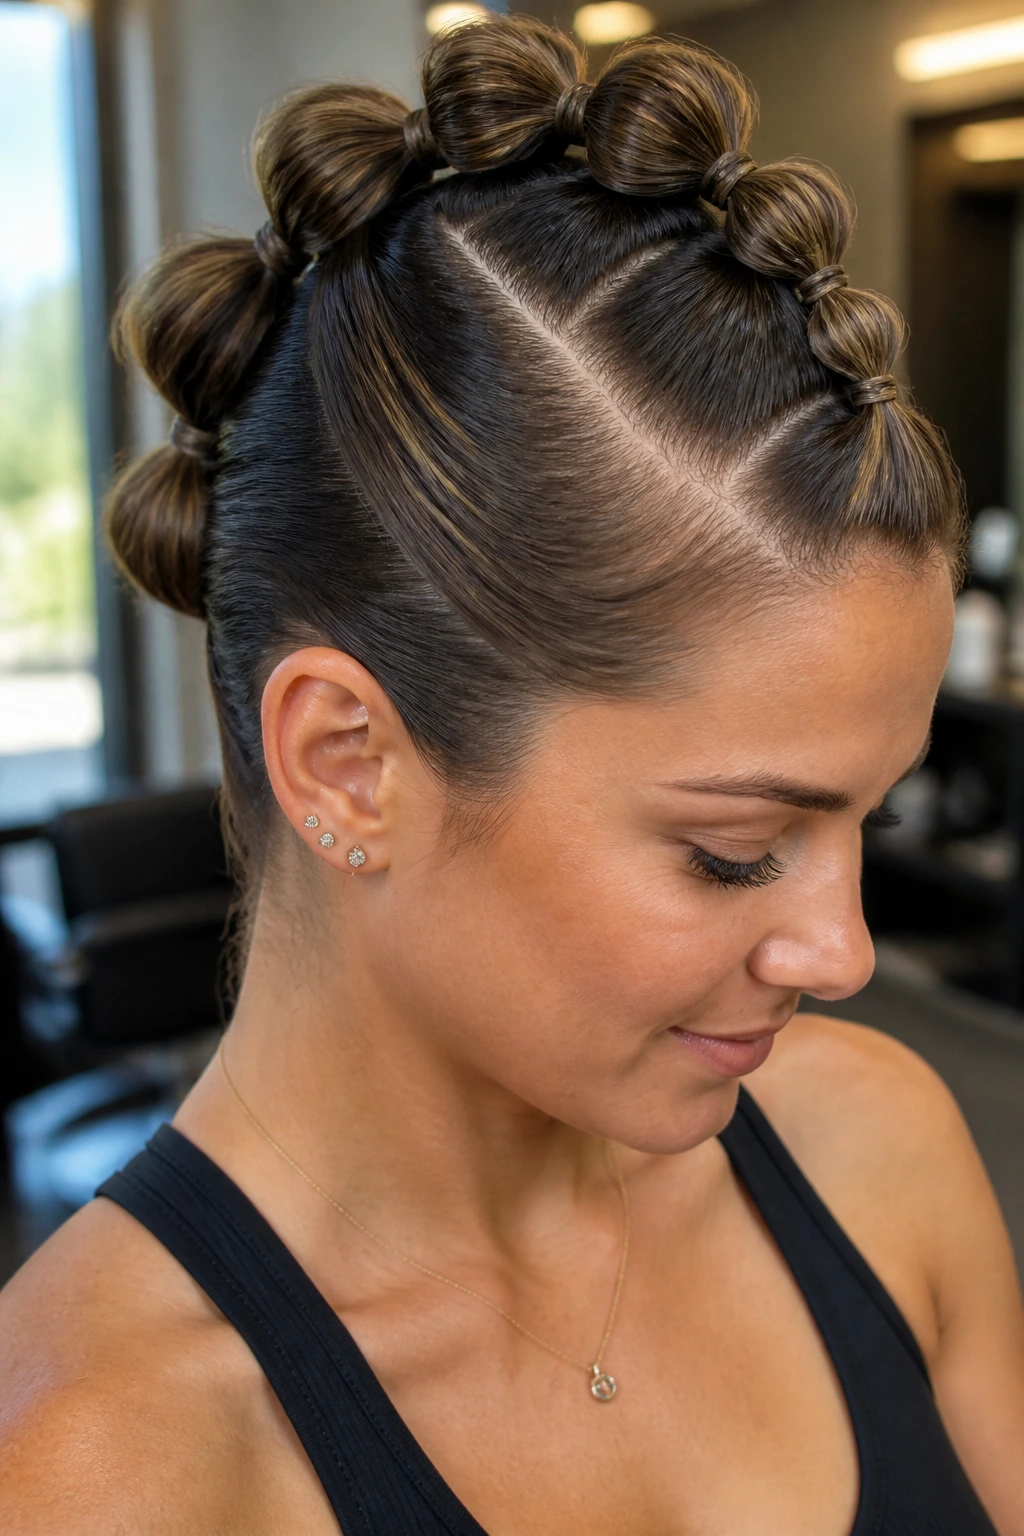
Finally, we have the bubble braid. Similar to the pull-through braid but even easier, this style creates a series of “puffs” along the center of your head that look like a chain of bubbles.
The Technique
- Tie your hair into a series of small, tight ponytails down the center of your head.
- Gently pull on the hair between the elastics to create the “bubble” effect.
- Wrap each elastic with a thin strand of hair to keep it looking polished.
The Result
The bubble braid is the most beginner-friendly mohawk style on this list. It is essentially foolproof. As long as you have enough elastics and can make a clean part, you will get a perfect mohawk shape every time. It’s a fun, quirky style that works exceptionally well on pin-straight hair because it doesn’t rely on weaving tension to stay put.
Final Thoughts
Working with straight hair demands a bit more technical preparation, but it also offers a clean, sharp finish that other textures cannot replicate. The key to any mohawk braid is maintaining tension at the roots and ensuring that you are using the right products to give your hair the “teeth” it needs to hold a style.
Do not be discouraged if your first attempt is not perfect. Braiding is a muscle-memory skill, and the more you practice these sections, the faster your hands will move. Remember that you can always go back and fluff your braids to add volume, but you cannot easily take volume away once you have over-teased. Start small, keep your tools clean, and have fun with the silhouette. The mohawk is about confidence, so wear it with that in mind.