



Fine hair is beautiful, but it behaves like fine silk thread—soft, slippery, and prone to losing its shape within twenty minutes of leaving the house. Adding an accessory like a ribbon often feels like a gamble. Will it slide down your neck by lunchtime, taking half your ponytail with it? It happens more often than most beauty tutorials care to admit.
The secret to making ribbon hairstyles work on fine hair lies not in the ribbon itself, but in how you prepare your hair and choose your materials. Heavy satin or thick, chunky velvet will drag down lightweight strands, flattening whatever volume you managed to blow-dry into your crown. But when you pair the right lightweight textile with a clever anchoring technique, a simple ribbon becomes a functional tool. It can pinch sections together to create the illusion of thickness, hide hair ties, and add structured bulk to otherwise small buns and braids.
This approach is about working with the delicate nature of fine hair rather than fighting it. You do not need a thick mane to wear ribbons; in fact, the contrast between delicate strands and a beautifully textured ribbon can look incredibly deliberate and chic. By choosing fabrics that grip and using styling tricks that prevent slippage, you can wear ribbons all day without touching up your hair once.
Let’s look at how to select your styling toolkit first, then explore how to build reliable anchor points before we go through the best styles for your hair type.
The Fine-Hair Ribbon Toolkit: Materials That Actually Hold
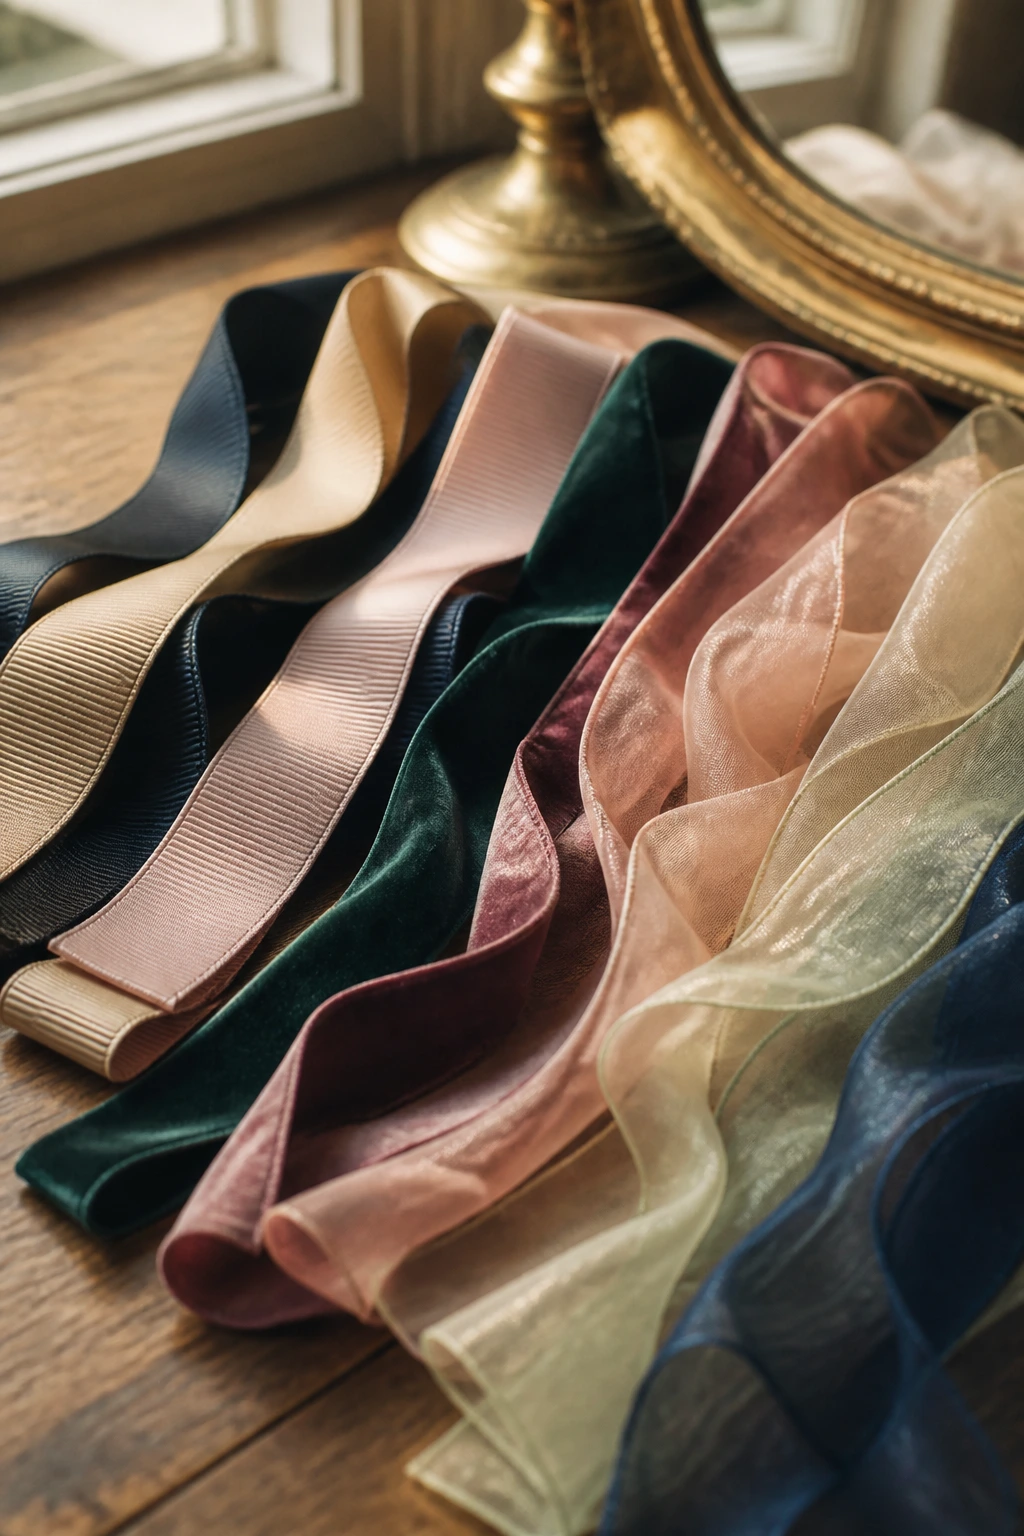
When you have fine hair, fabric choice is everything. Slippery polyester satin is the enemy of fine hair; it lacks friction, meaning it will slide right off a ponytail unless it is glued in place. Instead, you want fabrics that have built-in texture to grab onto your hair fibers.
Grosgrain ribbons are your best friend. The ribbed texture of grosgrain creates natural friction against hair, making it highly slip-resistant. It holds its shape beautifully, which means if you tie a bow, the loops will stay perky rather than flopping flat against your head.
Lightweight velvet is another excellent choice, provided it is single-faced (velvet on one side, flat on the other). The plush pile of the velvet clings to hair strands like micro-velcro. Keep the width under one inch; anything wider will be too heavy for fine hair to support.
Organza and chiffon are perfect when you want a larger, dramatic bow without the weight. These sheer fabrics are almost weightless, allowing you to use wide ribbons that billow beautifully without pulling down your hairstyle or flattening your roots.
How to Create an Invisible Anchor Point for Hair Ribbons
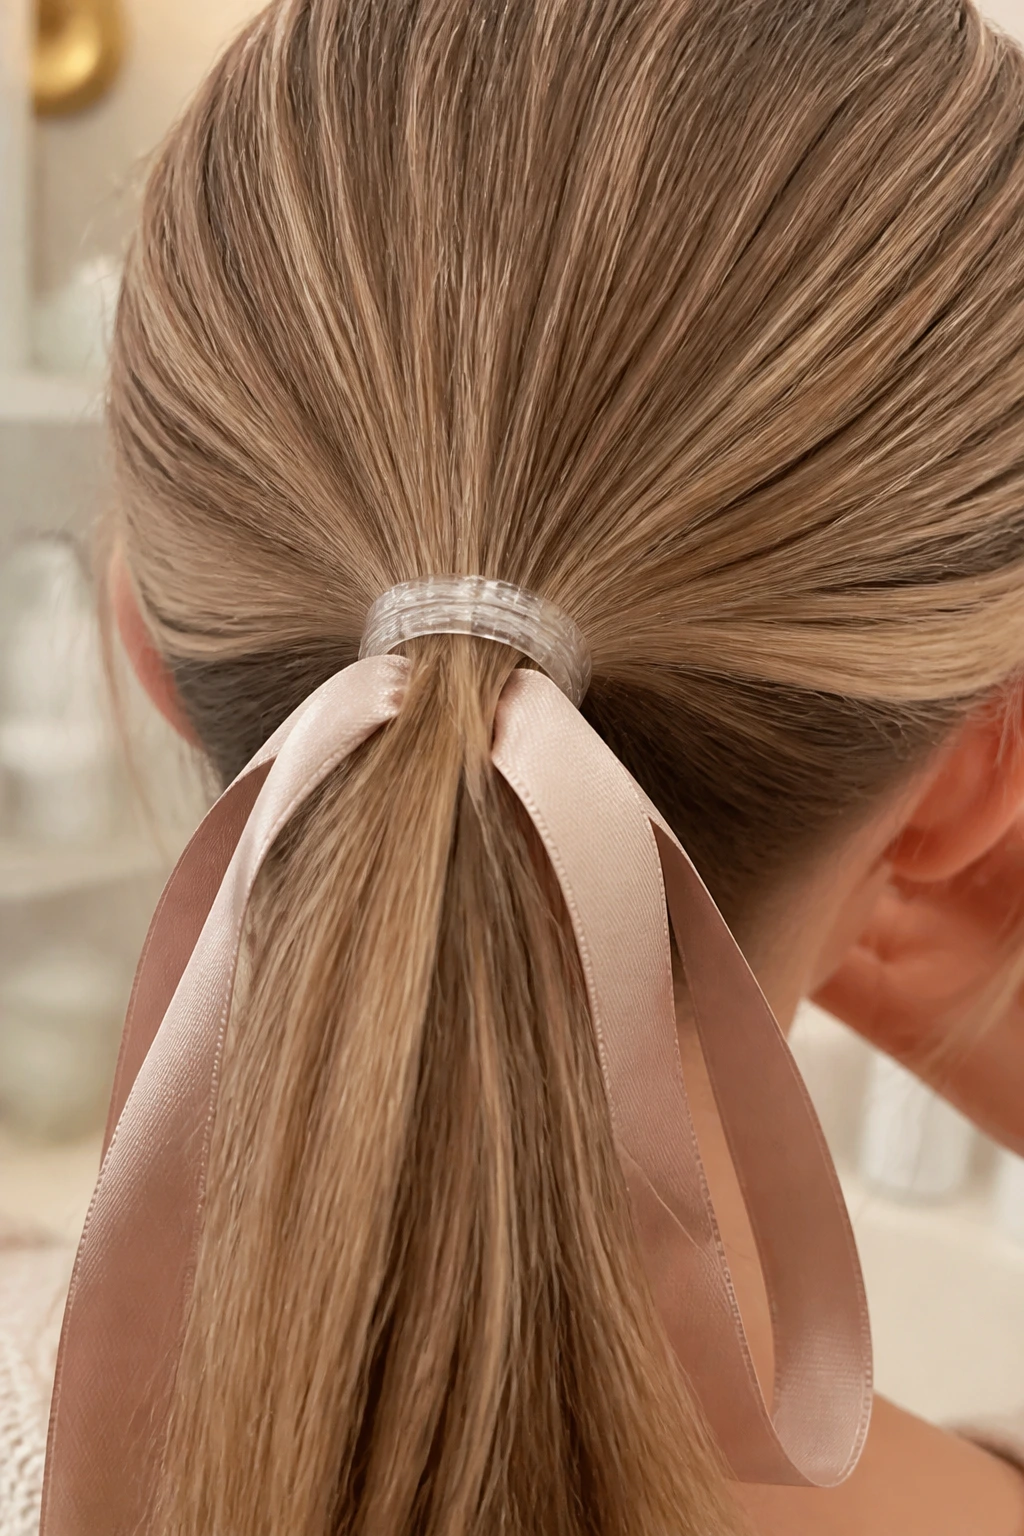
Never tie a ribbon directly around fine hair and expect it to stay. It won’t. You need a structural foundation to support the fabric and lock it into place.
The easiest way to do this is with a small, clear elastic band. Secure your ponytail or half-up section with the elastic first. This creates a solid, non-slip ridge. When you tie your ribbon, loop it through the elastic or wrap it directly over the band. The rubbery texture of the elastic acts as a barrier that prevents the ribbon from sliding down the hair shaft.
For braids and buns, use bobby pins as anchors. Slide a bobby pin vertically down through the knot of your ribbon and into the base of your hair, keeping the pin hidden beneath the hair folds. If your hair is exceptionally slick, spray the bobby pin with texturizing spray before inserting it. This creates a gritty surface that locks the pin—and your ribbon—firmly in place.
1. Low Ponytail with Velvet Wrap
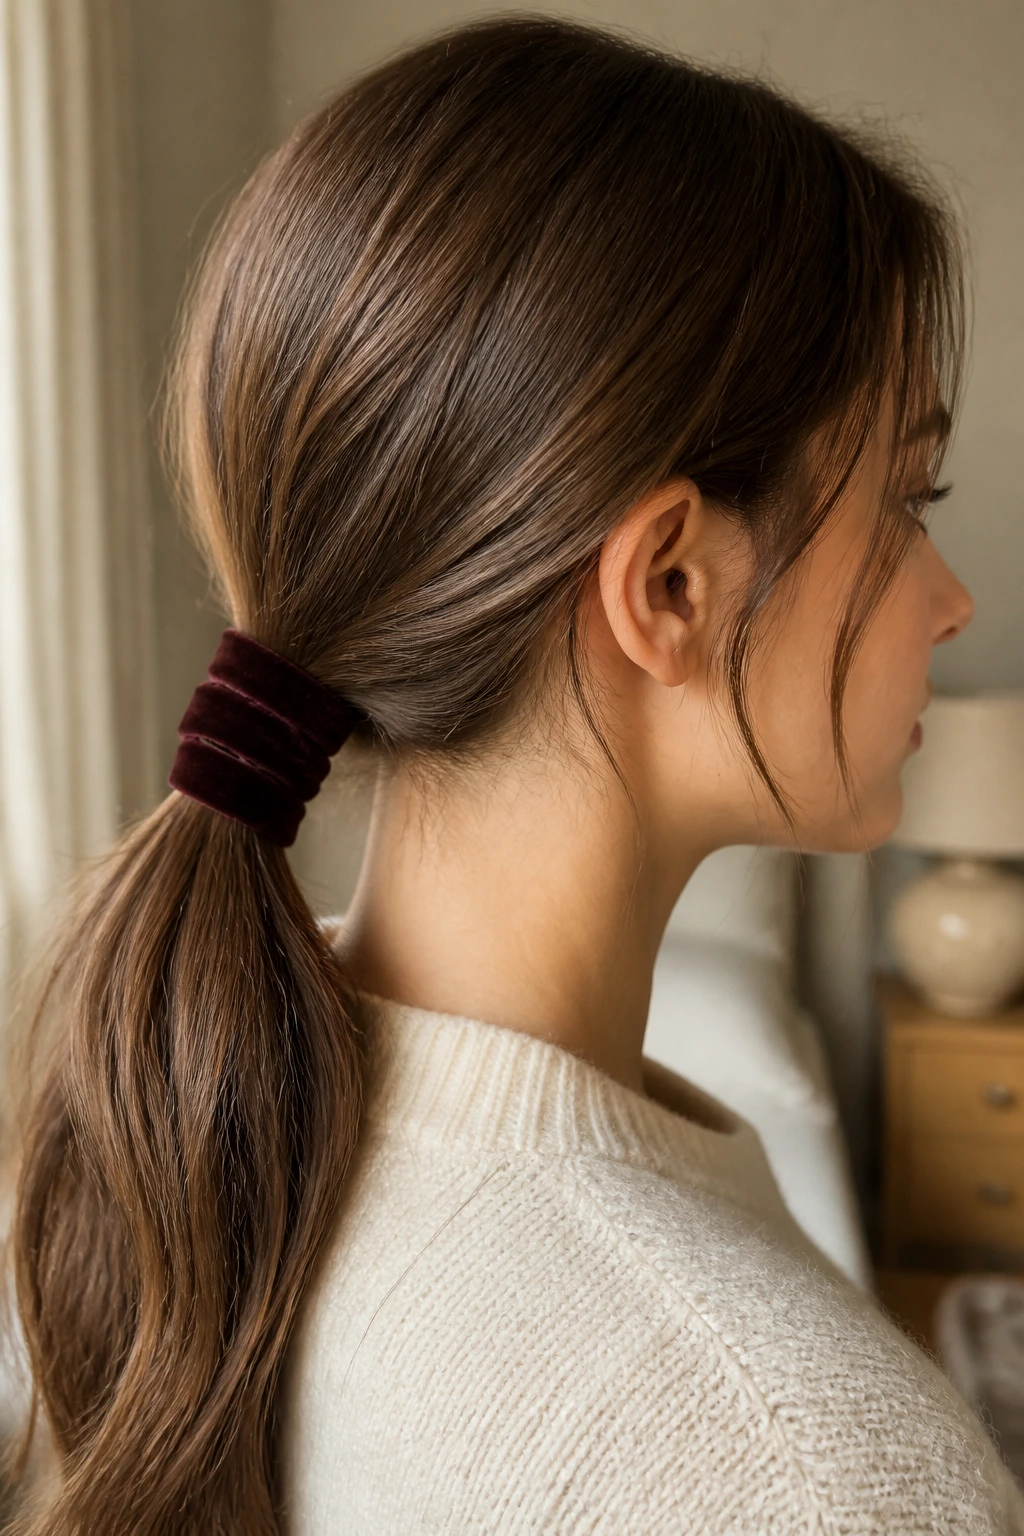
This style is excellent for hiding a thin ponytail base while adding structural weight to the back of your head. By wrapping the ribbon down the length of the pony, you create the illusion of a thicker, more solid column of hair.
Why This Wrap Works for Fine Strands
Fine hair often tapers to a very thin point at the ends. Wrapping a velvet ribbon around the top three to four inches of a low ponytail keeps the strands grouped tightly together, preventing them from splitting and looking sparse over your shoulders.
Step-by-Step Styling
- Gather your hair at the nape of your neck and secure it with a clear elastic.
- Tie a half-inch wide velvet ribbon over the elastic, leaving one short tail and one very long tail.
- Wrap the long tail tightly down the ponytail in a spiral pattern, keeping each wrap about a half-inch apart.
- Secure the end of the ribbon with a second clear elastic, tucking the ribbon tail inside the band.
Pro tip: Pull gently on the hair sections between the ribbon wraps to puff them out slightly, creating a beautiful bubble effect that looks twice as thick as a regular ponytail.
2. Half-Up Top Knot with Organza Bow
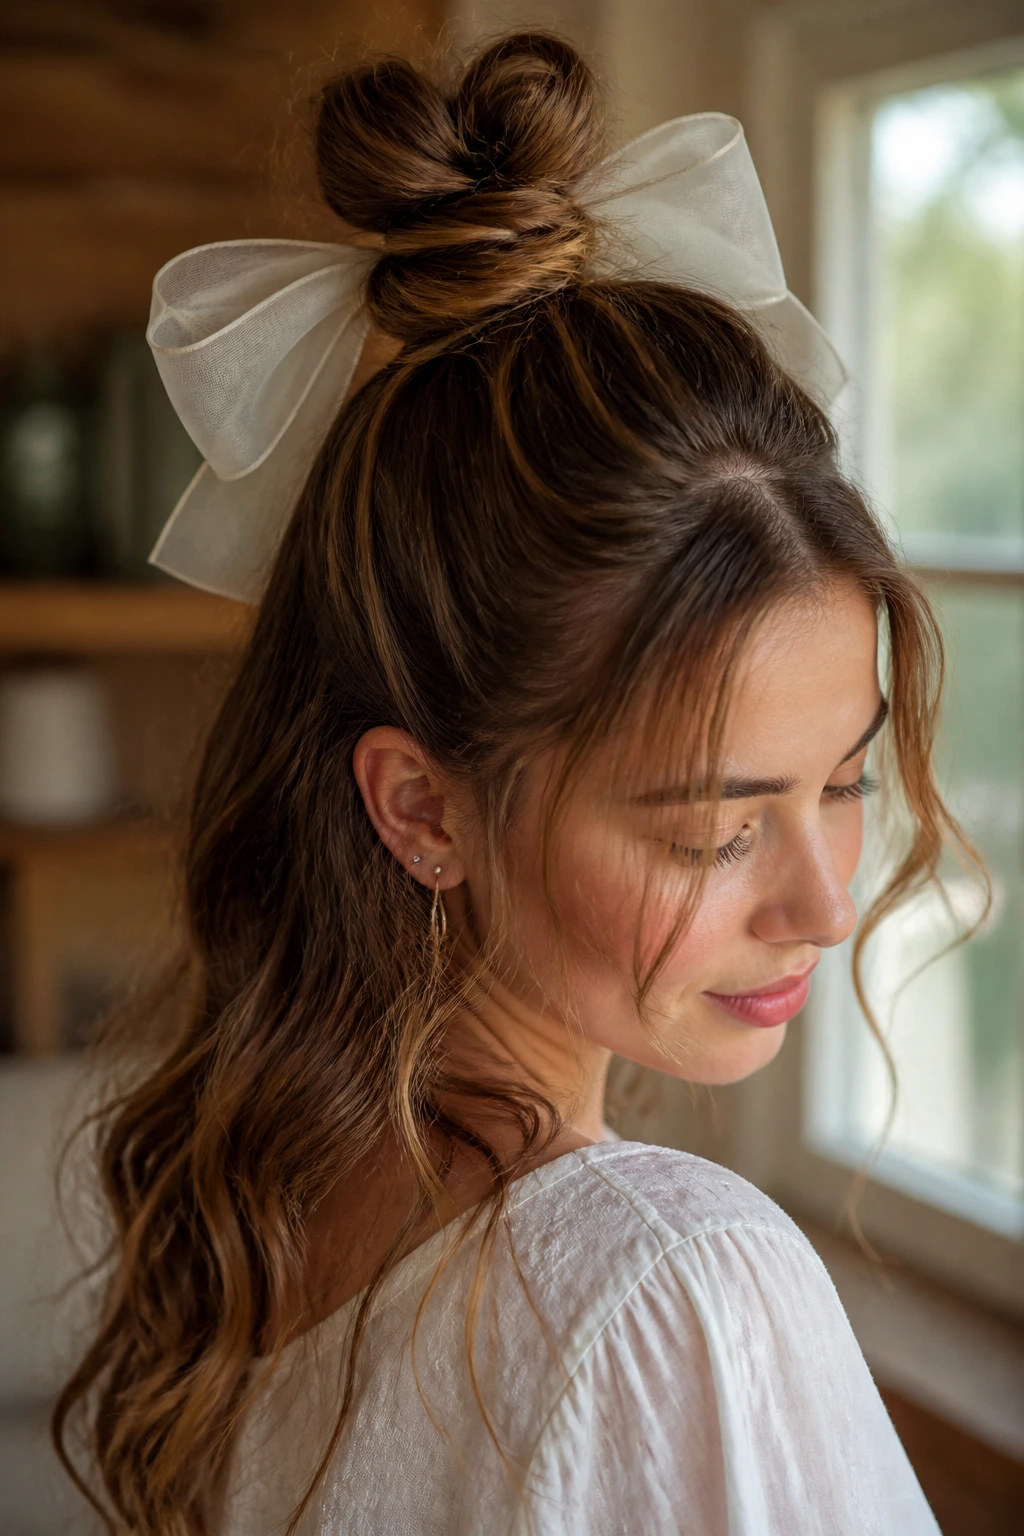
This style gives you the best of both worlds: the volume-boosting effect of a top knot and the softness of loose hair around your shoulders. The sheer organza bow adds massive visual volume without adding any actual weight.
For fine hair, a top knot can sometimes look like a tiny, sad bump on top of your head. Adding a wide, airy organza bow directly behind the knot hides its small size and makes the entire style look intentional and full. It is a brilliant optical illusion.
How to Style It
- Section off the top third of your hair, from your temples back to your crown.
- Twist this section into a small bun on top of your head and secure it with pins.
- Tie a two-inch-wide organza ribbon around the base of the bun, finishing with a large bow.
- Gently pull at the loops of the bow to puff them up, ensuring they sit wider than the bun itself.
3. Classic French Braid with Woven Grosgrain
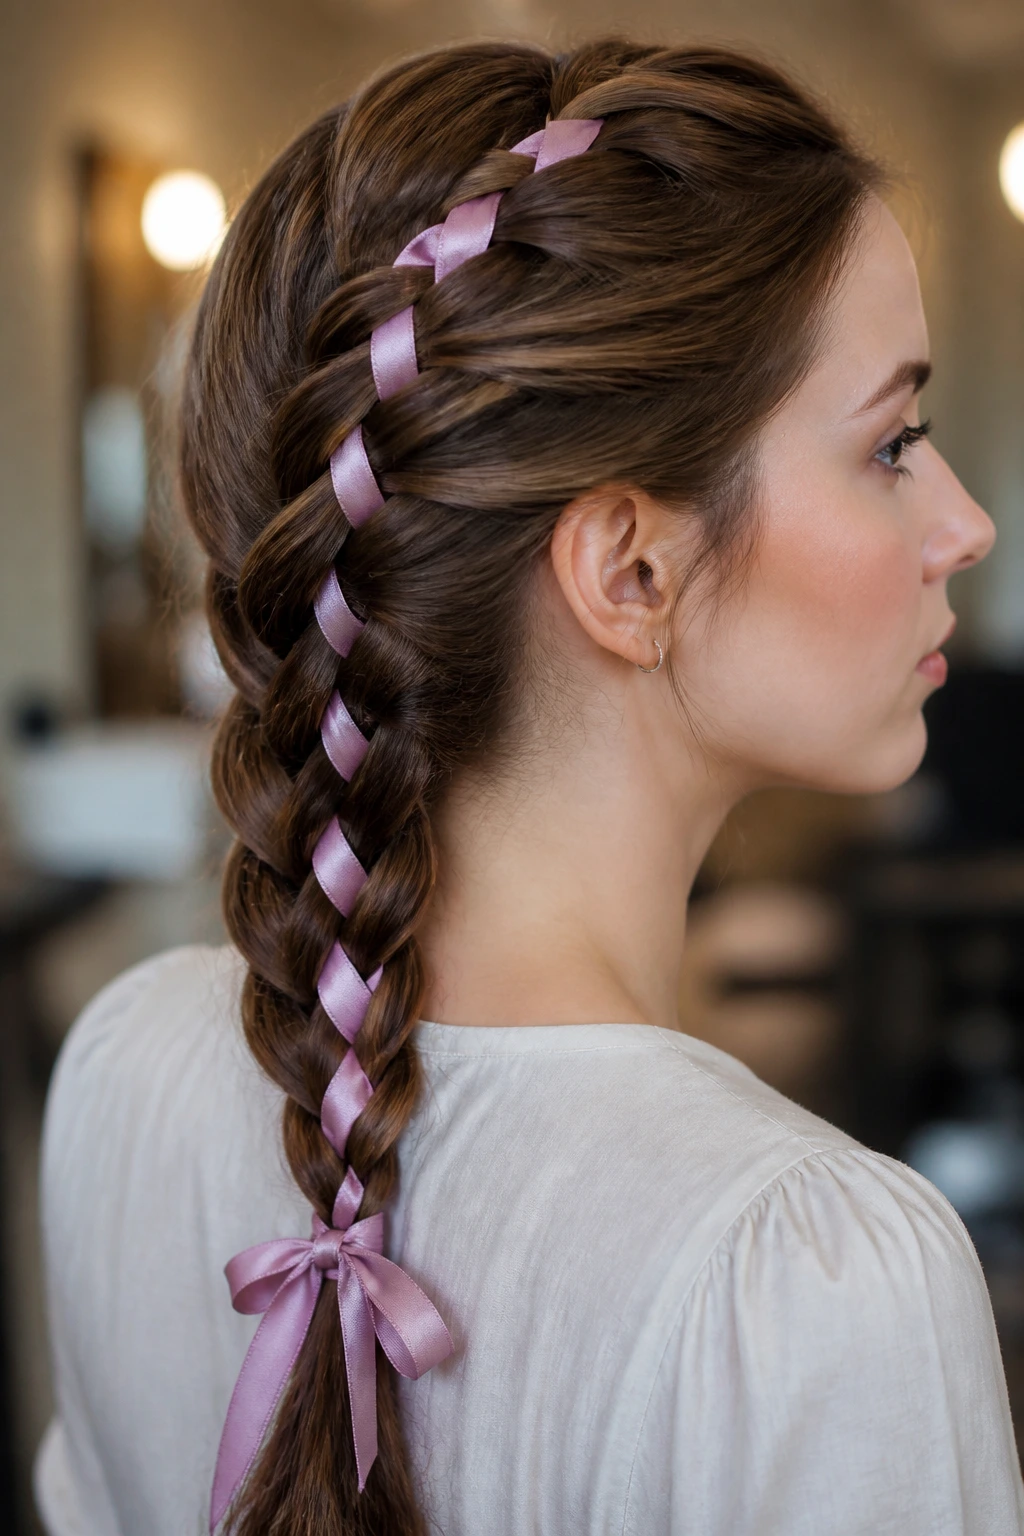
Braiding ribbon directly into your hair is one of the oldest tricks for making a thin braid look thick and three-dimensional. The ribbon acts as a structural third strand, filling in the gaps where your hair might naturally look sparse.
Unlike satin, grosgrain ribbon will not slide out of the braid as you cross the strands over. The ribs of the fabric lock against your hair, helping to keep the braid tight and secure throughout the day.
Braid Structure
- Fold a long piece of grosgrain ribbon in half.
- Pin the fold of the ribbon to the center of your head where you will start your French braid.
- Treat the two ribbon tails as part of your hair strands, incorporating them into the outer sections as you braid.
- Once you reach the bottom, tie the ribbon ends into a knot to secure the braid, then remove the anchor pin at the top.
4. Double Bubble Ponytail with Mini Ribbons
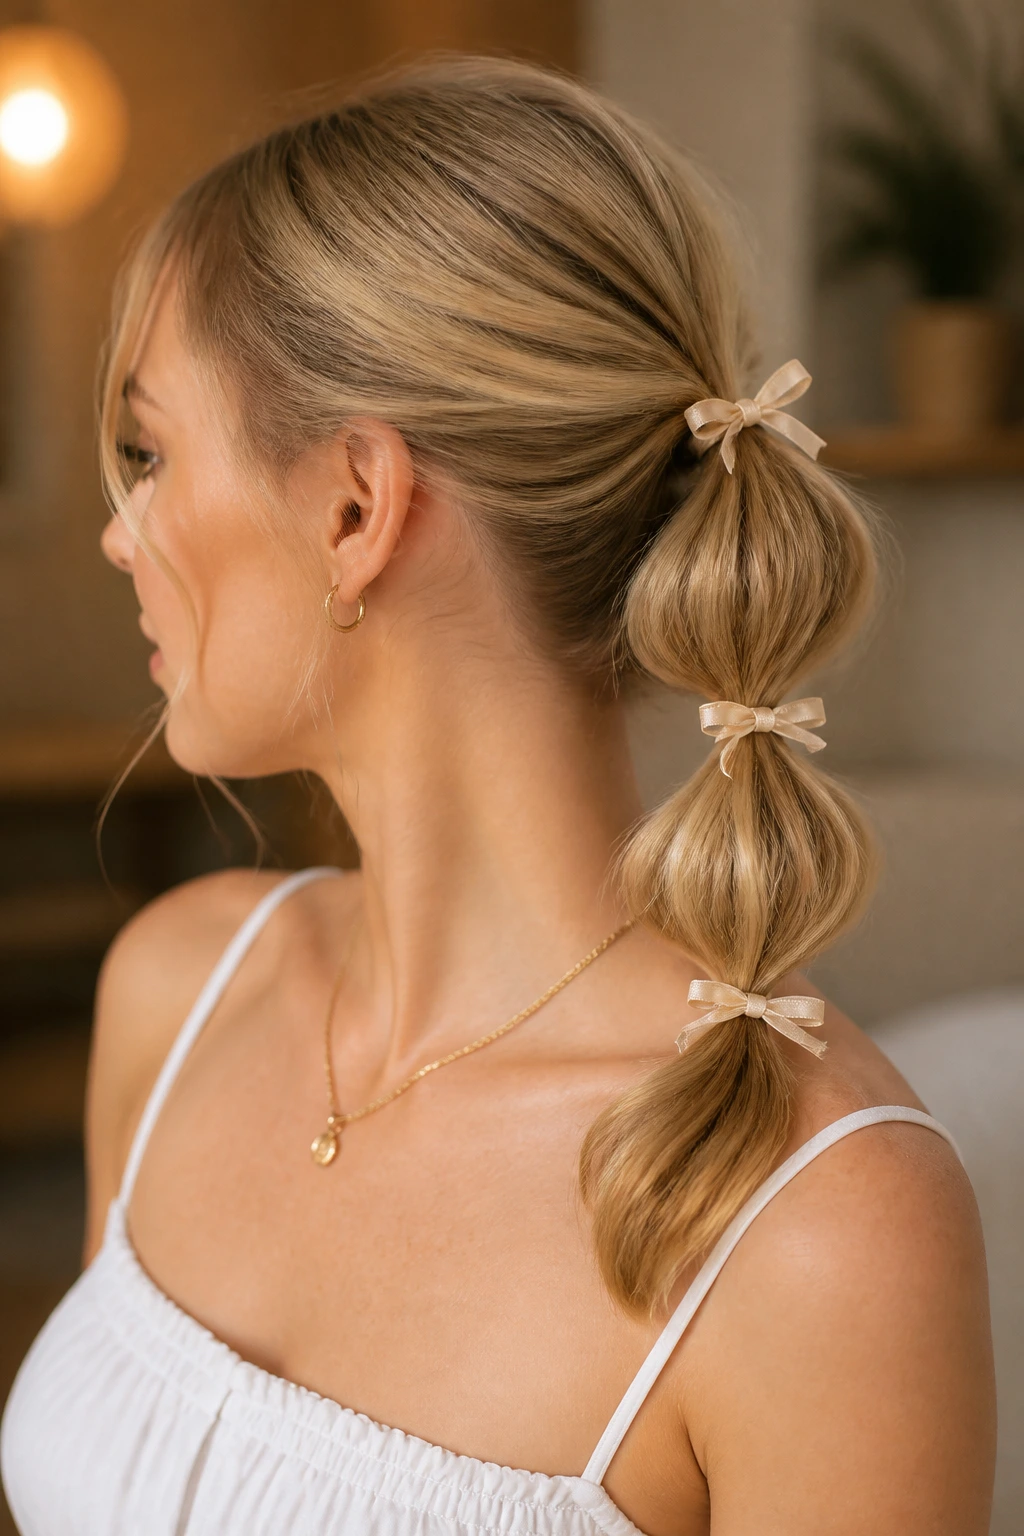
If your ponytail looks thin and flat, the bubble ponytail is the ultimate fix. Adding mini ribbons at each segment hides the elastics and adds a playful, structured touch that holds the bubbles in shape.
This hairstyle is highly effective for fine hair because the elastics physically force the hair to expand. It creates pockets of air between the bands, making your hair look much thicker than it actually is.
Quick Segment Guide
- Spacing: Keep your elastics about three inches apart down the length of your pony.
- Puffing: Pull sideways on each bubble segment before tying the ribbons on.
- Ribbon Size: Use very thin, quarter-inch ribbon so you do not weigh down the bubbles.
- Friction: Use textured cotton or grosgrain ribbons for maximum grip on the elastics.
Pro tip: Spray each bubble segment with a tiny puff of dry shampoo before pulling it out to give the hair the grip it needs to stay expanded.
5. Messy Chignon Anchored by Velvet Ribbon
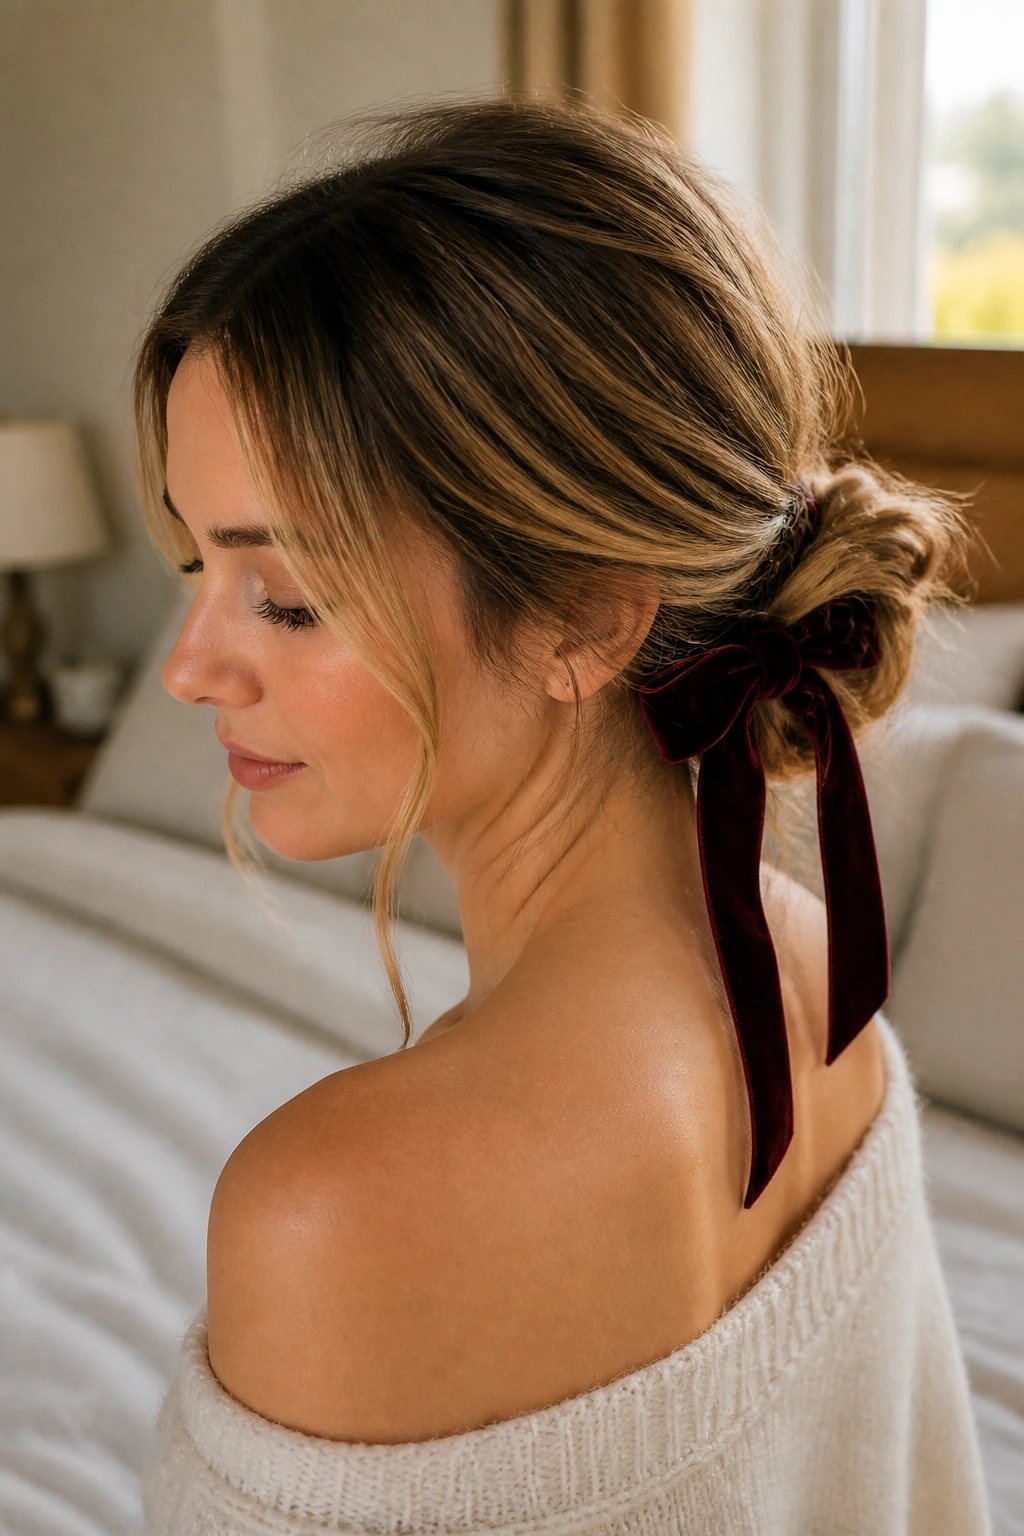
A low, messy chignon is a classic choice, but on fine hair, it can easily unravel or look flat against the head. Wrapping a velvet ribbon around the chignon serves a dual purpose: it anchors the loose ends and frames the bun beautifully.
Velvet is heavy enough to feel secure but soft enough to let the messy texture of your hair shine through. It provides a structured border that makes even a small bun look elegant and substantial.
Styling Instructions
- Pull your hair into a loose, low ponytail, leaving a few face-framing pieces out.
- Loop the ponytail halfway through the elastic on the last wrap to create a loose loop bun.
- Wrap the remaining ends of your hair around the elastic to hide it, pinning them in place.
- Tie a velvet ribbon around the base of the loop bun, letting the tails hang down your back.
6. Sleek High Pony with Long Trailing Ribbon
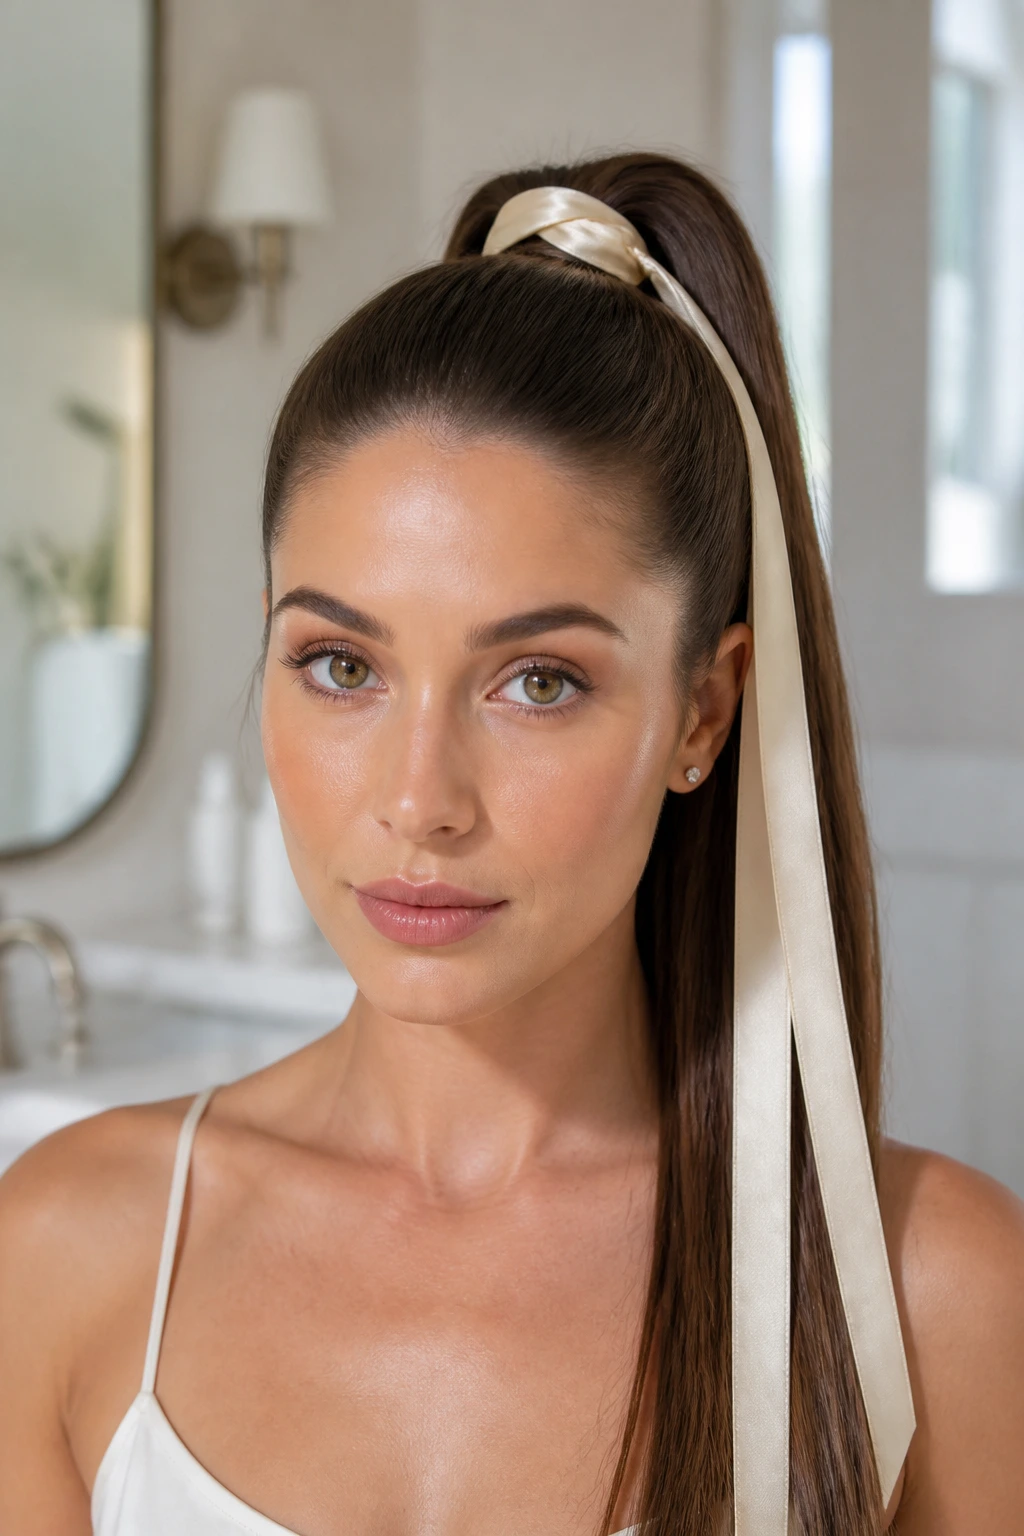
A high ponytail can be tough for fine hair because gravity wants to pull it down, making it look limp. By anchoring a high pony with a sturdy hair tie and wrapping it with a ribbon that features long, trailing tails, you create a dramatic vertical line that draws the eye upward.
The Secret to High Pony Volume
To keep a high ponytail from sagging on fine hair, use the two-elastic trick. Split your hair into two halves horizontally. Put the top half into a high ponytail first, then gather the bottom half and secure it into the first ponytail with a second elastic. This double-ponytail method provides an incredibly firm foundation that will not sag under the weight of a ribbon.
How to Style It
- Create your double-secured high ponytail at the crown of your head.
- Tie a one-inch-wide satin or silk ribbon around the base, hiding the elastics.
- Tie a simple knot rather than a bow, letting the long tails fall down the length of your ponytail.
- Cut the ribbon tails so they are just slightly shorter than your actual hair.
7. Double Dutch Braids Tied Off with Bows
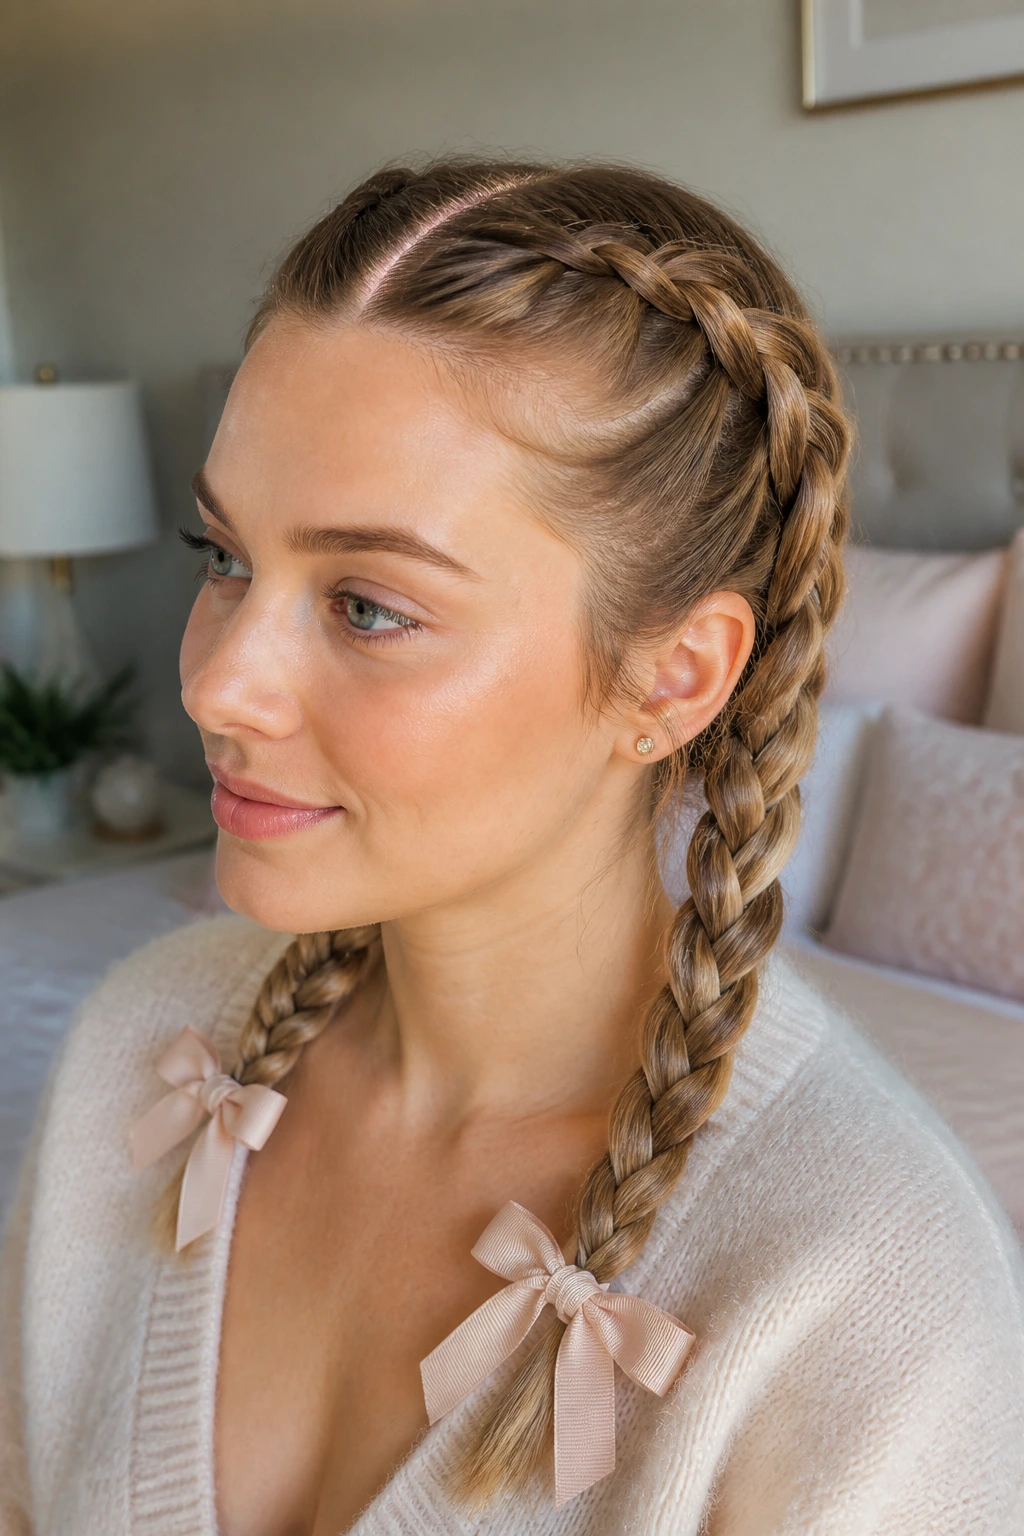
Double braids are fantastic for fine hair because they organize your strands into neat, controlled sections. However, the ends of double braids on fine hair often taper down to tiny, pencil-thin tails.
Why Tying the Ends Works
Tying a generous ribbon bow at the end of each Dutch braid completely disguises those thin, tapered ends. It draws the focus to the beautiful pattern of the braids and the volume of the bows, rather than the small amount of hair left at the bottom.
Braid Prep and Finish
- Part your hair down the center and create two Dutch braids (crossing strands under, not over, for extra height).
- Braid all the way down to the nape of your neck, then secure with clear elastics.
- Tie a half-inch grosgrain ribbon around each elastic, finishing with a neat, even bow.
- Gently pancake the loops of your braids by pulling outward on the edges to make them look twice as wide.
8. Low Side Braid Woven with Silk Cord
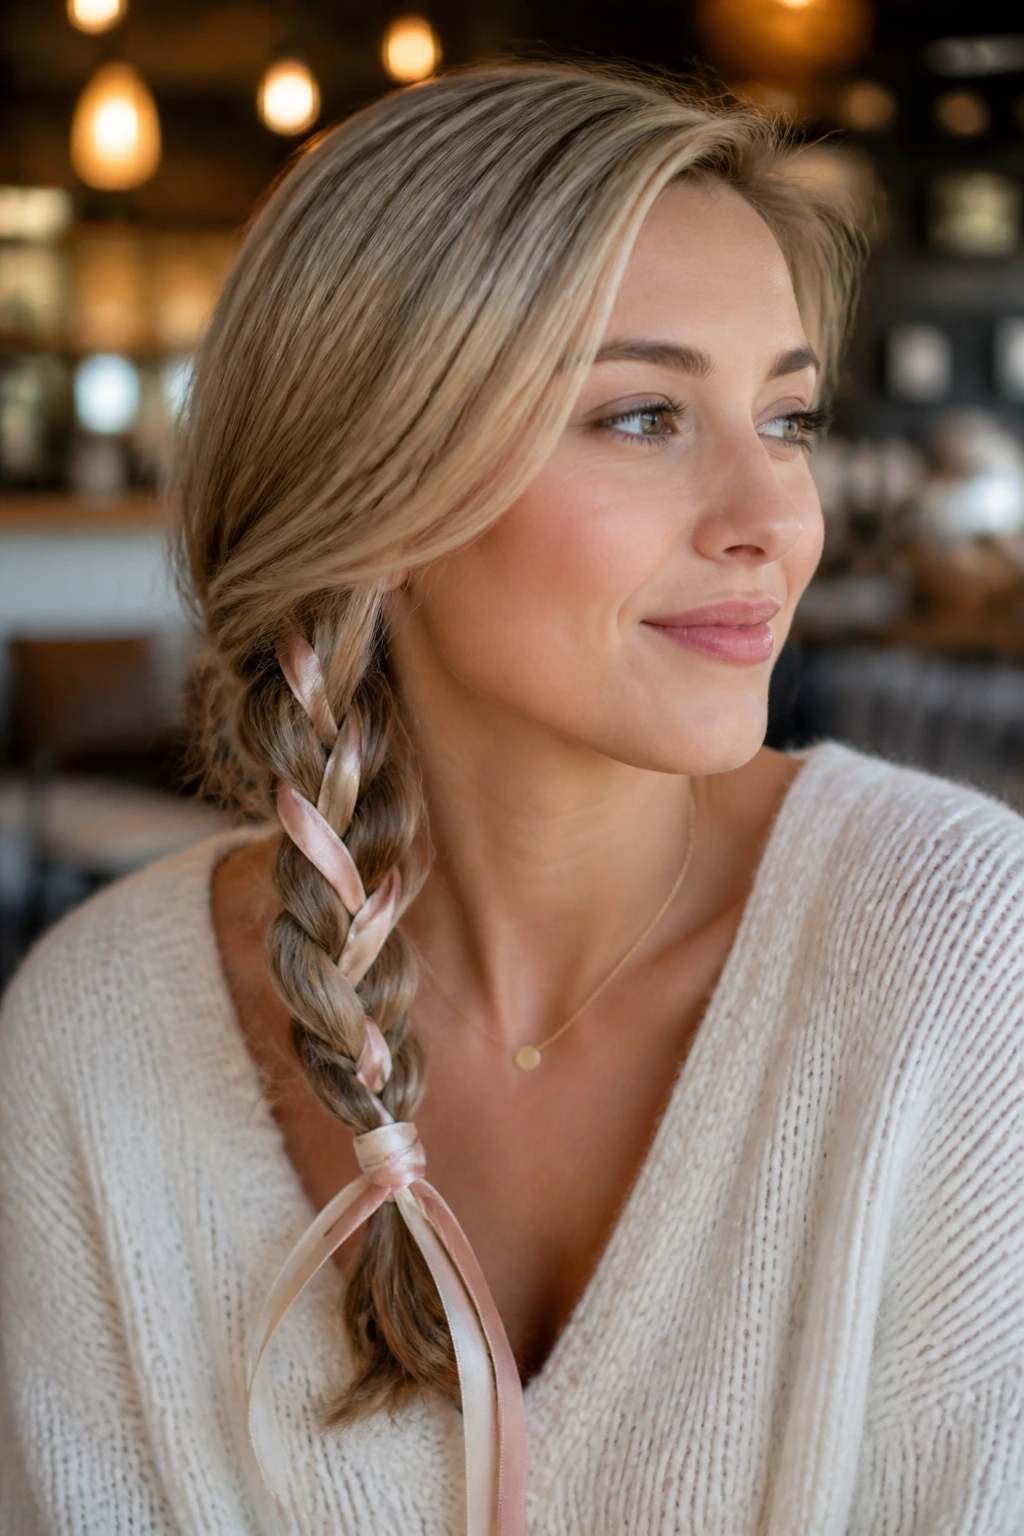
A side braid is incredibly easy to wear, but it can look a bit thin when swept over one shoulder. Intertwining a thin silk cord or ribbon into the braid adds color, texture, and physical thickness to the style.
Silk cord is incredibly lightweight, meaning it won’t pull on your scalp or drag the braid down. It adds a delicate, intricate detail that makes a standard three-strand braid look highly detailed.
Step-by-Step Guide
- Step 1: Sweep all your hair over one shoulder and secure it into a loose pony behind your ear with a clear elastic.
- Step 2: Tie your silk cord around the elastic, letting it hang down with your hair.
- Step 3: Divide your hair into three strands, grouping the cord in with one of the side strands.
- Step 4: Braid to the end, secure with another elastic, and wrap the remaining cord around the bottom to finish.
Pro tip: After securing the bottom of the braid, use your fingers to gently tug the ribbon loops outward to increase the braid’s overall width.
9. Messy Space Buns with Velvet Wraps
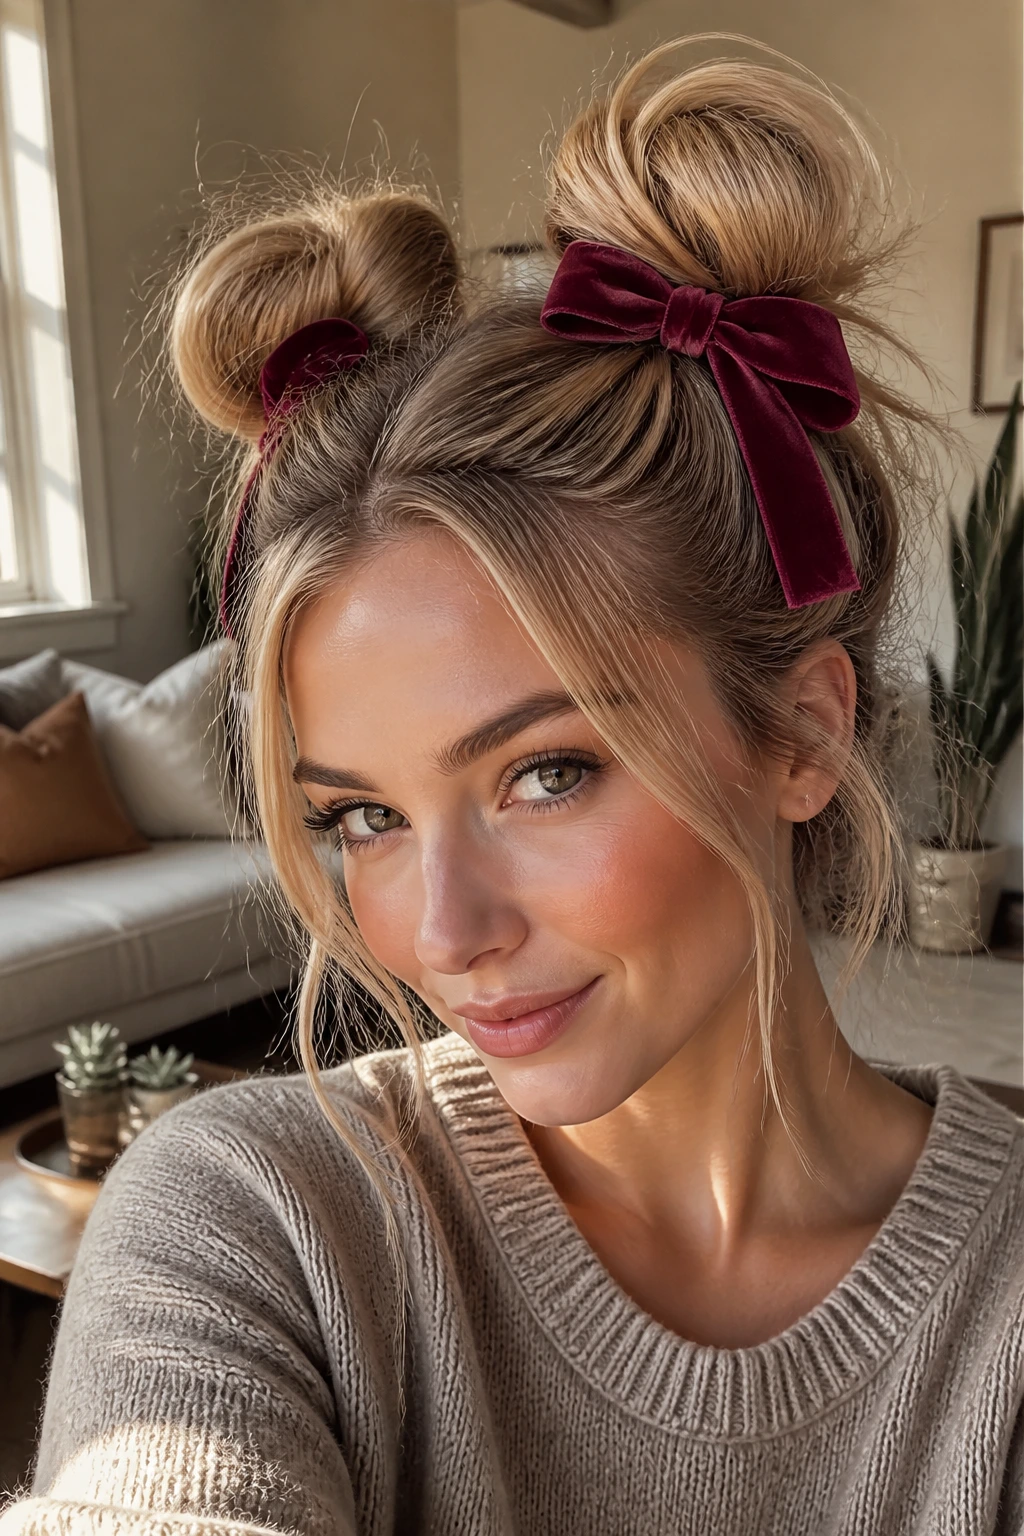
Space buns are incredibly playful, but fine hair can make them look more like tiny knots than buns. Wrapping the base of each bun with a soft velvet ribbon adds bulk and structure, making the buns look much larger.
The velvet ribbon acts as a collar, pushing the hair of the bun upward and outward. This prevents the buns from collapsing flat against your scalp and keeps them looking round and full.
How to Style It
- Part your hair down the middle and tie it into two high pigtails.
- Backcomb each pigtail gently with a fine-tooth comb to build up volume and texture.
- Twist the teased hair loosely into a bun shape around the base of the pigtail and secure with pins.
- Tie a thin velvet ribbon around the base of each bun, tying a small bow at the front or back.
10. Crown Braid with Intertwined Ribbon
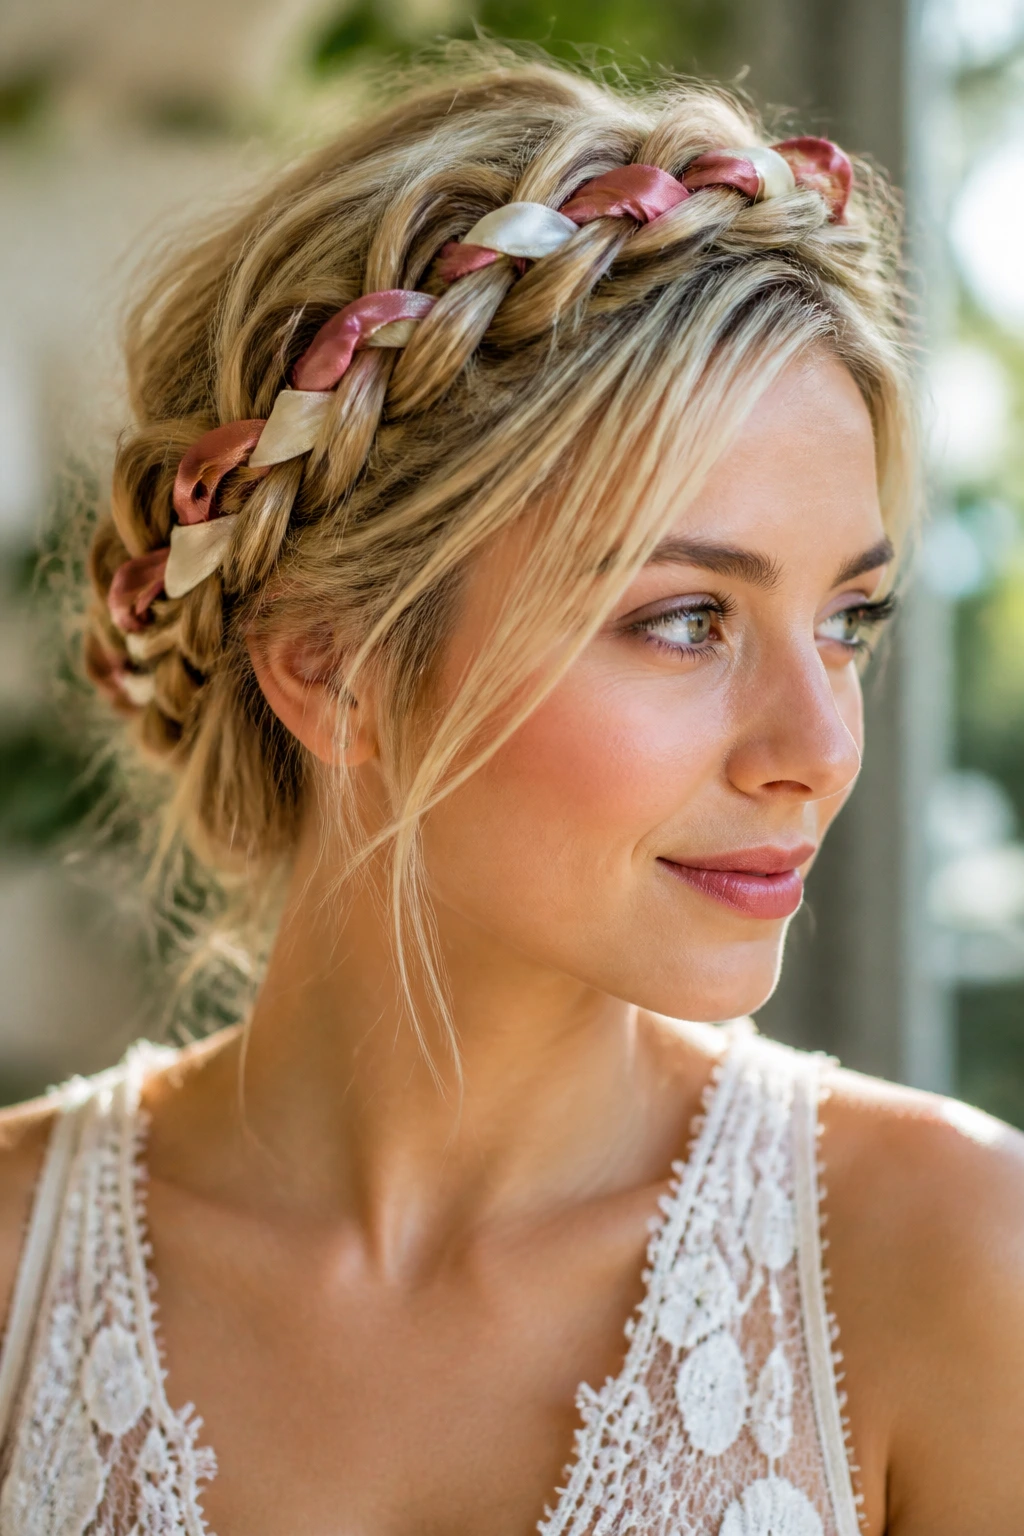
A crown braid is the ultimate romantic hairstyle, but it requires a lot of hair to look full. If your hair is fine, a crown braid can look thin and reveal too much scalp. Intertwining a colorful ribbon throughout the braid solves both problems.
The ribbon fills in the spaces between your hair sections, hiding any scalp lines that might show through. It also adds a beautiful band of color that makes the braid look much more complex than it actually is.
Crown Braid Blueprint
- Part your hair down the middle and create two low three-strand braids at the back of your head, weaving a ribbon into each braid as you go.
- Pull the left braid up over the top of your head and secure it with bobby pins.
- Pull the right braid up over the top, overlapping it with the first braid, and pin it in place.
- Tuck the ends of the braids and the ribbon tails under the braided crown to hide them, securing everything with extra pins.
11. Half-Up Twisted Crown with Tiny Bow
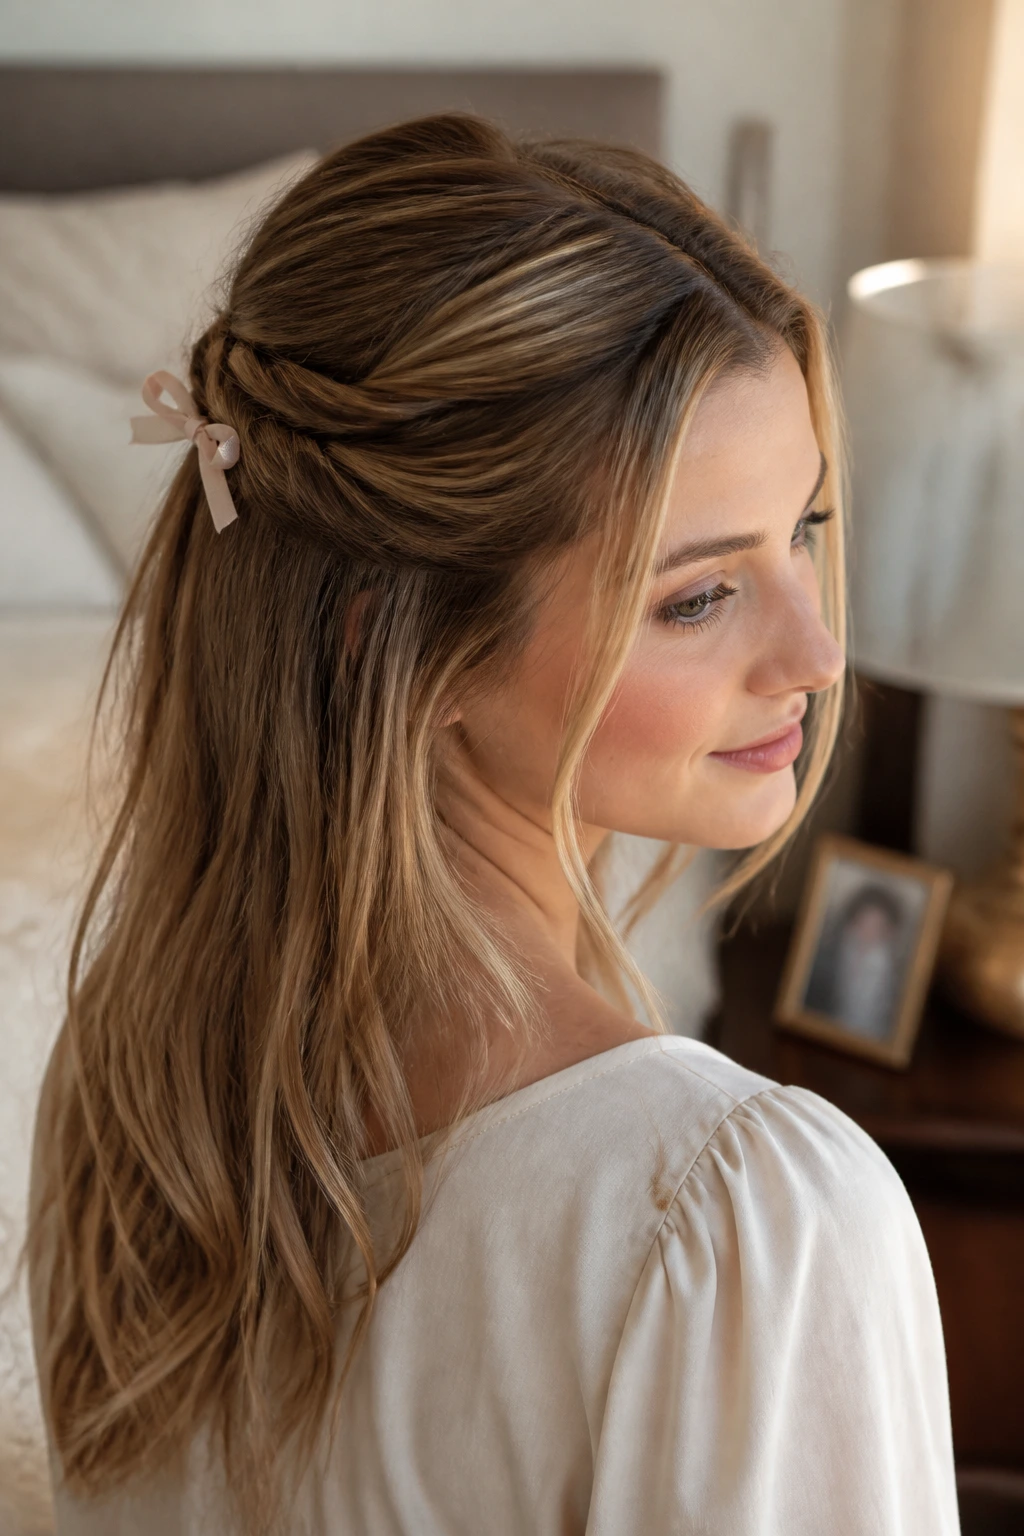
For an everyday look that takes less than five minutes, the twisted crown is unbeatable. It pulls hair away from your face while leaving the back loose, and a tiny ribbon bow at the back adds a perfect point of interest.
Fine hair can sometimes look flat when pulled straight back. Twisting the side sections instead of pulling them tight adds natural volume and texture along the sides of your head.
Quick Styling Checklist
- Prep: Spray your roots with texturizing spray for lift.
- Twisting: Take a two-inch section of hair from above each ear and twist it backward.
- Joining: Bring both twists to the back of your head and tie them together with a clear elastic.
- Ribbon: Tie a delicate, quarter-inch-wide ribbon over the elastic, finishing with a tiny, neat bow.
12. Faux Hawk Ponytail with Tied Segments
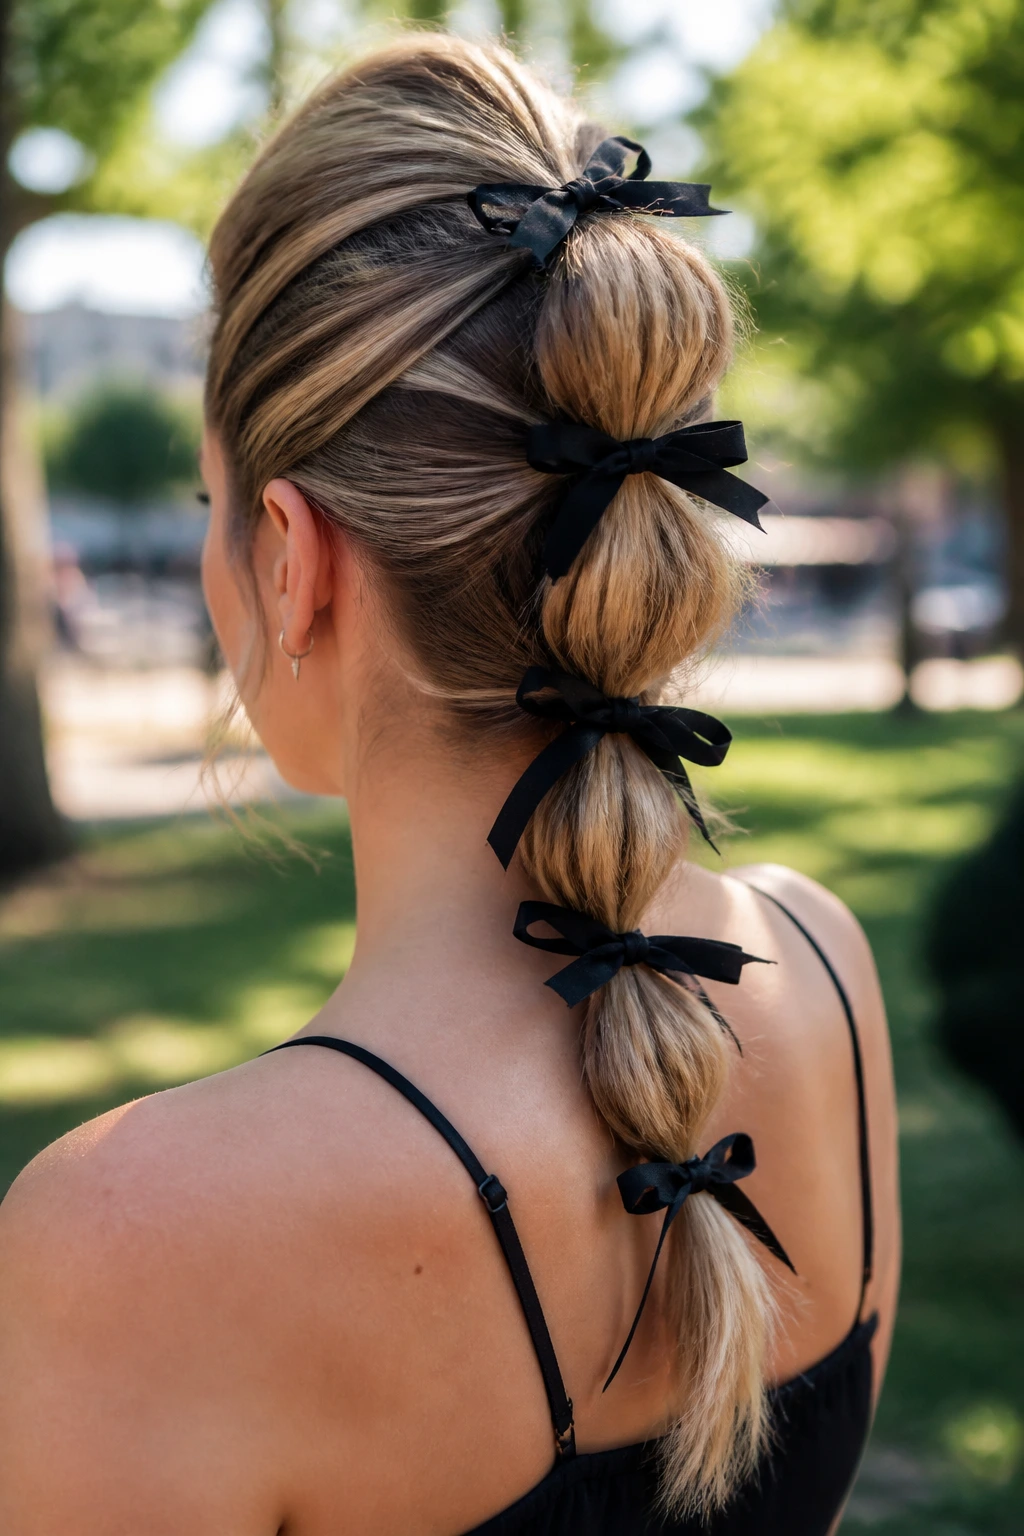
If you want a style with a bit of edge, a faux hawk ponytail is a brilliant option. By sectioning your hair into multiple smaller ponytails down the back of your head and tying each with a ribbon, you build continuous volume from front to back.
This style works because fine hair is much easier to lift and volumize in small sections. By grouping the hair into three or four distinct ponytails, you get maximum lift at the roots that lasts all day.
How to Style It
- Create a small ponytail at your crown, using the hair from your forehead to your crown, and tie it with a clear elastic.
- Create a second ponytail directly below the first, incorporating the tail of the first pony into it.
- Repeat this process down the back of your head until all your hair is gathered into a single low pony.
- Tie a small ribbon over each elastic segment, using contrasting colors or matching shades for a cohesive look.
13. Rolled Gibson Girl with Velvet Band
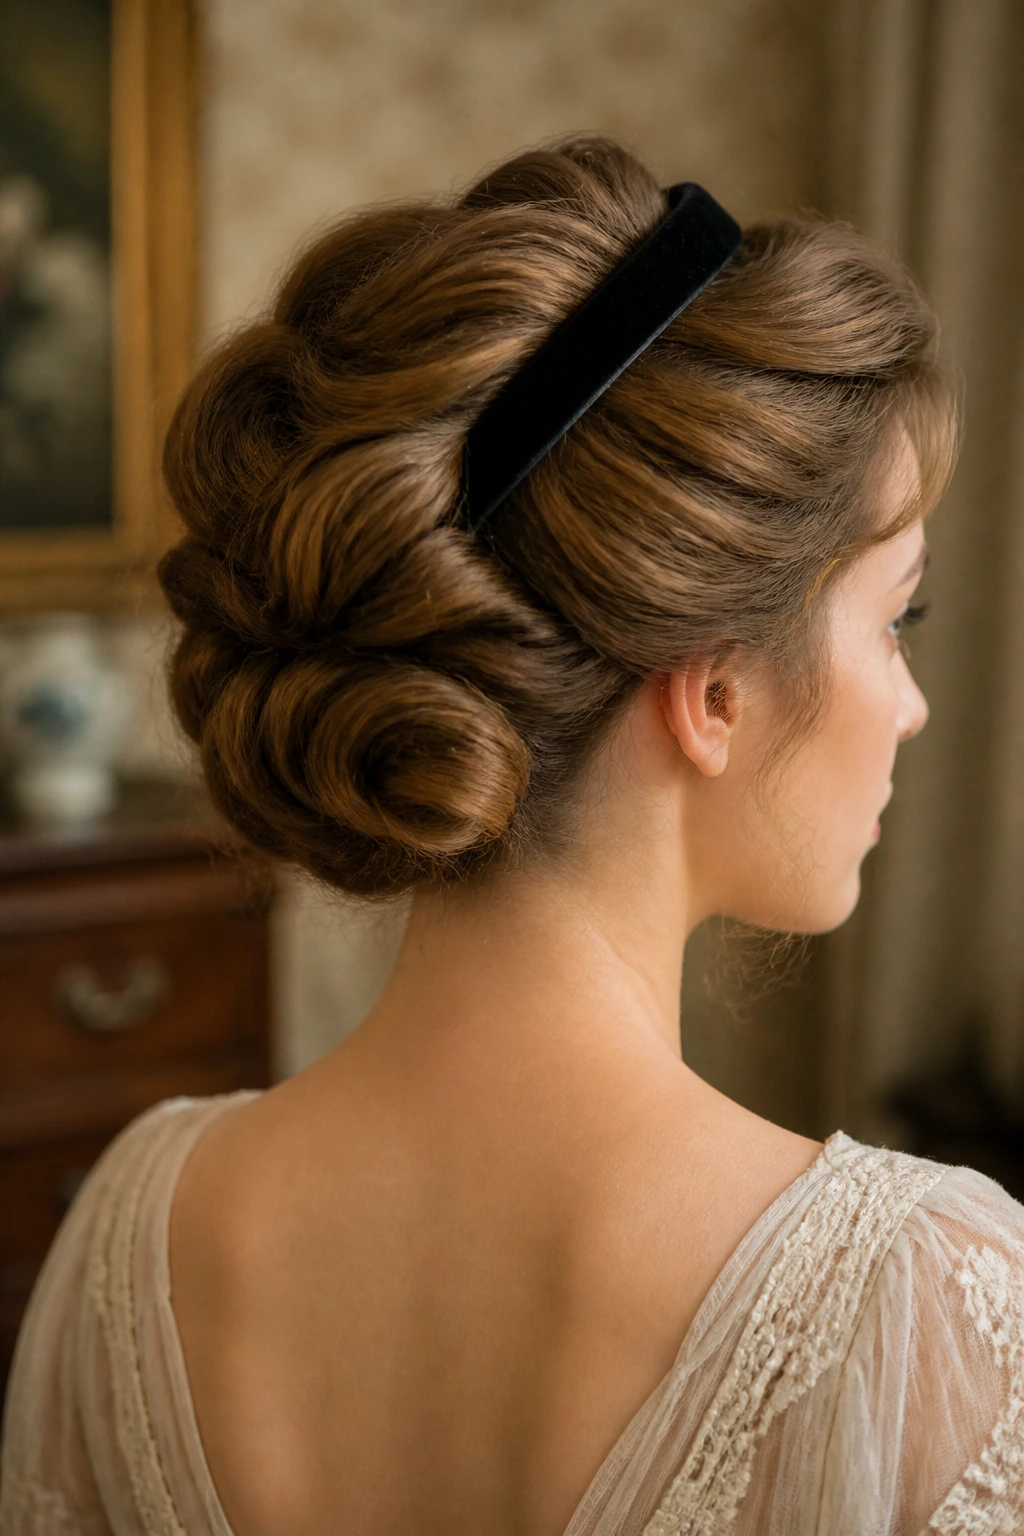
The Gibson Girl style is a vintage classic that is wonderfully suited for fine hair. It involves rolling your hair upward into a soft halo around the nape of your neck, and a velvet band helps hold the roll in place while adding a beautiful retro finish.
The rolling action creates massive natural volume, as the hair is essentially folded over itself. This makes your hair look incredibly thick and full from the back and sides.
Step-by-Step Instructions
- Place a continuous velvet ribbon headband over your head, sitting on top of your hair like a crown.
- Starting from the front, take small sections of hair and tuck them over and under the band.
- Work your way toward the back, wrapping all the loose hair around the band until a soft, continuous roll is formed.
- Secure any loose pieces with bobby pins and spray lightly with medium-hold hairspray.
14. High Bun with Base Ribbon Bow
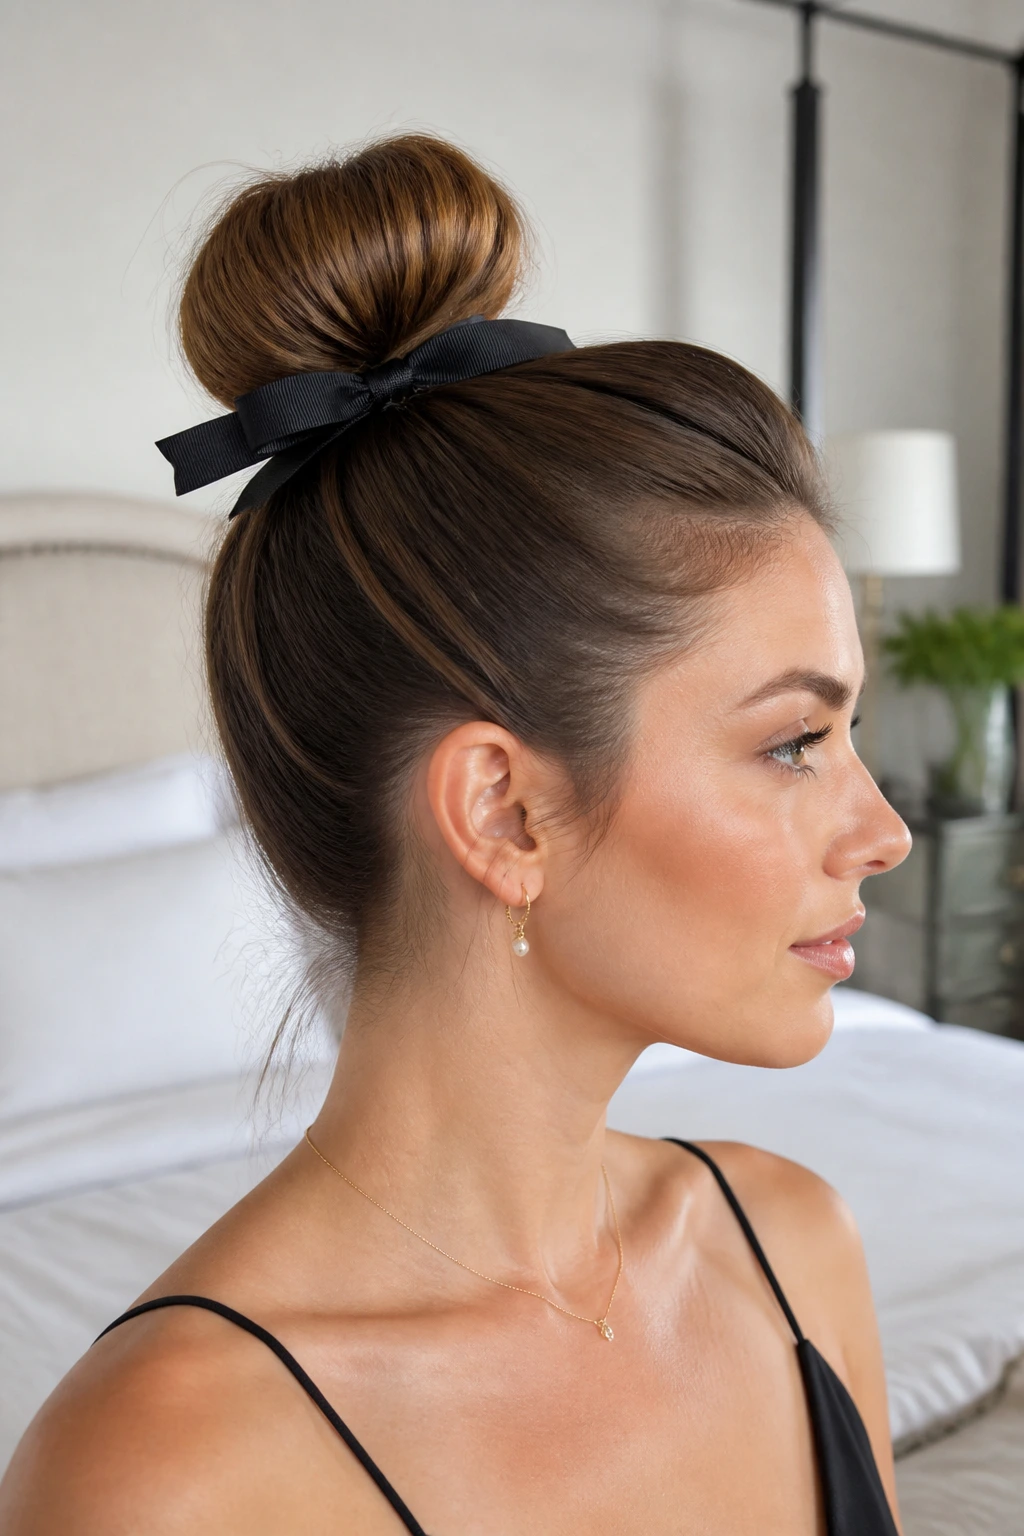
When you need a polished, elegant look, a high bun is always a safe bet. For fine hair, wrapping a thick grosgrain ribbon around the base of the bun not only hides the pins but also props the bun up, making it look much larger.
The stiffness of grosgrain ribbon is key here. It acts as a physical support system for your bun, keeping it perched high on your head and preventing it from sliding downward as you move.
Styling Blueprint
- Pull your hair into a high ponytail at your crown and secure it with a strong elastic.
- Wrap your hair around the base to create a neat bun, securing it with U-shaped hairpins.
- Wrap a one-inch-wide grosgrain ribbon around the base of the bun twice, pulling it snug.
- Tie the ribbon into a structured bow at the back of the bun, letting the loops prop up the hair.
15. Side-Swept Braid with Velvet Accent
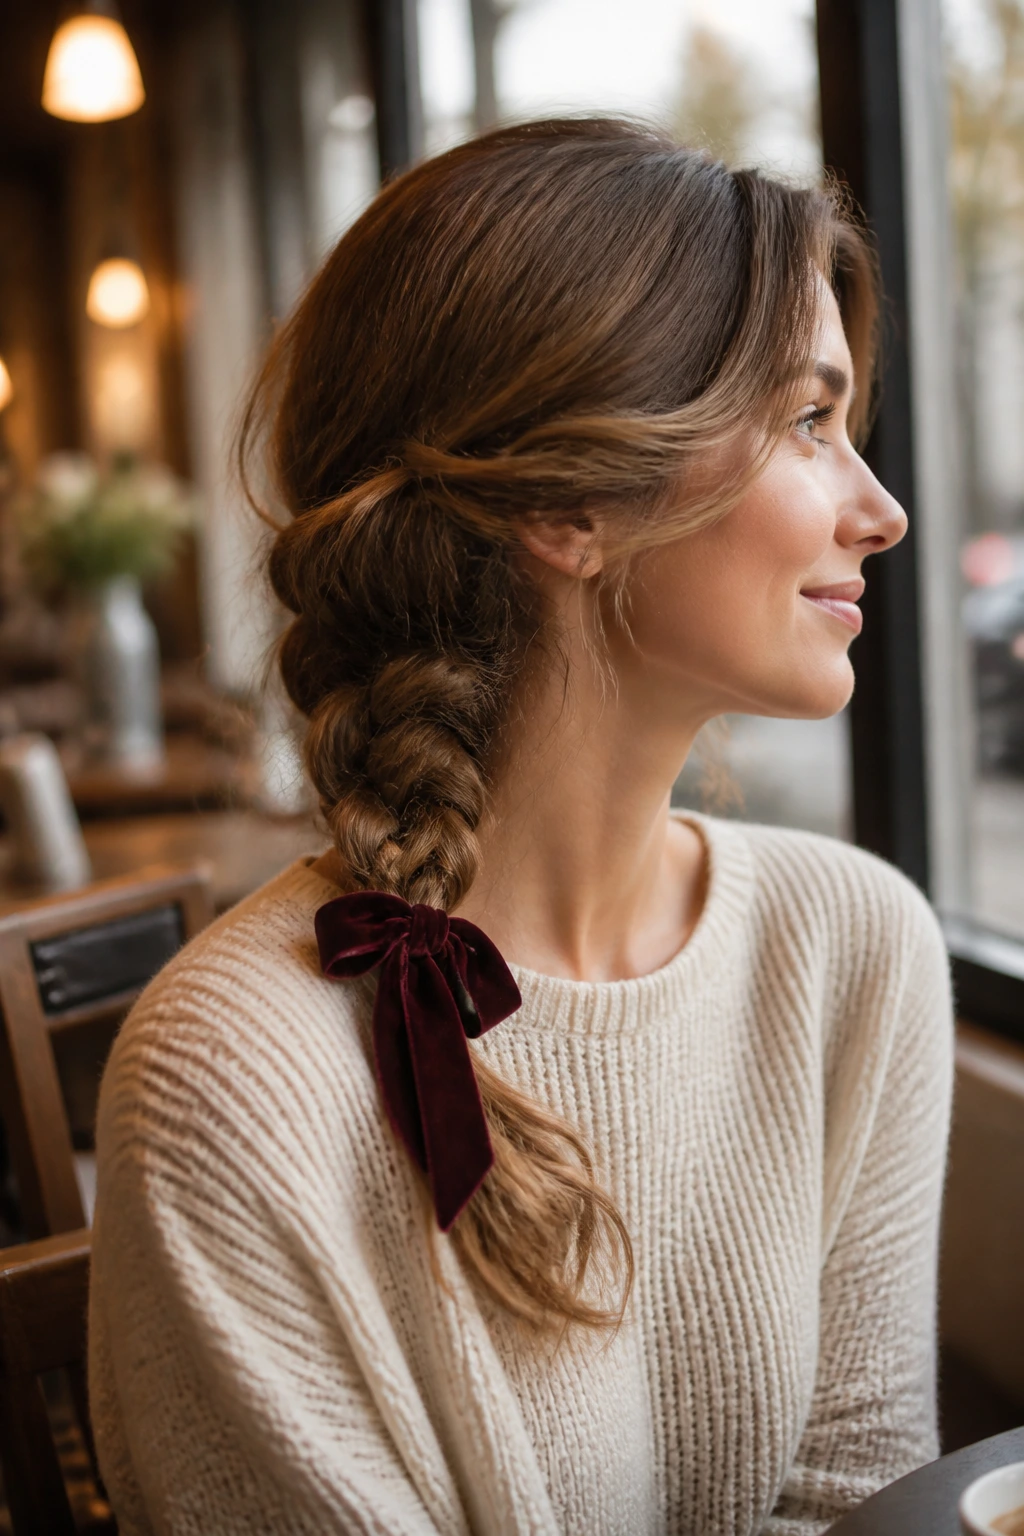
Sweeping your hair to one side is an easy way to create the illusion of thickness, as it concentrates all your hair into one visible area. Adding a rich velvet ribbon at the base of a side braid adds a touch of sophistication.
Velvet is perfect for this style because it sits close to your neck. The soft texture of the ribbon feels comfortable against your skin and stays securely in place without sliding down your shoulder.
Quick How-To
- Sweep: Bring all your hair over one shoulder.
- Anchor: Tie a low, loose ponytail behind your ear using a clear elastic.
- Ribbon: Wrap a velvet ribbon over the elastic and tie a secure knot.
- Braid: Braid the remaining hair loosely, letting the velvet tails blend in with the strands.
16. Low Loop Bun Secured with Grosgrain
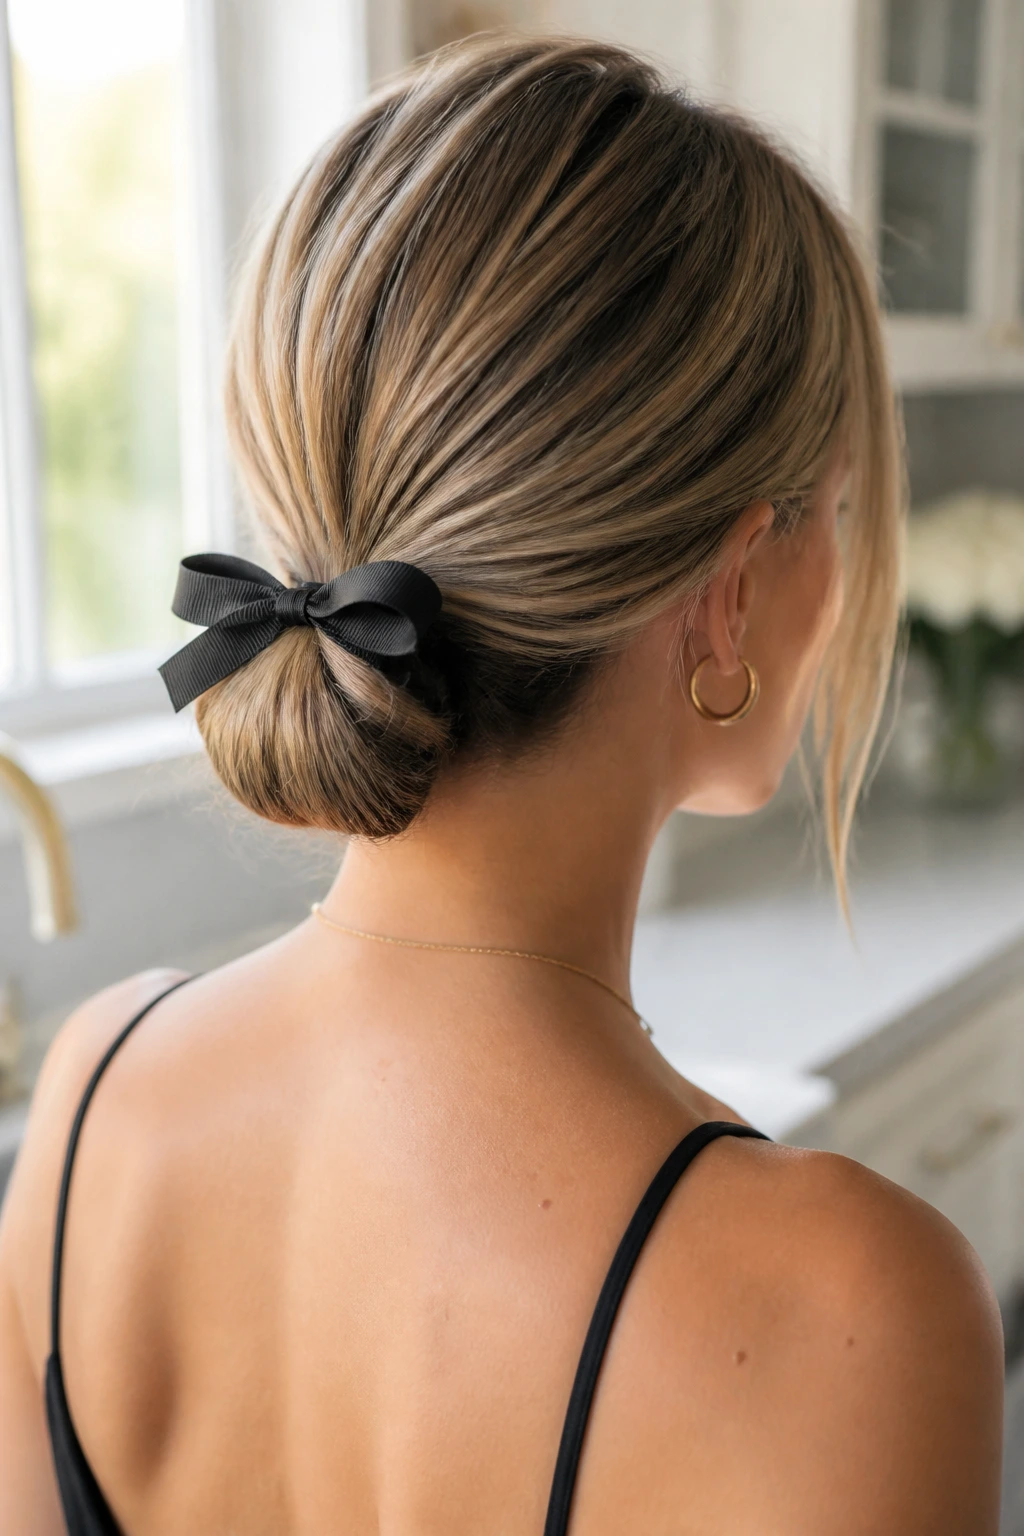
A loop bun is one of the fastest hairstyles to create, making it perfect for busy mornings. It is simply a ponytail that isn’t pulled all the way through the elastic. On fine hair, this can look a bit casual, but a grosgrain ribbon instantly elevates it.
The flat, structured shape of a loop bun pairs beautifully with the crisp texture of grosgrain. It creates a modern, minimalist silhouette that looks incredibly chic and put-together.
Step-by-Step Guide
- Gather your hair at the nape of your neck as if making a low ponytail.
- Pull your hair halfway through the elastic to create a neat loop, leaving the ends pointing downward.
- Tie a grosgrain ribbon over the elastic, finishing with a flat, two-loop bow.
- Pull gently on the sides of the loop bun to widen it, creating a fuller shape.
17. Fishtail Braid with Thin Ribbon Accent
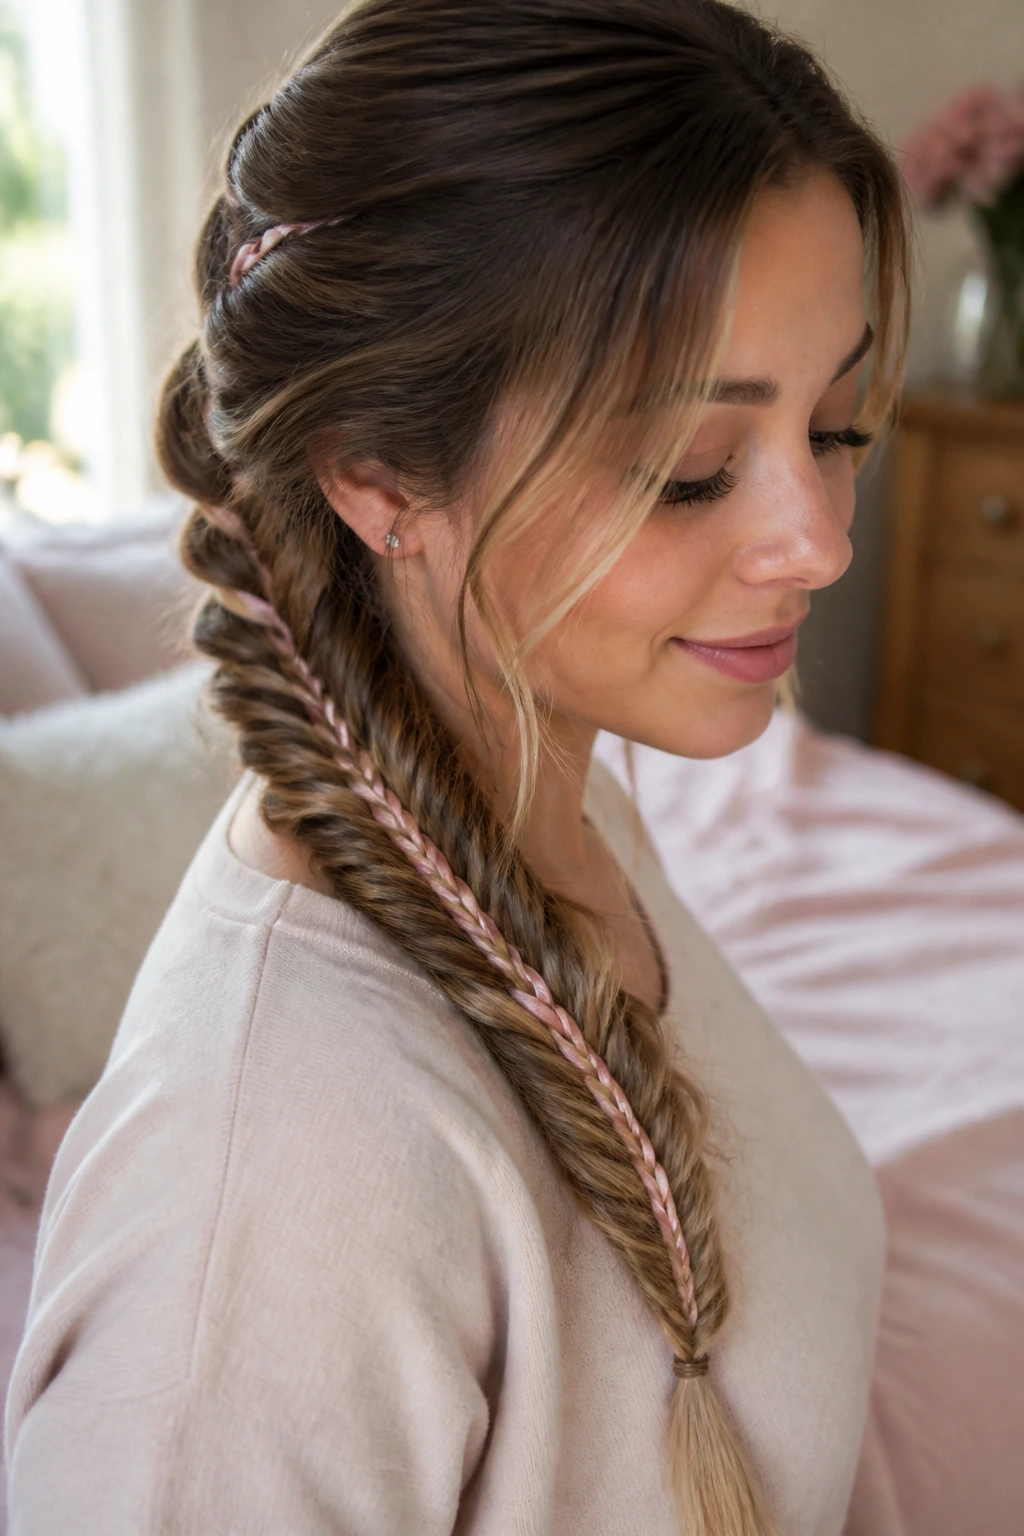
Fishtail braids are known for looking intricate and beautiful, but on fine hair, they can easily look thin and flat. Weaving a thin, metallic or satin ribbon into the braid adds a glint of light that makes the braid appear much thicker.
The key to a great fishtail braid on fine hair is to use very small sections. The more sections you cross over, the wider and more textured the braid will look, especially when highlighted by a delicate ribbon.
Braid Structure
- Split your ponytail into two equal sections.
- Pin a thin, quarter-inch ribbon to the base of the ponytail, letting it hang down between the two sections.
- Take a small strand of hair from the outer edge of the left section, bring it over to the right section, and include the ribbon in the cross-over.
- Repeat on the right side, keeping the ribbon moving back and forth with the hair strands.
- Secure the end with a clear elastic and tie a small bow with the remaining ribbon.
18. Pigtail Braids with Bow Tie-Offs
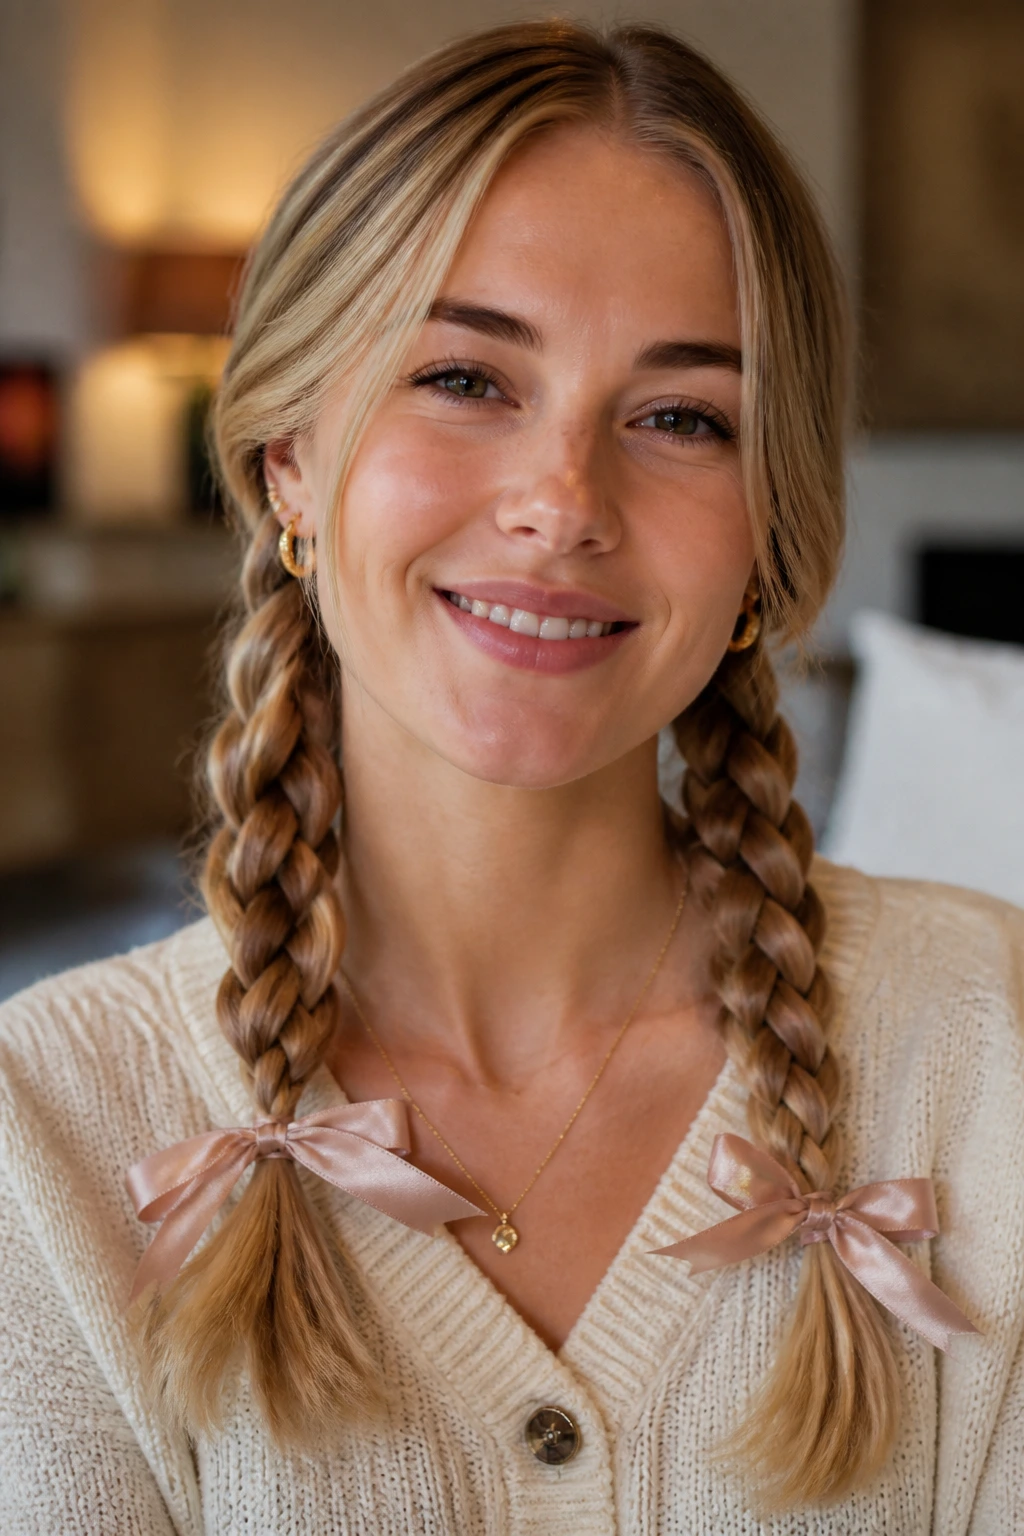
Pigtail braids are charming and youthful, but they can easily look sparse on fine hair. Disguising the ends with structured ribbon bows is an easy way to add volume and charm.
By using a slightly wider ribbon for the bows, you draw the eye down to the beautiful fabric accents, making the size of the braids themselves less noticeable.
Styling Instructions
- Part your hair down the center from your forehead to the nape of your neck.
- Braid each side into a classic three-strand braid, keeping the tension even.
- Secure each braid about two inches from the ends with a clear elastic.
- Tie a half-inch-wide grosgrain or cotton ribbon over each elastic, finishing with a neat, perky bow.
19. Half-Up Bouffant with Grosgrain Barrette
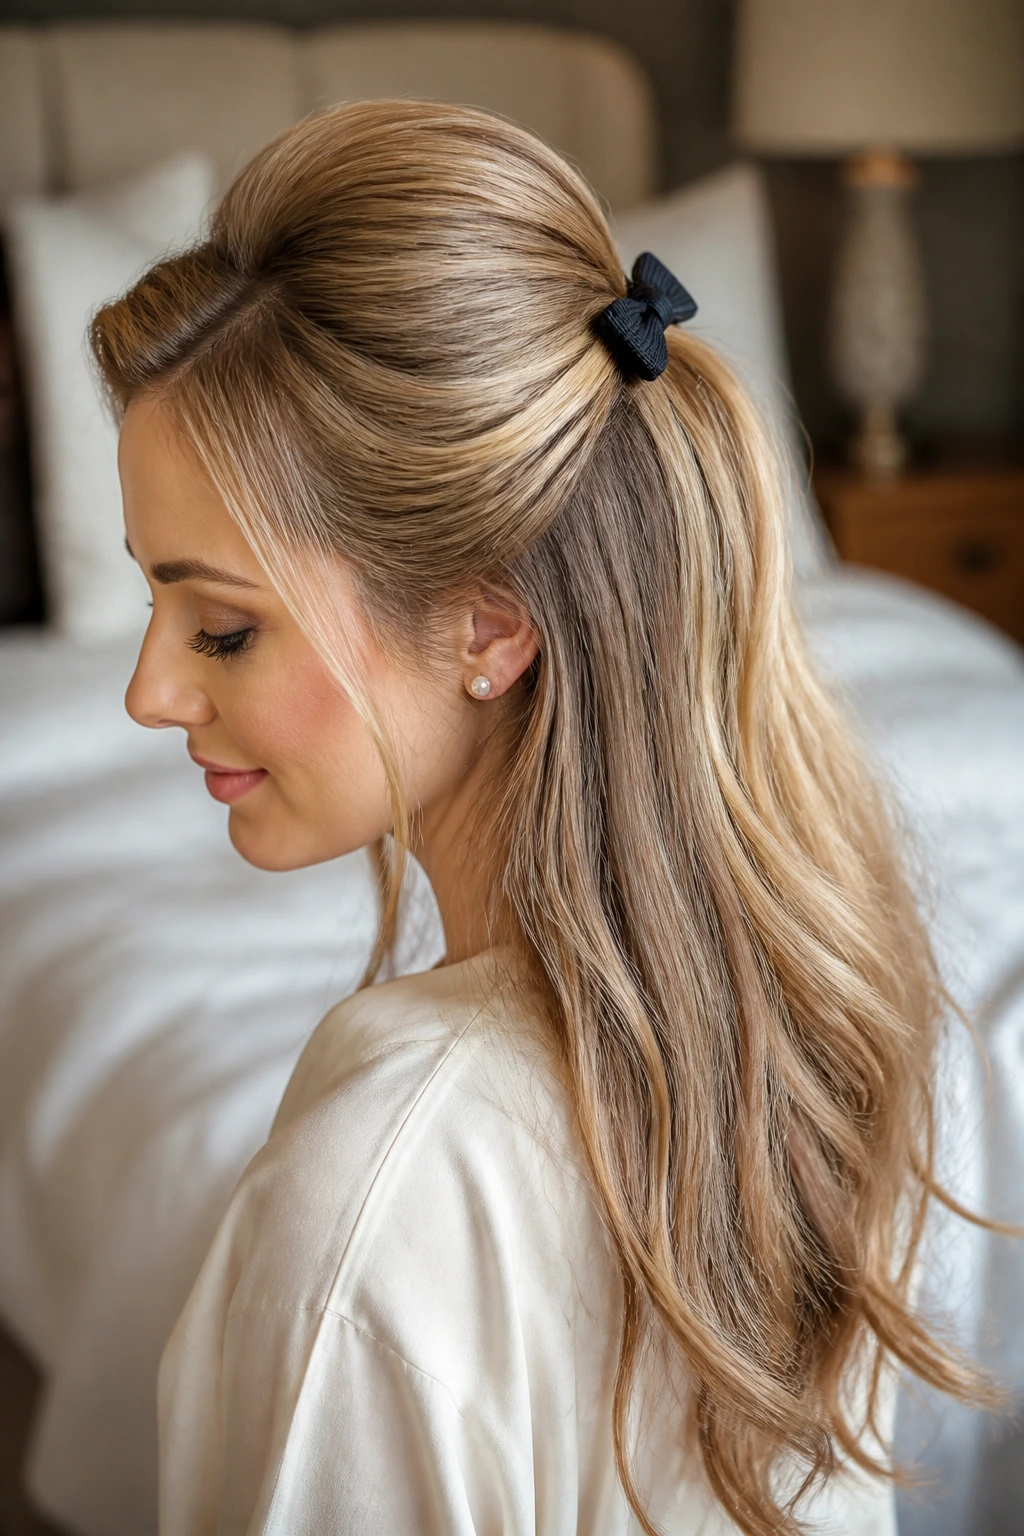
If you love vintage-inspired styles, a half-up bouffant is a must-try. Teasing the crown of your head creates beautiful height, and securing the half-up section with a ribbon-wrapped barrette keeps the volume locked in place.
Barrettes are excellent for fine hair because they clip flat against the head, clamping the hair firmly so it cannot slide or lose its lift.
Bouffant Blueprint
- Volume: Backcomb a small section of hair at your crown, spraying lightly with hairspray.
- Smoothing: Gently smooth the top layer of hair over the teased section using a soft-bristle brush.
- Securing: Gather the sides and clip them at the back of your head with a ribbon barrette.
- Finish: Pull gently upward on the crown hair to refine the bouffant shape.
20. Multi-Strand Braid with Threaded Ribbon
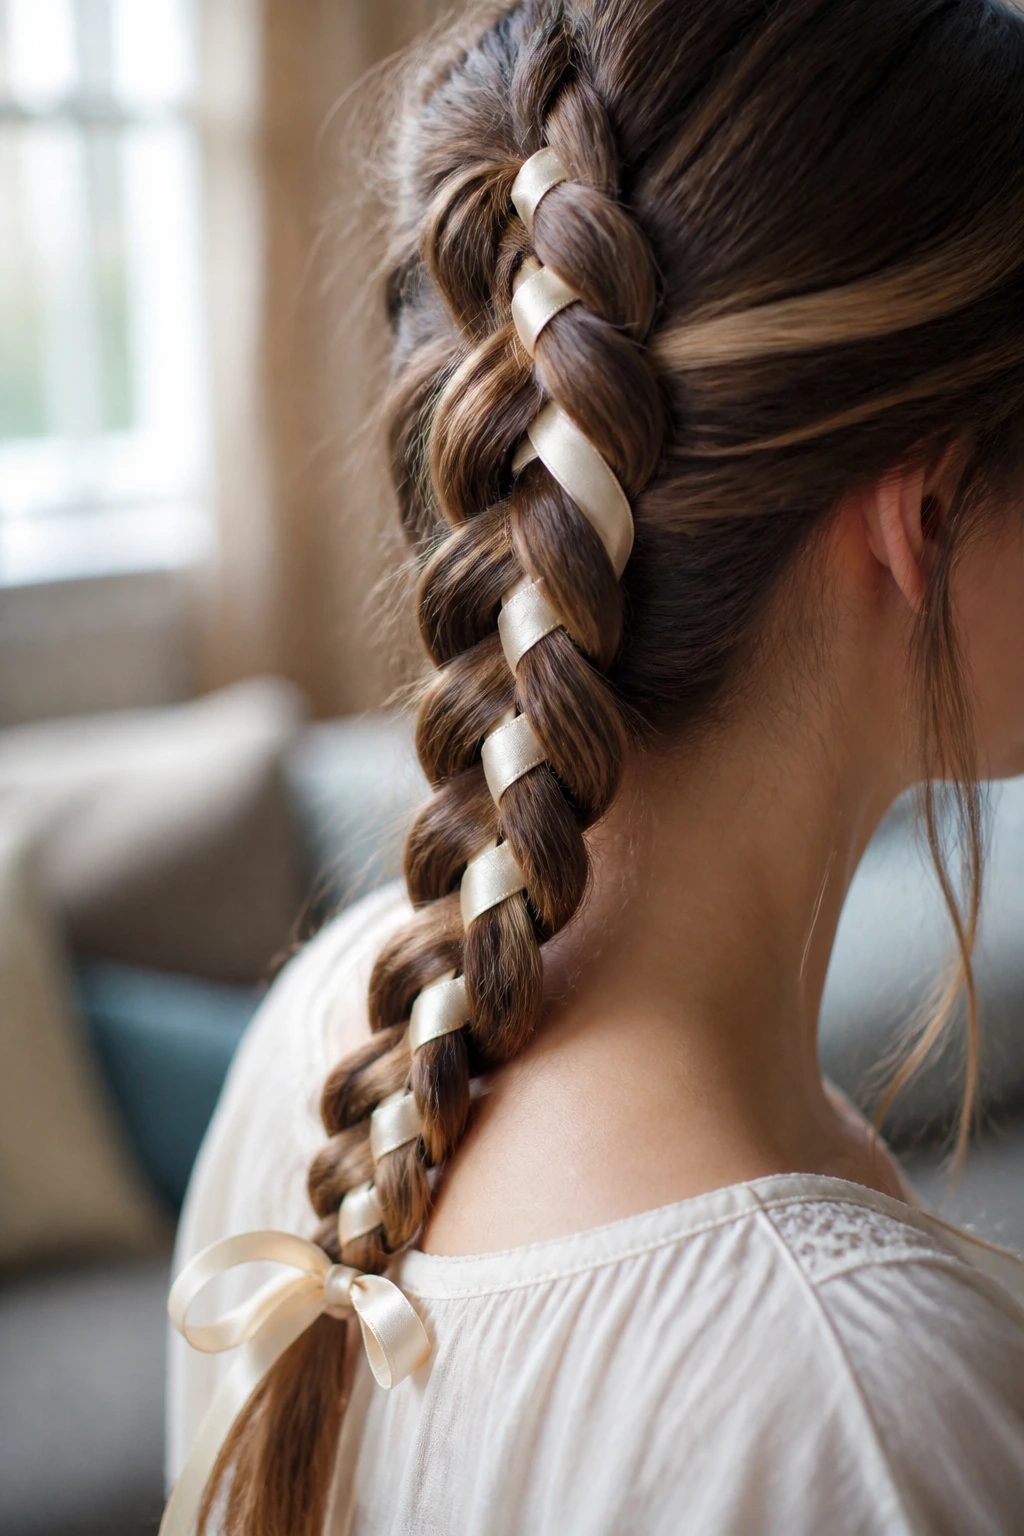
If you want a truly unique style, threading a ribbon through a multi-strand braid is a showstopper. It turns your hair into a piece of art, with the ribbon weaving in and out of the strands like a tapestry.
While a four- or five-strand braid can be tricky to master, the addition of a ribbon actually makes it easier to keep track of the strands, as the ribbon acts as a highly visible guide.
How to Style It
- Tie your hair into a low ponytail and secure it with an elastic.
- Attach a long ribbon to the elastic so it hangs down with your hair.
- Divide your hair into three strands, treating the ribbon as a fourth strand.
- Braid the strands by weaving them over and under the ribbon in a basketweave pattern.
- Secure the bottom with an elastic and wrap the remaining ribbon around the end to finish.
21. Triple Ponytail Cascade with Ribbon Ties
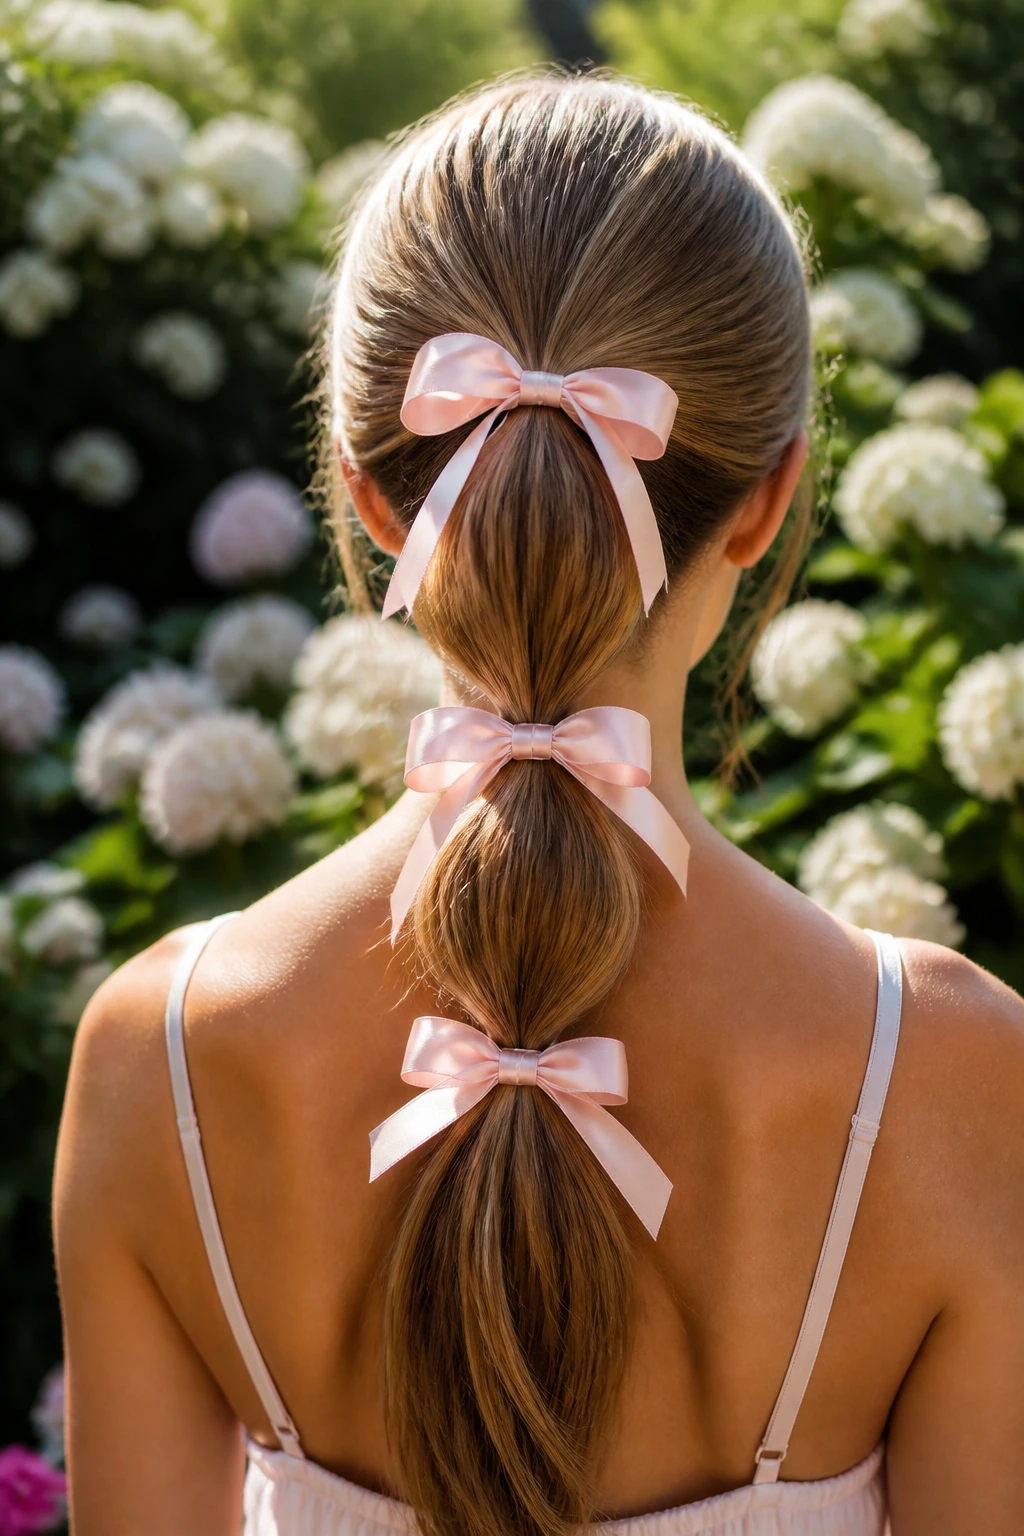
This style is perfect for active days when you want your hair completely secure but still stylish. By creating three small ponytails down the back of your head and joining them together, you create a beautiful cascade effect.
Tying a small ribbon over each elastic segment breaks up the vertical line of the ponytail, making your hair look much fuller and more dynamic from the back.
Styling Steps
- Create a small half-up ponytail at the top of your head and secure it with an elastic.
- Gather a second section of hair from above your ears, combine it with the tail of the first pony, and secure it with a second elastic.
- Gather the remaining hair at the nape of your neck, combine it with the second tail, and secure it with a third elastic.
- Tie a matching ribbon over each of the three elastics, finishing with small, neat knots.
22. Twist-and-Pin Crown with Ribbon Headband
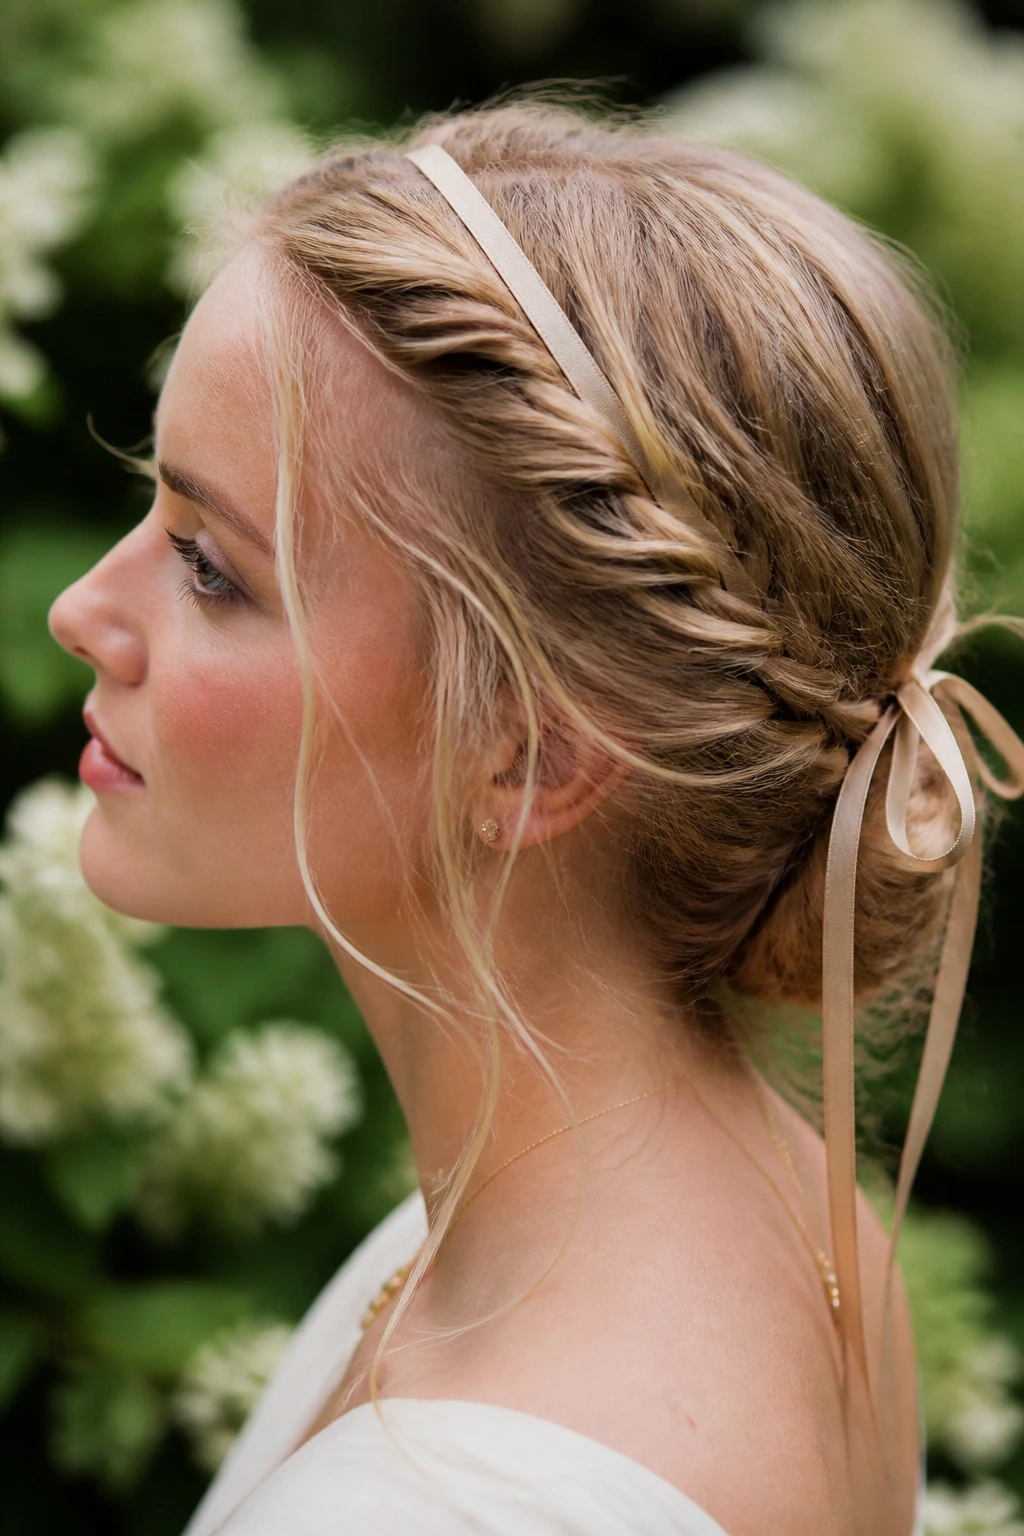
For a soft, bohemian look, a twist-and-pin crown is incredibly flattering. It involves twisting sections of hair along your hairline and pinning them back, accented by a delicate ribbon headband.
The headband serves a functional purpose: it acts as a barrier that keeps your fine hair from falling forward into your face, while the twists add beautiful texture along the sides.
Quick Setup
- Base: Place a thin velvet ribbon around your head, tying it at the nape of your neck.
- Twisting: Take a small section of hair near your temple and twist it away from your face.
- Tucking: Tuck the end of the twist over and under the ribbon band, securing it with a bobby pin.
- Repeat: Do the same on the other side, meeting in the middle at the back.
23. Tousled Lob with Tied Side Accent
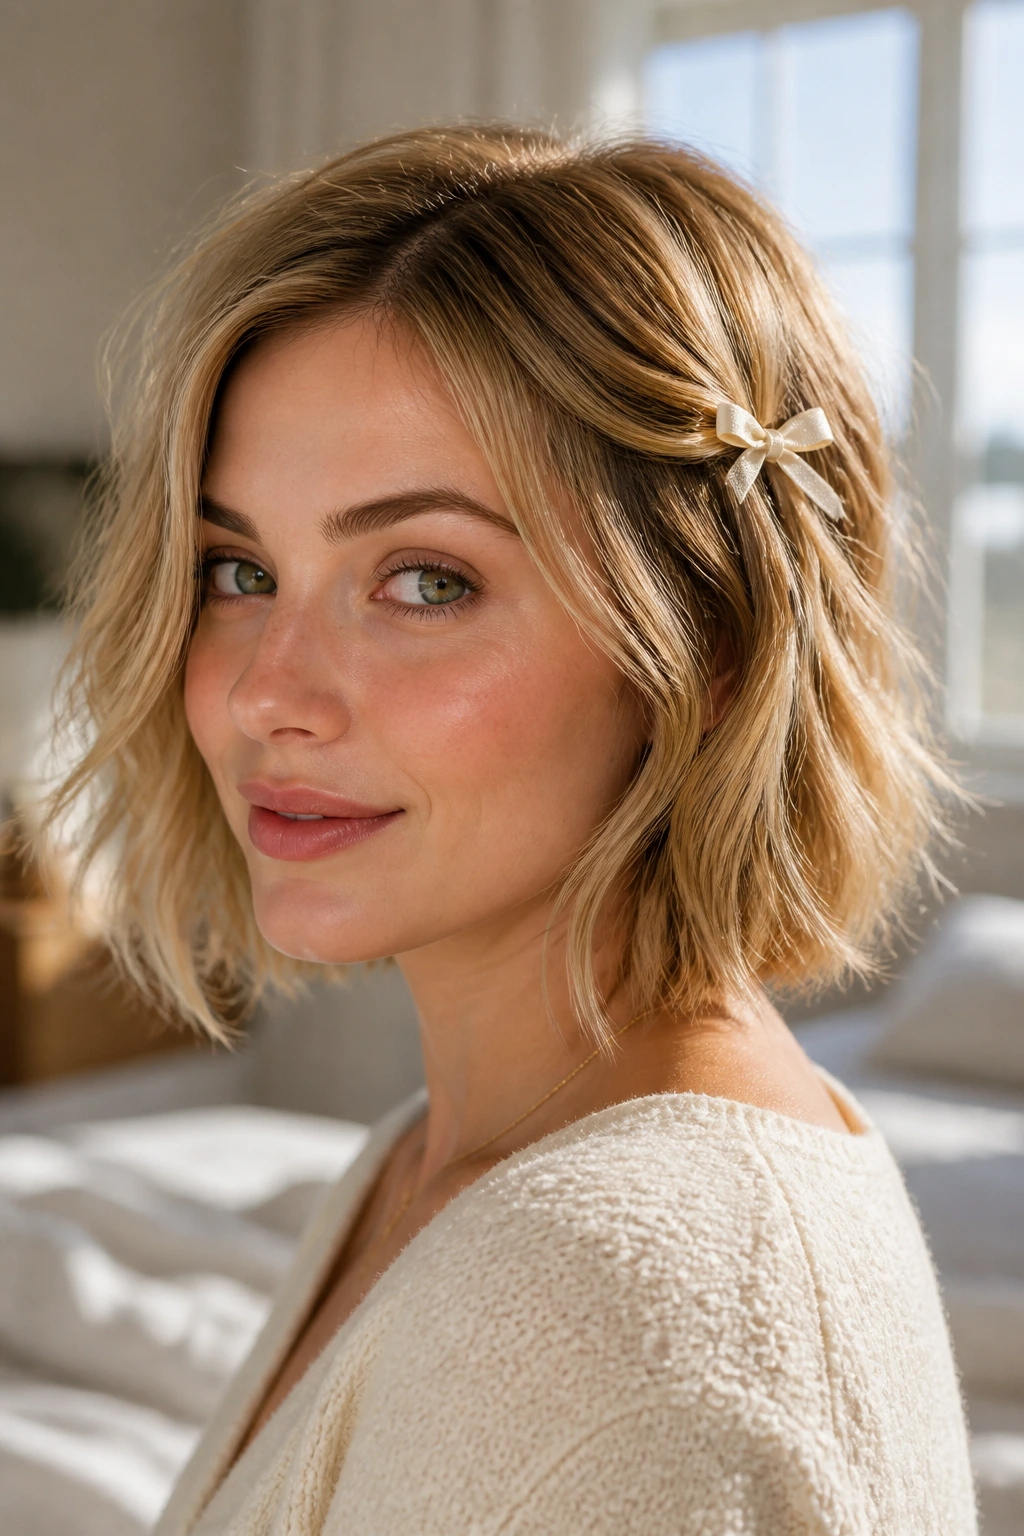
If you have short, fine hair like a bob or a lob, you might feel limited in your styling options. A tied side accent is a simple way to add a touch of detail without needing a lot of length.
By pulling back just a small section of hair on one side and securing it with a tiny bow, you create a beautiful asymmetrical look that highlights your jawline and cheekbones.
How to Style It
- Part your hair on the side and style it with loose, textured waves.
- Take a small, one-inch section of hair from the shallower side of your part and sweep it back behind your ear.
- Secure this section with a small bobby pin, sliding the pin horizontally.
- Tie a tiny ribbon around a small barrette or clip, and place it directly over the bobby pin to hide it.
24. Low Twisted Ponytail with Velvet Ribbon
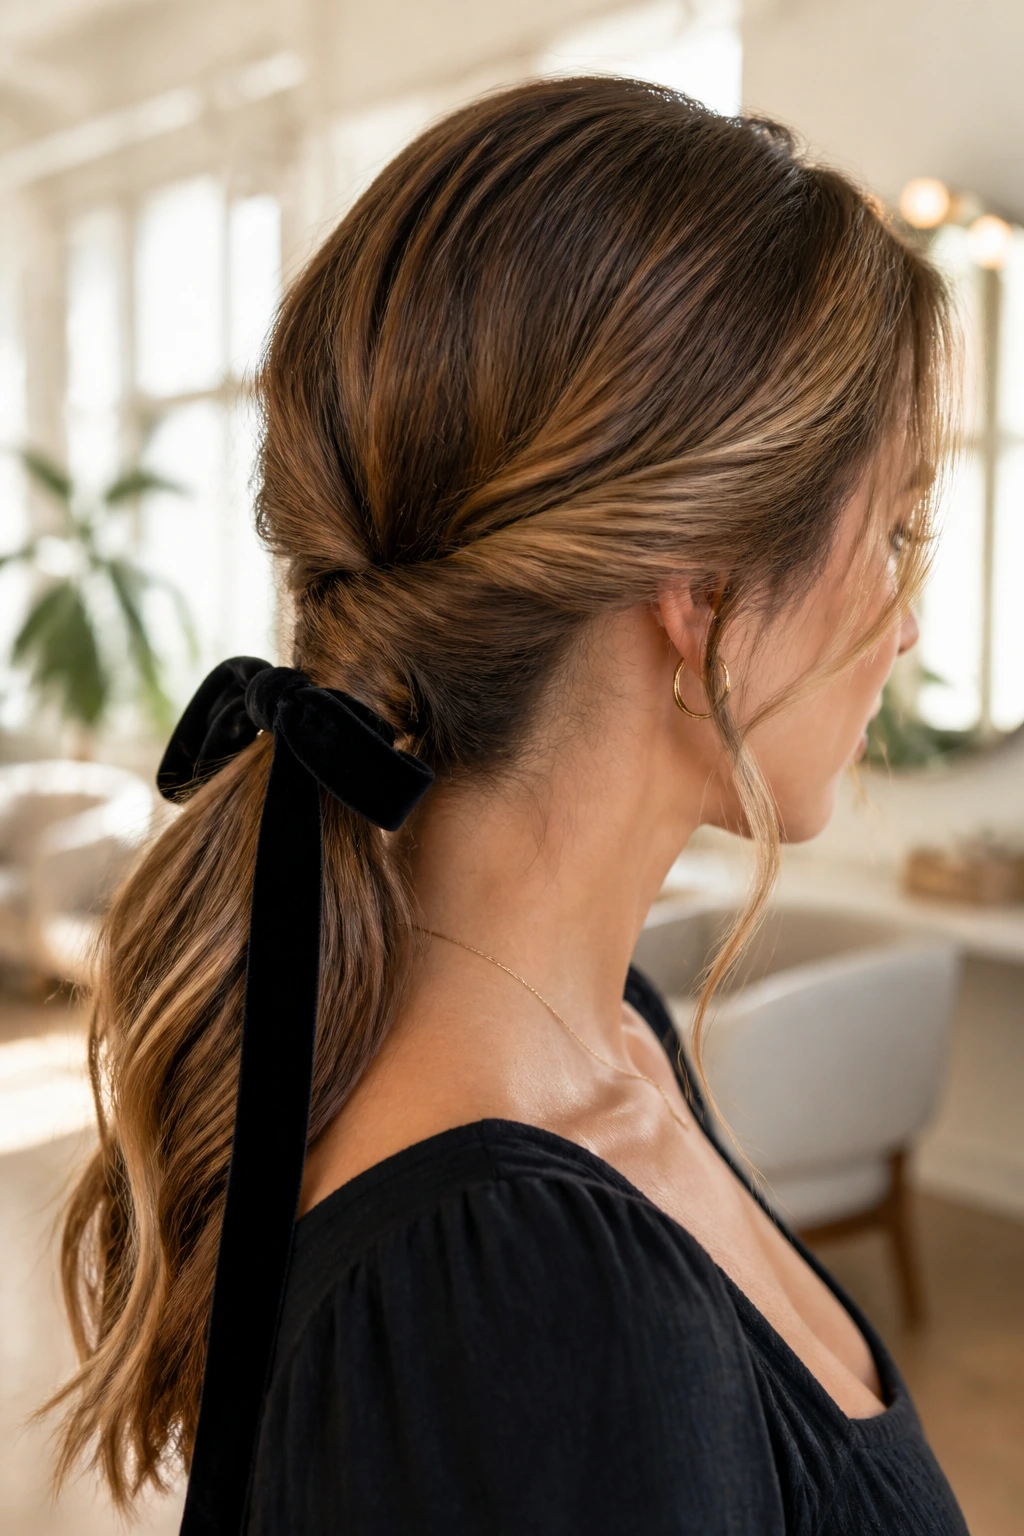
A twisted ponytail is a great way to add interest to a standard low pony. By twisting the side sections before gathering them into the main ponytail, you create beautiful depth and texture at the back of your head.
A velvet ribbon tied around the base of the ponytail adds a rich, cozy texture that makes the entire style look incredibly polished and elegant.
Twist Blueprint
- Leave two small sections of hair out at the front, parting them from your ears forward.
- Gather the rest of your hair into a low ponytail at the nape of your neck and secure it with an elastic.
- Take the left front section, twist it backward, and wrap it over the ponytail elastic, pinning it underneath.
- Repeat with the right front section, crossing it over the first twist.
- Tie a velvet ribbon around the base of the ponytail to cover the pins and elastics.
25. Braided Bun Woven with Sheer Organza
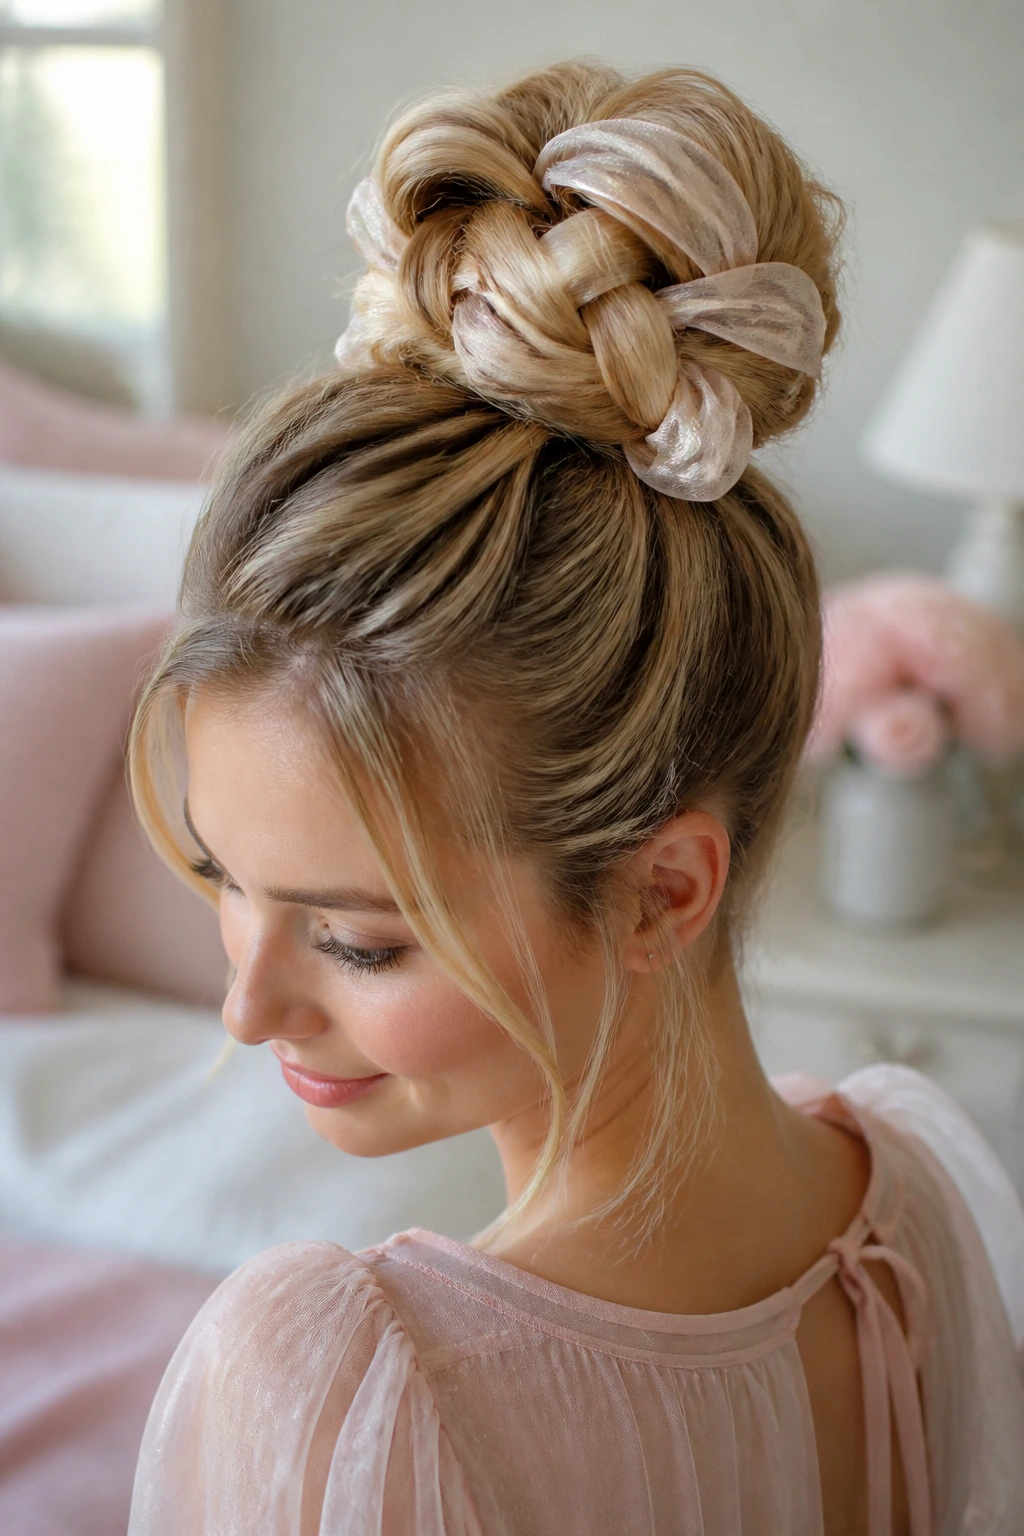
If you want a bun that looks incredibly intricate and voluminous, try braiding your hair with a sheer organza ribbon before twisting it into a bun. The organza adds massive physical volume to the braid, which translates into a much larger bun.
Because organza is sheer and airy, it blends beautifully with your hair, creating a soft, cloud-like texture that looks romantic and full.
Styling Instructions
- Tie your hair into a high ponytail and secure it with a clear elastic.
- Knot a long organza ribbon around the base of the ponytail.
- Split your hair into three strands, letting the ribbon join one of the strands.
- Braid the ponytail loosely, then wrap the braid around the base to form a bun.
- Secure the bun with U-shaped pins, letting the edges of the ribbon peek out.
26. High Puff Ponytail with Under-Tied Ribbon
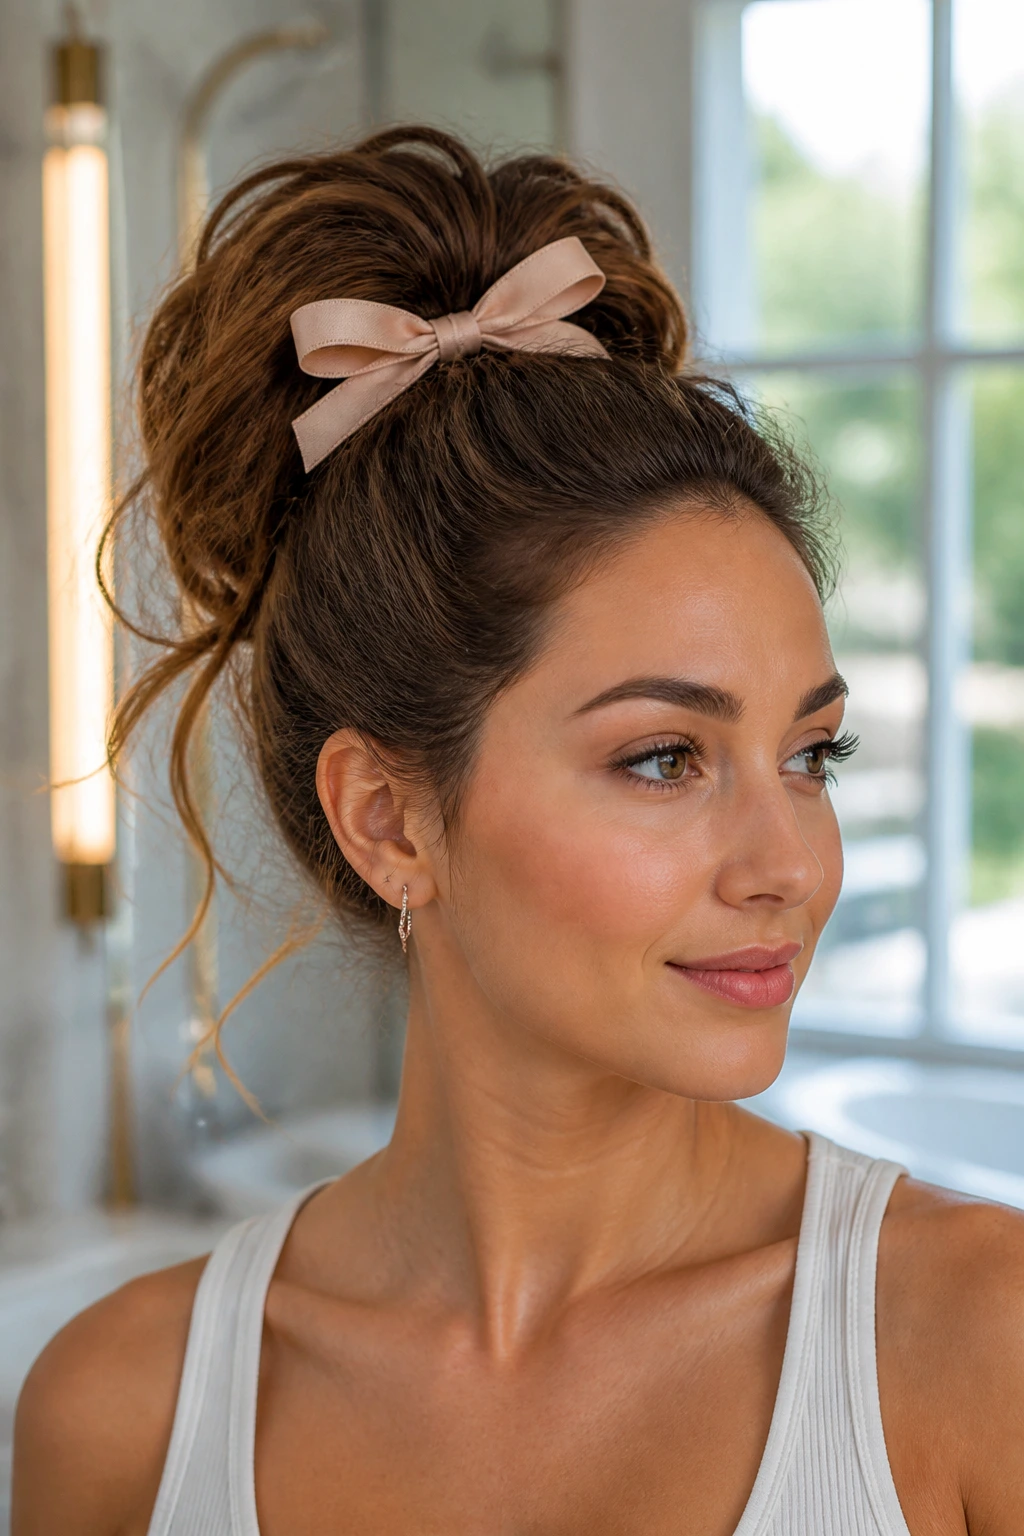
This style is fantastic for adding lift and volume to the top of your head. By tying a ribbon under your ponytail and bringing it up to tie at the front, you physically lift the ponytail upward, creating a beautiful, bouncy puff.
The ribbon acts as a sling, supporting the weight of the ponytail and keeping it from drooping throughout the day.
High Puff Guide
- Placement: Gather your hair into a very high ponytail, sitting just in front of your crown.
- Sling: Place the center of your ribbon at the nape of your neck, slide it upward behind your ears, and cross the ends over under the ponytail.
- Tying: Bring the ribbon ends up to the top of your head, just in front of the ponytail, and tie them into a neat bow.
- Teasing: Gently tease the ponytail hair with a comb to create a full, fluffy puff.
27. Sleek Low Bun with Criss-Cross Wrap
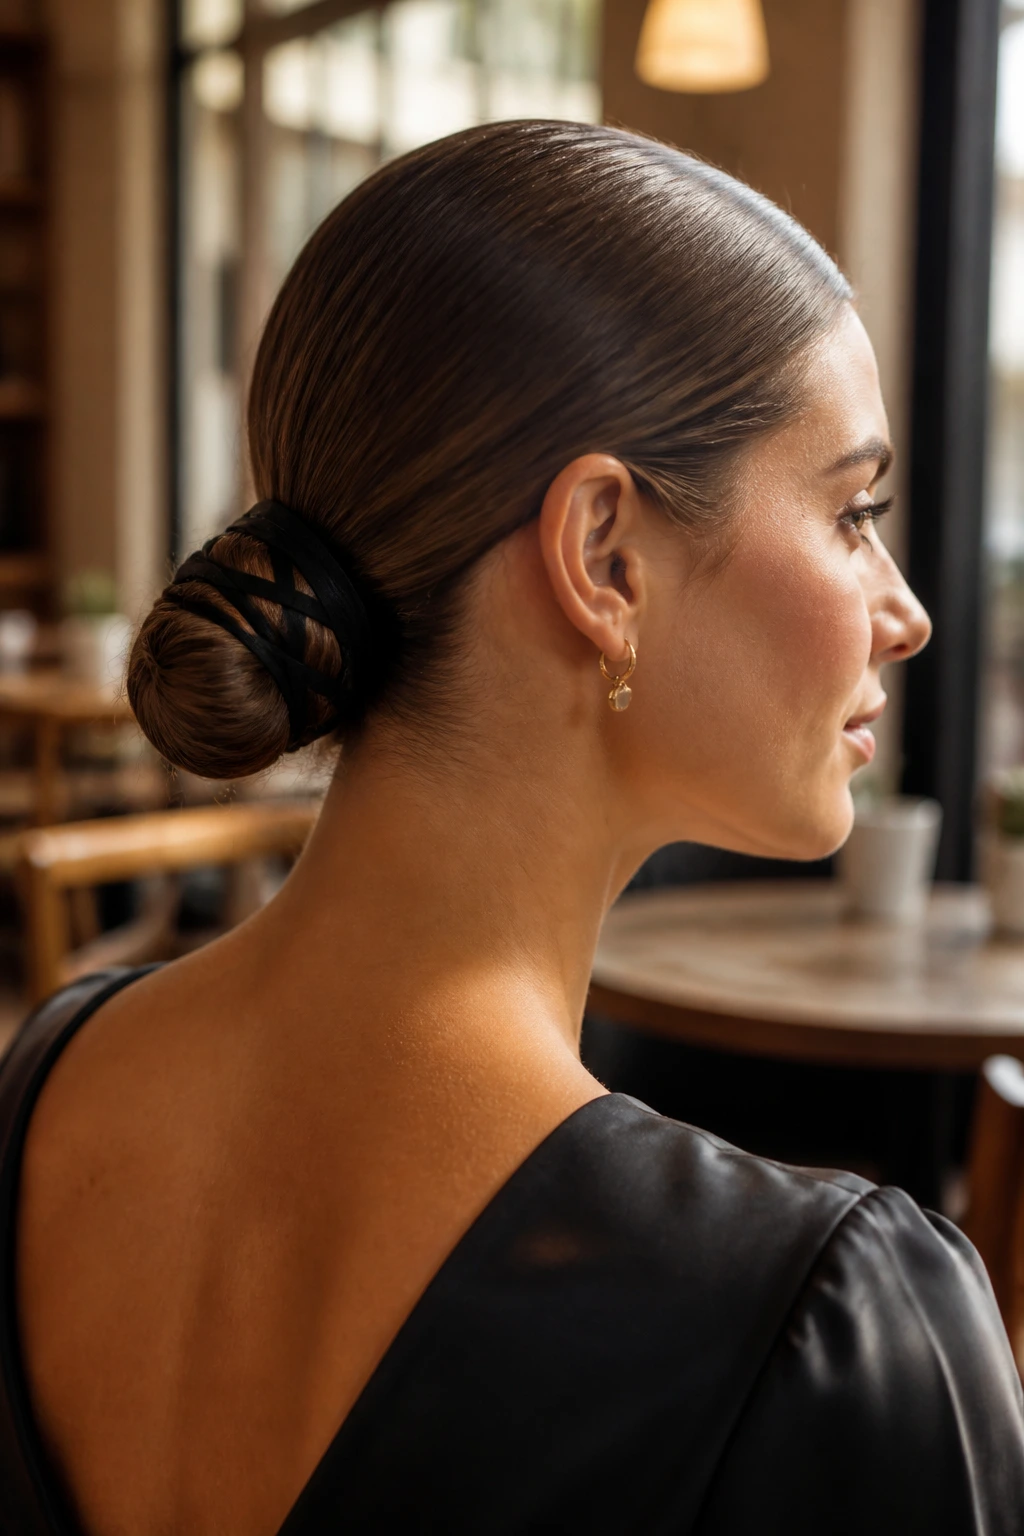
For a modern, architectural look, a criss-cross ribbon wrap is incredibly striking. It involves wrapping a thin ribbon in a criss-cross pattern around a sleek, low bun, creating a beautiful geometric design.
This style is perfect for fine hair because it embraces a sleek, neat finish rather than trying to create fake volume. It looks deliberate, modern, and highly polished.
Step-by-Step Instructions
- Smooth your hair back into a low, tight ponytail at the nape of your neck, using a light gel to tame any flyaways.
- Twist the ponytail tightly and wrap it into a neat, flat bun, securing it with pins.
- Tie a long, thin ribbon around the base of the bun.
- Cross the ribbon tails over the top of the bun, wrap them around the back, and tie them in a neat knot at the bottom.
28. Vintage Victory Rolls with Silk Bow Accent
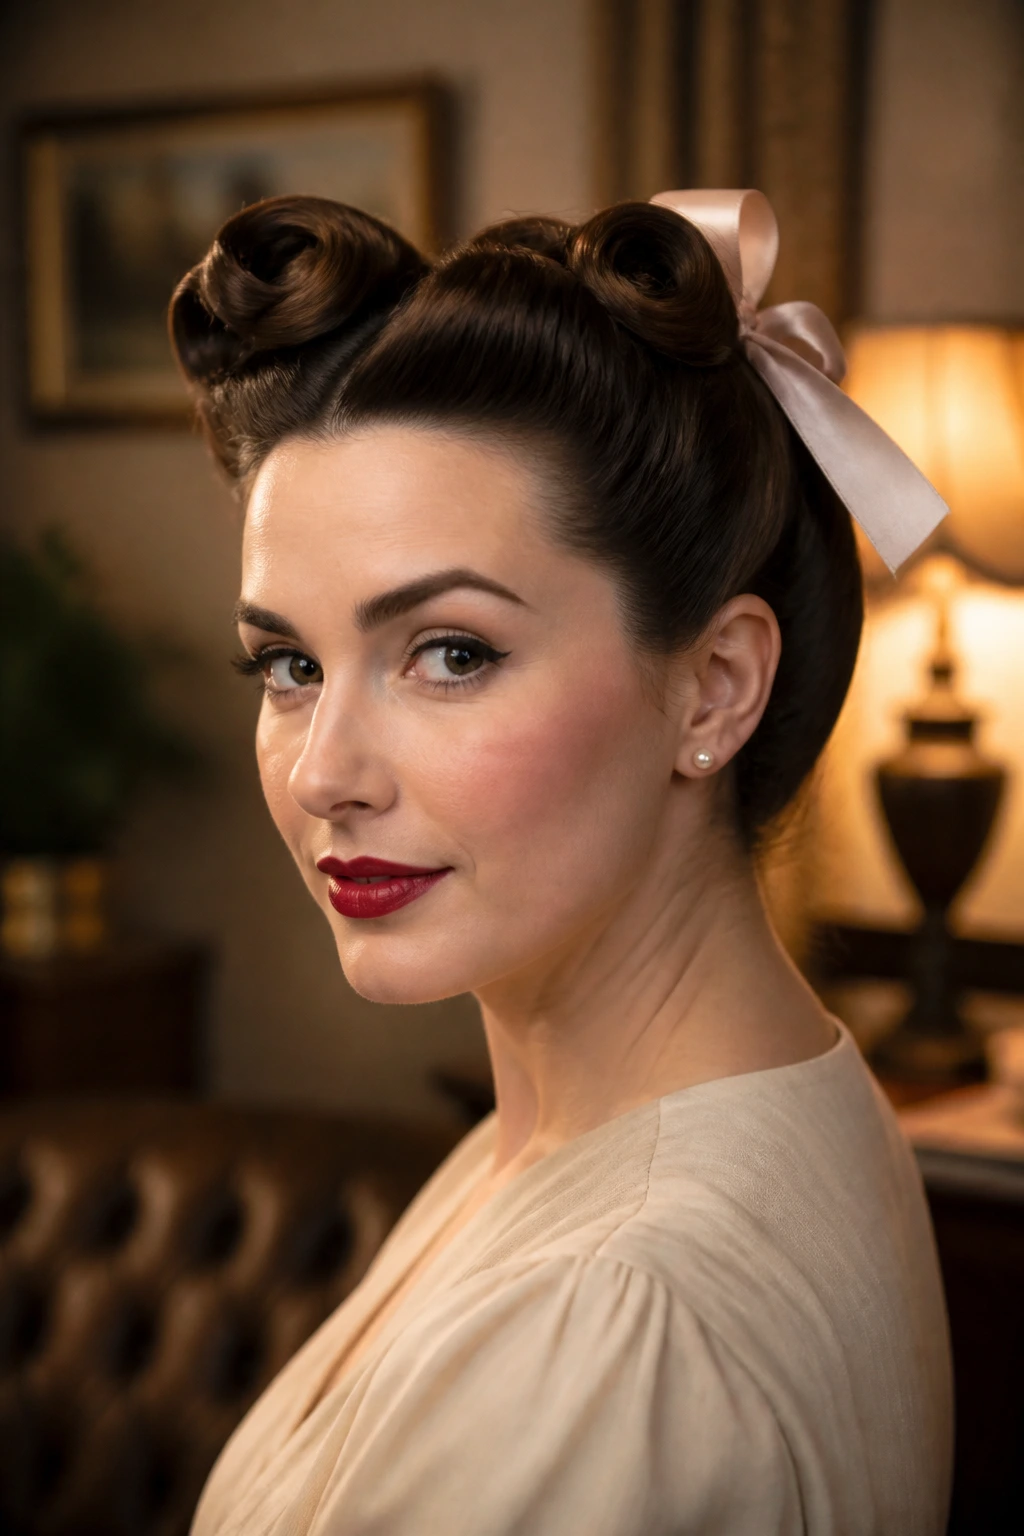
Victory rolls are a classic vintage style that is surprisingly effective for fine hair. The rolling technique creates massive volume at the front of your head, and a silk bow at the back adds a perfect finishing touch.
The rolls are essentially hollow tubes of hair, which means they use very little hair to create a large, structured shape. This makes them ideal for anyone with fine or thin strands.
Victory Roll Blueprint
- Create a deep side part and section off a two-inch-wide piece of hair along your front hairline.
- Hold this section straight up, spray it with hairspray, and backcomb the back of it gently.
- Wrap the ends of the hair around your fingers and roll the section down toward your head, creating a hollow roll.
- Pin the roll in place from the inside so the pins are hidden.
- Gather the remaining hair at the back into a neat bun or ponytail, and accent it with a silk bow.
Keeping Fine Hair Healthy Under Ribbons
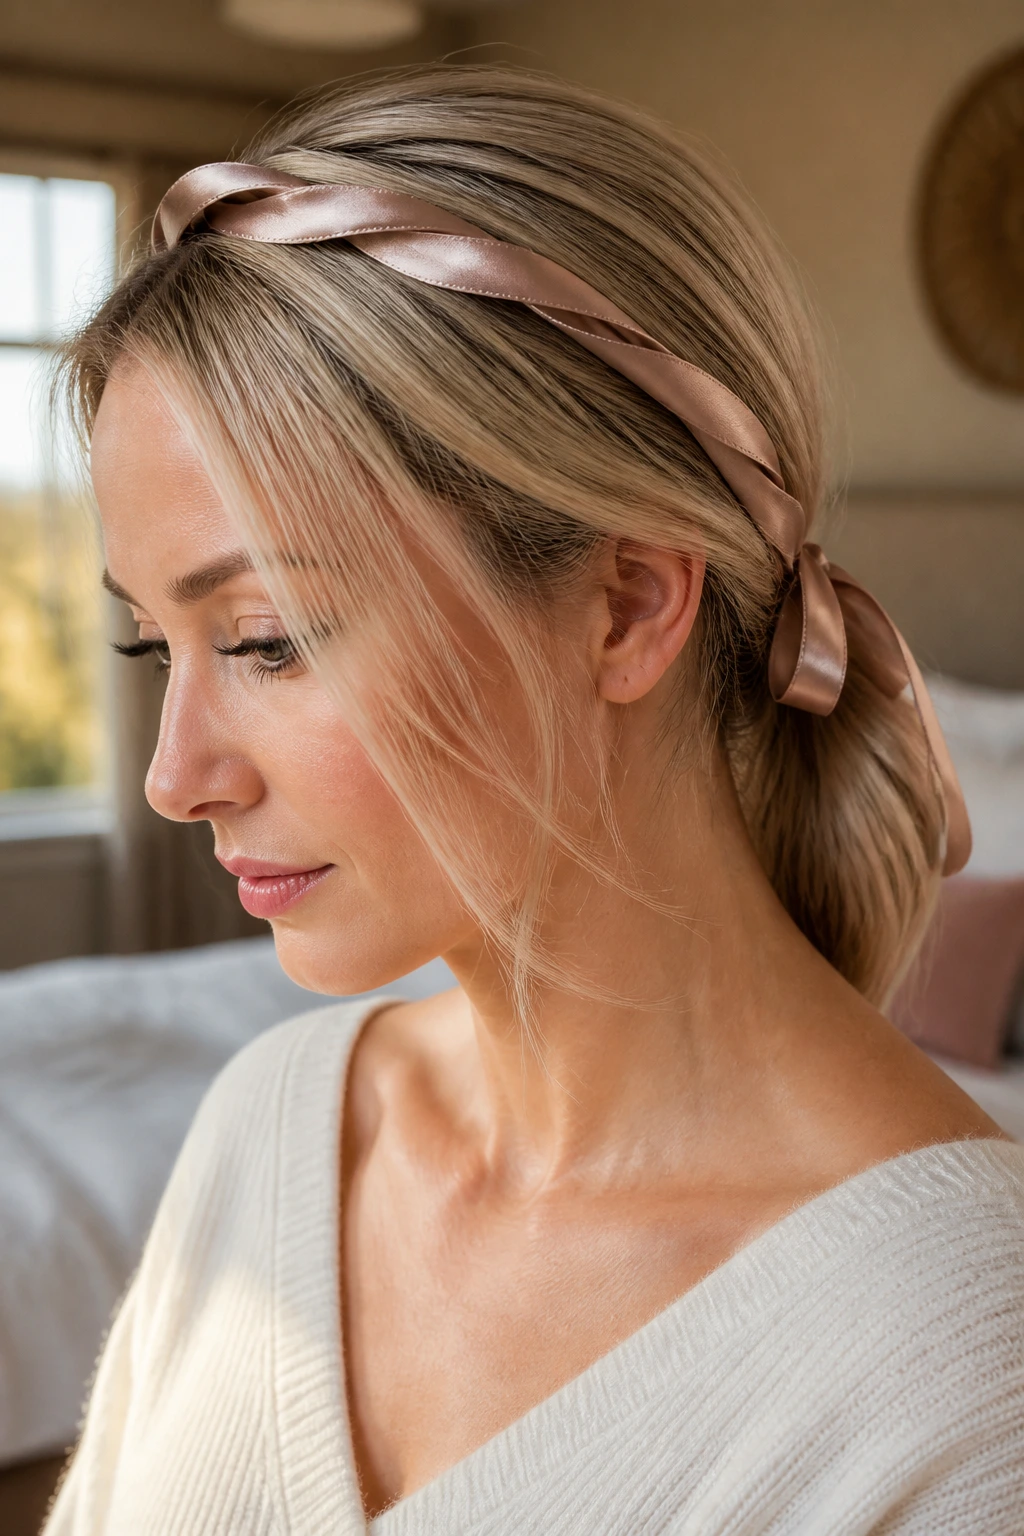
While ribbons are incredibly gentle compared to harsh metal clips or tight hair ties, they still require a little care to ensure they do not cause damage to your fine strands.
Always untie your ribbons gently at the end of the day. Never pull or yank a ribbon to get it out of your hair, as the friction can snag and snap delicate hair fibers. If you used a bobby pin as an anchor, remove the pin first before attempting to untie the ribbon.
When washing your ribbons, treat them like delicate clothing. Silk, velvet, and organza ribbons can be hand-washed in warm water with a drop of gentle shampoo, then laid flat to dry. This removes any buildup of hairspray or styling products, keeping the fabrics soft, clean, and ready for your next styling session.
