Braided headbands are the ultimate multitasker in the world of hair styling. They have a rare, chameleon-like quality that allows them to transition from a messy, just-out-of-bed morning look to a polished, professional appearance with nothing more than a few pins and a bit of practice. If you find your hair constantly falling into your eyes or if you simply need a way to keep your strands under control during a long day, a braided headband offers a structural solution that stays put while looking intentional. It is not just about keeping your hair back; it is about creating a frame for your face that feels secure and sophisticated.
Most people assume that creating these intricate-looking styles requires a professional stylist, but that is simply not true. You do not need expensive tools or advanced cosmetology training to master these looks. Whether your hair is thick, thin, curly, or stick-straight, there is a variation of the braided headband that will work for your hair type and length. The beauty of these styles is that they rely on your own hair as the accessory, which saves time, reduces heat damage from styling tools, and gives you a custom, organic finish that looks different every single time you braid it.
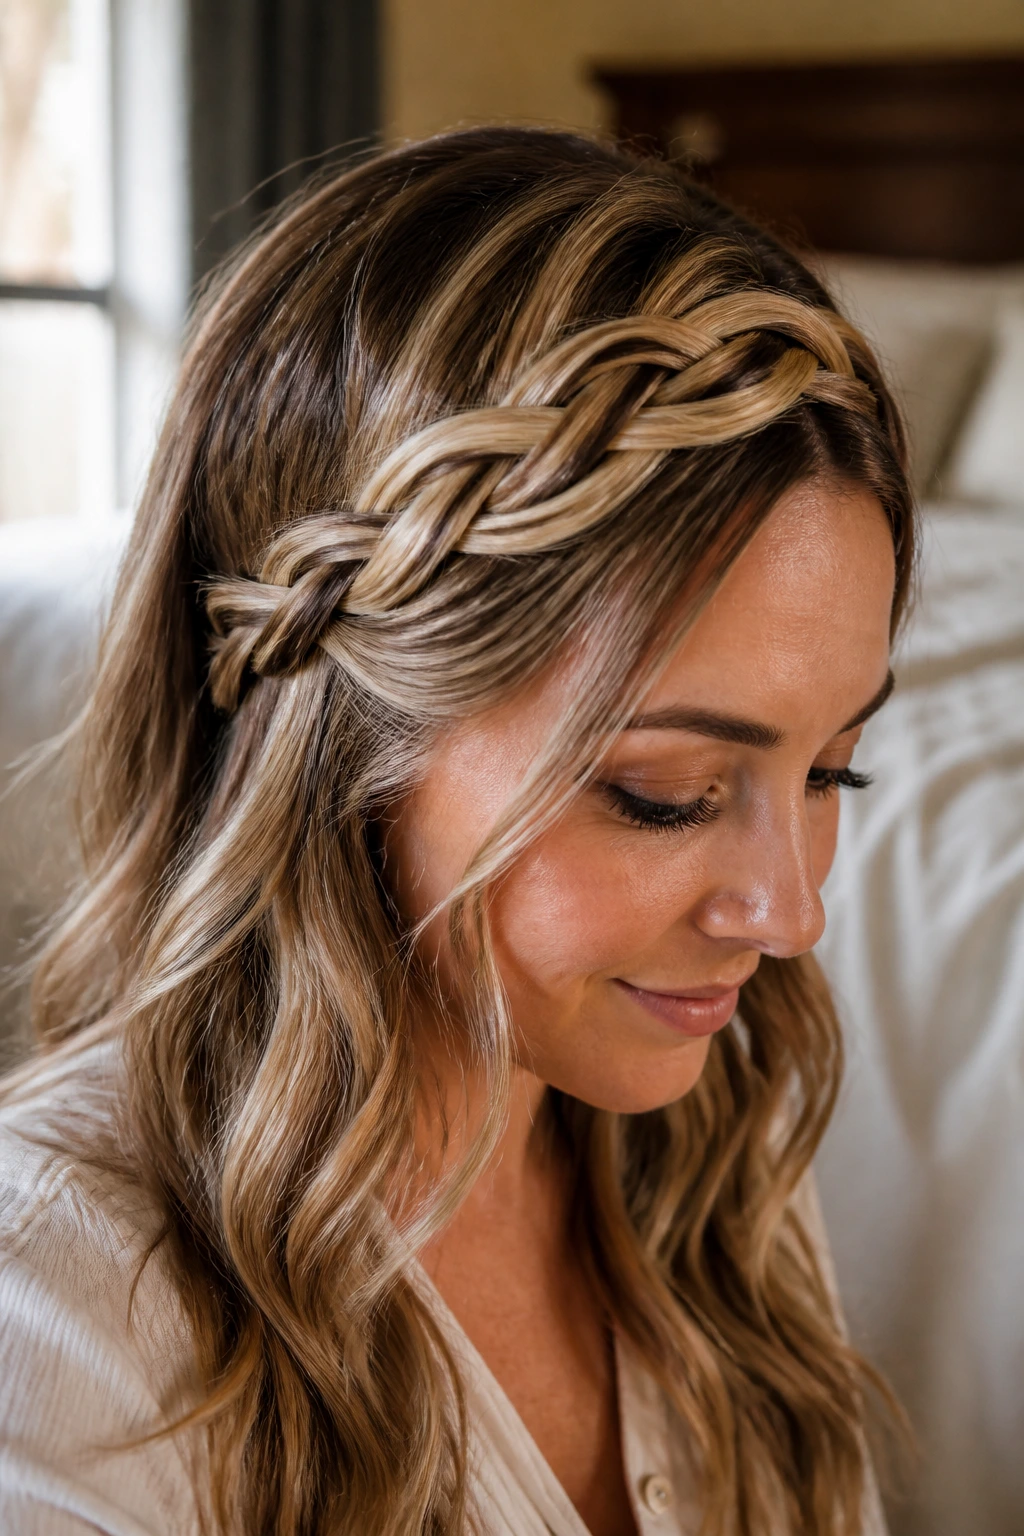
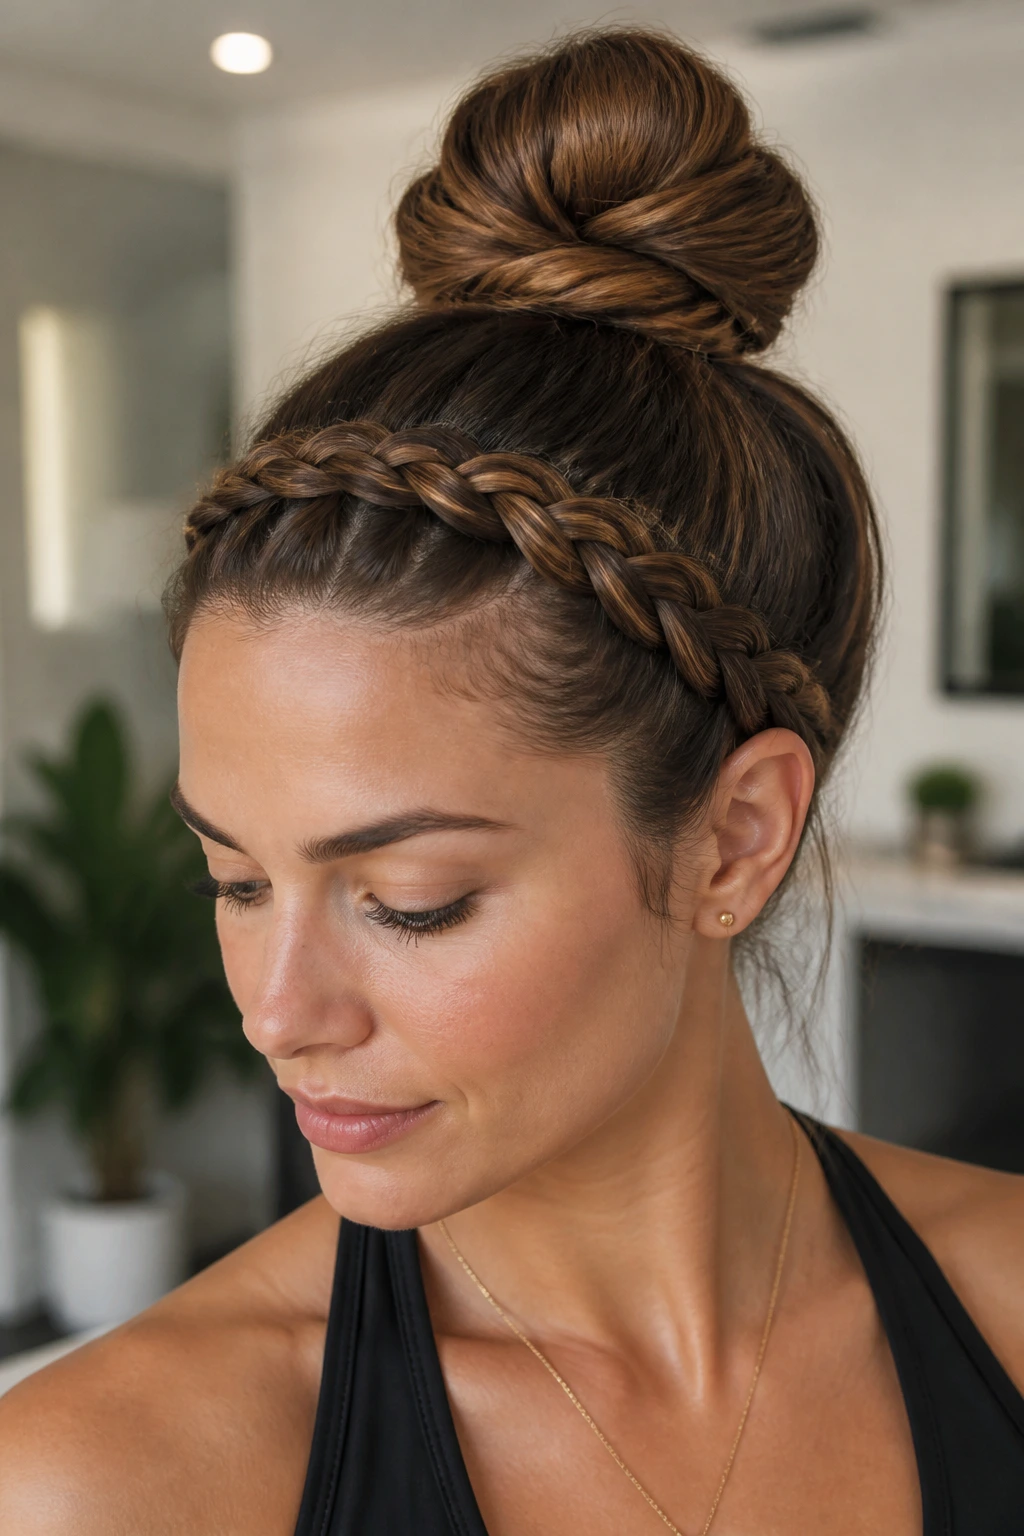
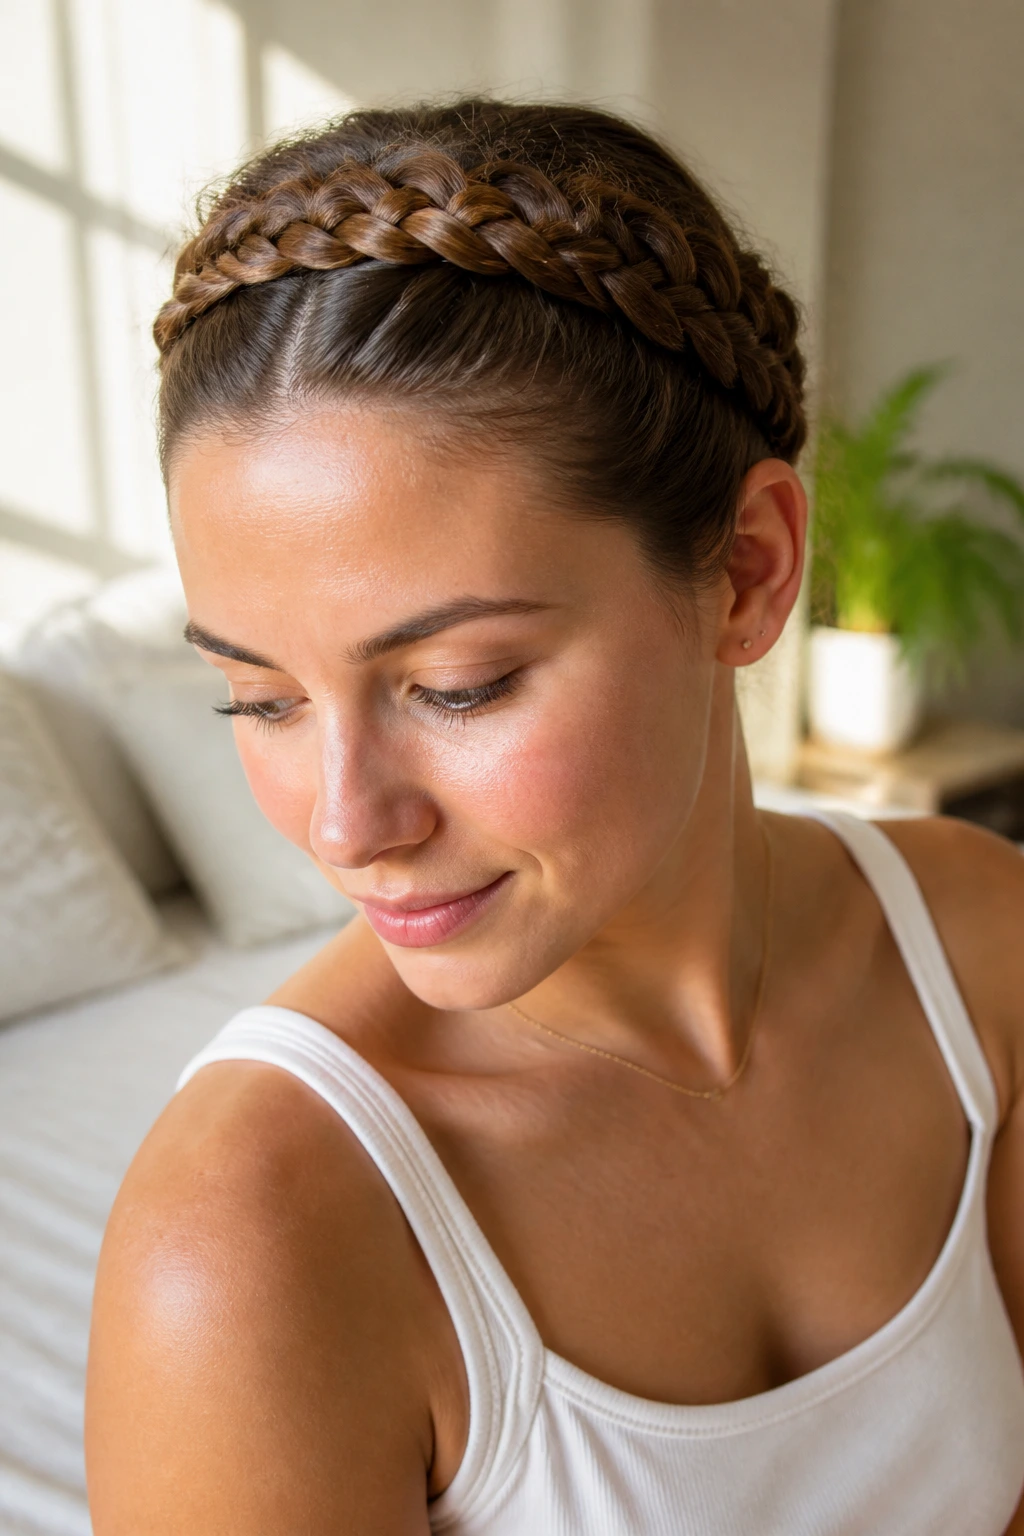
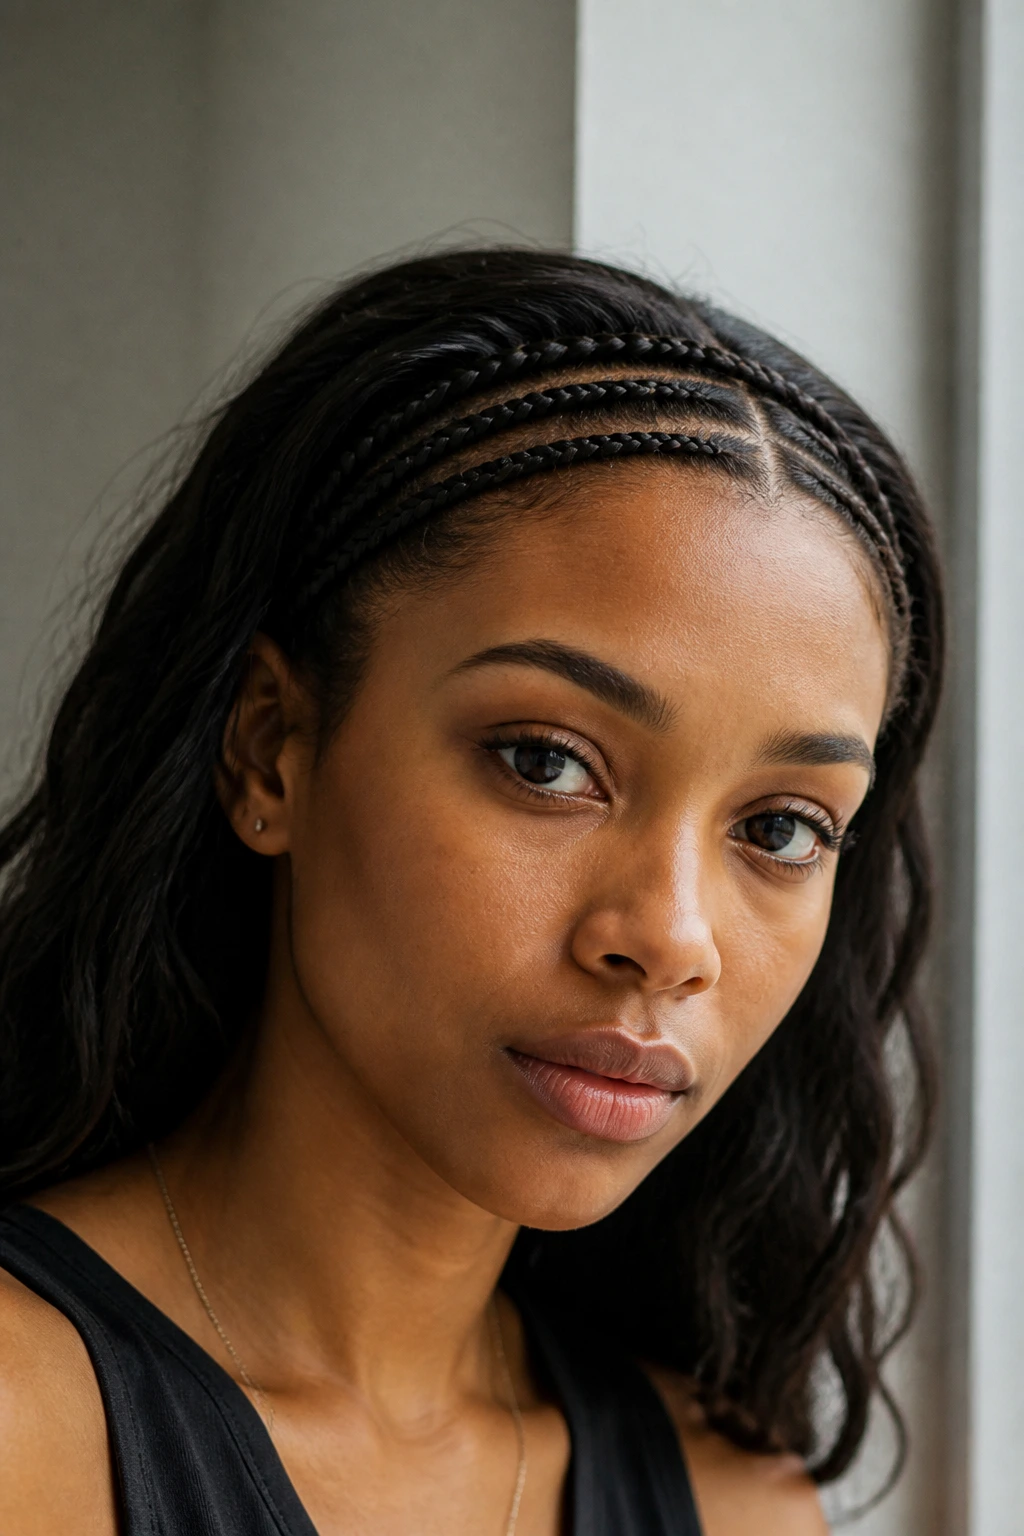
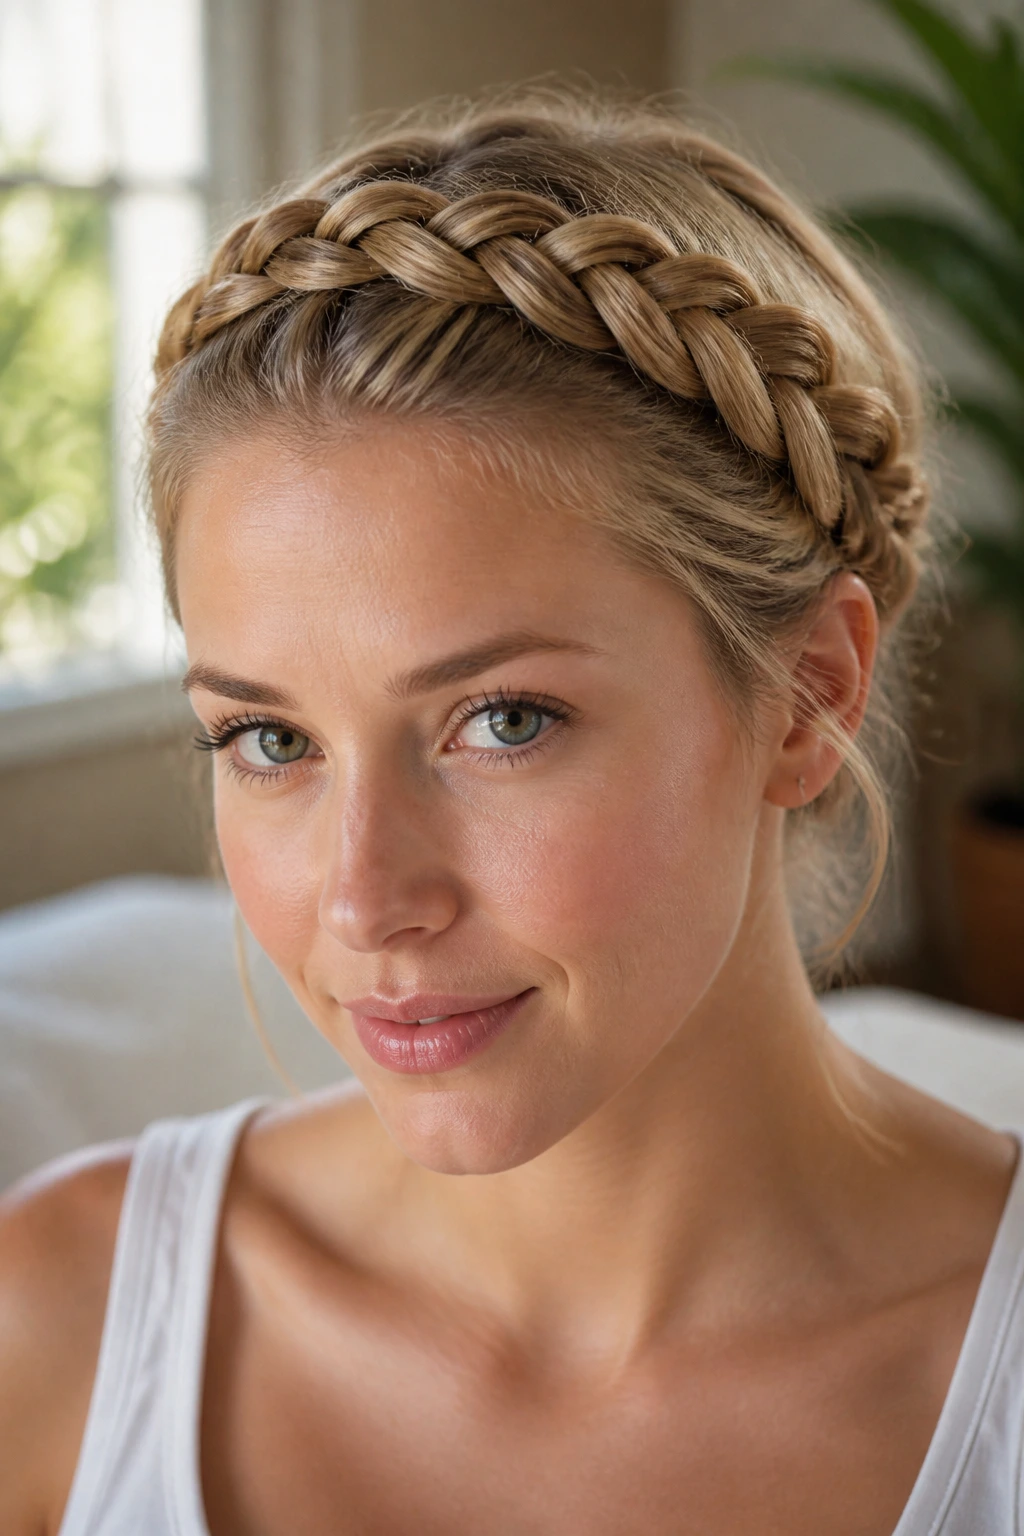
1. Classic Three-Strand Dutch Braid Headband
This is the foundational technique that every hair enthusiast should keep in their repertoire. Unlike a standard French braid, a Dutch braid sits on top of your head, creating a raised, 3D effect that gives the illusion of a thick, ornate headband. Because it sits high, it stays firmly in place regardless of how active your day is.
Why It Works for Daily Wear
The Dutch technique pulls hair tight against the scalp, creating a level of structural security that is hard to achieve with other styles. It is perfect for gym sessions, long commutes, or days when you know you will be constantly on the move. Once you master the tension, this braid can be completed in less than five minutes.
The Mechanics of the Braid
- Begin by parting your hair as you normally would, then isolate a 2-inch section of hair near your hairline from ear to ear.
- Clip the rest of your hair back to prevent stray strands from getting in your way while you work.
- Start at one temple, dividing that small section into three equal parts.
- Instead of crossing the strands over, pass them under the center strand, adding a small piece of hair from the surrounding area each time you cross.
- Continue this pattern until you reach the opposite ear, then secure the tail with a clear elastic.
Pro tip: Once you reach the end, gently pull at the outer loops of the braid—a technique known as “pancaking”—to make the headband appear wider and more voluminous.
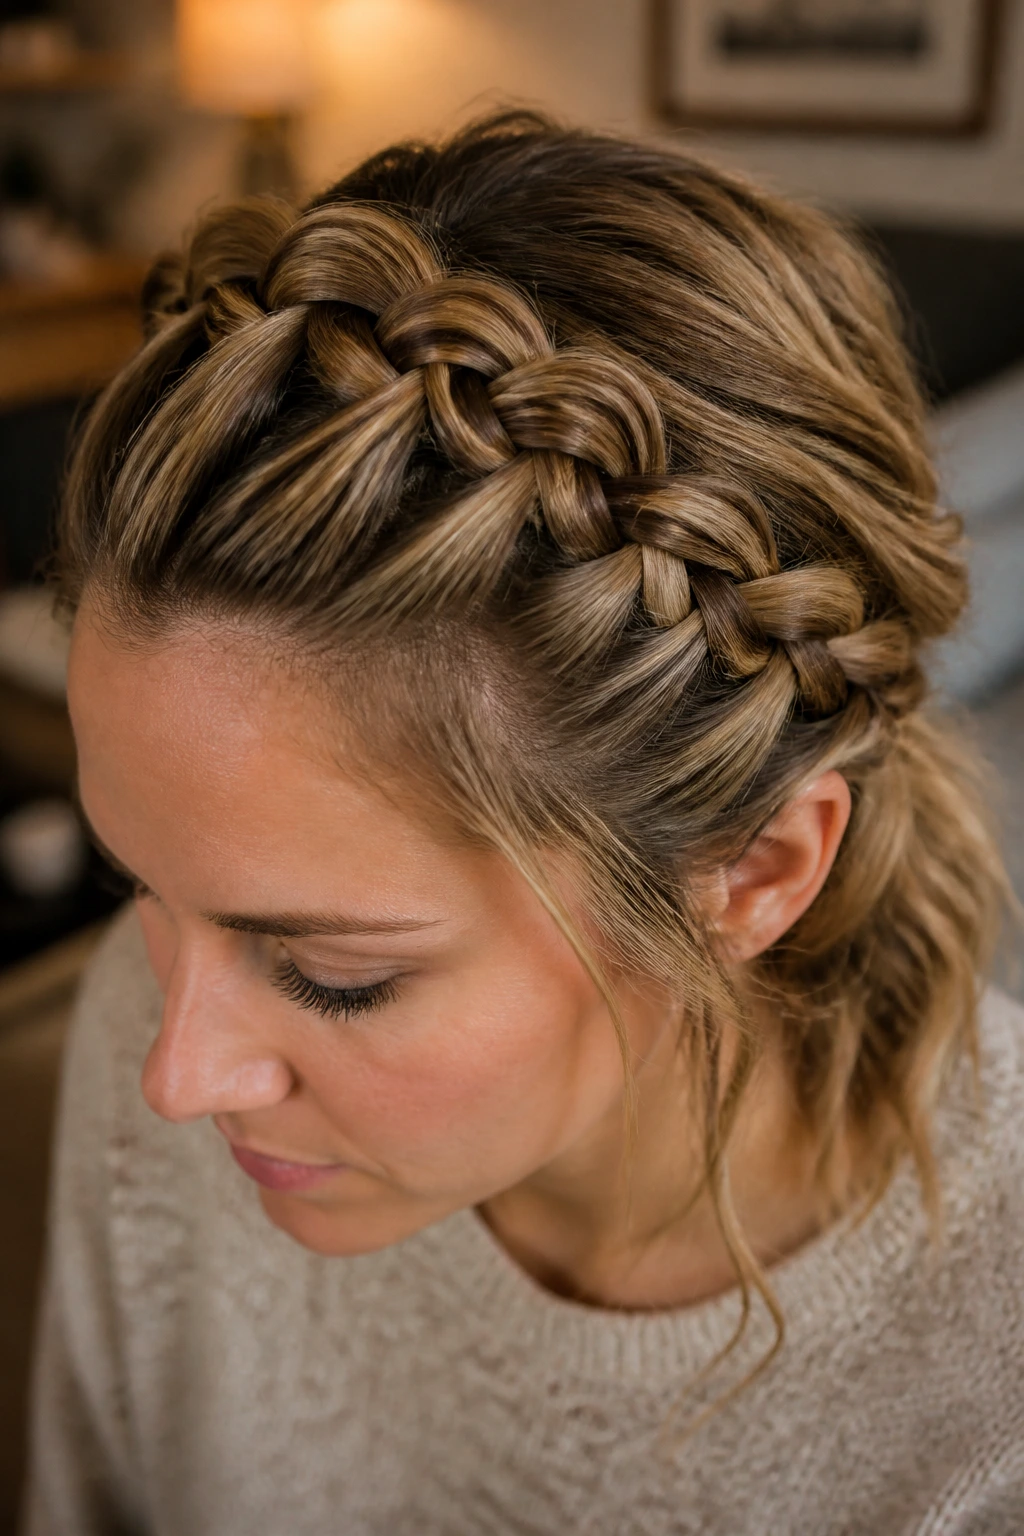
2. Twisted Rope Headband for Fine Hair
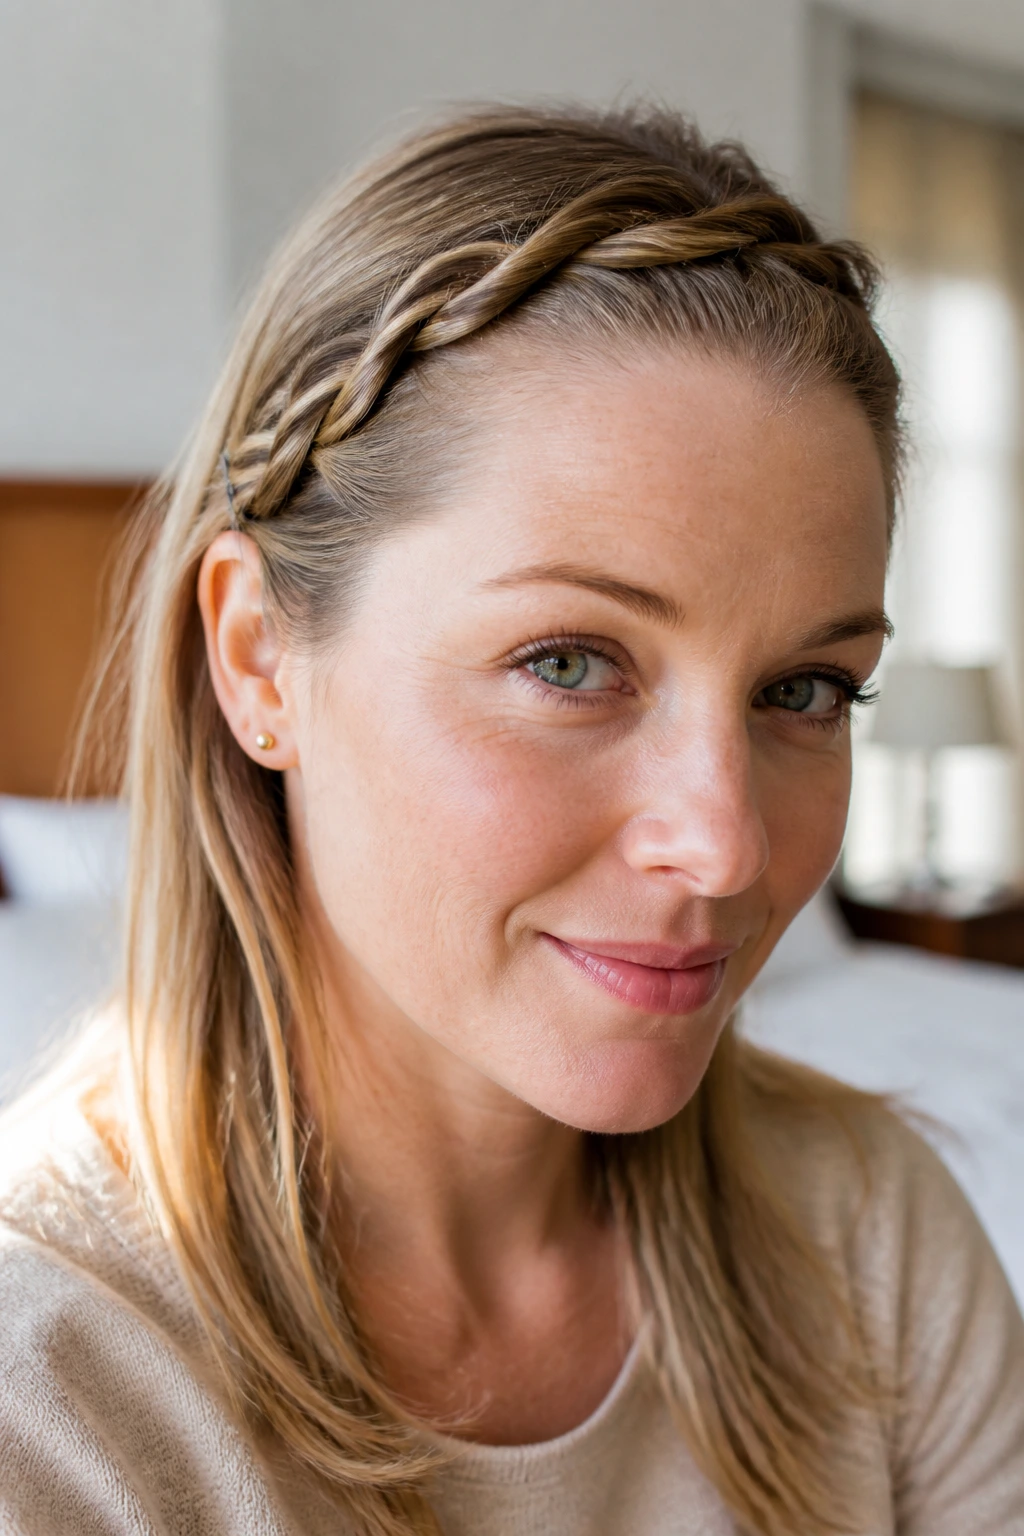
If you struggle with thin hair that slips out of traditional tight braids, the rope twist is a much more forgiving alternative. It mimics the look of a rope and relies on tension between two strands rather than a complex weave, which is much easier to manage when you are working in front of a mirror.
The Ease of the Twist
Rope twists are significantly faster than braids. They do not require a deep understanding of three-part weaving, meaning they are less prone to looking messy if you do not get the tension perfectly even. For fine hair, the twist provides enough grip to stay put without needing an excessive amount of hairspray.
How to Execute the Look
- Divide a section of hair from your front hairline into two equal pieces.
- Twist each piece individually to the right.
- Once twisted, wrap them around each other to the left, repeating this pattern as you travel across your forehead.
- Add small, thin sections of hair into the mix as you go, just like you would with a Dutch braid.
- Secure the end behind your ear with a discreet bobby pin that matches your hair color, tucking the tail under the loose hair.
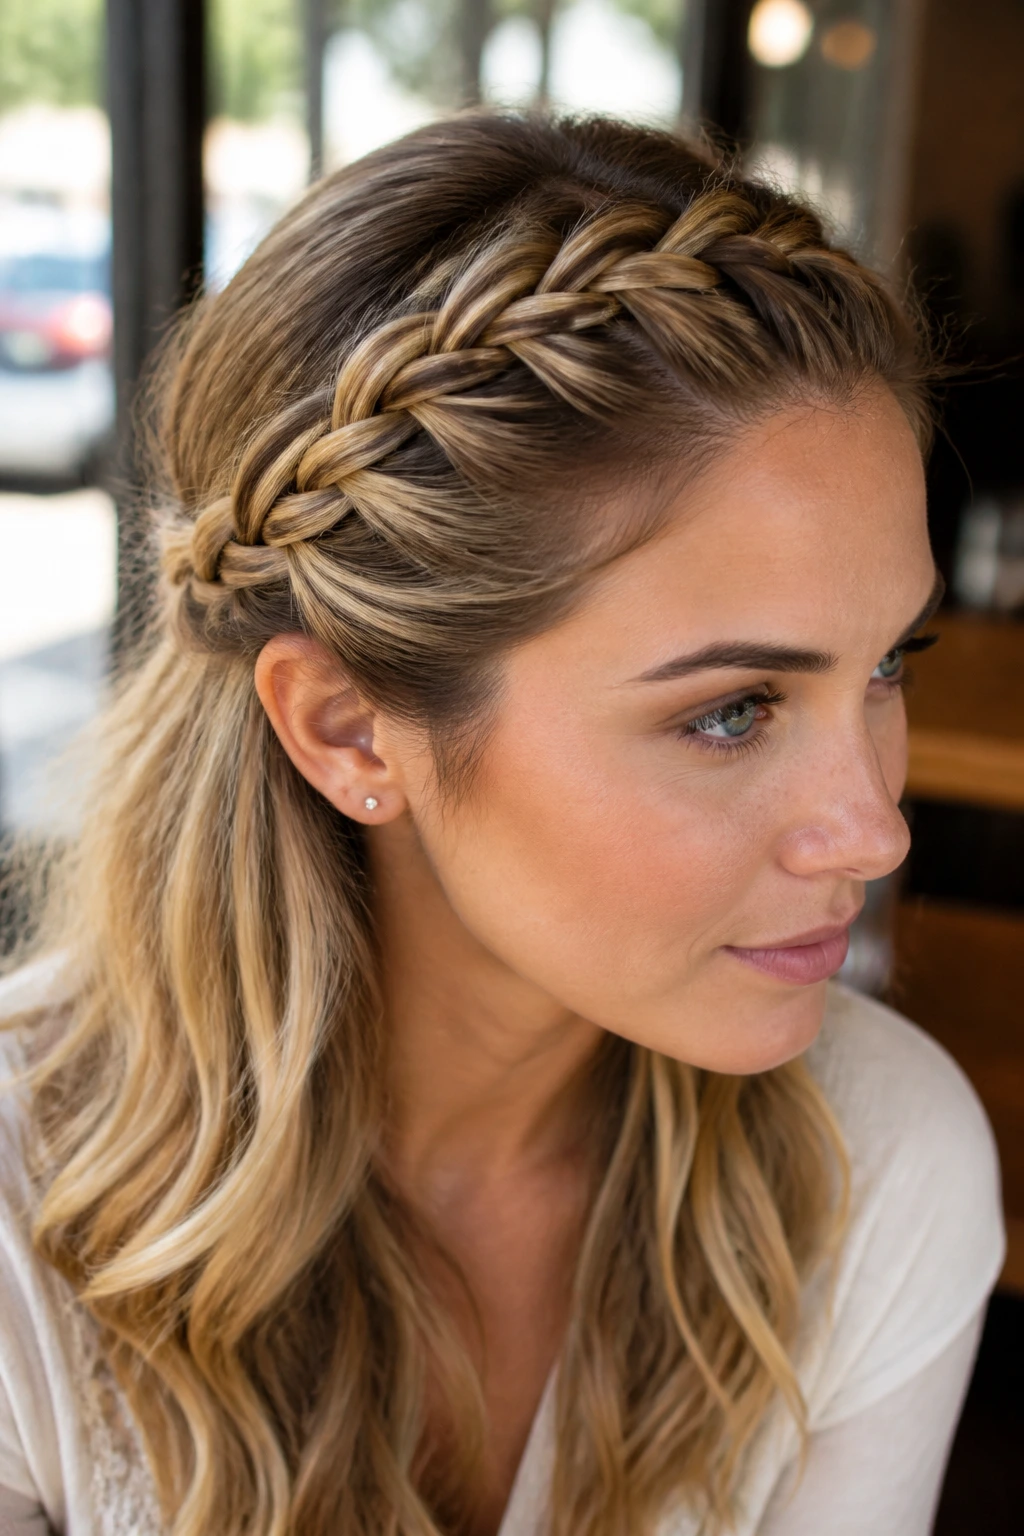
3. Double-Braided Headband for Added Volume
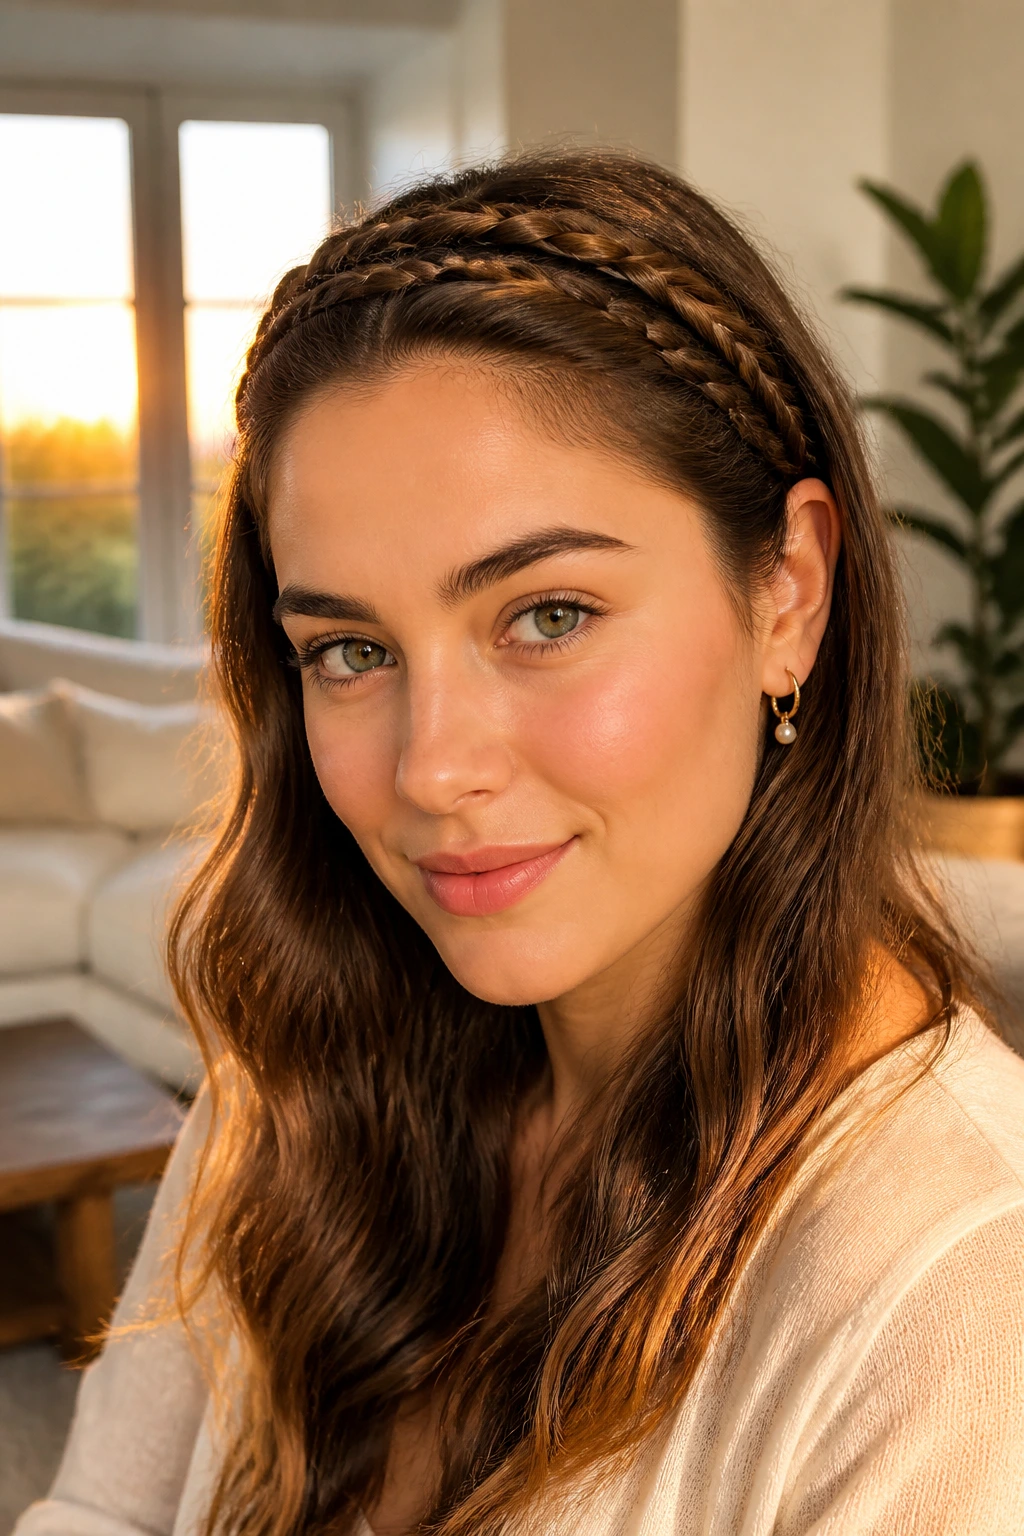
Sometimes one braid just does not provide the impact you want. By creating two thinner braids side-by-side, you achieve a layered, bohemian look that feels much more elaborate than it actually is. This style is especially useful for those with layers that are too short to fit into a single, thicker braid.
Why This Style Stays Secure
Using two separate braids distributes the weight of the hair more evenly. If one braid starts to loosen throughout the day, the second one acts as a backup, keeping your hairline smooth. This is a common choice for those with bangs, as the two braids can catch different lengths of fringe that wouldn’t hold in a single, larger section.
Getting the Two-Layered Look
- Create a horizontal part one inch back from your front hairline.
- Braid the front section into a classic three-strand braid and pin it behind your ear.
- Create a second, identical braid immediately behind the first one.
- Instead of pulling them tight against each other, leave a slight gap between the two for a “stacked” appearance.
- Use a small amount of texturizing spray on your fingers before you start, which will give the hair the grip it needs to keep those two braids distinct and defined.
4. The Half-Up Bohemian Headband

This is a softer, more romantic take on the headband braid. It involves braiding the front sections but leaving the majority of your hair flowing down, making it an excellent choice for a casual workday or a relaxed evening out. It feels less like a structured “up-do” and more like a loose, natural accent.
When to Choose This Style
This is the best option if you feel that pulling all your hair back makes your face feel too exposed. By maintaining the volume of your loose hair, you get the functional benefit of a headband without sacrificing the flattering framing effects of your natural length. It works beautifully on both wavy and straight textures.
Simple Steps to Success
- Section off the top portion of your hair from the temples upward.
- Braid both sides toward the back of your head, essentially creating two “headband” pieces that meet at the crown.
- Instead of braiding all the way down, tie both braids together at the back of your head using a thin, clear elastic.
- If you have any remaining hair at the ends of the braids, you can either tuck them under the elastic or leave them loose to blend into the rest of your hair.
- Use a curling wand on the ends of your loose hair to harmonize the look with the braids.
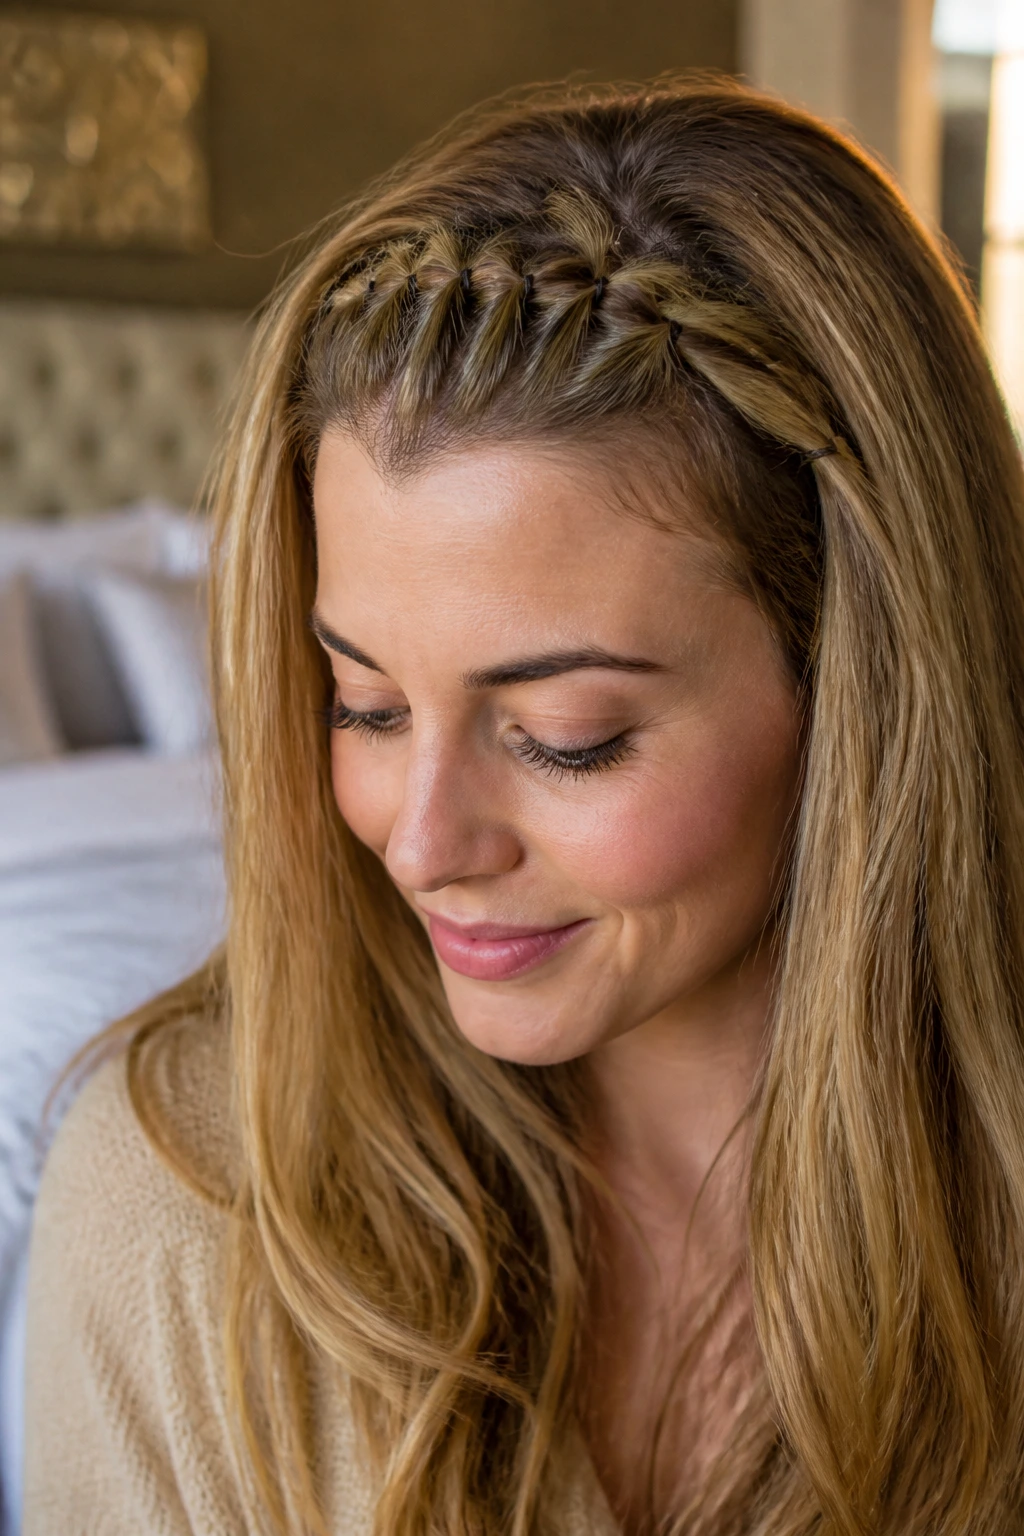
5. Reverse Fishtail Headband
A fishtail braid has a unique, intricate look that feels much more complex than it is. When applied as a headband, it sits beautifully against the hairline, providing a tight, clean look that is perfect for professional settings where a messy bohemian braid might feel too informal.
The Durability Factor
Fishtail braids are incredibly dense. Because you are only moving very small sections of hair at a time, the braid is physically tighter than a standard braid. This makes it resistant to humidity and movement, ensuring your hair stays exactly where you want it until you decide to take it out.
Mastering the Fishtail
- Take a small section of hair near your left ear and divide it into two parts.
- Pull a tiny strand from the outside of the left section and cross it over into the right section.
- Repeat the process from the right side, crossing a tiny strand into the left.
- Continue this, moving slowly across your hairline to the opposite side.
- Critical note: Keep your fingers close to your scalp to maintain tension. The closer you stay to your skin, the cleaner the resulting “headband” will look.
6. Messy Fishtail Headband with Wisps
If you prefer a lived-in, effortless aesthetic, the messy fishtail is your best friend. This style leans into the imperfections, using loose strands to frame the face. It is ideal for days when your hair has a bit of natural texture or second-day grit, which actually helps the style hold.
The Appeal of the Messy Look
There is an undeniable charm to a style that looks like it wasn’t labored over. By intentionally pulling out small wisps near the temples and ears, you soften the harshness of a tight braid. This makes it a great transition style for someone moving from a daytime meeting to a casual dinner.
Creating the Effortless Finish
- Follow the same steps as the standard fishtail headband, but don’t worry about keeping it perfectly tight or uniform.
- Once the braid is secure, take the handle of a rat-tail comb and gently pull at the sides of the braid to create texture.
- Shake your head slightly to encourage natural fall.
- Spray a small amount of dry shampoo or texturizing mist over the top of the head to give the wisps a matte, soft look.
- If the braid feels like it’s slipping, use a matte bobby pin that matches your hair color, inserting it upward through the braid to anchor it to the scalp.
7. The Knotted Headband Braid
The knotted headband uses a series of loops rather than a standard weave. It creates a bold, architectural look that stands out, especially on people with highlighted or multi-toned hair, as the knots show off different colors in the strands more effectively than a standard braid.
Why This Stands Out
Most people gravitate toward traditional braids, which makes the knotting technique look unique and unexpected. It gives your hair a slightly more elevated, “designed” appearance. Despite looking complex, it requires nothing more than looping and pulling, making it a great alternative for those who find the dexterity of braiding difficult.
How to Knot Your Hair
- Pull a section of hair from your hairline as if you were starting a braid.
- Instead of weaving, tie the strand into a loose knot, adding new hair into the knot with every step.
- The key is to keep the knots relatively loose so the pattern is visible.
- Secure the entire structure with a small, clear elastic at the end.
- Use your fingers to fluff the knots gently to make them look more rounded and pronounced.
8. Side-Part Headband Braid
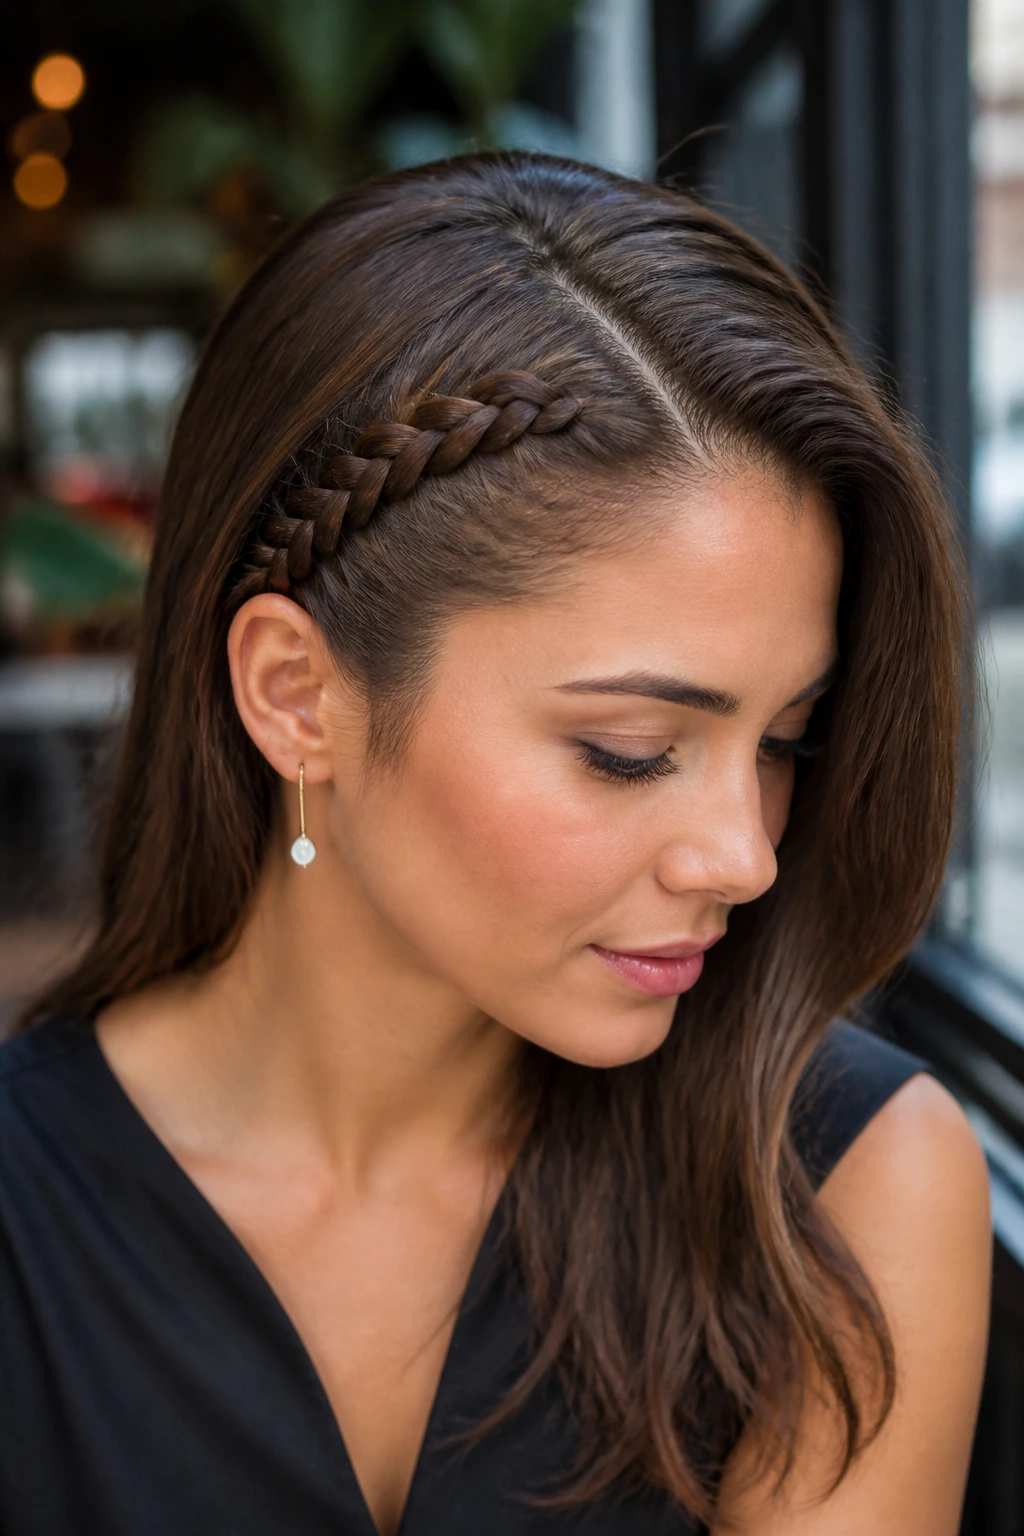
For those who prefer a deep side part, a headband braid can be adapted to follow the curve of the hairline. This creates an asymmetrical look that is very flattering, as it draws attention to one side of the face while keeping the other side perfectly controlled and smooth.
The Asymmetrical Advantage
A side-part braid works well for those with long, sweeping bangs. It allows you to incorporate your bangs into the braid, which effectively gets them out of your face while maintaining the style you prefer. It is a sophisticated way to manage hair that usually falls in your eyes.
Steps for an Asymmetrical Style
- Create a deep side part and start your braid from the side with more hair.
- Follow the natural arc of your hairline as you braid, moving toward the side with less hair.
- Once you reach the opposite temple, secure the braid behind the ear.
- You can tuck the tail behind the ear and cover it with the rest of your loose hair to hide the elastic.
- Use a small amount of smoothing cream to manage any flyaways along the part, ensuring the transition from your hair to the braid looks seamless.
9. Waterfall Headband Braid
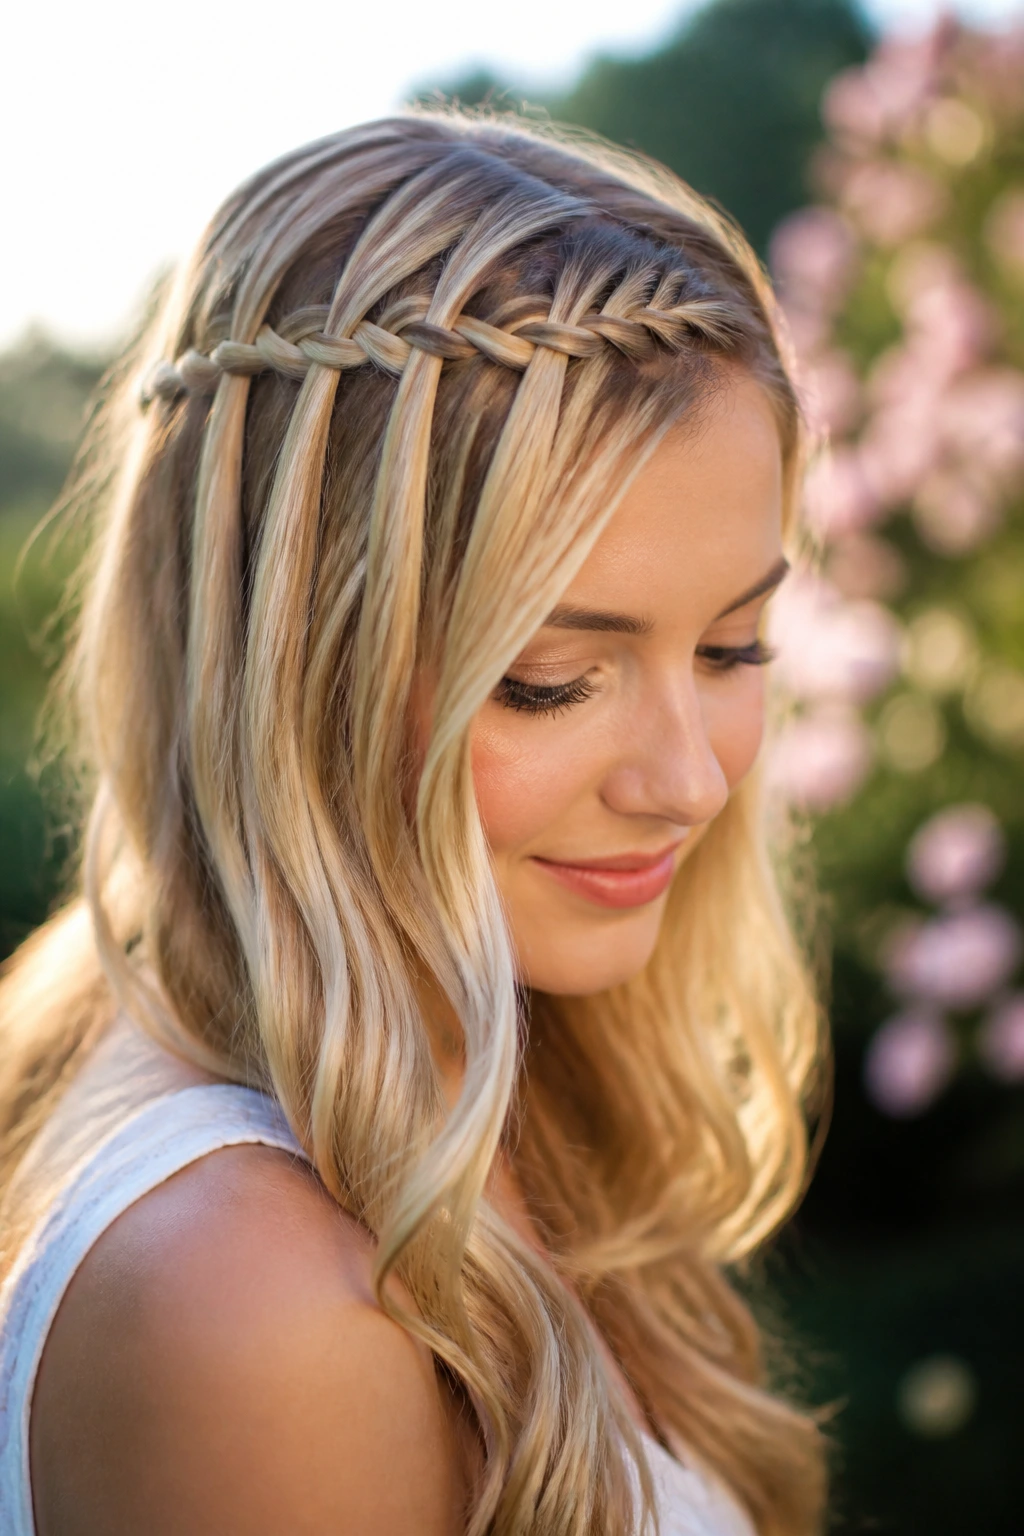
This is perhaps the most delicate style on this list. A waterfall braid involves dropping one strand of the braid down after every crossover, creating a cascading effect. When used as a headband, it looks like a soft, flowing crown of hair across your forehead.
Where to Use This Style
This style is less about total control and more about aesthetics. Because it leaves sections of hair loose, it isn’t the most “secure” option for high-intensity activity, but it is unrivaled for events or casual days where you want your hair to look ethereal and light.
The Cascading Technique
- Start braiding at the temple with three small strands.
- As you cross the strands, drop the bottom strand and pick up a new piece of hair from the top.
- Continue this “drop and pick up” method as you travel across the head.
- The result will be a row of braids with strands of hair “flowing” through them.
- Pin the end of the braid discreetly behind your ear and use a light-hold hairspray to keep the cascading strands from tangling with the rest of your hair.
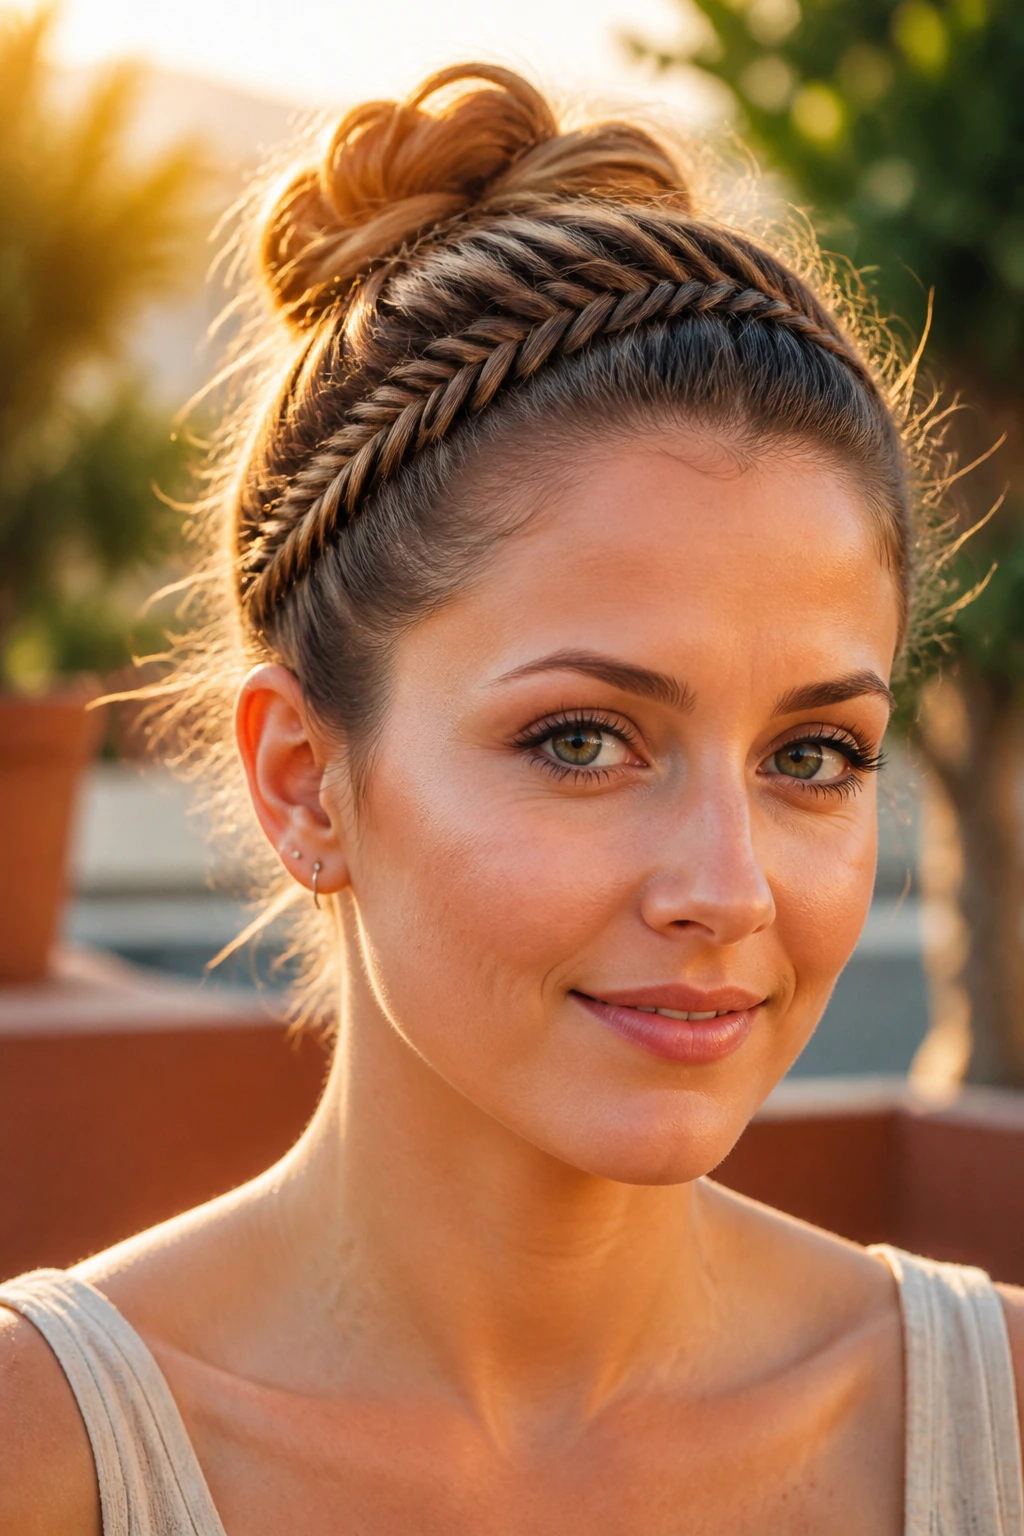
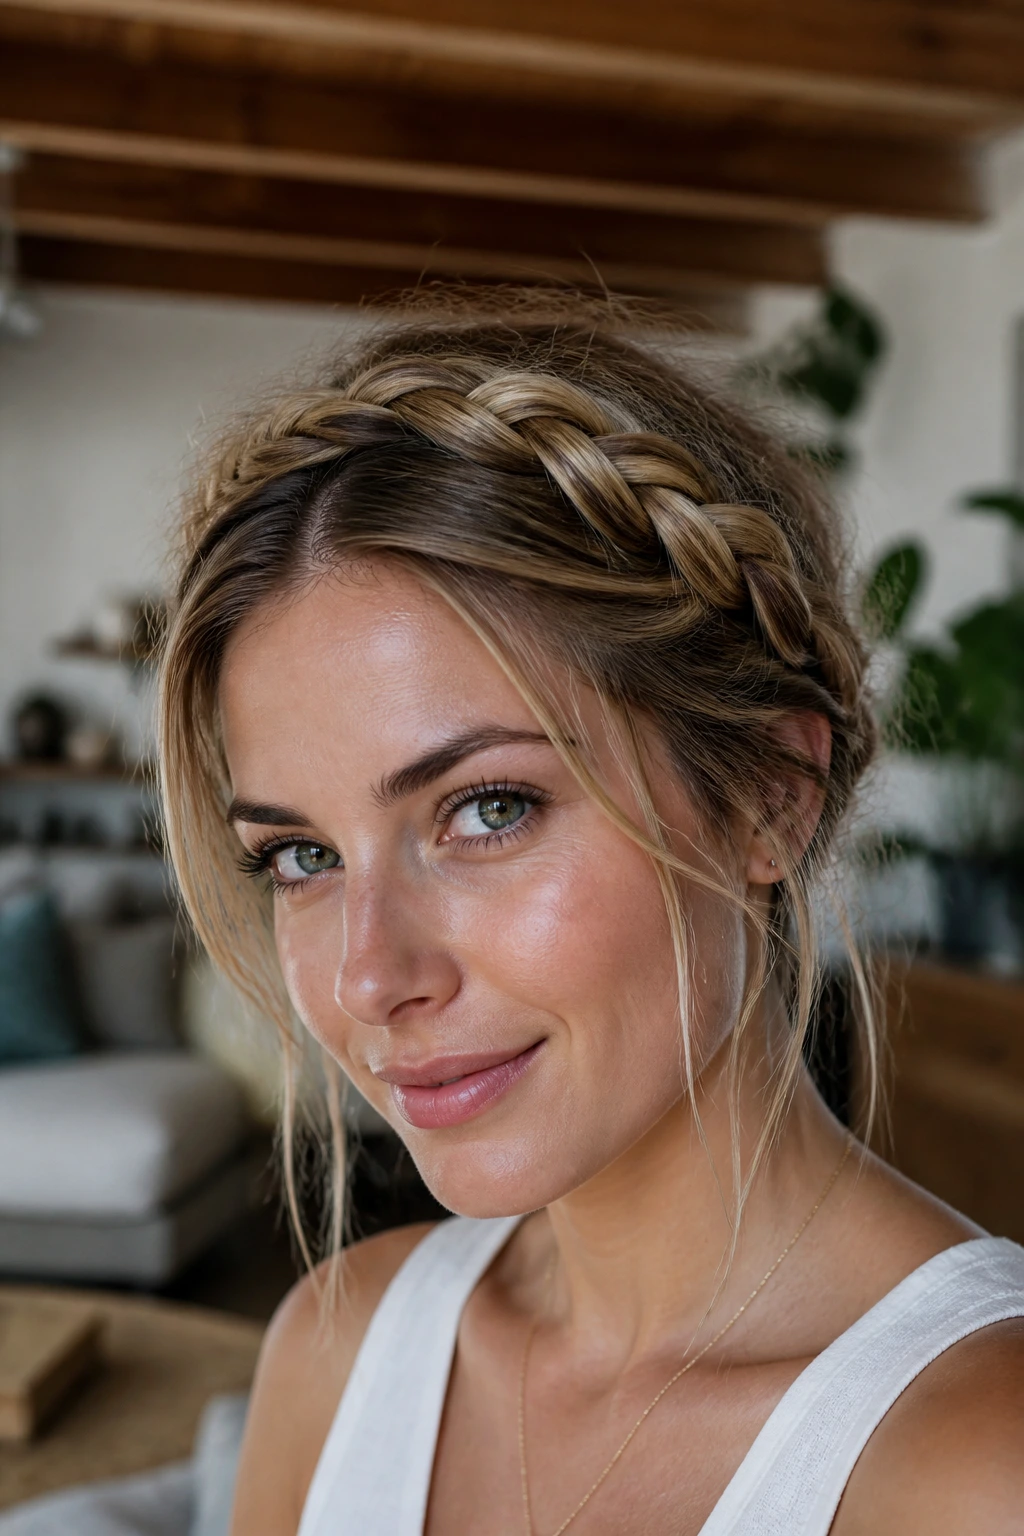
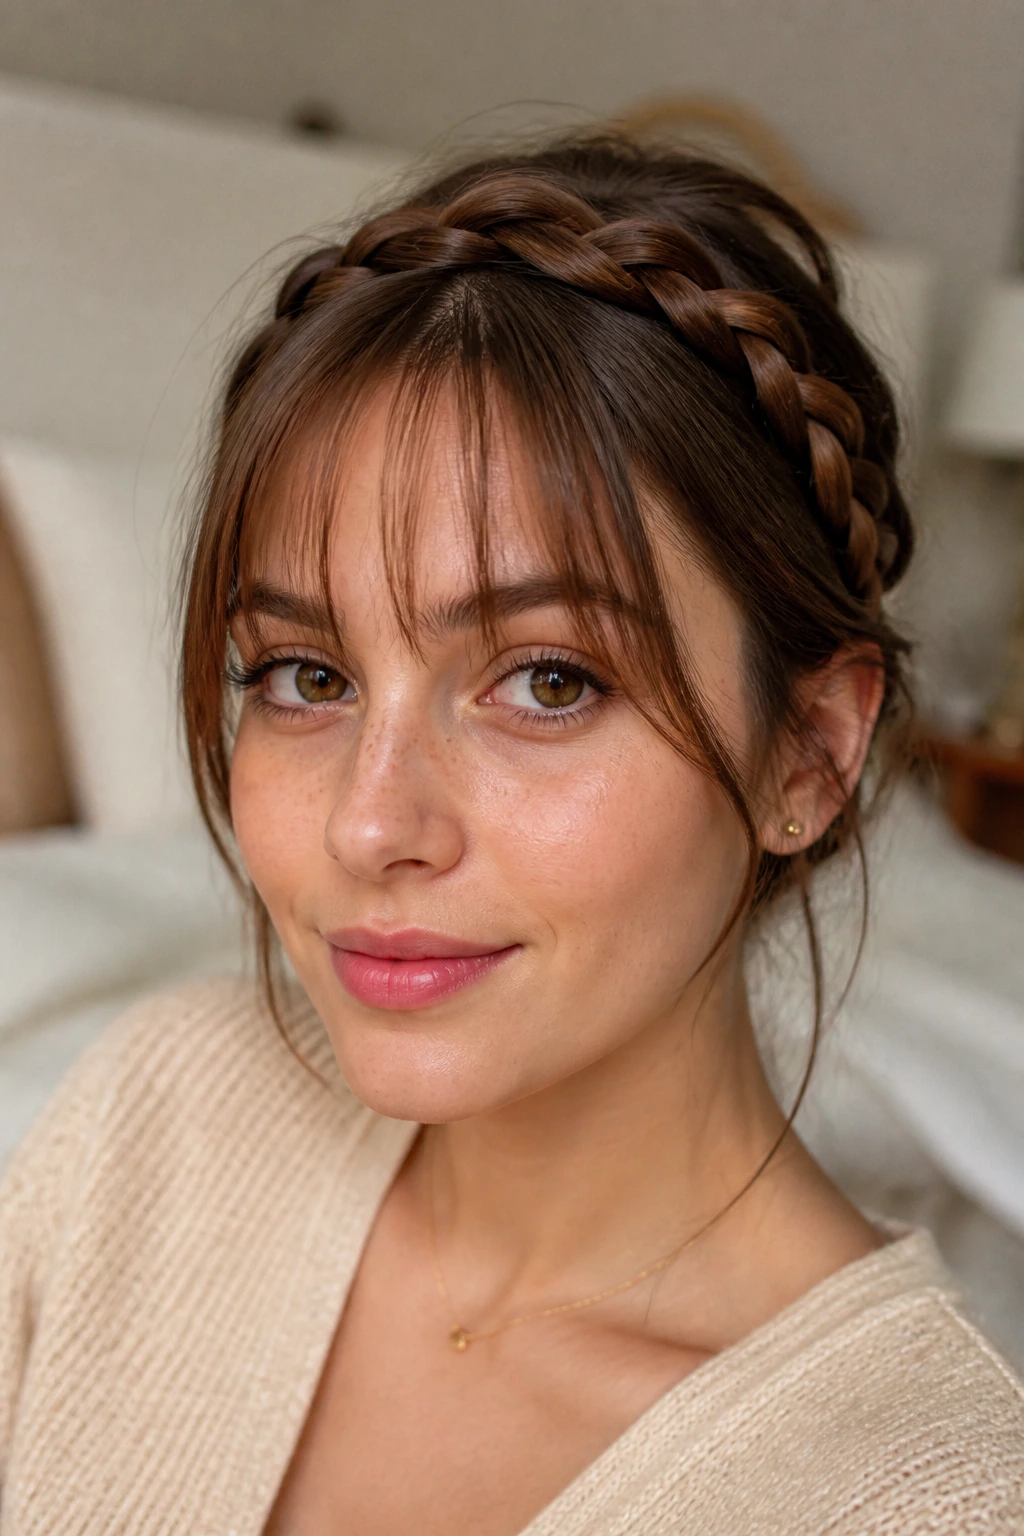
10. The Crown Braid Variation
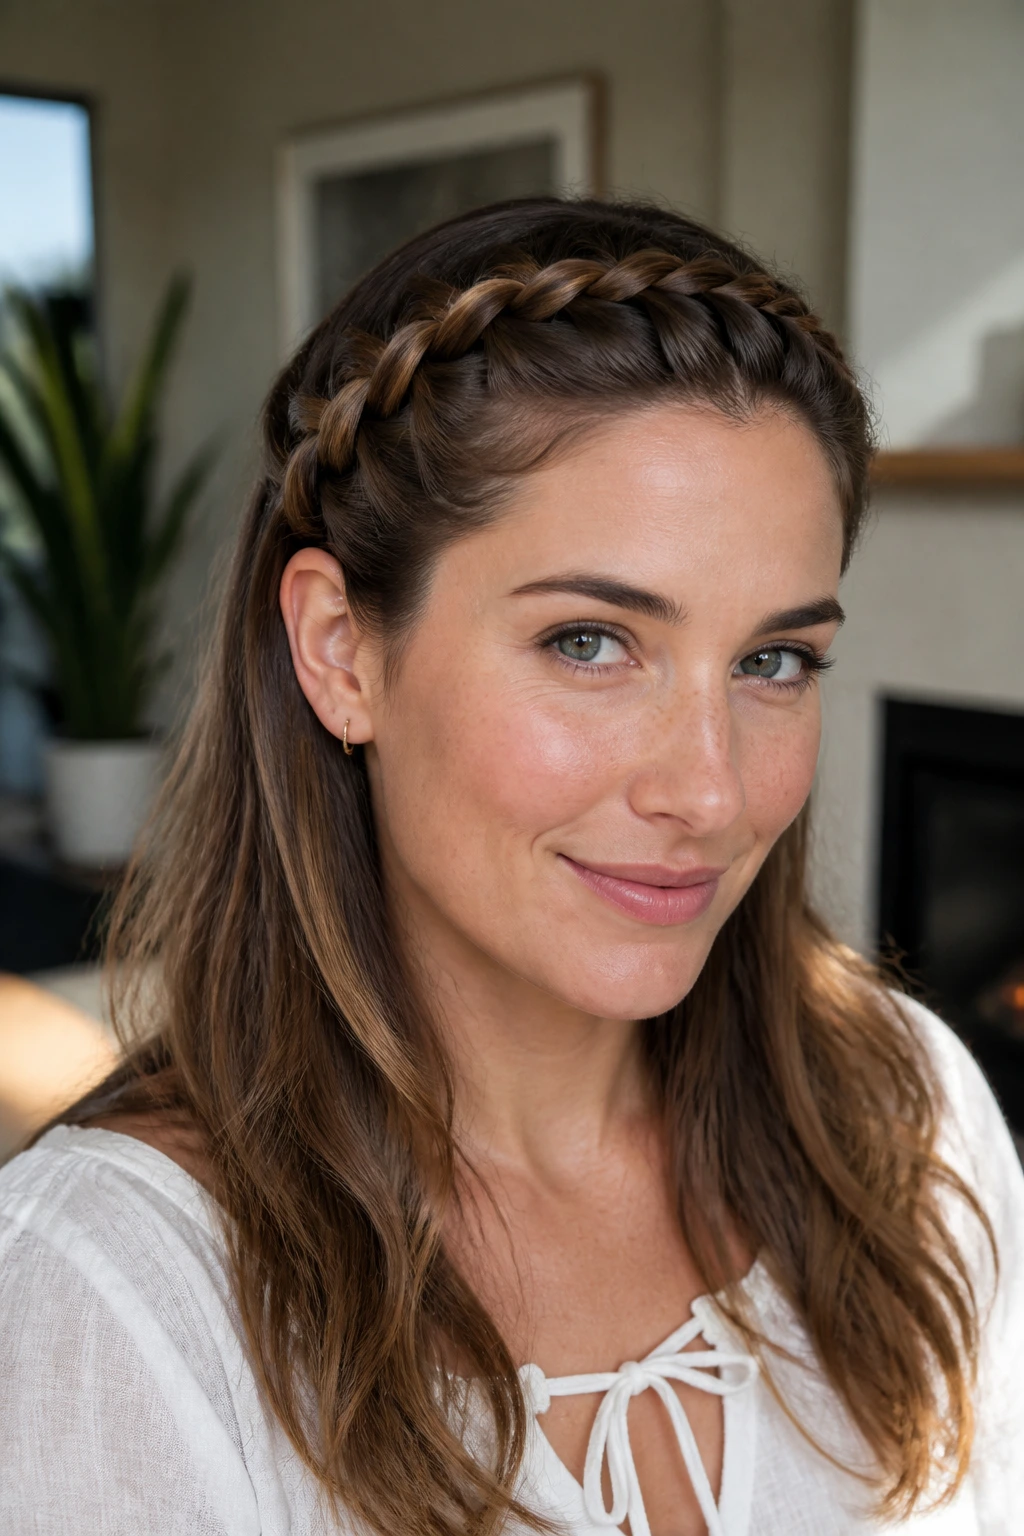
A full crown braid is often associated with formal events, but a mini-crown braid—one that only covers the front half of the head—is entirely appropriate for daily wear. It acts as a permanent, built-in headband that you don’t have to adjust throughout the day.
Why It’s Great for Busy Days
Once you have the front section braided and pinned, you don’t have to touch it. It is entirely out of the way. If you are doing chores, working, or chasing after errands, this is the most secure version of the headband braid available because it is anchored on both sides of the head.
Achieving the Mini-Crown
- Start at the left temple and braid toward the back of the head.
- Repeat on the right side.
- Bring both braids together at the back, just behind your ears.
- Use a hair pin to connect the two braids, hiding the ends of the braids underneath the bulk of your loose hair.
- For a more “daily” look, keep the braids relatively tight; this prevents them from getting caught on clothing or feeling heavy during the day.
11. The Braided Headband with a Top Knot
Combining a braid with a high bun or top knot is a popular way to keep the hair completely off your neck and face. The braid adds interest to what would otherwise be a simple, utilitarian hairstyle, turning a basic gym bun into a styled, purposeful look.
The Practicality of the Combo
This is a high-function hairstyle. The braid anchors the front, and the top knot secures the rest of the volume. It is practically impossible for this style to fall out, making it the ideal choice for long days or intense physical activity.
How to Style It
- First, section off the front inch of hair and braid it along the hairline.
- Secure the braid behind the ear, then pull all remaining hair—including the braid tail—into a high ponytail at the crown.
- Wrap the ponytail into a bun.
- Secure with an elastic and a few strategically placed pins.
- The contrast between the sleek braid and the textured bun provides a nice visual balance that looks deliberate and modern.
12. Milkmaid-Style Front Braid
This style draws inspiration from traditional folk hair, but in a headband format, it looks incredibly trendy. By braiding the front section and pulling it across like a headband, you get a clean, polished look that keeps every stray hair off your forehead.
The Benefits for All Hair Textures
Whether you have thick, coarse hair or fine, straight strands, this braid creates a uniform appearance. It is particularly helpful if you are trying to grow out shorter layers or bangs, as the braid keeps those pieces flat against the scalp and out of your face.
Quick Execution
- Part your hair down the center or slightly to the side.
- Braid both front sections tightly, starting from behind the ears and moving toward the front.
- Cross the braids over your head, pinning them just behind the opposite ear.
- Use enough pins to ensure the braid doesn’t sag in the center.
- A dab of styling wax on your fingertips before you start will help manage the shorter layers that tend to pop out near the hairline.
13. The Pinned-Back Textured Headband
Sometimes you don’t actually need to braid the entire length of a section; you just need to create the appearance of a braid to hold back your front hair. This style uses small sections to create a “faux-braid” effect that is held in place by decorative or hidden pins.
Why This Is Different
This is a shortcut for those who aren’t confident in their braiding skills. It creates a similar visual impact with less effort and is far less likely to result in arm fatigue. It is the perfect “quick fix” for a morning where you have very little time to get ready.
How to Fake the Look
- Pull a small section from the front hairline.
- Take a tiny piece, cross it over, and pin it flat against the scalp.
- Take another piece, overlap it, and pin that flat.
- Continue this overlapping and pinning pattern across the forehead.
- The result looks remarkably like a complex braid but feels much thinner and lighter on the head.
14. French Braid Headband with Volume
The French braid headband is the direct counterpart to the Dutch braid. While the Dutch braid sits on top of the hair, the French braid is “tucked” in, creating a more integrated, seamless look. This is ideal if you want your braid to look like it is growing naturally out of your scalp.
Why Choose French Over Dutch?
The French braid is generally considered more “classic” and less “active.” It provides a smoother look that blends better with loose, straight hair. If you have very long hair, the French braid is often easier to pull through to the end without creating a bulky tail.
The Integration Technique
- Start with a French braid technique, adding hair from both the hairline and the top of the head into each crossover.
- Keep the braid tight to ensure it doesn’t loosen.
- If you have layers, use a tiny bit of hairspray as you go to catch those shorter pieces.
- Pin the braid discreetly behind the ear, and use a comb to smooth the hair directly behind the braid to hide any gaps.
15. The “Micro-Braid” Headband
Micro-braids are a great way to add detail without adding bulk. By creating three or four extremely thin braids across the front of the hair, you get the function of a headband with a very modern, minimalist aesthetic that looks great on younger people or those who prefer a subtler look.
Why This Style Is Unique
Micro-braids are delicate. They don’t overwhelm your face the way a large, chunky braid might. This makes them a fantastic choice if you have a smaller face or finer features that can easily be “drowned out” by large, thick braids.
Tips for Success
- Use a fine-tooth comb to part perfectly straight, thin sections.
- Braid them as tightly as you possibly can.
- Use the smallest clear elastics you can find to keep the ends invisible.
- Apply a tiny bit of smoothing pomade to your hands before braiding to ensure the strands don’t look fuzzy.
16. The Pull-Through Headband Braid
The pull-through technique uses elastics rather than weaving to create a braid. It results in a very wide, rounded braid that looks incredibly full. This is the best technique for someone who wants the “pancaked” look without having to manually pull at their braids.
Why It’s Efficient
You don’t need to learn a complex weave. If you can make a series of ponytails and pull hair through them, you can create this headband. It is physically impossible to mess up the tension because the elastics do all the work for you.
Step-by-Step
- Create a series of small ponytails along your front hairline.
- Split each ponytail in half and pull the next one through the gap.
- Secure the pulled-through section with the next elastic.
- Repeat across the forehead.
- This creates a very uniform, architectural look that stays perfectly in place all day.
17. The Bejeweled Braided Headband
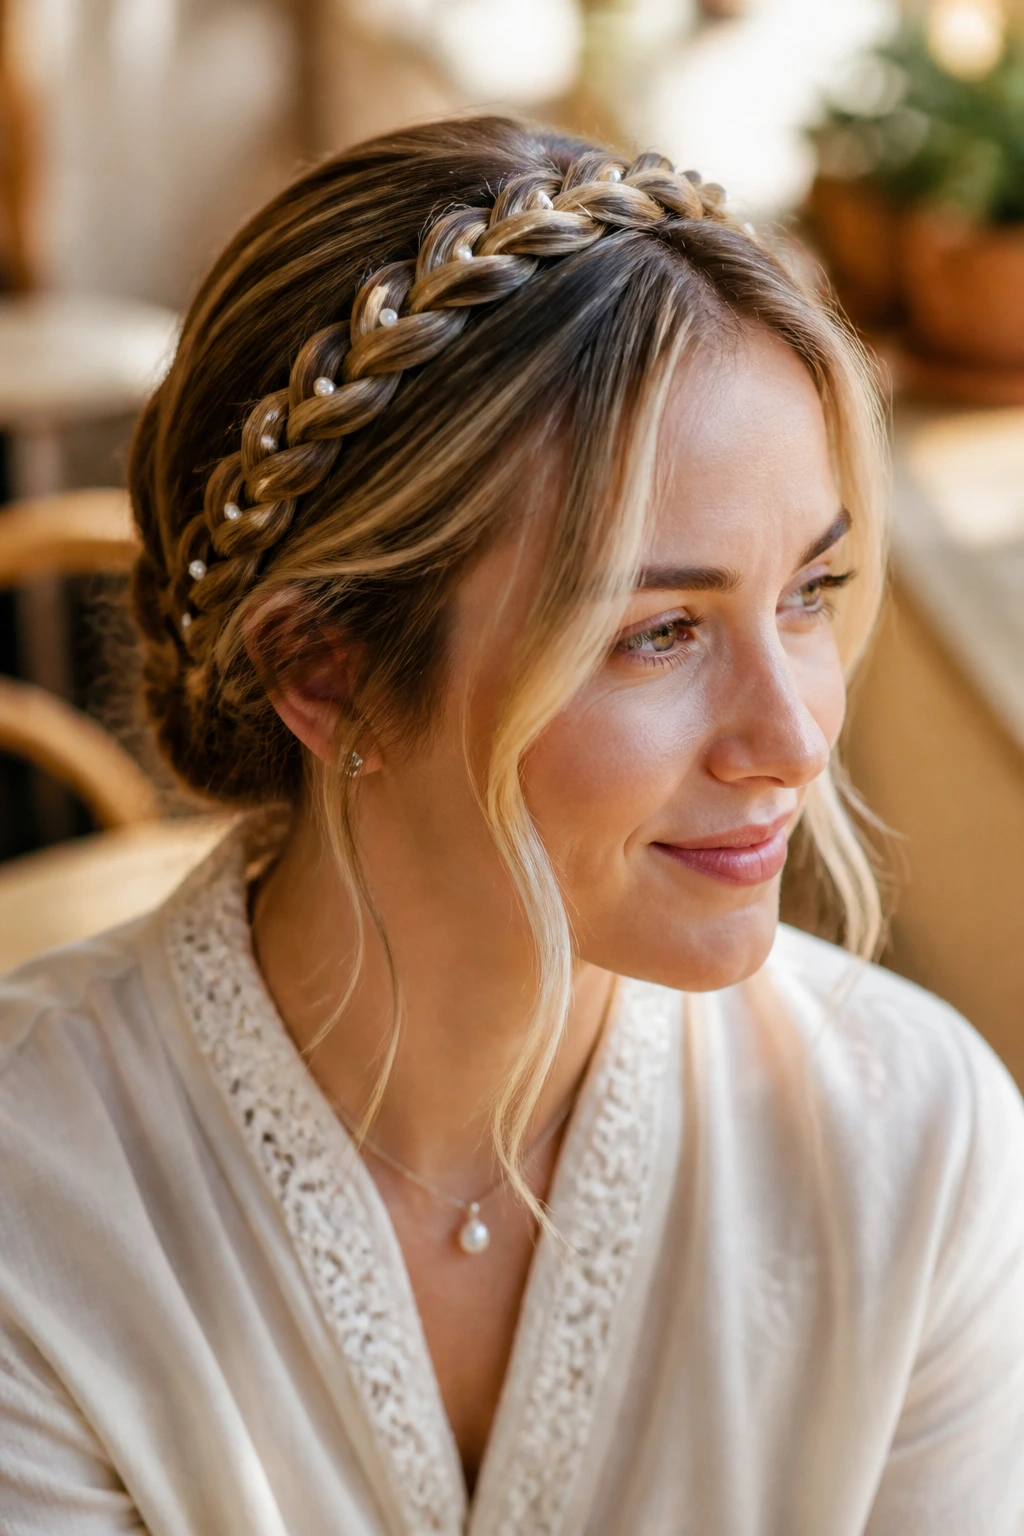
Sometimes, the braid itself is just the base. By adding small accessories—pearl pins, gold cuffs, or thin ribbon—into your headband braid, you can turn a basic everyday look into something slightly more festive for a special brunch or a weekend event.
Elevating the Everyday
Accessories draw the eye, which means they can distract from any minor imperfections in your braiding technique. If your braid is a little uneven, a few well-placed pearl pins can hide it entirely while adding a touch of elegance that feels very intentional.
Styling Tips
- Avoid heavy metal accessories that will weigh the braid down and cause it to sag.
- Look for lightweight decorative pins or ribbon that can be woven into the braid as you go.
- Place accessories primarily along the top of the head where they are most visible, rather than behind the ears where they might get caught on clothing.
18. Braided Headband with Wispy Bangs
If you have bangs or shorter face-framing layers, you don’t have to pull them into the braid. Leaving them out can actually create a very soft, flattering effect that breaks up the severity of the braid and makes the look feel more balanced.
Why This Works
For many people, their bangs are the most flattering part of their hair. Forcing them into a braid can look harsh or unnatural. By leaving them out, you maintain the frame around your face while still gaining the functional benefits of a headband braid.
Balancing the Look
- Use a curling iron to give your bangs a soft, slight bend before you begin the braid.
- Braid your headband section just behind the bangs.
- If you find your bangs getting in the way, tuck them behind your ears rather than trying to pin them into the braid.
- This creates a soft, approachable, and very feminine style.
19. The Low-Tension “Twist-and-Pin”

If you suffer from headaches or scalp sensitivity, tight braids can be painful. The low-tension twist-and-pin method offers the same headband effect but with zero pulling or tightness on the roots. It is a gentle way to keep hair back.
The Gentle Approach
This style avoids the “pull” that characterizes most braids. It uses the natural lay of the hair to create a headband shape. Because there is no tight tension, you won’t experience that “tight scalp” feeling that some people get after a long day of wearing a braid.
How to do it
- Take a section of hair from the temple.
- Instead of braiding, simply twist it away from your face and lay it across the crown.
- Pin it down flat.
- Take the next section, twist it, overlap it with the first, and pin.
- Repeat until you reach the other side.
20. The Braided Headband for Short Hair
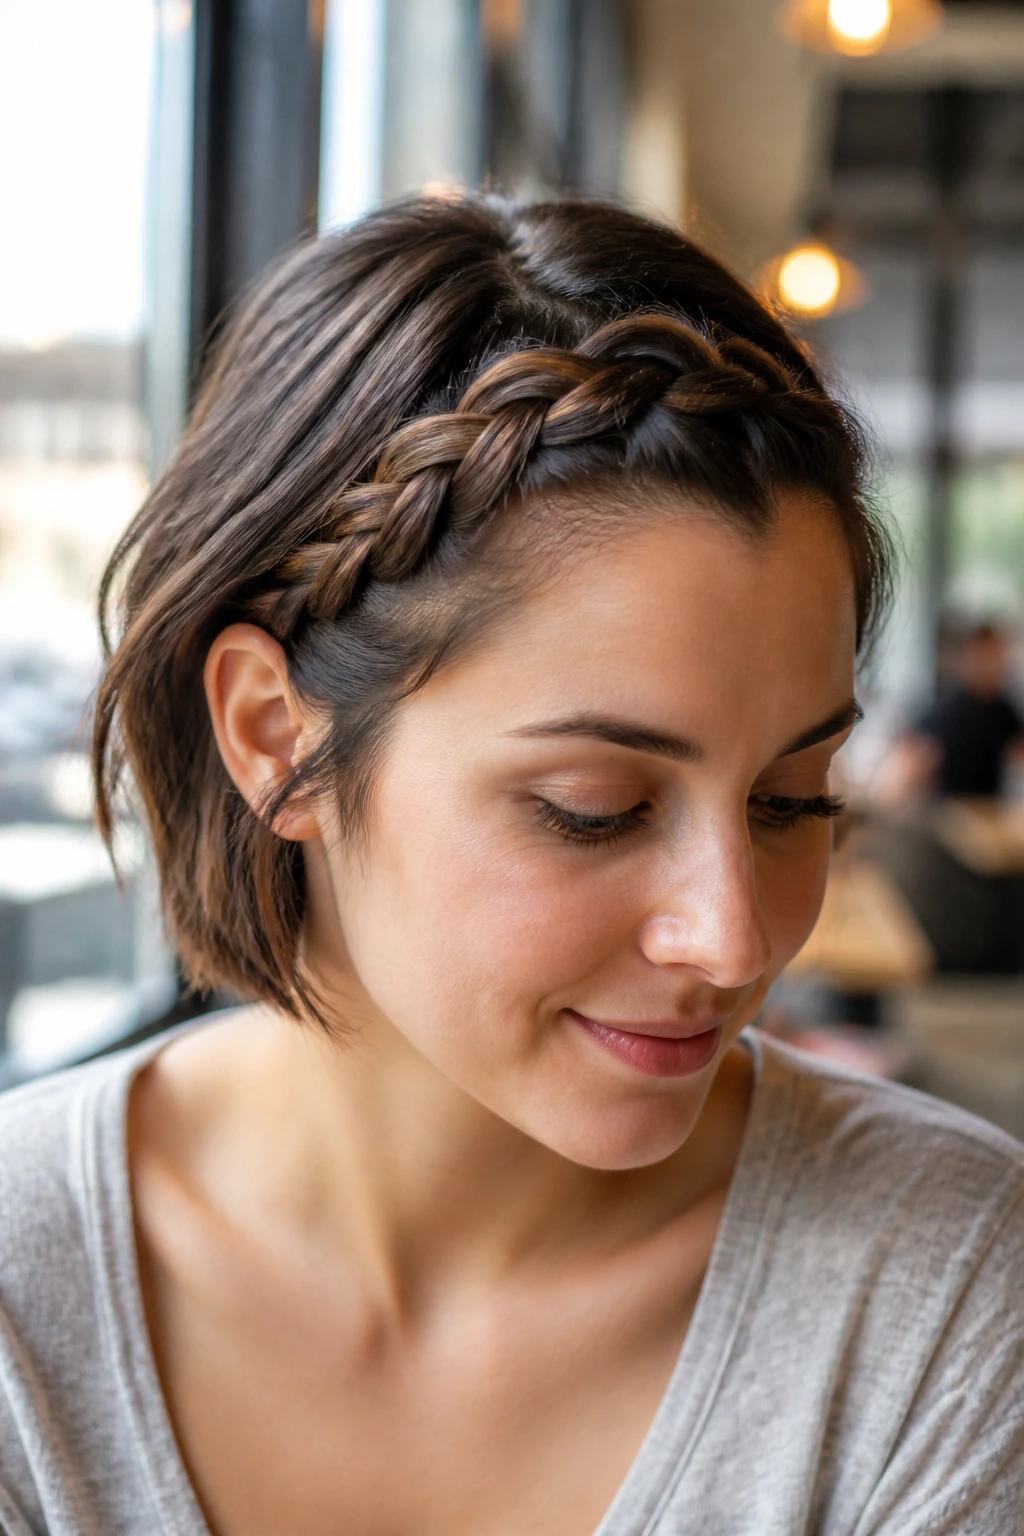
Having short hair doesn’t disqualify you from the braided headband trend. Even if your hair is shoulder-length or shorter, you can create a headband by braiding the small front sections and pinning them back.
The Short-Hair Advantage
Short hair is easier to handle because there is less weight dragging the braid down. You don’t have to worry about the braid sagging because the hair is already close to the scalp. It is a fantastic way to deal with the “awkward” phase of growing out a bob.
Tips for Success
- Use plenty of texture spray, as short hair needs extra grit to stay in a braid.
- Don’t try to braid too much hair at once—work in small, manageable sections.
- Use small pins that match your hair color perfectly; with shorter hair, pins are more visible, so placement is key.
- If a piece is too short to reach the back, just pin it firmly at the temple and cover it with the hair behind it.
Final Thoughts
Mastering the braided headband is less about perfection and more about understanding what your specific hair texture needs to hold a shape. Whether you are working with fine, slippery strands or thick, heavy waves, the secret is always in the tension and the foundation you build with your fingers. Do not feel discouraged if your first attempt feels loose or if you have a few stray pieces; those wisps are often what make the style look natural and wearable rather than robotic.
Take your time with the initial sections, as these set the tone for the entire braid. If you find your arms getting tired, remember that you don’t have to braid the whole length of your hair to get the headband effect—you can simply braid the front and secure the rest with a pin. Start with the simpler twist or pull-through methods before moving on to the more complex Dutch and waterfall techniques. With a little repetition, you will soon be able to pull off these styles in a matter of minutes, giving you a reliable, stylish, and functional way to keep your hair exactly where you want it.