Festival season is more than just music; it’s a temporary alternate reality where your wardrobe choices, makeup, and hair are given license to be loud, wild, and entirely impractical. While you might be tempted to just throw on a hat and call it a day, there is a certain rhythm to festival life that demands more. Between the heat, the humidity, the inevitable dust storms, and twelve hours of dancing, the wrong hairstyle becomes a tangled nightmare by sunset. Braids are the ultimate solution. They don’t just hold hair back; they lock it in place, protect it from the elements, and provide a canvas for the kind of glitter, rings, and extensions that don’t belong in a traditional office setting.
True festival hair is about striking a balance between aesthetic maximalism and industrial-strength durability. You want something that will survive a mosh pit or a long walk back to the campsite without needing a mirror check every twenty minutes. The most successful styles are those that use tension and product strategically, ensuring that flyaways are minimized and the structure remains intact through wind and movement. Whether you’re working with fine, slippery hair or thick, textured coils, the right braiding technique can turn your hair into one of the most reliable accessories you own.
As we look at these twenty-five styles, keep in mind that execution matters as much as the design. Preparation—think texturizing sprays, grip powders, and clean, unconditioned roots—is often the difference between a style that lasts three days and one that sags by noon. Let’s look at how to construct these intricate, enduring looks that define the spirit of outdoor music events.
1. Classic Double Dutch Braid
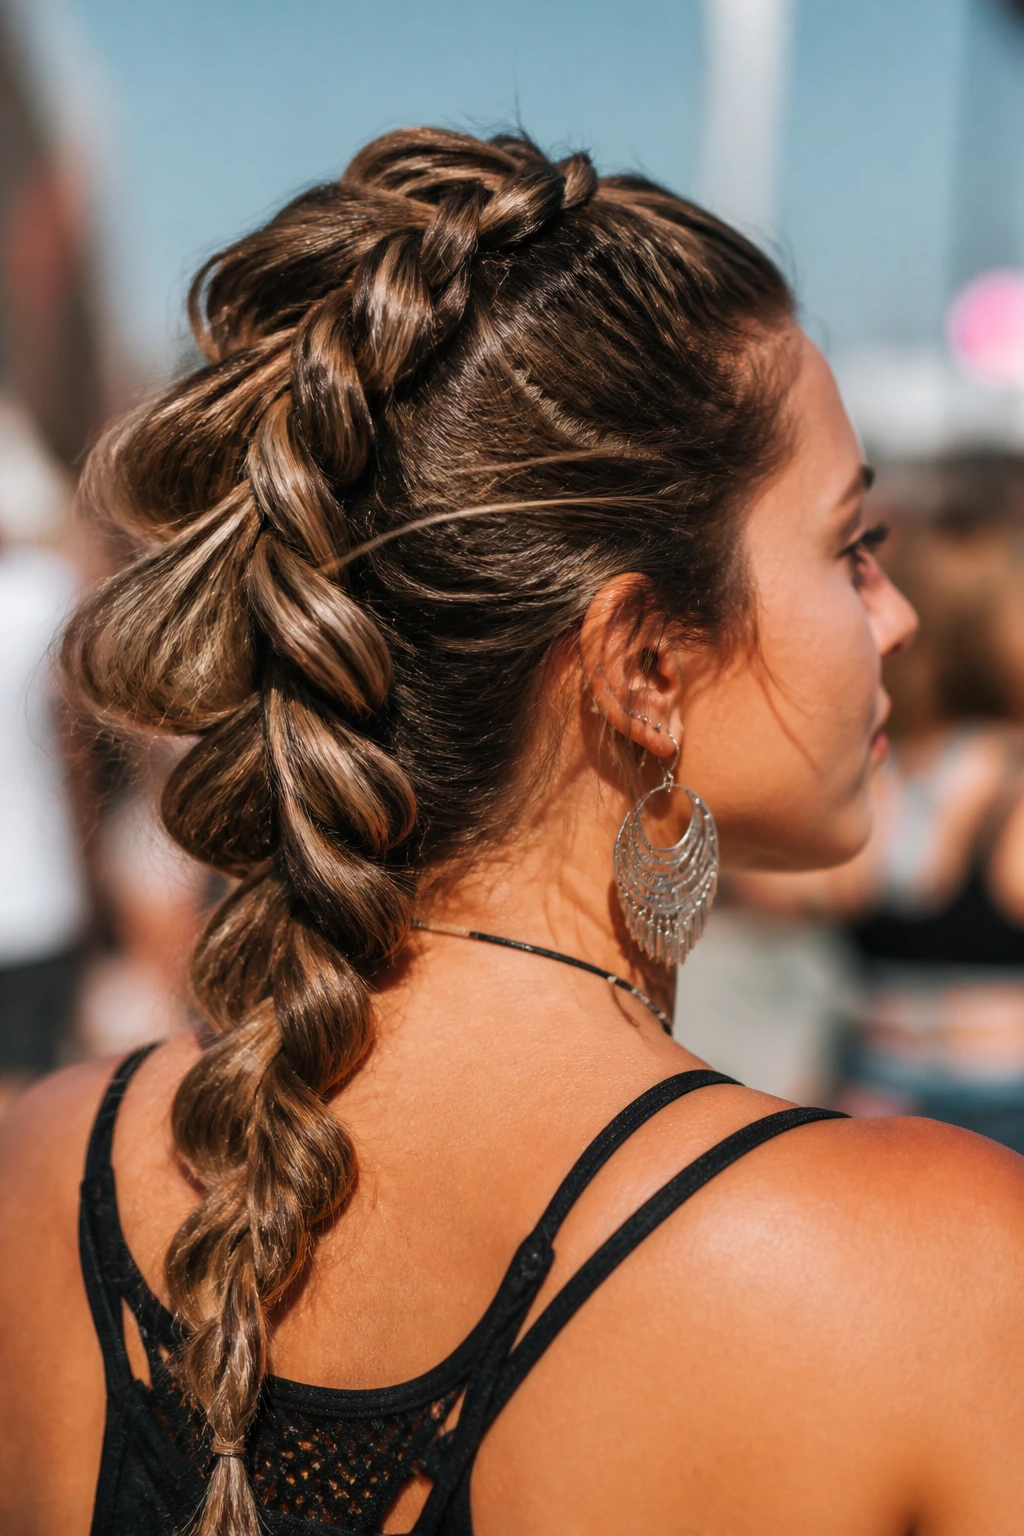
The double Dutch braid is the bedrock of festival hair, and for good reason. It pulls everything away from the face, keeps your neck cool in the sun, and creates a clean silhouette that works with everything from oversized sunglasses to bohemian jewelry. The key to making it look “festival” rather than “gym class” is the pancake technique. Once you have finished braiding, gently pull at the loops of the braid to make them look wider and more lived-in.
How to Achieve Maximum Volume
- Start with a center part and divide the hair into two even sections.
- Use a texturizing powder at the roots to give the hair grip before you begin braiding.
- Cross the strands under rather than over to get that raised, 3D Dutch effect.
- Once you reach the nape of the neck, secure the ends with clear, snag-free elastic bands.
- Pro tip: Pull at the edges of the braid starting from the bottom and working upward to ensure even volume across the entire length.
2. Neon Fiber Mohawk Braid
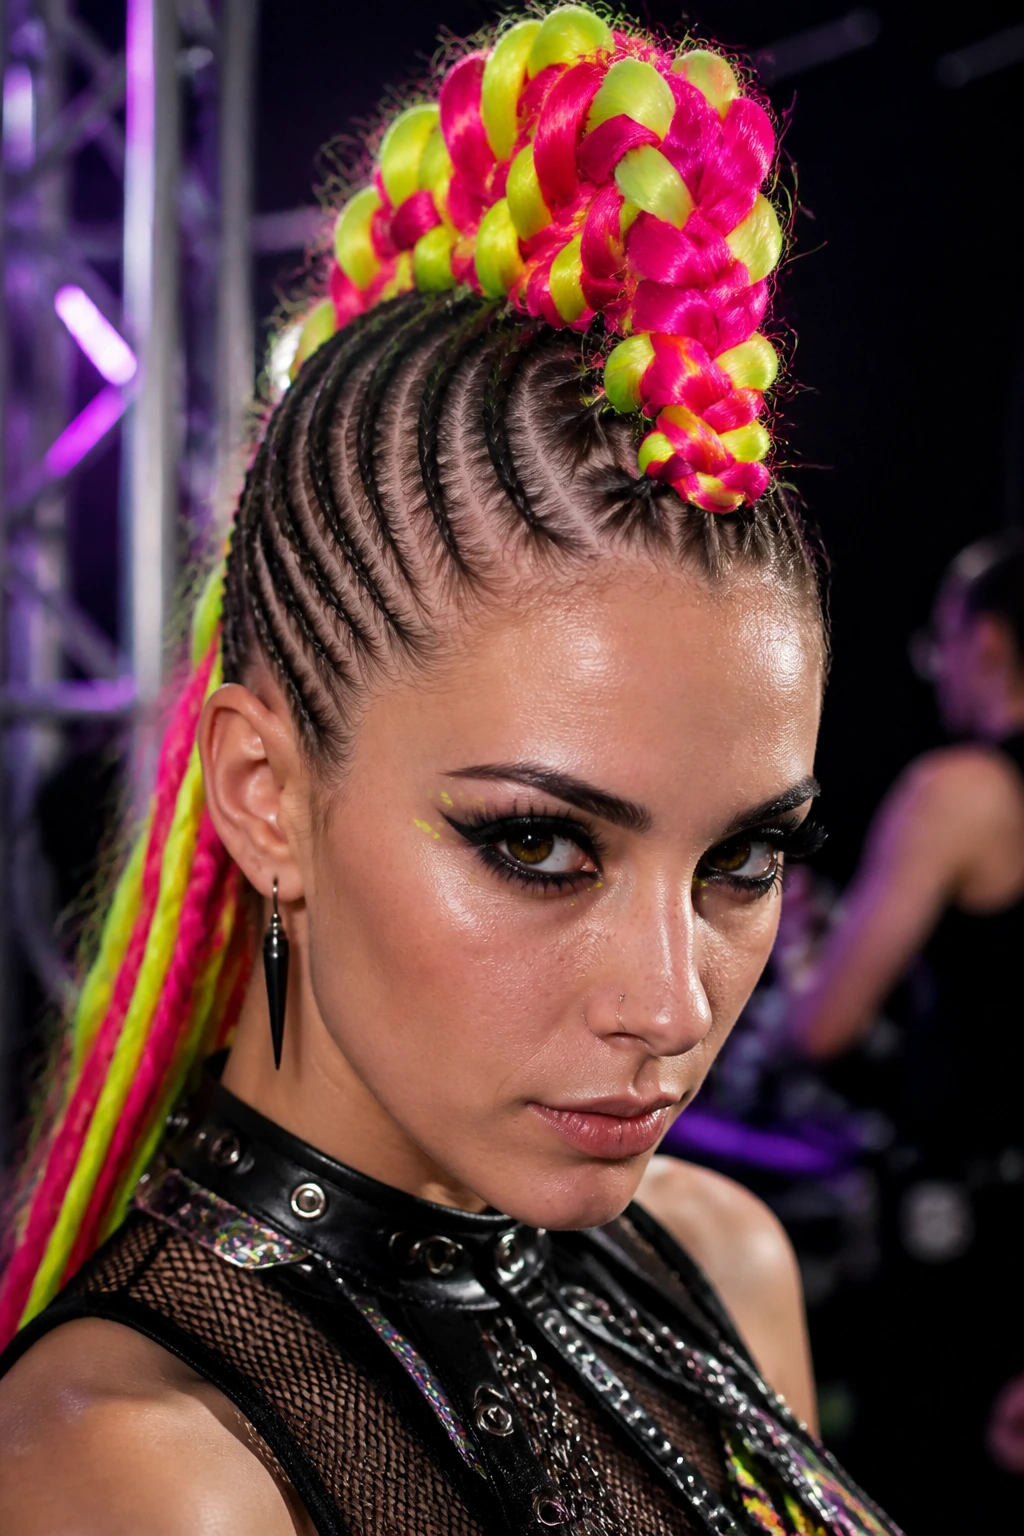
If you want to make a visual statement, adding synthetic braiding hair in high-contrast neon shades is the way to go. This look involves a series of small, tight cornrows on the sides that lead into one massive, oversized French braid down the center of the scalp. The contrast between your natural hair color and the synthetic fiber creates an architectural look that is impossible to miss.
Why It Works for Long Days
Because the cornrows on the sides are so tight, they act as a structural anchor for the entire style. You can jump, run, and dance without the center braid flopping around or losing its shape. This is essentially “locked” hair. Even when it gets a little frizzy toward the end of the weekend, the frizz adds to the rugged, high-energy vibe of the style.
3. Bohemian Half-Up Crown Braids
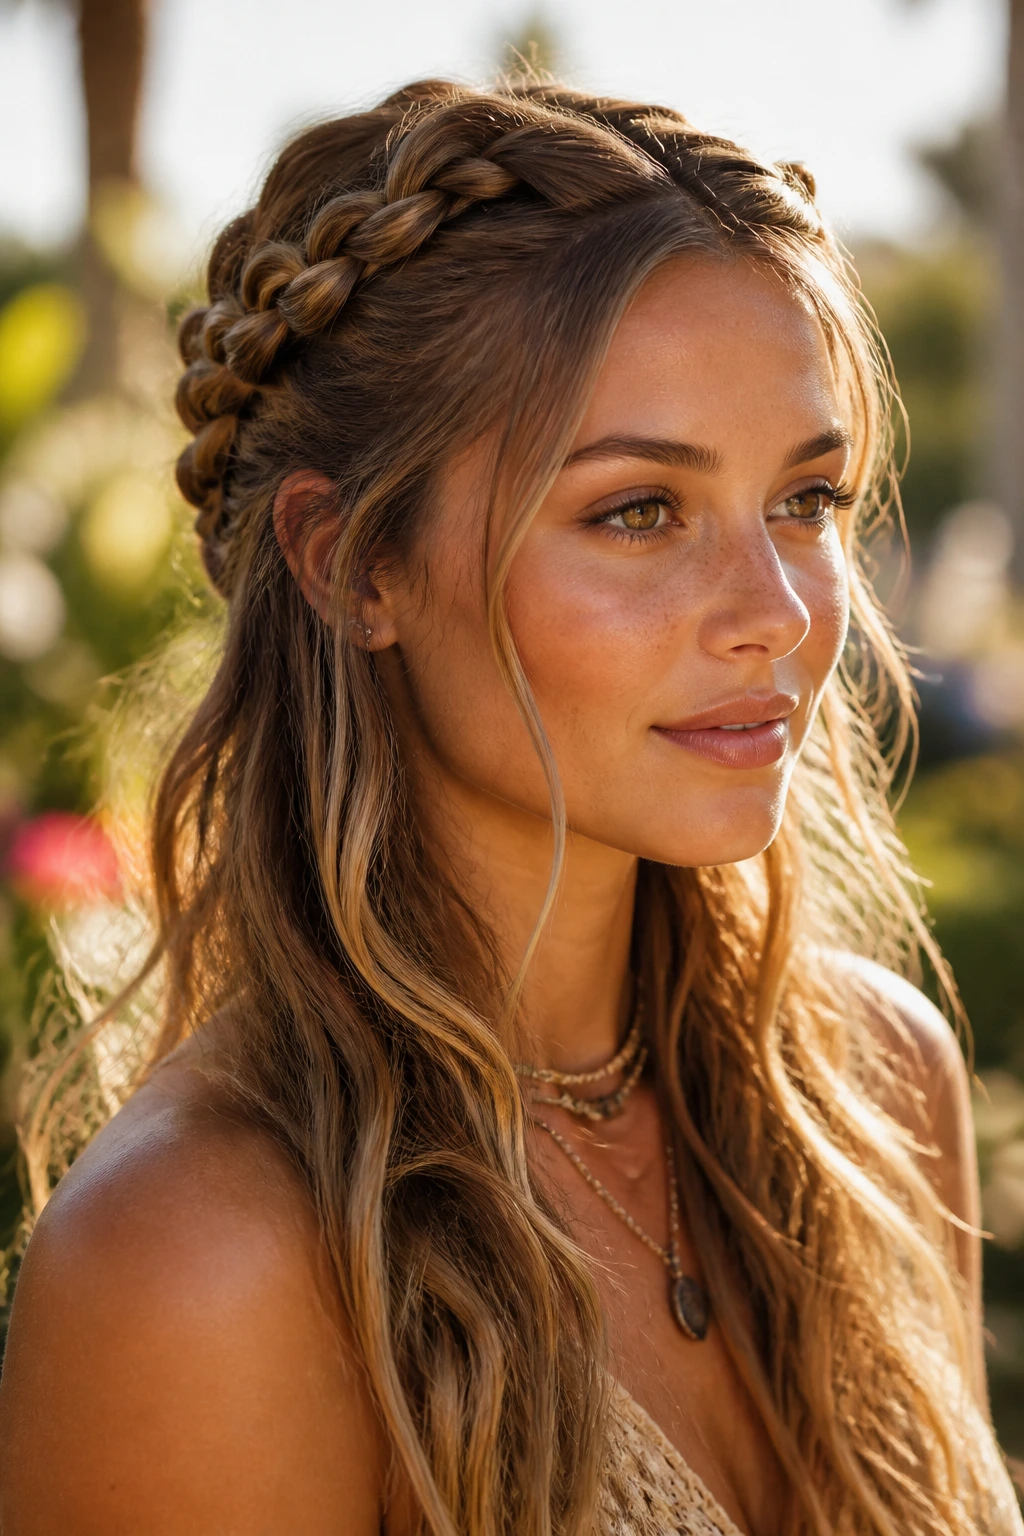
For those who prefer a softer, ethereal aesthetic, the half-up crown braid is a staple. It keeps the hair out of your eyes while allowing the majority of your length to cascade down your back or over your shoulders. This style pairs beautifully with floral accessories or delicate hair rings tucked into the loops.
Essential Styling Steps
- Section off the top portion of your hair from temple to temple.
- Create a loose three-strand braid on both sides, ensuring they meet at the back of the head.
- Pin the braids together with bobby pins that match your hair color to hide the anchor point.
- Use a curling wand to create soft, loose waves in the remaining hair to complete the romantic, whimsical effect.
4. Double Bubble Ponytail Braids
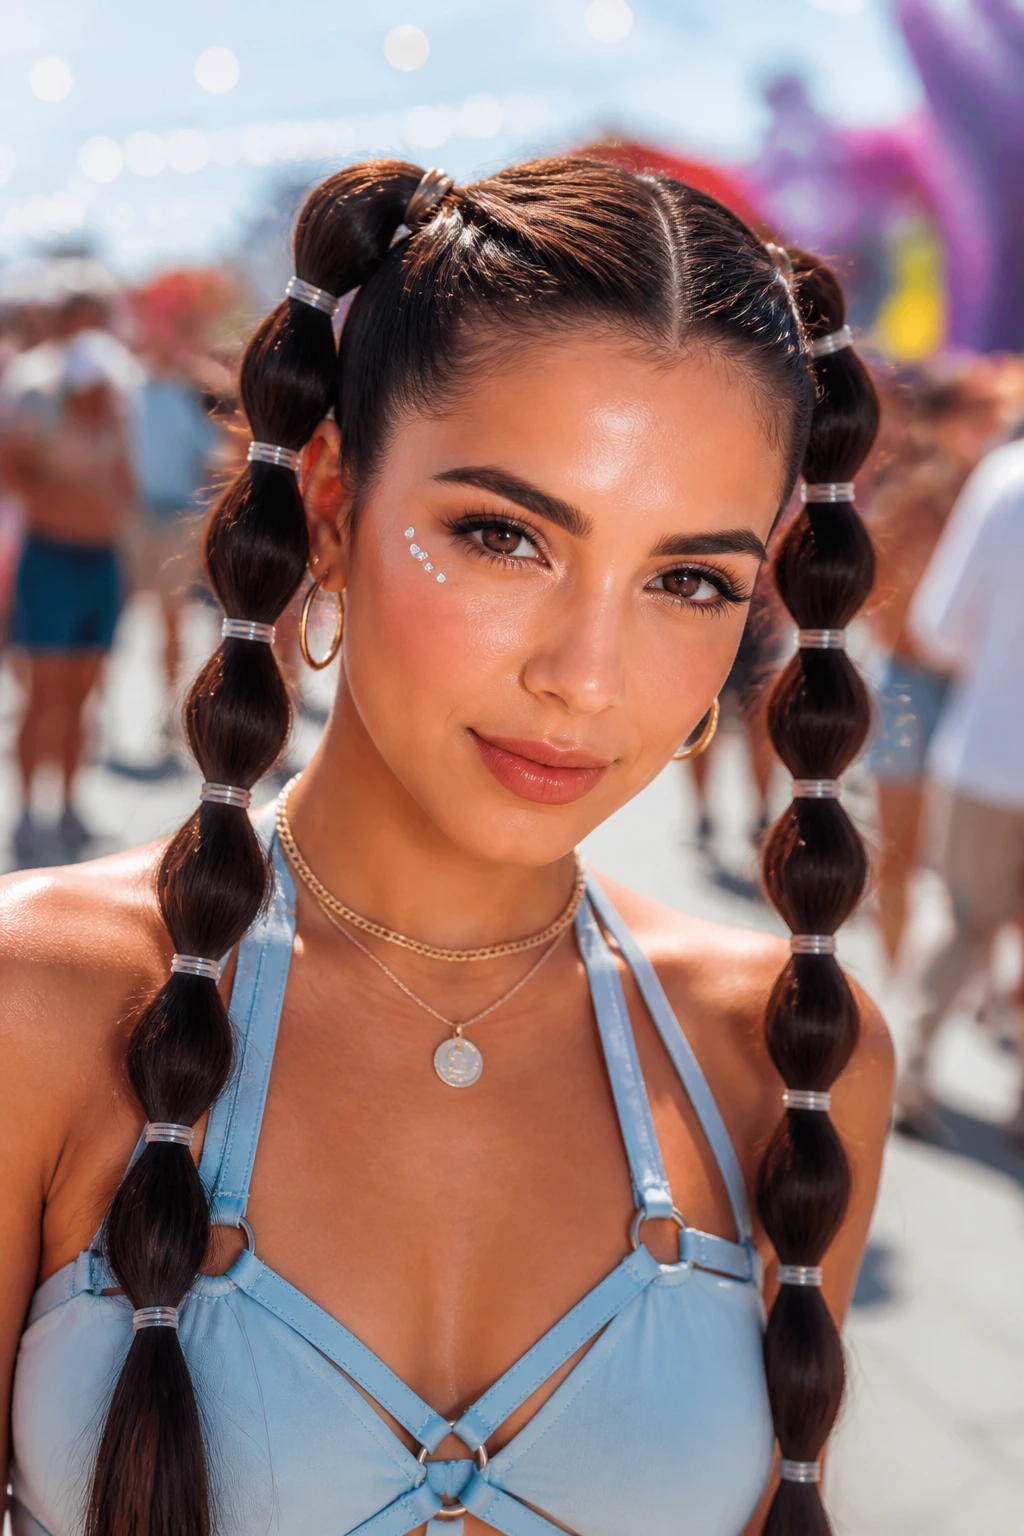
This is a playful, modern take on the traditional braid that uses elastics to create “bubbles” between sections. It is arguably the most beginner-friendly style on this list, requiring zero advanced braiding skills, only the ability to pull hair through elastics and tease it for volume.
Why You Should Use Clear Elastics
Clear elastics are your best friend here. They disappear into the hair, making the bubbles look like they are floating in place. If you are worried about the elastics snapping—which happens more than you’d think when you’re dancing—always carry a small pouch of extra bands. Always double-up on your elastics for extra durability.
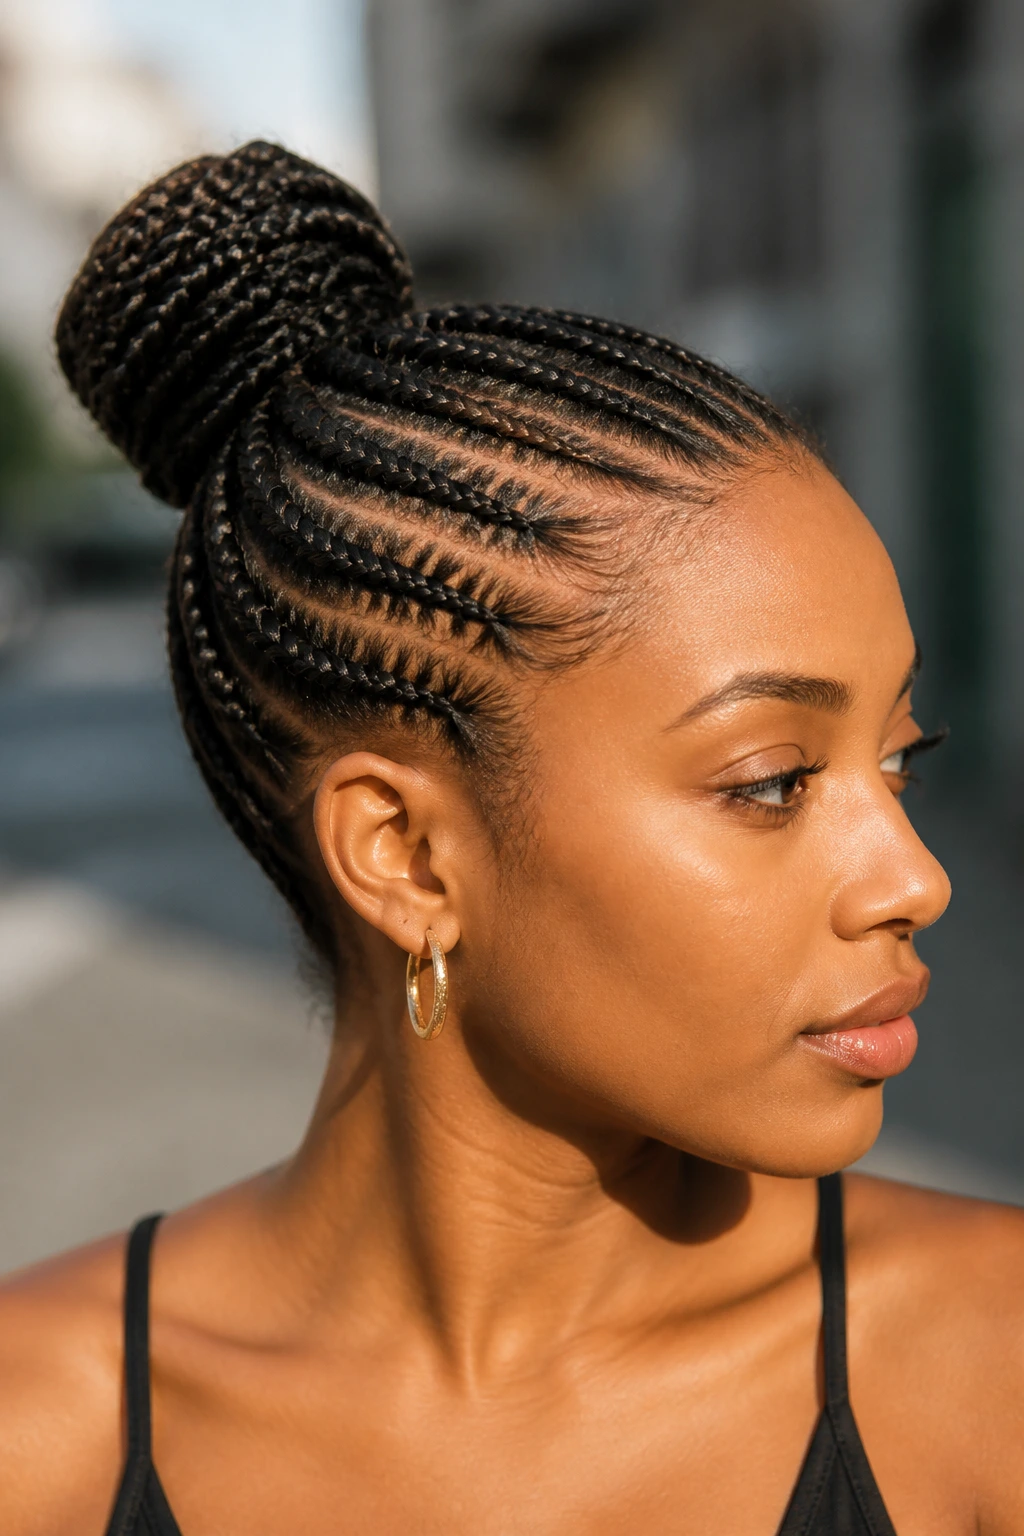
5. Tight Cornrows with Cuffs and Rings
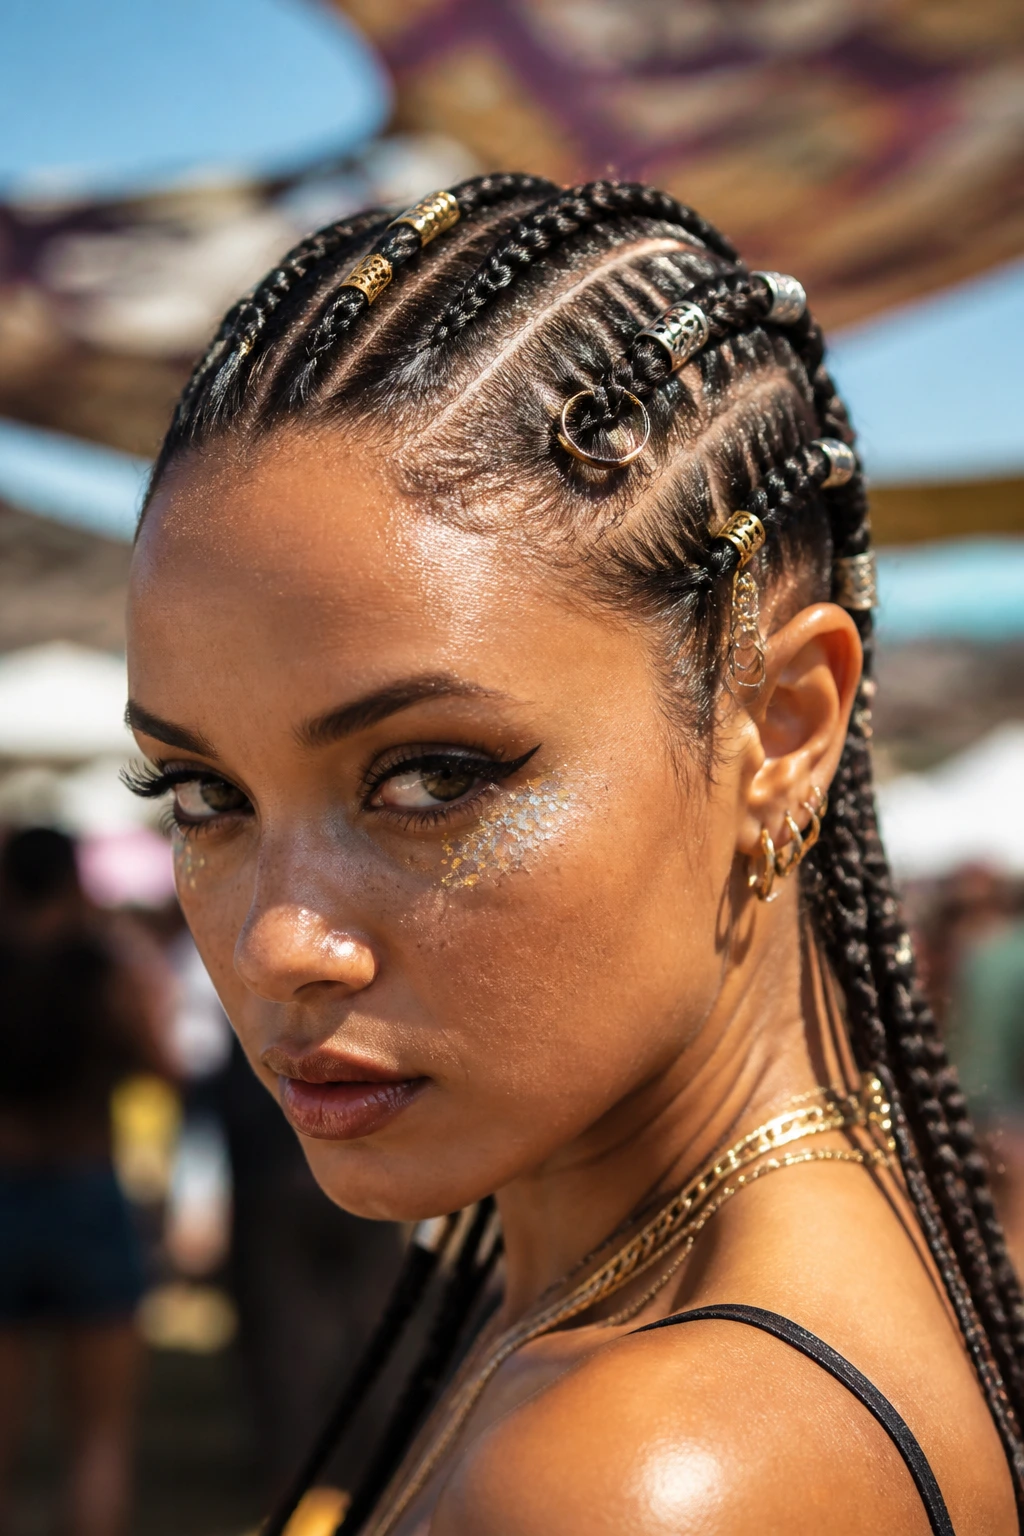
Taking inspiration from traditional styles, tight cornrows adorned with metal cuffs are a festival classic that never looks dated. The metal rings catch the sunlight, turning your hair into a piece of jewelry in its own right. These are best installed a day before the festival, as they require significant tension and precision.
The Importance of Tension
- Keep your sections clean using a rat-tail comb.
- Apply a light-hold pomade to the hair as you braid to ensure the lines remain sharp.
- Add the metal rings as you go; trying to put them on after the braids are finished often results in snagged hair and frustration.
- Note: Avoid going too tight at the hairline to prevent tension alopecia or excessive discomfort during the event.
6. Fishtail Braid into a Loose Side Ponytail
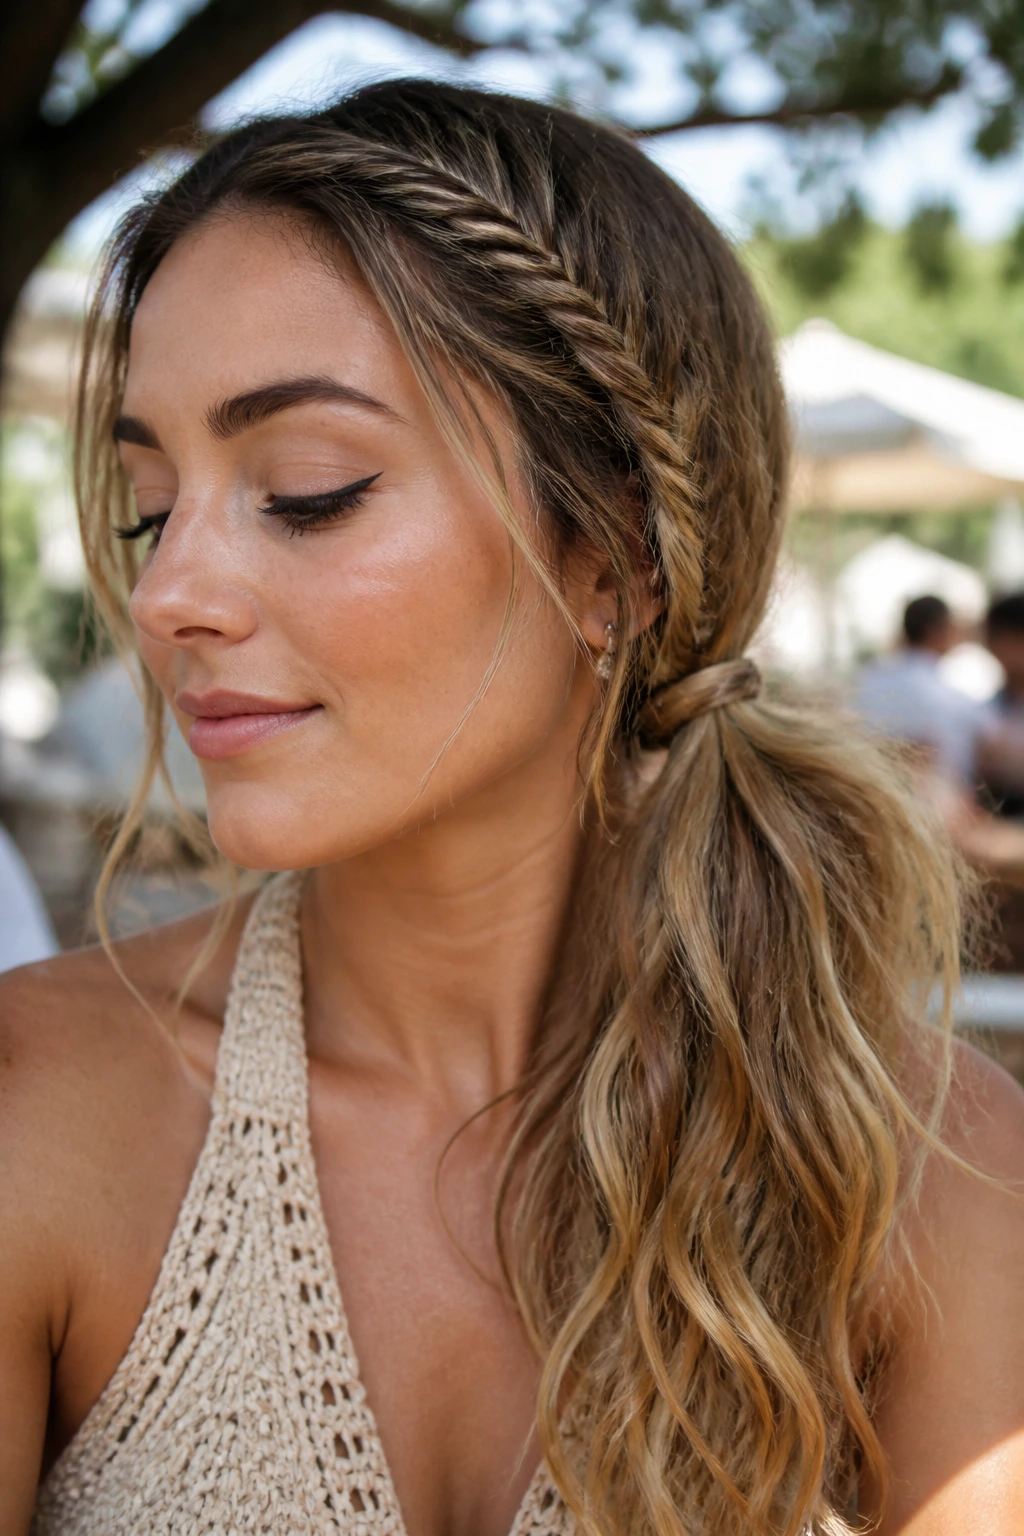
The fishtail braid looks intricate and time-consuming, but once you master the alternating technique, it becomes muscle memory. For a festival, turning that fishtail into a loose, low-slung side ponytail allows for a more relaxed, effortless look. It’s perfect for day-two or day-three hair when you might be using dry shampoo.
The Mechanism of a Fishtail
Unlike a three-strand braid, the fishtail relies on pulling small, thin pieces from the outer edges of the two main sections and crossing them over to the opposite side. The thinner the pieces you grab, the more intricate the final braid looks. It takes a bit more time than a standard braid, so budget about twenty minutes for the full look.
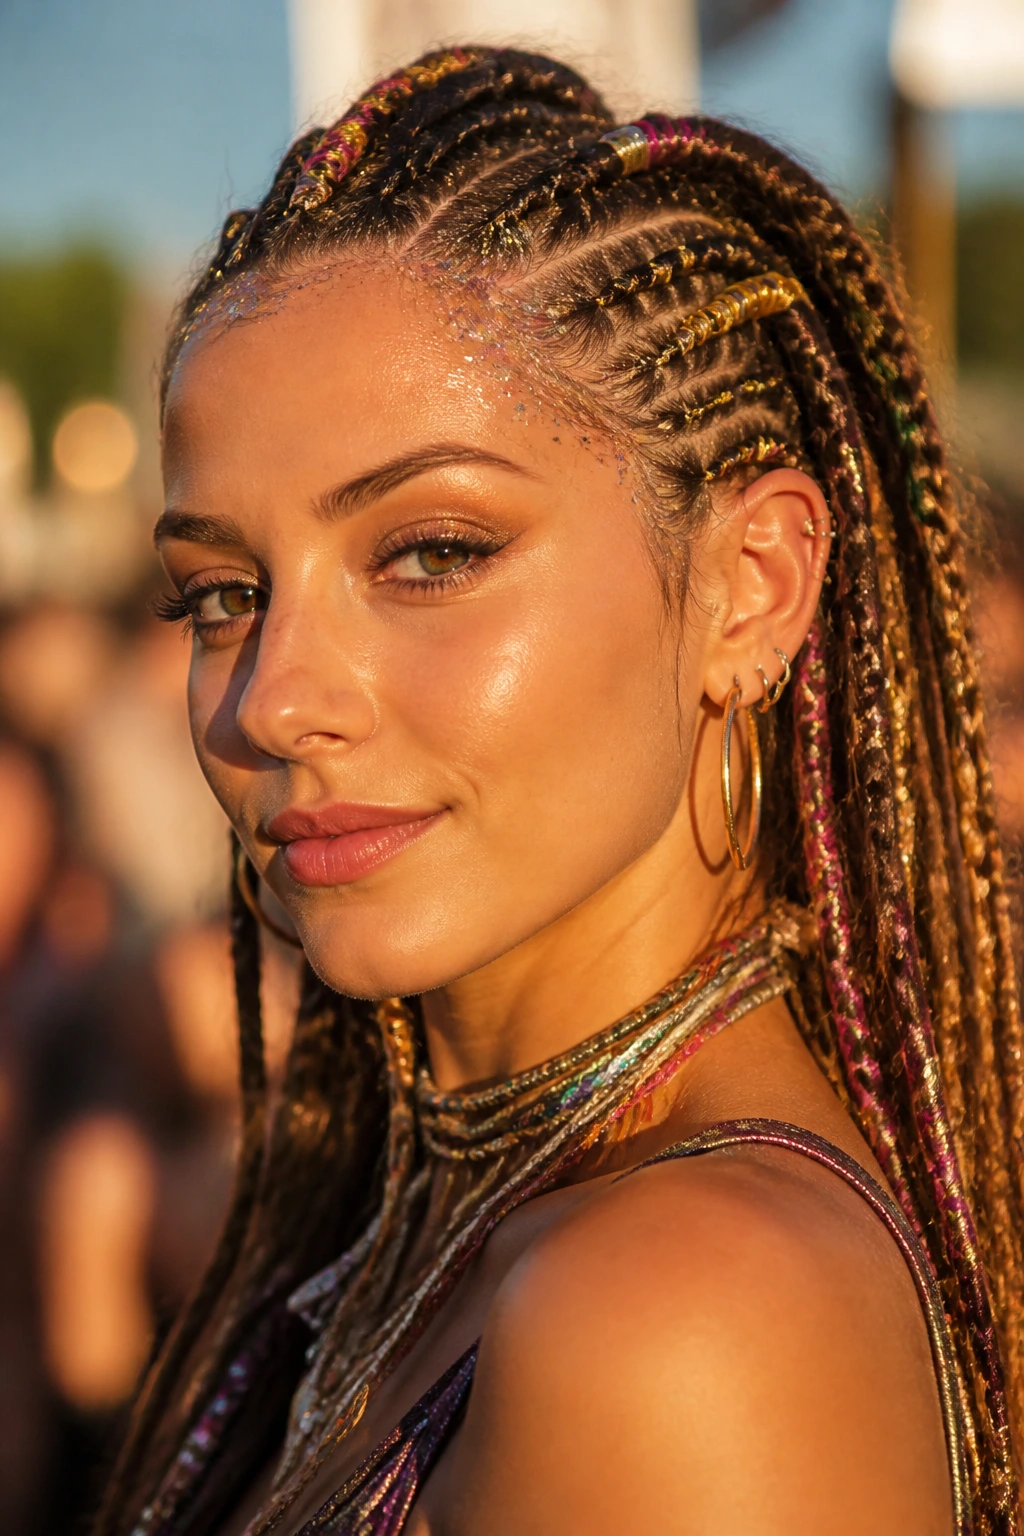
7. Multi-Colored Yarn Braid Wraps
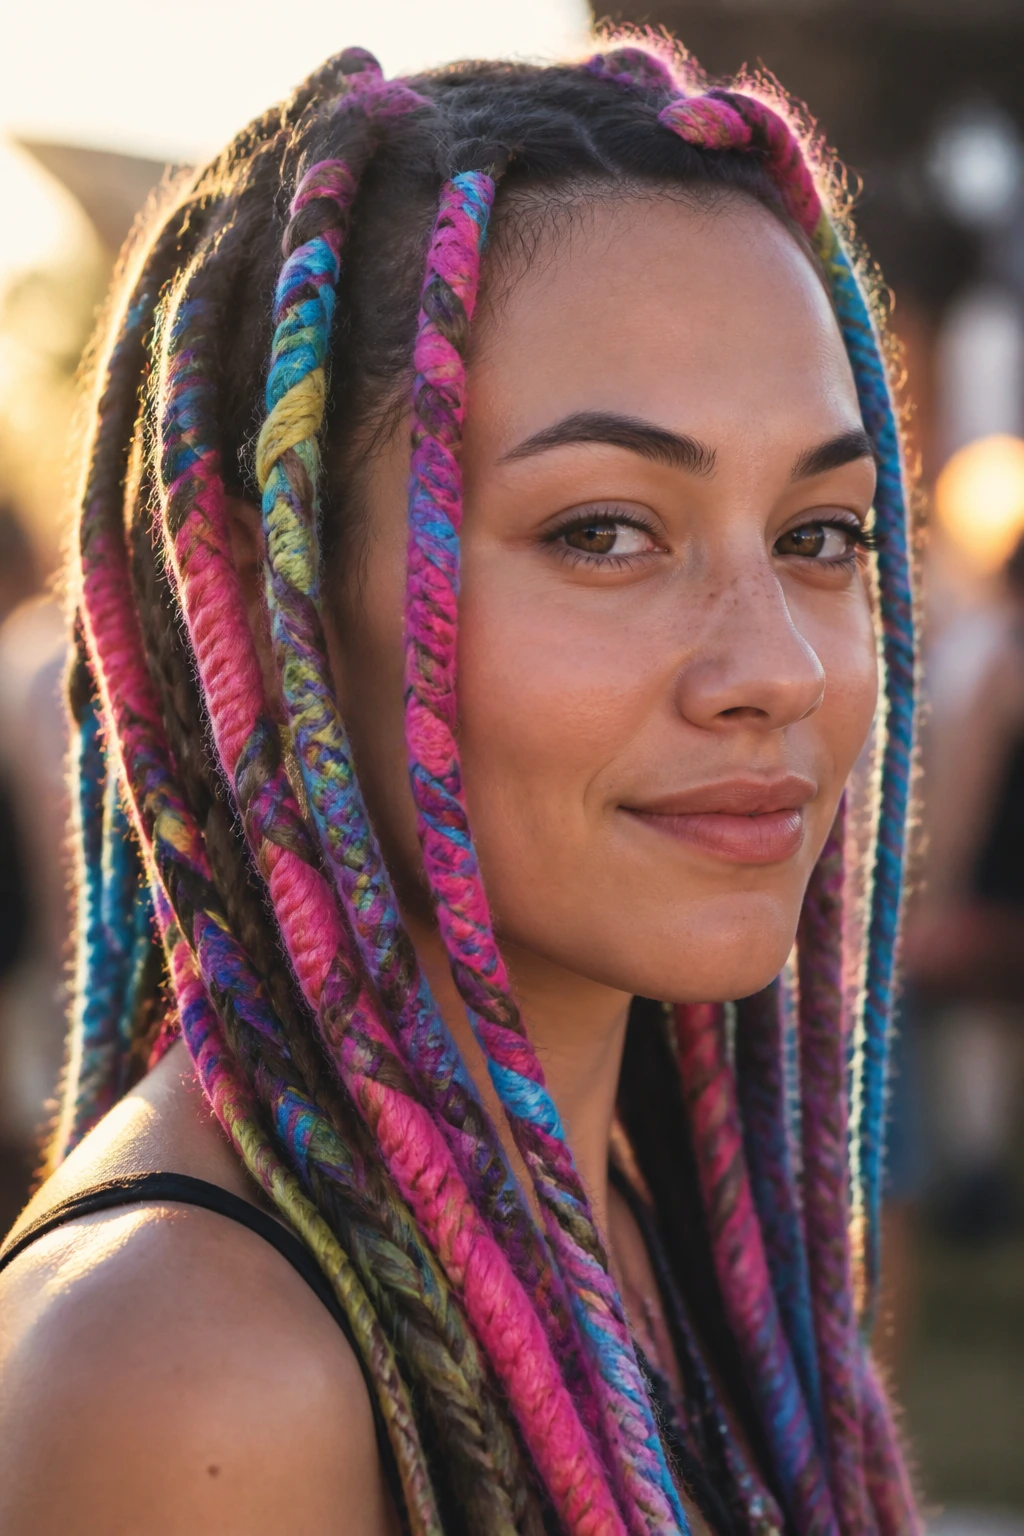
Yarn wrapping is a fantastic way to incorporate color without damaging your natural hair with dyes. By braiding colorful yarn into your hair, you create thick, textured ropes that can be styled into buns or left hanging. This style is incredibly lightweight, making it a comfortable option for heat-intensive events.
How to Style
Select 3-5 colors of yarn that complement your outfit. Section off the hair where you want the wrap and begin braiding the yarn alongside your natural hair. Once you reach the end, knot the yarn securely and trim the excess. This look lasts for the duration of the trip and is easy to unravel when you finally get home.
8. Triple-Section Top Knot Braids
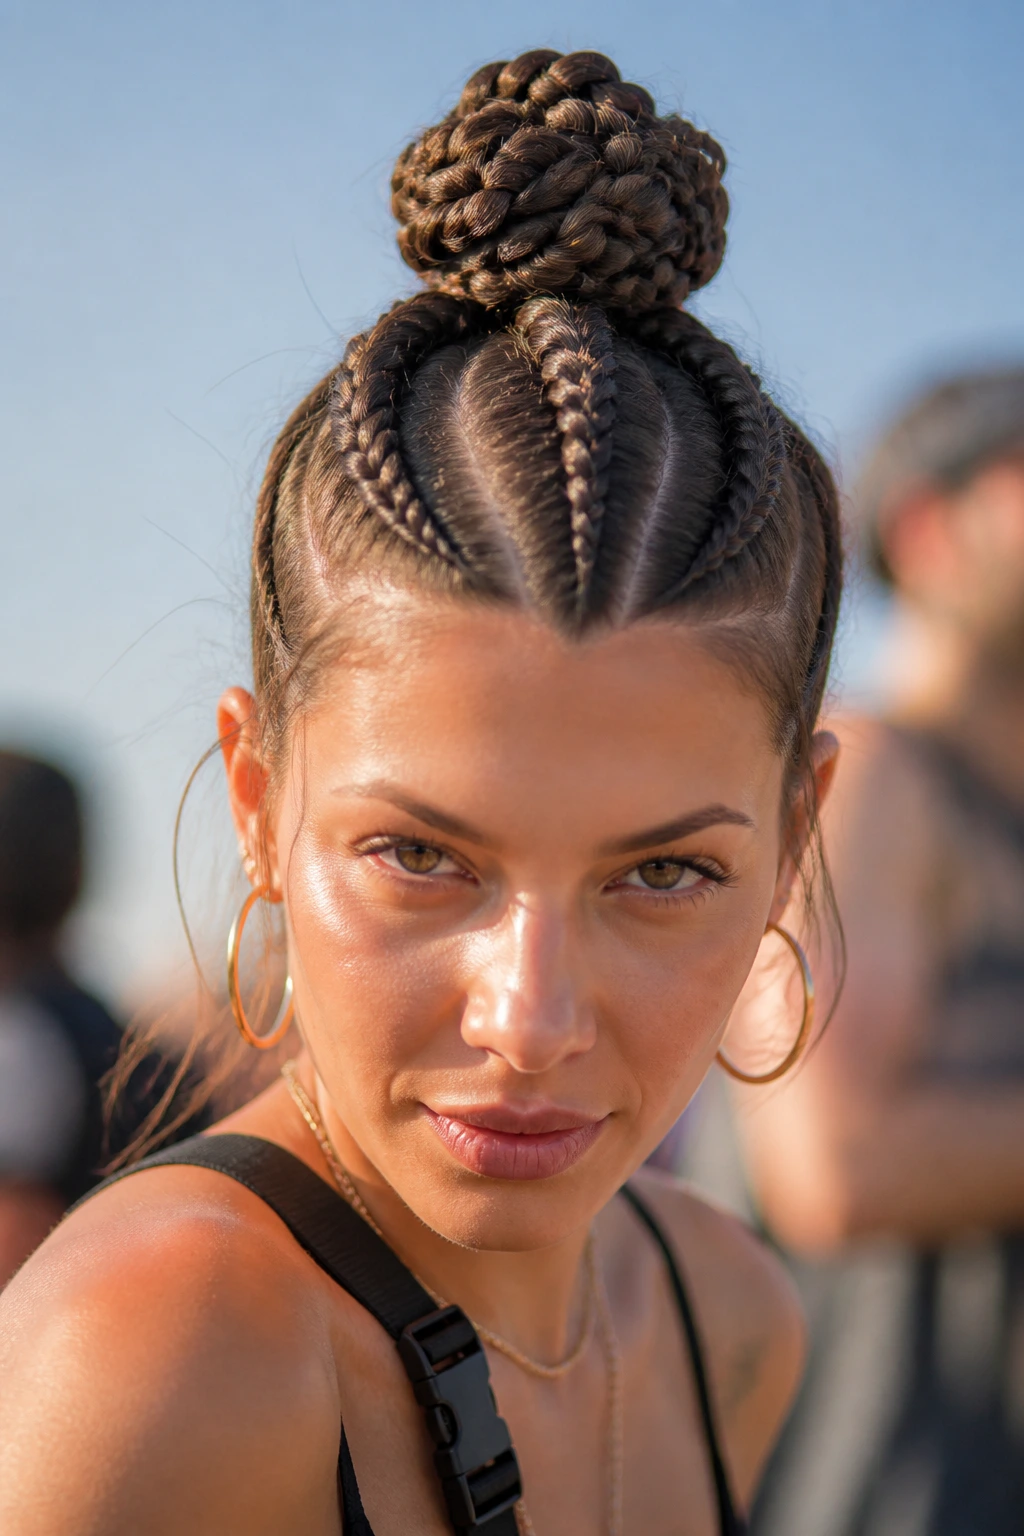
Three distinct braids starting from the forehead, all feeding into one massive top knot, provides a look that is both sporty and chic. This style is particularly effective at keeping the hair completely off the neck, which is a lifesaver during afternoon sets in direct sunlight.
Why This Style Succeeds
The “three-part” approach distributes the weight of your hair evenly across your scalp. Unlike a single high ponytail, which can pull heavily on the hairline, these three braids act like a suspension system. You can even use different types of braids for each section—maybe a French braid in the middle and two tighter cornrows on the sides—to add a layer of complexity.
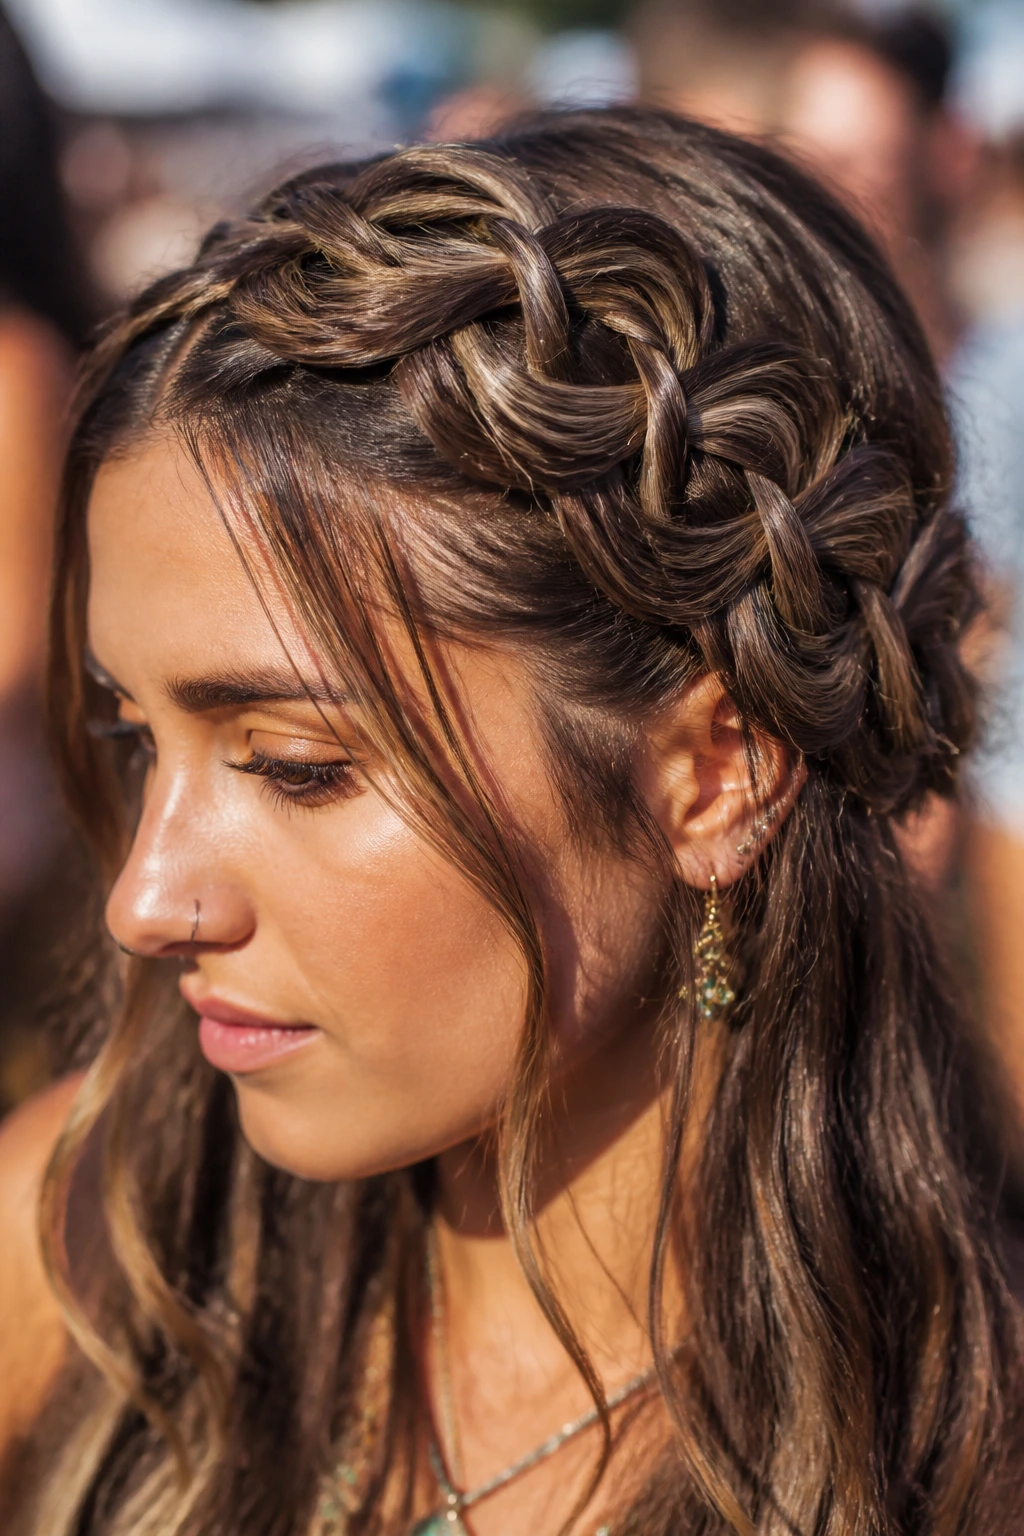
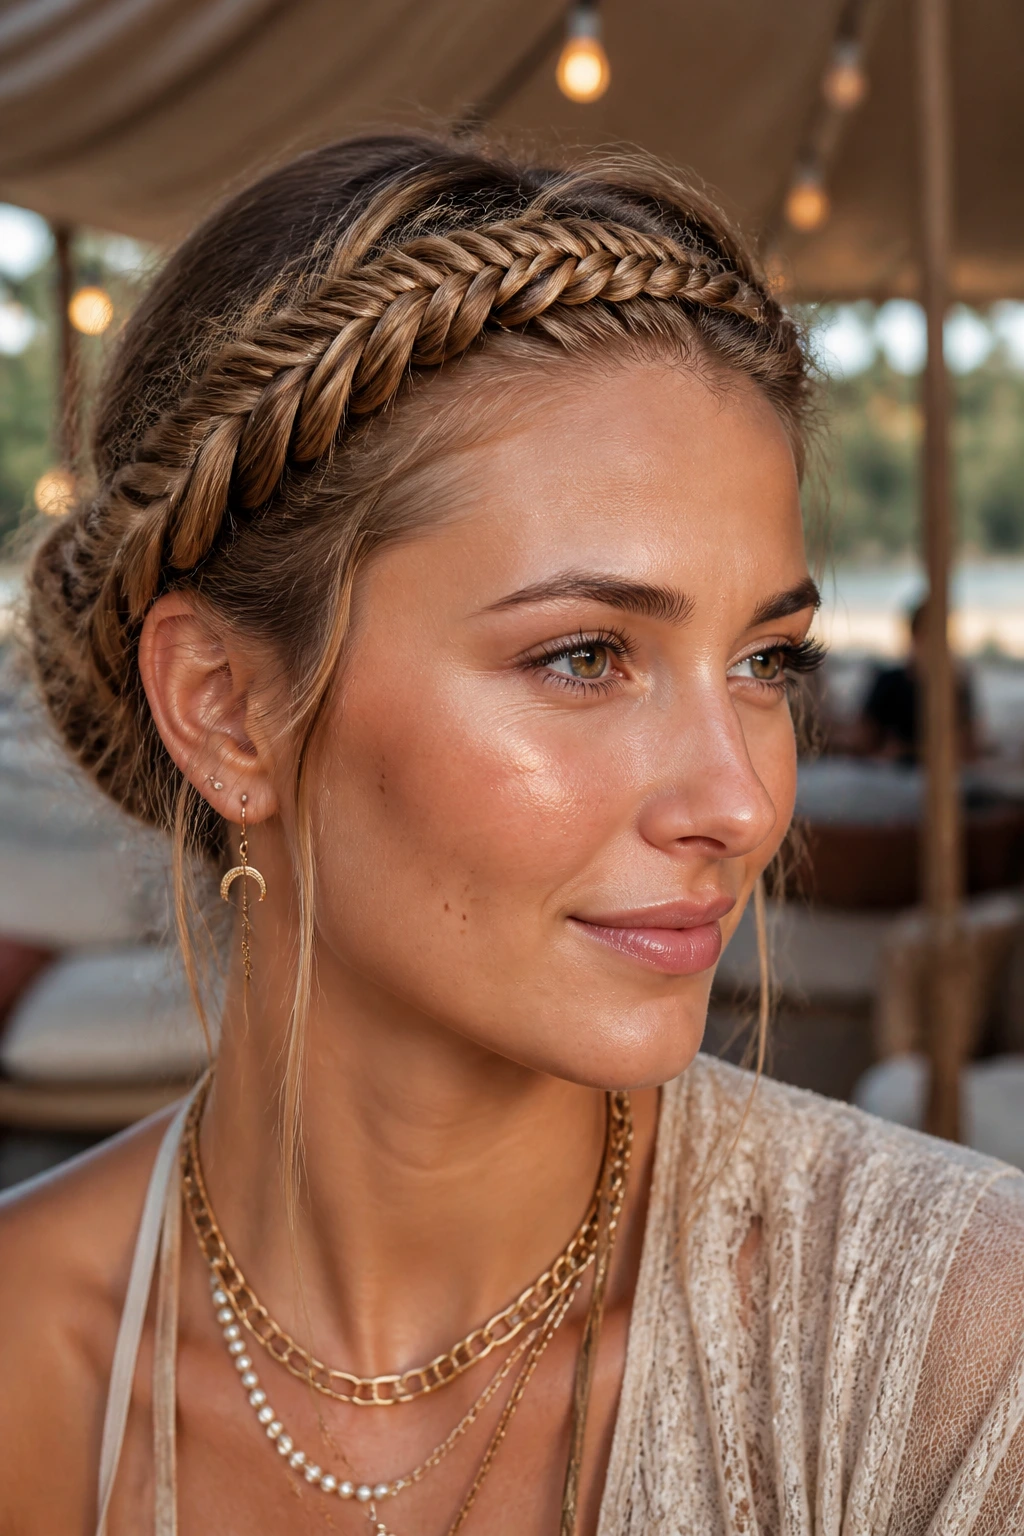
9. Rope Braid Headband
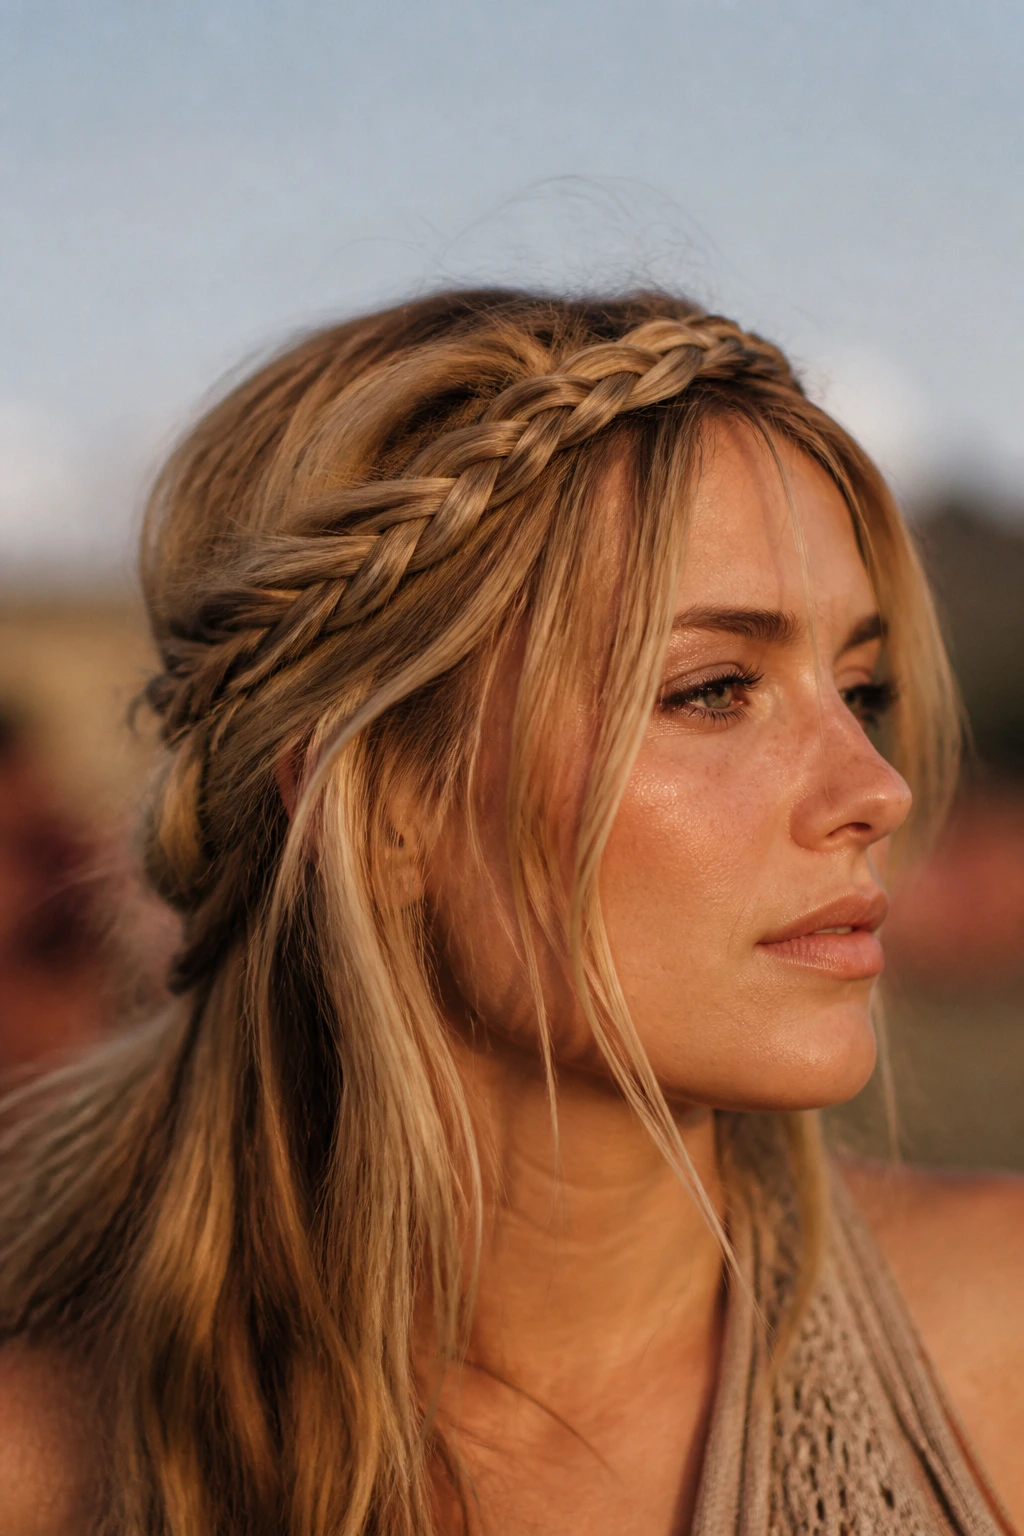
The rope braid—or “twist”—is a two-strand technique that creates a spiraling, rope-like appearance. When styled as a headband, it frames the face and creates an elegant, polished look. This is a great choice if you have bangs or layers that you want to integrate into your hairstyle without using hairspray.
Tips for Success
- Use a bit of hair wax on your fingers to keep the two strands from slipping while you twist.
- Always twist the two individual strands in one direction, then wrap them around each other in the opposite direction. This prevents the braid from unraveling the second you let go.
- Anchor the end of the rope behind your ear with a small, clear elastic and a bobby pin.
10. Pull-Through Braid

The pull-through braid is the king of “fake” braids. It looks like a complex, voluminous Dutch braid, but it is actually created using elastics and strategic pulling. It produces a massive, Instagram-worthy shape that looks like it took hours, even though it takes about ten minutes to execute.
Why It’s a Festival Favorite
It adds immense volume without needing a lot of hair density. If you have thin hair, this is your secret weapon. The structure provided by the elastics ensures that the braid maintains its shape even after hours of dancing. Remember to pull the sides of each “loop” out to maximize the width of the braid.
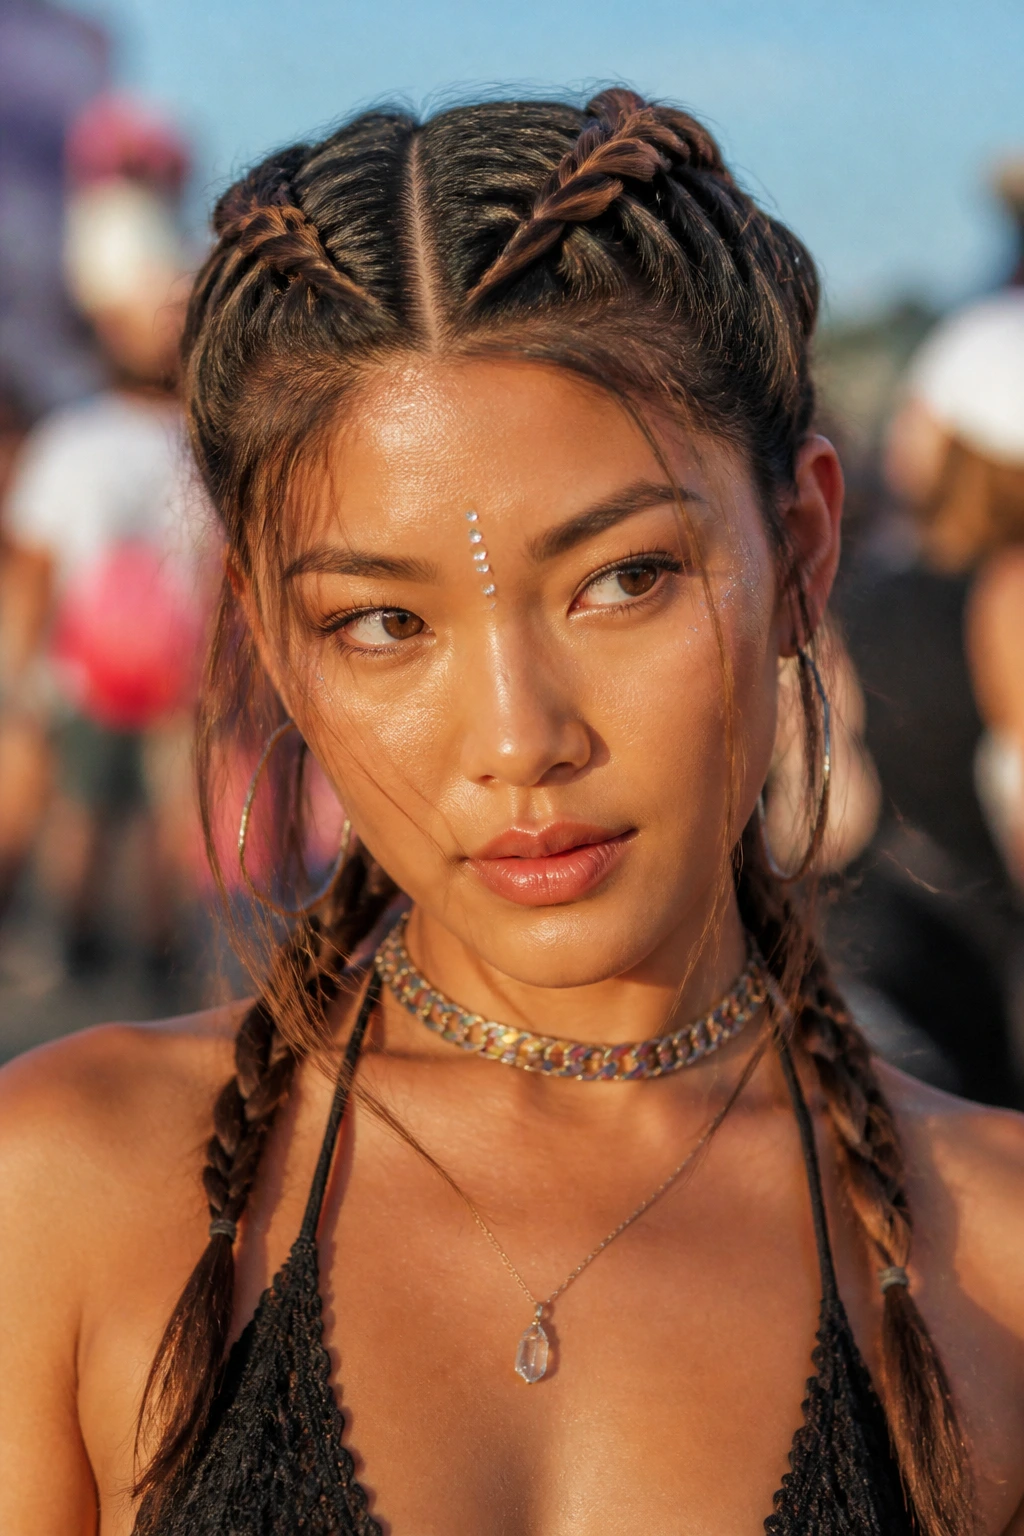
11. Hidden Glitter Part Braid

Sometimes the simplest braid is just a frame for something else. A small, tight Dutch braid placed directly along your part can serve as a conduit for glitter. By painting hair gel mixed with chunky cosmetic glitter onto the part and the braid itself, you create a “space-age” look that is iconic for festival aesthetics.
Application Advice
- Use a thick hair gel that dries hard.
- Mix in a generous amount of biodegradable glitter.
- Apply carefully with a small makeup brush to ensure you don’t get the glitter all over your forehead or eyes.
- This is a messy look, so lean into the chaos—the glitter is meant to migrate a little bit.
12. Viking-Inspired Side Swept Braids
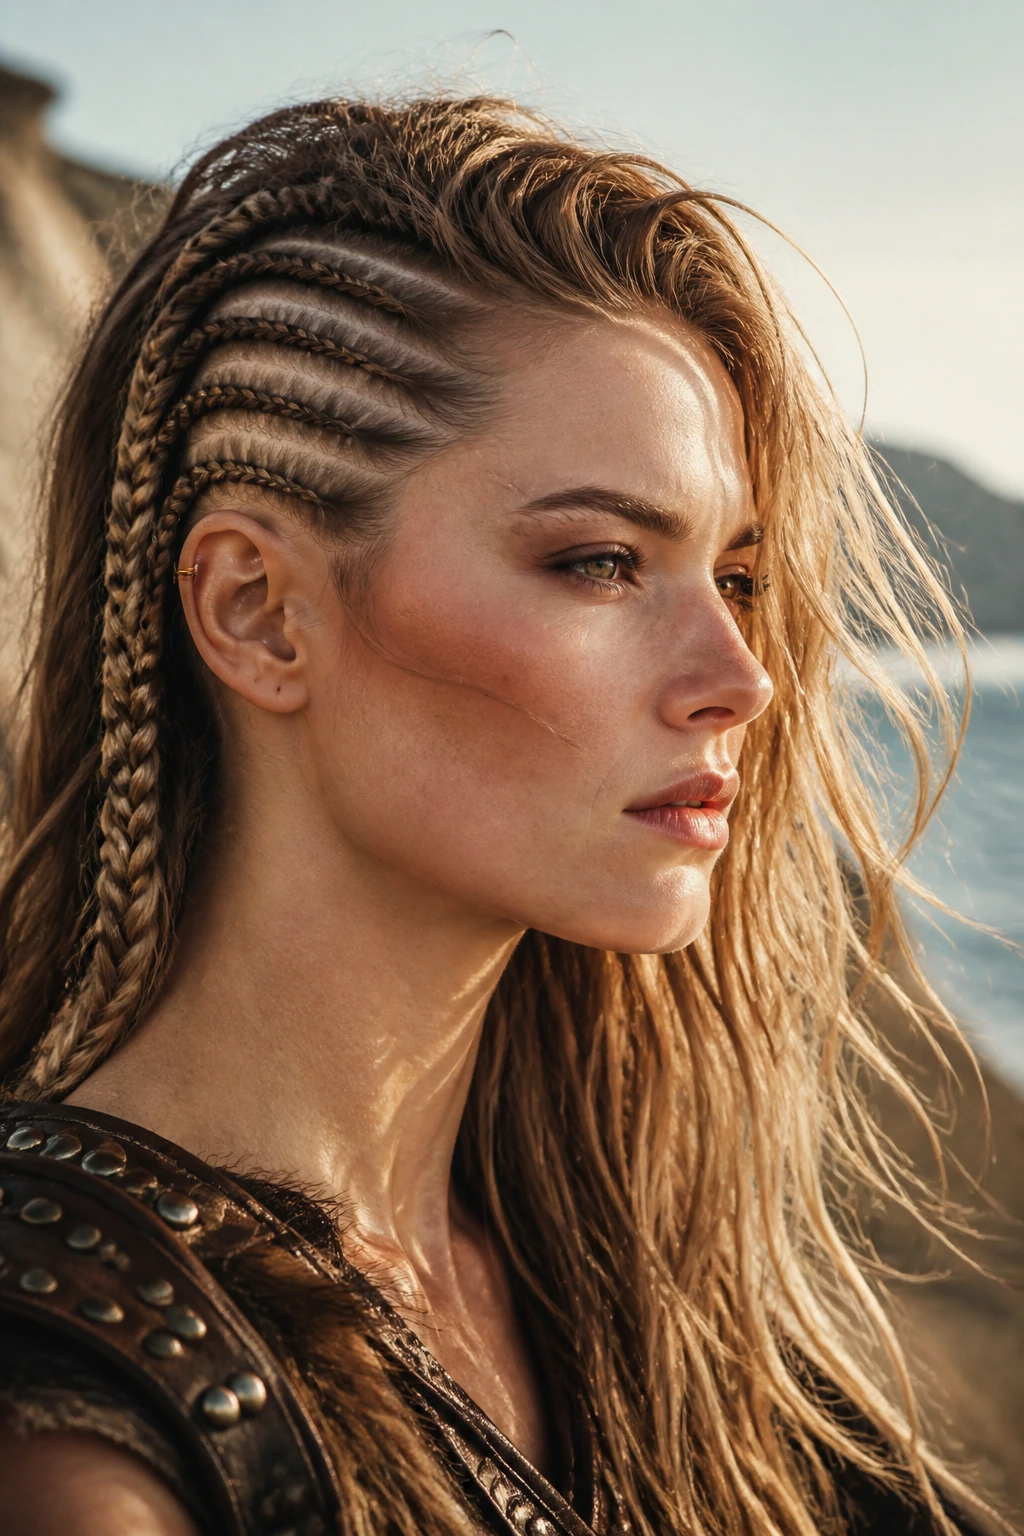
Think of this as a “warrior” style. It involves tight braids on one side of the head, creating a faux-undercut effect, with the rest of the hair left loose and textured with sea salt spray. It’s an aggressive, cool, and highly practical style for windy locations.
Creating the Texture
Once the braids are secure, hit the remaining loose hair with a generous amount of texturizing or sea salt spray. Use your fingers to “scrunch” the ends to create that messy, sun-dried, beachy volume. The contrast between the tight, orderly side braids and the wild, loose hair is exactly what makes this look work.
13. Double Braid Buns (Space Buns)
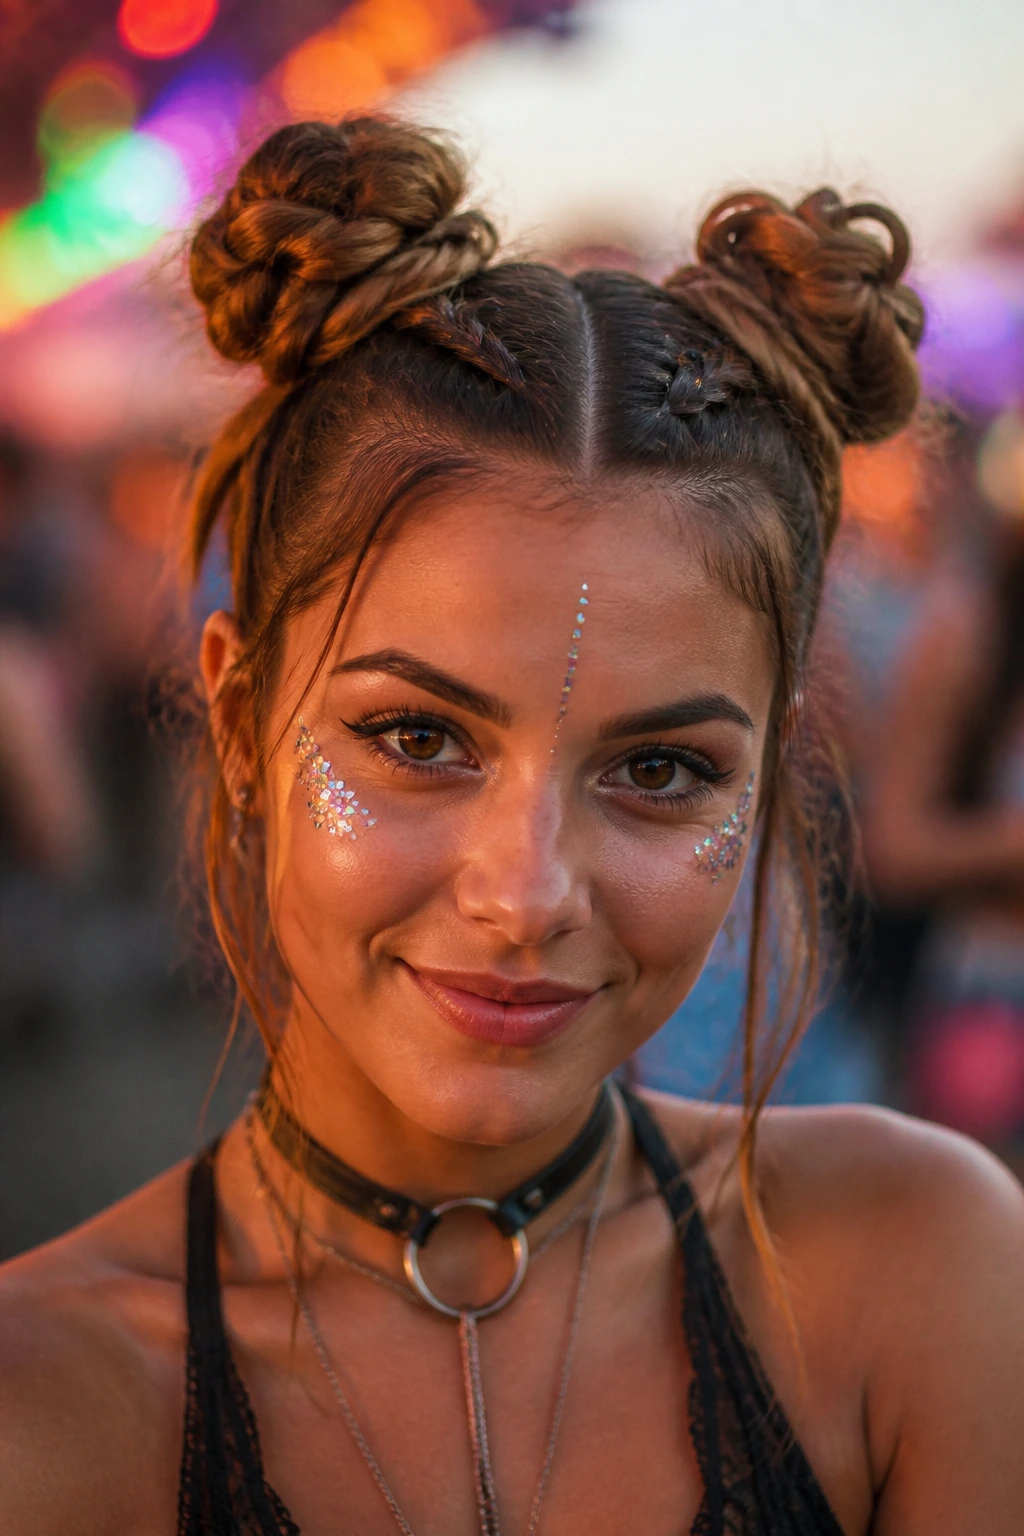
Space buns are a festival staple, but adding braids into the mix takes them from cute to professional. By Dutch-braiding your hair up the back of your head and ending in two messy, spiked buns, you achieve a style that is both youthful and highly functional.
Securing Your Buns
- Ensure your braids reach the very top of your head before you start twisting the buns.
- Use sturdy hair ties for the base of the buns.
- If you have shorter hair, consider using clip-in extensions to ensure the buns have enough bulk.
- Tip: Use bobby pins to secure the buns into a “starburst” shape rather than perfect circles for a more modern, messy look.
14. Cascading Waterfall Braid
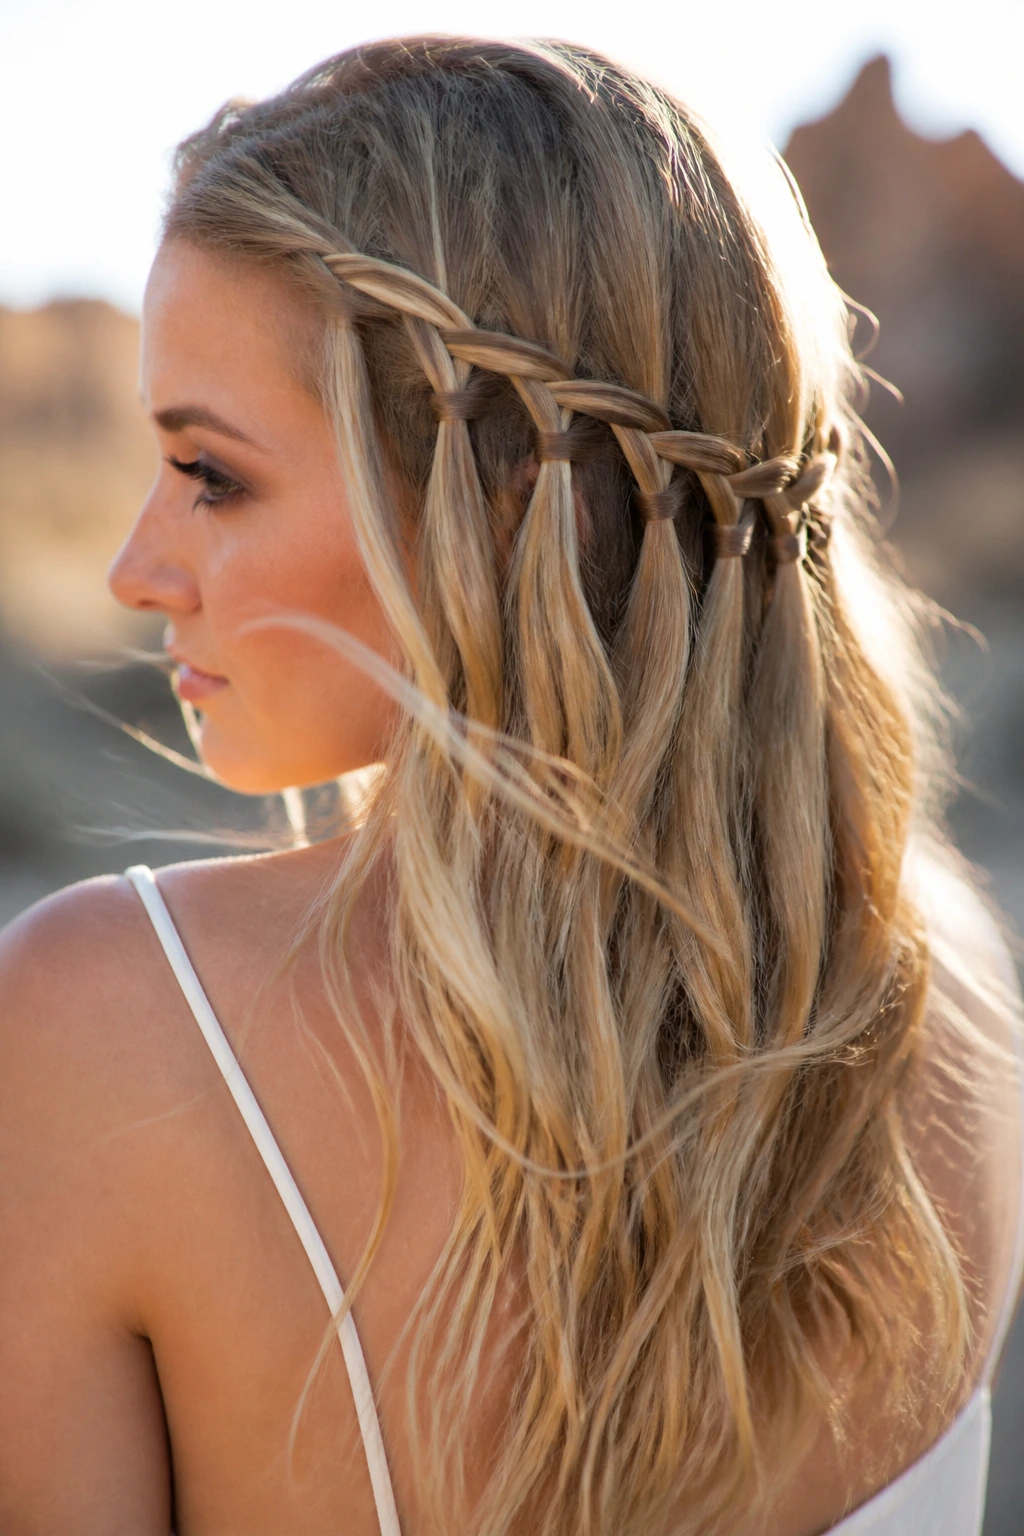
The waterfall braid is incredibly romantic. It allows you to have the look of a braid while leaving most of your hair loose. It creates a “dripping” effect where strands of hair are dropped through the braid, creating a layered, textured finish that moves beautifully in the wind.
Why Use It for Daytime?
It is less restrictive than a full-head braid, making it feel lighter during the heat of the day. It is an excellent choice for a Sunday afternoon set where you want to look put-together but don’t want a heavy, tight style pulling on your scalp. Pair it with a wide-brimmed hat for a classic festival outfit.
15. The “Dragon” Braid
The “Dragon” braid is a variation of the Dutch braid where you pull out small sections of the braid to create spikes or “fins” along the back. It’s a high-impact style that looks like an intricate piece of art. It’s perfect for people with long, thick hair who want a single, powerful braid.
How to Create the Fins
- Braid a standard Dutch braid.
- Once you reach the bottom, don’t just secure it. Go back up and gently tug on the edges of the braid.
- Pull out the loops significantly, specifically on the sides, to create that jagged, armored look.
- Use a light-hold hairspray to ensure the “fins” hold their shape against the wind.
16. Cornrow-to-Bun Transformation
Start your festival with tight, geometric cornrows leading into a bun. If the event is multi-day, you can easily transition this look. On the final day, undo the bun, add some leave-in conditioner to the ends, and let the hair hang loose for a “braid-out” texture that adds a whole new dimension to your final day look.
The Beauty of Versatility
Having a hairstyle that serves a dual purpose is essential for packing light. By starting with a protective cornrow style, you keep your hair healthy for the first two days, and on the third day, you get the benefit of a brand-new texture. Just be sure to bring a small travel-sized bottle of refresher spray to hydrate the hair once you take the braids down.
17. Feather-Accent Braids
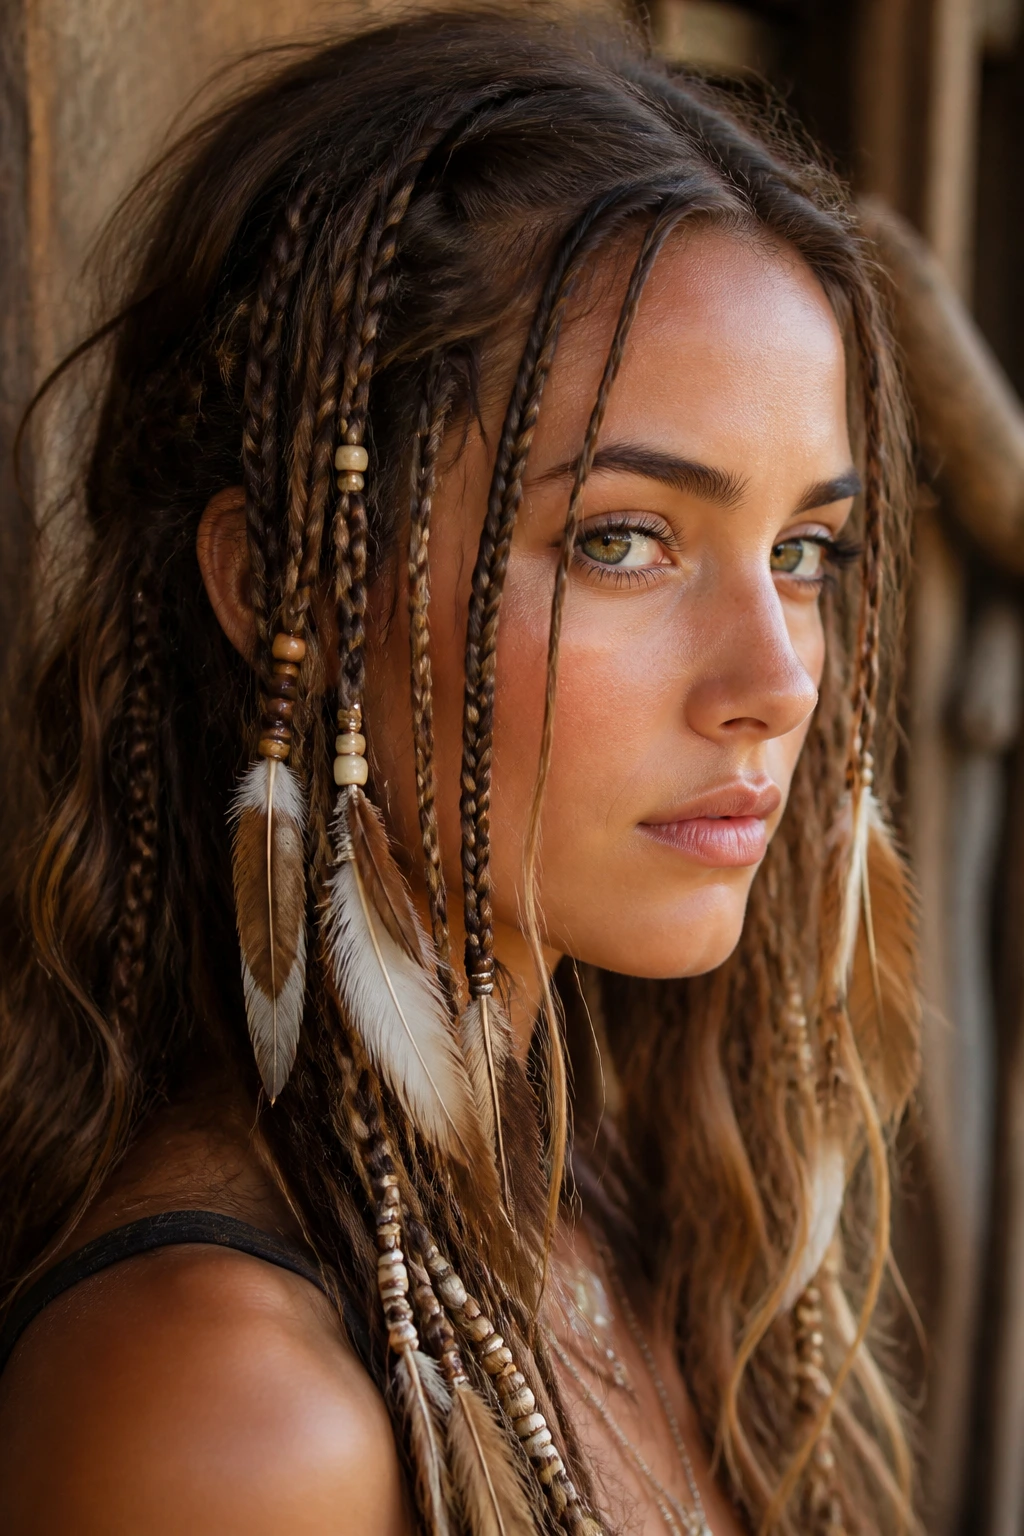
Sometimes the braid isn’t the star; it’s the frame. Using small, simple three-strand braids as anchors for feathers or leather charms adds an earthy, organic vibe. This is about accessorizing your hair in the same way you accessorize your body.
Placement Matters
- Place these small accent braids near your face to draw attention to your eyes.
- Use micro-beads to attach the feathers; these are much more secure than trying to tie them directly into the hair with knots.
- Don’t overdo it. Two or three accent braids are usually enough to make an impact without making your hair look heavy.
18. Micro-Braided Fringe

If you have bangs or face-framing layers, turning them into micro-braids is a fantastic way to keep them out of your face while adding a bit of edge to your look. It creates a “halo” effect around the face that feels slightly nostalgic yet very current.
Techniques for Bangs
- Braid your bangs starting from the hairline and working back toward the crown.
- Integrate the ends of the micro-braids into your main hairstyle, whether that’s a ponytail or a larger braid.
- Use tiny clear elastics to finish them off; if the elastic is too large, it will look bulky near your face.
19. Infinity Braid
The infinity braid is named for the way the hair weaves in a figure-eight pattern. It is incredibly intricate and visually dense. It works best on long hair and creates a very flat, sturdy braid that lies against the head, making it less likely to get caught on your clothing or backpack straps.
Why It Lasts
Because of the figure-eight pattern, this braid is naturally tighter than a standard French or Dutch braid. It essentially locks itself in place. It’s the perfect braid for an active day when you know you’ll be moving constantly. It feels very secure and requires almost no maintenance once it’s finished.
20. Crown Braid with Ribbon
Weaving a thin, velvet or silk ribbon into your crown braid adds a pop of color and a soft, feminine touch. Ribbons are lightweight, easy to pack, and can be switched out to match different outfits throughout the weekend.
Weaving the Ribbon
- Start by pinning the center of your ribbon to the base of your hair where the braid begins.
- Incorporate the two ends of the ribbon into your three strands of hair as you braid.
- Secure the ends with the ribbon itself, tying it into a small bow for a clean, decorative finish.
- Note: Choose a ribbon with a slight texture, like velvet, to help it stay put. Silky ribbons tend to slide out if the hair is too clean.
21. Reverse Dutch Braid Top Knot
Starting the braid from the nape of the neck and working your way up to a top knot is a great way to handle shorter hair. It effectively gathers all the hair at the bottom and forces it into a high, secure position. It’s the “upside-down” version of a standard Dutch braid.
Practical Benefits
This is the ultimate solution for people whose hair tends to fall out of high ponytails. By anchoring the braid at the base of the skull, you are fighting gravity. The braid provides the tension required to keep the hair in place, even if your hair is layered or has pieces that usually escape.
22. Messy Side Braid with Flower Crowns
If you are attending a festival with a bohemian theme, a loose, messy side braid is practically mandatory. It feels effortless and soft. Adding a flower crown or individual silk flowers tucked into the braid completes the aesthetic perfectly.
Achieving the “Messy” Look
- Do not use a comb to part your hair. Use your fingers to create an irregular, natural-looking part.
- Braid loosely and don’t tighten it at the end.
- Once you reach the bottom, pull at the loops to create a soft, romantic finish.
- If pieces fall out, let them! This style is supposed to look like you just walked through a meadow, not like you spent an hour in front of a mirror.
23. Braid-In Tinsel
Hair tinsel is no longer just for holiday parties. Adding strands of holographic or metallic tinsel into your braids catches the stage lights beautifully, especially during night sets. It gives a futuristic, sparkling effect that makes your hair look like it’s vibrating with energy.
Application Tips
- Use “tie-in” tinsel, which has a small loop at one end.
- Use a crochet hook to pull a tiny section of hair through the loop, then pull the tinsel through itself to create a knot at the root.
- Braid the tinsel into your hair as you go.
- Don’t worry about the ends; if they are too long, you can trim them to match the length of your hair after the braid is complete.
24. Fishtail Crown Braid
Combining the fishtail technique into a crown braid takes a standard look and makes it significantly more complex. It’s a very sophisticated style that works well for VIP areas or lounge settings. It looks intricate, expensive, and intentionally styled.
Why It Stands Out
Most crown braids are done with simple three-strand braids. Using a fishtail pattern makes the braid appear flatter and more woven, almost like a textile. It’s a subtle change, but one that people will definitely notice. It takes more skill, but the payoff in terms of style is substantial.
25. The Half-Down “Snake” Braid
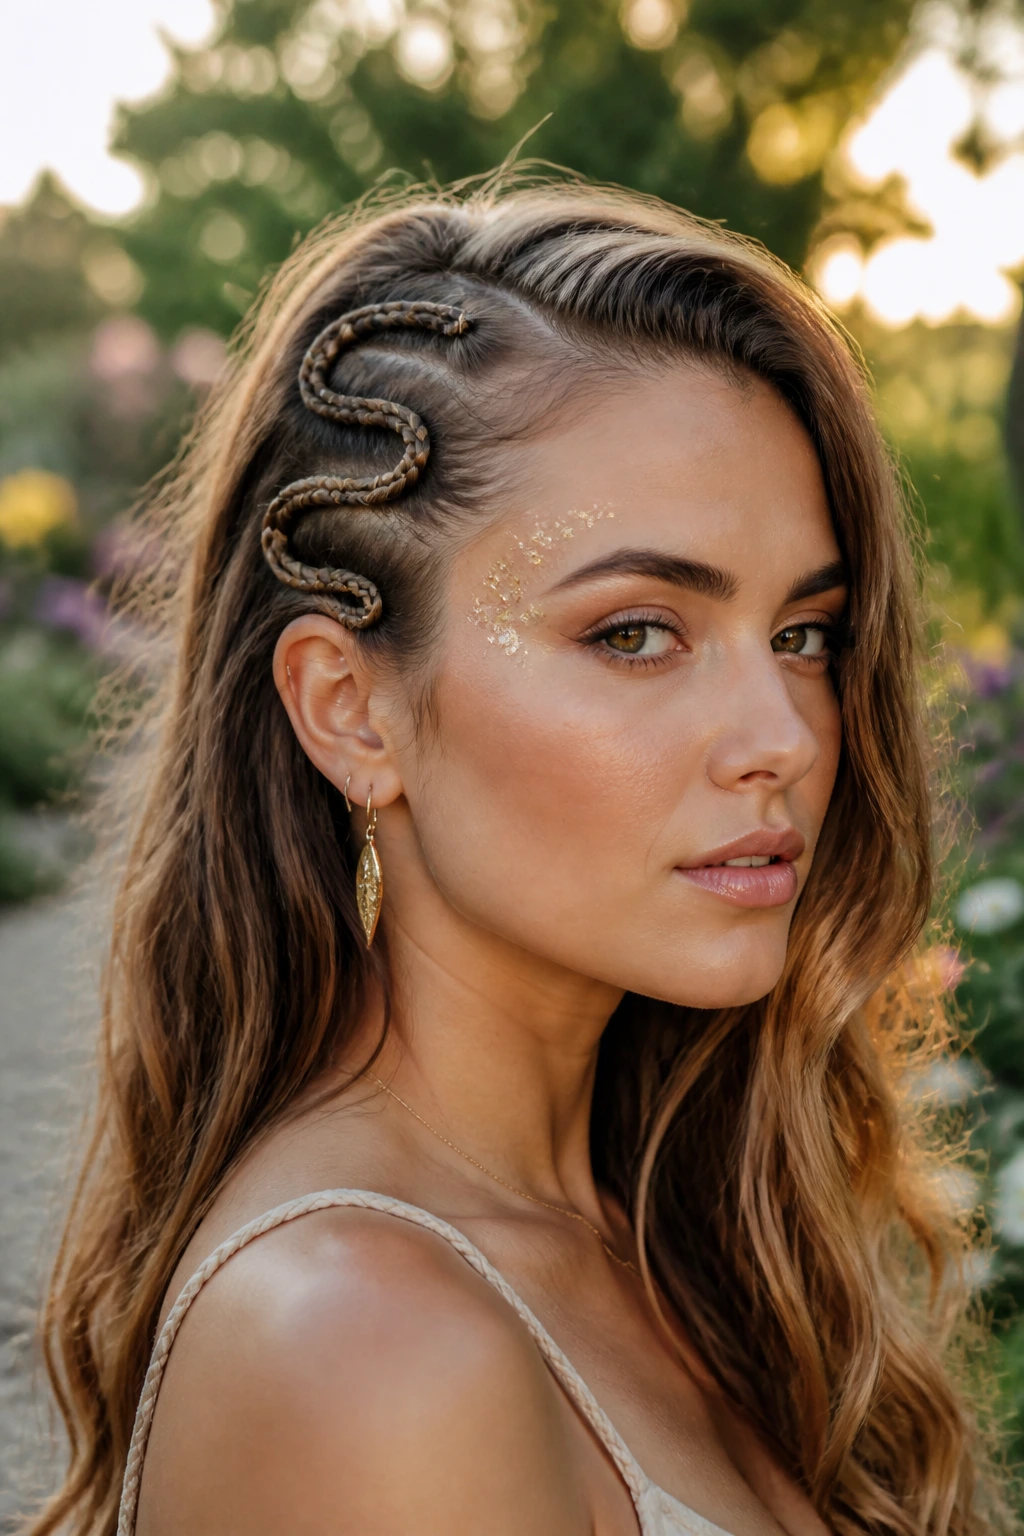
The snake braid is a fun, decorative technique that creates a wiggling shape along the head. By performing a three-strand braid on a small section and then pulling on one of the strands, the braid “snakes” up into a decorative shape. It’s a great accent for the side of your head.
Finishing the Look
- Leave the rest of your hair loose with a deep side part.
- Pin the snake braid along the side of your temple to keep it flat.
- This is a purely aesthetic braid—it doesn’t do much for hair control, but it looks incredible in photos and adds a unique, playful flair to your overall look.
Final Thoughts
At the end of the day, festival hair is about confidence. Whether you’ve spent three hours installing intricate, tinsel-filled cornrows or you’ve simply thrown your hair into a quick, messy Dutch braid with some glitter, the goal is to create a style that allows you to stop worrying about your hair and start focusing on the music.
Always keep a small emergency kit in your backpack: clear elastics, a few extra bobby pins, and a travel-sized bottle of dry shampoo. These basics will save you when the inevitable desert heat or humidity starts to wear on your style. Braids are a gift to the festival-goer—they are the most reliable tool in your arsenal, proving that you can look intentional, artistic, and entirely “festival-ready” from the moment the gates open until the very last song of the weekend. Have fun with the colors, don’t be afraid of the glitter, and let your hair be the loudest part of your outfit.