Mastering the inverted braid—often called the Dutch braid or “inside-out” braid—is arguably the single best way to upgrade your daily hair game from “I just woke up” to “I put genuine effort into this.” While a standard French braid tucks your hair underneath itself, creating a flatter, seamless look, the inverted version forces the strands over one another, resulting in a three-dimensional, high-definition plait that pops off the scalp. It is robust, stays put through high winds and long commutes, and manages to look sophisticated even on day-three hair.
Whether you are working with slippery, freshly washed strands or hair that has a bit of grit from dry shampoo, the mechanics of the inverted braid remain the same. The trick lies in the tension. If you pull too loosely, the braid will sag and lose its definition by midday. Pulling too hard, however, can lead to tension headaches and unwanted breakage. The sweet spot is a firm, consistent tug on each strand as you cross it under the middle section.
Before you begin, consider your preparation. A light dusting of texturizing spray or dry shampoo is vital for fine hair, as it provides the grip necessary to keep the braid tight. If you have thicker hair, you might find a bit of smoothing cream or a light-hold pomade helpful to keep flyaways in check as you weave. Grab a clear elastic band and a boar-bristle brush, and let us walk through the most practical ways to wear these braids throughout your week.
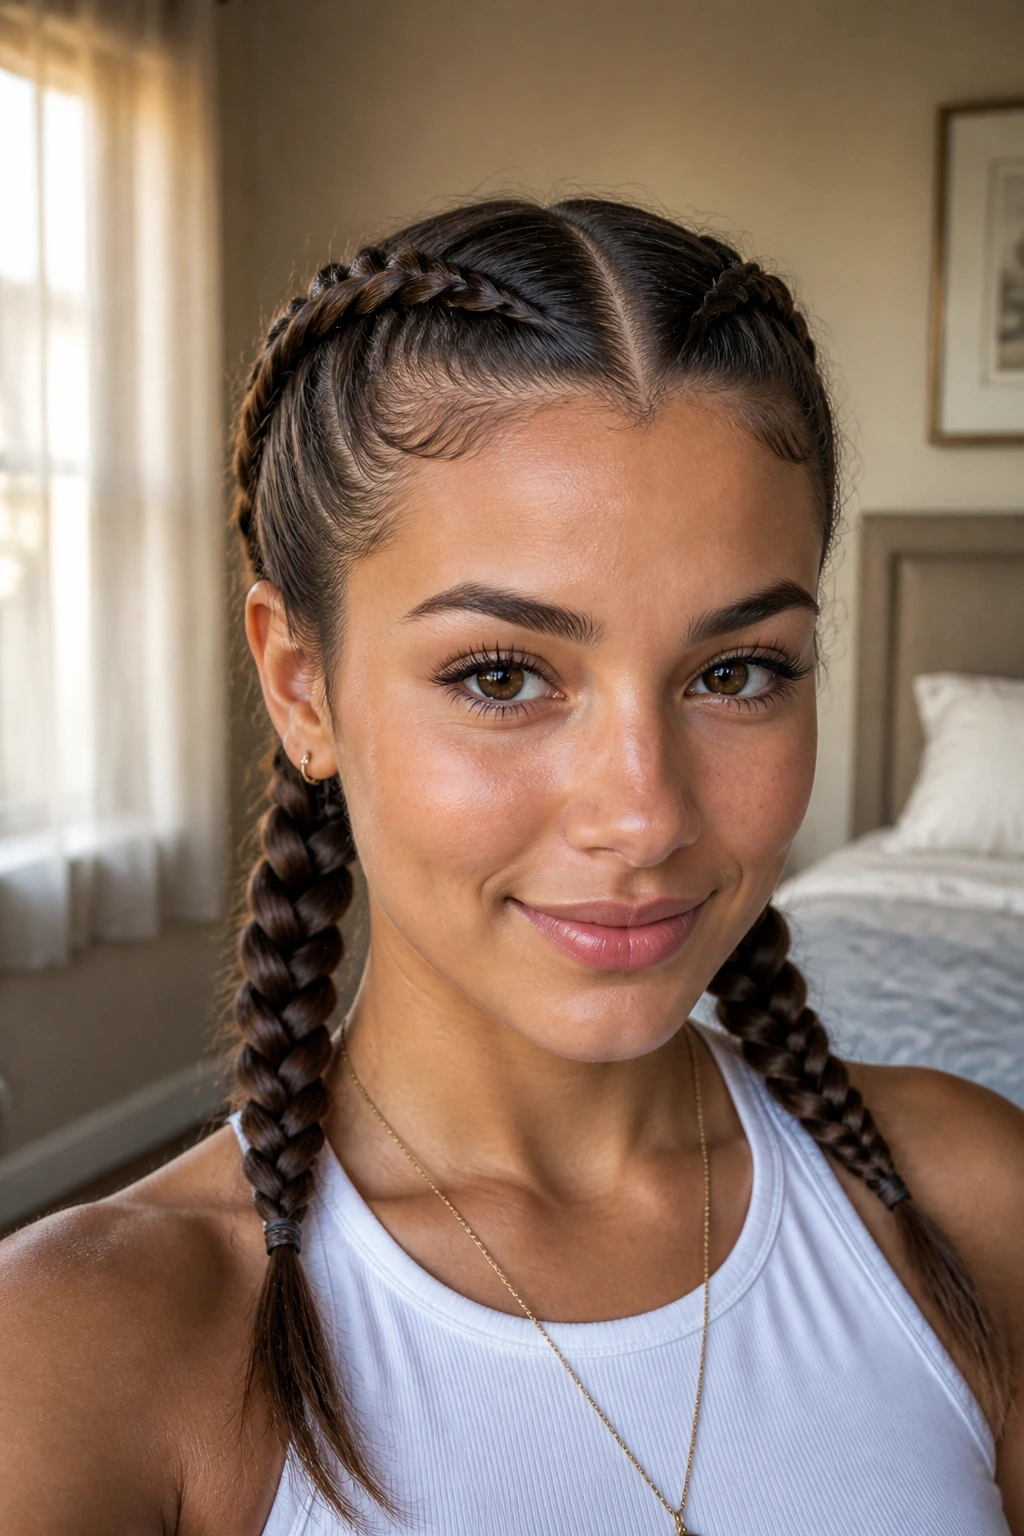
1. Classic Dual Dutch Pigtails
This is the foundational look that every braider should have in their toolkit. By splitting your hair down the center and working two inverted braids from the hairline to the nape, you create a symmetrical, polished style that works for the gym, a hike, or a casual weekend errand.
Why This Style Works
The beauty of the dual approach is the distribution of weight. Because the hair is split into two sections, the braids are easier to manage and less likely to pull on your scalp compared to a single, heavy center braid. It stays secure for hours and protects your hair ends from friction.
How to Get the Look
- Part your hair into two equal sections using a rat-tail comb for precision.
- Secure one side with a clip so it stays out of the way while you work on the first braid.
- Start at the very front hairline, grabbing a small triangle of hair.
- Divide this into three strands, and begin crossing the outer strands under the middle, picking up new hair with every pass.
- Repeat on the other side, matching the angle and tension as closely as possible.
Pro tip: If you want a messier, more relaxed appearance, wait until you have secured the ends with elastics before you start “pancaking”—pulling gently at the edges of the braid loops to make them appear twice as wide.
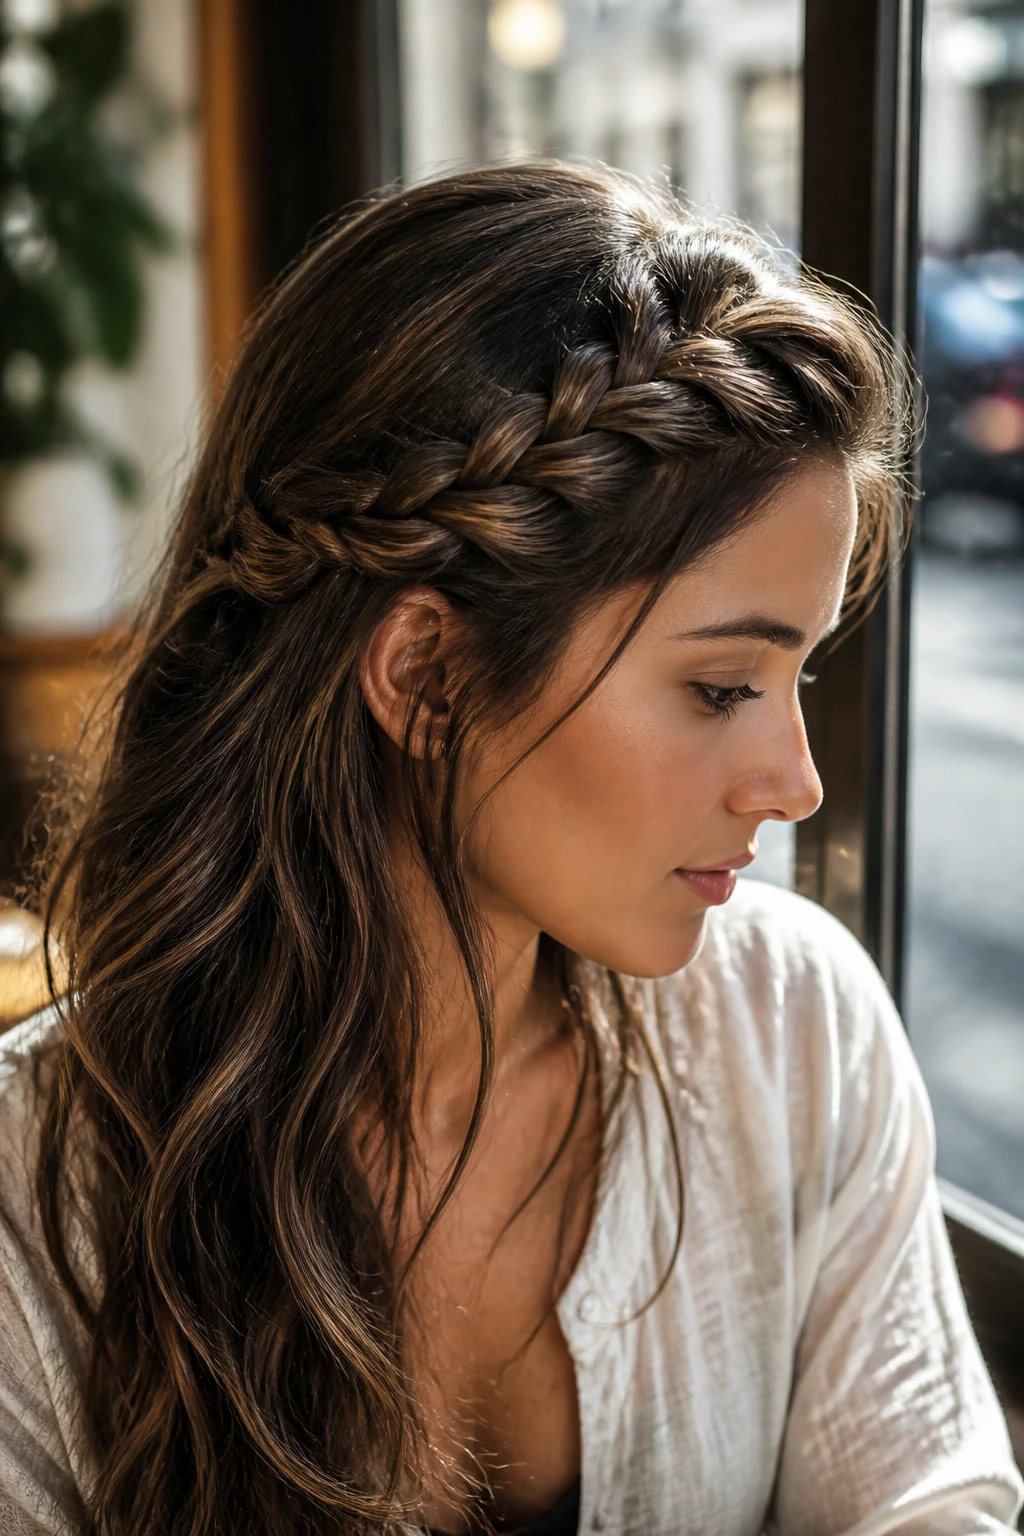
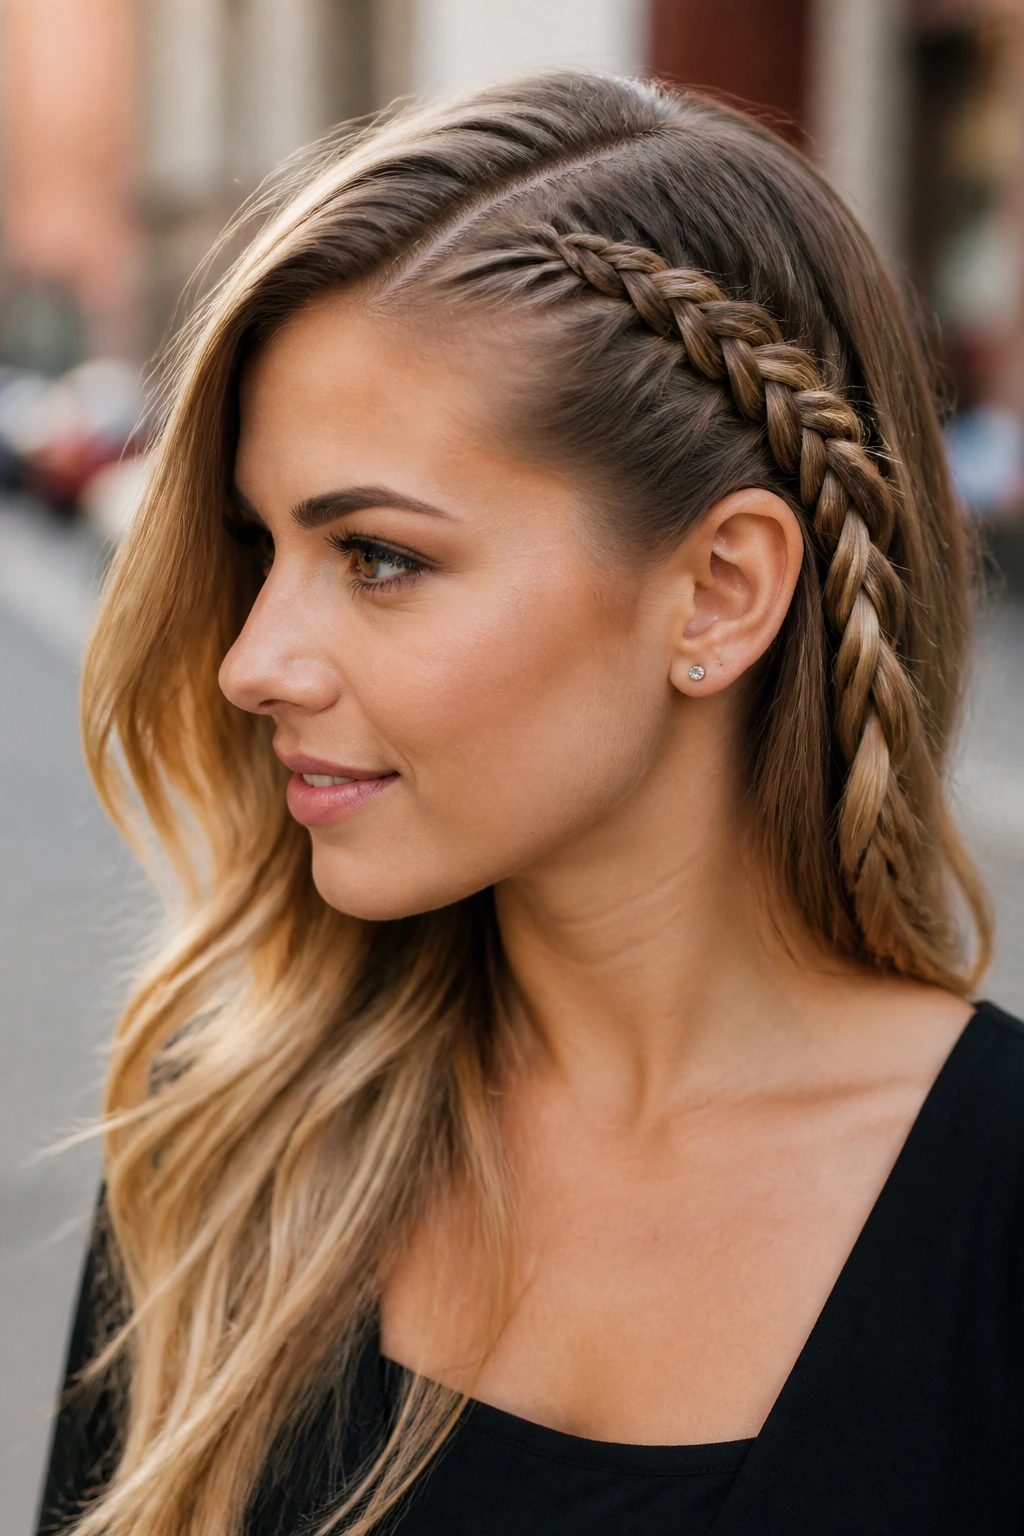
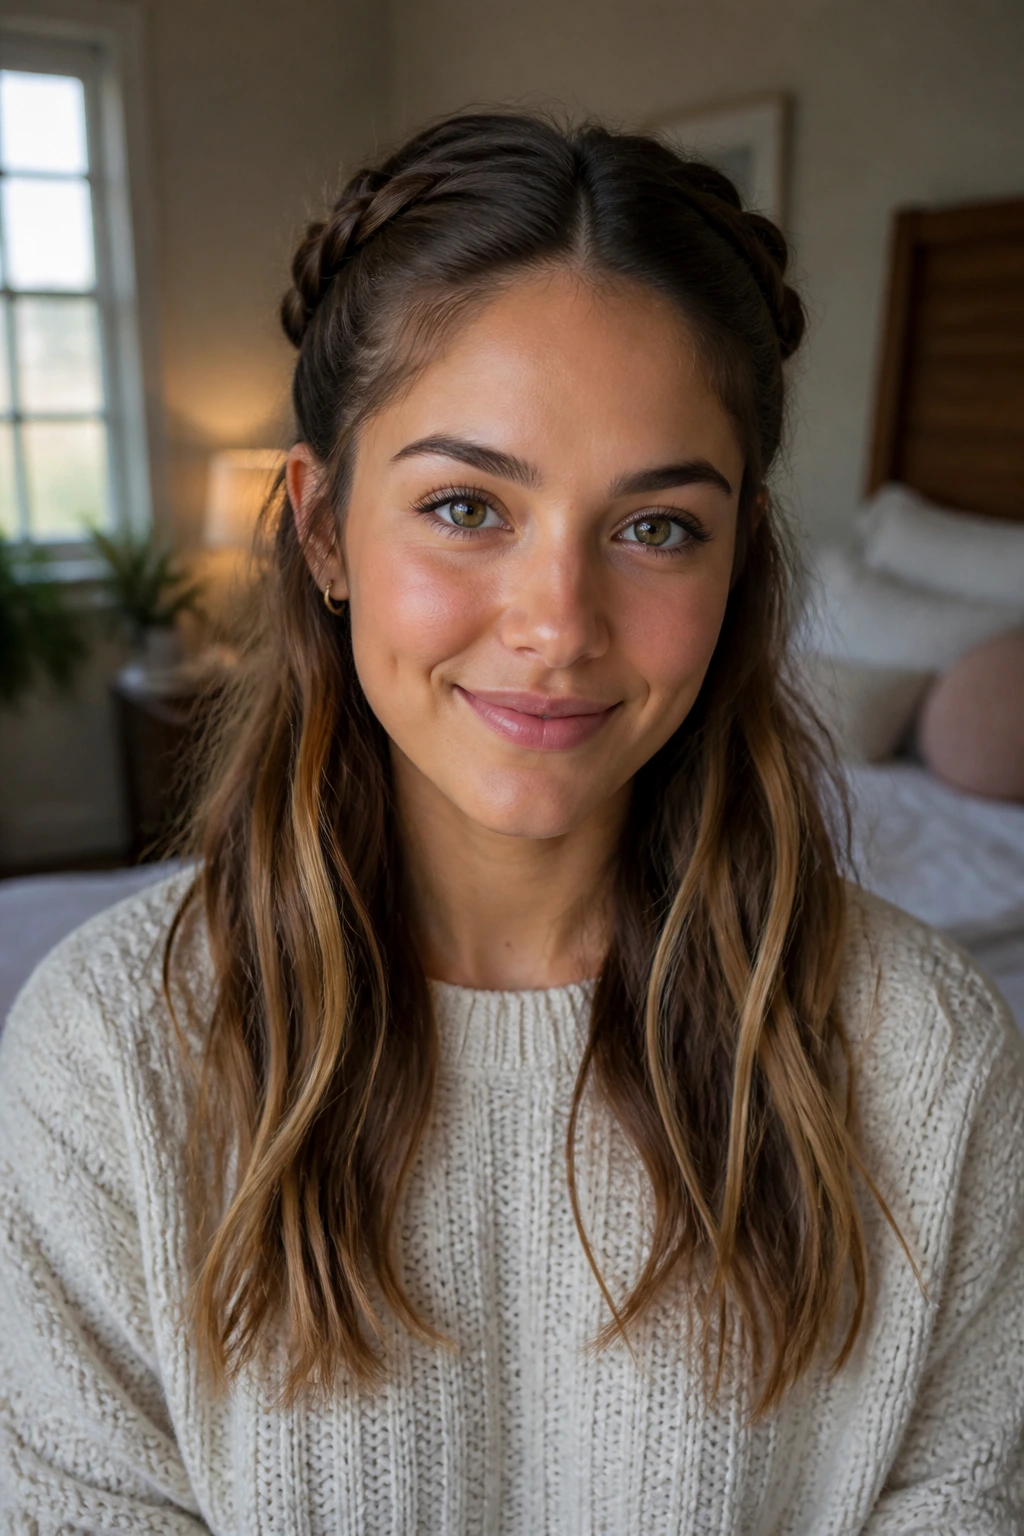
2. The Headband Braided Crown
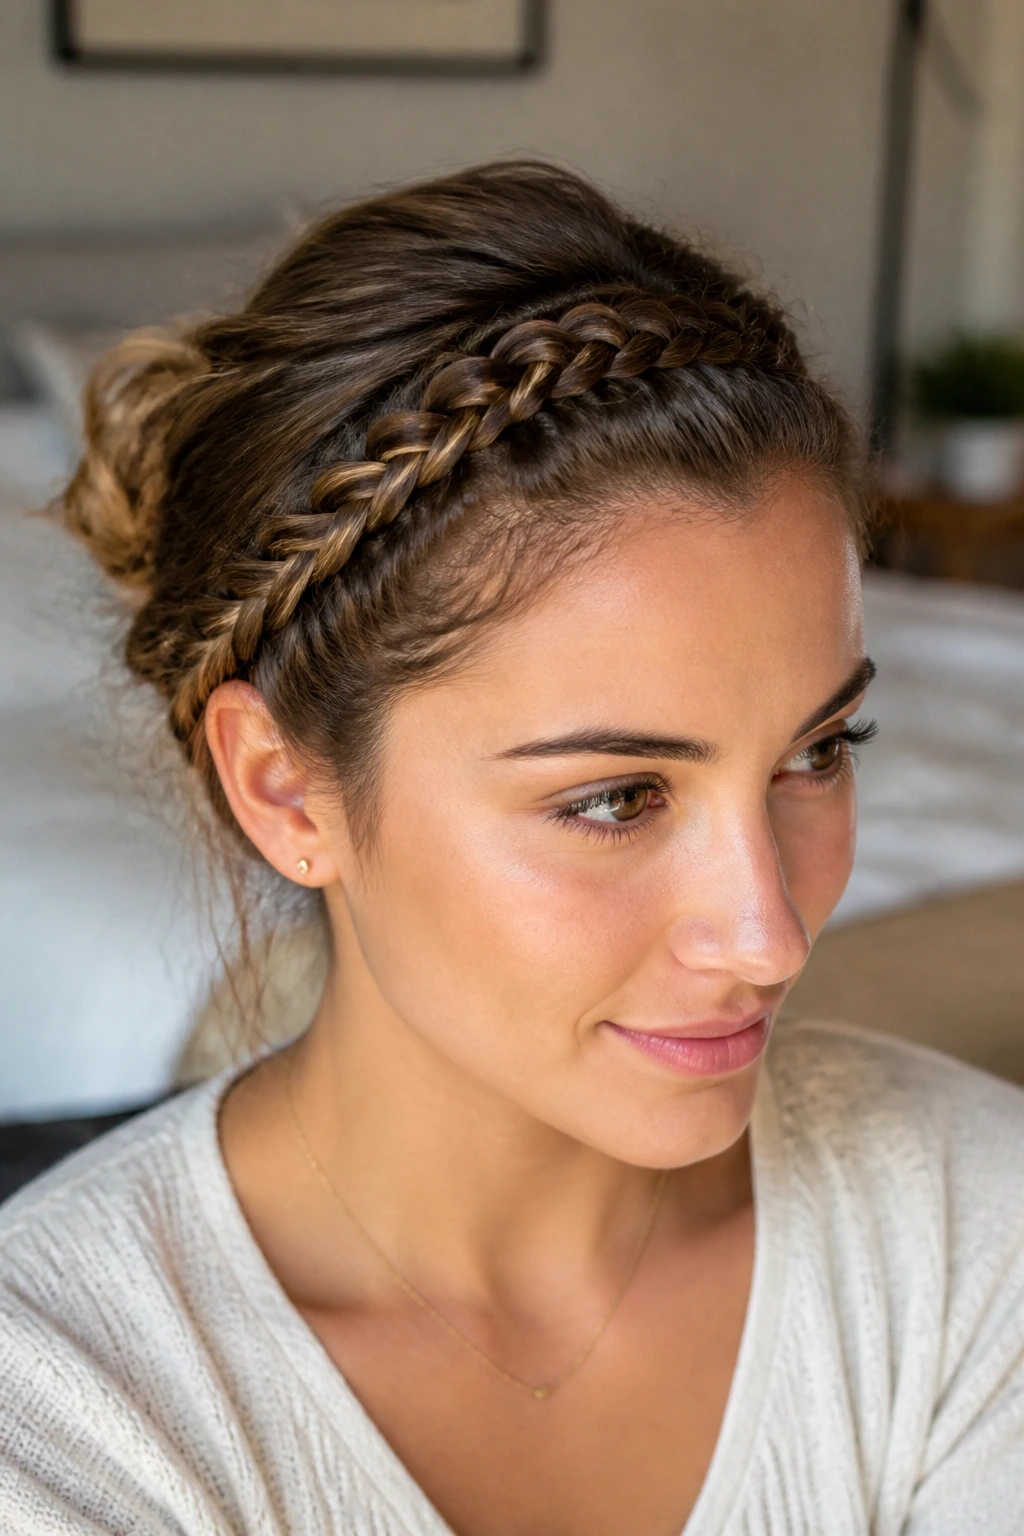
Instead of braiding your entire head, this look focuses on a single inverted braid that traces the shape of your hairline, acting as a functional headband to keep hair out of your face. It is an excellent solution for growing out bangs or keeping layers contained.
Setting the Tension
To ensure this braid stays flush against your forehead without bulging, you must pick up very thin sections of hair with each pass. The closer you keep the braid to the hairline, the more secure it will feel throughout the day.
Why It’s Perfect for Busy Mornings
You only need to braid about a third of your head before you can tie it off and hide the tail under the rest of your hair. It looks complicated, but once you find your rhythm, you can finish this style in under five minutes.
- Start on one temple, angling the braid back toward the crown.
- Incorporate hair from the hairline and a bit from behind the braid.
- Stop at the opposite ear and pin it securely with bobby pins hidden beneath your loose hair.
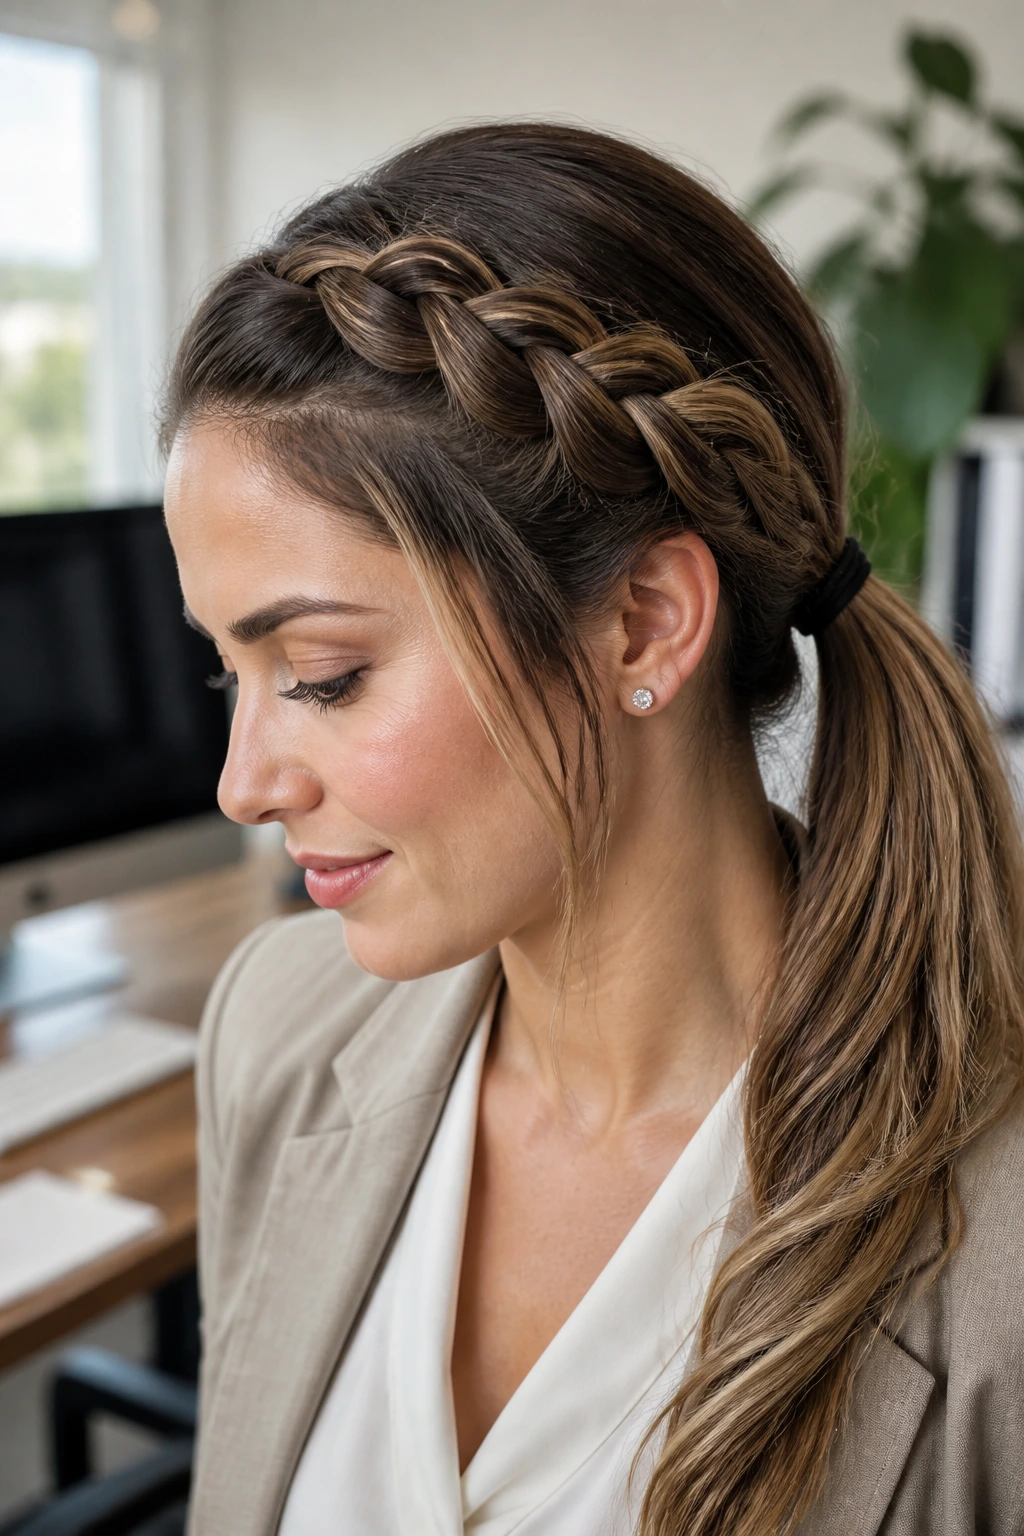
3. High-Volume Inverted Ponytail
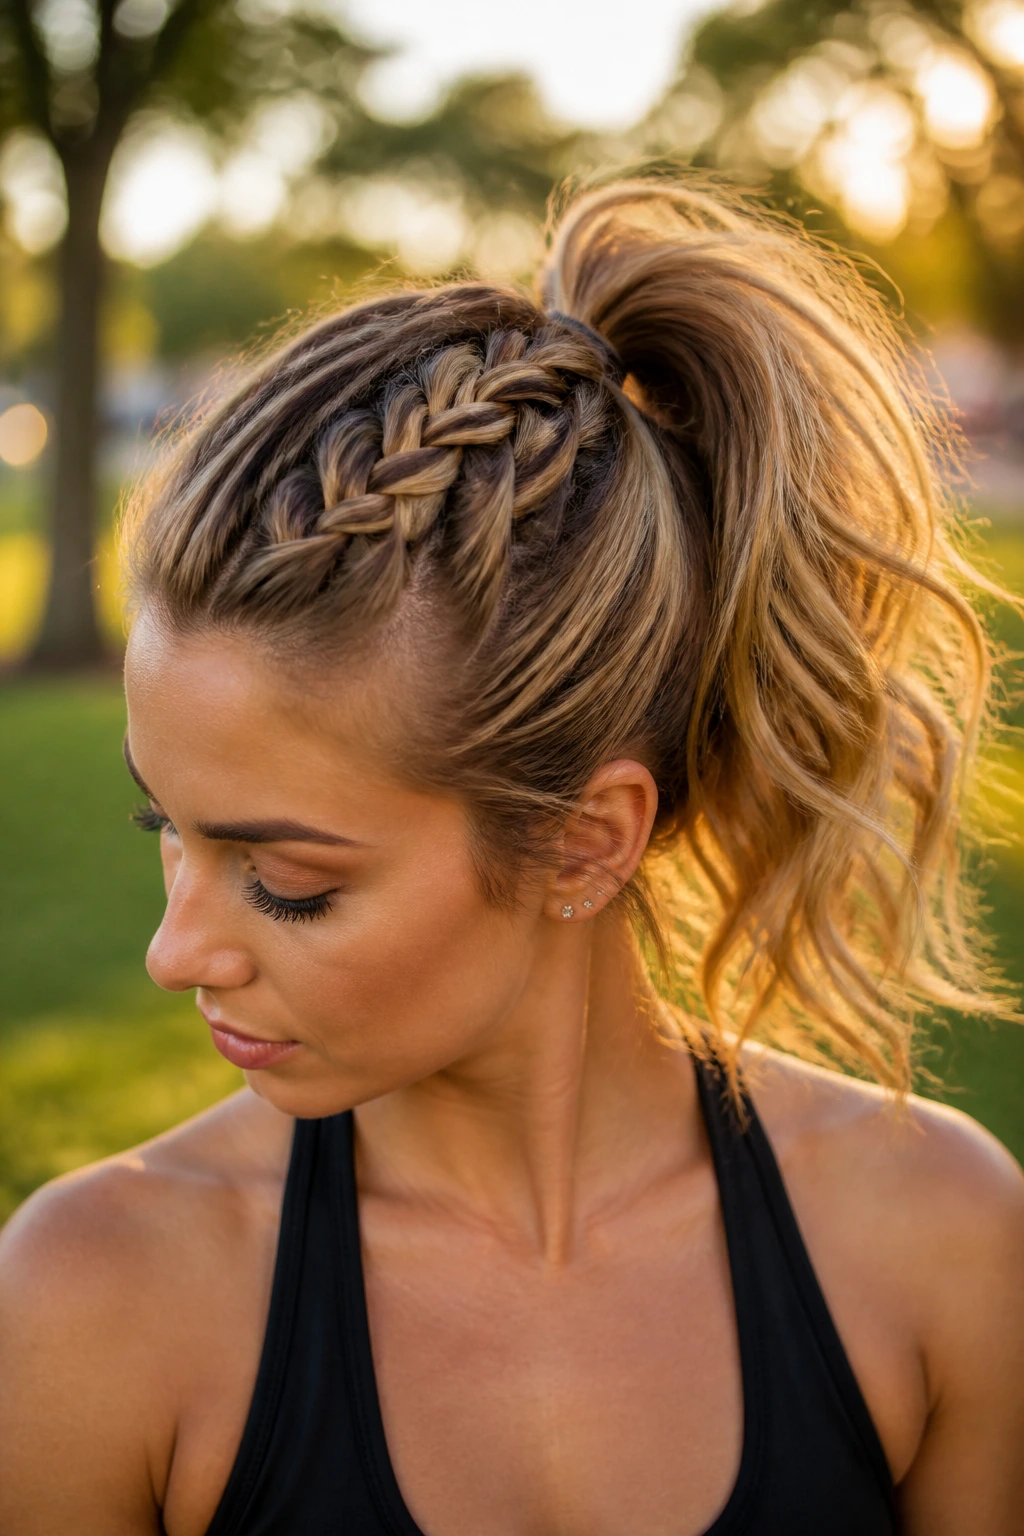
If you love a ponytail but find that it looks a bit thin, an inverted braid leading into it adds the illusion of thickness. By braiding the top section of your hair and merging it into a high ponytail, you create a dramatic, sporty look.
The Mechanism of the Merge
The key is to braid only the crown section. Stop adding new hair once you reach the top of your head, then continue braiding the tail for another two inches before tying it off with a clear elastic. Now, gather that braid along with the rest of your hair into a ponytail.
Why This Beats a Basic Pony
The braid provides a structural anchor. It prevents your hair from sagging or pulling away from the scalp as the ponytail moves. It also keeps your crown looking smooth and styled rather than frizzy.
- Use an “X” shape of bobby pins to keep the ponytail base extra lifted.
- Wrap a small strand of hair around your elastic to hide the plastic and elevate the look instantly.
4. The Half-Up Inverted Accent
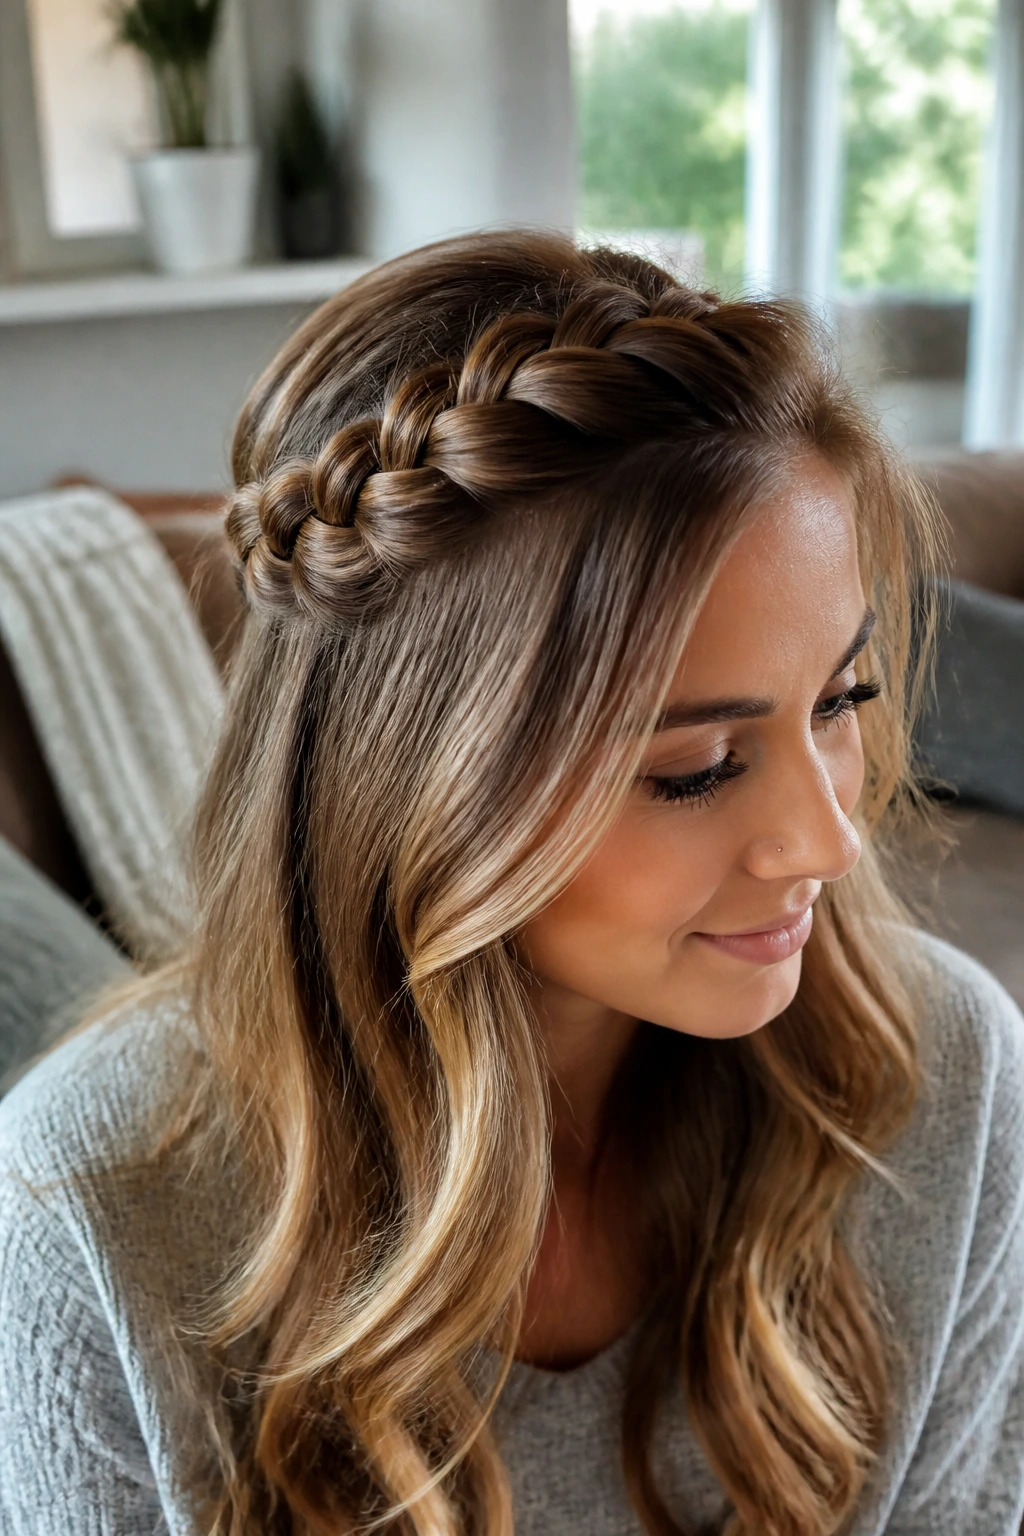
For those who prefer to keep most of their hair down, the half-up inverted braid is a godsend. It offers the polish of an updo while letting you show off your length. This is particularly striking on hair with highlights, as the braid pattern makes the color variation stand out.
Tips for Success
Avoid picking up hair from too low on the head; you want to maintain the “half-up” silhouette. If you start too low, you end up with a full-head style, which loses the intentional “half-down” look you are aiming for.
How to Style It
- Section off the hair from your temples to the crown.
- Create a single inverted braid that travels straight back to the center of your head.
- Tuck the end of the braid underneath a small section of hair and secure it with a tiny elastic or a clear pin.
- Gently pull the loops to create a soft, romantic finish.
5. The Low-Nape Inverted Chignon
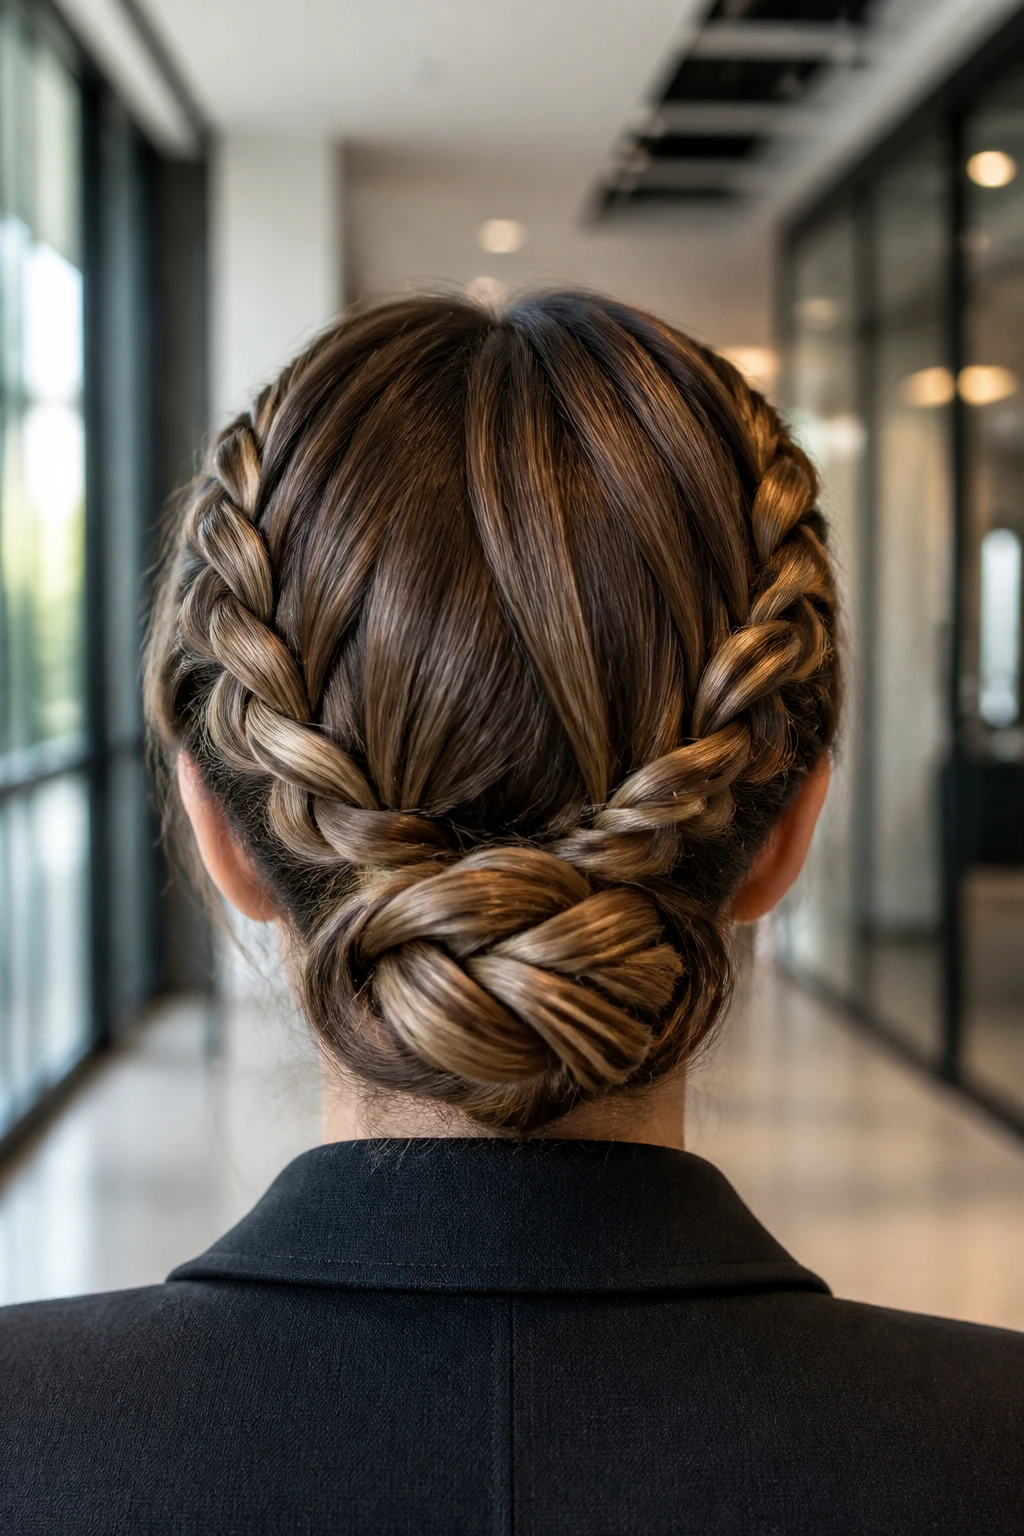
If you need a professional look that can handle a boardroom meeting or a formal dinner, this style is your answer. You begin by creating two inverted braids at the nape of the neck and then rolling them into a low bun.
The “Slick” vs. “Textured” Approach
You can choose to slick your hair back with a bit of gel for a minimalist look, or you can curl your hair beforehand for a softer, more romantic vibe. The braid itself remains the focal point, keeping the messy bun held firmly in place.
- Start two inverted braids starting from behind the ears, aiming them downward.
- Braid all the way to the ends.
- Twist the two braids together into a bun and pin them tightly to the back of your neck.
6. The Side-Swept Waterfall Inversion
This style is all about movement. By starting a single inverted braid at your parting and letting it swoop across your forehead, you create a frame that highlights your features. It is a creative way to style shorter, layered cuts that usually fall into your eyes.
Why It’s Unique
Most braids are static. By placing this braid diagonally across the head, you create a leading line that draws the eye. It is an artistic choice that feels much more intentional than a standard part.
Making It Last
Use a tiny amount of hair wax on your fingertips before you start the braid. This tames short, choppy layers that might want to poke out of the braid pattern, ensuring the line remains clean and sharp.
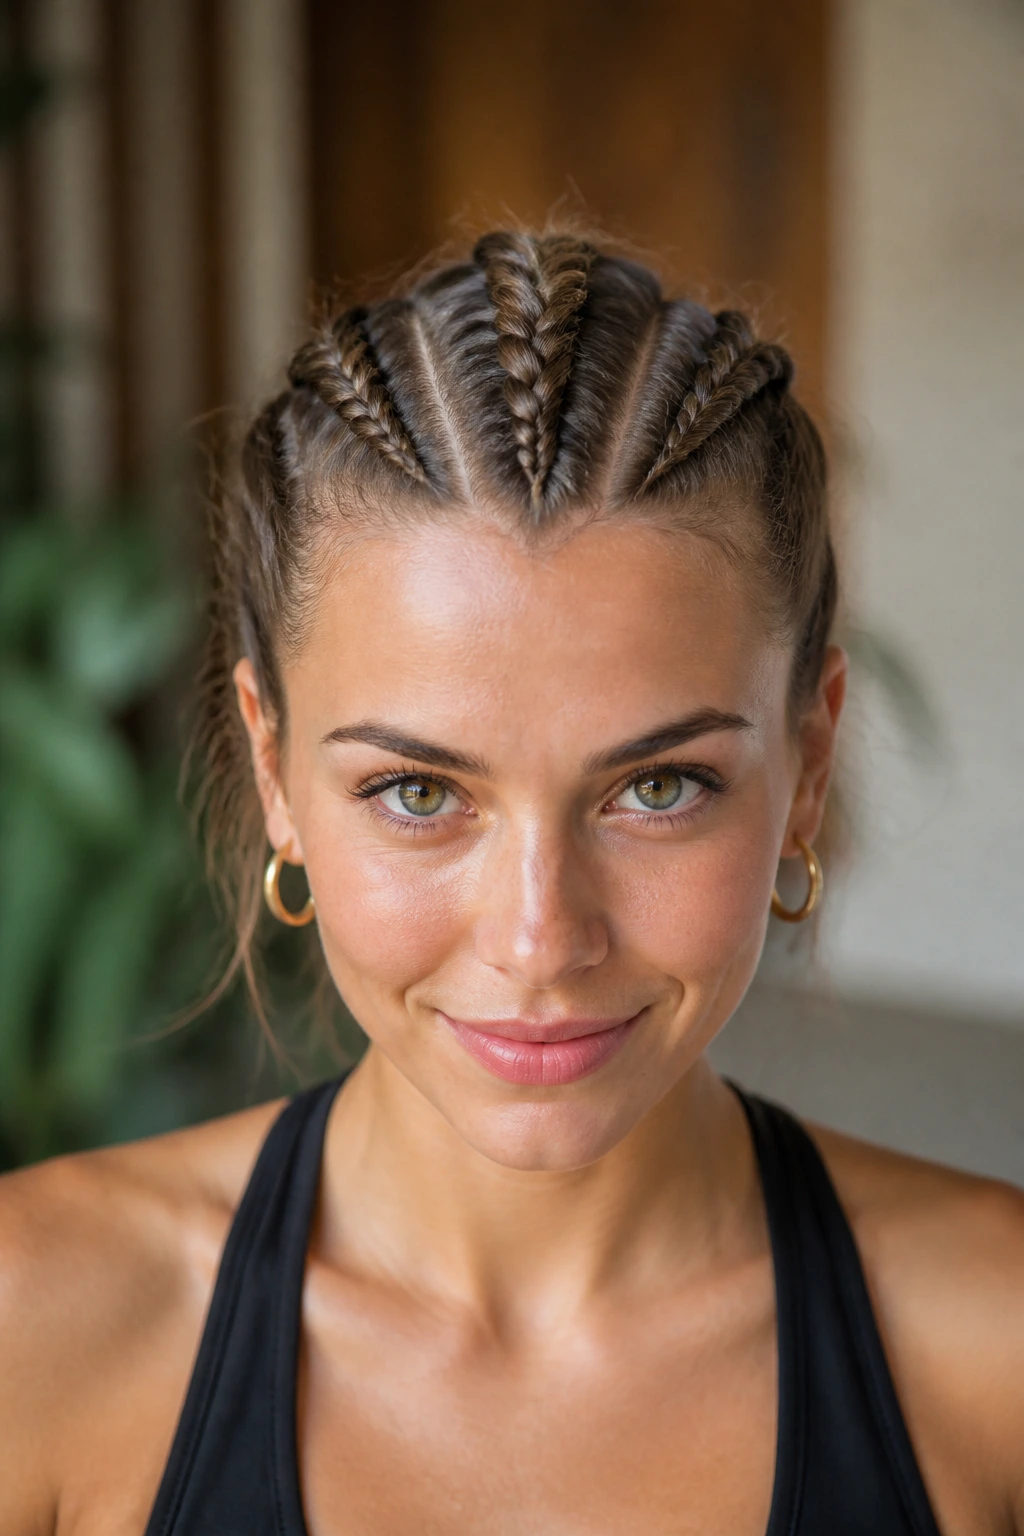
7. Triple-Braid Mohawk Illusion
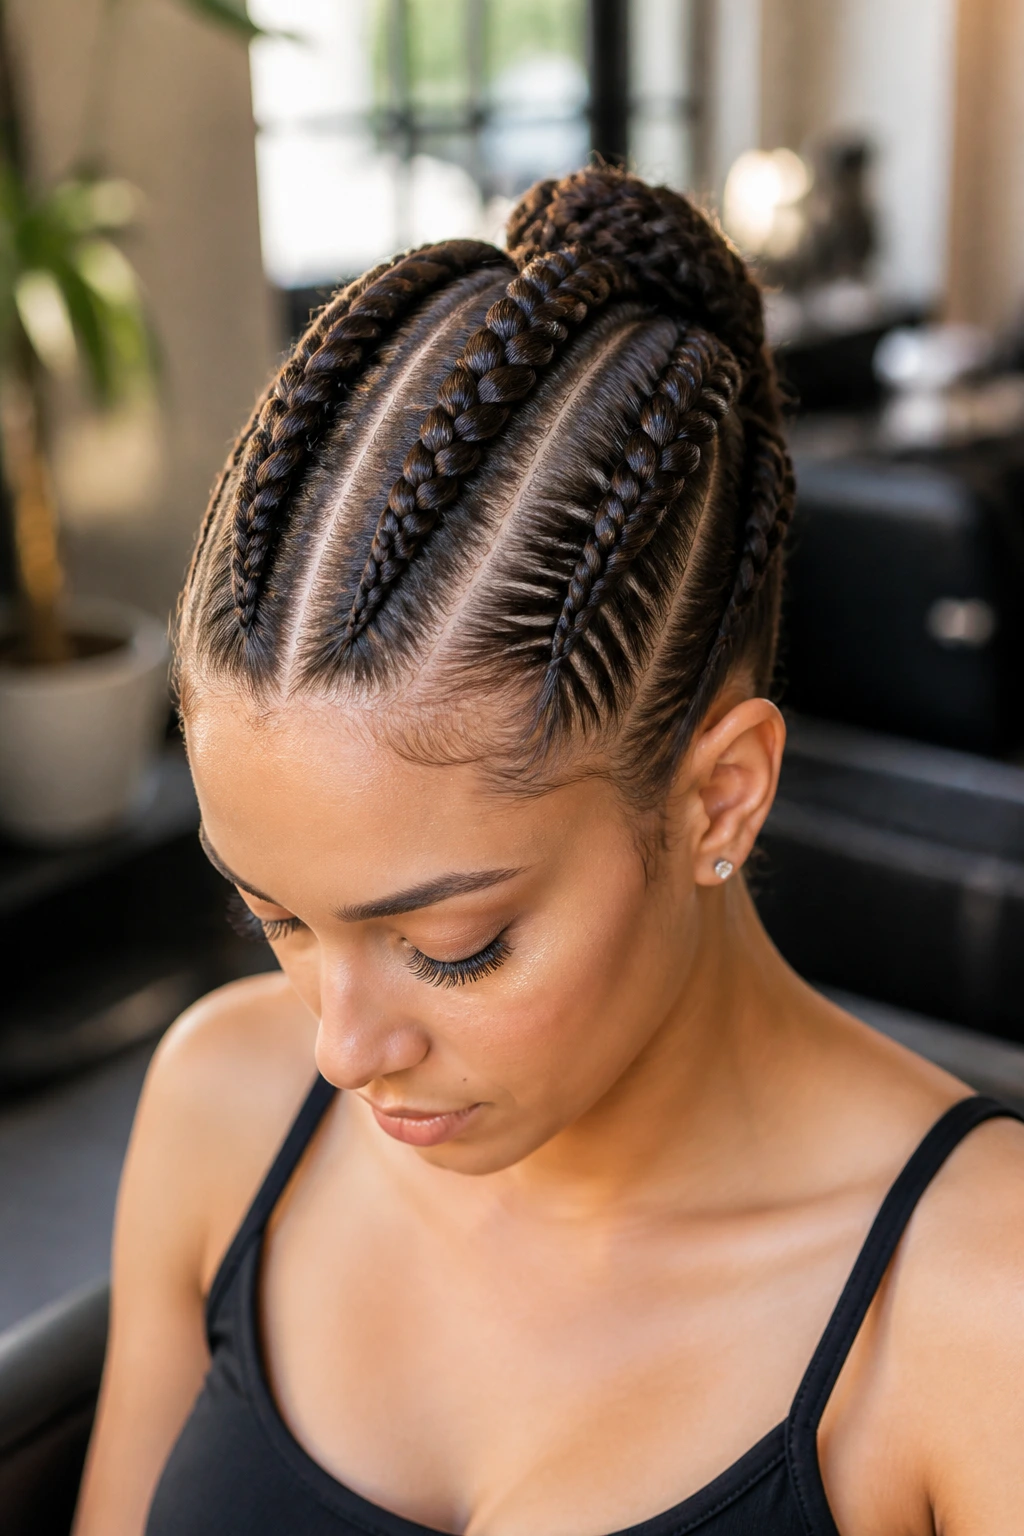
If you want to appear edgy without actually shaving your head, the triple-braid look is the best alternative. You divide the top of your head into three parallel sections and braid each into an inverted style, converging them all at the back.
The Geometry of Three
This style requires patience and decent mirrors. The trick is to keep the partitions perfectly straight so the braids do not look cluttered. If the lines are messy, the whole look loses its precision.
- Section off three long strips of hair running from your hairline to your crown.
- Braid each section tightly.
- Gather the tails and braid them together or pin them down into a tight, neat knot.
8. The Messy Boho Inverted Braid
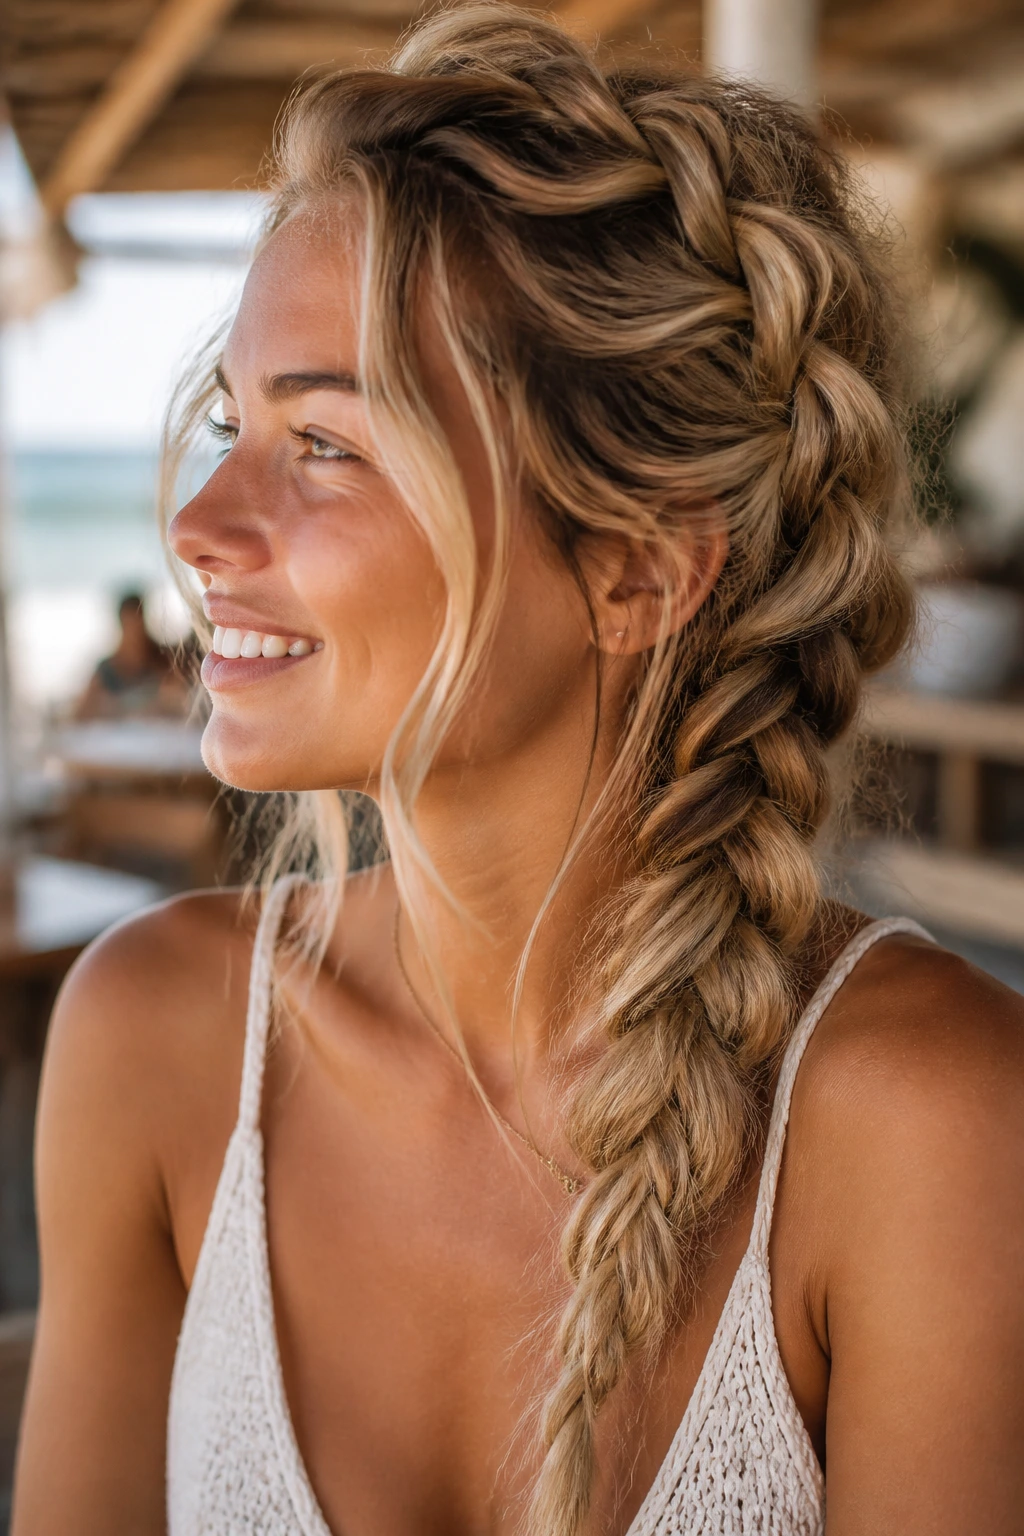
Perfect for brunch or a beach day, this style embraces imperfection. You aren’t aiming for sleekness here; you are aiming for volume and a “just-rolled-out-of-bed” aesthetic that is carefully constructed.
How to Achieve the “Done-Undone” Look
After you finish the braid, pull at the loops aggressively—but only on the outside edges. This creates a fanned-out, lace-like appearance. Let some wispy pieces fall around your face to soften the lines.
Best Hair Types for This Style
This style thrives on wavy or curly hair. If you have straight hair, hit it with a sea salt spray before you start. The extra texture allows the braid to hold its shape even when you pull it apart for that voluminous, boho look.
9. The Ribbon-Woven Dutch Braid
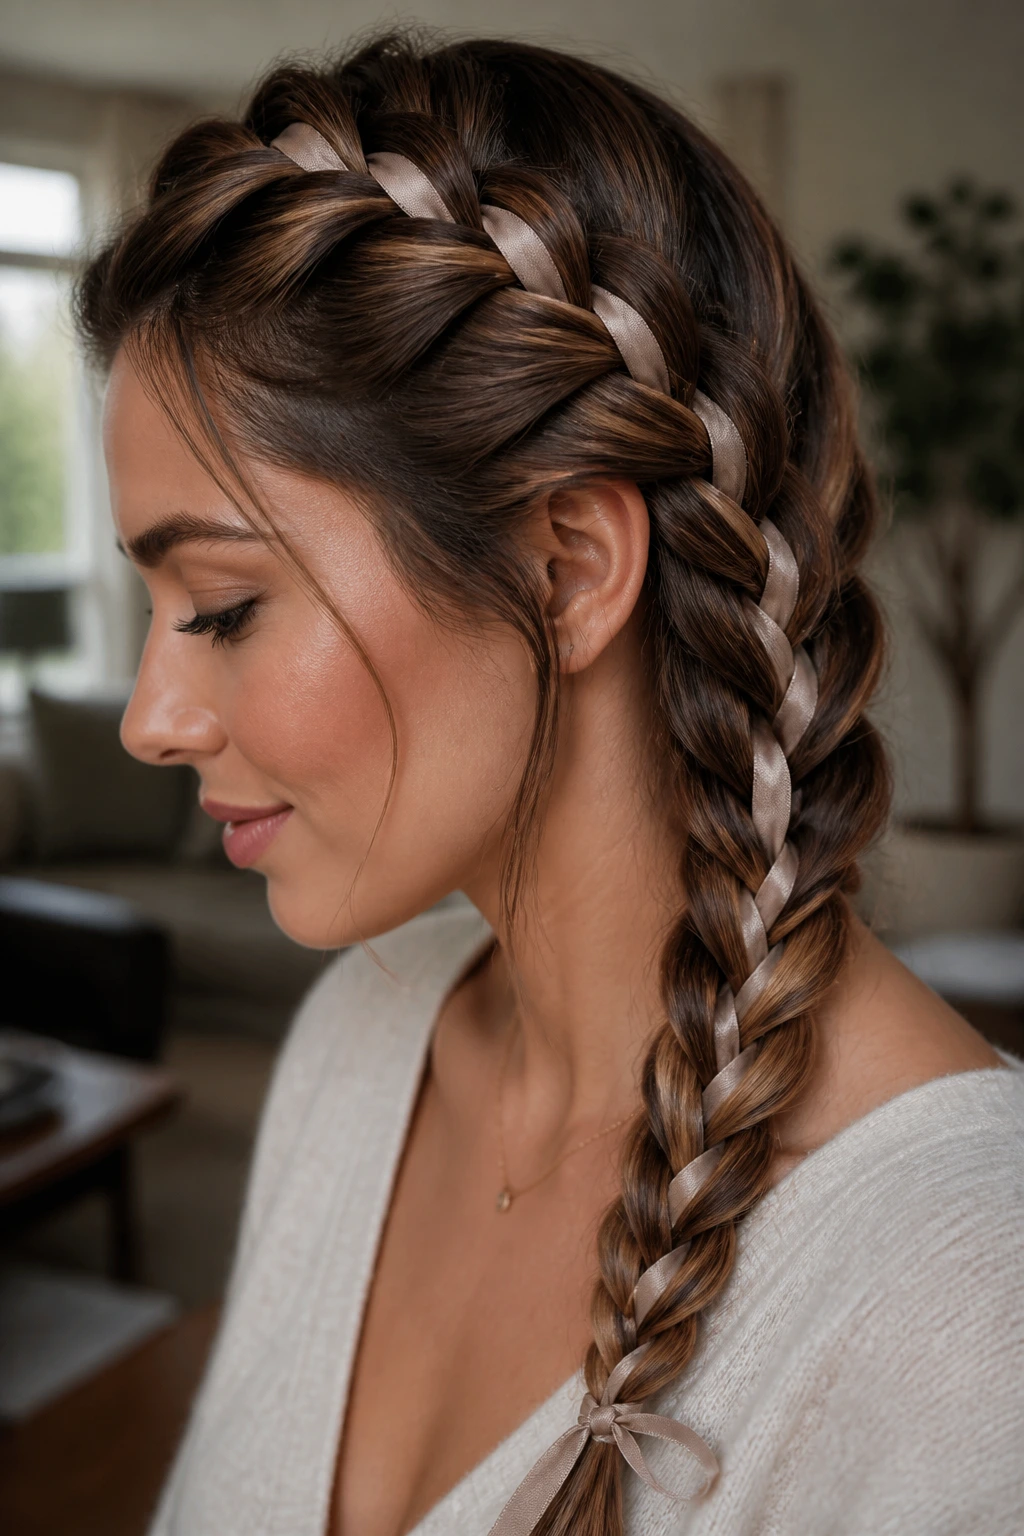
Adding a piece of silk or velvet ribbon into your hair can turn a standard braid into a luxury accessory. You incorporate the ribbon as the “third strand” in your inverted braid pattern, allowing it to weave throughout the hair.
The Technical Aspect
You need a ribbon that is narrow—about 1/4 inch wide—to ensure it doesn’t overpower the braid. Fold the ribbon in half and tie it around your starting hair section so that it is secure and won’t slip out as you work.
- Incorporate the two ends of the ribbon into the two outer strands of your three-strand braid.
- Braid as usual, keeping the ribbon flat so it doesn’t twist and lose its sheen.
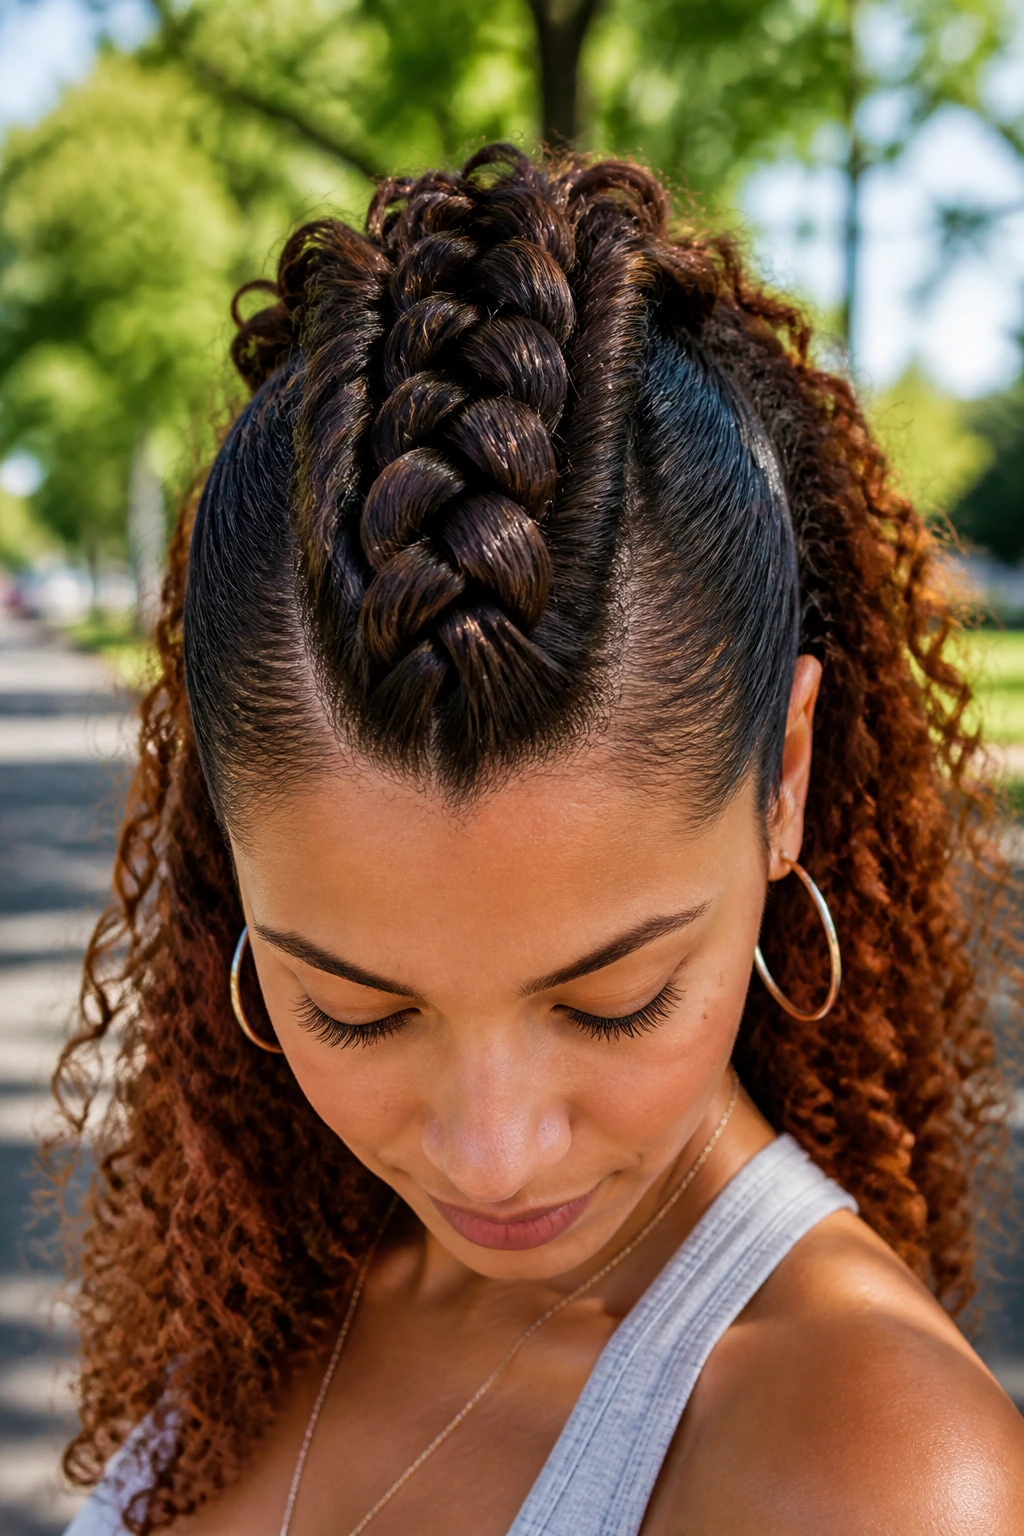
10. The Gym-Proof High Inversion
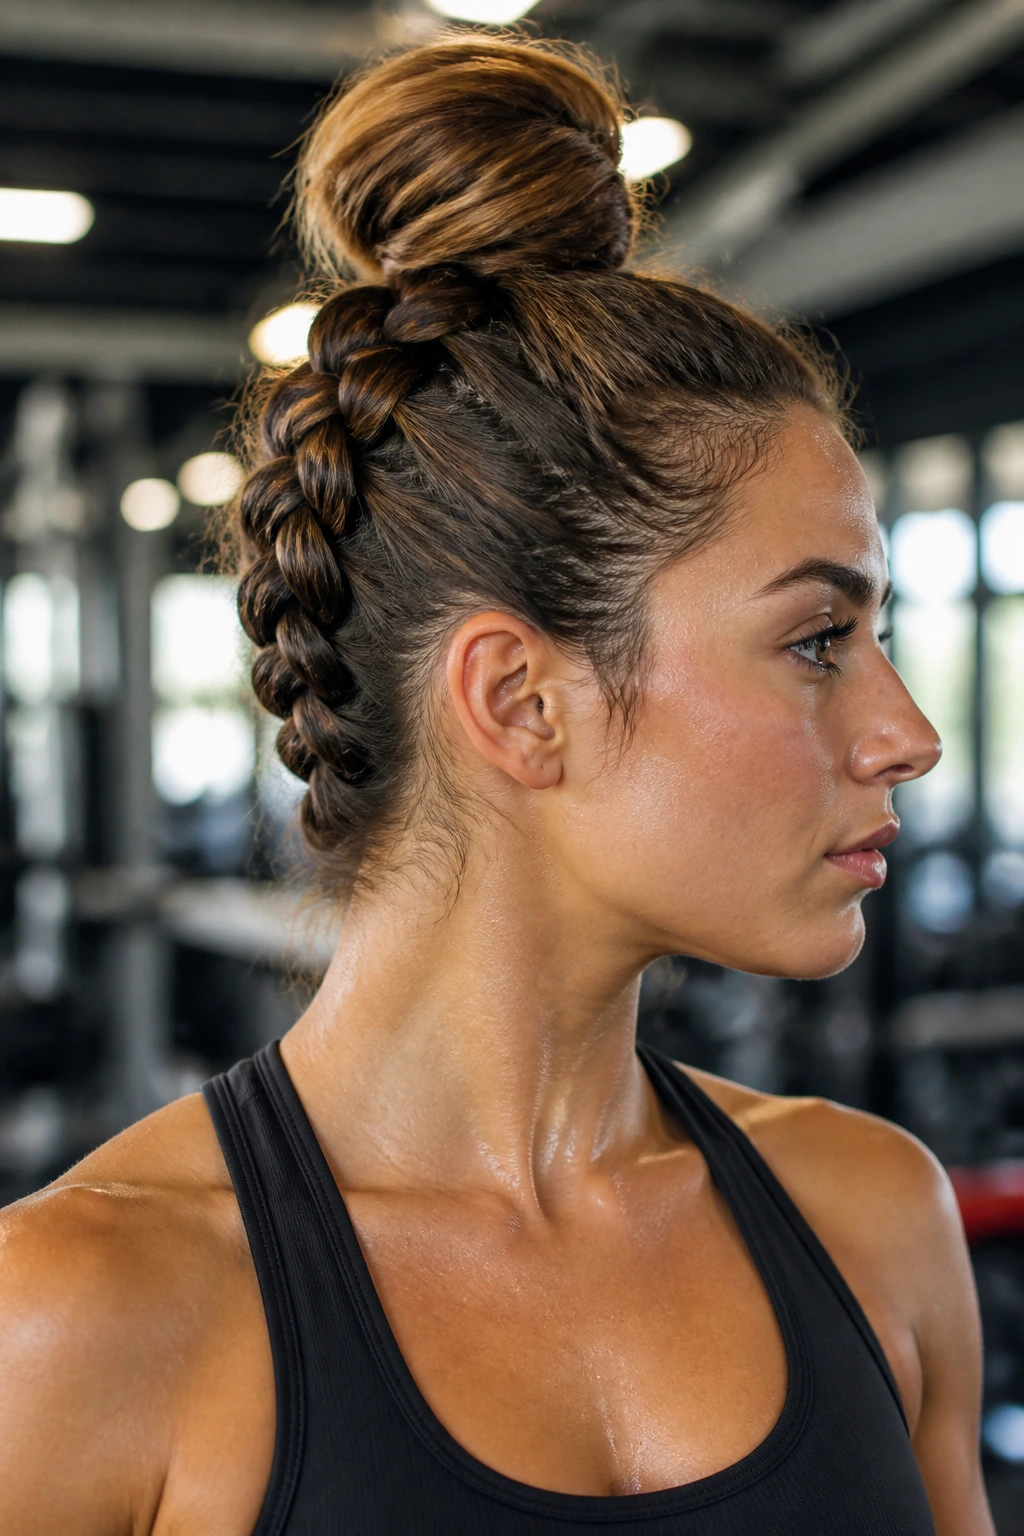
When you are moving, you need a braid that won’t budge. This style starts at the nape and braids upward toward the crown, creating a “reverse” inverted braid that ends in a high topknot.
Why This is Better Than a Standard Bun
A standard topknot often slides down after thirty minutes of exercise. By anchoring the hair with an inverted braid that travels up the back of the head, you essentially provide a structural “handle” that holds the bun in place.
- Flip your head over.
- Start your inverted braid at the nape of the neck.
- Braid upward until you hit the crown.
- Gather the braid and the remaining loose hair into a bun.
11. The Double-Wrapped Crown
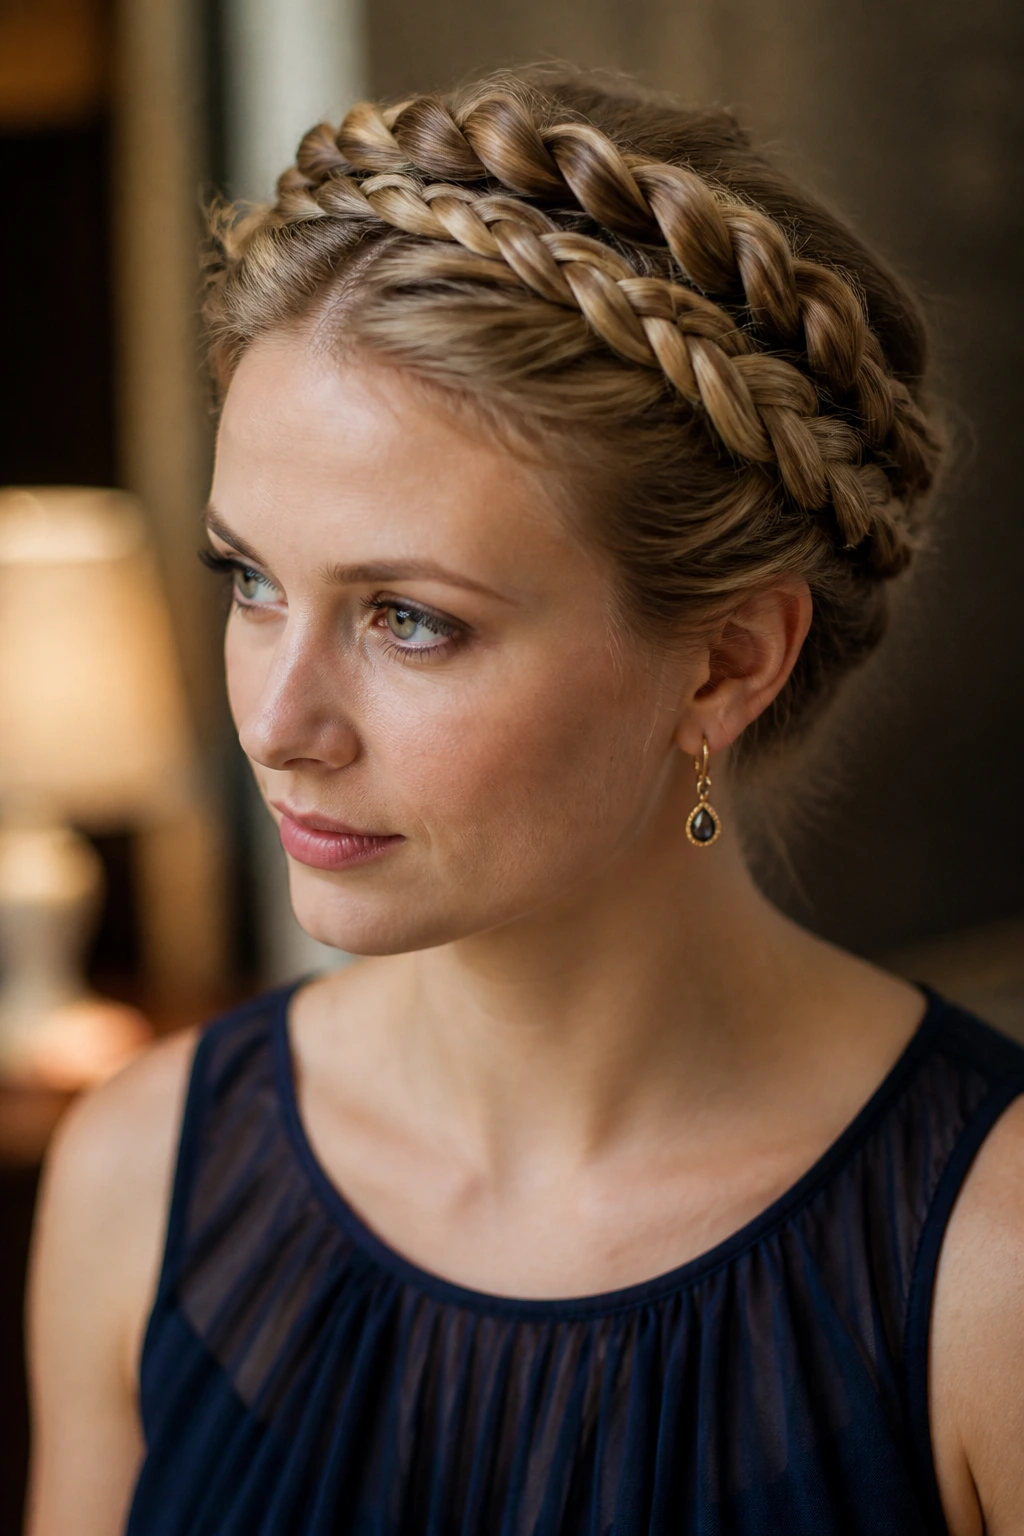
This is a more formal version of the headband braid. Instead of stopping at the ear, you continue the braid all the way around your head, picking up hair as you go, eventually meeting back at the starting point.
Handling the “Joining” Problem
The hardest part is the transition where the end of the braid meets the beginning. The trick is to tuck the tail of the braid underneath the first few stitches you made at the start, using several bobby pins to lock it in place.
Why It’s a Classic
This style essentially mimics a halo. It is timeless, elegant, and keeps every single hair accounted for, making it ideal for windy days or formal events where you cannot worry about your hair.
12. The Side-Parted Inverted Braid
By shifting your part to the far left or right, you create a heavy side of hair that allows for a deep, dramatic braid. This style looks incredible with a pair of statement earrings, as it pulls hair away from one side of your face.
The Visual Weight
The braid should act as a contrast. If you have a deep side part, let the braid run down the side of your head while the other side remains loose and flowing. It creates a beautiful, asymmetrical silhouette.
- Start the braid at your temple.
- Curve it behind your ear as you braid down.
- Secure with an elastic hidden behind the nape of your neck.
13. The “Inverted” Messy Bun
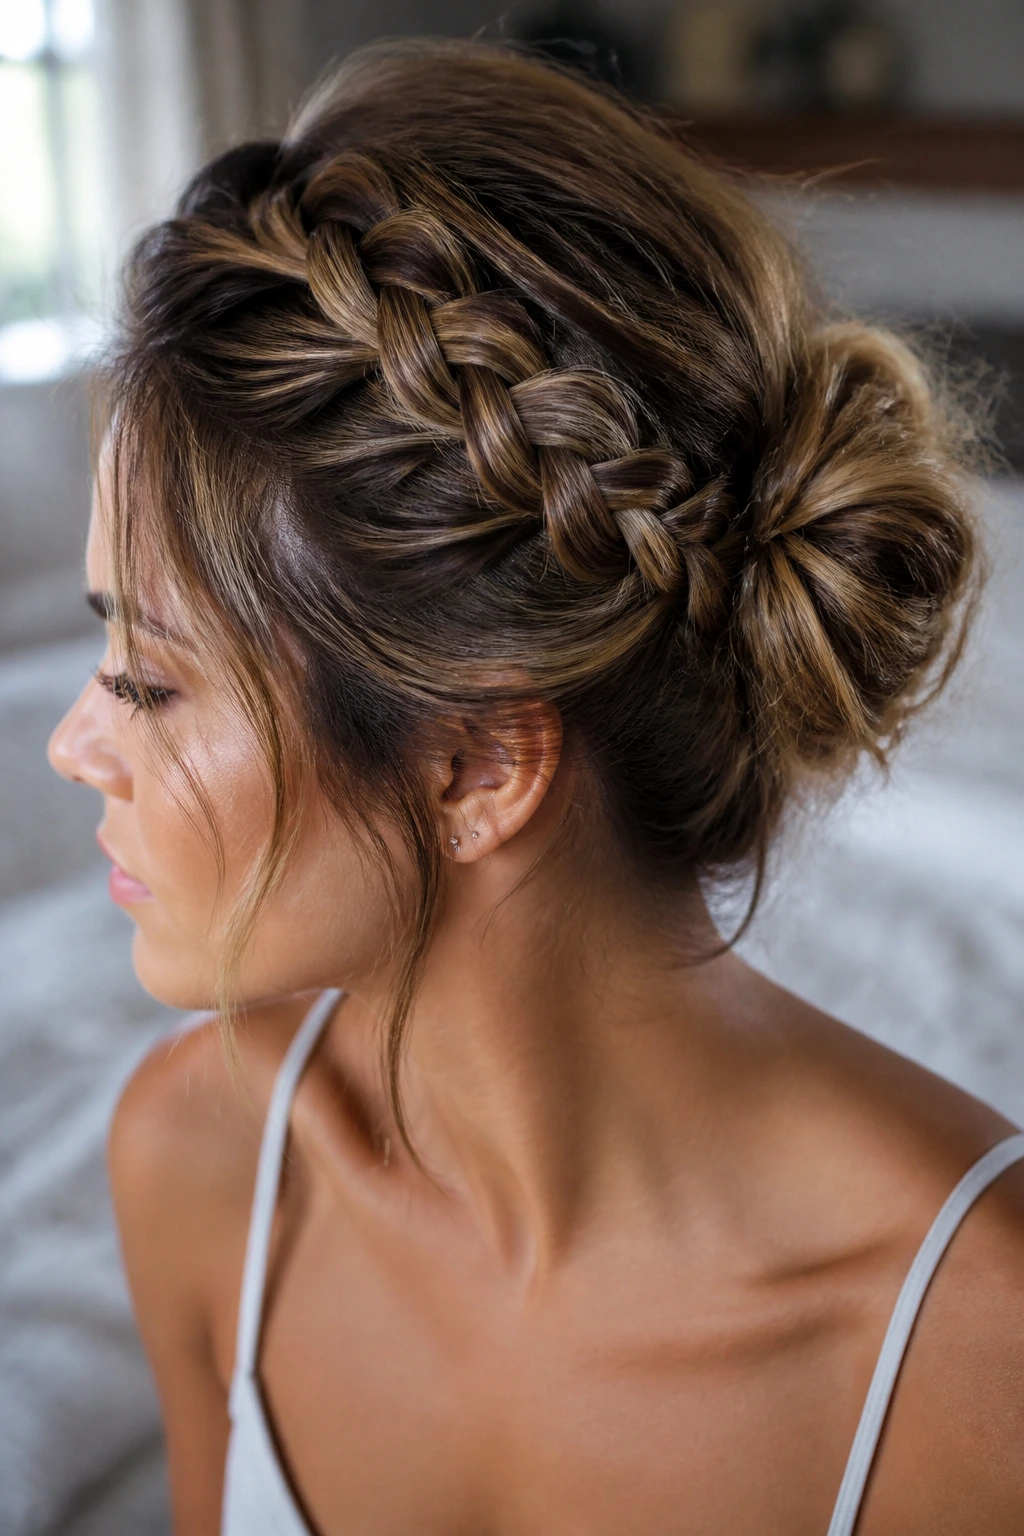
If you are tired of plain buns, an inverted braid leading into one adds instant texture. Braid a small section of your hair at the crown, then gather it into a loose, messy bun at the back. It adds interest to an otherwise boring updo.
Quick Prep
Don’t worry about perfect lines. Use your fingers to part your hair rather than a comb for this one. You want it to look soft and touchable.
- Pull your hair back loosely with your fingers.
- Create a simple inverted braid at the crown.
- Wrap your hair into a bun, allowing the braid to show through as an accent.
14. The Triple-Threat Braid
This look features three distinct inverted braids that start at the hairline and meet in the center of the head. It is a great style for showing off long hair and creates a very dense, intricate look that feels much more complicated than it actually is.
Keeping It Balanced
The secret is to ensure the middle braid is slightly wider than the two side braids. This gives the style a sense of depth and hierarchy, making the “triple” aspect feel deliberate rather than crowded.
- Divide your hair into three segments.
- Braid each one to the back.
- Tie them together at the nape of the neck.
15. The Fishtail-Dutch Hybrid

This is for the advanced braider. You start with an inverted braid at the hairline to add volume and structure, then switch to a fishtail braid midway down to create a refined, tapered end.
The Transition
The switch happens when you stop picking up new hair for the Dutch braid. Simply combine the three strands into two and begin your fishtail technique. It’s a stunning transition that looks professional and highly polished.
- Begin your inverted braid normally.
- When you reach the neck, switch to a fishtail by crossing small strands from the outside in.
16. The Half-Down, Double-Braid
Take two small sections from each temple and create two inverted braids that meet in the middle. It’s like a braided crown but smaller, focusing only on the top section of the head.
Why It’s Great for Thin Hair
Because you are pulling hair from the top, you can create volume at the crown by gently tugging on the braid loops. This gives your head a fuller, more styled appearance without needing to braid your entire length.
- Section hair at the temples.
- Braid both sides back.
- Pin them together in the back using a nice barrette or decorative clip.
17. The Waterfall Inverted Accents
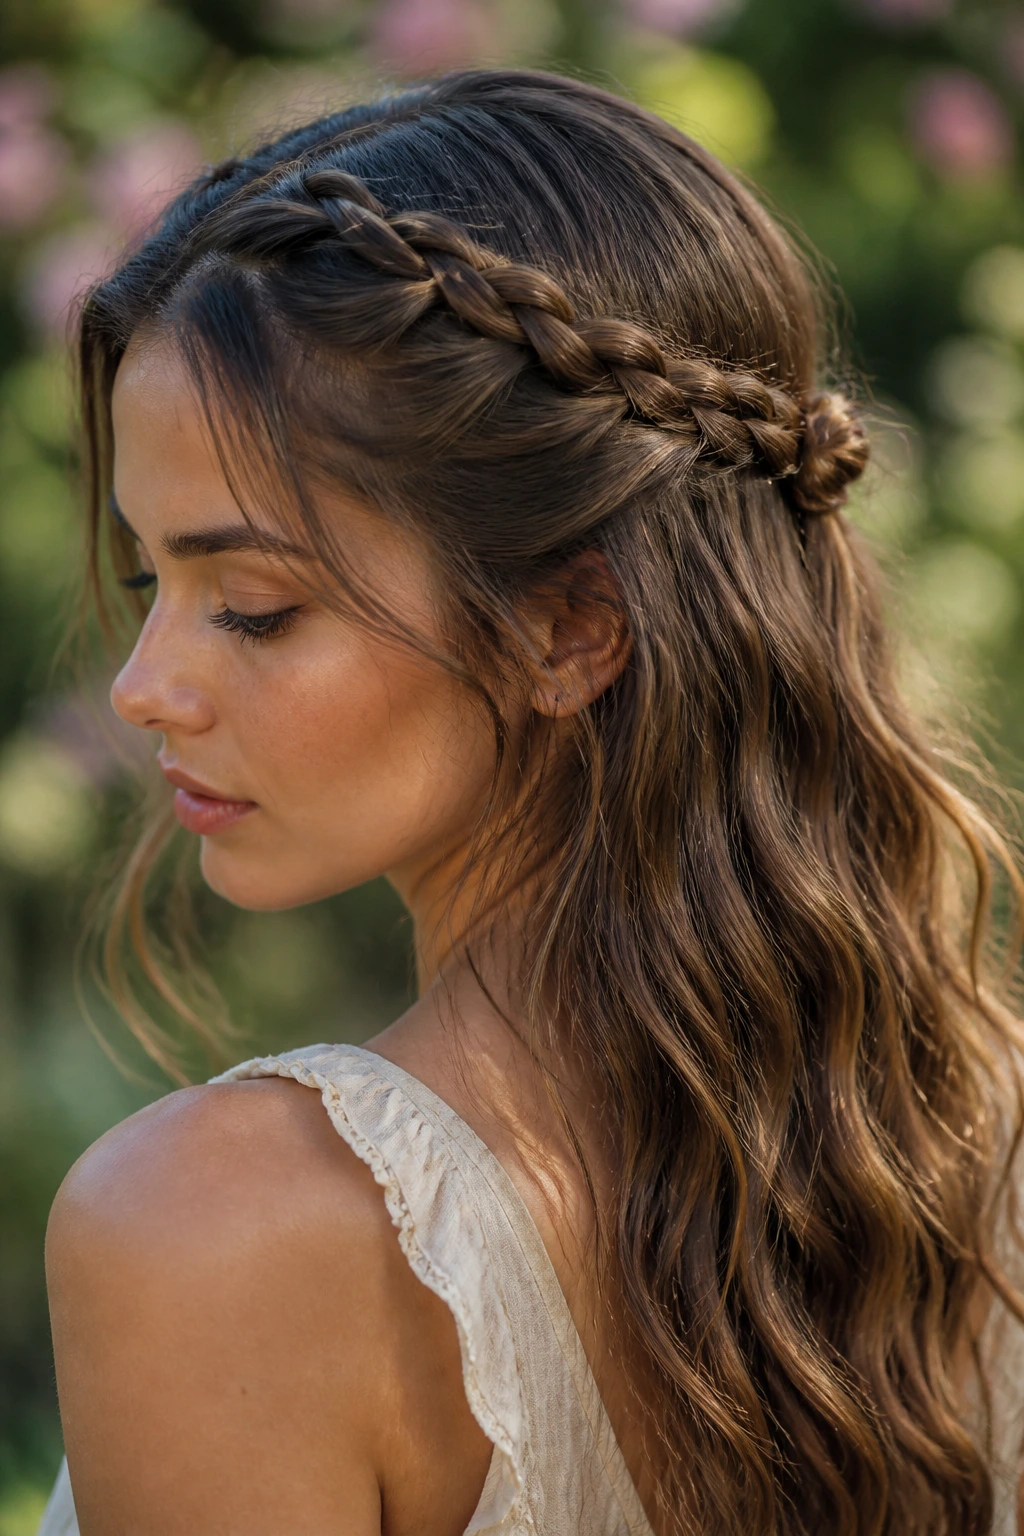
For a whimsical look, braid two small inverted sections on either side of your head and pull them back into a knot. Let the rest of your hair flow down in waves. It’s incredibly soft and works well for outdoor events.
Making It Stay
If you have very straight, fine hair, the braids might slip. Use a small dab of texture paste on your hands before you start braiding to give the strands a little more “grip.”
- Braid two small sections at the front.
- Pull them to the back.
- Tie them together with a small elastic, and flip the tail through the gap (the “topsy-tail” method) for a refined finish.
18. The “Mohawk” Braid for Curly Hair
Curly hair is the best base for inverted braids because the texture naturally fills in the gaps. Create a single, thick inverted braid right down the center of your head to create a voluminous “mohawk” look.
Handling Tight Curls
If your hair is very tight, do not try to use a comb. Use your fingers to pick up sections. This will keep your curl pattern intact and prevent the hair from becoming frizzy.
- Section your hair from the hairline to the crown.
- Braid it tightly, pulling firmly as you cross the strands.
- Let the curls loose at the end for a high-volume, wild finish.
19. The Side-Braided Ponytail
This is a sleek look for the office. Create a side-parted inverted braid that runs horizontally along one side of your head, then pull everything into a low, slick ponytail.
Achieving the Sleekness
Use a fine-tooth comb and a light hair oil to smooth the hair as you pull it into the ponytail. This creates a high-gloss finish that looks expensive and professional.
- Part your hair deep to one side.
- Braid the heavy side starting at the hairline.
- Gather everything into a low ponytail and use a piece of hair to wrap the elastic.
20. The Full-Head Lattice Braid
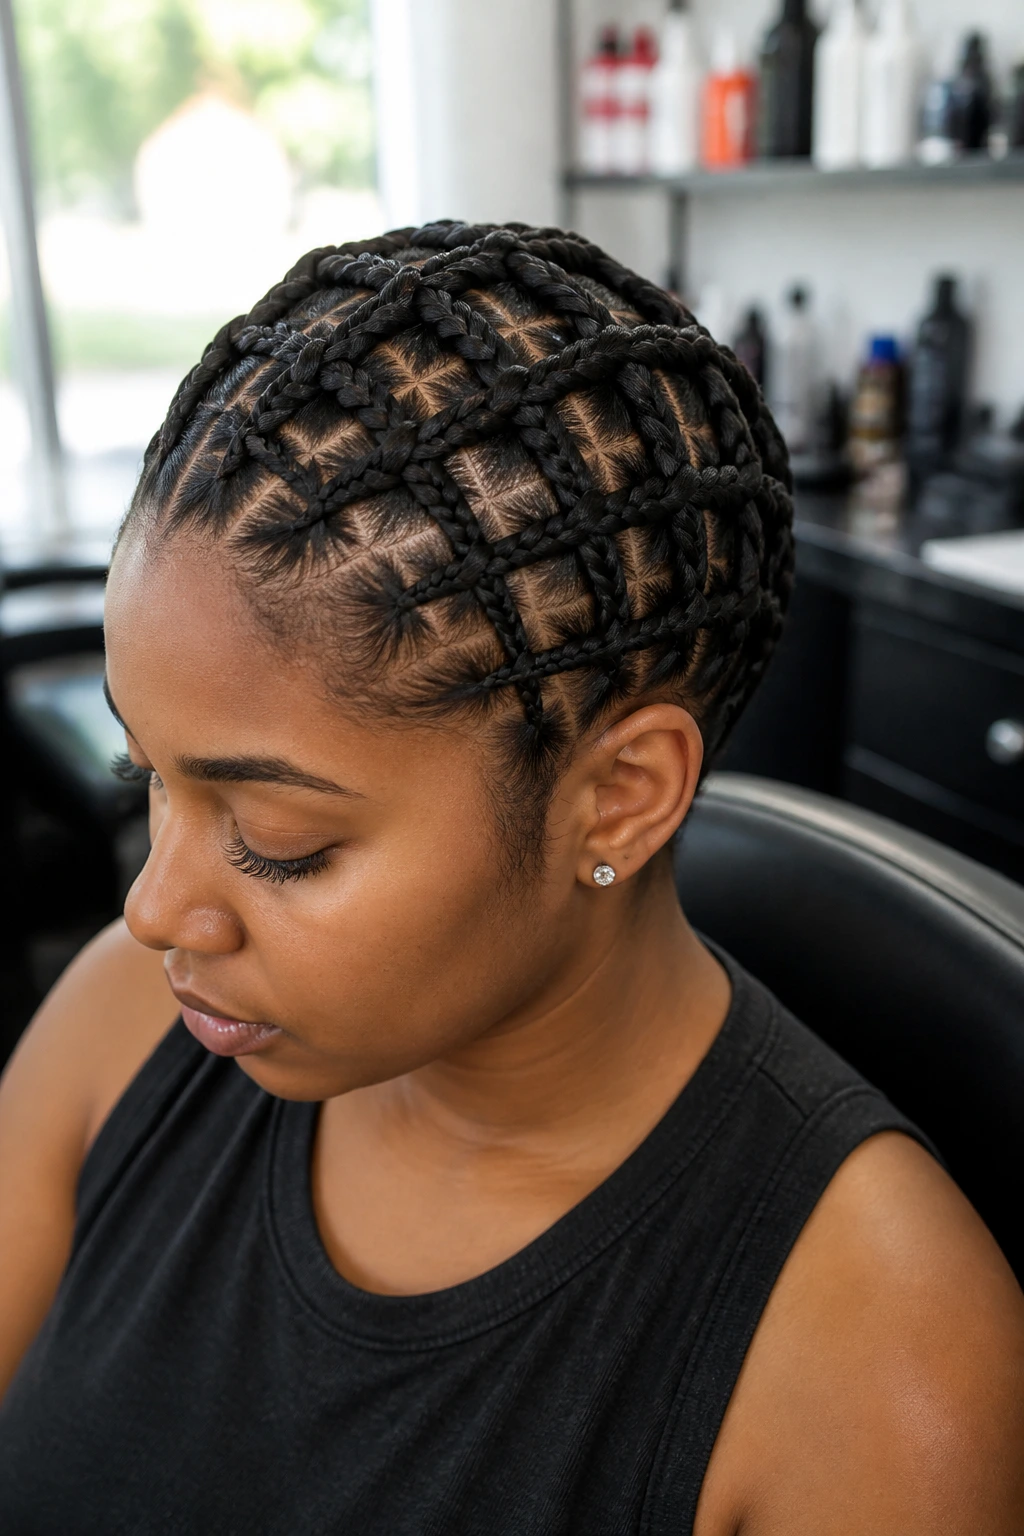
This is the ultimate look for someone with time and patience. By creating a series of overlapping inverted braids, you create a lattice pattern that looks like a woven fabric. It is a head-turning style that serves as its own accessory.
The Complexity
This is not a morning-rush style. Save this for when you have twenty minutes to sit and work. The reward is a look that is structurally sound, visually arresting, and will last for two days if you sleep with a silk pillowcase.
- Section your hair into four rows.
- Braid each row into an inverted braid.
- Use bobby pins to weave the ends of the braids into one another for a seamless look.
Final Thoughts
The key to mastering these inverted styles is consistency. Your hands will likely feel awkward during the first few attempts—this is completely normal. The inversion of the strands feels counterintuitive to our muscle memory, which is usually trained to cross strands over the top. Be patient with yourself. Start with the dual pigtails to get the rhythm down, and once that feels like second nature, the more complex lattice and crown styles will become much more accessible.
Consistency in tension is more important than perfect sectioning. If you can keep the tension firm throughout the length of the braid, the style will hold, even if your part is a little crooked. Remember that you can always “pancake” your braid after the fact to hide any unevenness in your sections. The most important thing is to keep your strands clean, slightly textured, and—most of all—to just have fun with the process. Your hair is the ultimate canvas for your own creativity.