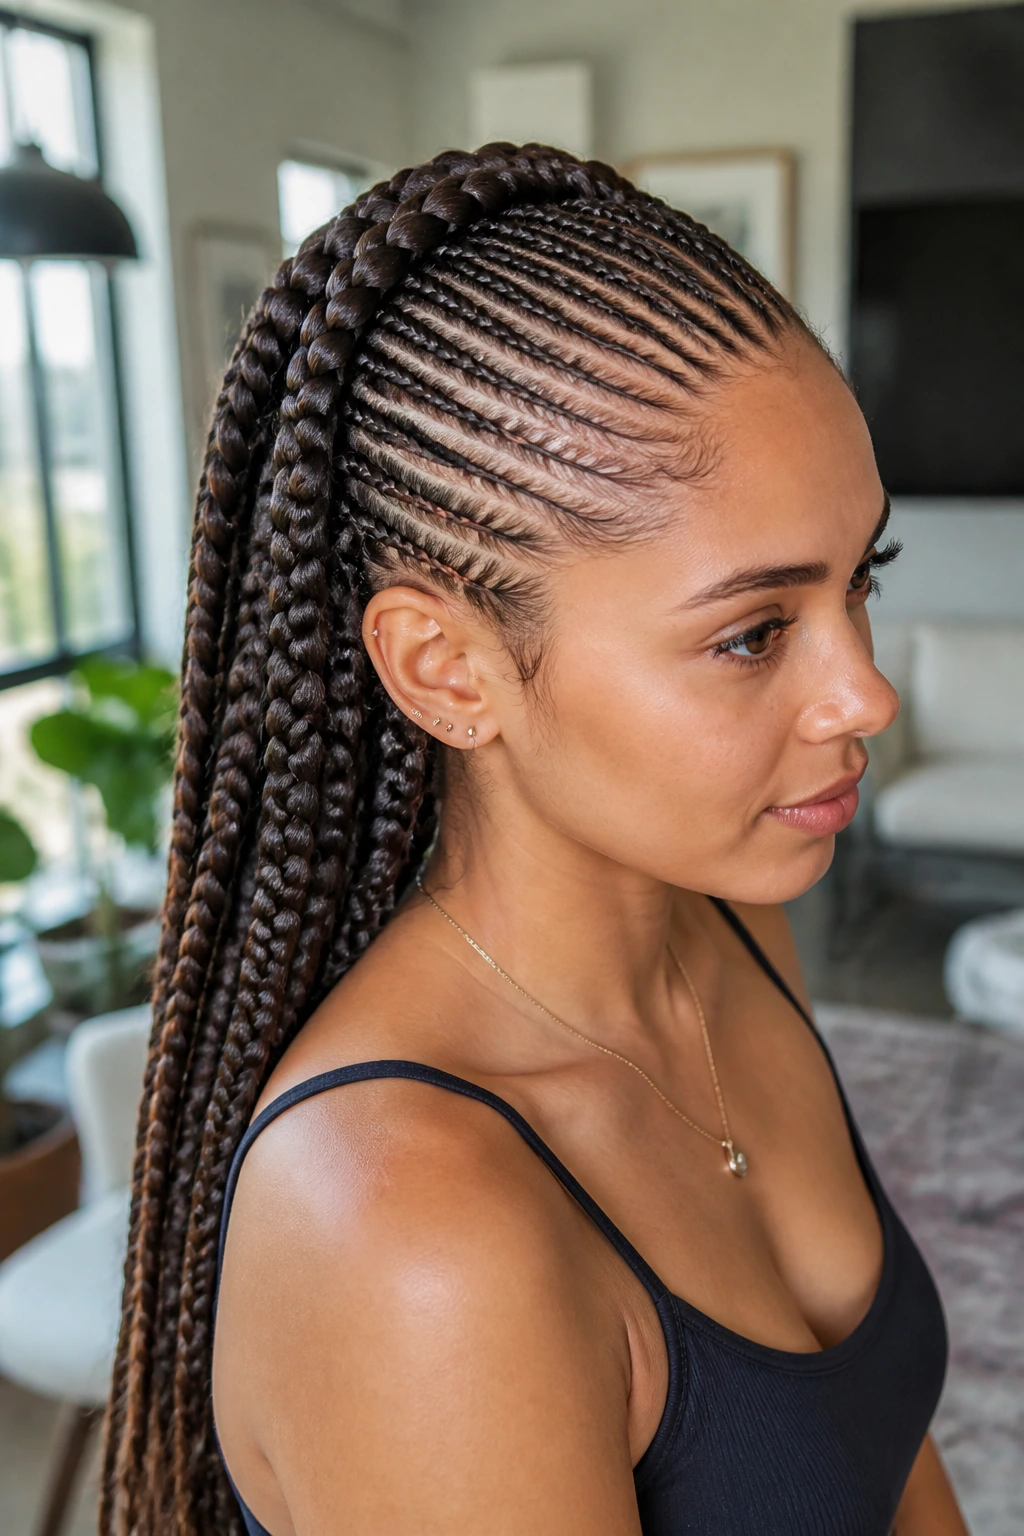
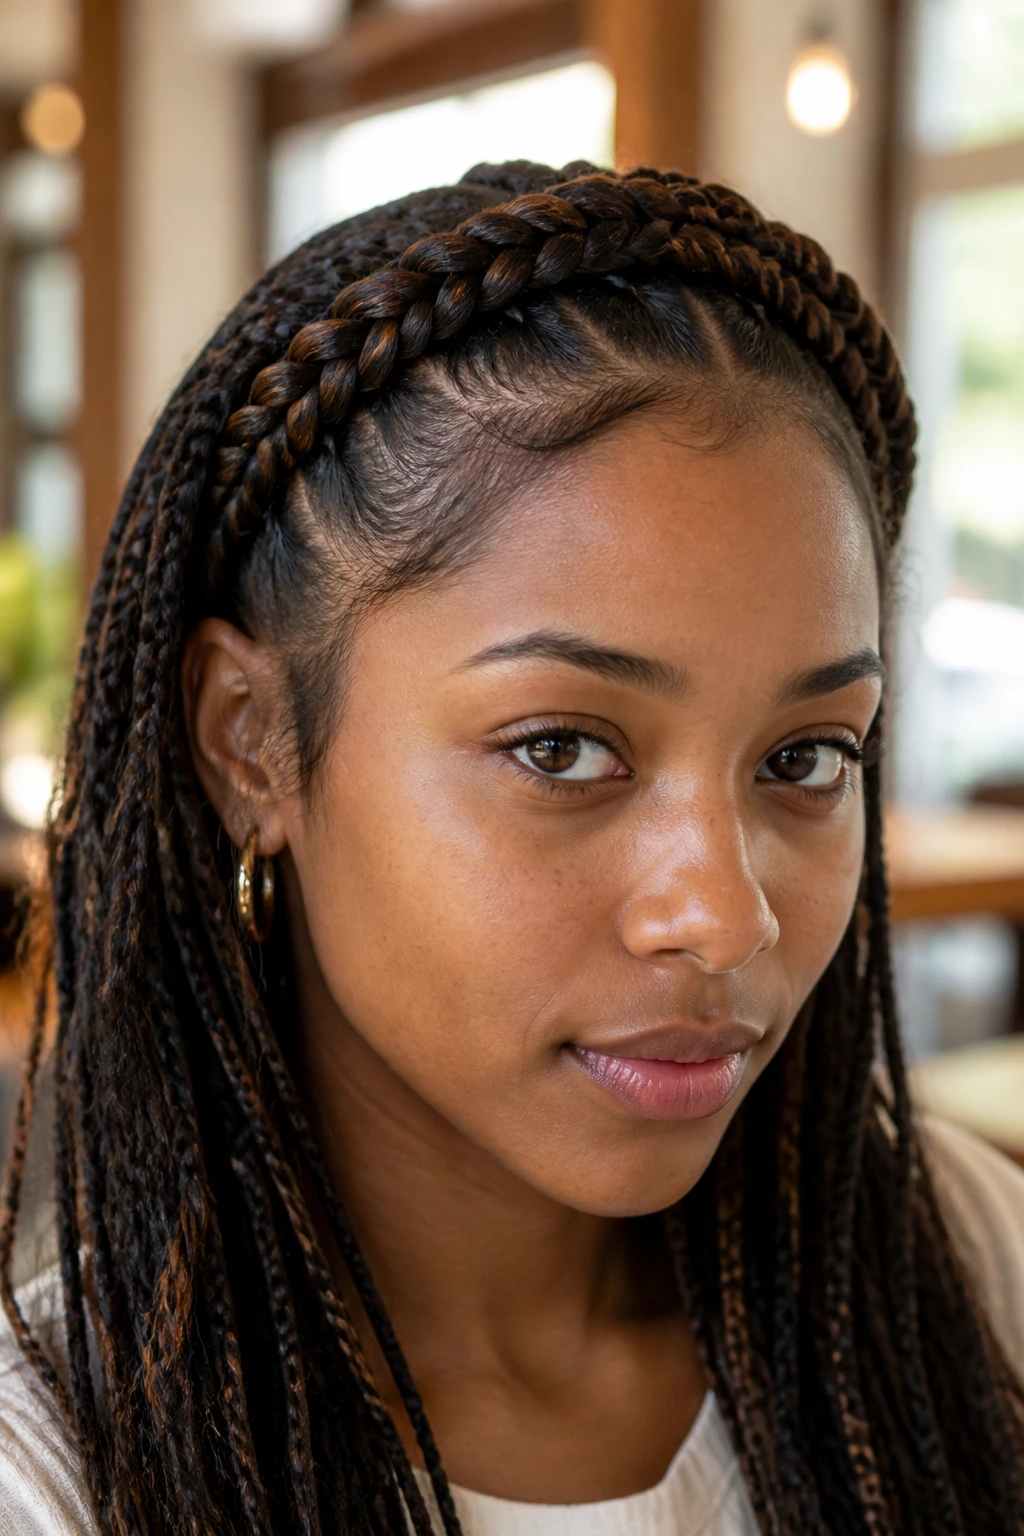
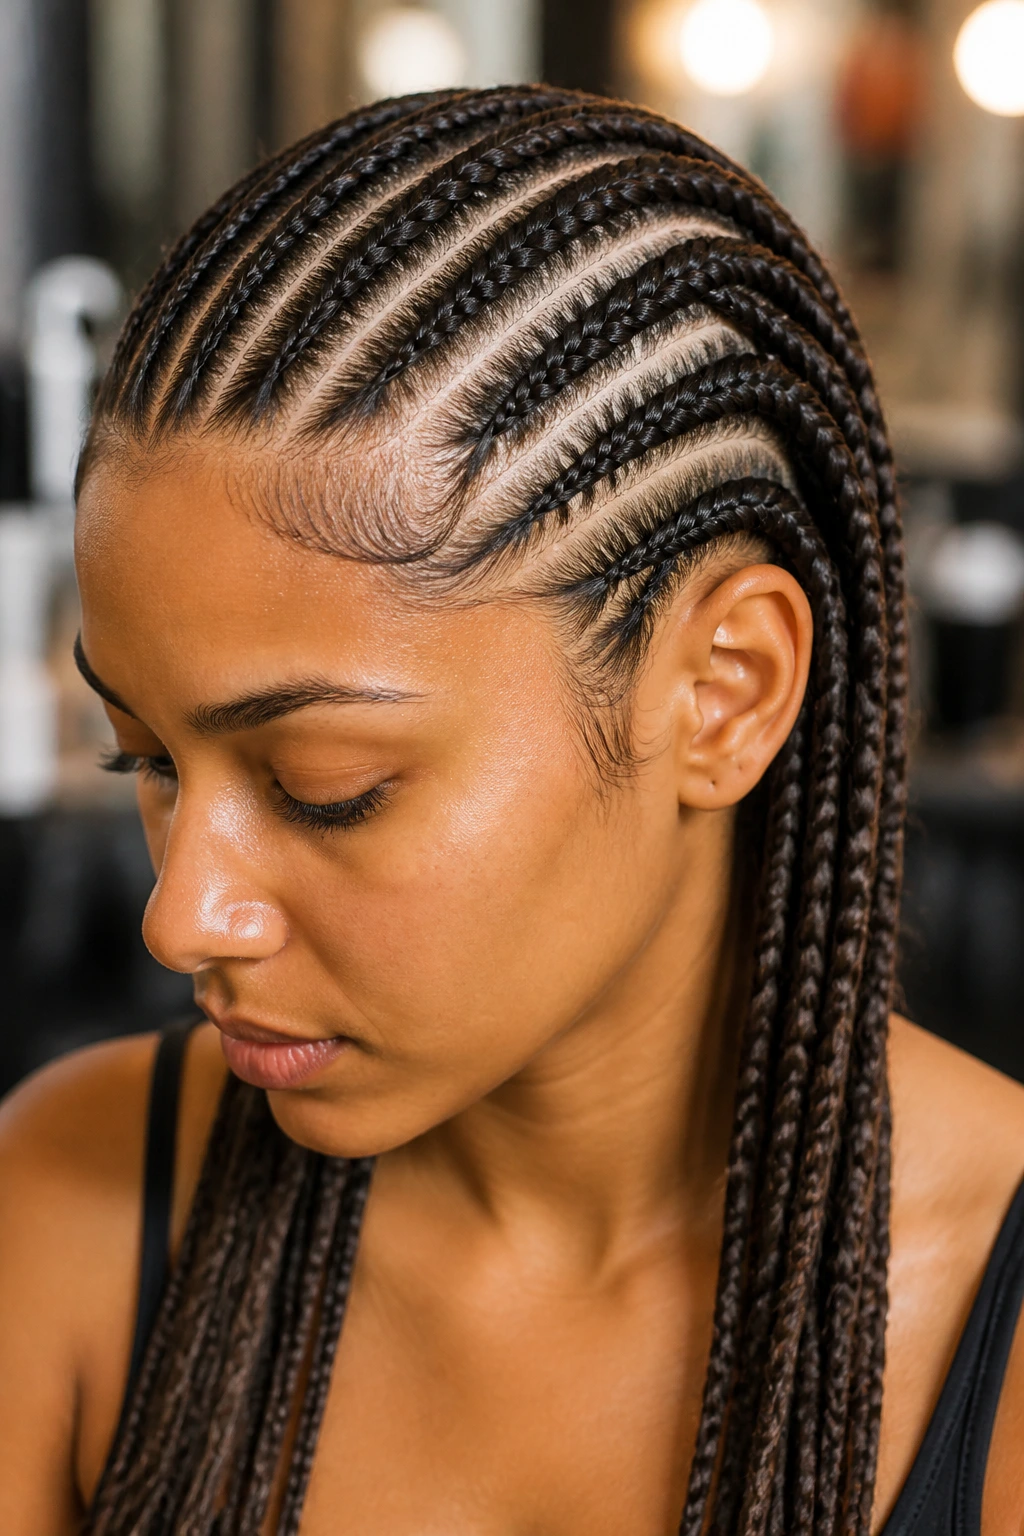
Pencil braids are not just a style choice; they are a masterclass in tension, precision, and architectural beauty. If you have wavy hair, you likely already know that your texture can be both a blessing and a frustration. Wavy hair often possesses a natural volume that can make intricate braiding feel like a losing battle against frizz or unraveling ends. Pencil braids—thin, tightly woven strands that hug the scalp with the diameter of a pencil—offer the perfect solution to control that movement while showcasing the natural luster of your waves.
When you look at someone wearing these, it is easy to assume they are just standard box braids. But there is a distinct difference in the parting and the weave. Because pencil braids are so fine, they require a meticulous approach to sectioning. If your hair is wavy, you are working with a texture that shifts. It does not lay as flat as Type 4 coils, nor is it as slippery as pin-straight hair. This makes it an ideal middle ground for styles that demand grip without needing an excessive amount of heavy product that could weigh down your natural shape.
The beauty of this style lies in its longevity. Because the individual braids are so narrow, they put less weight on the individual follicle compared to jumbo braids or chunky twists. This means your scalp gets a break from the pulling that usually causes thinning over time. Whether you are aiming for a classic half-up look or a full head of intricate geometric patterns, pencil braids give you the freedom to move, style, and wash your hair with a level of convenience that longer, thicker styles simply cannot match.
1. Classic Micro-Pencil Braids

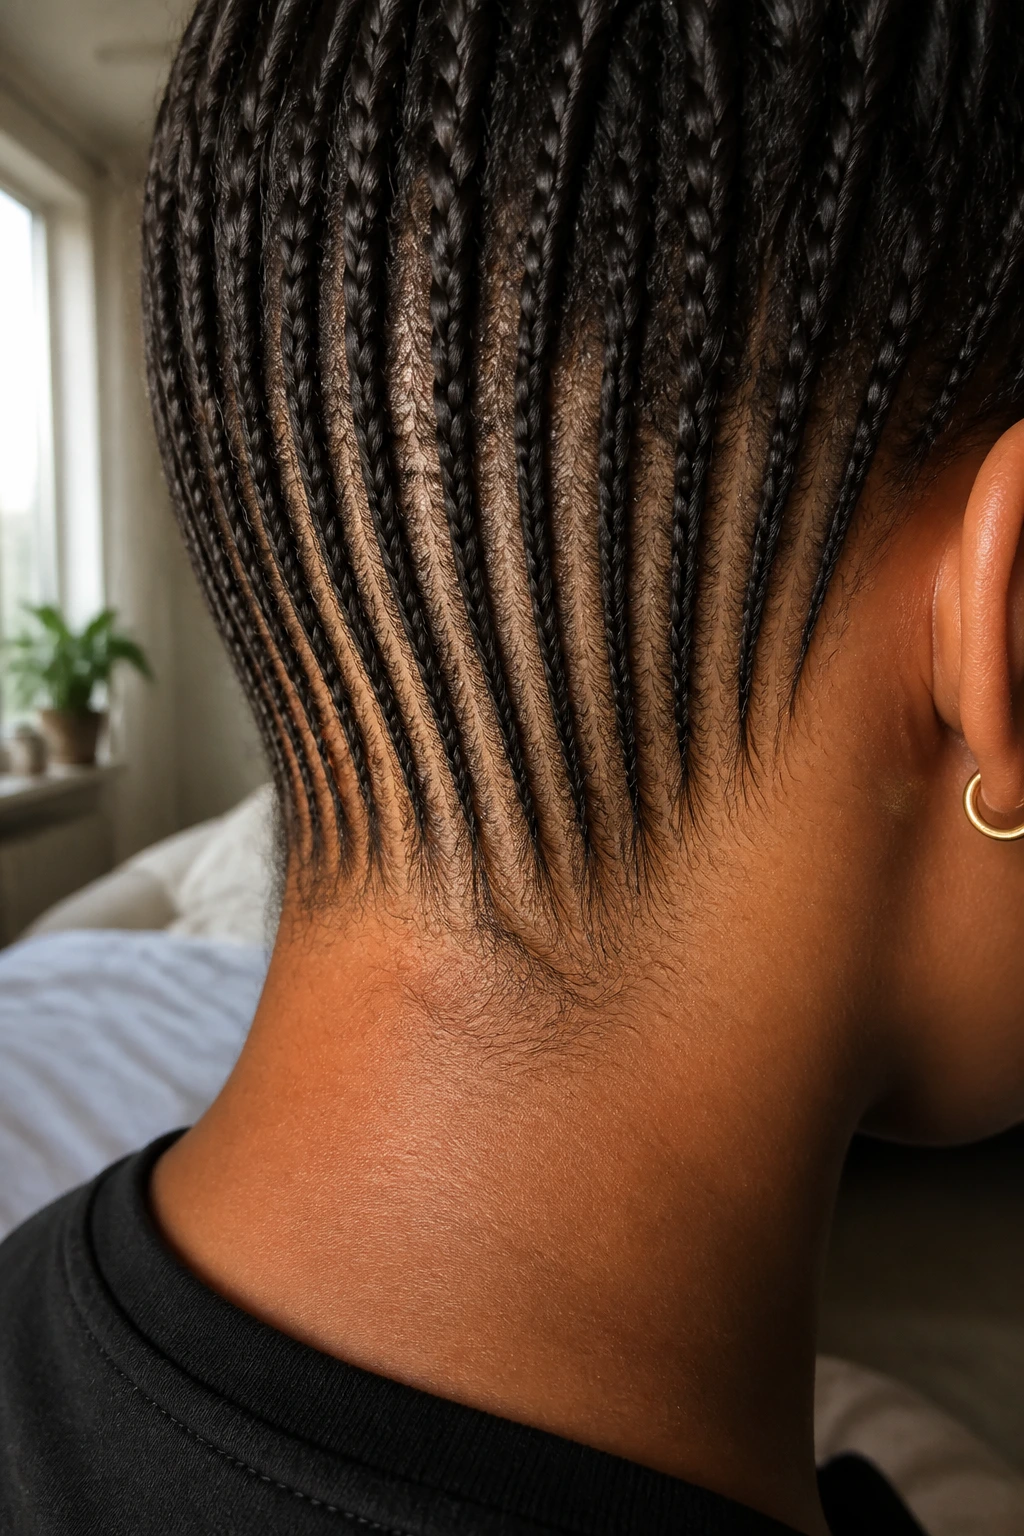
These are the foundation of the style. They are defined by their uniform size and direct-back parting. For those with wavy hair, the key here is starting with a very clean, damp base. If you try to braid dry, wavy hair, you will inevitably end up with “fuzz” poking out of every single link. Using a lightweight, water-based pomade helps smooth the cuticle down before the braid starts.
Why This Style Works
The uniformity creates a sleek, almost fabric-like appearance. It frames the face without distraction and is remarkably easy to pull into a high bun or ponytail. Unlike thicker braids, there is no “bulk” at the root, so you do not have to worry about the style feeling stiff or needing a long break-in period.
Tips for Success
- Use a rattail comb with a metal tip for the sharpest parts.
- Apply a tiny dab of edge control to the section before braiding to keep the flyaways locked in.
- Secure the ends with boiling water rather than heavy rubber bands to prevent breakage.
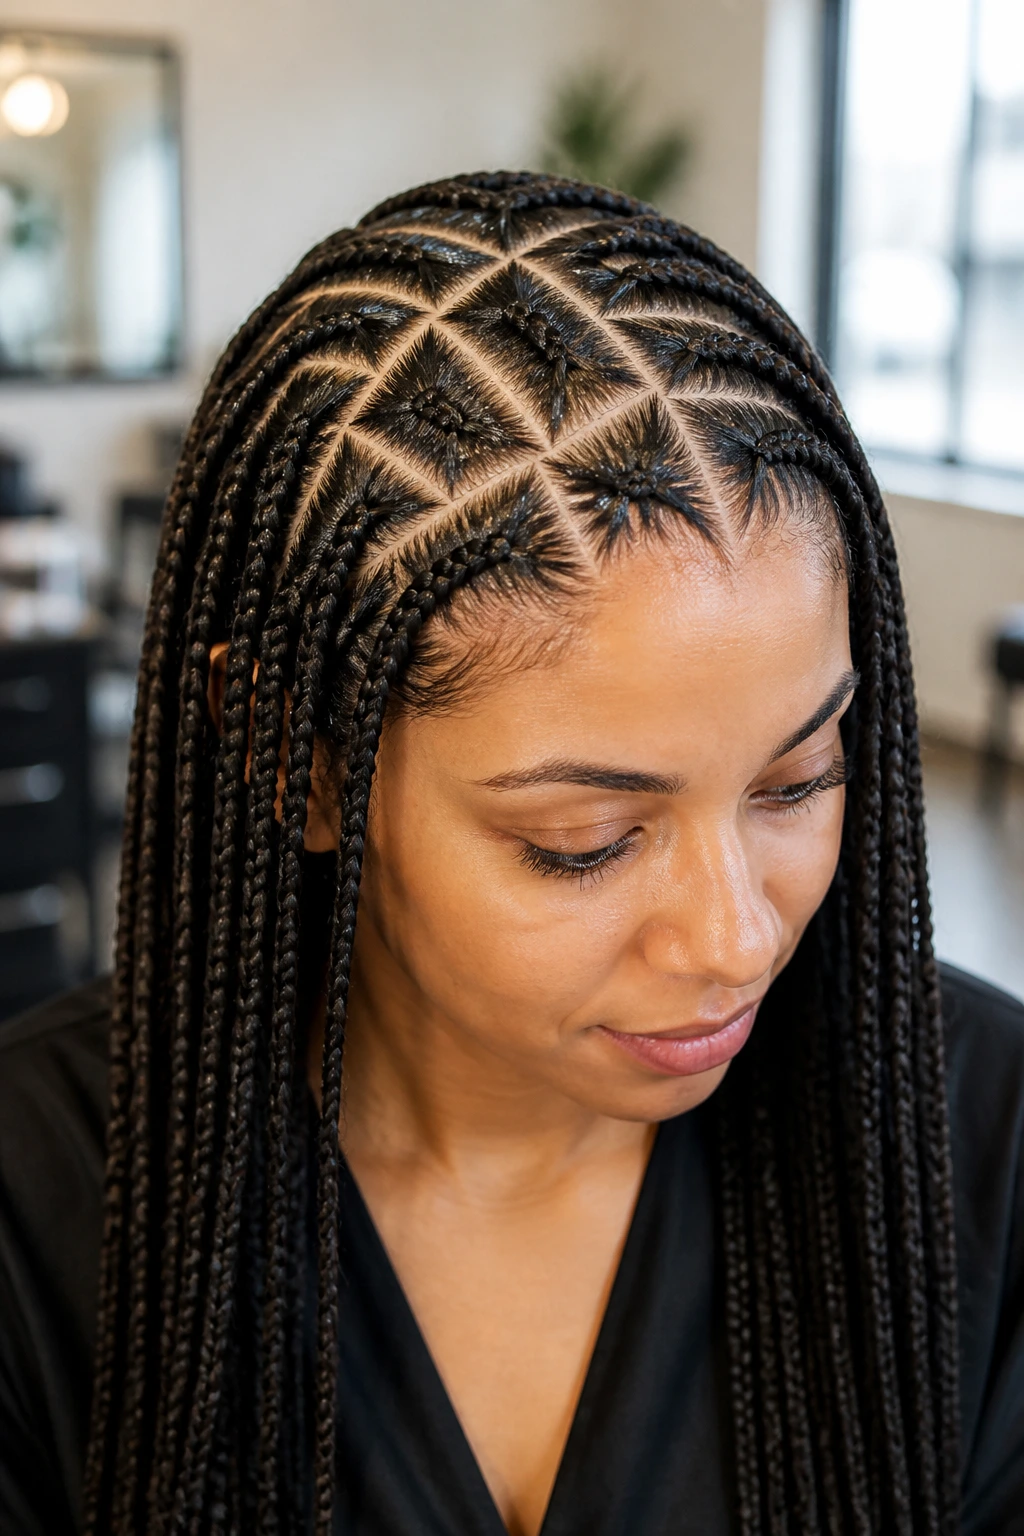
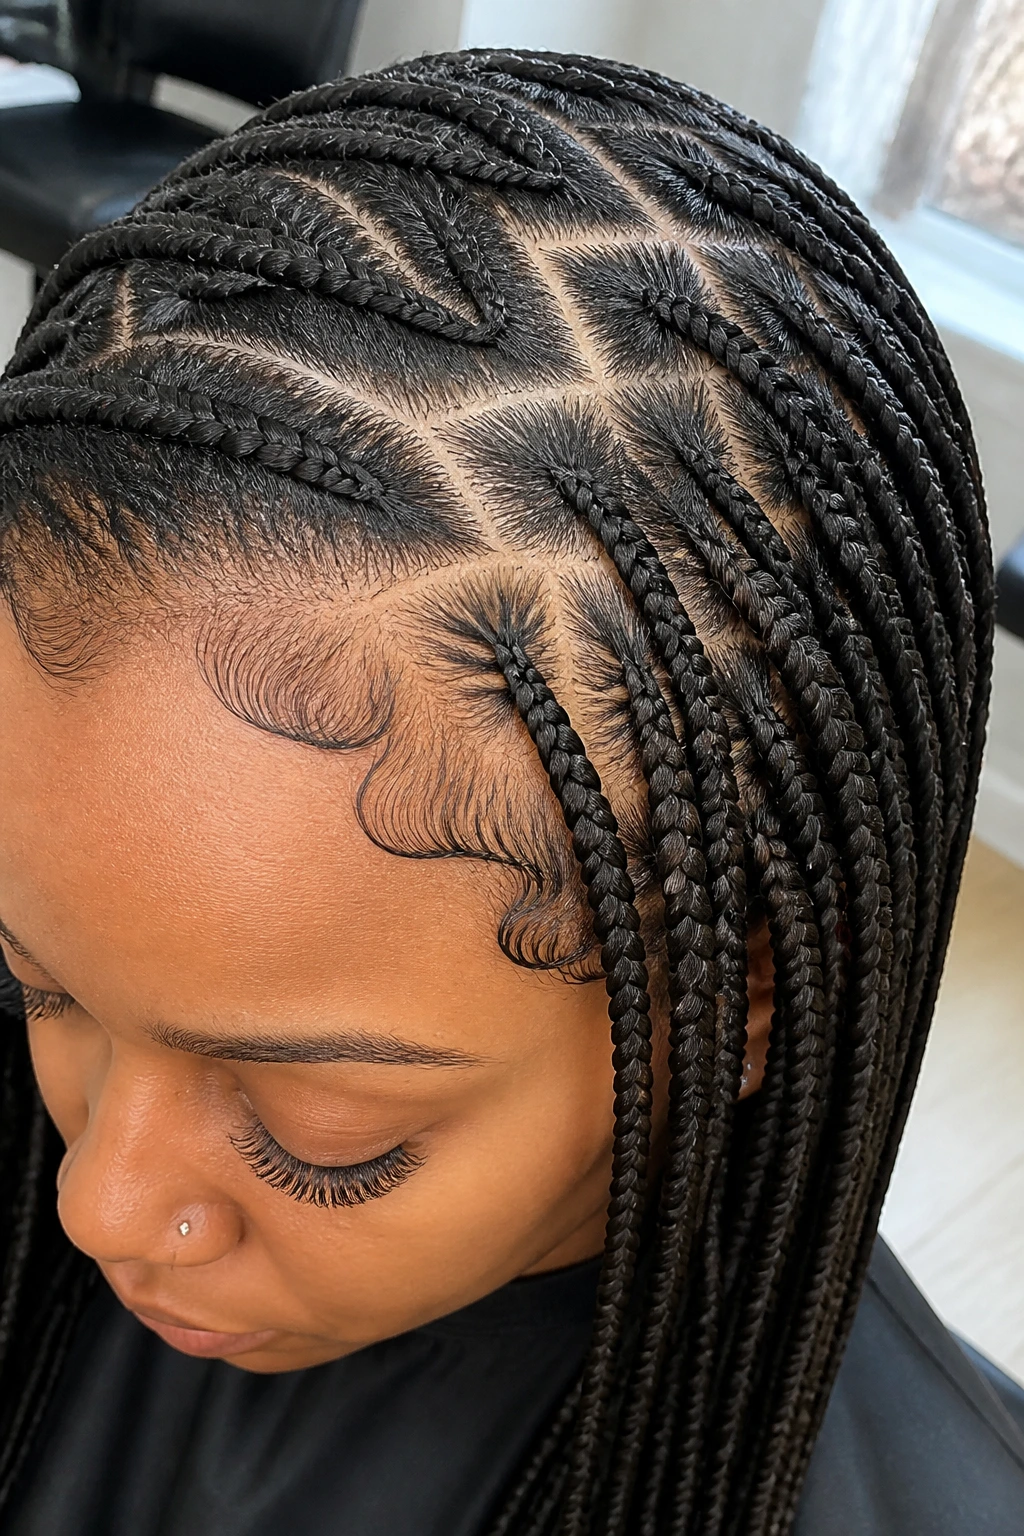
2. Geometric Triangle Parts
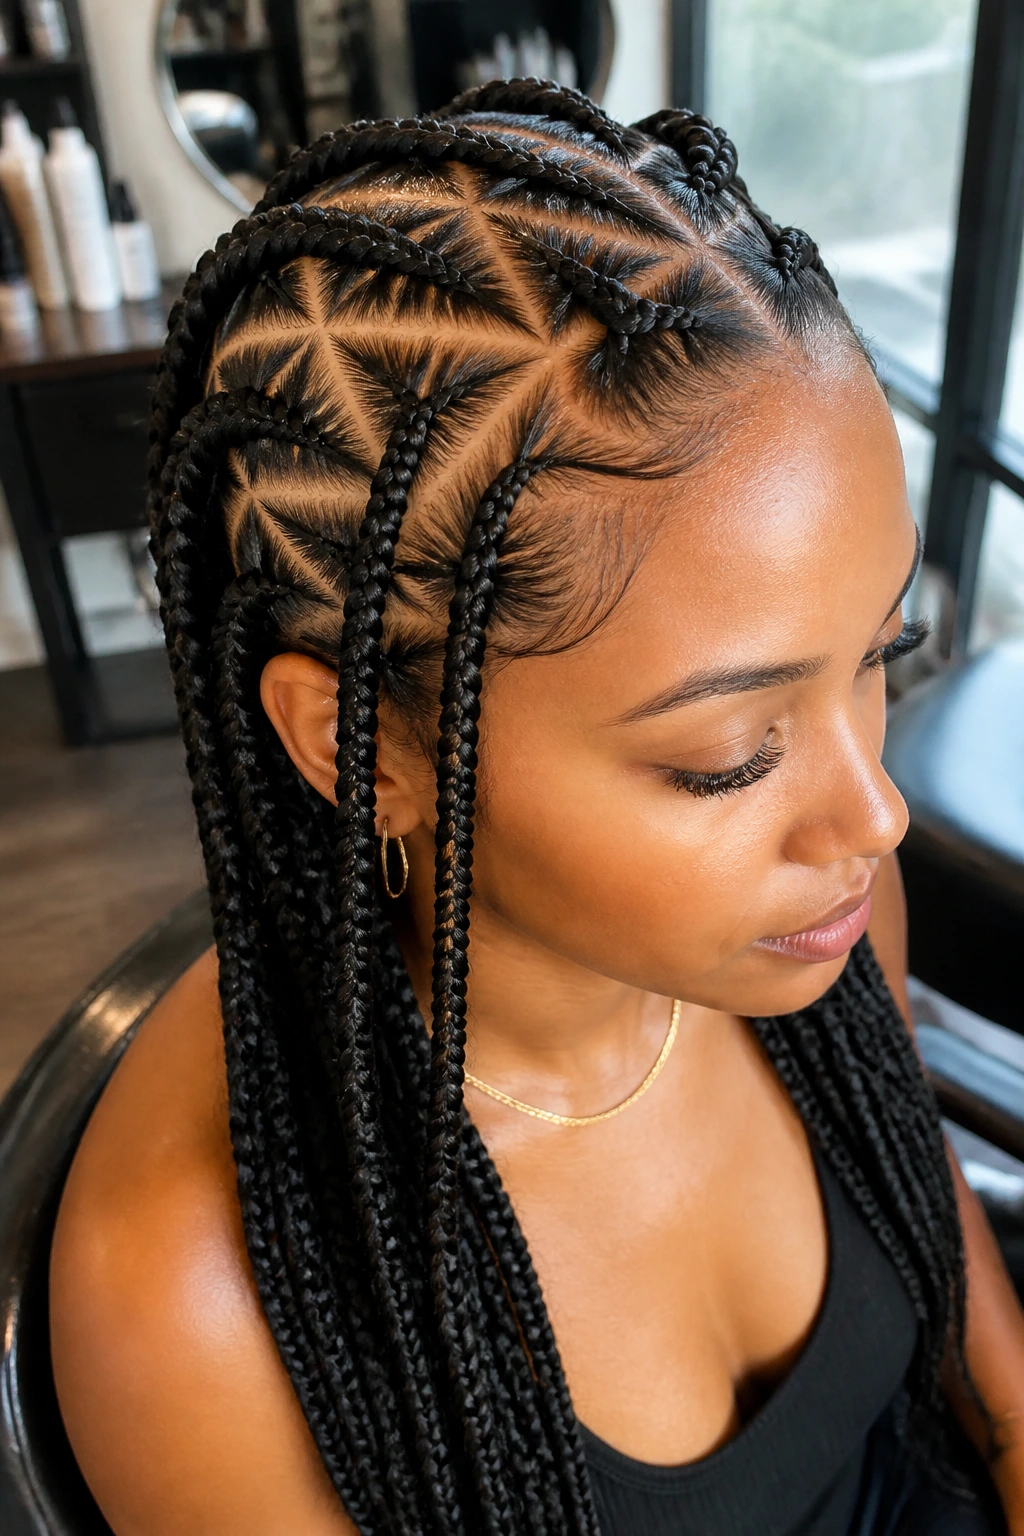
If you are bored with standard squares, triangles are the next logical step. They add a structural element that makes the hair look like it has been professionally mapped out. For wavy hair, this is a great way to distribute the weight evenly, as the triangular base creates a natural flow that moves with the shape of your head rather than against it.
How to Achieve the Shape
Sectioning is where you spend 80% of your time. Start by creating a primary line from the front hairline to the nape, then work in diagonals to form your triangles. The size of the triangle should match the diameter of the pencil braid you want to achieve. Anything larger, and you risk the braid looking unbalanced at the root.
Maintenance Note
Because the parts are exposed, you will need to keep your scalp hydrated. A lightweight oil mist or a spray containing rosewater and glycerin will stop the scalp from feeling dry or itchy under the tight tension of the triangles.
3. The Half-Up, Half-Down Pencil Style
This is a high-fashion approach that keeps the hair off your face while letting the back fall naturally. It is particularly striking if you have different lengths of hair, as the braids can be woven in a way that incorporates your shorter face-framing pieces without them snapping out of the braid.
Styling the Crown
Keep the braids on the crown section smaller and tighter to create a “headband” effect. This ensures that the hair does not fall into your eyes. You can then gather these into a small bun or a high ponytail, letting the remaining braids drape down the back.
Who Should Choose This
This is a perfect entry-level style for people who are nervous about full-head braiding. It is less time-consuming, requires less sitting in the chair, and gives you a sophisticated silhouette that works for both professional settings and weekend casual.
4. Pencil Braids with Curly Ends

This look is a beautiful nod to the “goddess” aesthetic but on a much more manageable scale. By stopping the braid an inch or two from the ends and letting the remainder of the hair stay in its natural wavy or curled state, you add movement and softness to the look.
Achieving the Texture
You can achieve this by using a perm rod or a small flexi-rod on the ends of your hair once the braids are finished. Dip the braided portion in hot water to set the structure, but leave the loose ends dry or lightly coated in a curling mousse. The contrast between the rigid, thin braids and the bouncy, loose waves is visually arresting.
Potential Downsides
Keep in mind that the loose ends require more care. You will need to detangle them gently every morning and night to prevent them from matting into the braids. If you are lazy with your hair routine, this might cause tangles that eventually ruin the braids.
5. Criss-Cross Patterned Roots
This style turns your scalp into a canvas. By braiding the hair in an X-pattern at the root before transitioning into the long pencil braids, you create a complex, interwoven look that is practically impossible to ignore. It is a favorite for special events or when you want your hair to be the centerpiece of your outfit.
The Complexity Factor
Do not attempt this if you are a beginner. It requires a lot of maneuvering to get the intersection of the braids clean. If your waves have a very high “S” pattern, the hair will naturally want to pull toward the curve; you must use a firm-hold gel to combat that natural desire to spring back during the braiding process.
Longevity Expectations
Patterned roots tend to show new growth faster than straight-back styles. Because the roots are locked into a pattern, as your hair grows, that pattern will shift. Plan to keep this style for about four to six weeks before the roots look too messy.
6. High-Contrast Two-Tone Braids
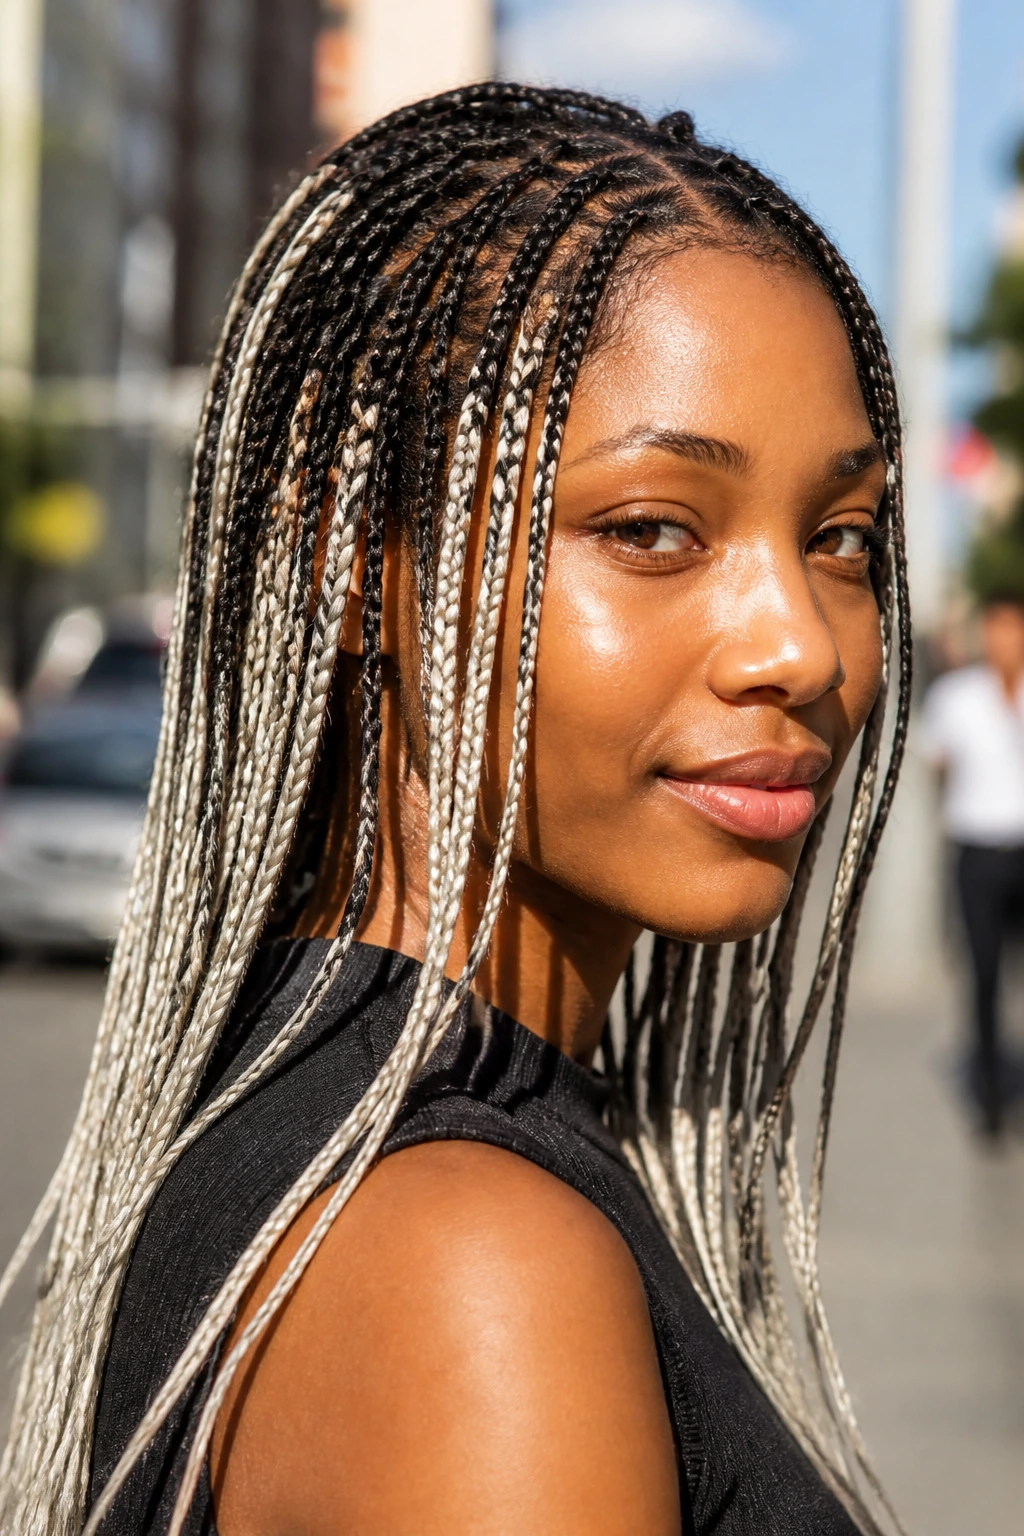
Using extensions that are a different color than your natural wavy hair creates a sharp, graphic look. Pencil braids are so thin that they don’t blend colors the way thick braids do; instead, they create a “marbled” or “streaked” appearance that looks incredibly modern.
Selecting the Right Shade
If your natural hair is dark, try a platinum or ash-blonde extension. The thinness of the braid means the color won’t look like a solid block, but rather like fine, painterly highlights. It is a fantastic way to experiment with bold color changes without actually bleaching your natural hair.
Safety First
Check the quality of the hair extensions. Since you are putting these in tight, thin braids, you want hair that is lightweight. Synthetic hair is often the default, but ensure it is pre-stretched or soft-touch to avoid adding unnecessary tension to your scalp.
7. Side-Swept Pencil Braids

If you have a side part that you love, lean into it. By braiding all the hair toward one side, you create a dramatic, elegant silhouette that accentuates your jawline. This look is particularly effective for those with wavy hair because the weight of the braids will hold your waves down in a uniform, controlled direction.
Visual Impact
This style creates a “fringe” of braids on one side of your face. It is great for showing off earrings and creates an asymmetrical look that feels very intentional and high-end.
Why It Works for Wavy Hair
Wavy hair often fights against a clean, center-parted style. By sweeping everything to one side, you are essentially working with the hair’s natural inclination to fall in a particular direction rather than forcing it to comply with a rigid, symmetrical grid.
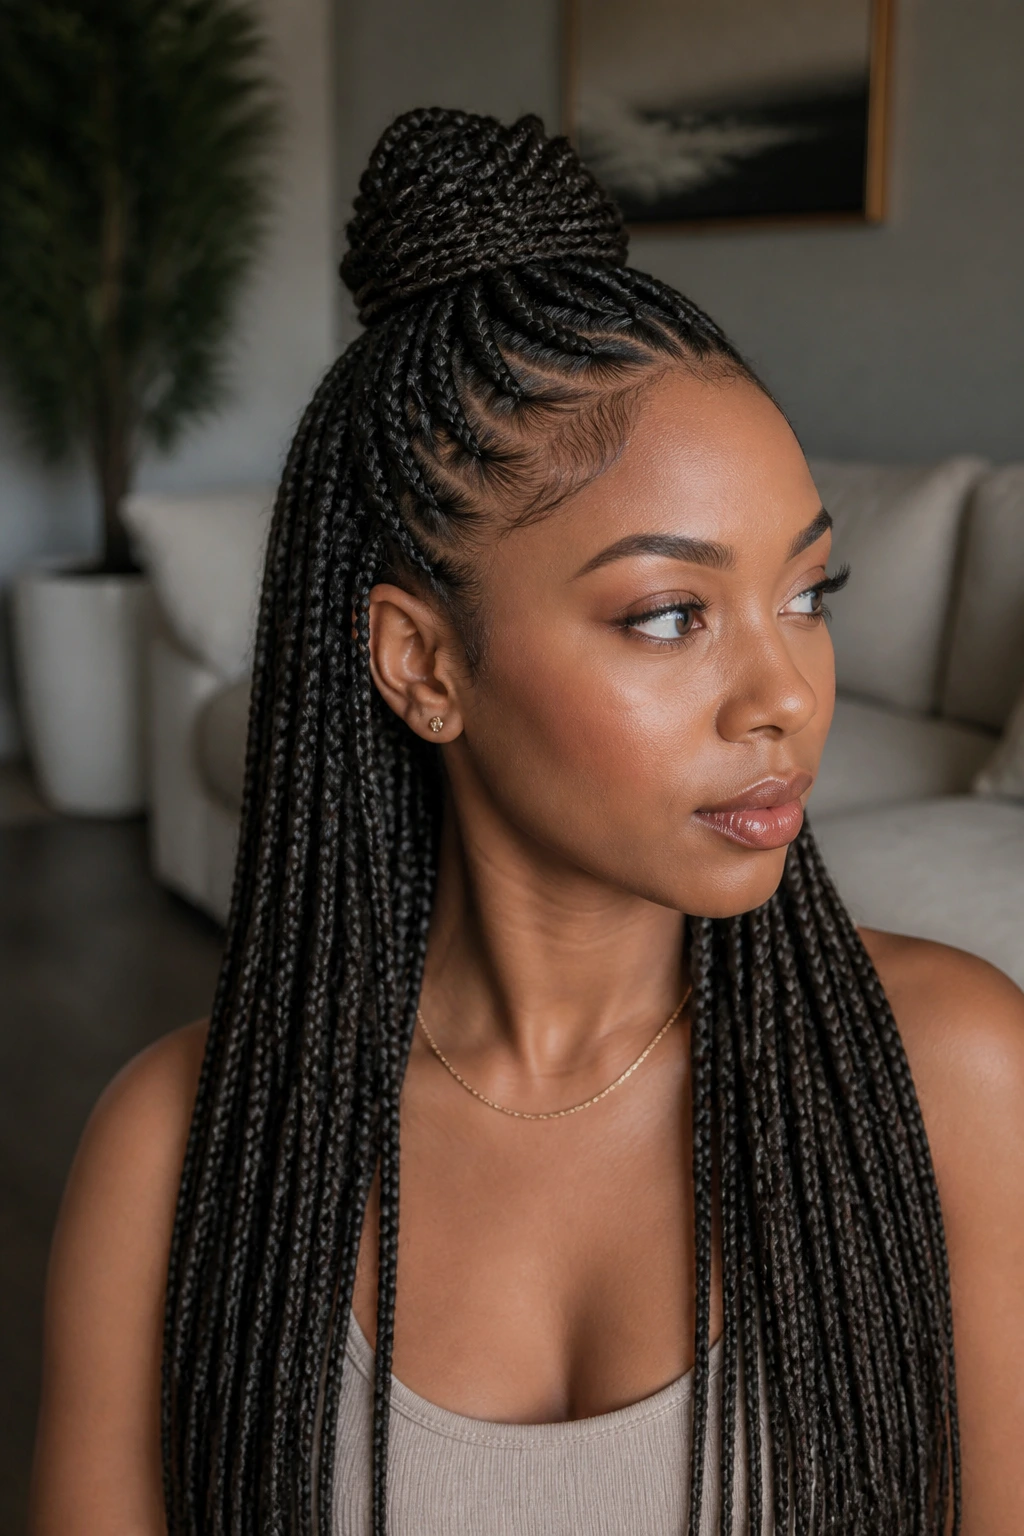
8. The Pencil Braid Updo
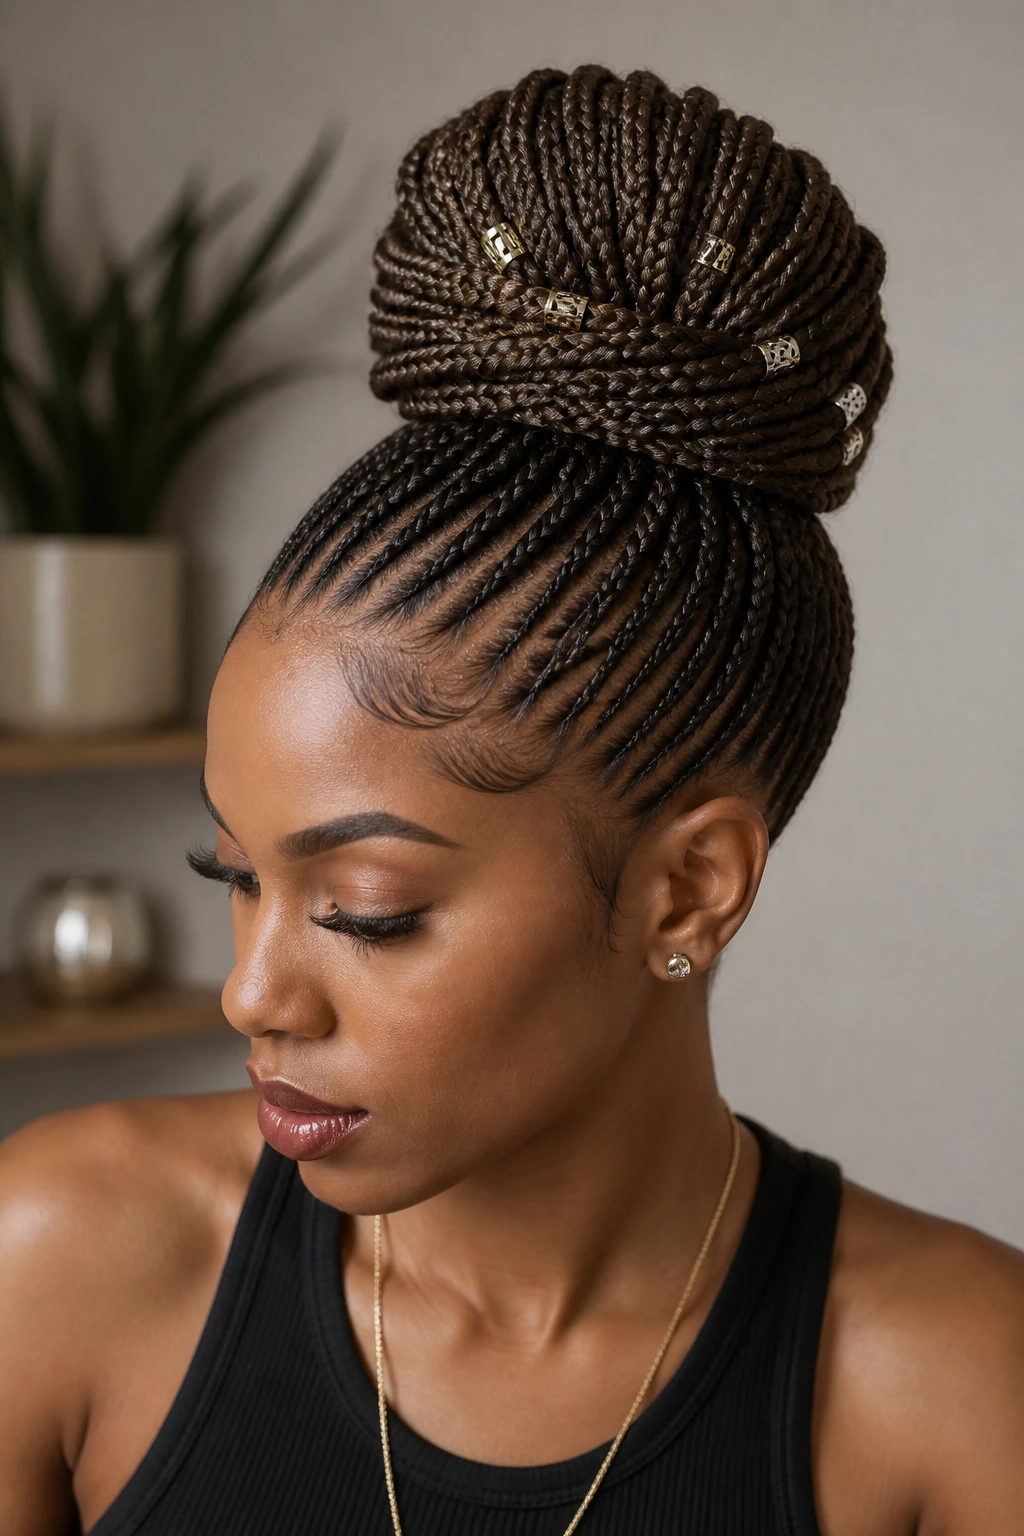
This is the ultimate protective style for long-term wear. By weaving the thin braids into a crown or a structured bun, you protect the ends of your hair entirely. Since the braids are small, the resulting bun is not oversized or heavy, but rather sleek and refined.
Constructing the Bun
Gather all the braids at the crown and pin them securely with hair-colored bobby pins. You do not need to pull them tightly; instead, spiral them around the center to create a donut-like shape. This looks effortless and keeps your neck cool.
Styling Tip
Add a few gold cuffs or beads into the braids to dress up the updo. Even a simple, basic bun becomes a red-carpet look when you incorporate metallic hardware into the individual strands.
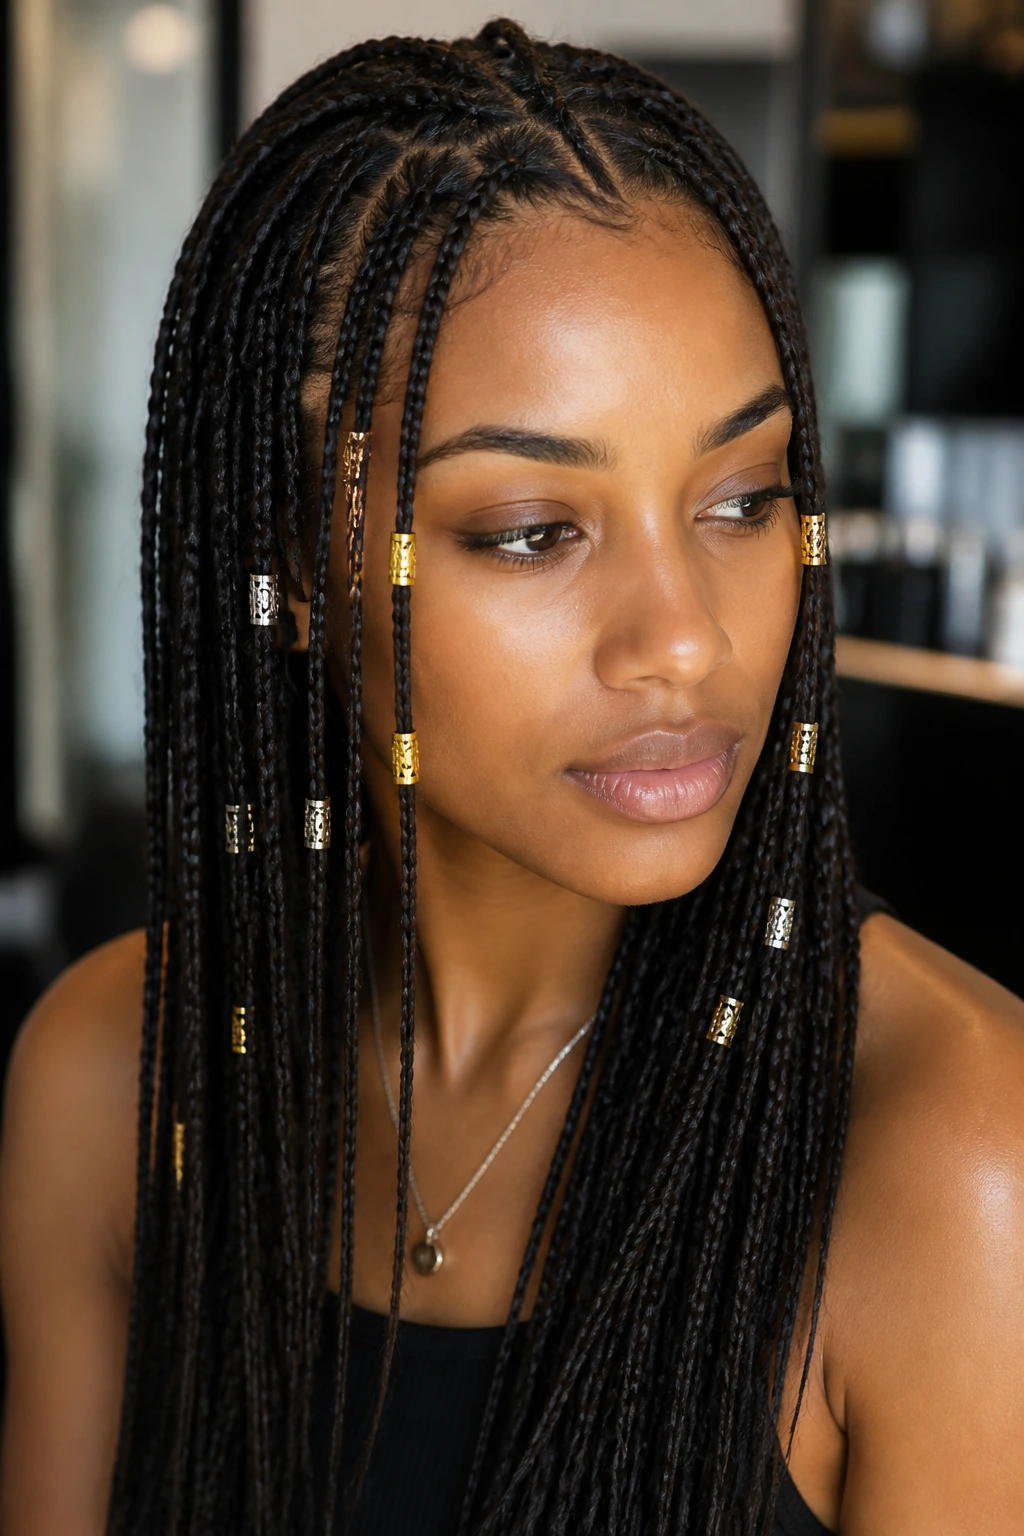
9. Pencil Braids with Beaded Ends
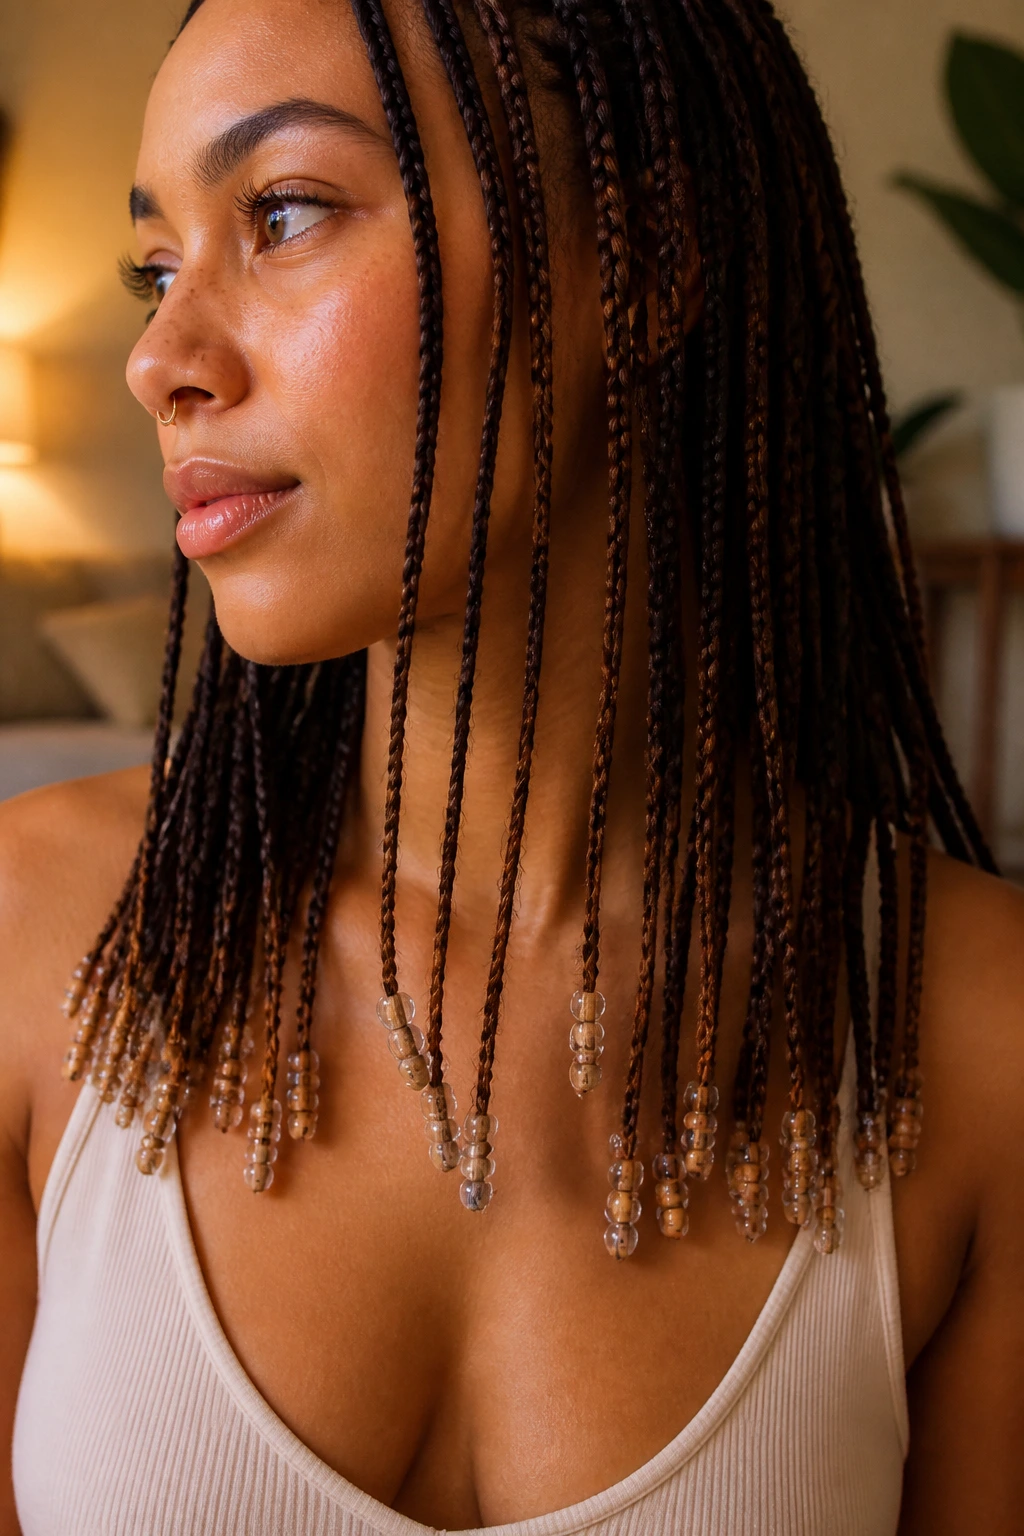
Beads are making a comeback, and they look best on thinner braids. When you use thick beads on a jumbo braid, it can look a bit clunky. On a pencil braid, however, the beads sit perfectly flush with the braid, creating a rhythmic clinking sound as you move.
Choosing Your Material
Wooden beads offer an earthy, natural vibe, while clear plastic beads provide a Y2K aesthetic. Choose what fits your personal style, but ensure the hole in the bead is just wide enough to slide over the braid without you having to force it and risk snapping your hair.
Practicality Check
Beads do add weight. If you put a heavy bead on every single braid, you will feel it at the end of the day. For a more balanced feel, try adding beads to every third or fourth braid, or just around the perimeter of your hairline.
10. The Wrapped Pony
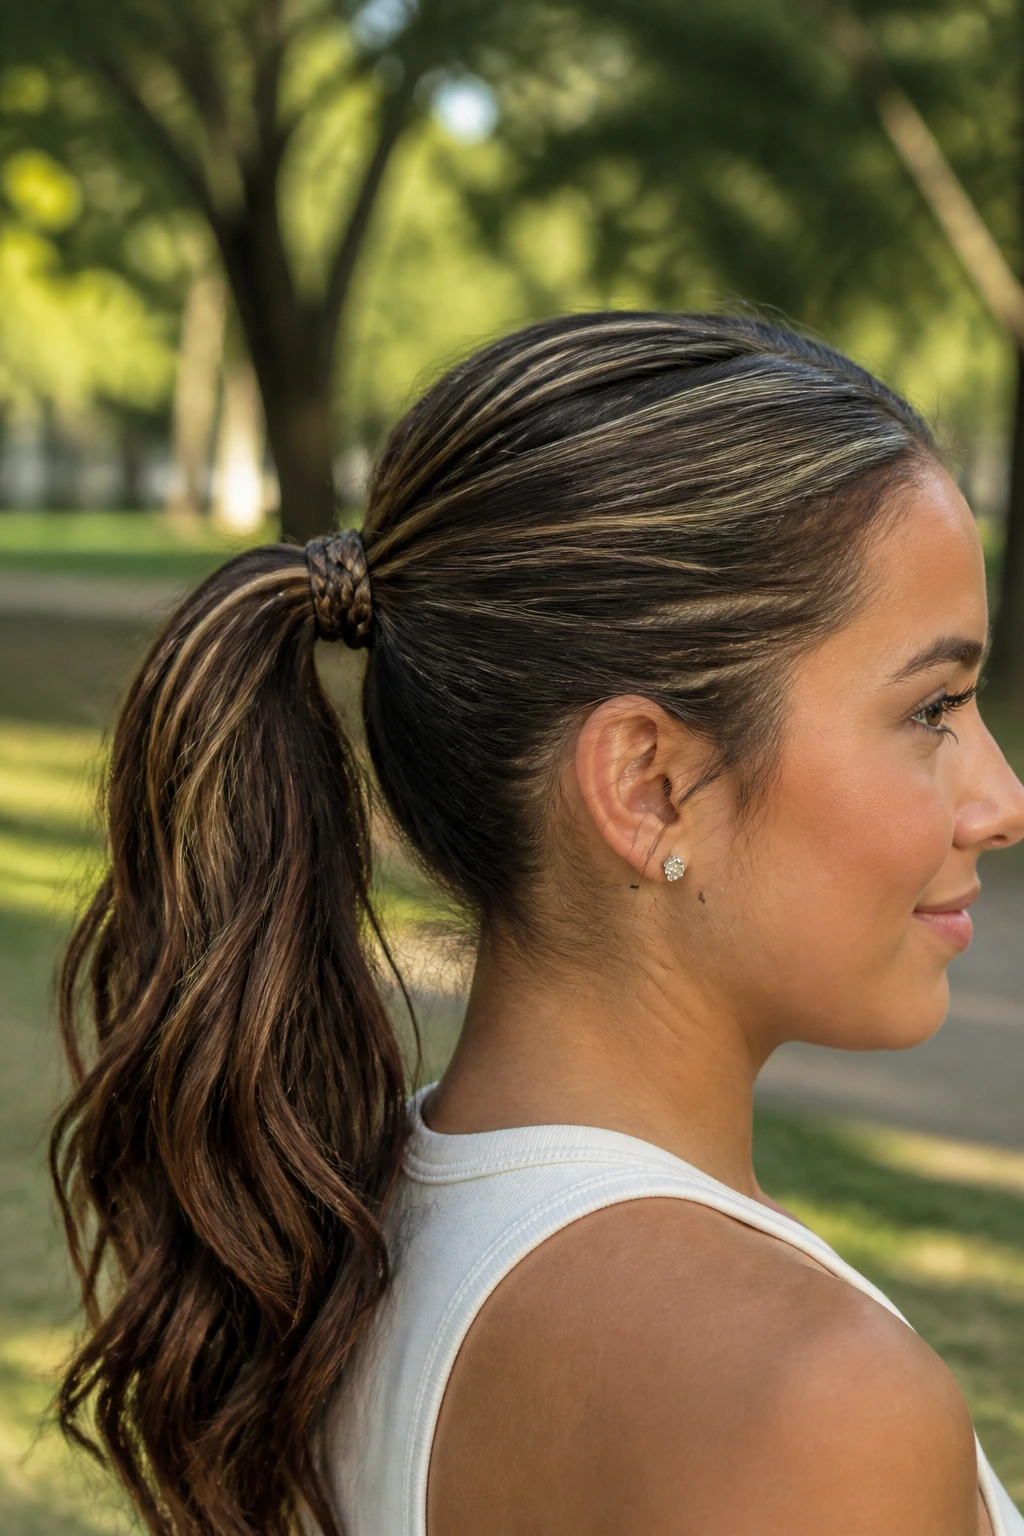
This takes a standard ponytail and elevates it by wrapping a single pencil braid around the base. It is a subtle detail, but it changes the entire look of the ponytail from a gym hairstyle to a chic, deliberate choice.
How to Execute
Once you have pulled your braids into a ponytail, take one braid from the underside, wrap it around the hair tie, and tuck the end back into the ponytail using a small crochet needle or a hair pin. It looks like the hair is holding itself up.
Why It Works
It hides the elastic band, which is the quickest way to make any braided style look more professional. This is a five-minute tweak that adds a high-end feel to your existing style.
11. Zig-Zag Parts
A classic technique from the 90s, zig-zag parts add playfulness to the pencil braid look. Because the braids are so fine, the zig-zag creates a mesmerizing, interlocking pattern at the root that looks very complex.
Managing the Part
You need a steady hand. Start from the front and work your way back with a rattail comb. If you slip, simply use a bit of leave-in conditioner to lay the hair back down and try again. It is a labor-intensive start, but the result is a style that stands out in a crowd.
Maintaining the Zig-Zag
As your hair grows, the zig-zag will naturally lose its crispness. Keep the style for three weeks maximum if you want the geometric lines to remain the primary focus. Beyond that, the roots will start to puff up, and the effect will be lost.
12. Asymmetrical Pencil Braids
Mix up the sizes. Braiding the front section in smaller, more intricate pencil braids and then transitioning to slightly larger ones toward the back creates a look that is both modern and functional. The smaller braids at the front provide the sleekness you want, while the larger braids in the back speed up the braiding time.
The Balancing Act
Ensure that the transition between braid sizes is smooth. You don’t want a sudden jump from a thin braid to a thick one; gradually increase the amount of hair in each section as you work your way toward the nape of the neck.
Visual Harmony
This approach is excellent for those who find the uniform look a bit monotonous. It gives the eye something to travel across and breaks up the monotony of a full head of identical braids.
13. Pencil Braids with Accent Cuffs
Gold or silver cuffs are the perfect accessories for this style. Because pencil braids are slender, they hold cuffs very securely. You can space them out at different heights along the length of the braid to create a “constellation” effect.
Placing the Cuffs
Use a small pair of pliers or your fingers to gently clamp the cuffs shut. Don’t press too hard, or you might crimp the braid and create a weak point where the hair could eventually break.
Curating the Look
Don’t clutter every braid. The elegance of this style is in the restraint. Place cuffs on random braids—maybe five or six in total—to create a look that feels curated rather than overwhelmed by jewelry.
14. The “Halo” Pencil Braid
This style involves braiding the hair around the perimeter of your head to create a frame, then letting the rest of the braids hang loose. It’s an ethereal look that works well for special occasions or warmer months when you want to keep the hair off your face while still having length.
Managing the Tension
The halo braid is under the most tension of any style on this list. Since it is acting as a headband, ensure that the braids are not pulling too hard at the hairline. If it feels tight immediately, loosen the tension by gently massaging the scalp around the braid.
Longevity
This is a high-maintenance look for your edges. Because of the constant pull, make sure you are not leaving the style in for more than four weeks. You need to give your hairline a significant rest period afterward.
Understanding Your Wavy Texture
Wavy hair, or Type 2 hair, behaves differently under the pressure of a braid. Unlike straight hair, which is quite uniform, wavy hair has varying degrees of bend. This bend provides a natural “cushion” that helps the braid hold its shape, but it can also make the initial parting phase difficult. You must be prepared to use more product to keep the sections clean.
The Role of Moisture
If your hair is dry, it will look frizzy within hours of being braided. Always start with a deep-conditioning treatment before you even begin to part. You want your hair to be hydrated, but not greasy. A leave-in conditioner that is lightweight is your best friend during this process.
Combating the Frizz
The biggest enemy of pencil braids on wavy hair is the “halo” of frizz that appears around the root. To combat this, keep a small spray bottle filled with water and a tiny bit of aloe vera gel nearby. Spritz as you go, and smooth the hair down with your palms before you start weaving the strand.
Choosing the Right Braid Thickness
Pencil braids are specifically defined by their width, but there is still some wiggle room. If your waves are very tight, you might want a slightly thicker braid to accommodate the volume. If your waves are loose or fine, a thinner braid is better to avoid it looking limp.
Visual Cues
Hold a pencil next to your own hair. The width of that pencil is your target. If you have a lot of density, you might need to make the braid slightly wider to ensure you can actually complete a full head in a reasonable amount of time.
The Impact of Extensions
Do you need extensions? If you want the pencil braid to have a consistent look from root to tip, you almost certainly do. Adding a small amount of Kanekalon or synthetic braiding hair gives the braid weight and structure that natural hair—especially wavy hair—lacks on its own. It also protects your natural hair from the friction of the braid.
Essential Tools for the Job
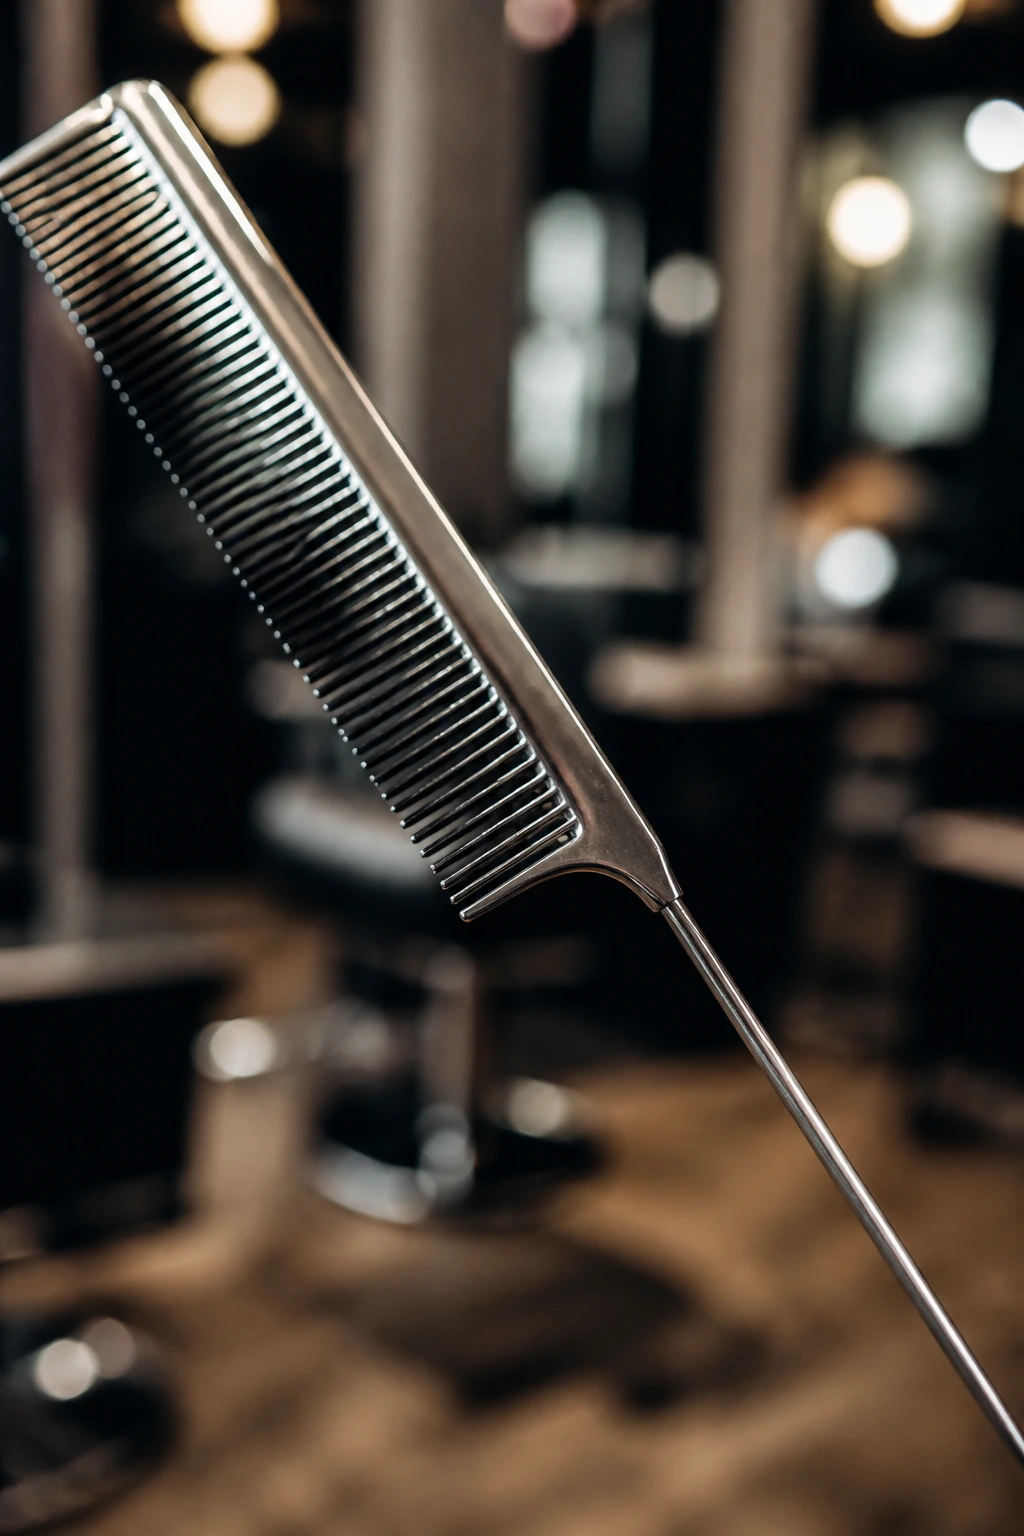
You cannot achieve a perfect pencil braid with cheap equipment. A high-quality metal-tail comb is non-negotiable for clean parts. Plastic combs will leave jagged lines that ruin the entire geometric look of the style.
The Must-Have List
- Metal-tail rattail comb: For precise, razor-sharp parting.
- Crochet hook: Essential for tucking in ends or incorporating loose pieces.
- Clear, lightweight gel: Look for one that doesn’t flake; this is the difference between a professional look and a messy one.
- Hair clips: Get at least 10 large sectioning clips to keep the rest of your hair out of the way while you focus on one braid.
- Spray bottle: Keep it filled with water and a dash of leave-in conditioner.
The Importance of Lighting
Braiding your own hair or someone else’s requires intense focus on the scalp. If you are doing this at home, use two mirrors to ensure the back of the head is just as precise as the front. Lighting should be bright and positioned from both the front and the back to eliminate shadows that make parting difficult.
Maintenance and Daily Care
Pencil braids might look like a “set it and forget it” style, but your scalp needs attention. The thinness of the braids makes your scalp more exposed to the elements. During the day, protect your hair with a silk bonnet or pillowcase to stop friction from causing frizz.
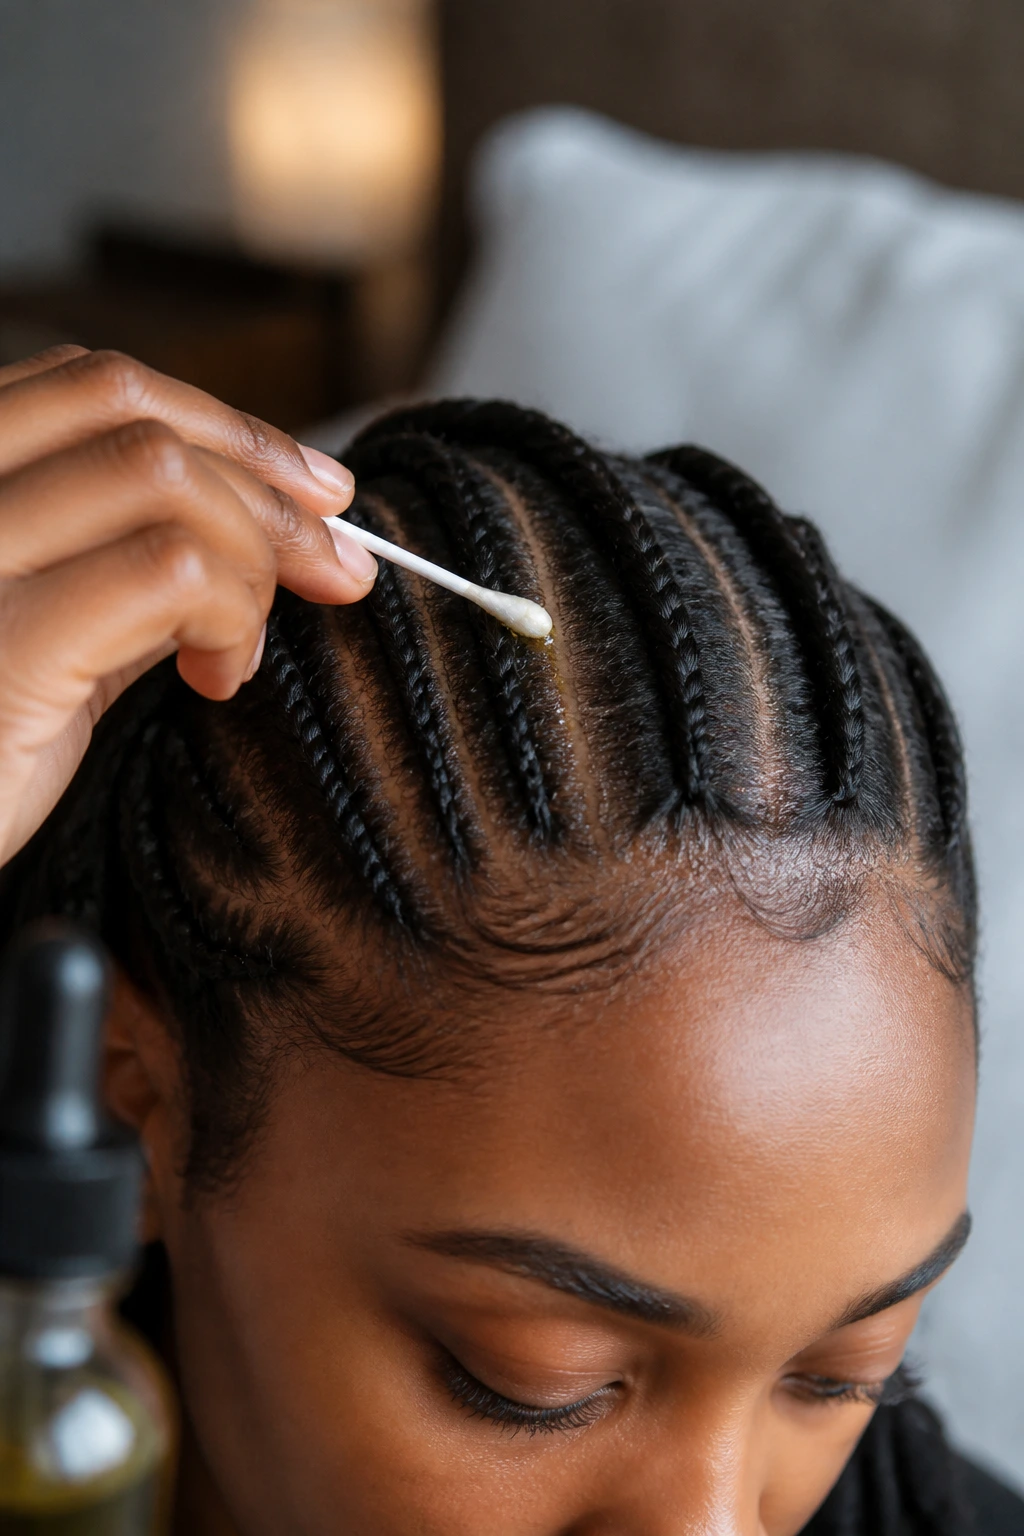
Dealing with Itchiness
It is natural for the scalp to itch when it is pulled tight. Do not scratch with your fingernails, as you will disrupt the parts. Instead, use a scalp oil with tea tree or peppermint oil. Dab it onto the scalp with a cotton swab. The cool sensation will soothe the itch without you needing to touch the braids themselves.
Refreshing the Look
Around week three, your roots will start to get fuzzy. You can touch up the perimeter—the braids around your face—by carefully taking them out, re-moisturizing the roots, and re-braiding them. This will make the entire style look like it was done yesterday, extending your wear time by at least a week.
The Bottom Line
Pencil braids on wavy hair are a beautiful, sophisticated choice, provided you are willing to commit to the prep and the maintenance. They offer a level of control and durability that other styles lack, and they can be customized to suit any aesthetic, from the minimalist to the maximalist. By focusing on clean parting, using the right amount of product to tame your natural wave, and respecting the tension on your scalp, you can enjoy a style that looks polished, intentional, and effortless. Remember, the goal is not to force your hair to be something it is not, but to use its natural texture to give these braids the grip and body they need to truly shine. Whether you choose a simple straight-back design or an intricate patterned root, you will find that these braids give you a fresh, light, and modern look that lasts for weeks.