Rolling out of bed when the sun barely peeks through the blinds is a universal challenge, and when the bus or the first bell is looming, your hair is usually the last thing you want to fight with. Most of us have been there, staring at a mirror with five minutes to spare, wondering how to turn a messy, sleep-crushed mane into something that looks intentional rather than accidental. The secret isn’t a complex, hour-long styling session; it’s about having a rotation of reliable, quick, and sturdy looks that can survive a locker slam, gym class, and a full day of sitting at a desk.
Achieving this takes more than just a decent hair tie. It requires understanding your hair’s texture and knowing exactly which styles hold up under pressure. Whether your hair is stick-straight, coiled tight, or somewhere in the middle, the goal is to minimize morning stress while maximizing your confidence. We are looking for styles that provide a polished finish without requiring a suite of professional styling tools.
Getting a handle on these looks means focusing on the mechanics of the hold. It means knowing how to anchor a braid so it doesn’t fray by second period and how to secure a bun that doesn’t sag under its own weight after lunch. Let’s walk through twenty styles that strike the balance between school-day practicality and personal style, ensuring your morning routine becomes one of the smoothest parts of your day.
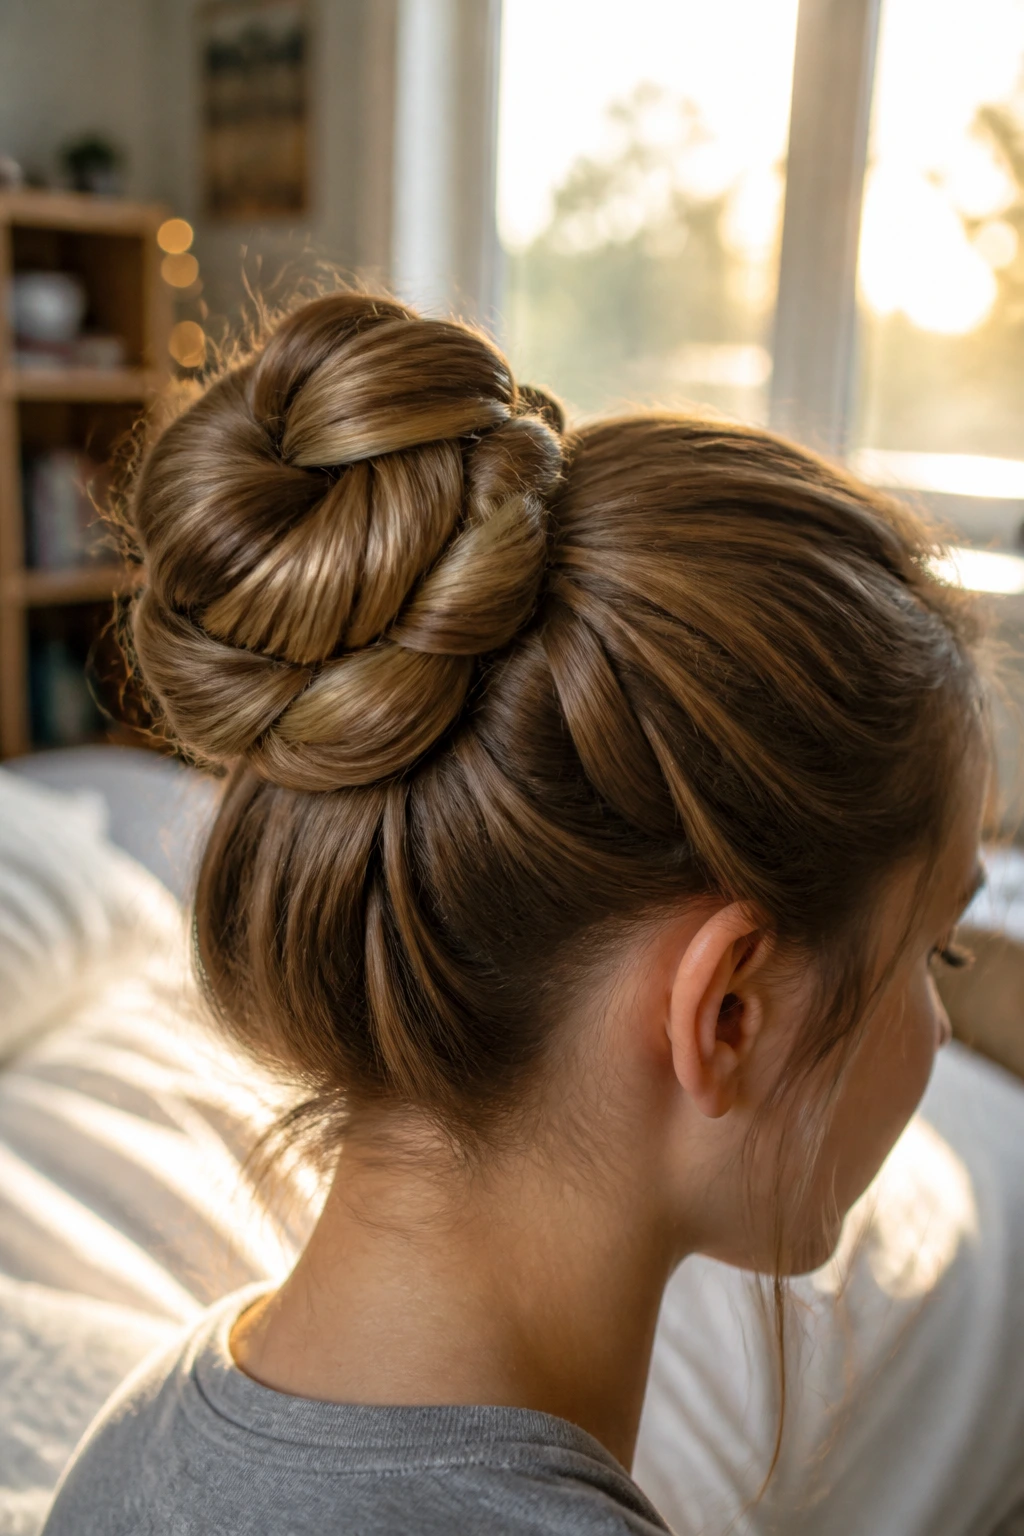
1. The High-Volume Messy Bun
This isn’t the fragile bun that falls apart the moment you walk down the hallway. To get that effortless, high-volume look, flip your head upside down and gather your hair at the crown before securing it loosely. The trick is to leave the final pull-through of your hair tie only halfway, creating a loop. Then, take the remaining tail, wrap it around the base of the tie, and pin it in place with a couple of bobby pins that match your hair color. You want the bun to feel secure, but looking too perfect is actually the enemy of this style; pull a few small strands out near your temples to frame your face.
Why This Works for Busy Mornings
This style thrives on texture, meaning it’s actually better if your hair isn’t freshly washed. The natural oils help give the hair “grip,” preventing pins from sliding out. If your hair is too slippery, a quick spritz of dry shampoo or texturizing spray at the roots will give you all the volume you need to make the bun look intentional and full.
Pro Tips for Long-Lasting Hold
- Use two hair ties if your hair is thick and heavy to avoid that dreaded mid-day droop.
- Focus your pinning on the underside of the bun where it meets your scalp.
- A U-shaped hair pin often holds better than traditional bobby pins for this specific look because it weaves through the hair rather than clamping it flat.
2. The Sleek Low Pony with a Wrapped Base
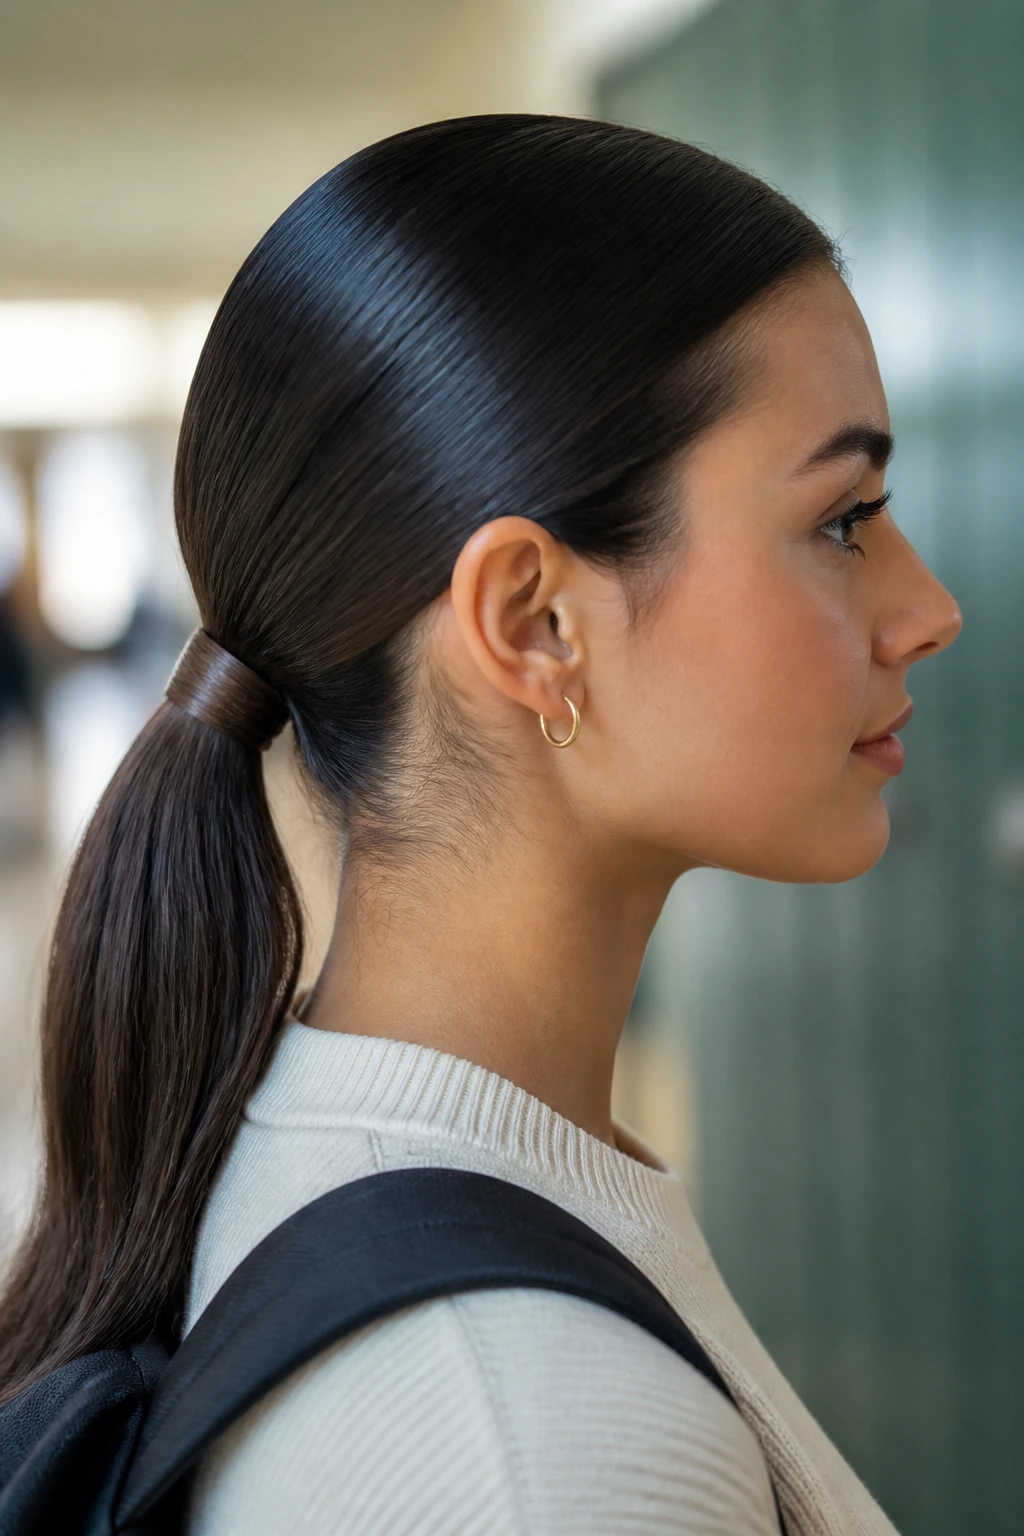
There is something undeniably crisp about a low, centered ponytail, especially when you take those extra ten seconds to hide the elastic. Gather your hair at the nape of your neck, smooth it with a boar-bristle brush, and tie it tight. Take a small, quarter-inch section of hair from the underside of the pony, wrap it tightly around your hair tie, and secure the end with a tiny bobby pin tucked underneath. This small detail turns a basic gym-class look into something that looks like you spent time planning it.
Why This Style Stays Polished
The secret is the tension. By pulling the hair tight at the nape, you reduce the chances of flyaways popping up during the day. If you struggle with baby hairs along the hairline, a tiny amount of hair oil rubbed between your palms and smoothed over the surface will tame the static without making your hair look greasy.
3. The Double Dutch Braid Headband
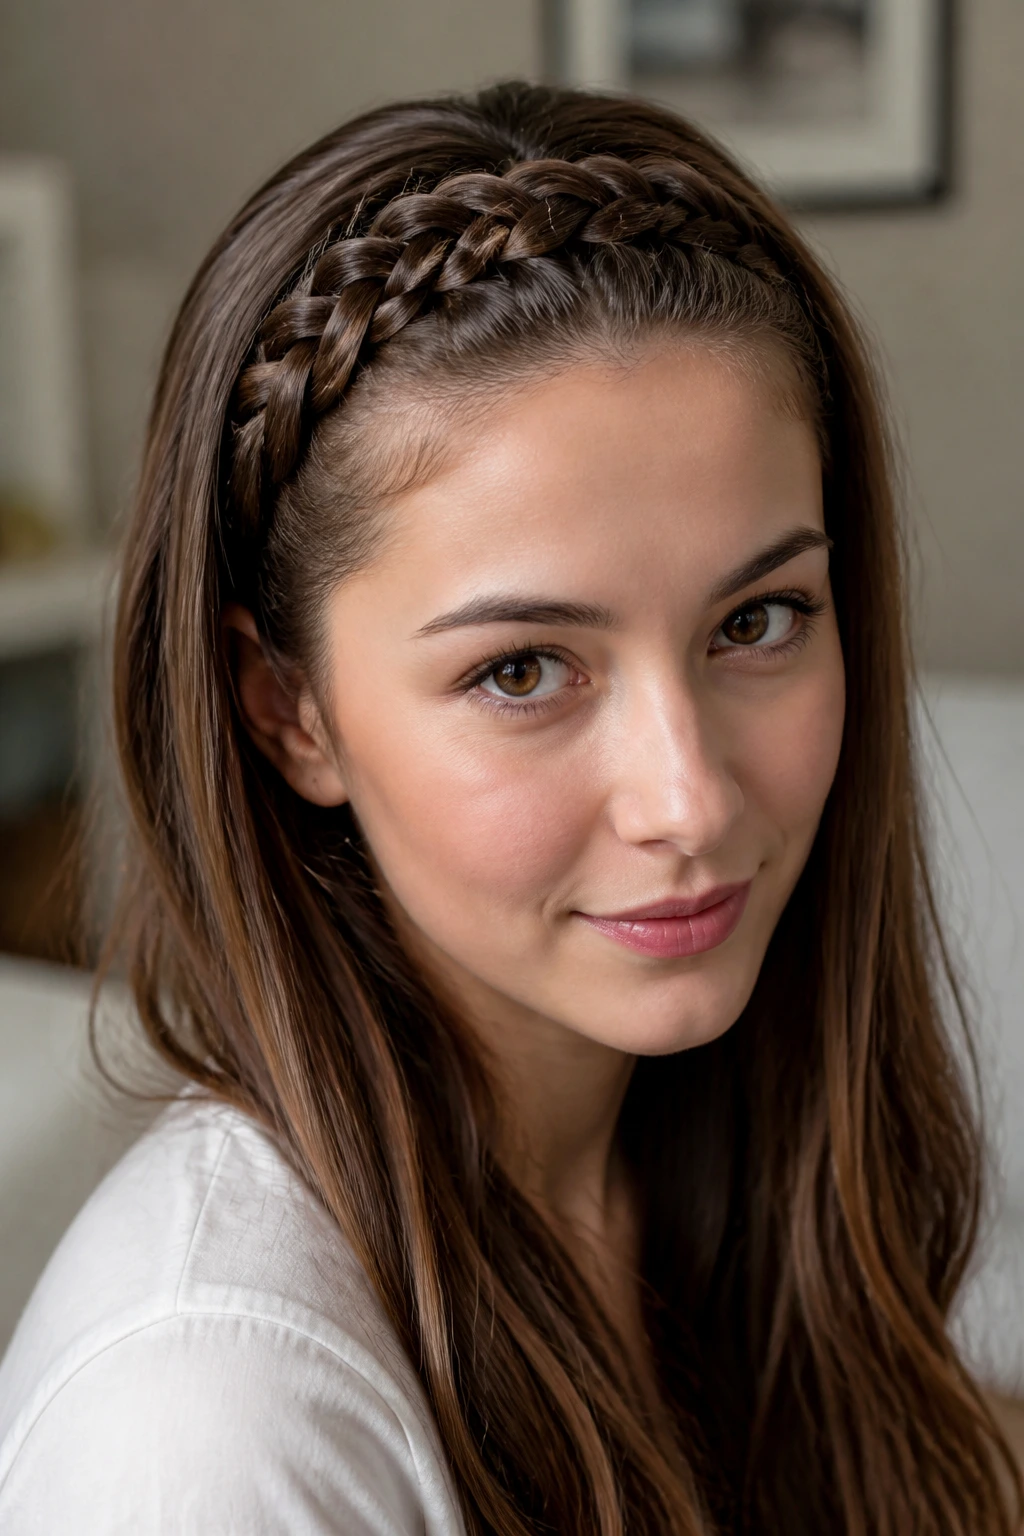
Braiding the front section of your hair away from your face is the best way to handle bangs or shorter layers that usually fall into your eyes during class. Start at one temple and dutch braid—where you cross strands under instead of over—along your hairline toward the other side. Once you reach the opposite temple, secure it with a clear elastic and let the rest of your hair hang down. If you want a more casual vibe, pull gently at the edges of the braid to “pancake” it, making the braid appear twice as thick.
Dealing with Shorter Layers
If you have choppy layers, don’t worry about them being perfect. The beauty of this braid is that it can look a bit textured and lived-in. If a few short pieces escape, just tuck them behind your ear or use a small amount of pomade to smooth them into the braid.
4. The Half-Up Top Knot
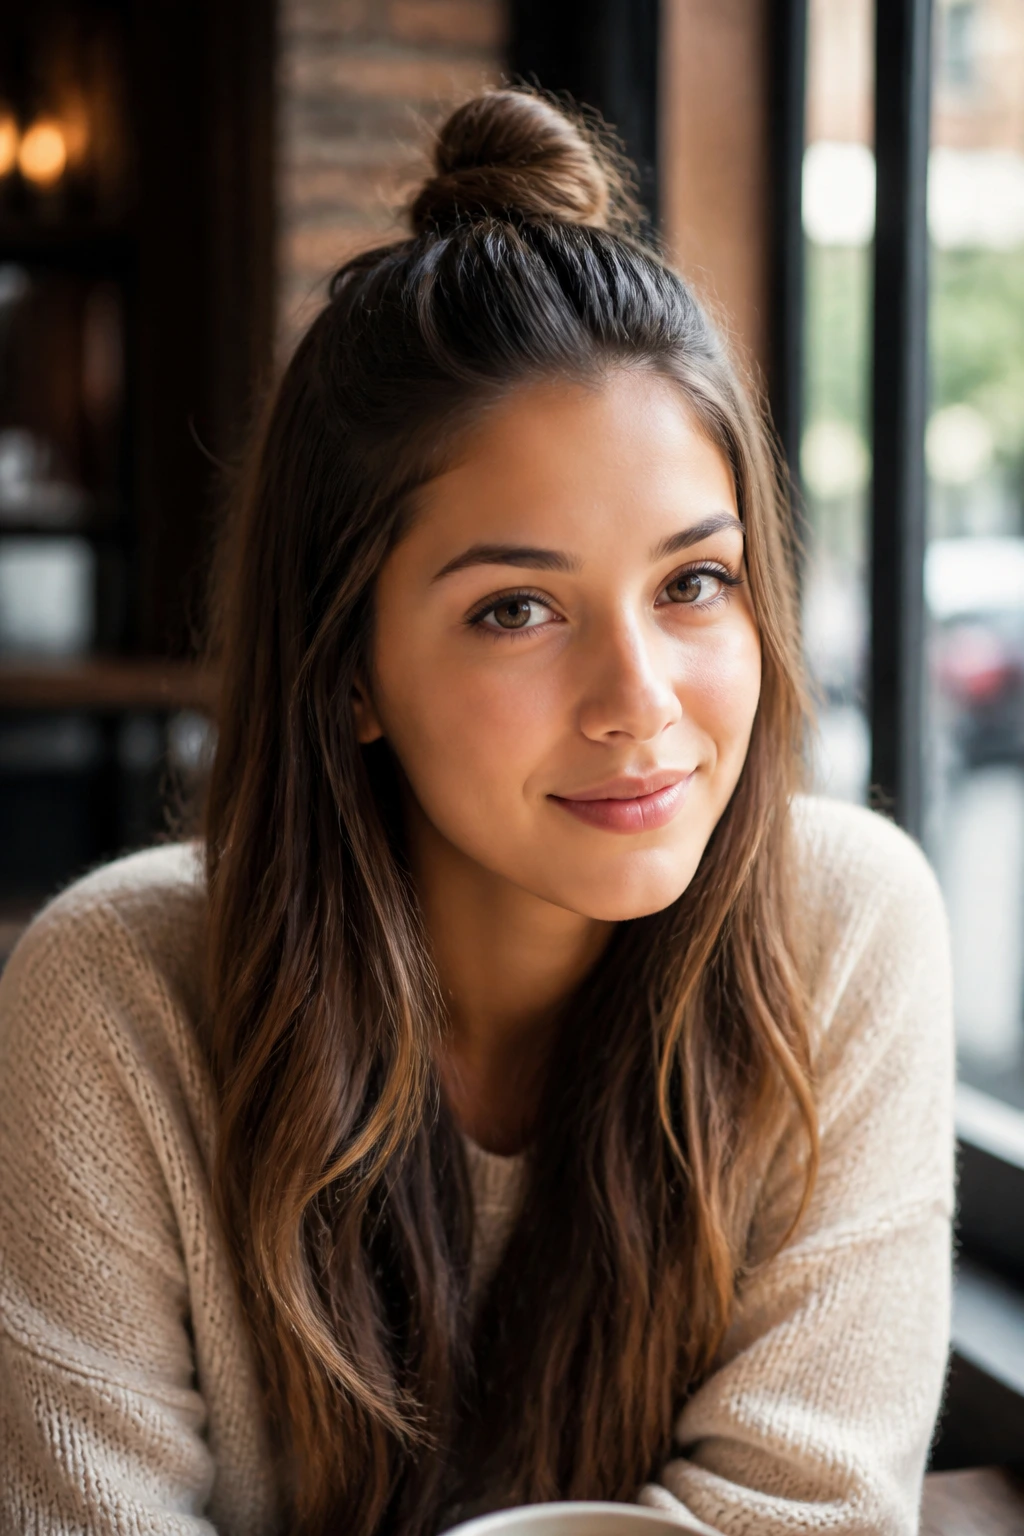
When you can’t decide between leaving your hair down or putting it all up, the half-up top knot is your answer. Section off the top third of your hair, starting from the arches of your eyebrows and pulling back to the crown. Twist that section into a small, tight bun and secure it with a scrunchie or a small elastic. It keeps your hair out of your face while letting you maintain the length and volume of your hair around your shoulders.
Making it Look intentional
The key here is placement. If the knot sits too low, it looks like you’re just pulling back stray hair. Aim for the very top of your head, where the skull starts to curve. This gives it that modern, lifted look that pairs perfectly with oversized hoodies or structured school uniforms.
5. The Twisted Crown Side Sweep
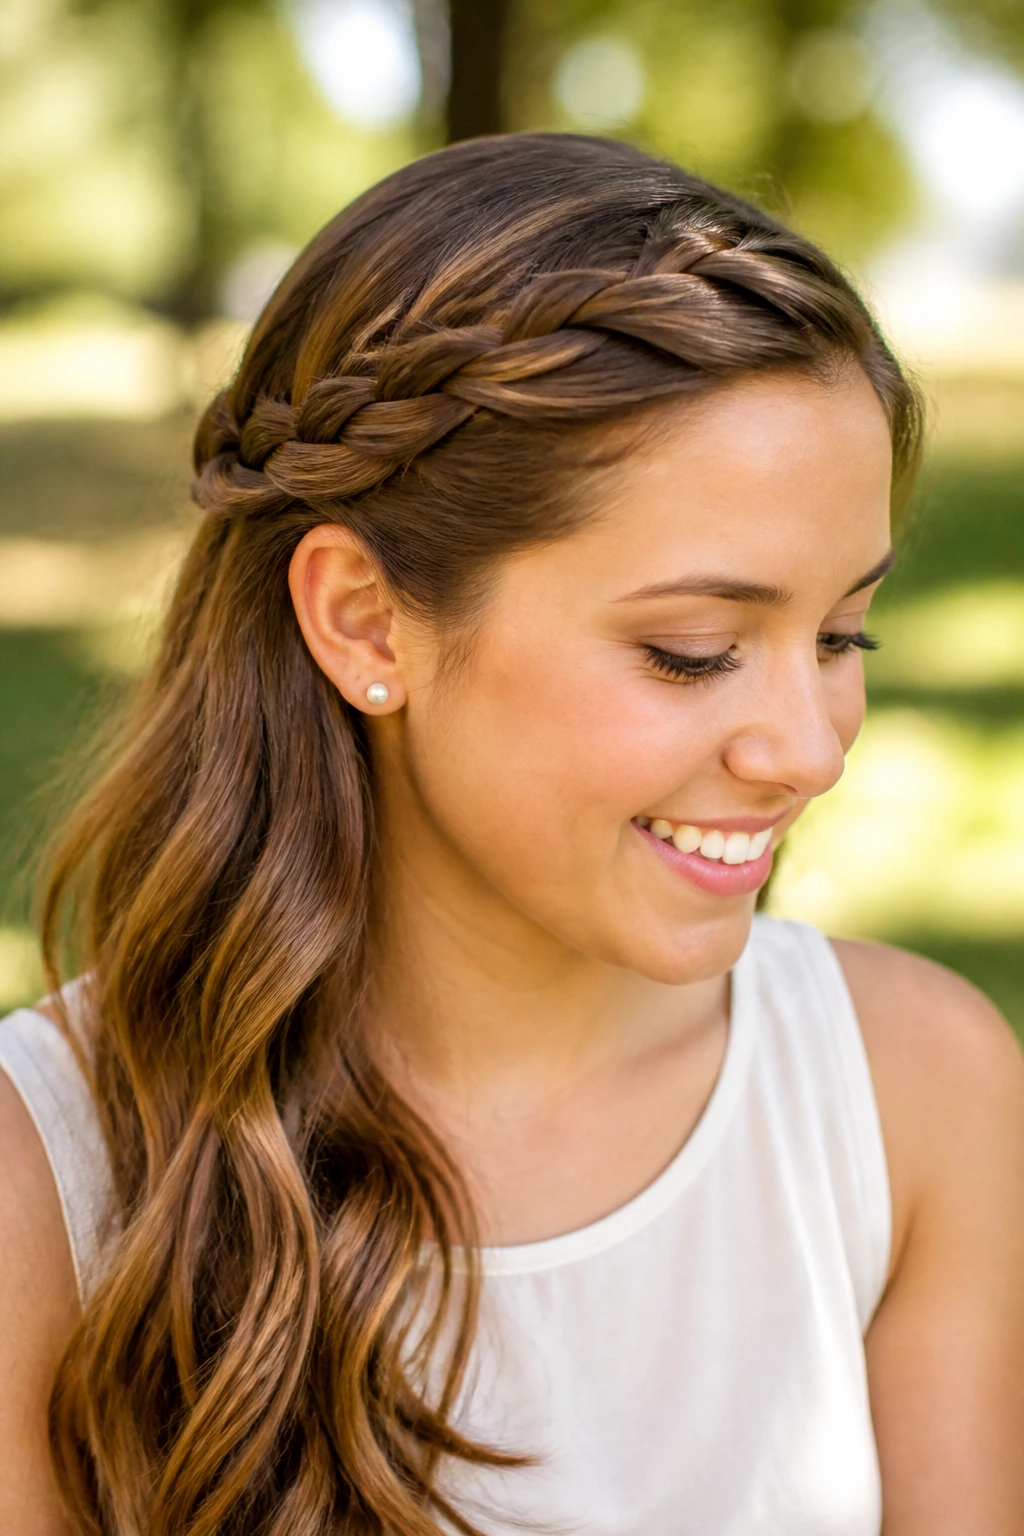
This style looks incredibly intricate but is surprisingly easy to execute in under two minutes. Take a two-inch section of hair from the front, split it into two, and twist the pieces around each other, adding more hair from your hairline as you move toward the back. Once you reach the side of your head, pin the twist securely behind your ear. It’s a great way to open up your face and keep the hair looking neat without needing a full-blown braided look.
Why It’s Perfect for Practicality
This style works for almost any hair length, from shoulder-length lobs to waist-length hair. It’s also incredibly easy to refresh during the day if it starts to loosen; just tighten the twist and add a fresh bobby pin.
6. The Bubble Pony
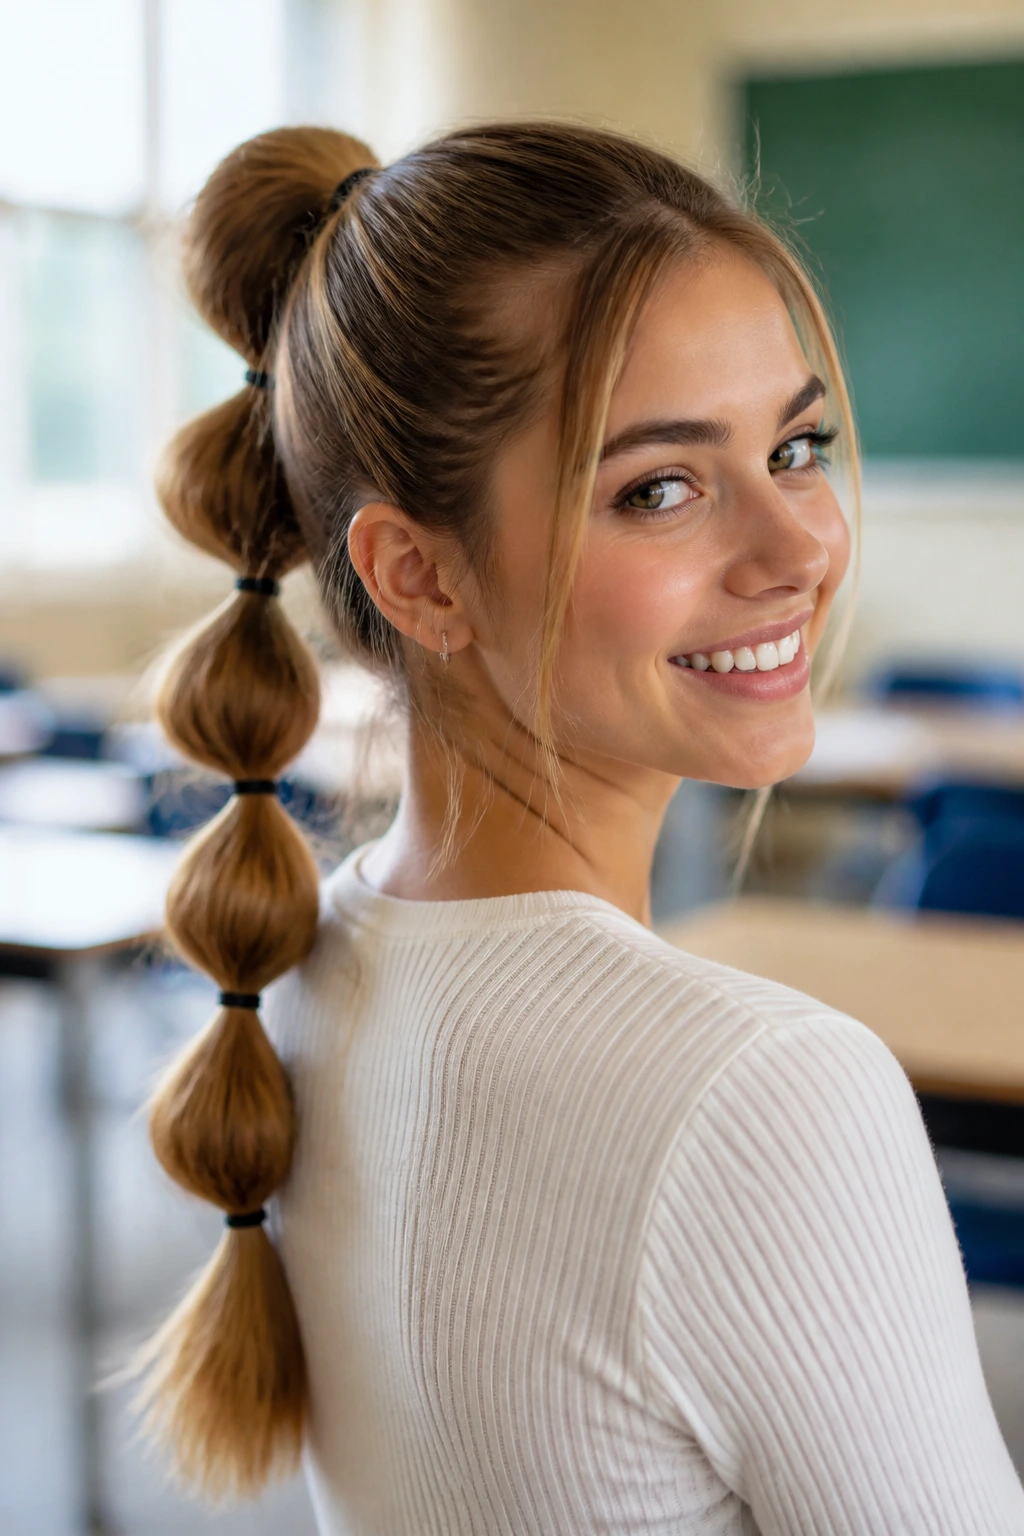
Forget complicated braiding techniques; the bubble pony is all about simple math. Start with a standard high ponytail. Then, place additional clear elastics down the length of your ponytail about two inches apart. After securing each elastic, gently pull at the hair between them to create a rounded “bubble” shape. It adds a playful, voluminous look that keeps your hair completely contained during long hours of studying.
Customizing Your Bubbles
For a more professional or sophisticated take, use small, fabric-covered elastics that match your hair color to make the bubbles look seamless. If you want to lean into the fun side, use bright, colorful elastics to coordinate with your outfit. The spacing is key—tighter spacing creates smaller, more controlled bubbles, while wider spacing creates a dramatic, long effect.
7. The Messy French Twist
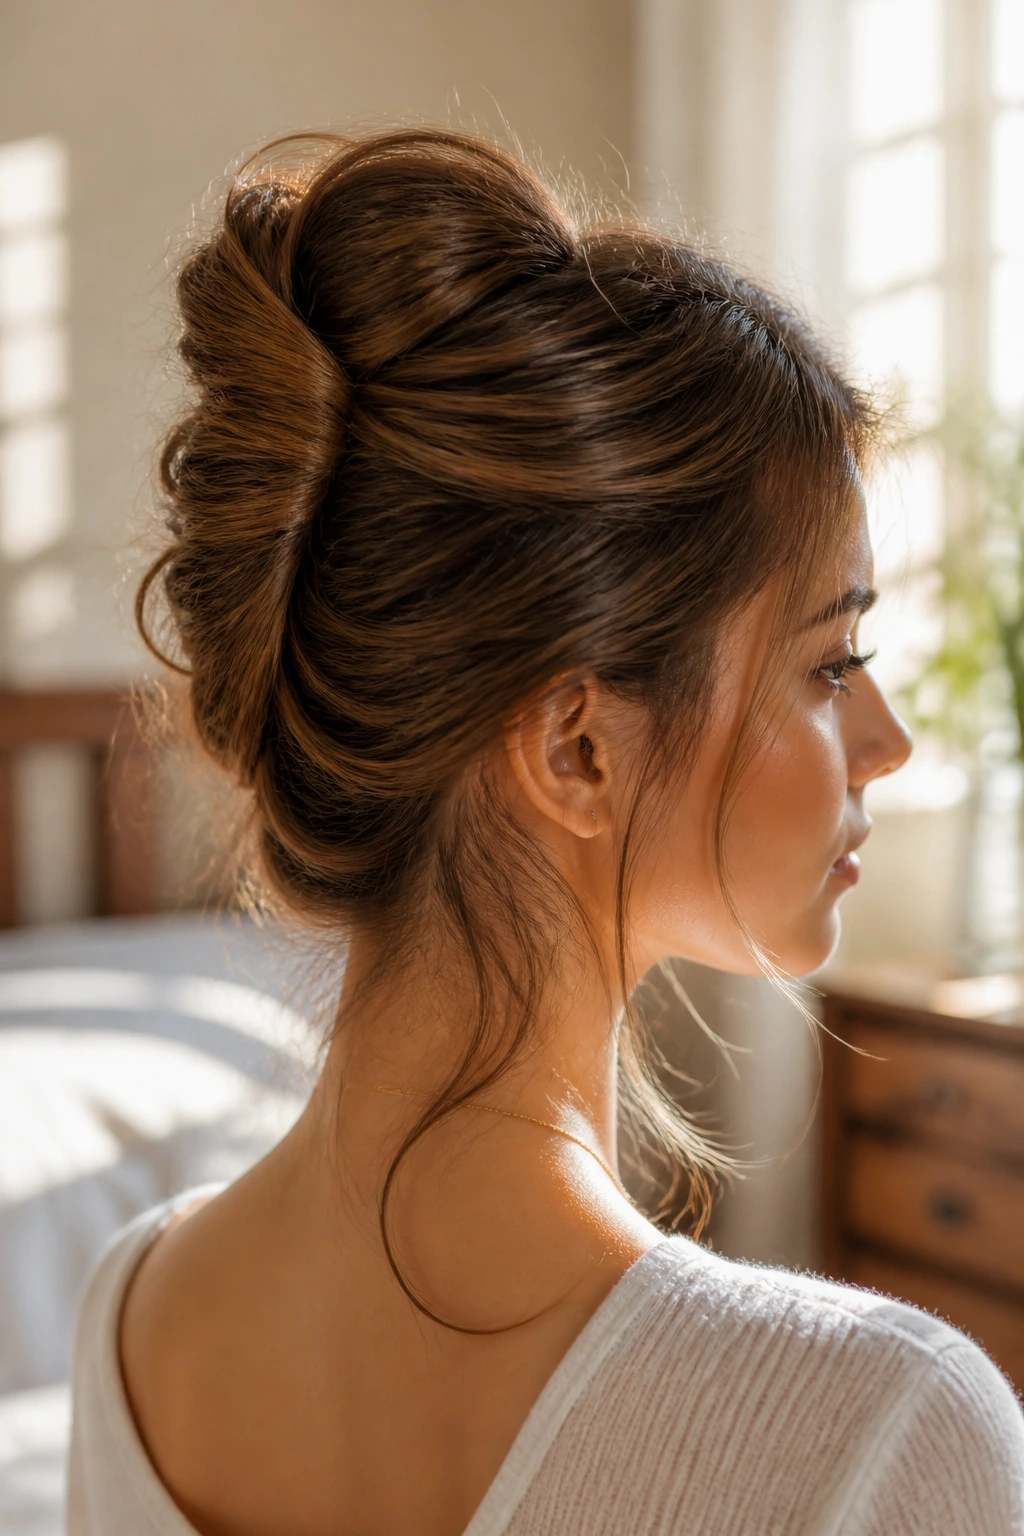
This is the ultimate “I have my life together” look, even if you’re actually rushing. Gather your hair back as if you’re making a ponytail, then twist the entire length upward toward the crown of your head. Once it’s coiled tightly, fold the ends inward and pin the twist along the vertical seam with several bobby pins. It’s a classic silhouette that keeps every single strand off your neck, which is a life-saver during warmer weather.
Fixing the “Stiff” Look
Don’t be afraid to let a few wispy strands fall around your face. A French twist can easily look too formal, but by pulling a few pieces loose at the temples, you keep the style grounded and accessible for a high school setting. If you’re worried about it staying, a light-hold hairspray is your best friend here.
8. The Scarf-Integrated Braid
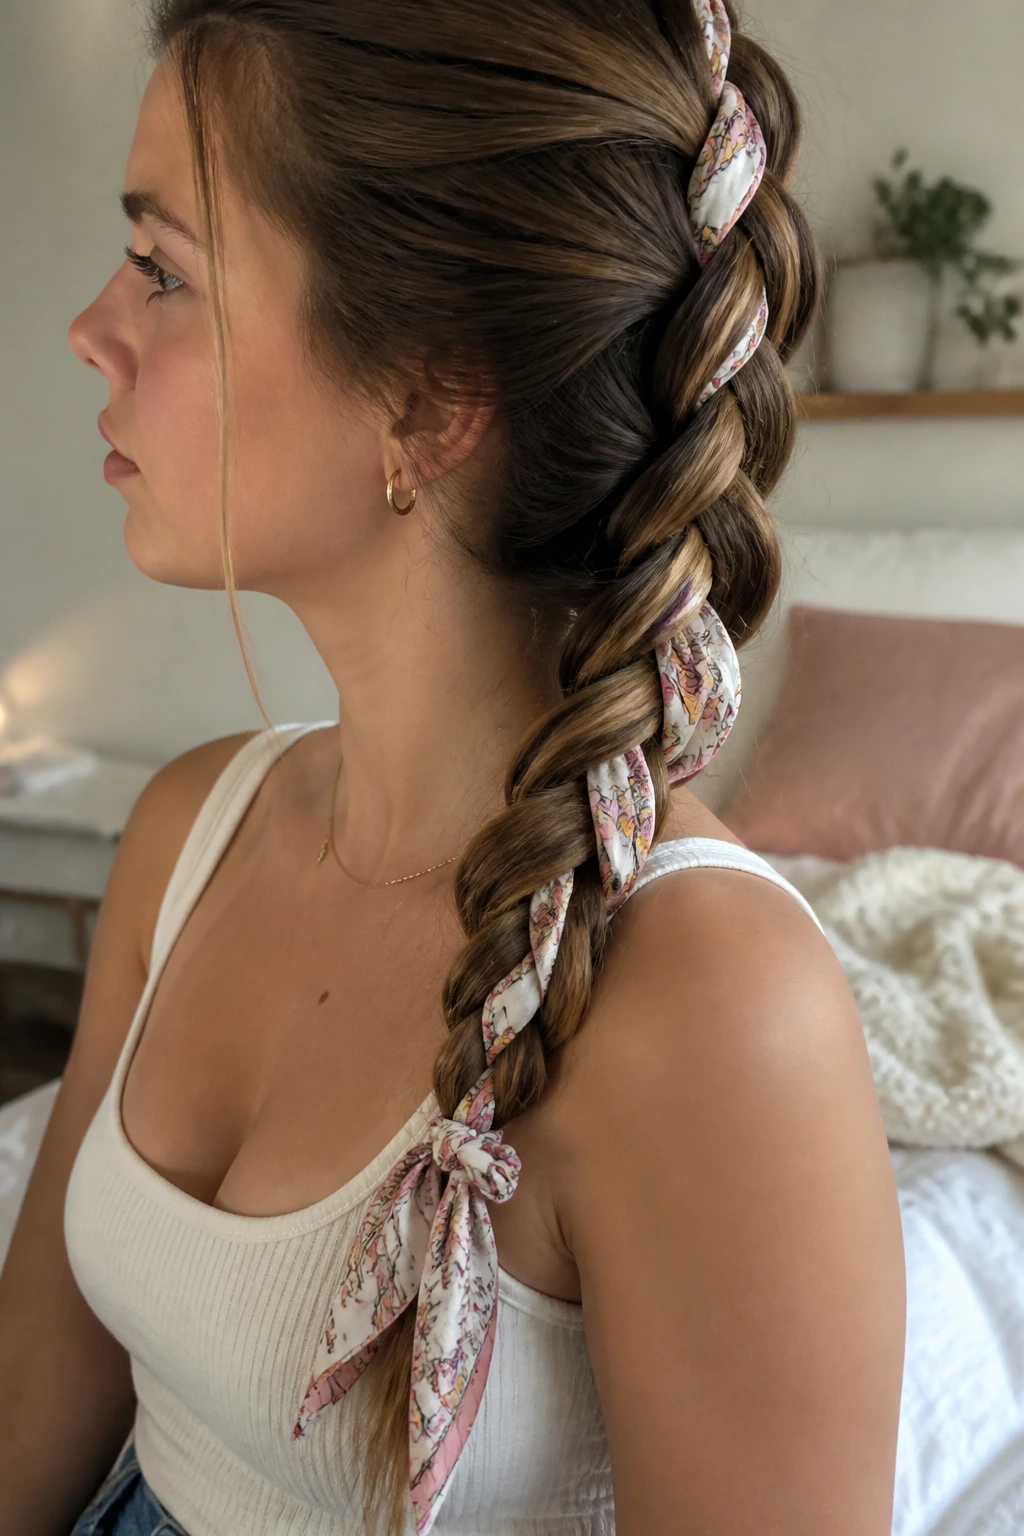
Take a standard three-strand braid and instantly upgrade it by tying a lightweight silk scarf to the top elastic before you start. Divide the scarf into two of the three sections of your hair, then braid normally. The fabric adds thickness to the braid, making it look much fuller than it actually is, and it brings a pop of color to an otherwise simple look.
Best Scarf Materials
Avoid heavy, thick fabrics, which can be slippery and difficult to work into the braid. Thin silk, chiffon, or soft cotton squares are the easiest to manage. If the scarf is too long, simply knot it at the end of your braid and leave the tails hanging.
9. The Low Side-Braided Bun
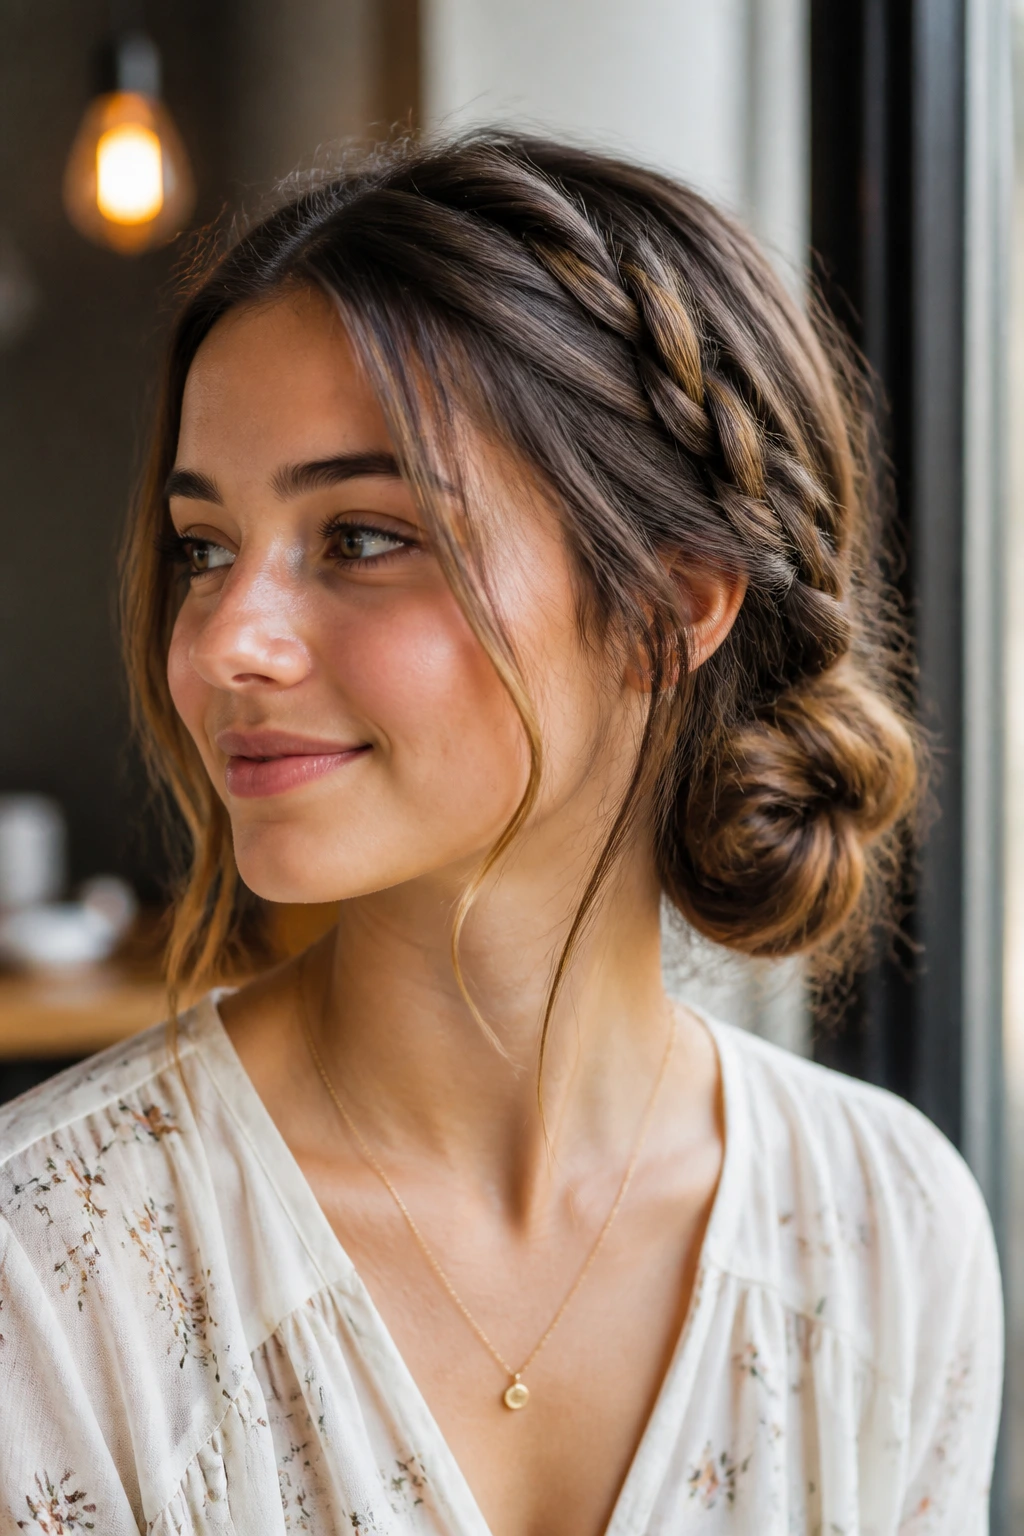
For days when a middle part feels too severe, move your hair to the side and start a simple three-strand braid starting at the temple. Braid it back toward the nape of your neck, incorporating the rest of your hair as you go. Once you reach the bottom, twist the remaining hair into a side-swept bun. It’s a softer, more romantic look that stays secure regardless of how active your school day gets.
The Benefit of Asymmetry
Side-swept styles are often more flattering because they break up the symmetry of the face. This style is also great for hiding second-day hair, as the braid adds detail that distracts from any lack of volume at the roots.
10. The Space Buns
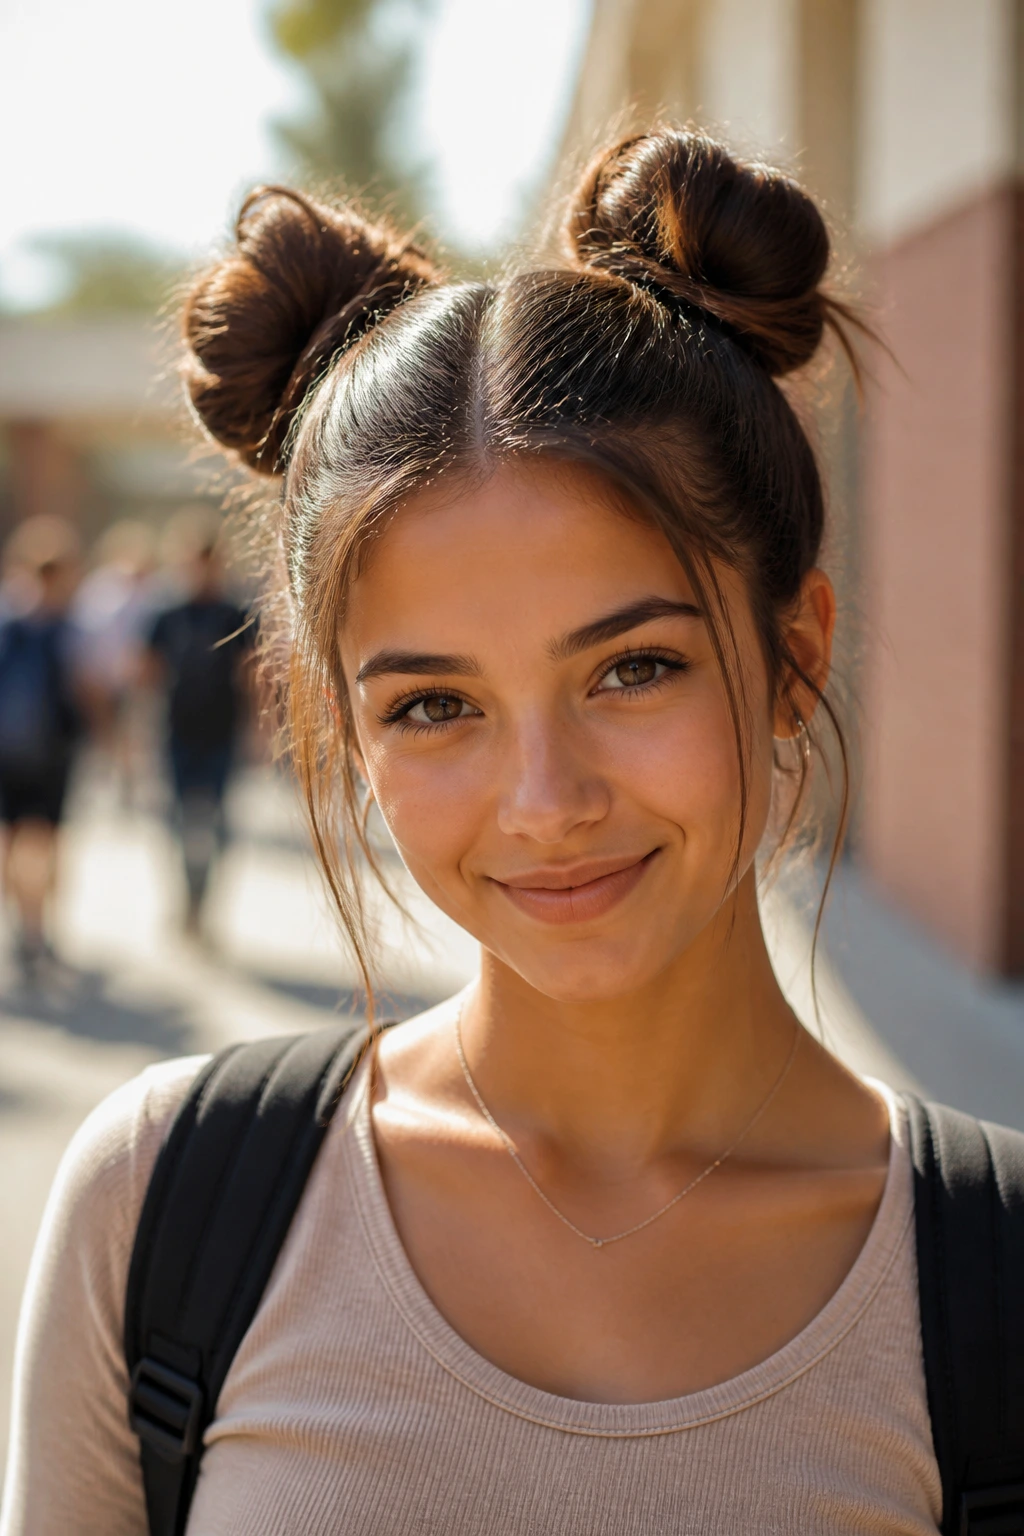
Don’t save these for festivals; space buns are functional and fun. Part your hair down the center, creating two equal sections. Pull each section into high pigtails, then twist them into buns and secure. To keep them from feeling too youthful, make them a bit messier by pulling at the outer edges of the buns so they look soft and voluminous rather than tight and pulled back.
Tips for Secure Buns
Since these are high on your head, they can be prone to shifting. Use a slightly smaller hair tie to create the base of each pigtail, and then use a second, decorative scrunchie to secure the bun. This double-layer approach ensures that even if you’re running between classes, your buns aren’t going anywhere.
11. The Faux-Hawk Braid
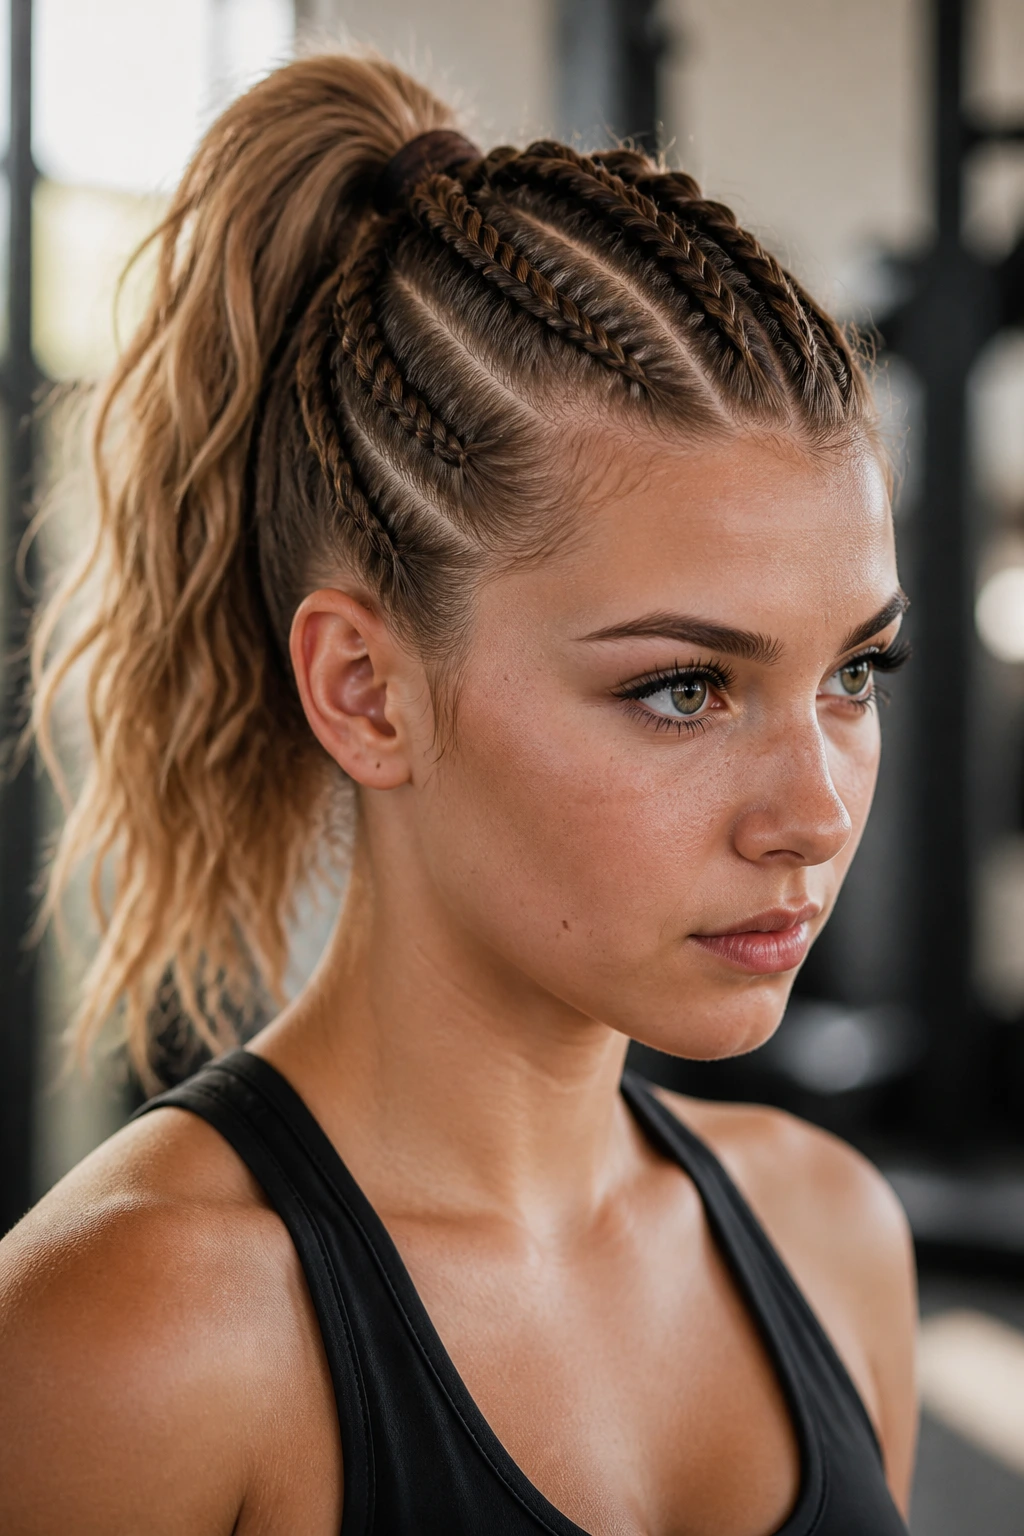
This look is all about drama and attitude without the commitment of a real haircut. Create three small, tight cornrows or french braids from your forehead moving back toward the crown of your head. Instead of braiding all the way to the ends, stop at the crown and gather all your hair into a high, voluminous ponytail. The braids provide a tight, controlled foundation, while the high pony adds height and movement.
Why This Style Rocks
It’s the ultimate choice for gym days or extracurricular sports. Because the braids pull the hair tight at the roots, it’s virtually impossible for the hair to get in your face during high-intensity movement. It’s a high-performance style that looks like it took much longer to create than it actually did.
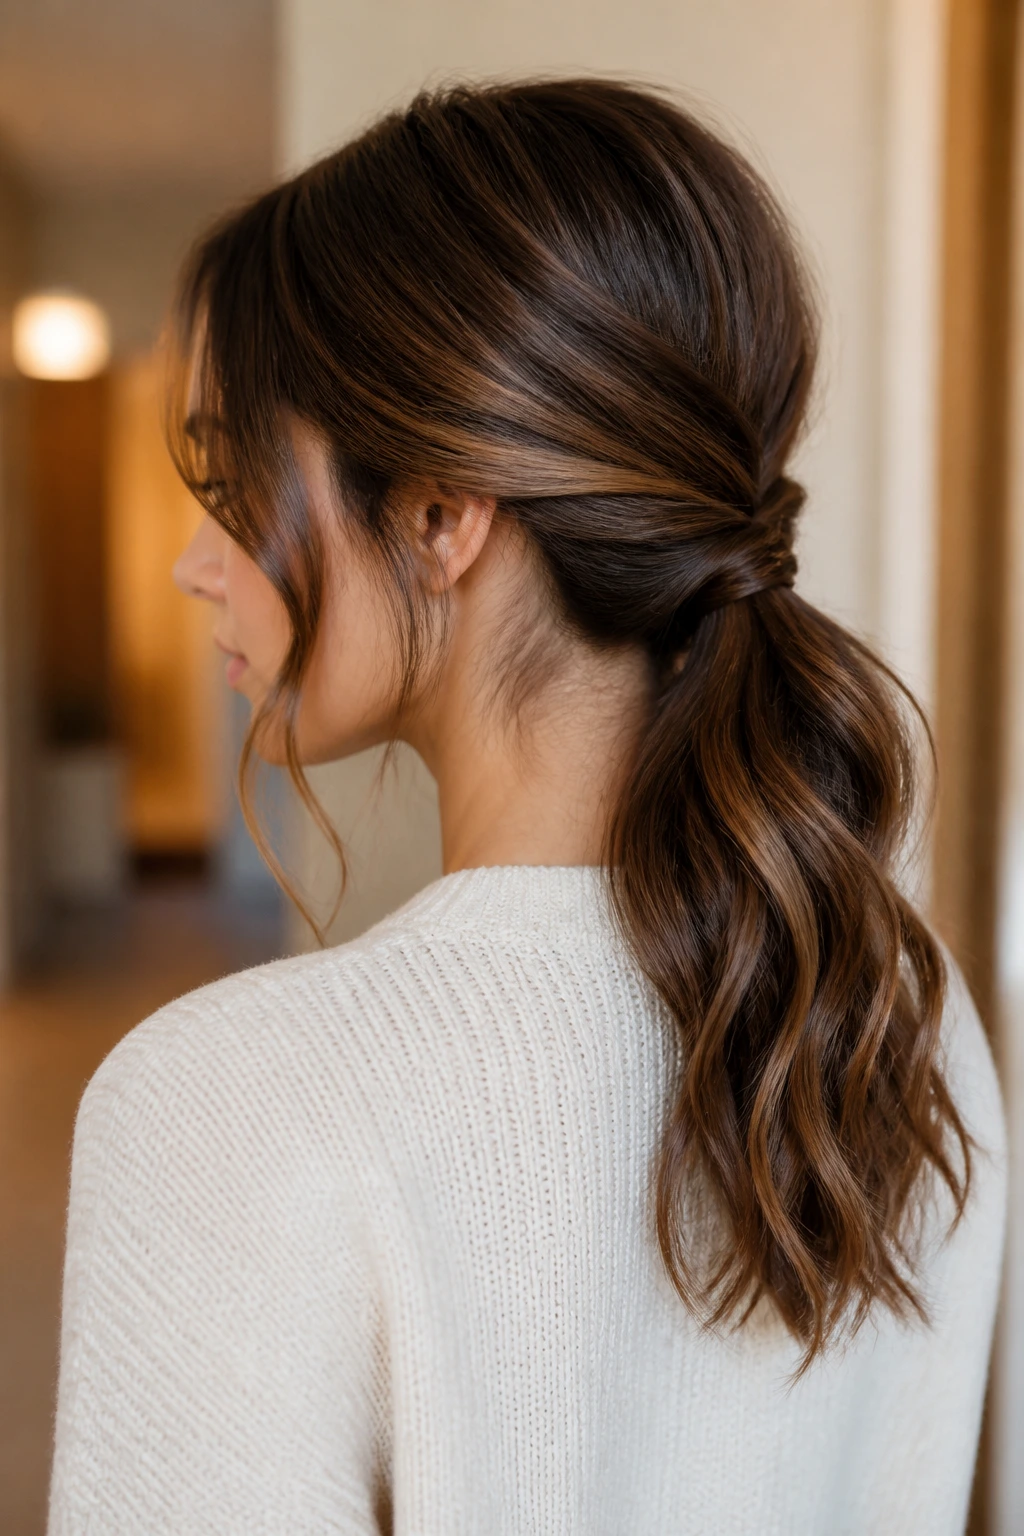
12. The Knotted Low Pony
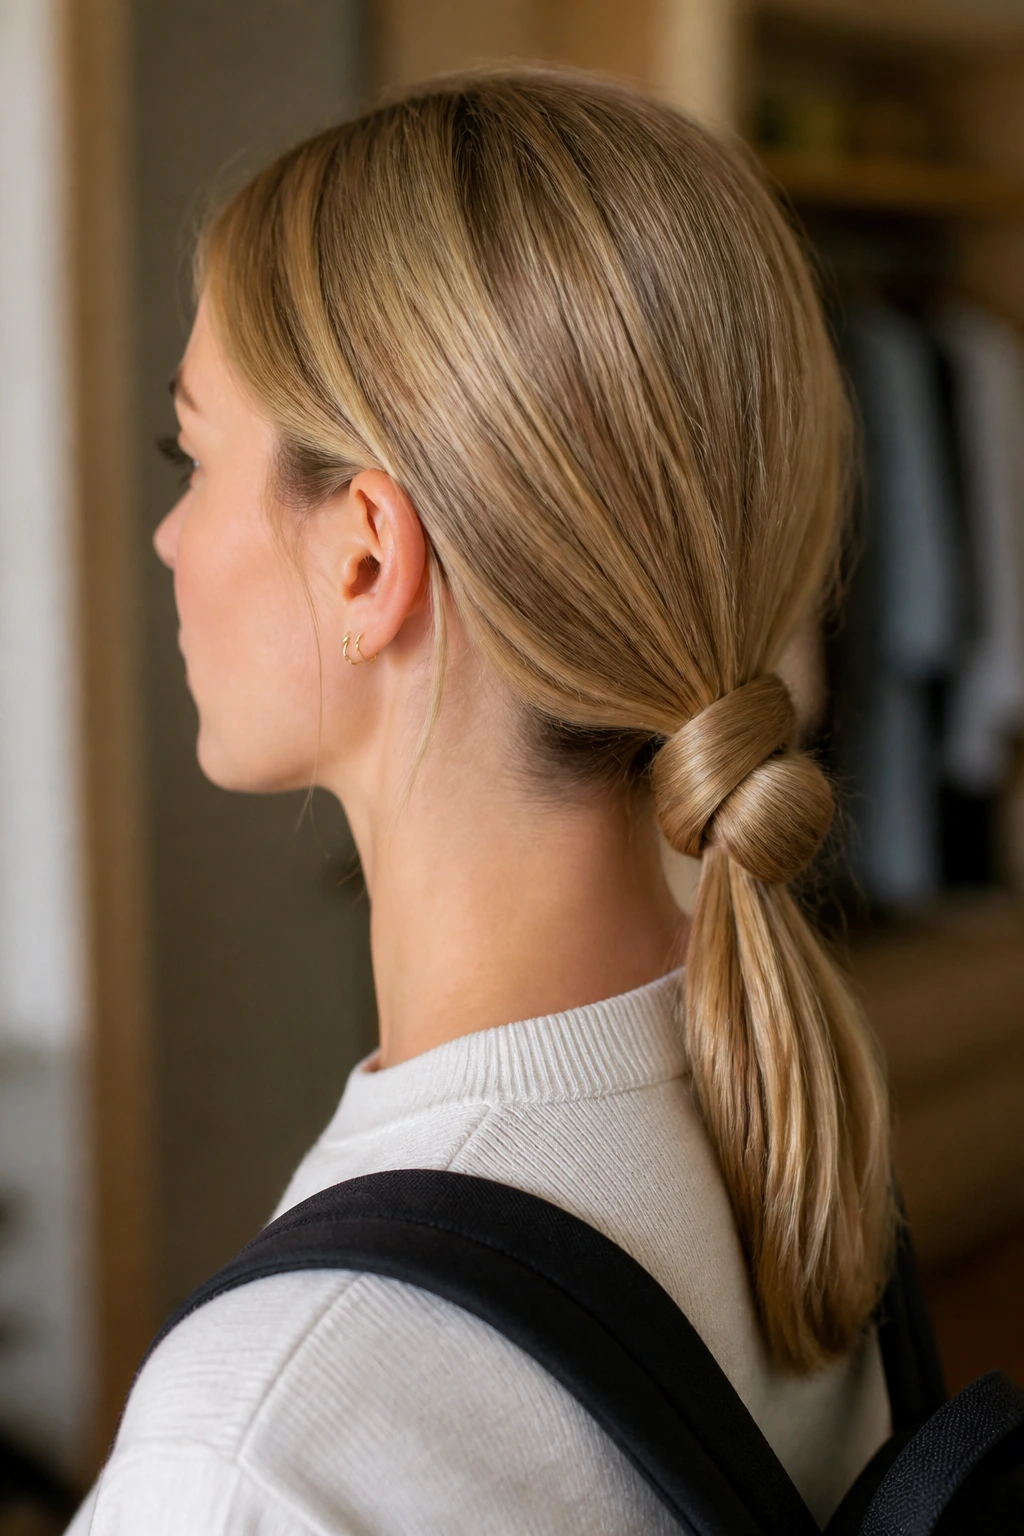
If you’re tired of hair ties, learn to use your hair to hold itself. Divide your hair into two equal sections at the nape of your neck. Take the left section and the right section and tie them together in a simple knot, just like you would a shoelace. Keep tying knots until you reach the ends of your hair, then secure the very bottom with a clear elastic that you can tuck underneath the last knot.
The “No-Tool” Advantage
This look is incredibly chic because it lacks the visual clutter of bulky elastics. It’s perfect for days when you forgot your hair supplies or simply want a cleaner, more minimalist aesthetic. Because the hair is knotted, it actually stays tighter than a standard ponytail for some hair types, especially those with natural wave or curl.
13. The Half-Down Fishtail
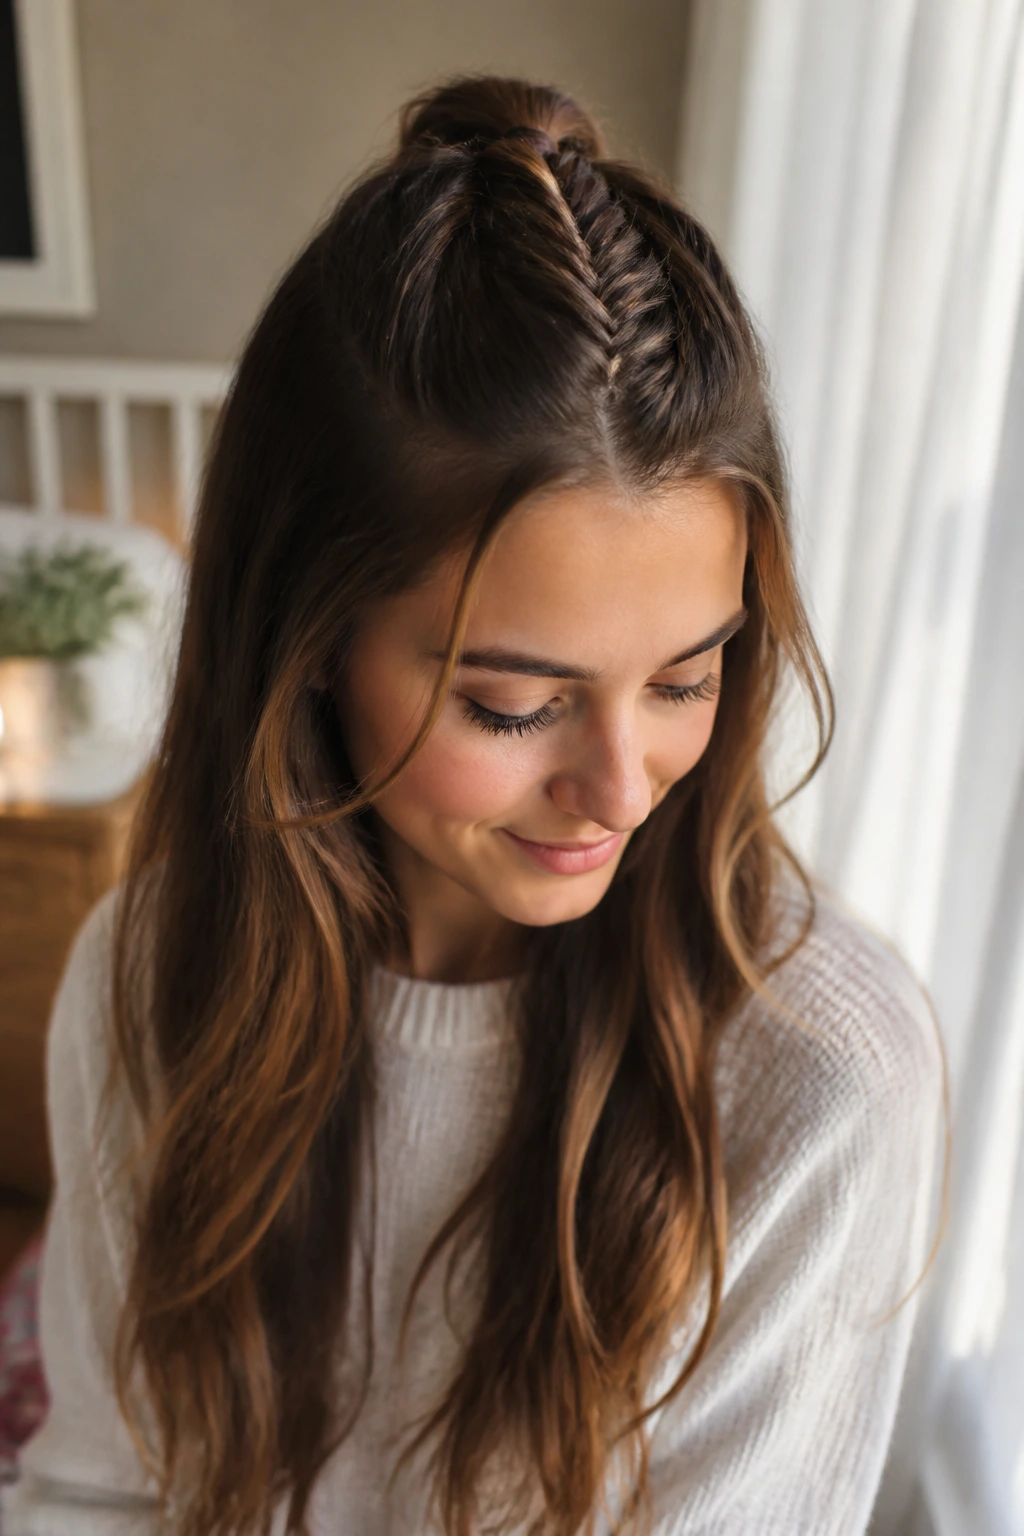
Fishtail braids always look like a puzzle, which is why people assume they’re difficult to master. Start by pulling back the top section of your hair as if you were doing a half-up style. Braid that section into a fishtail—where you take tiny pieces from the outer edges and alternate them over to the middle—and secure the end. Because you’re only braiding a small section, it only takes a few minutes, yet it adds a level of complexity that is visually striking.
Managing the Fishtail
The key to a good fishtail is the tension. Keep the sections small. If you try to grab too much hair at once, the “fishtail” pattern gets lost, and it just looks like a regular braid. Start with two-strand sections at the very top and work your way down.
14. The Sleek High Pony with Face-Framing Pieces
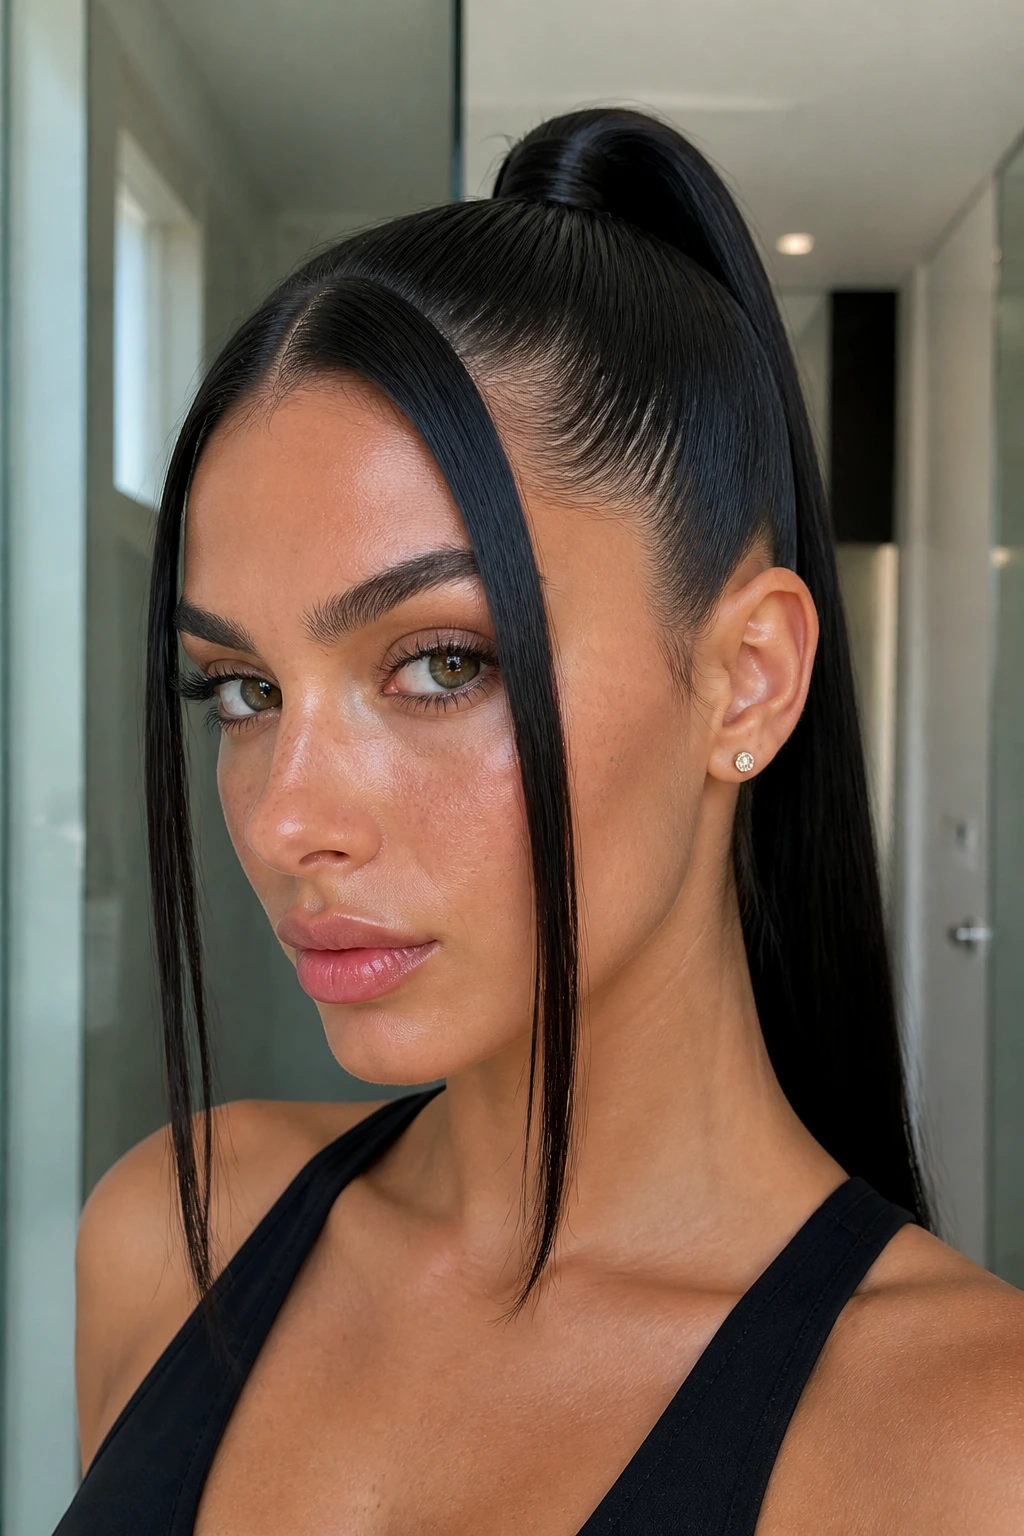
Sometimes, you just want to look sharp. Create a very tight, high ponytail, ensuring the sides are smoothed back with a bit of gel or hairspray. The “epic” factor comes from leaving two long, straight pieces of hair out at the front to frame your face. Use a straightener on these pieces for a crisp, intentional finish that contrasts beautifully with the height of the pony.
Achieving the “Snatch”
To get that perfect “pulled back” look, flip your head upside down when gathering the hair to ensure no bumps form at the nape of your neck. Once the elastic is tight, flip back up and adjust the height. This technique ensures a perfectly smooth finish that lasts all day.
15. The Criss-Cross Low Pony
This style creates a unique visual interest at the base of your ponytail. Before tying your hair back, separate two small sections at the front temples. Pull the rest of your hair into a low ponytail. Take the front sections, cross them over the top of the ponytail, and wrap them around the base, pinning them underneath. It creates an overlapping effect that looks sophisticated and modern.
Enhancing the Texture
If your hair is naturally straight, add a few waves to the ponytail portion to give it more body. The contrast between the sleek, wrapped-cross front and the wavy ponytail makes the style look much more professional than a simple wrap-around would on its own.
16. The Tucked-Under Chignon
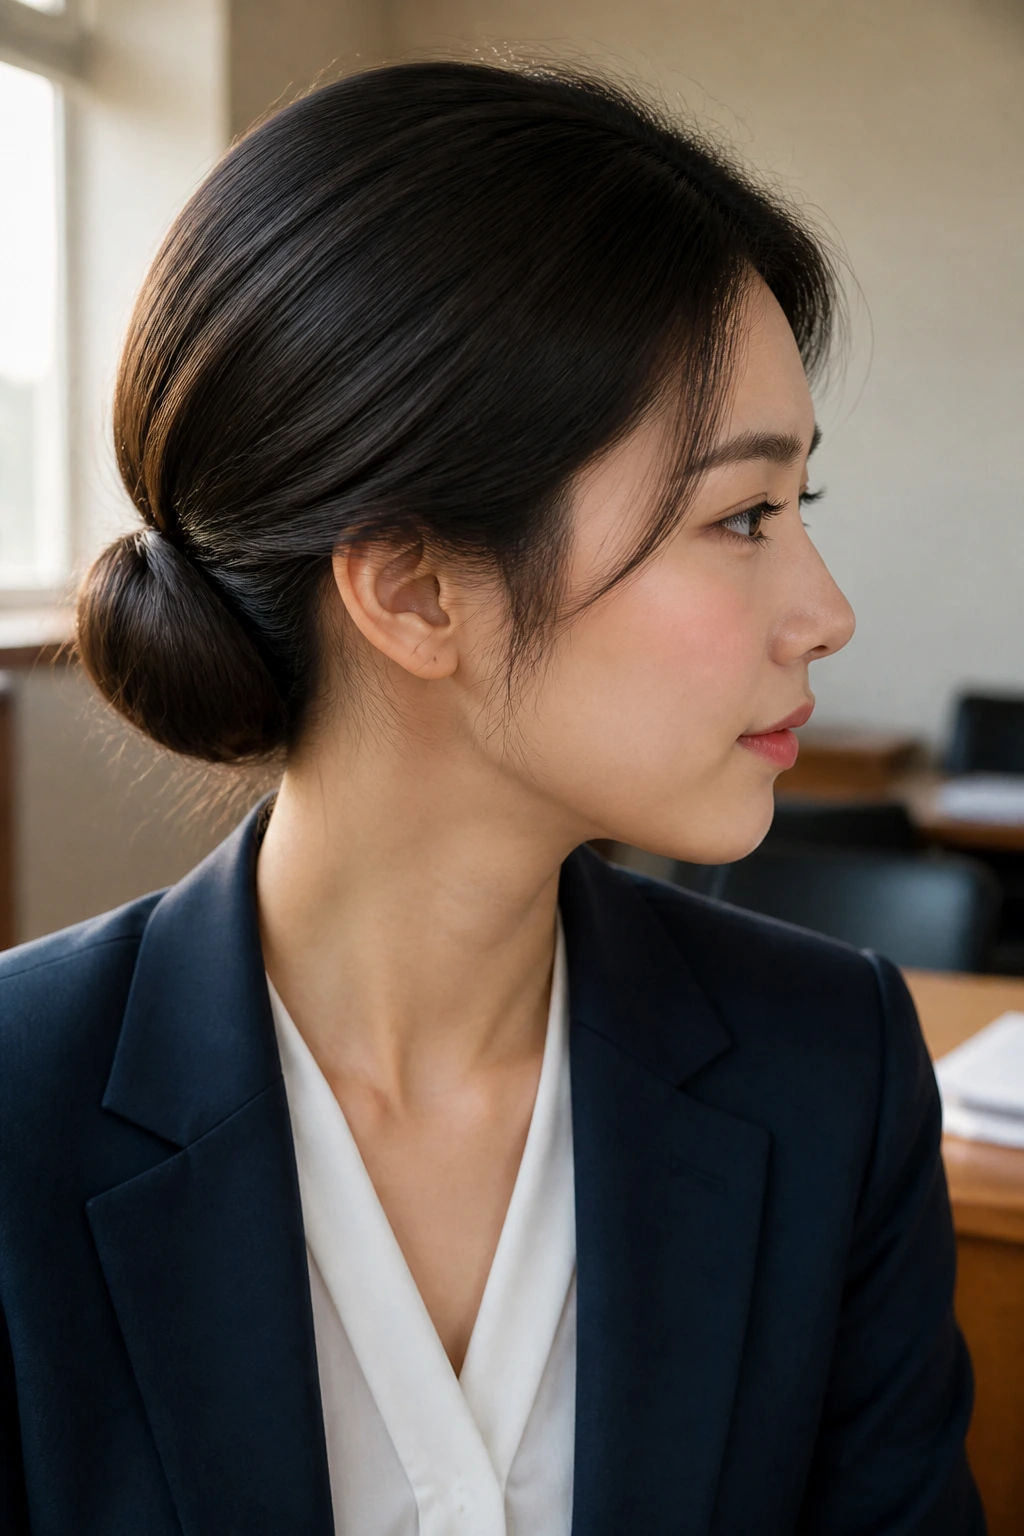
For a look that fits perfectly with a blazer or a collared shirt, try a low chignon. Gather your hair at the nape of the neck into a low ponytail, but on the last pull of the elastic, don’t pull the hair all the way through—create a loop. Then, take the remaining tail and wrap it around the elastic until it’s hidden, pinning the ends into the center of the loop.
Why It’s Professional
It’s a very clean, compact style that stays out of the way while you’re writing or typing. It minimizes the amount of hair hitting your face, which is a major bonus if you find yourself getting distracted by loose strands during exams.
17. The Waterfall Braid
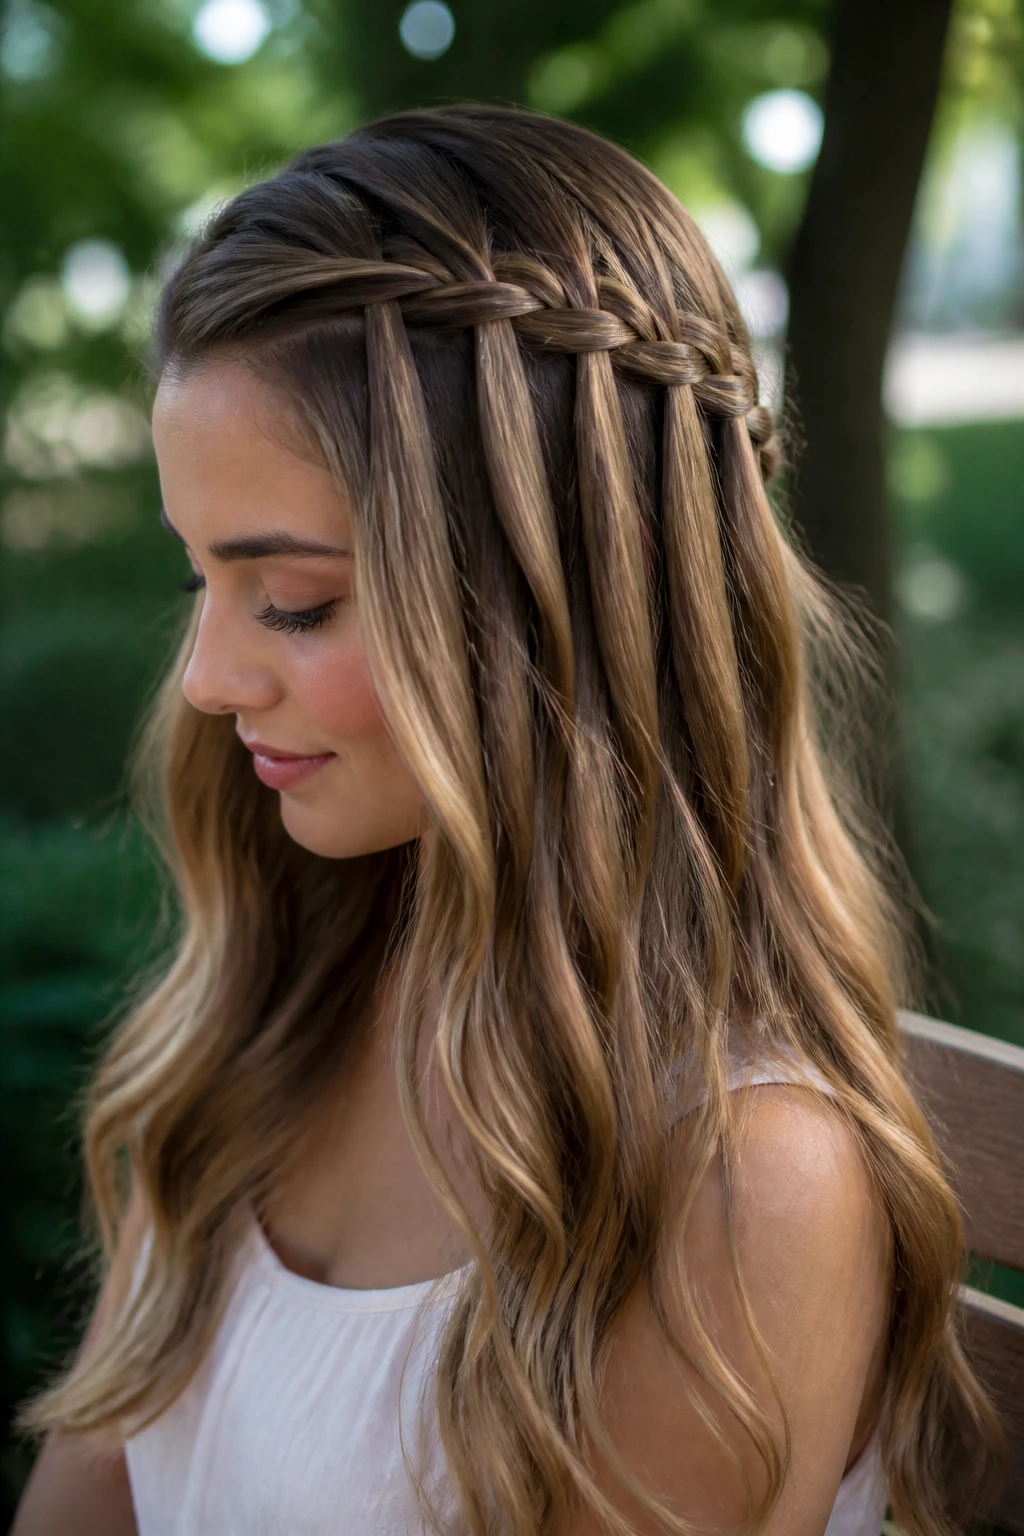
If you have long, straight hair, the waterfall braid is a must. It keeps the top section of your hair neat while leaving the rest flowing. Start braiding at the temple, but instead of pulling in new hair and keeping it in the braid, you drop the bottom strand and pick up a new one from underneath to keep the braid going across your head. It’s elegant and prevents your hair from falling into your face.
Perfecting the Drop
The “waterfall” effect works best when you keep the braid tight against the scalp. As you drop each strand, give it a light tug to make sure it’s hanging straight down. This style is particularly stunning when your hair has subtle highlights, as the weaving motion of the braid makes the different tones pop.
18. The “Puff” or Poof
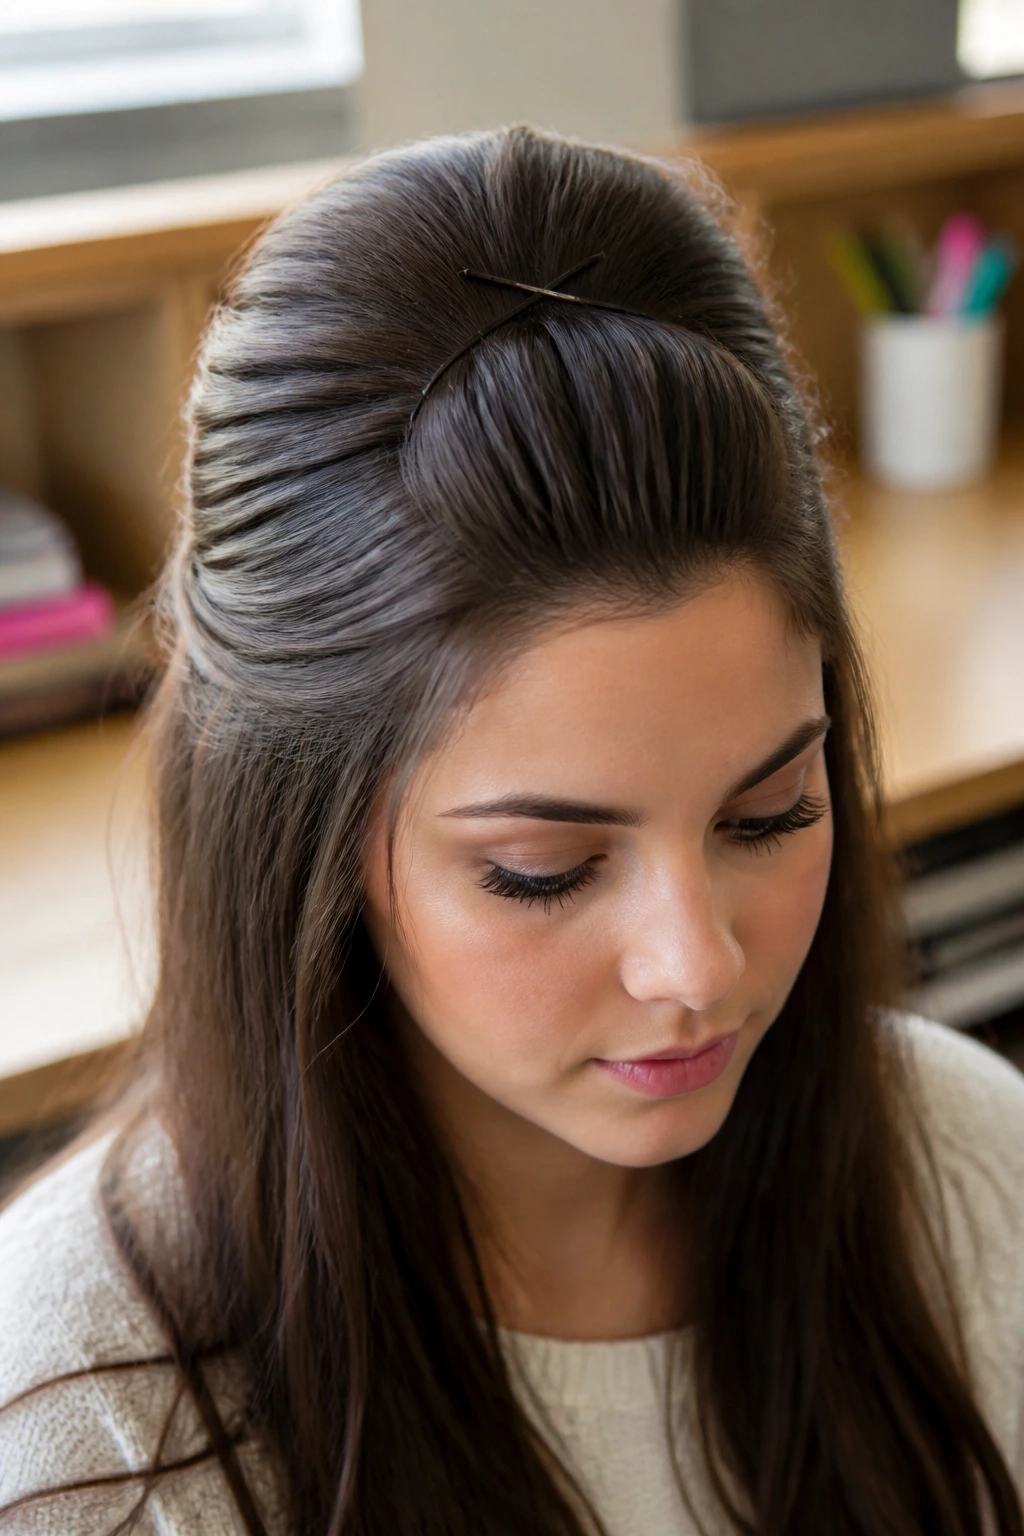
This is a classic that never really goes away because it works so well. Tease the hair at the crown of your head to create a bit of height, smooth the top layer over, and pin it back with two bobby pins in an ‘X’ shape. It’s the easiest way to give your hair a bit of glamour without actually styling the lengths.
Teasing Tips
Never tease by brushing the hair downward repeatedly; that just creates knots. Instead, use a fine-tooth comb to gently push the hair toward your scalp in short, controlled motions. This creates the “cushion” you need for the poof while keeping the outer layer smooth and healthy-looking.
19. The Double-Knotted Bun
Take your basic bun and give it a bit more structure. Divide your hair into two sections, tie them in a knot as if they were a pair of laces, and then wrap the tails around the base of that knot. Pinning it in place creates a unique, woven appearance that’s much more visually interesting than a standard twist-bun.
Why This Style Stays Up
The tension from the initial knot provides a solid base that takes the strain off your bobby pins. If your hair is particularly heavy, use an invisible hair elastic at the base of the knot to keep it from slipping.
20. The High-Volume Messy Pony

To get that effortless, “I just woke up like this” model look, start by curling the ends of your hair and adding a bit of texturizing spray. Instead of brushing the hair tight to your scalp, use your fingers to rake the hair back into a high ponytail. This leaves a bit of natural bumps and volume, which is exactly the point.
The Finishing Touch
Wrap a small section of hair around the base, but don’t worry if it’s perfectly smooth. Let a few short pieces hang out around your ears and at the nape of your neck. The key is to make it look like a “non-style”—an intentional choice to keep things looking relaxed and easy.
Final Thoughts

Finding the perfect school-day hairstyle really comes down to testing what works with your specific hair texture and patience level. The goal isn’t to create a masterpiece every morning but to have a small library of styles you can pull from when time is tight. Once you master the mechanics—the pinning, the knotting, and the sectioning—these looks move from challenging to routine.
Don’t be afraid to experiment with different accessories like silk scrunchies, decorative pins, or simple ribbons to add your own flair. The best hairstyle is the one that stays out of your way and lets you focus on your day, not on your mirror. Trust your own hands, keep a few reliable bobby pins in your bag, and remember that sometimes the most polished look is the one that embraces a little bit of natural texture.