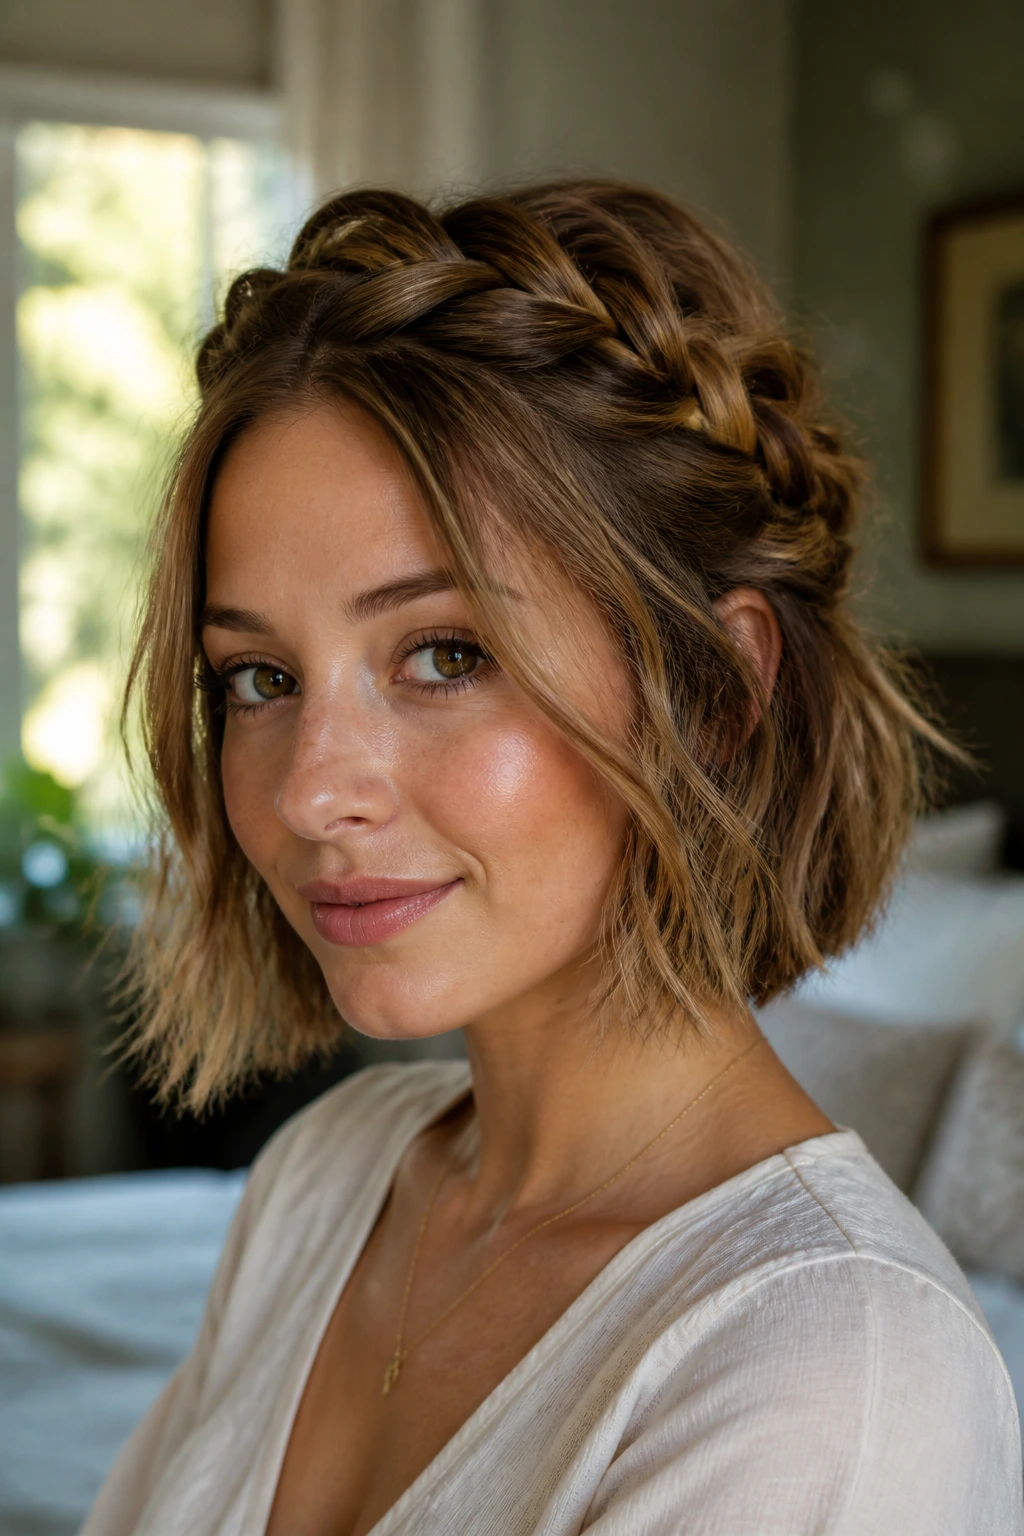
If you have ever chopped your hair into a chic bob or a layered lob, you probably remember the initial rush of relief. It felt lighter, faster to dry, and effortlessly sophisticated. But then came the morning you wanted to sweep your hair back, only to realize your usual long-hair go-tos were now physically impossible. The standard French braid suddenly felt like an engineering feat, and those intricate updos you spent years perfecting were now just, well, too short to tuck.
The secret to mastering short hair styling isn’t about fighting the length; it is about embracing the texture and the shift in tension. Short hair actually holds a braid differently than long, heavy locks. Without the weight of inches of hair pulling against your scalp, braids stay in place longer, provided you use the right prep. You need grip, you need texture, and you absolutely need to let go of the idea that a braid has to be tight and uniform to be “done.”
When you are working with shorter, shoulder-skimming layers or a blunt cut, the goal is often to create a soft, romantic finish that disguises the fact that your ends are poking out here and there. This is where loose, textured braids become your best friend. They are forgiving, they add volume to otherwise limp sections, and they look like you spent an hour when the whole process took less than five minutes. Here is how you can pull off the look, regardless of whether your hair is razor-cut or hitting the collarbone.
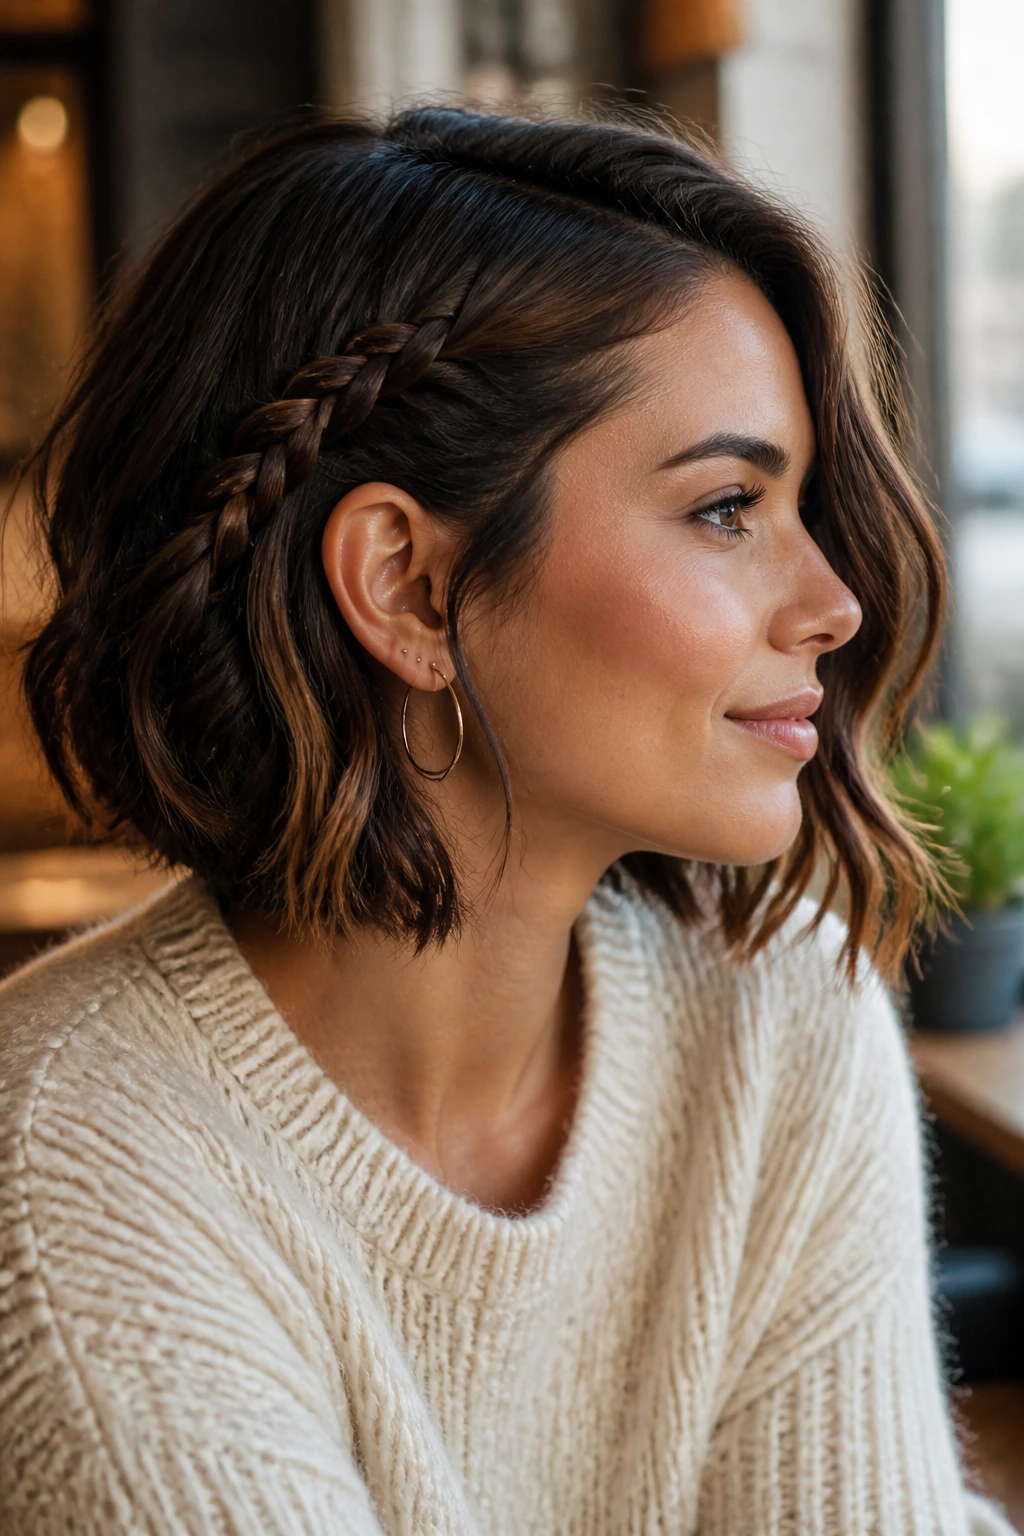
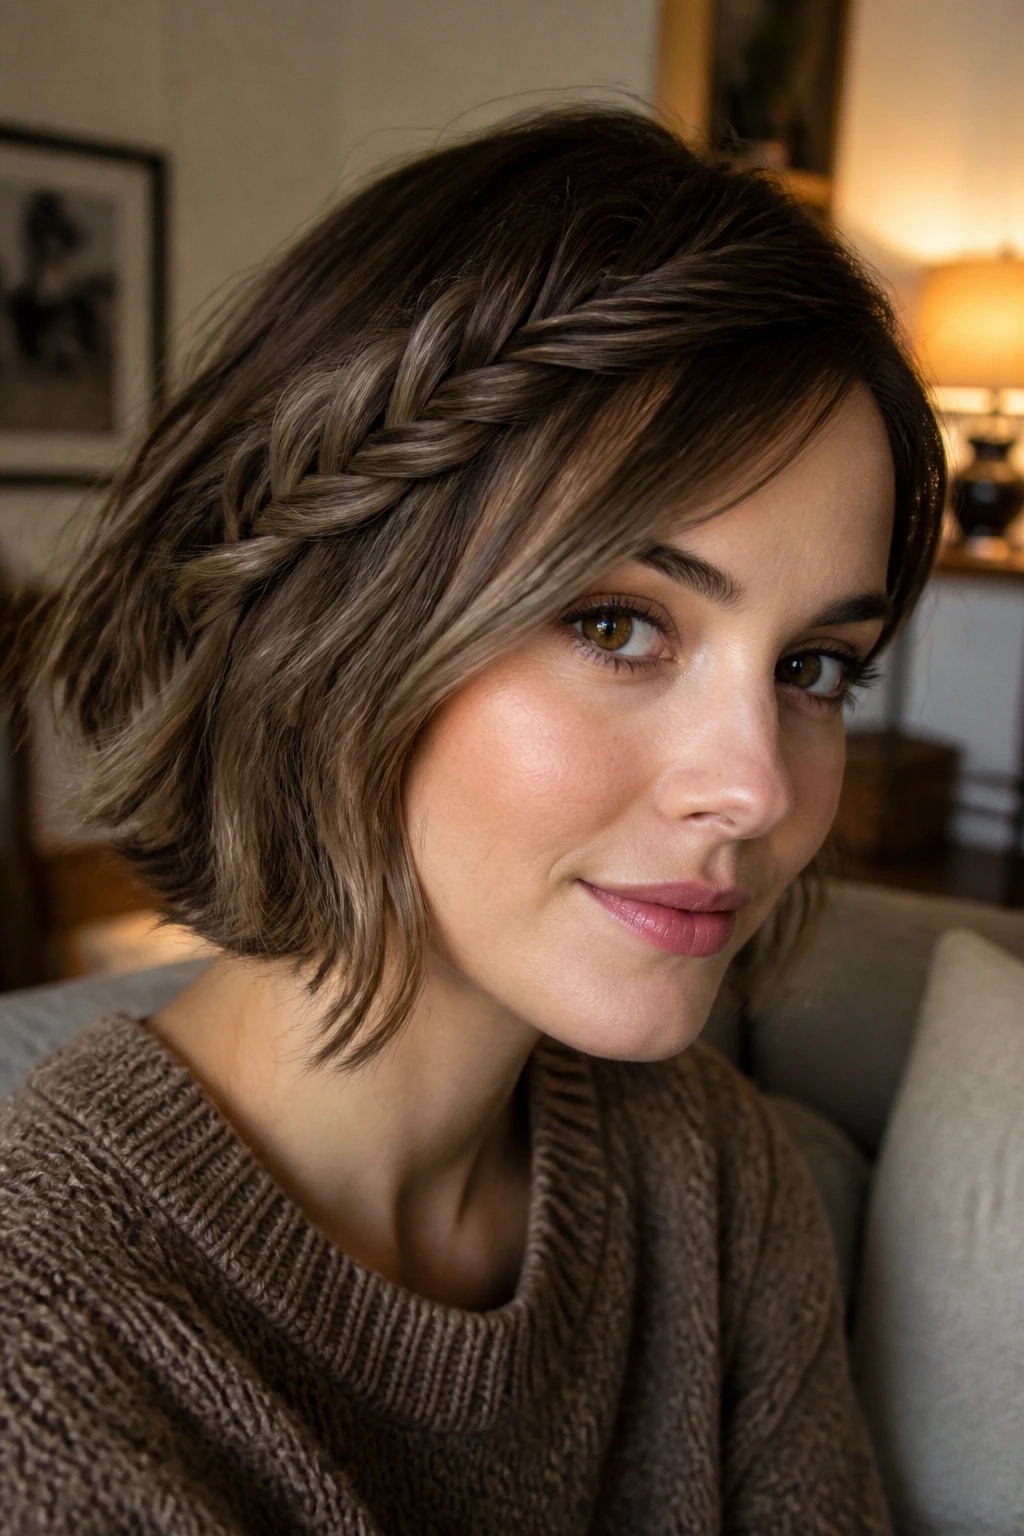
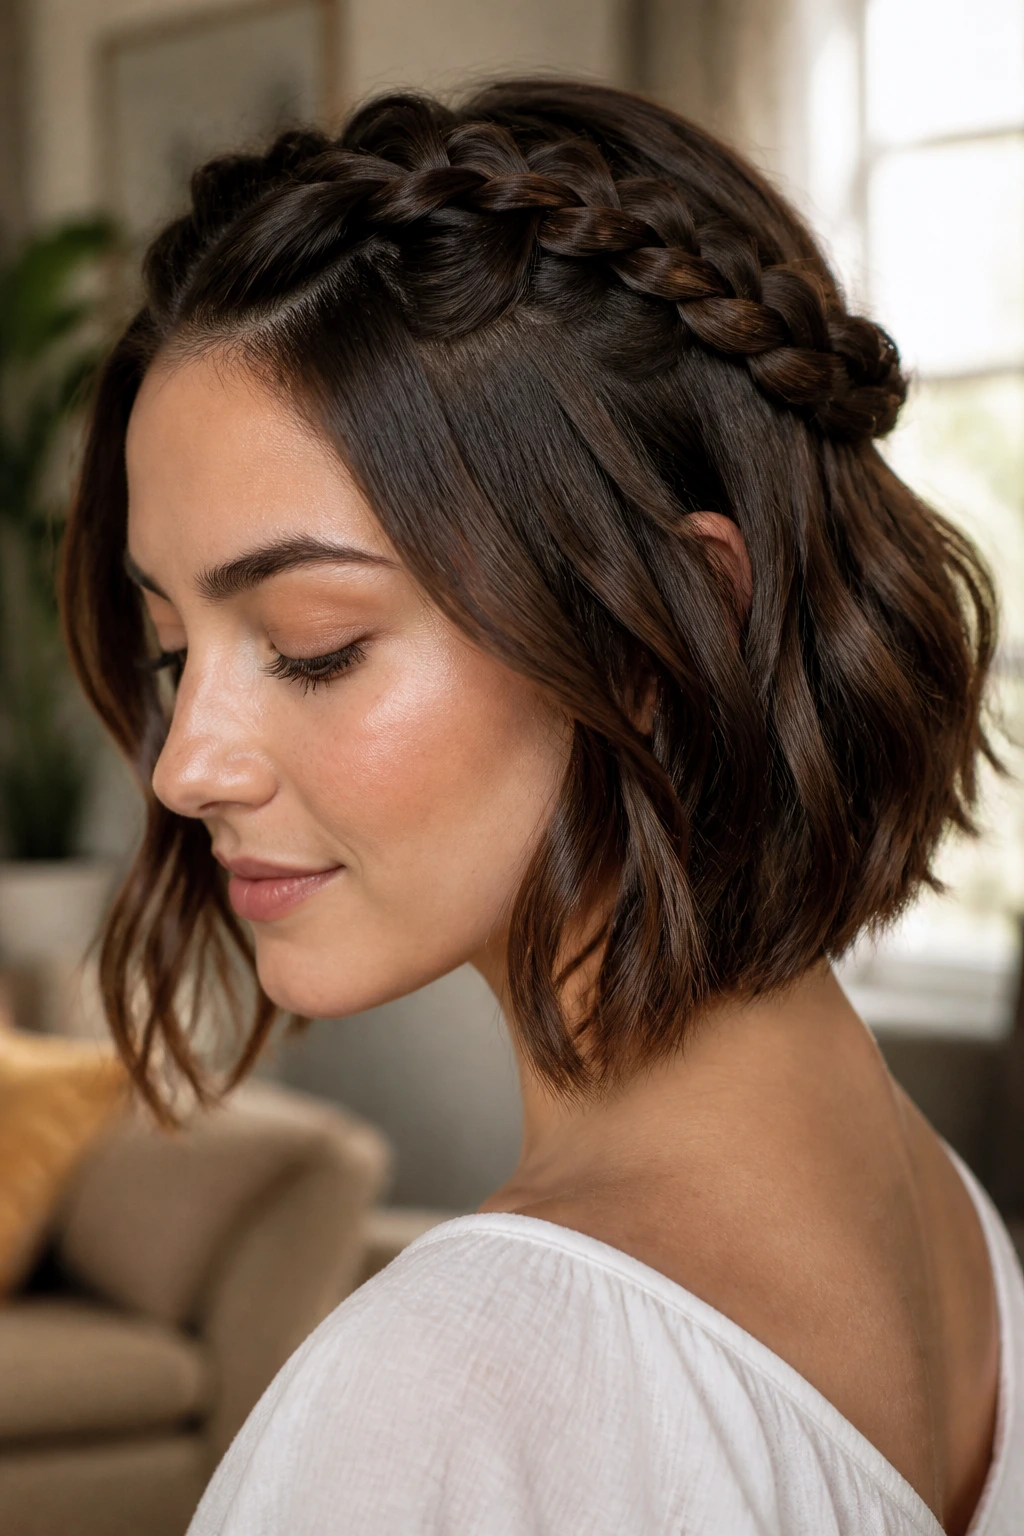
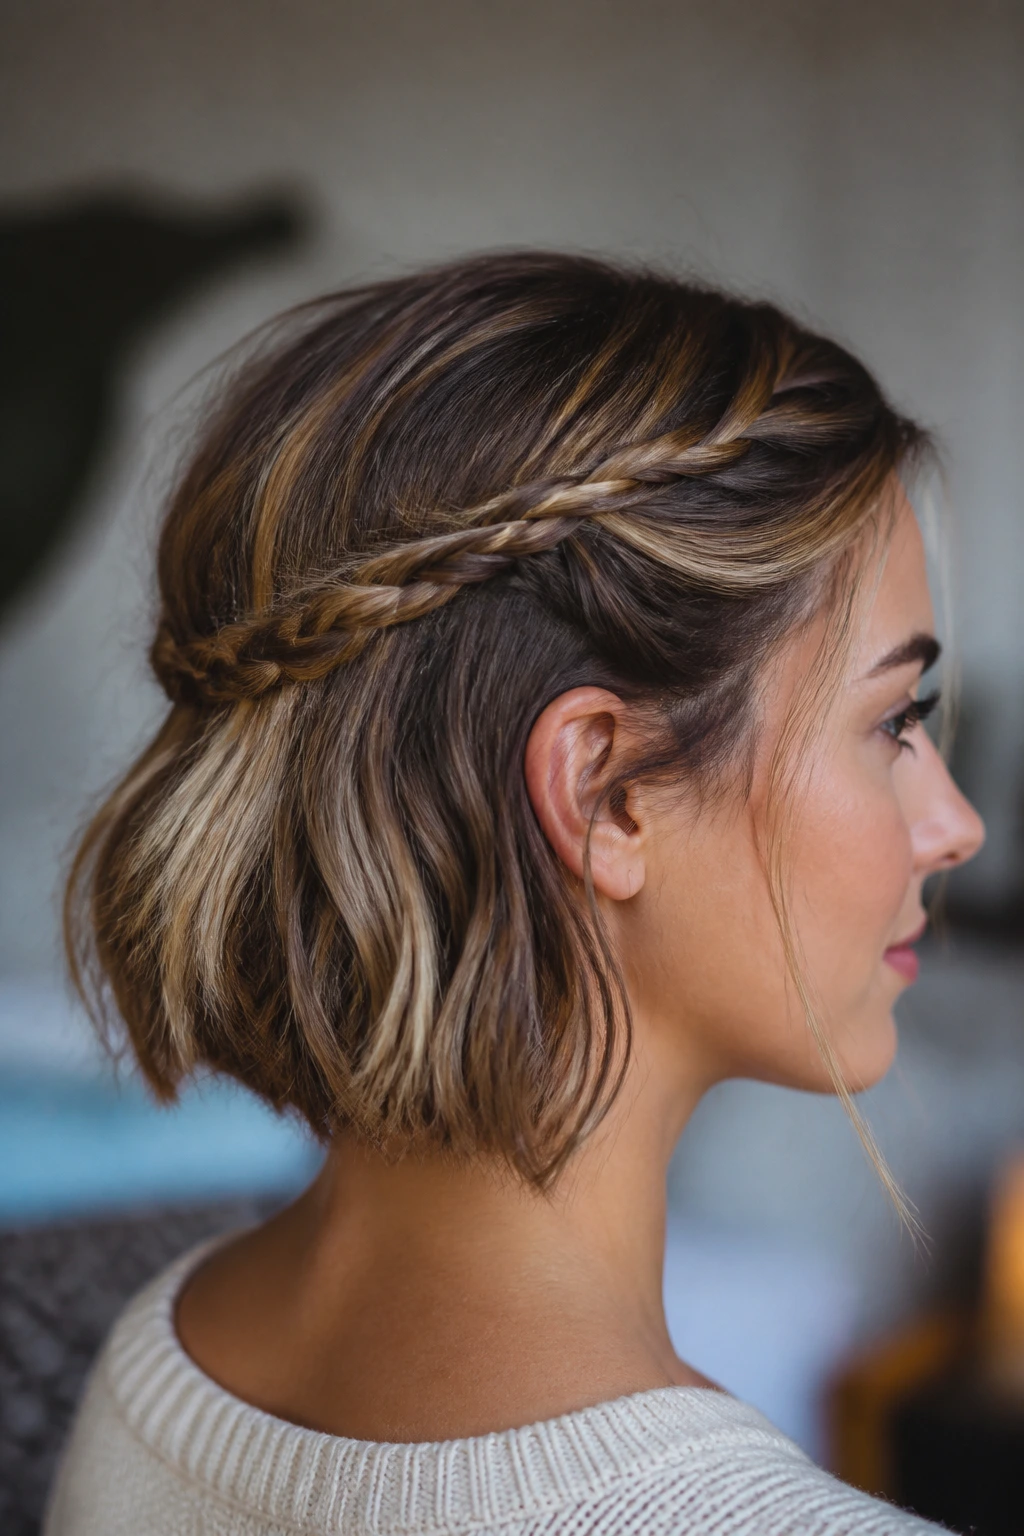
1. The Messy Half-Up Crown Braid
Starting your journey into shorter styles requires a move away from perfection. A half-up crown braid is the ultimate “I woke up like this” look that works beautifully on jaw-length bobs. The key here is to keep the braid itself loose enough to look lived-in, not structured. You are essentially creating a headband effect that pulls the hair away from your face while leaving enough length to frame your jaw.
Why This Works for Short Hair
When you pull all your hair back, you risk your layers sliding out. By keeping the bottom section loose, you use the natural weight of your hair to anchor the braid. It feels secure because you aren’t fighting the gravity of a full ponytail.
The Prep Work
- Start with second-day hair; clean, slippery hair never holds a braid well.
- Apply a light texturizing spray or dry shampoo to give the strands a gritty, workable feel.
- If your hair is poker-straight, add a quick, messy wave with a flat iron to give the braid some dimension.
Pro tip: Do not pull the braid too tight against your head. After you finish pinning, gently tug on the outer loops of the braid to create that wide, soft aesthetic that hides any shorter, rebellious layers.
2. The Twisted Side-Swept Braid
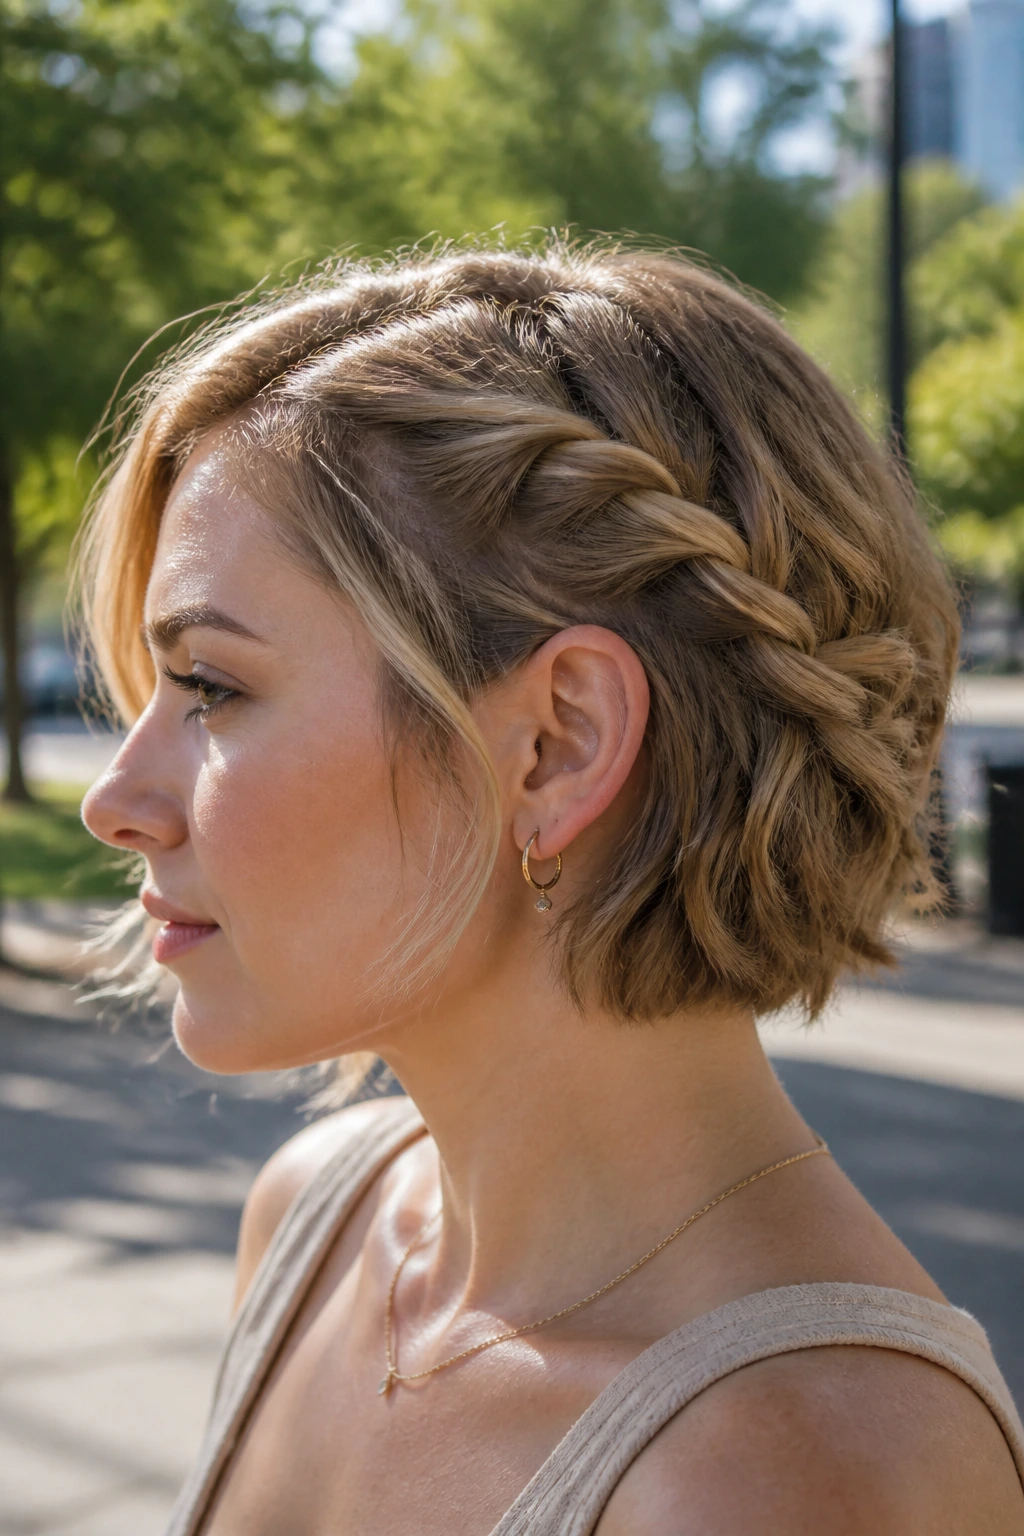
If you have a side part, you are already halfway to this look. This isn’t a traditional three-strand braid that runs from ear to ear, but rather a sequence of rope twists that mimic a braid’s texture. It is arguably one of the easiest ways to manage face-framing layers that refuse to stay behind your ear.
Executing the Technique
- Start by taking a one-inch section of hair near your part.
- Split it into two pieces and twist them over each other.
- Pick up a small new piece of hair and incorporate it into the twist, moving toward the back of your head.
- Continue twisting and adding hair until you reach the middle of the back of your head, then secure with a small, clear elastic.
- Repeat on the other side and tie the two ends together.
Why It’s Great for Beginners
There is no “over-under-over” complexity here. Because you are only working with two strands, you have much more control over the tension. If a piece slips out, you just tuck it back into the twist. It is designed to look messy, so there is truly no way to fail.
3. The Double-Dutch Bob Braid
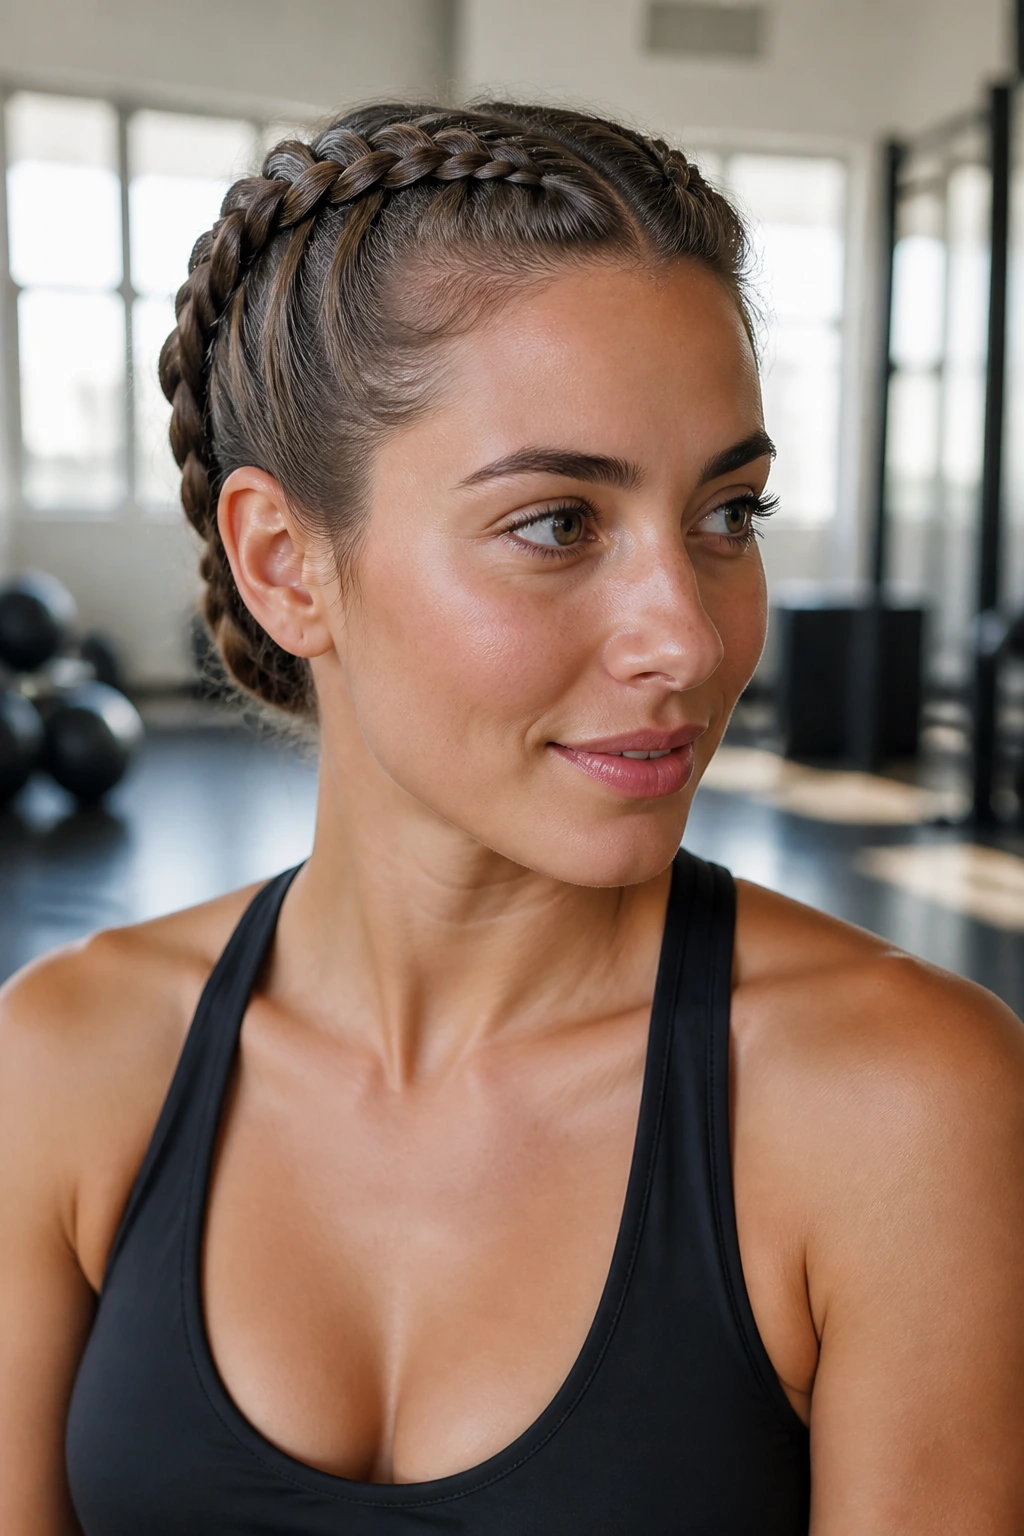
Most people think Dutch braids are reserved for long, cascading hair, but they are incredibly functional for short bobs. By splitting your hair into two sections, you take the pressure off your scalp and ensure that the braid doesn’t look too bulky. This style is perfect for gym days or when it is simply too hot to have hair on your neck.
Managing the Ends
- Keep a bobby pin ready at all times.
- Once you reach the nape of your neck, stop the braid and secure it.
- Take any remaining loose ends and pin them underneath the braid so they stay hidden.
Pro tip: Use matte-finish bobby pins that match your hair color. Shiny, metallic pins can sometimes cheapen the look, whereas matte ones disappear into the texture of the braid.
4. The Single Statement Braid
Sometimes, you don’t want an updo; you just want a bit of detail. A single, loose braid tucked behind one ear can change the entire silhouette of your haircut. It draws the eye downward and creates a beautiful contrast against the rest of your loose, wavy hair.
The Visual Balance
This works best if you have a deep side part. Braid the side with less hair—this prevents the look from feeling lopsided. It creates a sleek profile on one side and a voluminous, wild look on the other, which is the hallmark of a modern, stylish bob.
How to Make It Stay
Because there is so little hair involved, this braid will try to unravel within ten minutes. Use a tiny, clear plastic elastic to secure the end. To hide it, take a tiny strand of hair from the tail of the braid, wrap it around the elastic, and pin it underneath with a tiny hairpin.
5. The Waterfall Braid for Layers
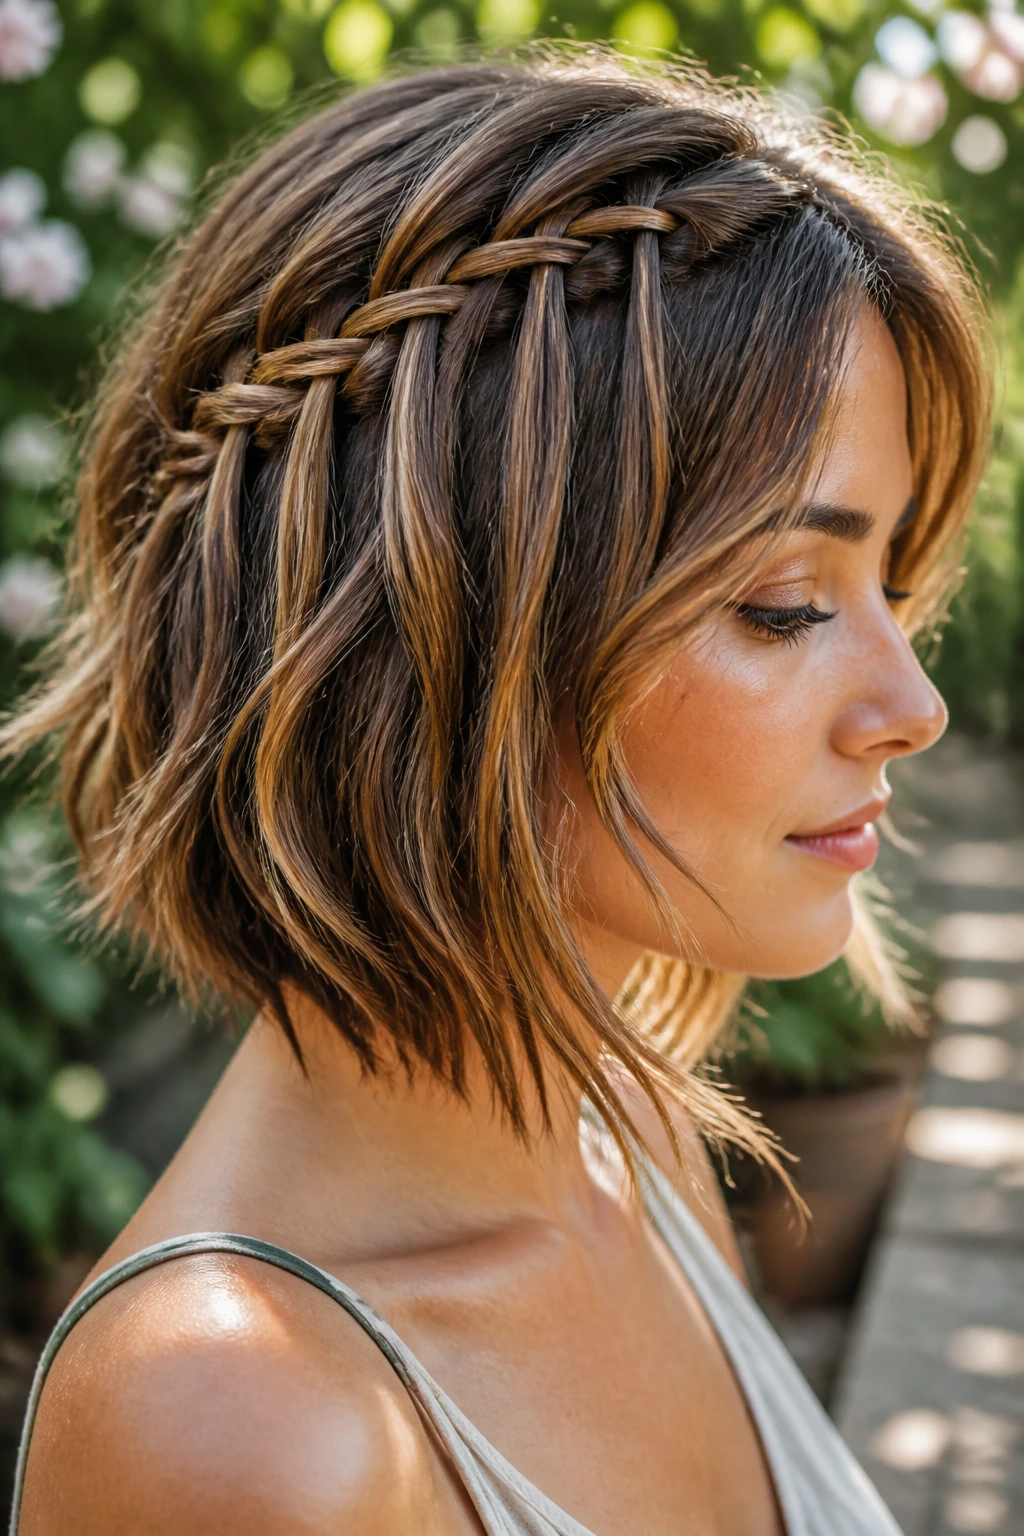
If you have layers around your face, a standard braid might cause them to fall out constantly. The waterfall braid is a brilliant solution because it drops strands as you go, incorporating them into the design rather than trying to force them into a tight weave.
Achieving the Flow
- Start near your temple, braiding as you would a French braid.
- Instead of keeping every strand in the braid, drop the bottom section after each cross-over.
- Pick up a new section of hair from the top to replace the dropped piece.
- This creates a cascading, waterfall effect that looks incredibly intricate on short hair.
Note: This requires a bit of dexterity. If you are a beginner, practice on a friend first. Once you master the “drop-and-pick-up” motion, it will become your favorite way to deal with overgrown bangs.
6. The Fishtail Fringe Braid
Fishtail braids usually take forever on long hair, but on short hair? It’s a five-minute job. The fishtail braid looks much more sophisticated than a standard three-strand braid, and it adds an element of texture that makes short hair look intentional.
Why the Fishtail Wins
It is all about the “X” pattern. By crossing thin slivers of hair back and forth, you create a dense, rope-like structure that stays very tight to the scalp. This is vital for short hair, where you don’t have the length to lose to a loose, sprawling weave.
The “Pancaking” Technique
Once you reach the end of the braid, take the edges of the braid between your thumb and index finger and pull them outward. This is called “pancaking.” It takes a skinny, tight braid and makes it look like it was woven with double the amount of hair.
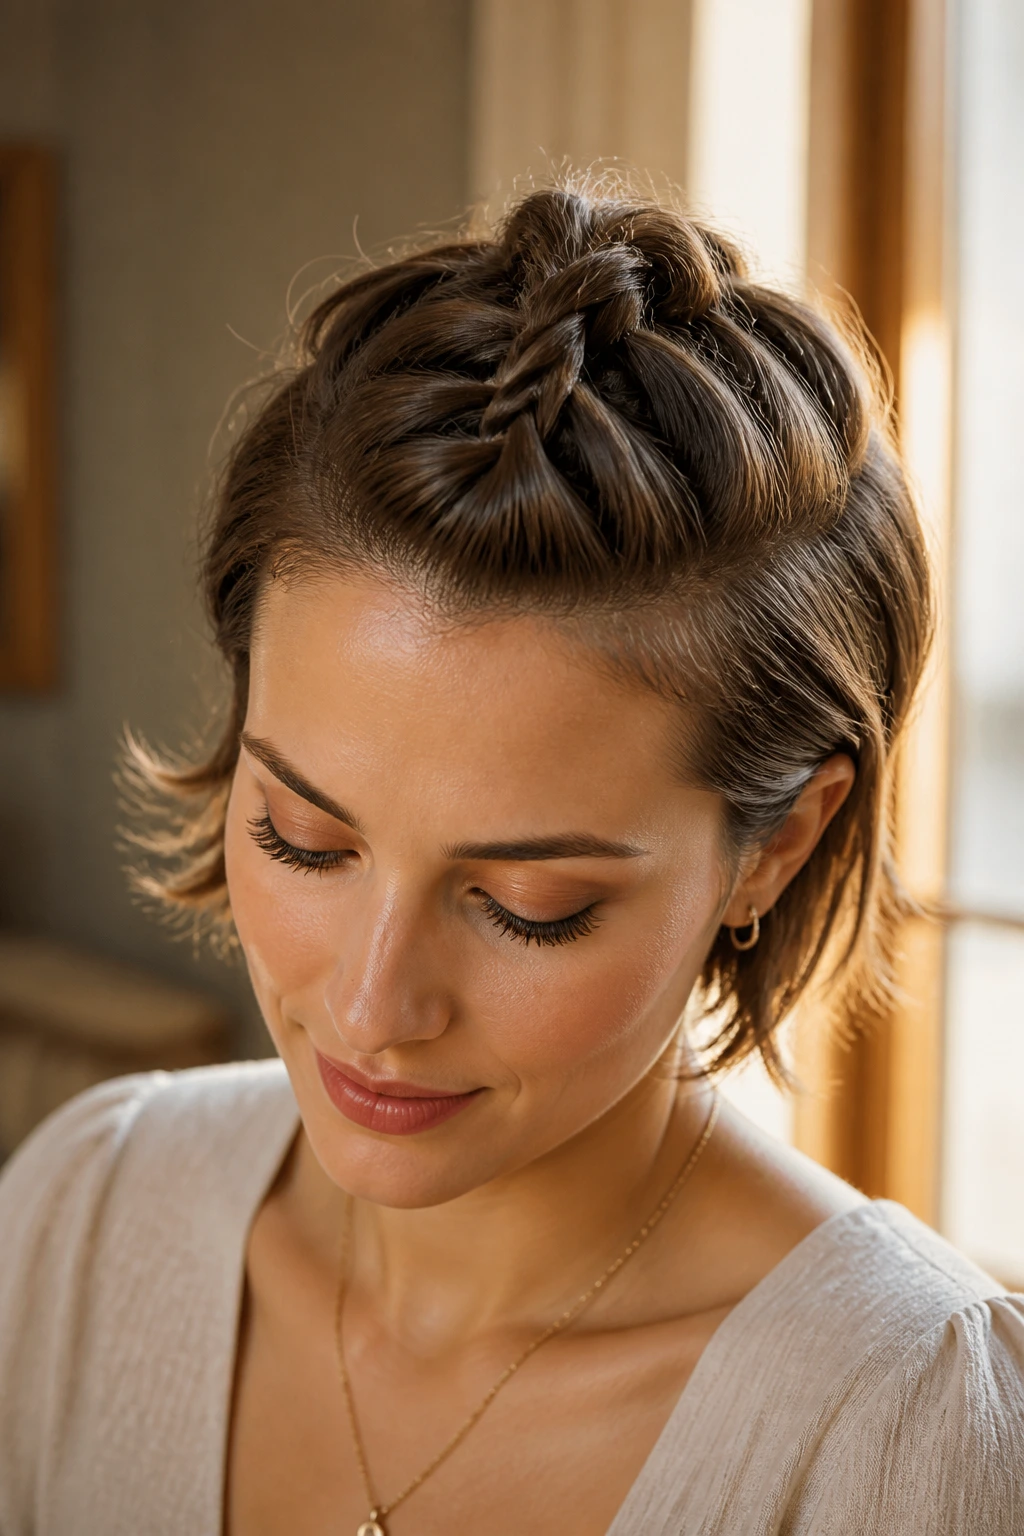
7. The Messy Top-Knot Braid
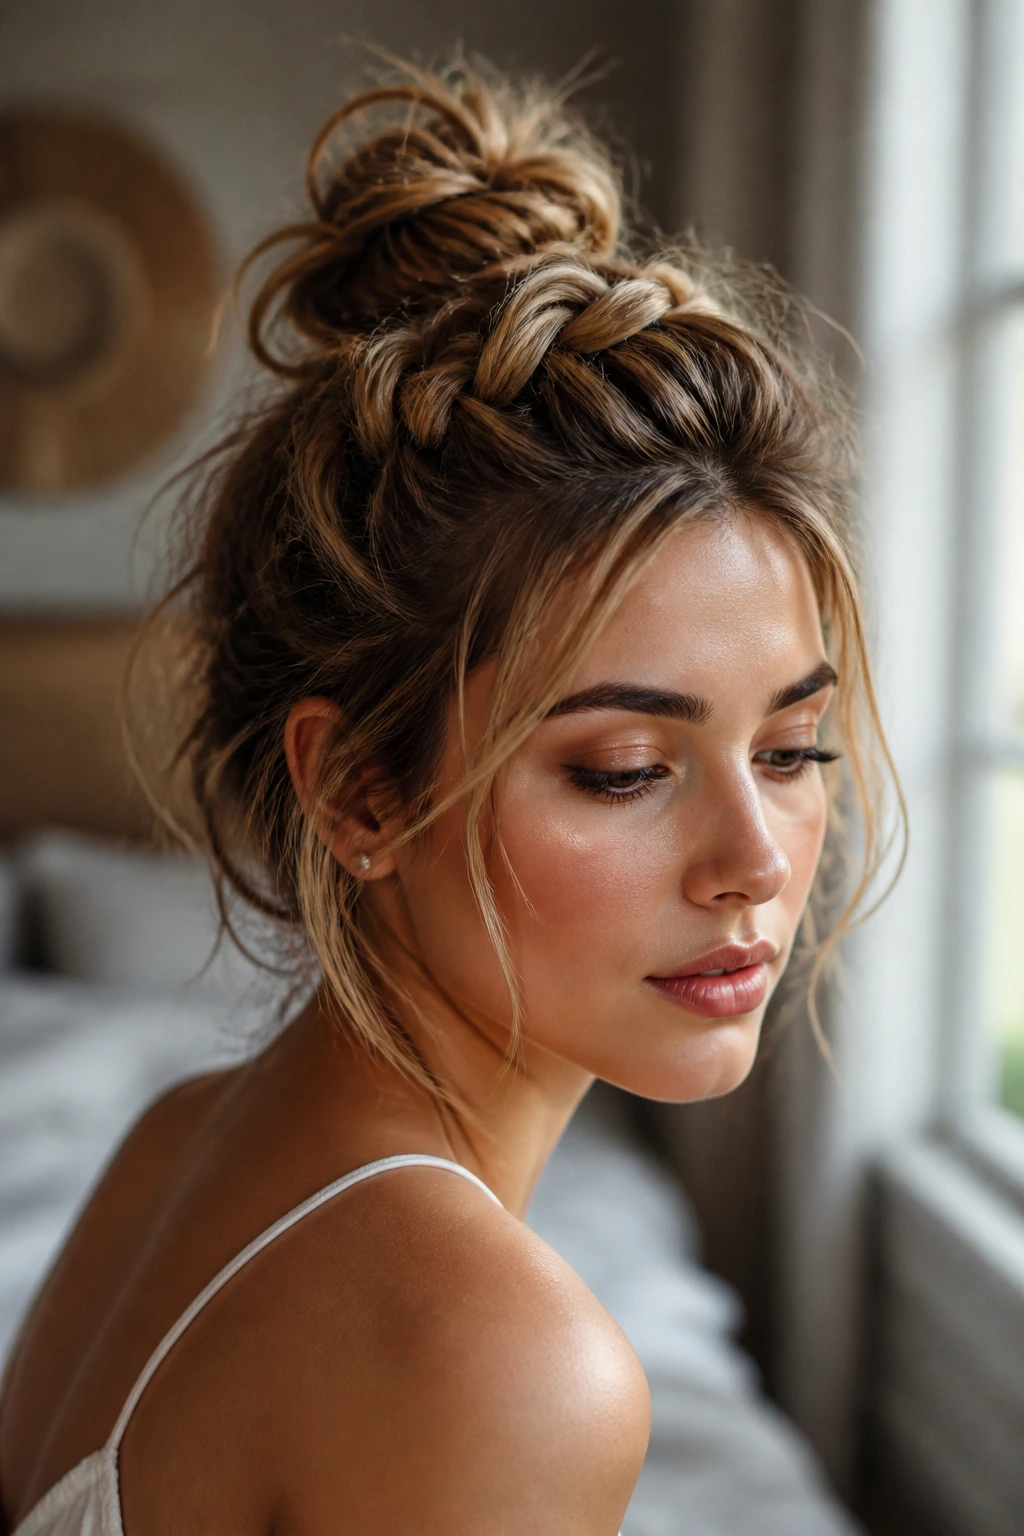
When your hair is too short for a full bun, use a braid to create the illusion of volume at the crown. This style is essentially a miniature French braid that leads into a messy, pinned-up knot. It is youthful, fun, and keeps your hair out of your eyes during active days.
Step-by-Step Construction
- Section off the top portion of your hair, starting at the hairline.
- Braid this section backward, incorporating hair as you go until you reach the crown.
- Once you hit the crown, gather the end of the braid and the remaining hair from the top section.
- Twist it into a small bun and pin it securely.
Expert Advice: If your ends are poking out, do not fight them. Use a bit of styling cream to smooth them, or leave them out intentionally for a “bedhead” vibe that looks high-fashion rather than accidental.
8. The Accent Braid with Headband
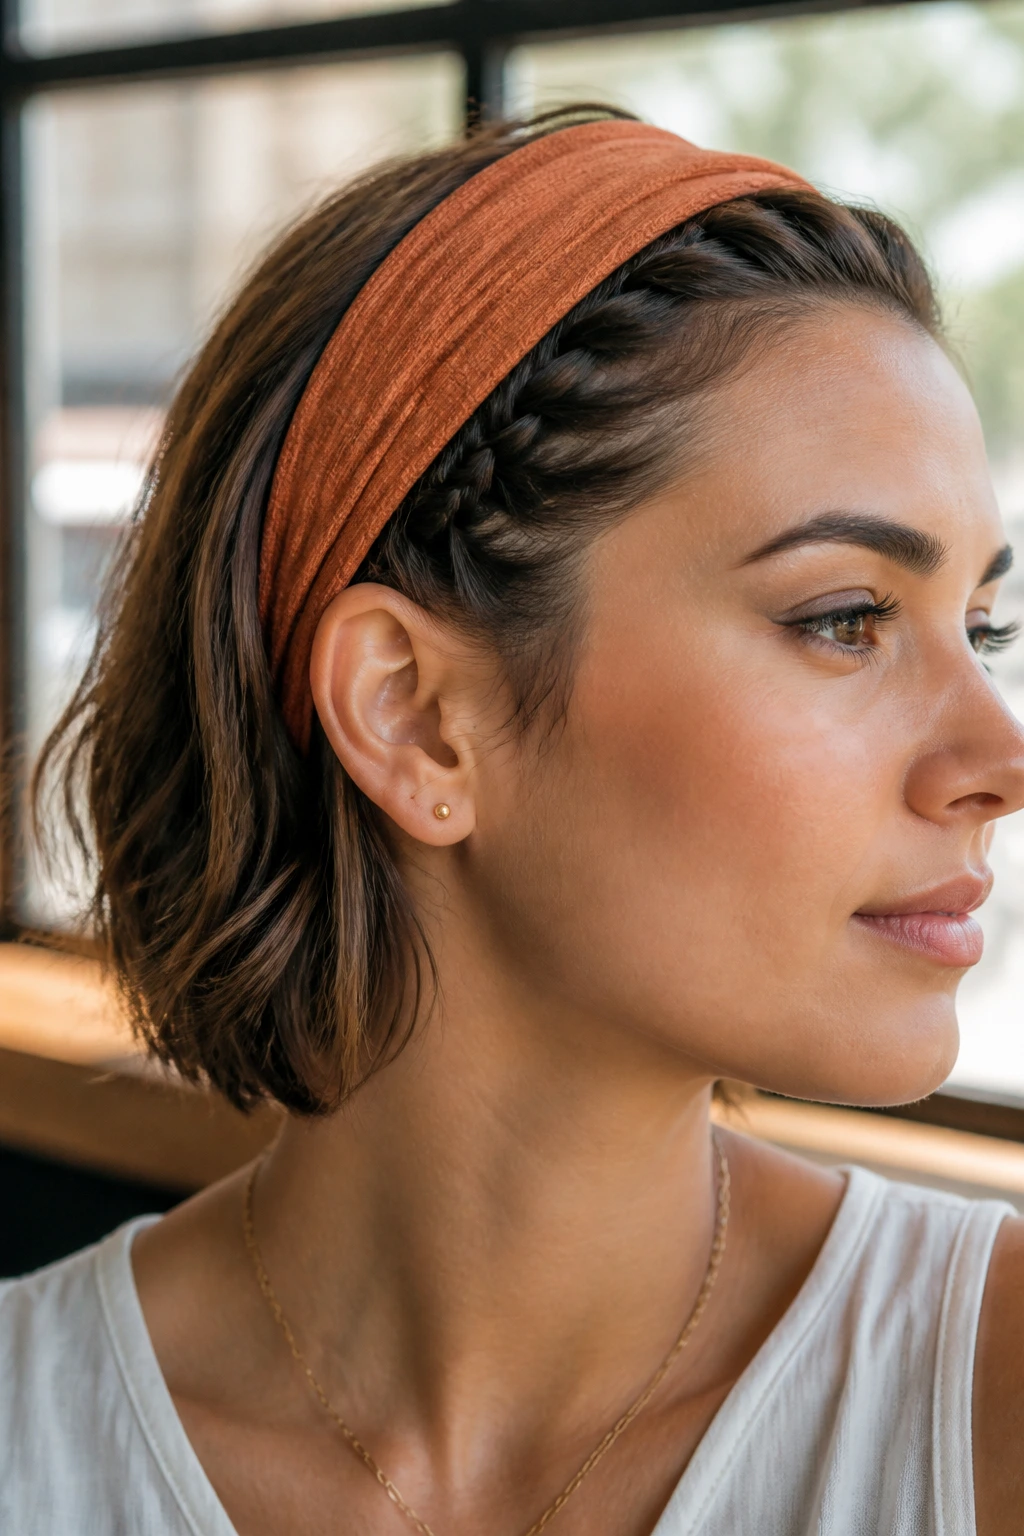
Sometimes the best braid isn’t a complex weave, but an accent piece. If you are struggling with your short hair, use a wide headband to handle the bulk of your hair, then pick one small section to braid. This is the perfect compromise for those who want the look of a braid without the effort of a full-head style.
Styling Strategy
- Place the headband about two inches back from your hairline.
- Leave some soft, wispy pieces out around your ears and temples.
- Take a one-inch section of hair near your ear, braid it tightly, and secure it with a clear elastic.
- Tuck the end of the braid behind your ear or pin it under the headband for a seamless finish.
9. The Boho Braided Headband
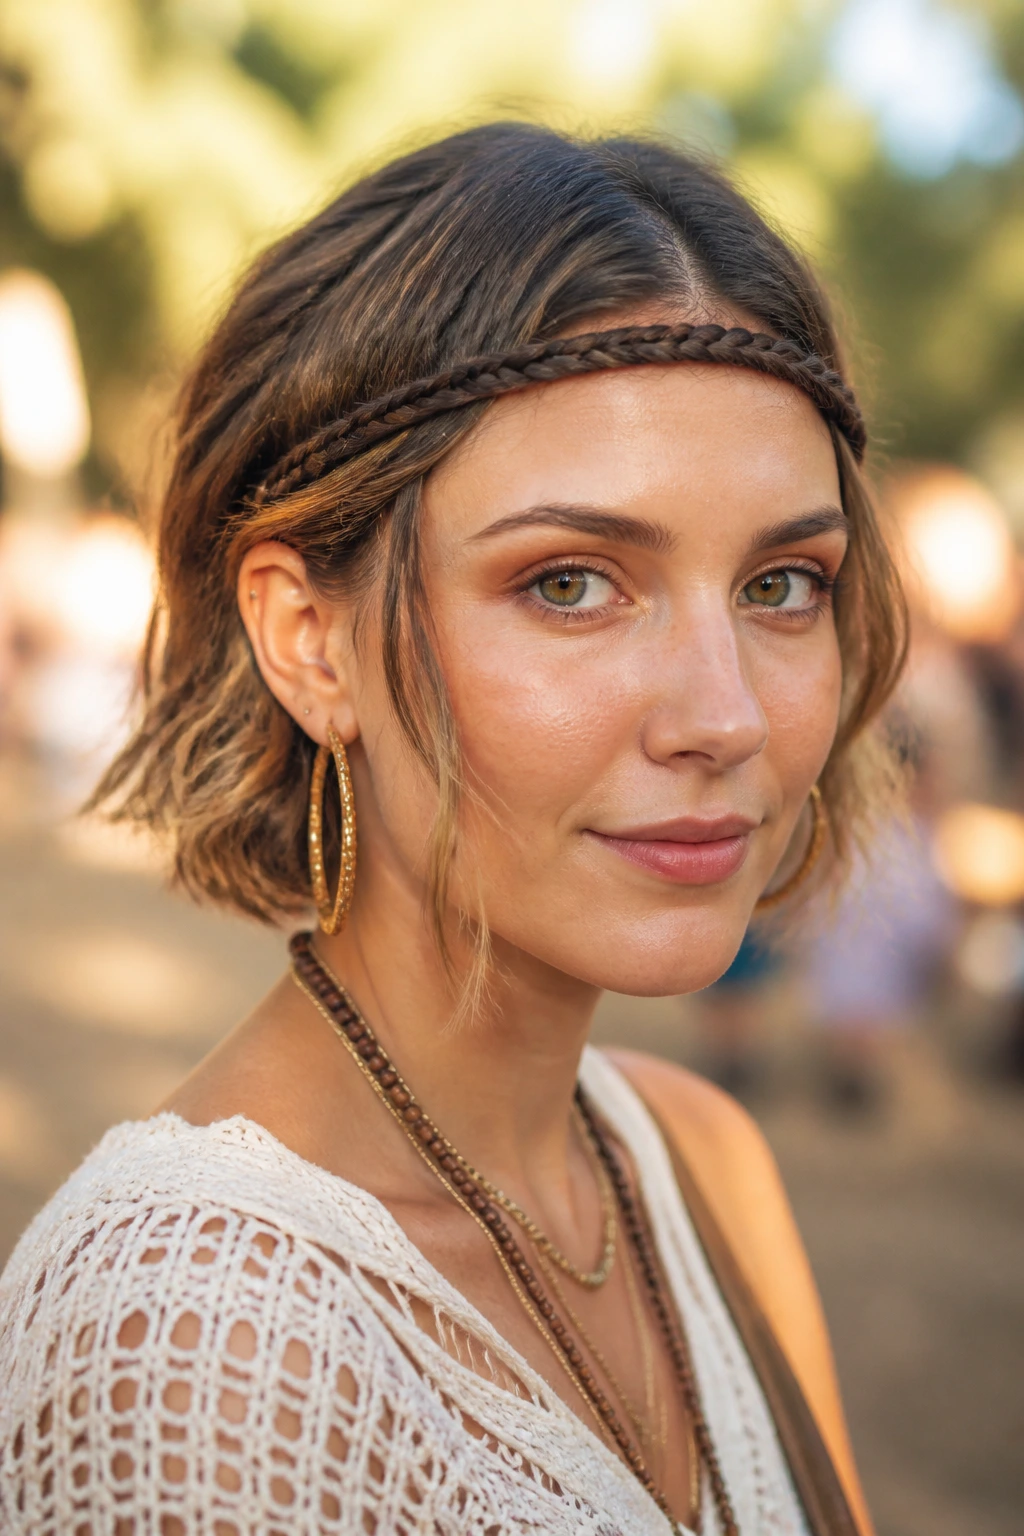
This is the classic “festival hair” look that works surprisingly well for short lobs. It essentially creates a braid that sits right across your forehead or crown, acting as a natural hair accessory.
Essential Tips
- Start the braid behind your ear on the side with more hair.
- Braid all the way across your hairline to the other side.
- Use a light-hold hairspray rather than gel. You want the braid to be flexible and soft, not stiff or crunchy.
- Keep the braid slightly “undone.” The more flyaways, the more authentic the bohemian vibe looks on shorter lengths.
10. The Braided Halo for Bob Cuts
You might think a halo braid is only for people with waist-length hair, but you can create a “faux” halo using two separate braids. By braiding from each side and pinning them at the crown, you get the same ethereal, regal look without needing the length for a full circle.
The Pinning Secret
The trick here is the way you pin the ends. Do not just pile them on top of each other. Overlap the two braid ends at the back or side, and pin them underneath the bulk of the braids. This hides the ends entirely and gives the illusion that your hair is much longer than it actually is.
11. The French-Twisted Braid
This is a beautiful hybrid style. You start with a traditional French braid at the front, but instead of finishing it as a braid, you stop halfway and twist the remaining hair into a small, elegant roll. It is a fantastic option for a formal event where you want something a bit more polished.
Why it works for formal settings
Short hair can often look messy. By incorporating a precise French braid into a structured twist, you create a “formal” silhouette that looks sophisticated from the front and back. It is a great way to wear your hair up without feeling like you are trying too hard.
12. The Triple-Threat Braid
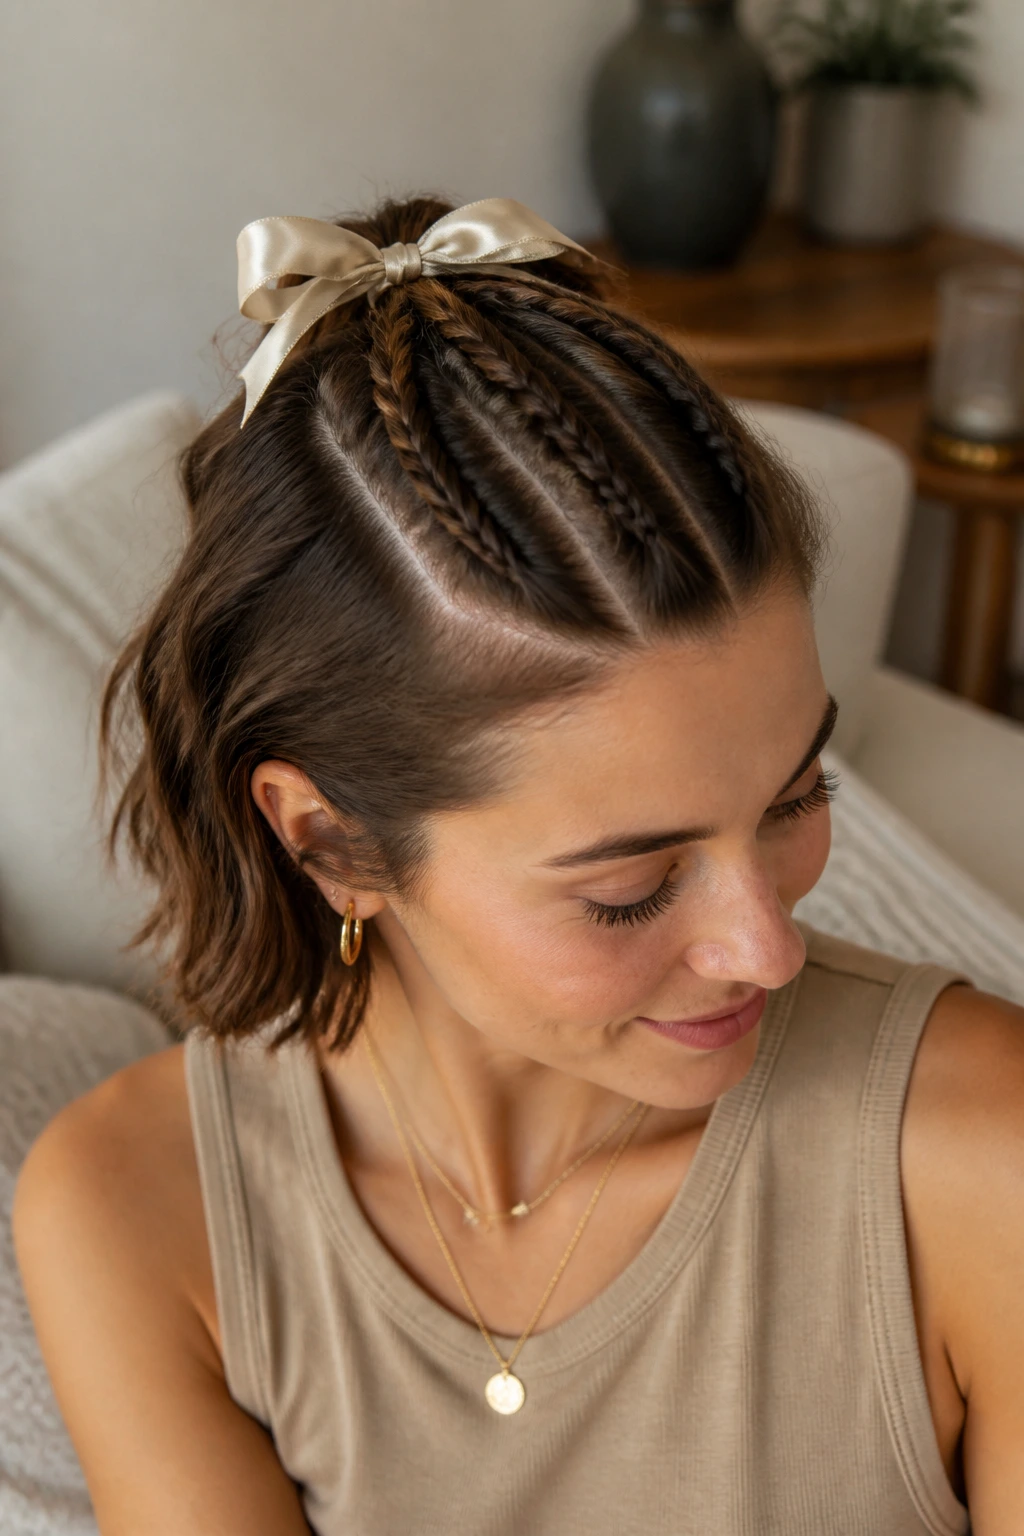
If you have a lot of layers, keeping them all in one braid can be frustrating. The triple-threat braid solves this by creating three separate, smaller braids that converge into one. This helps catch those shorter layers that would otherwise fall out of a single, large braid.
How to Organize
- Split the top of your hair into three horizontal sections.
- Braid each section individually—these are your base braids.
- Gather all three braids at the crown and tie them together with a decorative ribbon or a silk scrunchie.
- This creates a beautiful, layered visual that looks much more complex than it actually is.
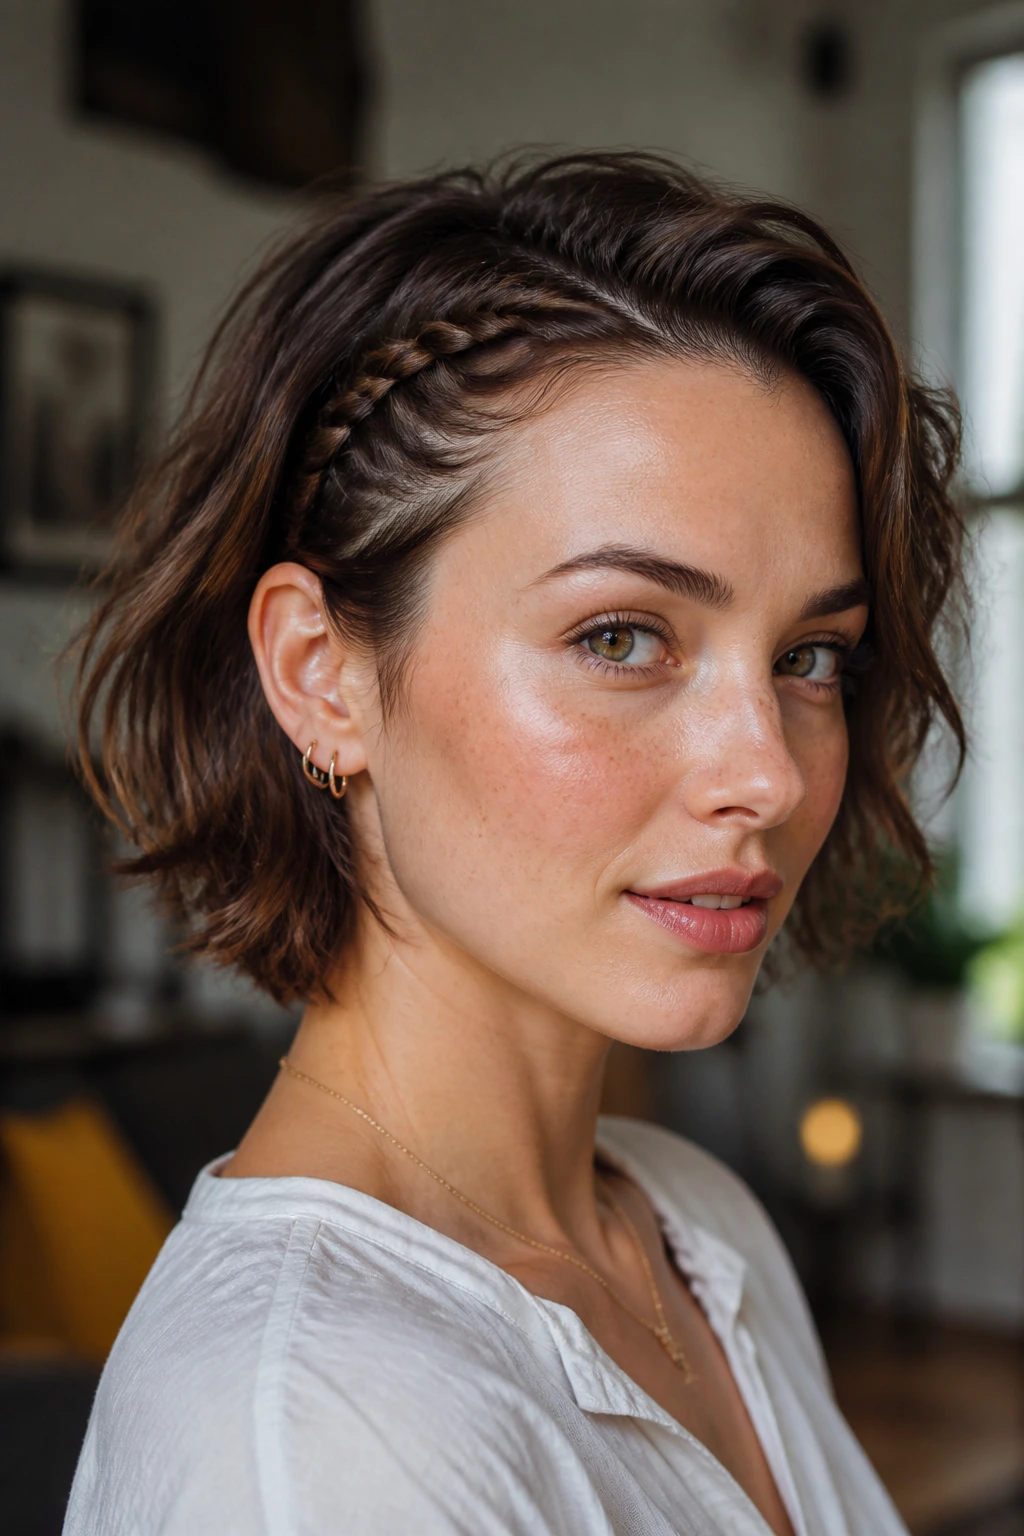
13. The Undercut-Style Braid
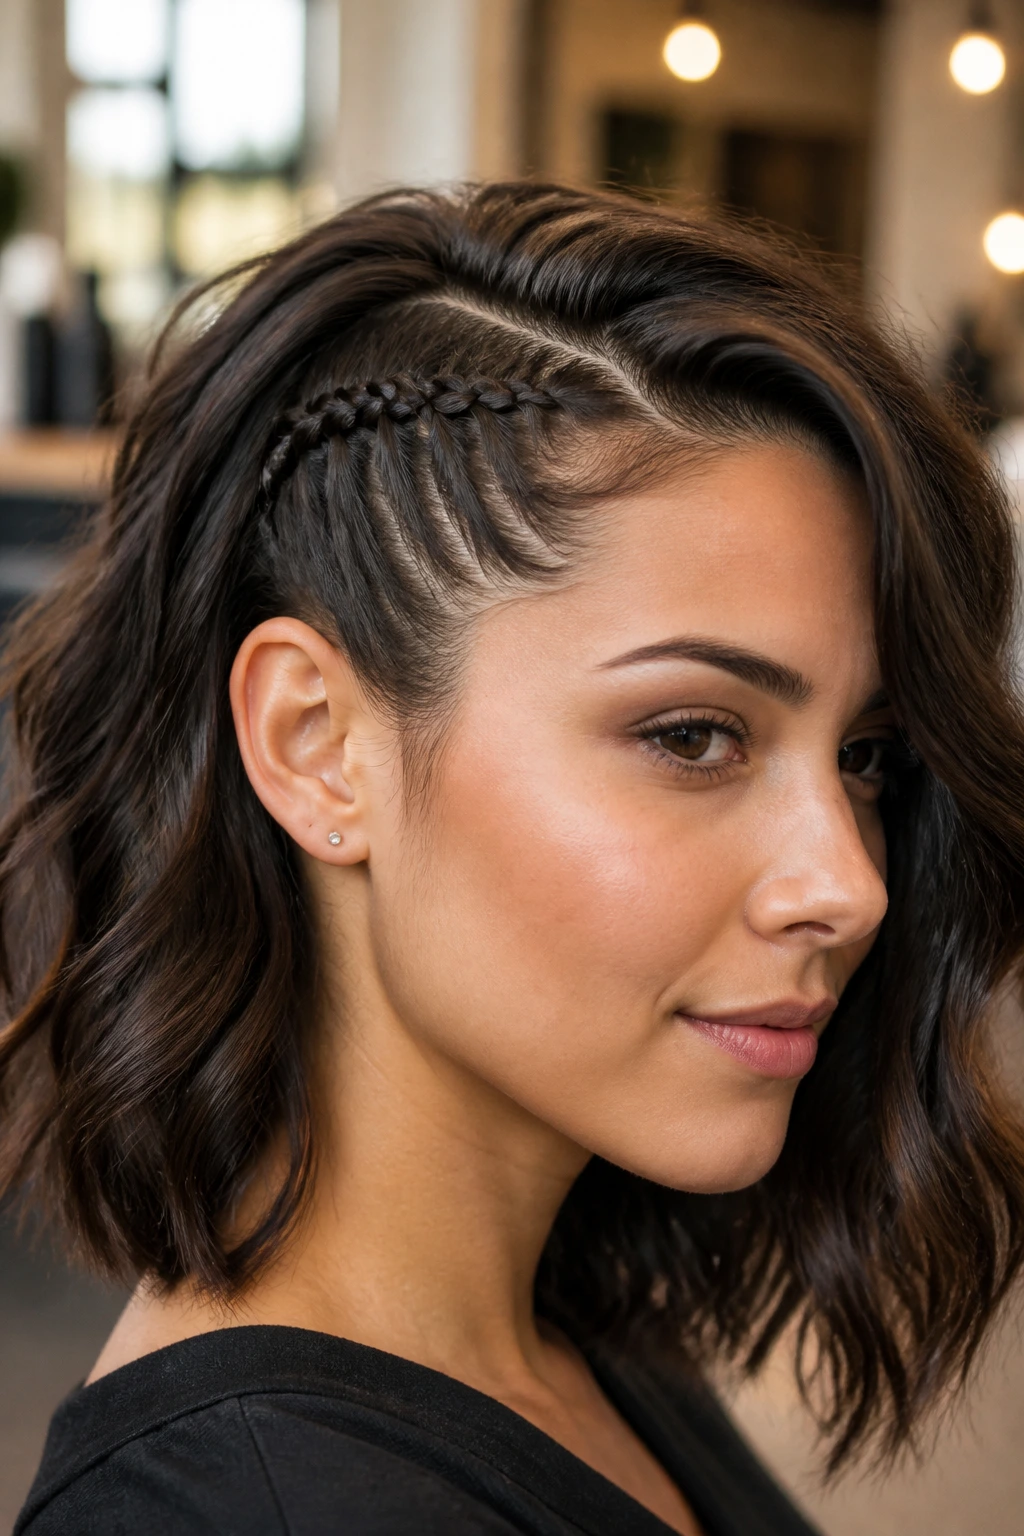
Do you want an edgy look without actually shaving your head? This style mimics the look of an undercut by creating a very tight, small Dutch braid along one side of the head, starting from the temple and going back to the ear.
The Power of Tension
Because this braid is meant to be tight, it is the only time you should really pull hard on your hair. Make the braid as flat as possible against the scalp. The contrast between this tiny, tight braid and the rest of your hair left down in loose waves is incredibly chic and modern.
14. The Low-Nape Braided Updo
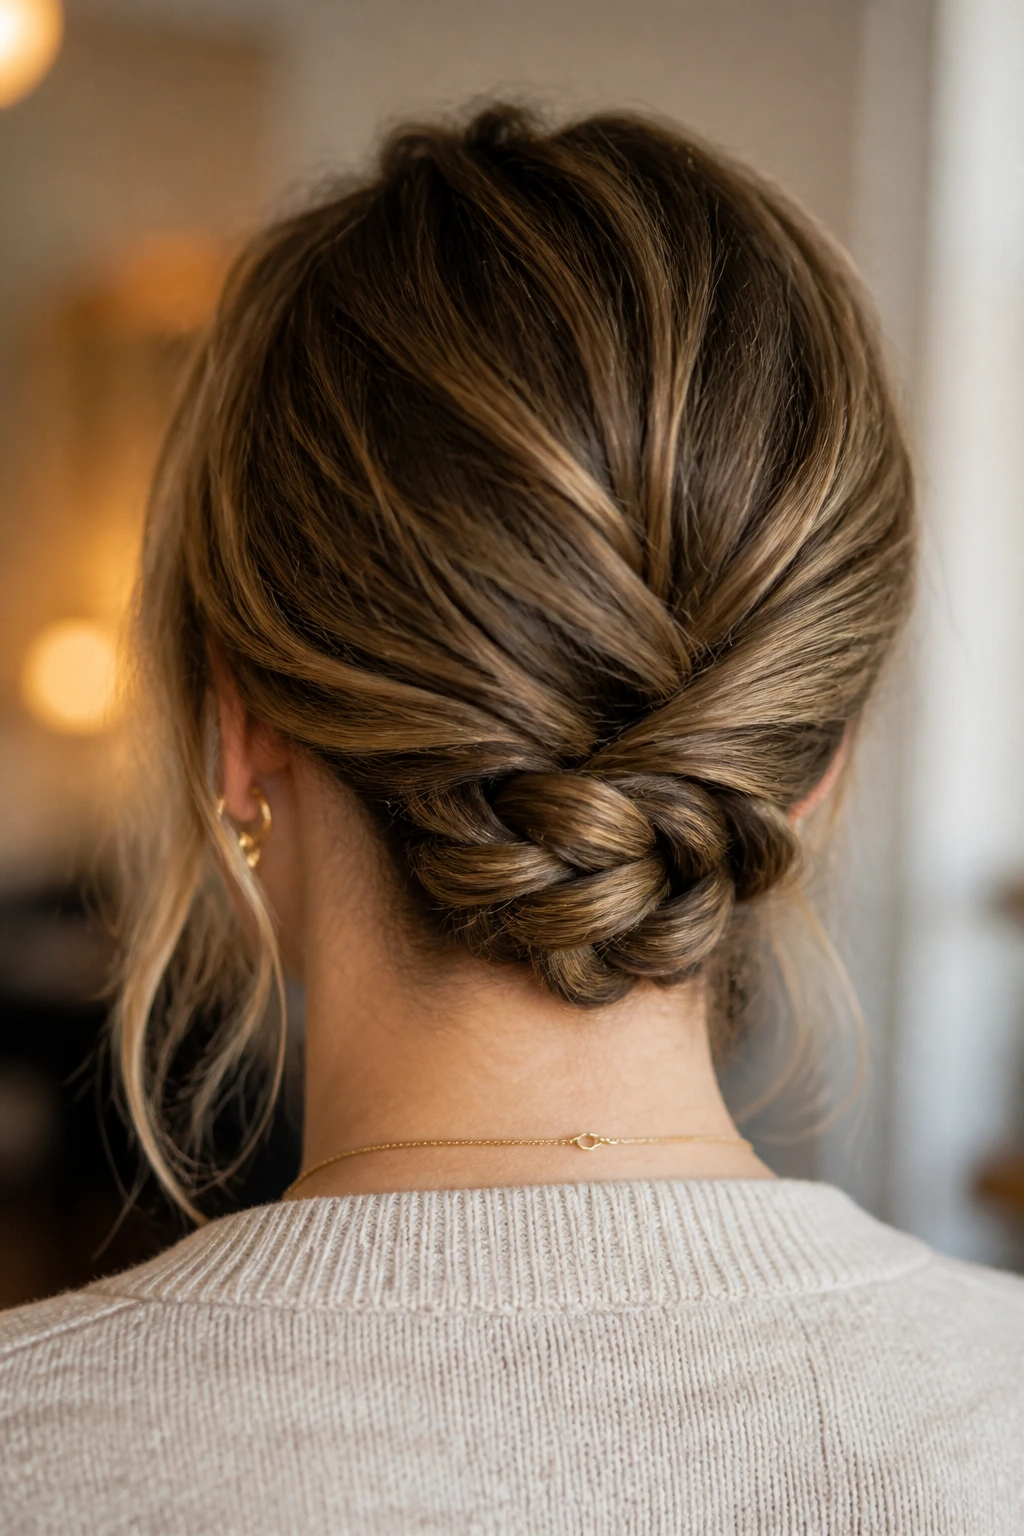
Short hair often gets uncomfortable at the neck. By braiding the very bottom section at the nape of your neck, you keep the hair off your skin and create a clean line. This is a classic, timeless look that works for almost any occasion.
Step-by-Step
- Section off the hair at the nape of your neck.
- Braid it upward toward the crown.
- Take the remaining hair, gather it, and pin it over the top of the braid.
- If you have enough length, tuck the loose ends of the top section into the braid itself.
15. The Rope-Braid Ponytail
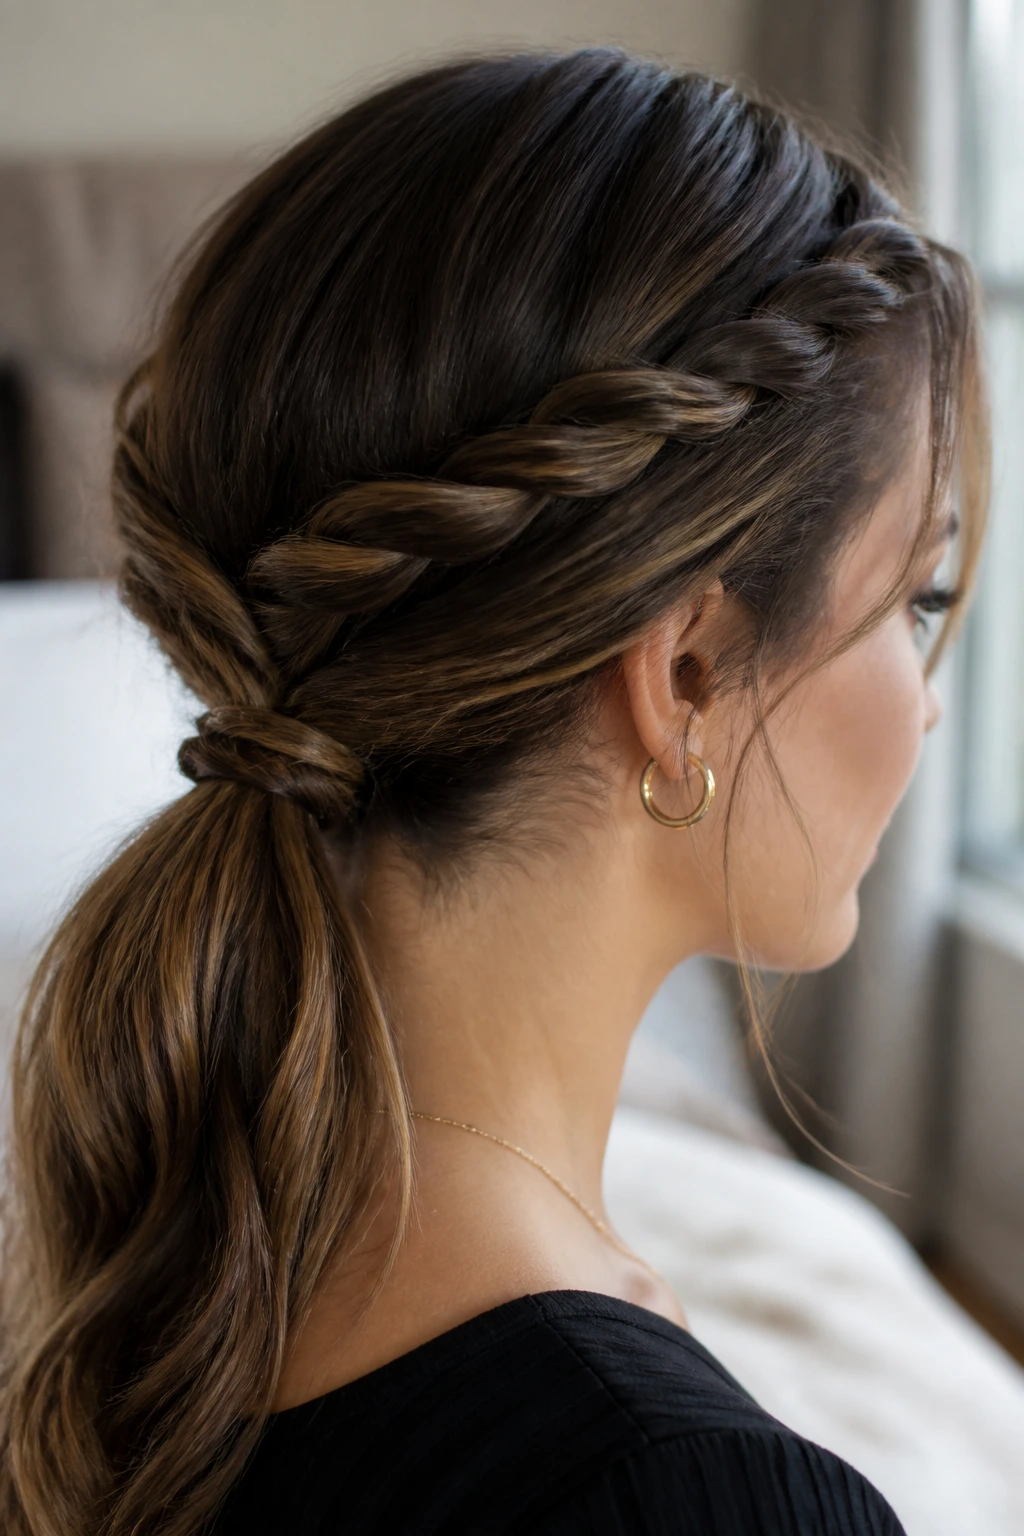
If you can pull your hair into a ponytail, you can pull off this look. This is perfect for when you are tired of your hair hitting your face but don’t want a full updo. A rope-braided pony adds texture that a plain ponytail lacks.
Building the Texture
- Create a low ponytail.
- Split the ponytail into two equal parts.
- Twist each part tightly in the same direction.
- Cross them over each other in the opposite direction and secure the end.
- It is a fast, stylish way to make a basic ponytail look professional.
16. The Faux-Hawk Braid
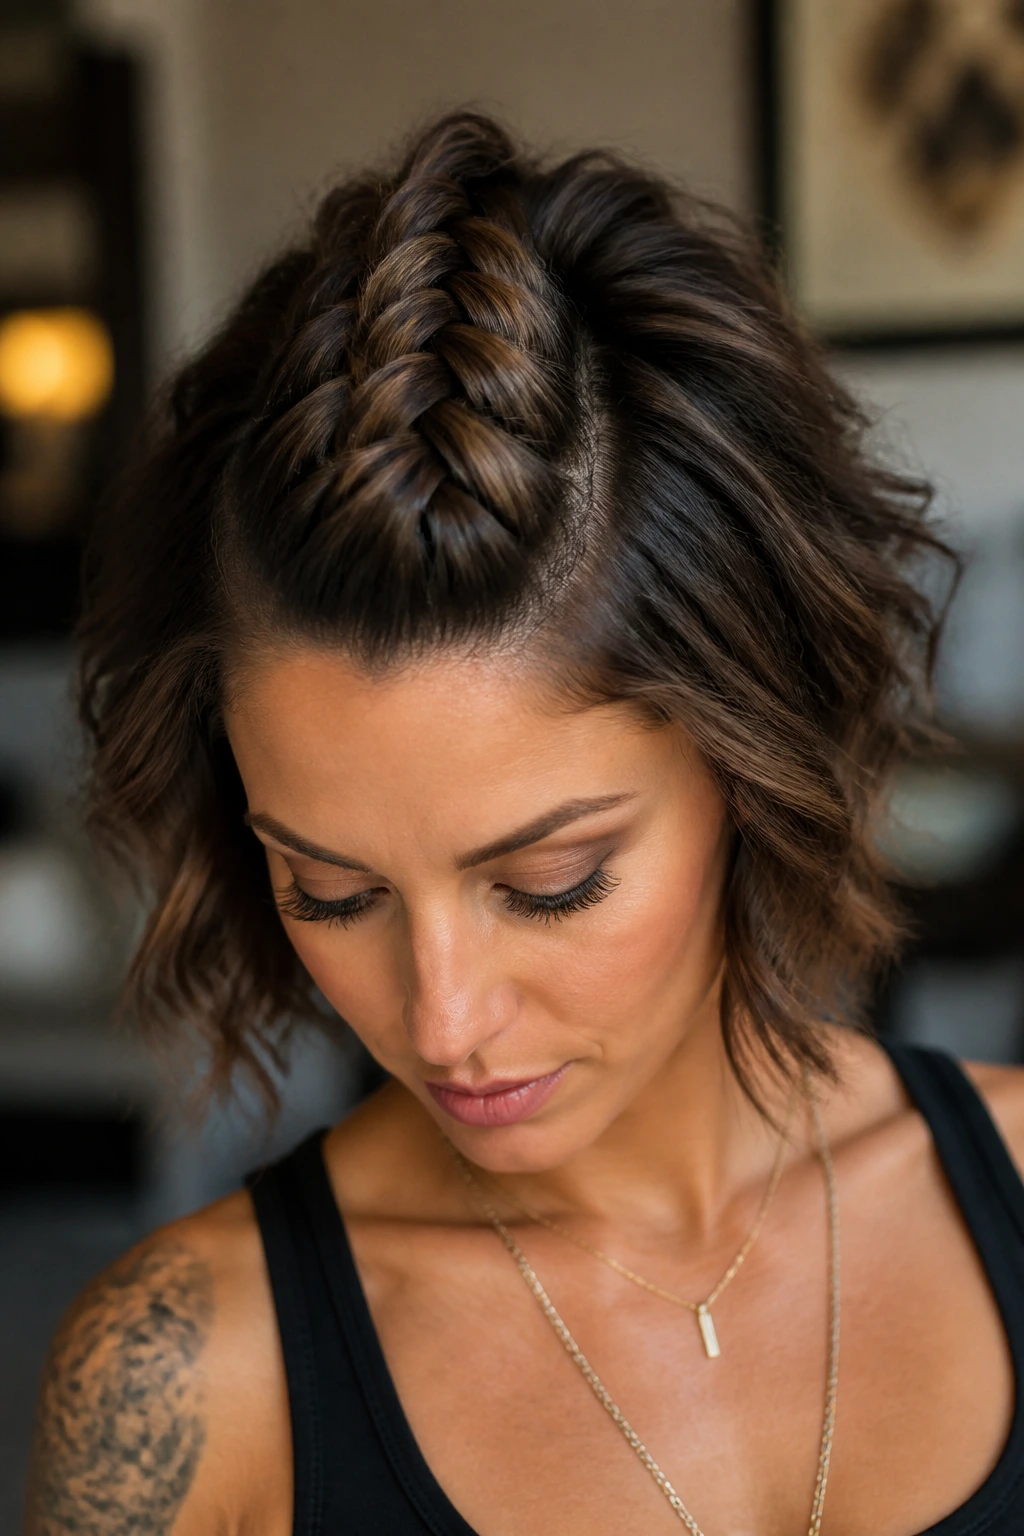
Want to tap into your wild side? The faux-hawk braid is a fantastic way to style a bob for a night out. You are essentially doing a tight French braid down the center of your head, but leaving the sides looser to create volume and height.
Balancing the Sides
The center braid provides the structure, and the hair on the sides provides the drama. Use a texturizing powder at the roots of the side sections to give them that “lifted” look that characterizes a true mohawk or faux-hawk.
17. The Twisted Bang Braid
Bang maintenance is a universal struggle. When they reach that awkward length where they are too long for your eyes but too short to tuck, braid them. This style incorporates your bangs into a small, delicate braid that keeps your face clear.
Softening the Look
- Do not braid your bangs all the way to the end.
- Braid them just until you reach your temple, then secure them with a bobby pin tucked under your hair.
- This keeps the style looking soft and natural, rather than like a headband.
18. The Crown-Pin Braid
This is the ultimate low-effort, high-reward style. You create two small, loose braids on either side of your head and simply pin them together at the back. It sounds basic, but the result is a beautiful, crown-like effect that looks perfect with jeans or a dress.
Final Touches
- Use decorative bobby pins—perhaps ones with pearls or gold accents.
- Because the braid is simple, the pin becomes the accessory.
- You can vary the thickness of the braids depending on your hair density; if you have thin hair, go for smaller, tighter braids. If your hair is thick, you can afford to let them be loose and wide.
Final Thoughts
The most important thing to remember when working with short hair is that you have to embrace the flyaways. Perfection is the enemy of a good short-hair style. If a piece slips out, it is not a mistake; it is a “softened edge.” By working with the texture your hair already has—rather than trying to force it into the sleek, heavy styles that long-haired tutorials demand—you open up a world of possibilities.
Always keep a small arsenal of clear elastics and matte bobby pins in your bag. These two tools are the difference between a style that lasts all day and one that falls apart during your morning commute. When in doubt, add a little texturizing spray before you start. It provides the grip that short, soft layers crave, making the process of braiding much less frustrating. Most importantly, have fun with the process. Your hair is an accessory, and with these 18 styles, you have plenty of ways to play with it.