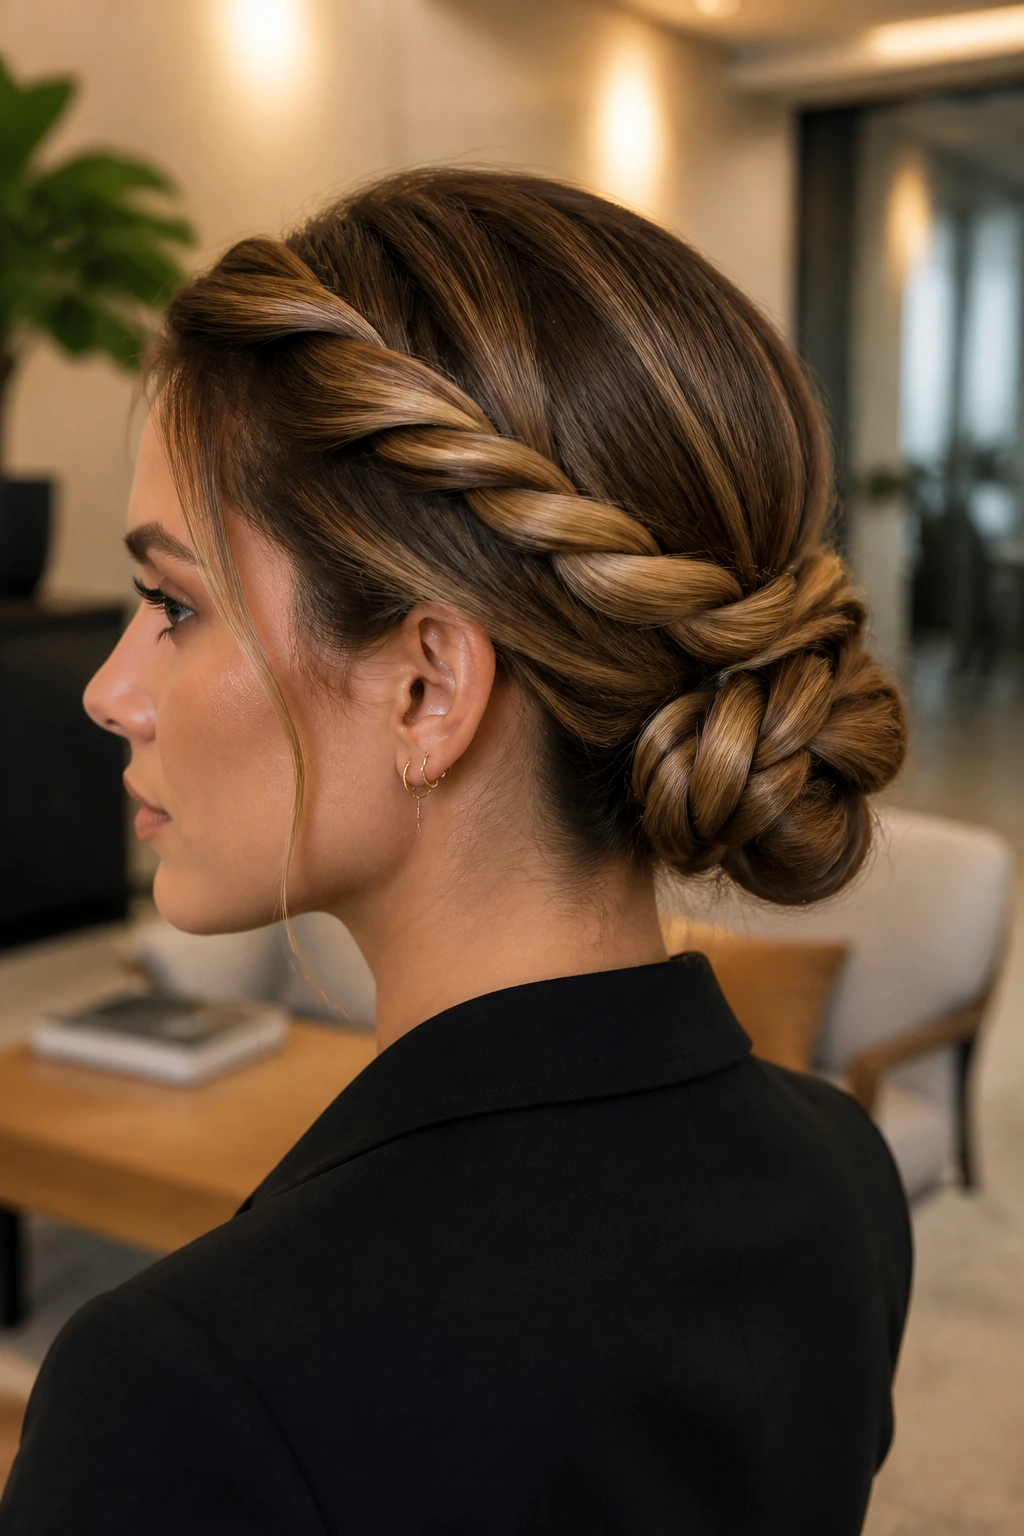
When you think of office-appropriate hair, the mind often drifts toward the standard, predictable low bun or the slightly curled blowout. These are fine—they get the job done—but they rarely spark that surge of confidence that comes from a style that feels both polished and intentionally creative. Thick braids, however, bridge the gap between structured professionalism and personal flair. They command attention without screaming for it. Whether you are dealing with naturally dense strands or utilizing extensions to build volume, a chunky, well-executed braid provides a textural richness that makes a simple blazer-and-slacks ensemble feel like a curated outfit.
Braiding for the workplace requires a delicate balance of tension and softness. You want the style to stay put through back-to-back meetings and long hours at your desk, but you also want to avoid the severe, tight-scalp aesthetic that can cause discomfort. The secret lies in the prep work. A bit of texture spray or a light dusting of volumizing powder before you even begin creates the grip necessary to keep thick, heavy sections from sliding out over time. It is less about being perfect and more about being consistent with your tension, ensuring the finished result looks intentional rather than rushed.
1. The Classic Polished Side Plait
This is the quintessential professional braid because it mimics the silhouette of a formal ponytail while offering much more character. By sweeping your hair to one side, you create a soft frame for your face that feels feminine but remains strictly business. The key to making this “office thick” is the pancake method—pulling at the edges of each loop after you have secured the ends to give the braid an exaggerated, voluminous appearance.
Why This Style Succeeds
- It keeps hair away from your face and neck, which is essential for focus.
- The asymmetry adds an element of design that standard ponytails lack.
- It is incredibly quick to execute once you master the basic three-strand technique.
How to Achieve the Look
Start by applying a dry texture spray to add “grit” to your strands. Gather your hair to your preferred side and secure it with a small, clear elastic at the nape of the neck. Braid the hair all the way down, using a firm grip, then secure the bottom. Once finished, start at the bottom of the braid and gently tug on the outer loops, working your way up to the base. This expands the braid, making it look twice as thick as it would otherwise.
2. The Low-Slung Fishtail Hybrid
Fishtail braids have a reputation for looking intricate and time-consuming, but the low-slung version is surprisingly resilient. Because the sections are smaller and woven tighter, the braid doesn’t “grow” or lose its shape as easily as a traditional braid during an eight-hour shift. It gives off a refined, woven appearance that looks high-end without being overly ornamental.
Maintaining the Weave
The trick here is to keep the sections consistent. If one strand is significantly thicker than the other, the braid will become lopsided. Focus on keeping your hands steady and pulling each section taut before crossing it over. If your hair is prone to flyaways, run a tiny amount of smoothing cream through your palms before you start. This prevents the “fuzzy” look that can sometimes make a fishtail appear messy rather than deliberate.
3. The Professional Crown Braid
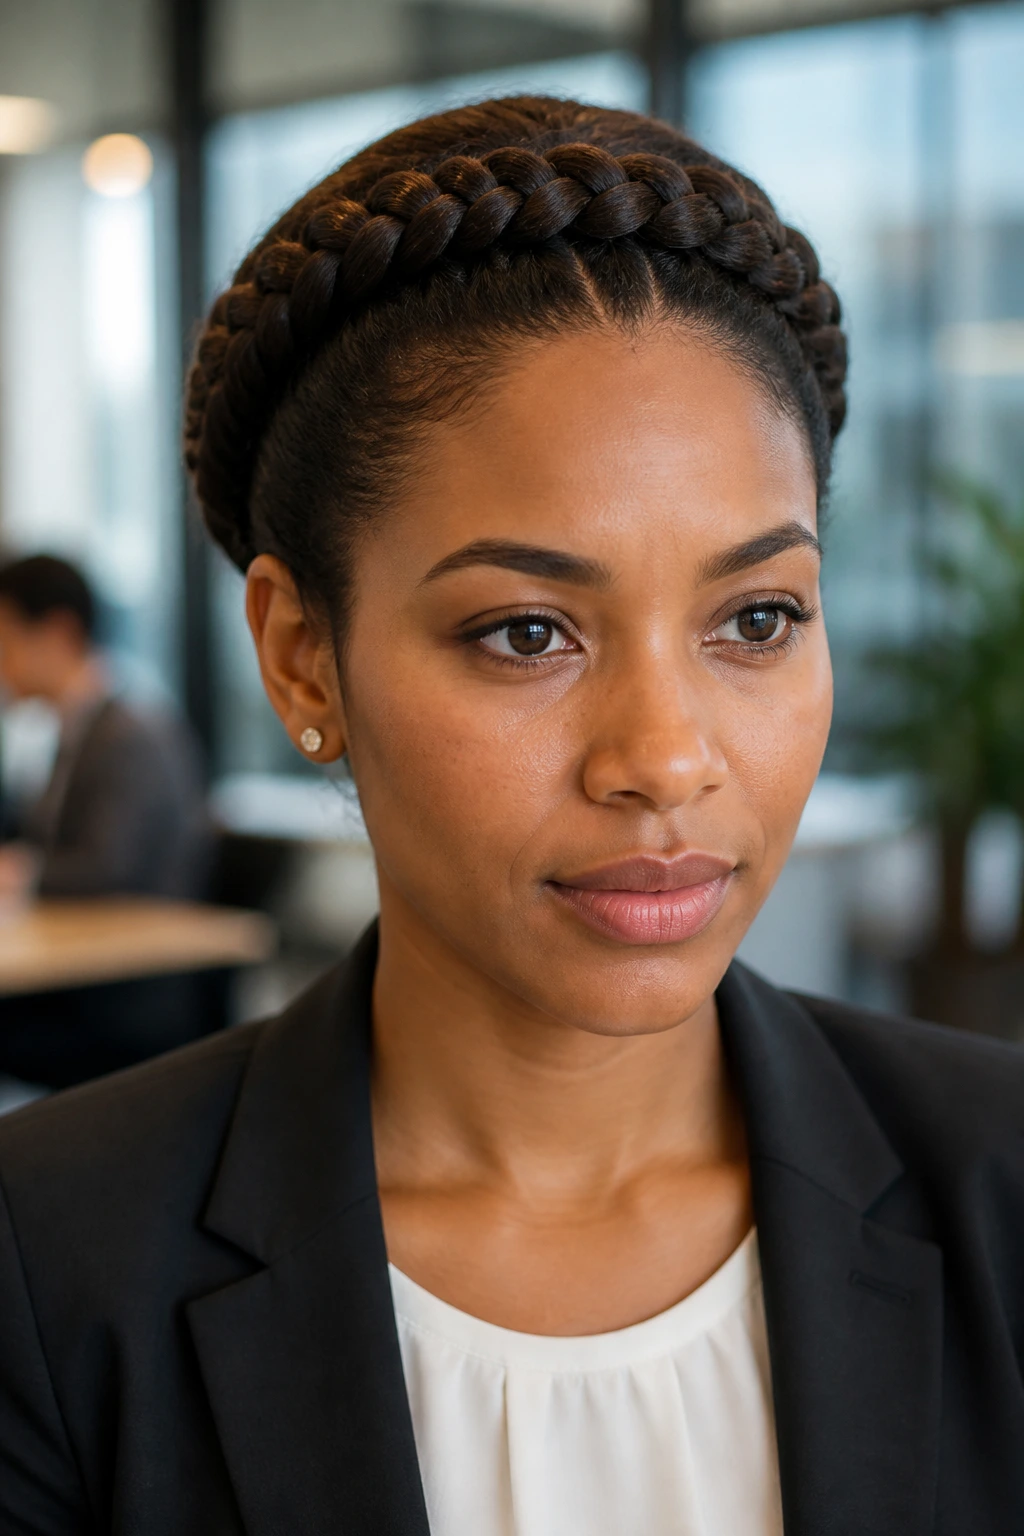
Crown braids are often associated with whimsical, bohemian styles, but when kept tight and neat, they are perfectly suitable for the boardroom. They are essentially a halo of hair that keeps everything anchored in place. This is an excellent choice for days when you have a long commute or travel, as the style is virtually indestructible.
Securing the Halo
- Use plenty of U-shaped pins instead of standard bobby pins; they hold more hair with less visible hardware.
- Tuck the tail of your braid underneath the starting section to create a seamless, infinite loop.
- Apply a medium-hold hairspray to the entire crown to keep stray hairs from drifting out of the braid during the day.
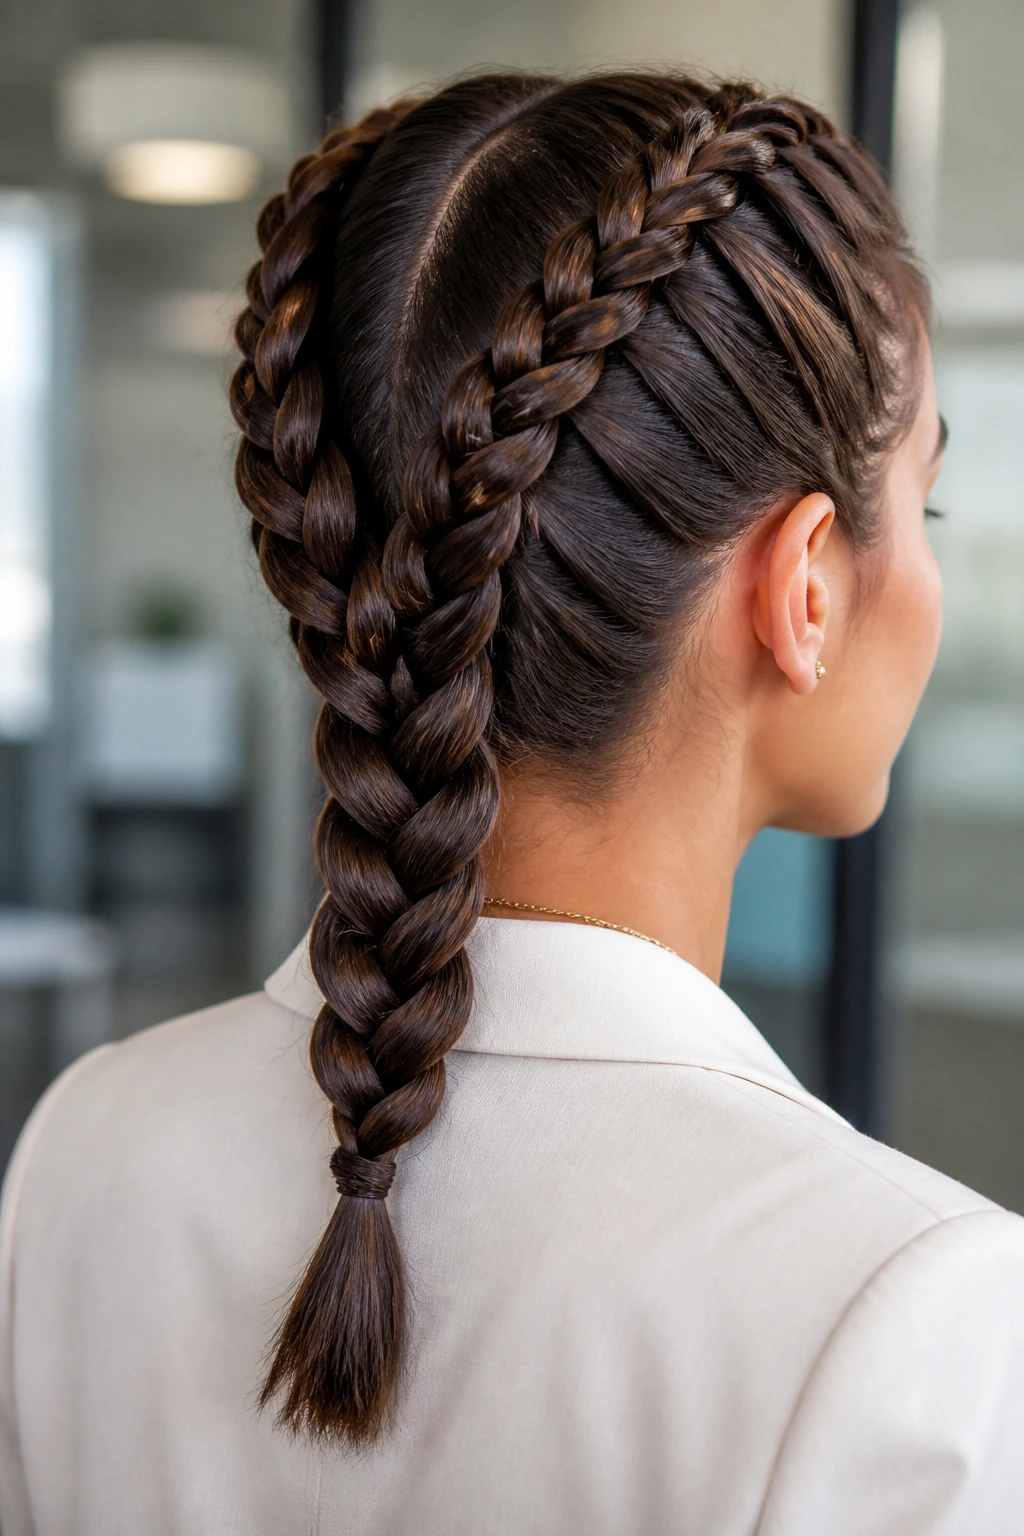
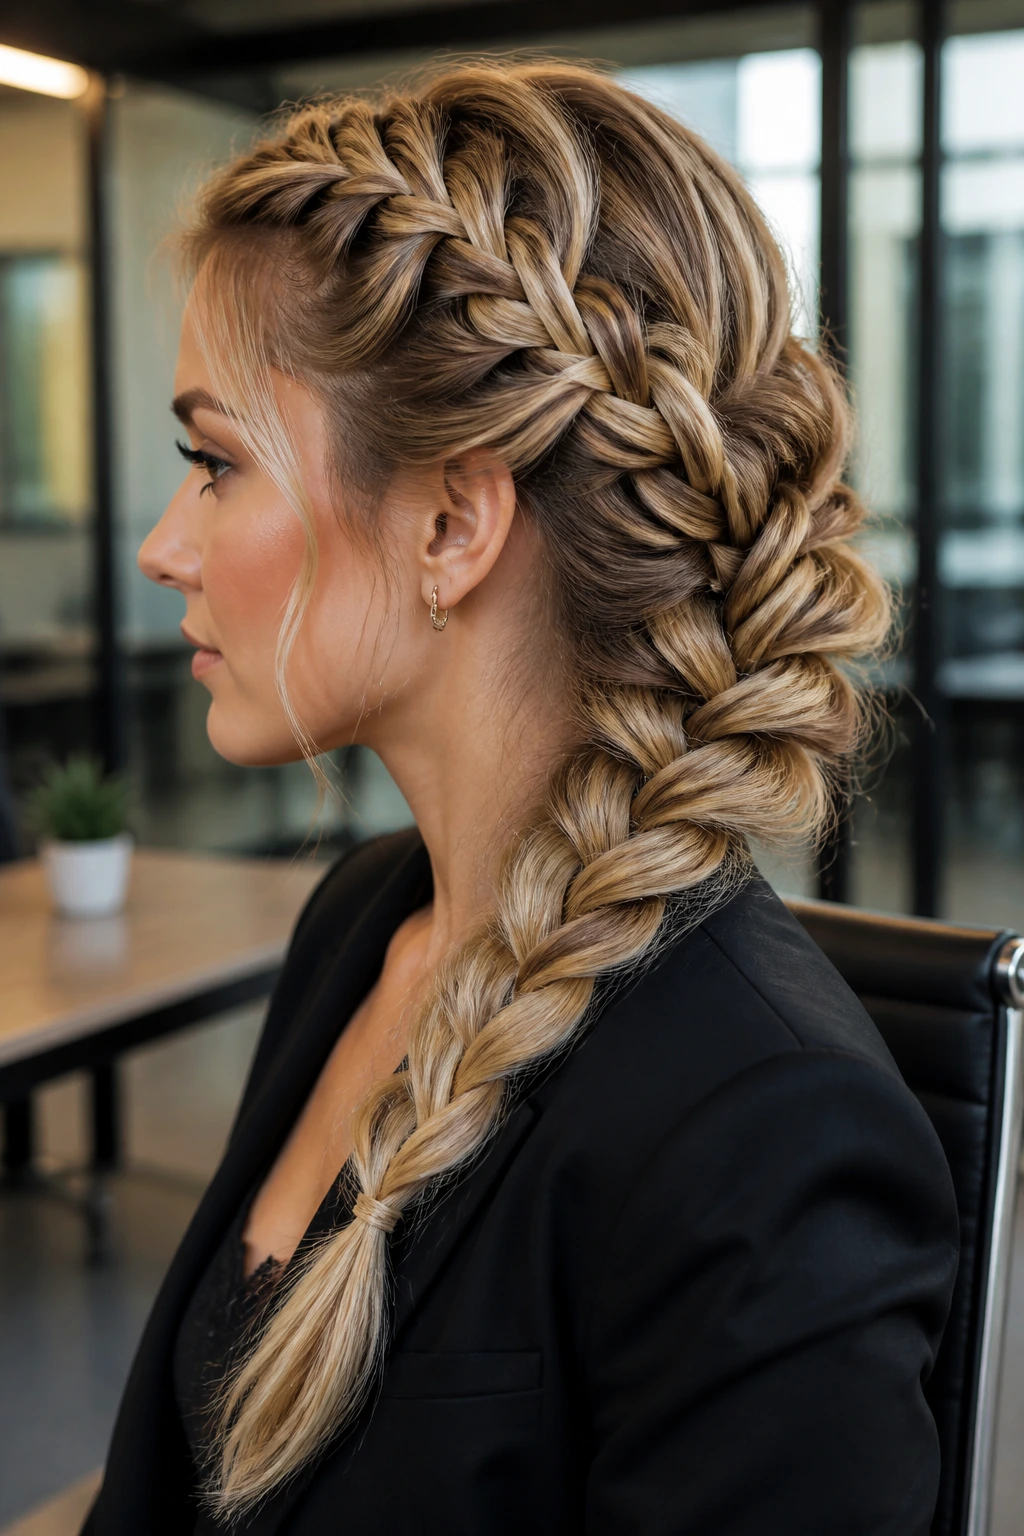
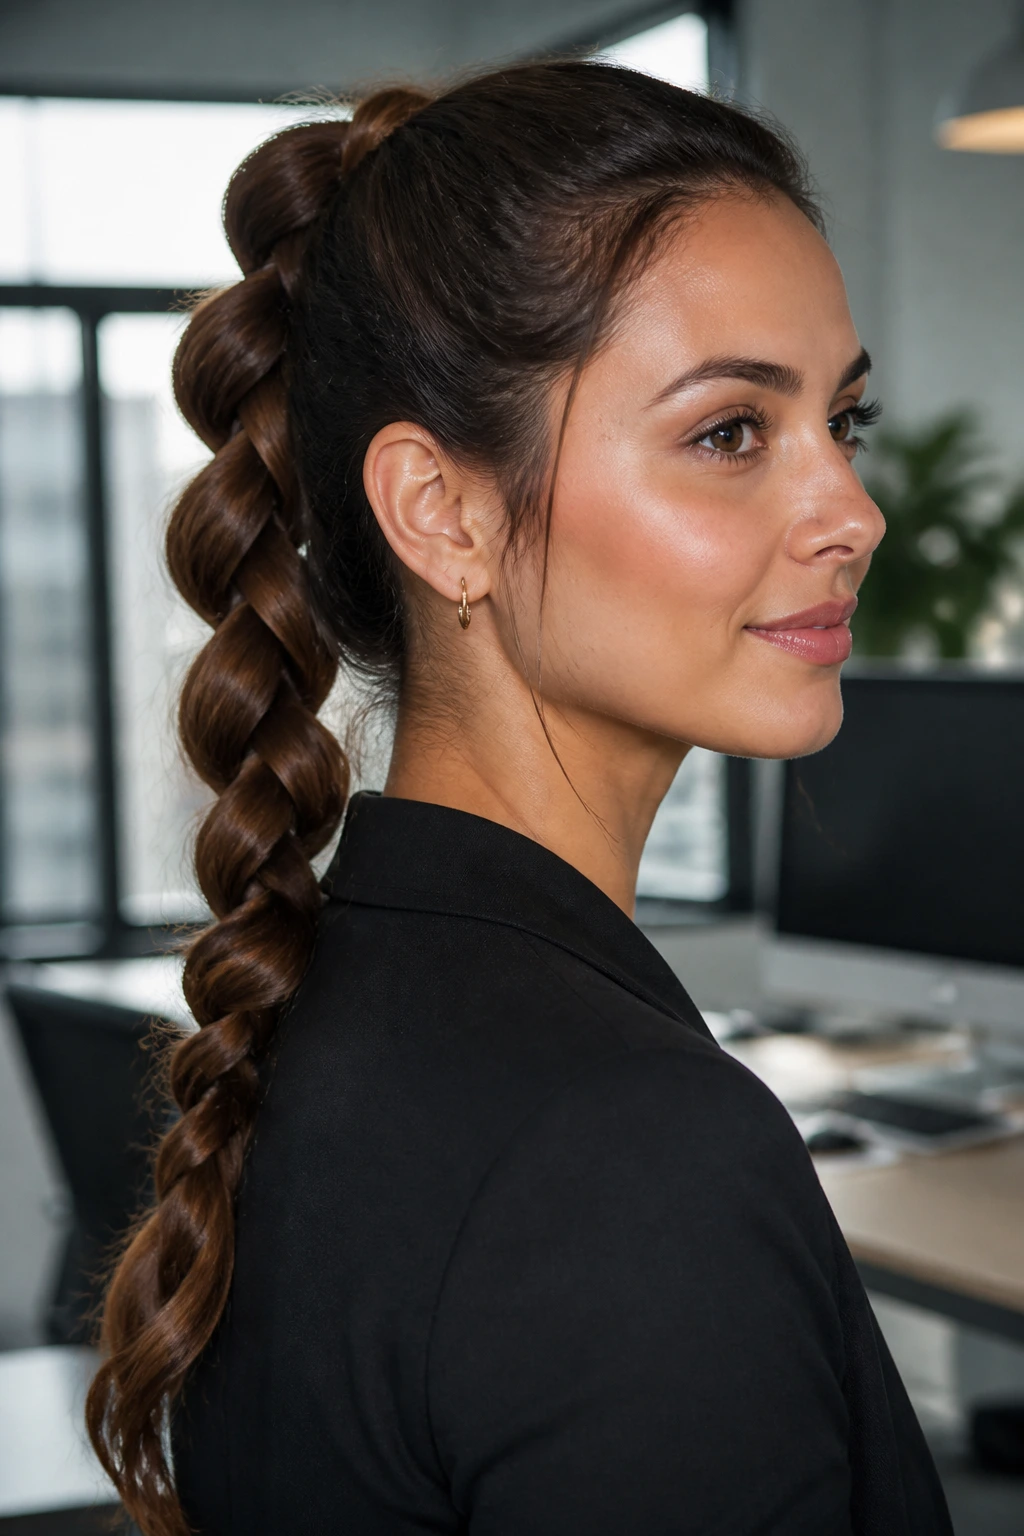
4. The Chunky Dutch Braid Ponytail
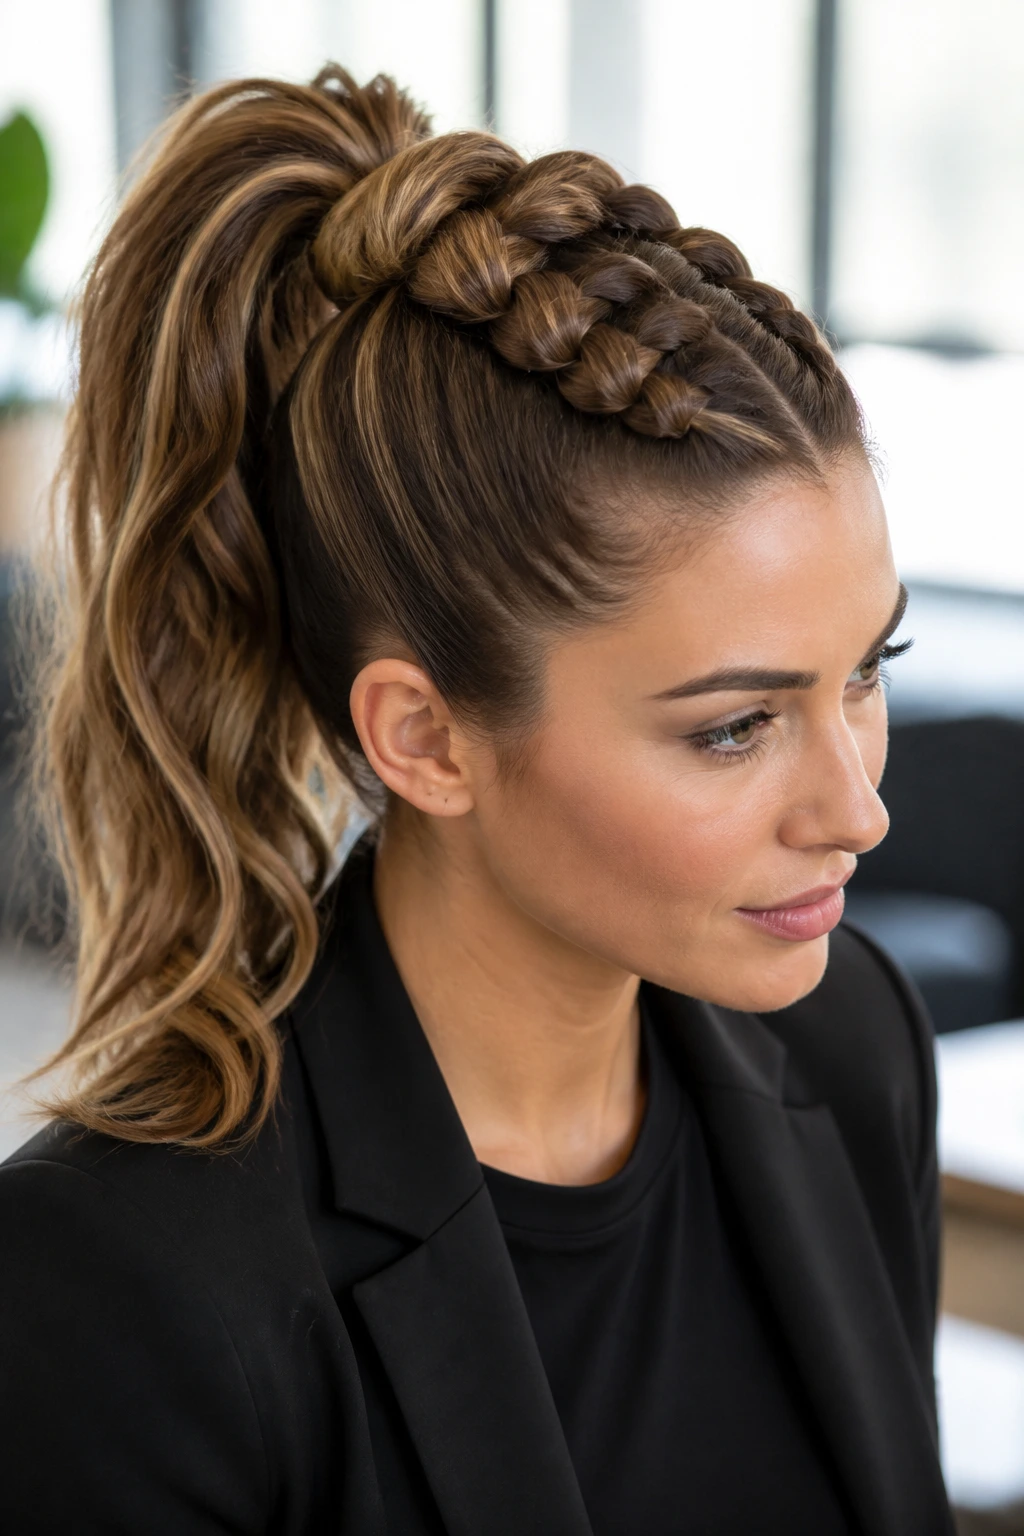
If you want the height and command of a high pony but want to elevate it, try incorporating a Dutch braid along the top of your head that feeds directly into the base of the ponytail. Dutch braids sit “on top” of the hair rather than woven underneath, which creates a striking 3D effect that looks exceptionally thick and structured.
Why It Works for Meetings
This style creates a clean, architectural line from your forehead to the crown of your head. It conveys organization and attention to detail. By finishing the look in a sleek ponytail, you maintain the polished aesthetic of a classic pony, but the braid gives it a modern, textured edge that stands out in a room full of blowouts.
5. The Messy-Yet-Calculated French Braid

There is a fine line between “undone” and “unprofessional.” The trick with a messy French braid for the office is to start with a very clean, tight base. Once the braid is secure, you can strategically loosen a few pieces around the hairline to soften the look. This creates an air of relaxed confidence—you are put-together, but you aren’t trying too hard.
Tips for Success
Avoid pulling out large chunks of hair. Instead, focus on the tiny, wispy hairs around your temples and the nape of your neck. These are the pieces that naturally fall out during the day anyway, so loosening them upfront makes the style look intentional. It also helps prevent that “gym hair” vibe by keeping the bulk of the braid solid and uniform.
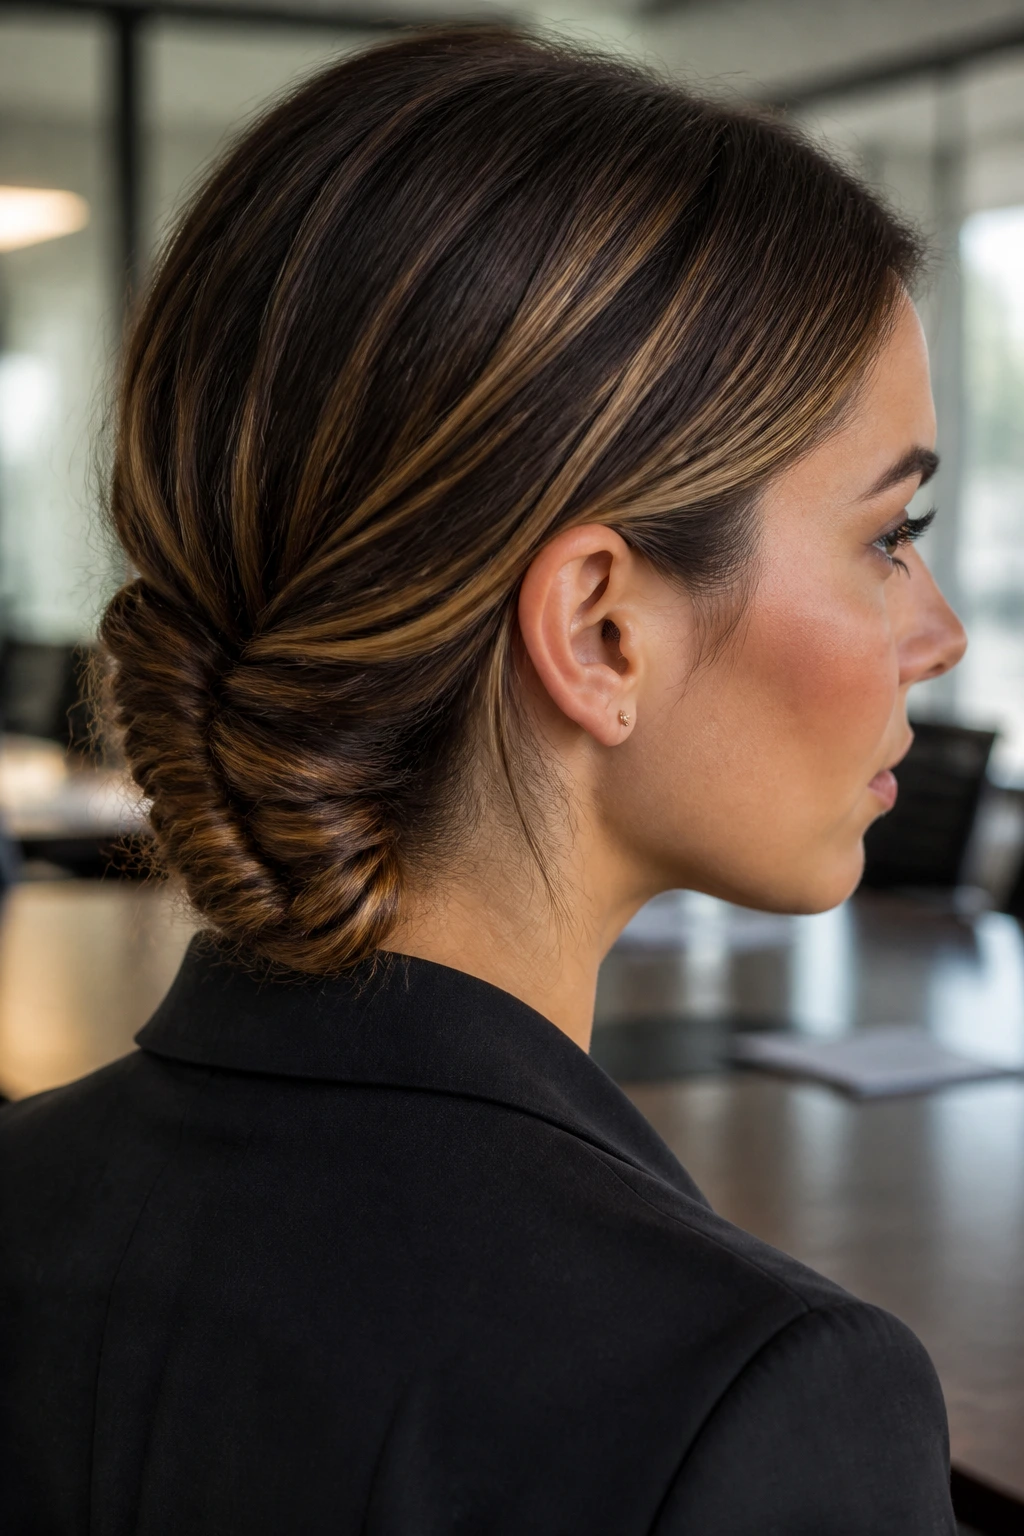
6. The Rope Braid Bun
Rope braids are essentially two strands twisted around each other, creating a unique, corded appearance. When you wrap this rope braid into a low bun, it looks like a complex piece of woven art. This is one of the most sophisticated styles you can wear, and it looks particularly striking if you have highlighted or multi-tonal hair, as the twist highlights the color variations.
The Construction Process
- Secure your hair in a sleek, low ponytail.
- Split the ponytail into two equal sections.
- Twist each section individually in the same direction.
- Cross the two sections over each other in the opposite direction.
- Wrap the rope around the base of your elastic and pin it firmly in place.
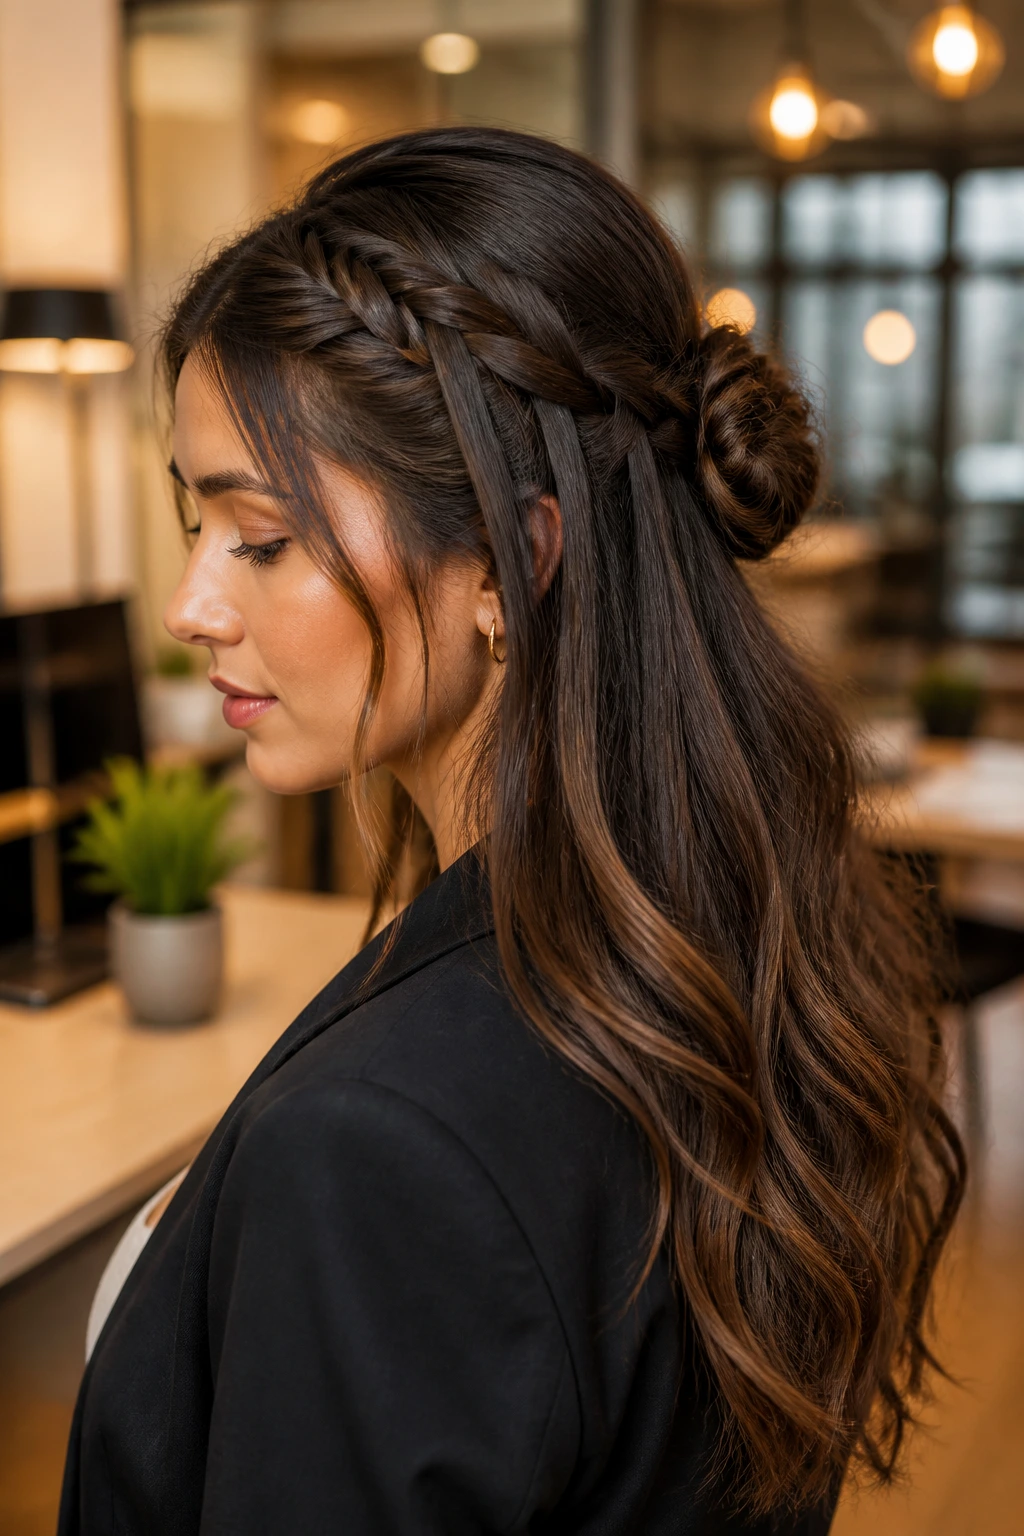
7. The Double-Braid Half-Up
Sometimes you don’t want your hair entirely pulled back. The double-braid half-up style gives you the comfort of having hair away from your face while allowing you to maintain the length and volume of your mane. By creating two medium-sized braids from the temple area and meeting them at the back, you create a sophisticated “headband” effect that is both practical and stylish.
Why It’s Great for Commuting
This style is gentle on the scalp. Because you aren’t pulling all your hair into one tight anchor, you avoid the tension headaches that often come with heavy, full-head styles. It holds up well even if you are wearing glasses or headphones, as the braids aren’t placed where hardware would cause interference.
8. The Inverted Waterfall Braid
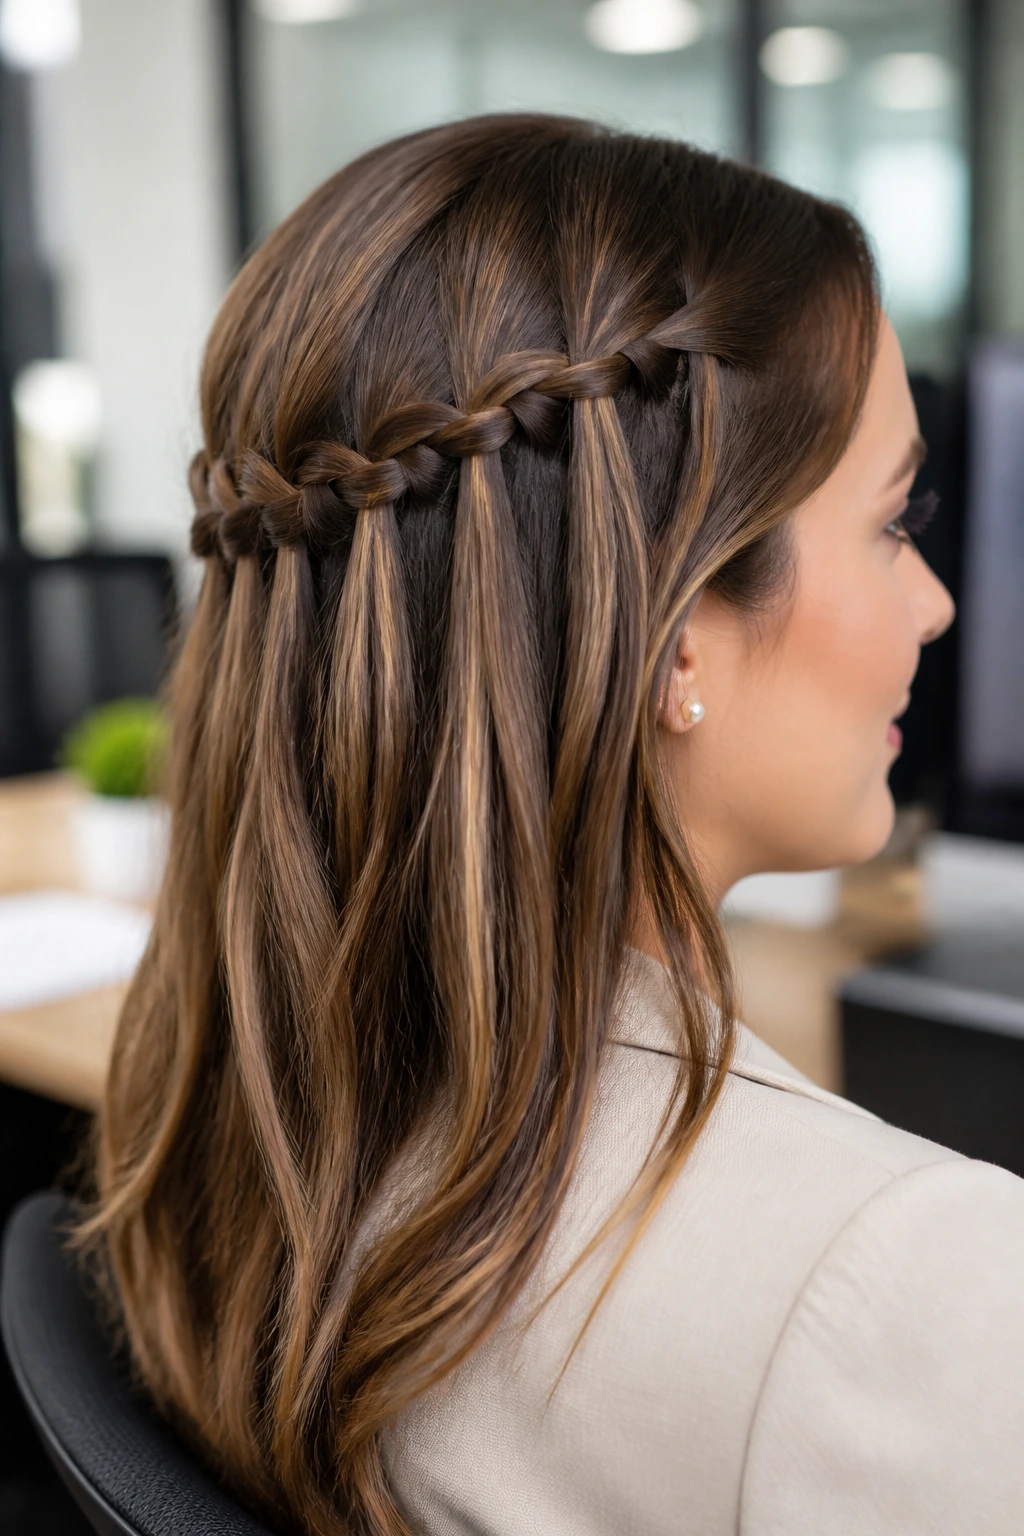
The waterfall braid is notoriously difficult to pull off for the office because it usually leaves loose strands everywhere. However, the inverted version is much more secure. By incorporating the loose strands into a secondary braid underneath, you create a look that is visually interesting but entirely contained. It is a subtle way to show off technical skill without looking like you spent three hours getting ready.
Stylist Notes
The inverted waterfall is all about control. You are essentially creating a braid that travels horizontally across the back of the head. Make sure to use bobby pins that match your hair color perfectly. The goal is to hide the mechanics of the style so that all people see is a beautiful, cascading woven section across the back of your head.
9. The Wrapped-Around Braid Accent
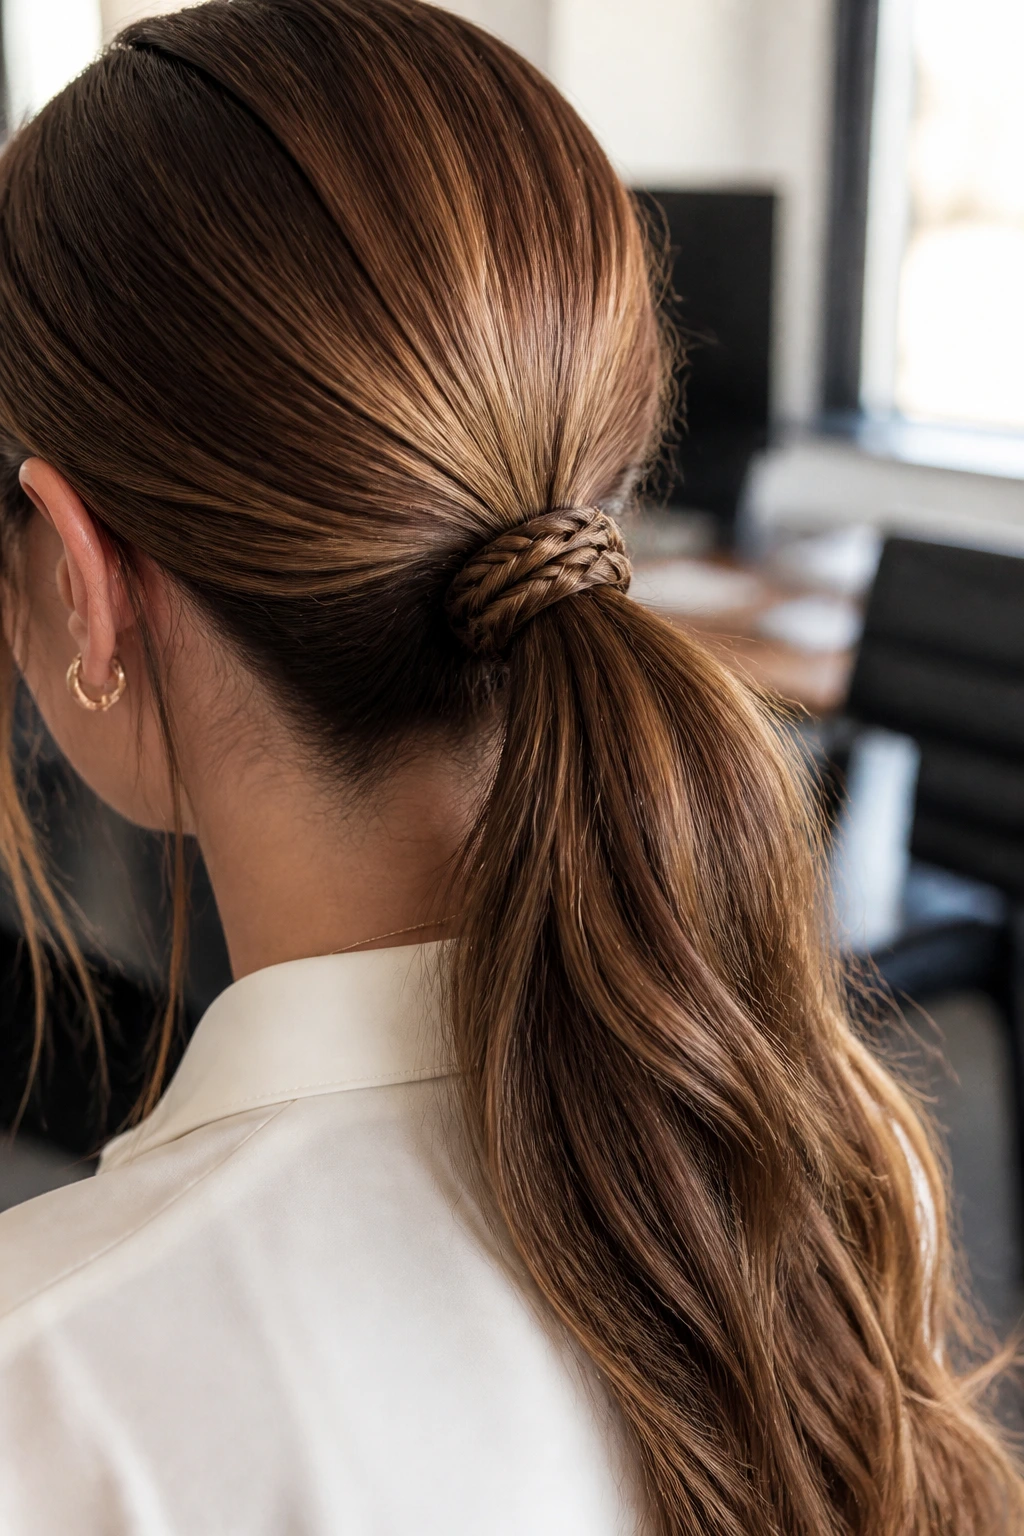
If you have a preferred ponytail, you can instantly upgrade it by braiding a small section of your hair and wrapping it around the base of the elastic. This is the simplest way to take a basic look and make it professional. It hides the elastic and adds a small, thoughtful detail that elevates the entire silhouette.
Refining the Detail
Don’t use the very top layer of your hair for the wrap; take the section from the underside of the ponytail. This ensures that even if the braid loosens, the ponytail itself stays perfectly positioned and sleek. It is a small detail, but in a professional environment, people notice the effort put into the “finishing touches.”
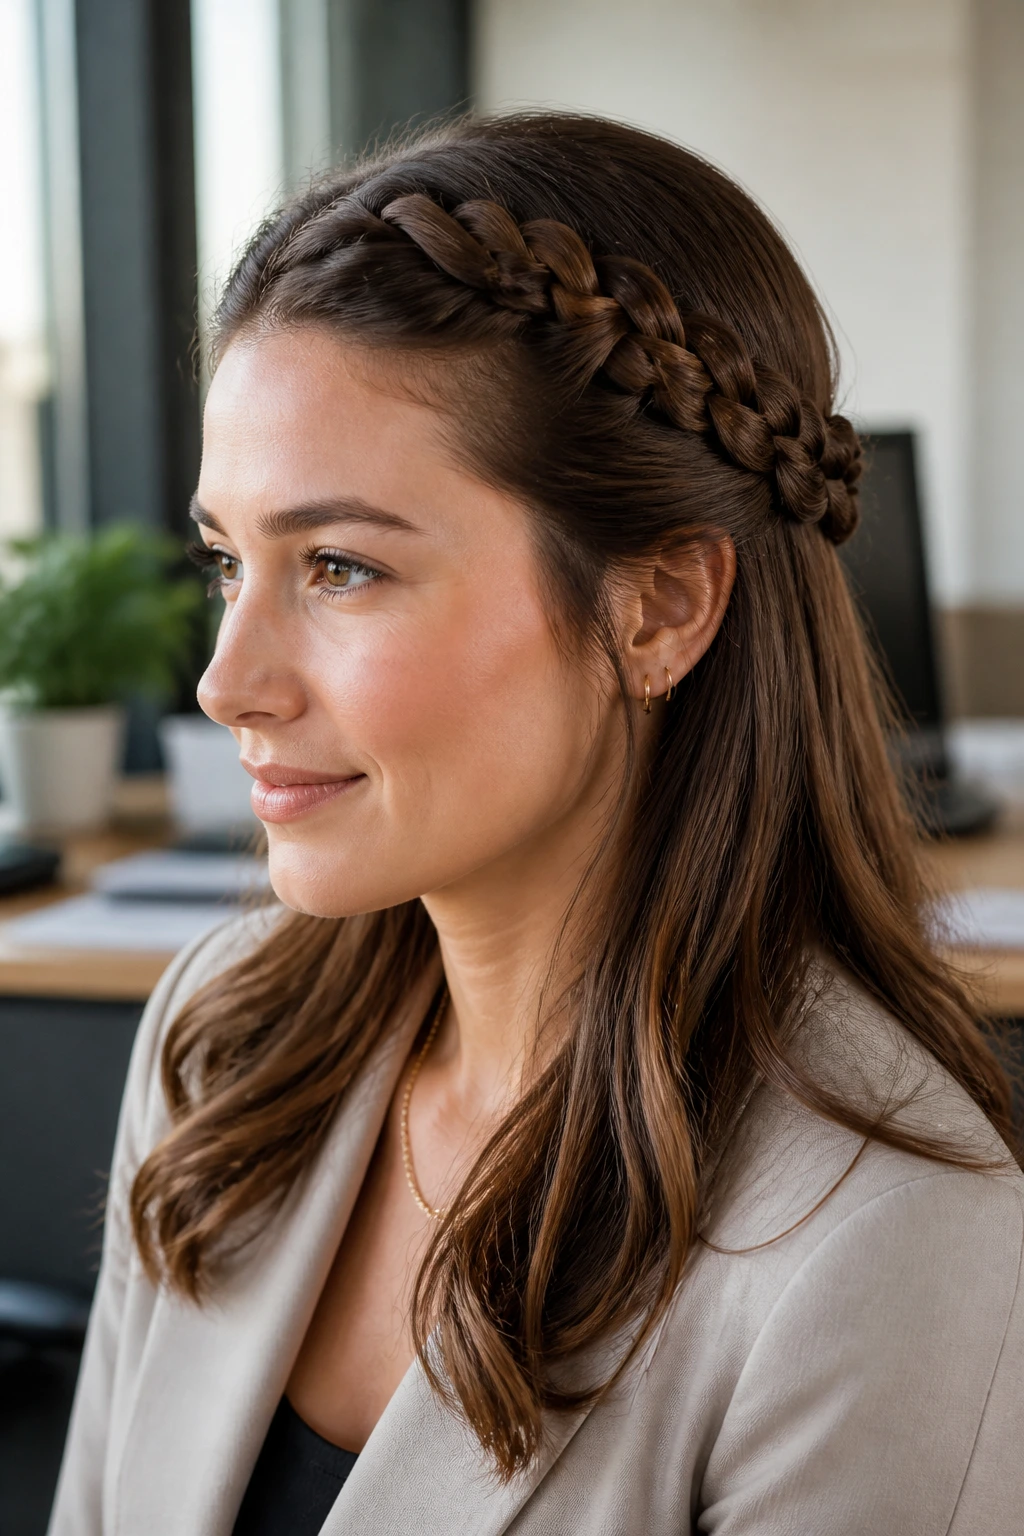
10. The Tight Lace Braid Headband

A lace braid is a French braid where you only add hair to one side. This is perfect for a headband effect that stays tight against the scalp. It creates a clean perimeter around the face, making it look very deliberate and “done.” It’s an excellent way to manage bangs that are at that awkward growing-out stage.
Management Tactics
If your hair is very slippery, apply a bit of texturizing mousse while it’s damp, then blow-dry it before starting the braid. This gives the hair enough body that the lace braid won’t slip backward during the day. A well-placed headband braid stays put for hours, meaning no mid-day mirror checks are required.
11. The Triple-Threat Plait
This involves three separate braids—one at each temple and one in the center—all converging into a single, thick, three-strand braid at the nape of the neck. It sounds complicated, but it is just a matter of breaking the hair into manageable sections. The result is a heavy, thick braid that feels substantial and very high-fashion.
Visual Appeal
The beauty of the triple-threat is the texture. You have multiple directional lines meeting at one point, which creates a visually complex design. For an office setting, keep the base braids tight and the final, combined braid thick and uniform. This style pairs beautifully with collared shirts or high-neck sweaters, as it clears the neckline entirely.
12. The Side-Swept Viking Braid
Don’t let the name intimidate you. The Viking braid, when toned down, is simply a combination of a small Dutch braid on the side and a larger, loose braid flowing into it. It’s rugged yet polished, and it manages to keep a large amount of hair off the face while leaving the rest of the hair down for a more approachable, soft aesthetic.
Finding the Balance
Make sure the smaller side braid is tight enough to serve as an anchor. If that side braid is too loose, the whole look will sag within an hour. Focus on the tension in the first two inches—those are the most important for longevity. Once the side braid is secured, the remaining hair can be styled with loose waves to complete the professional look.
13. The Minimalist Fishtail Accent
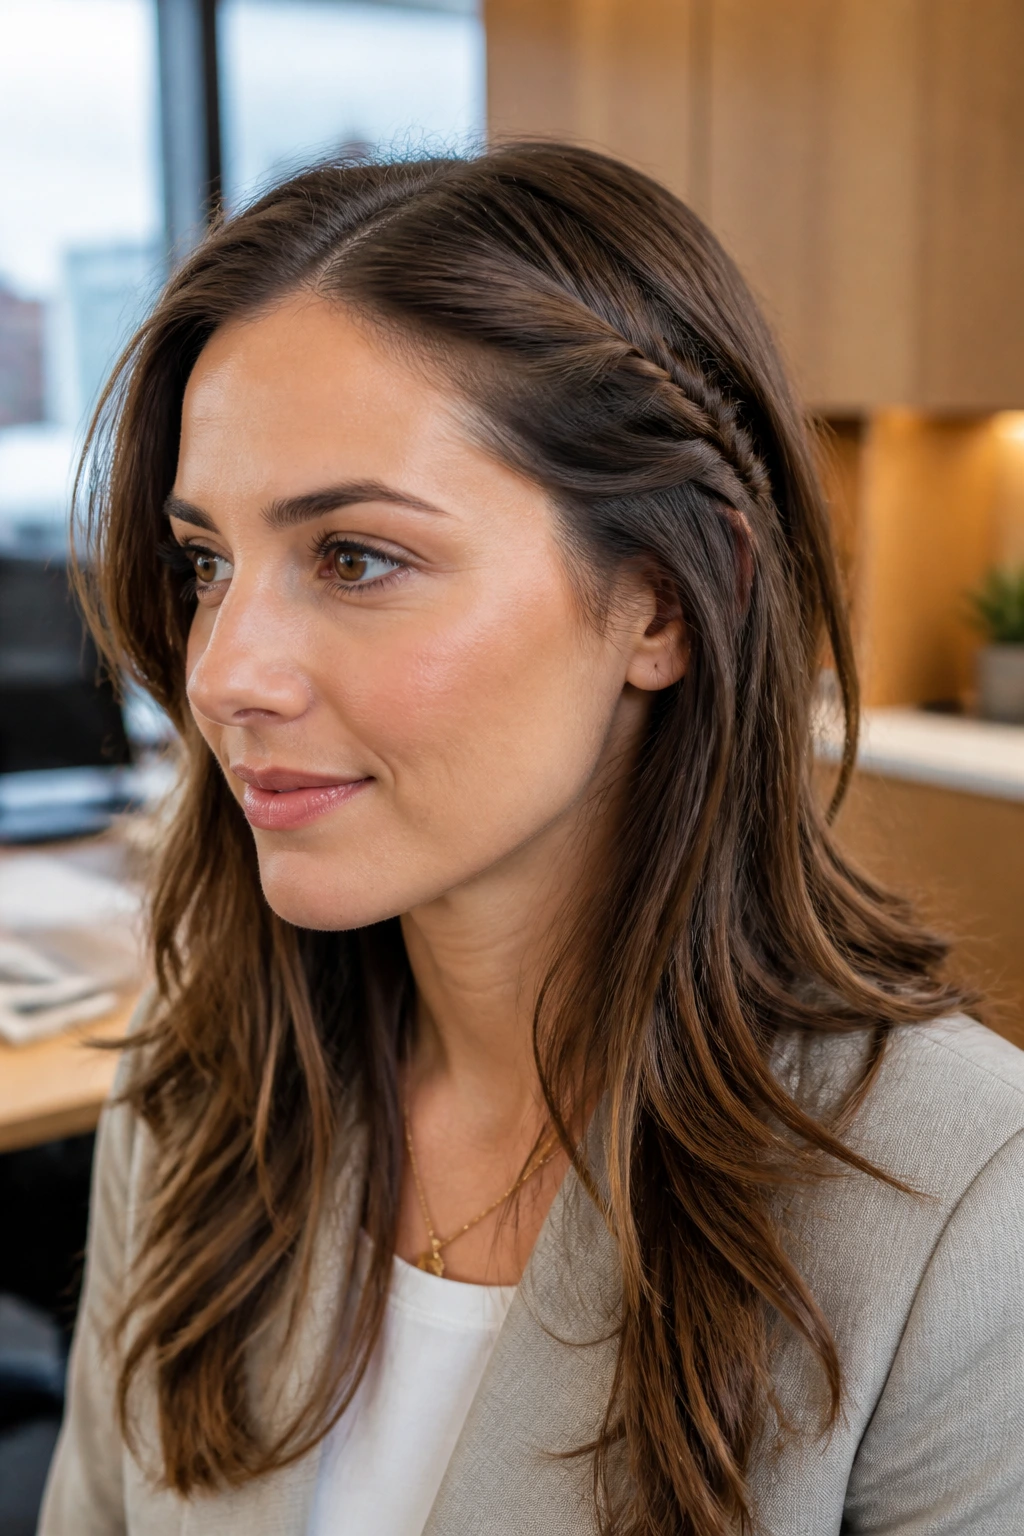
If you want to keep your hair loose but need it to stay out of your eyes, a minimalist fishtail accent is the answer. Braid just a small, one-inch section of hair from your part and pin it behind your ear. It’s a subtle nod to the braid trend that is sophisticated, understated, and doesn’t require a full-head style commitment.
Why This Wins
It’s the least intrusive style you can choose. It doesn’t pull, it doesn’t bunch, and it doesn’t leave you with crimped hair at the end of the day if you decide to take it down. It is ideal for creative offices where a full, thick braid might feel too formal but you still want to exhibit a bit of personal style.
14. The Stacked Dutch Braid
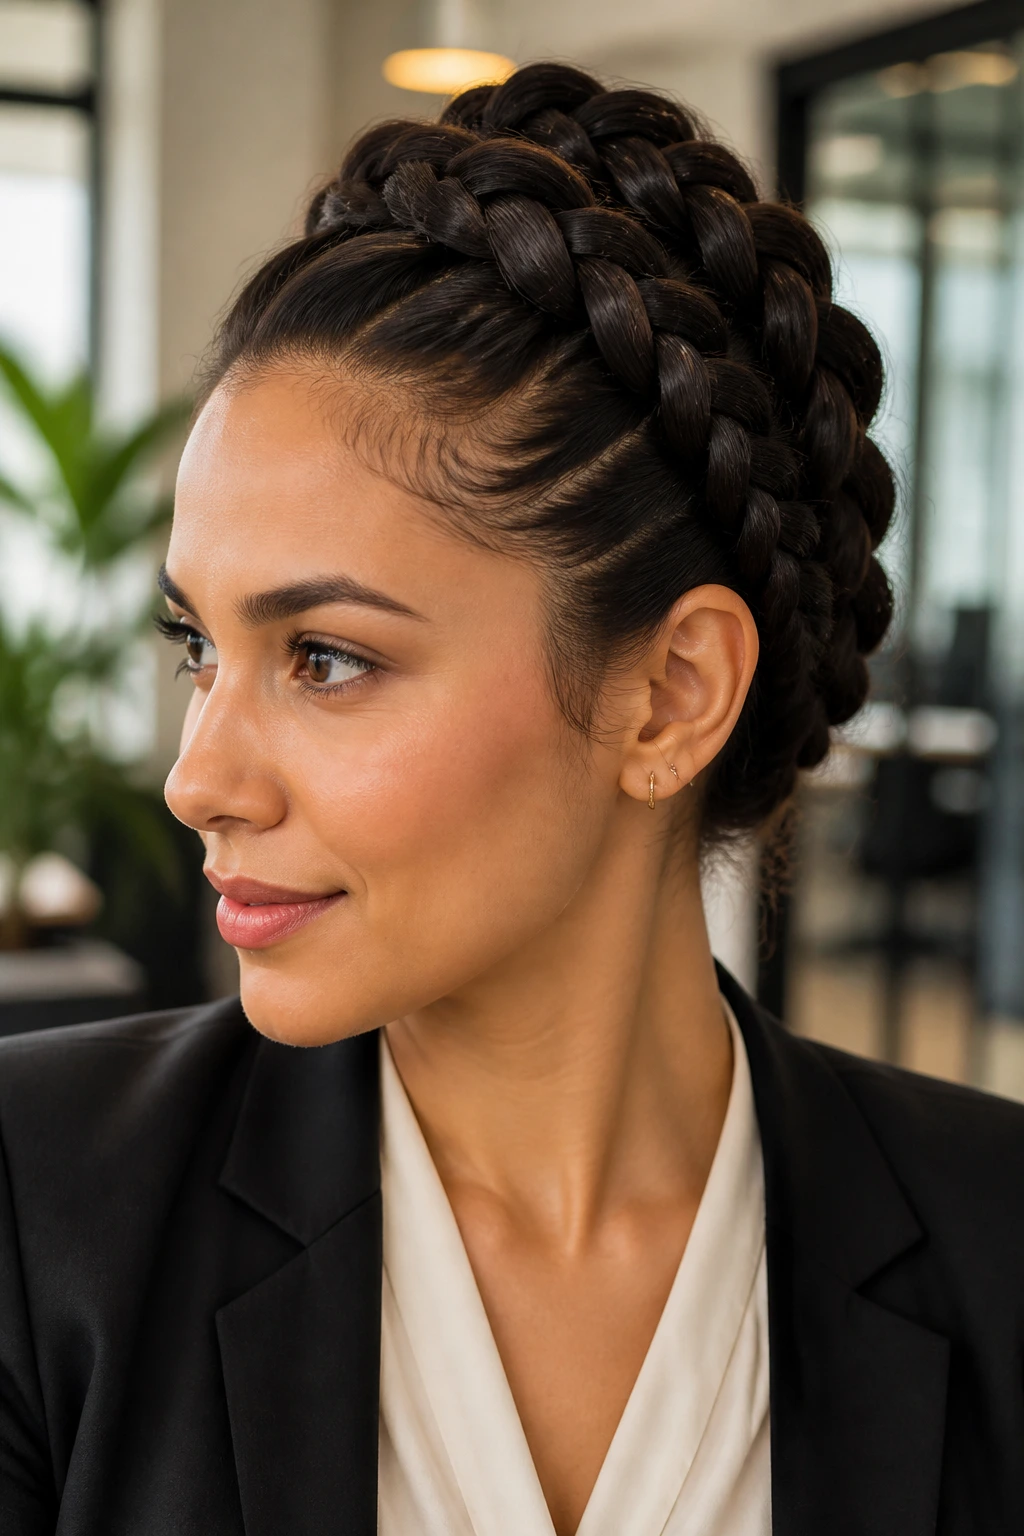
This technique involves braiding one Dutch braid, then “stacking” another smaller braid on top of it. It creates a dense, elevated look that is thick and very structured. Because of the sheer amount of hair involved in the weave, this style is essentially immovable once you pin it into place.
The Power of Technique
This is a more advanced style, but it pays off in durability. The stacked effect adds physical height to the braid, making it look much thicker than a standard braid. It’s a great way to handle heavy, thick hair that usually refuses to stay in a simple bun. The braids act as a cage for the rest of your hair, keeping everything secure and in check.
15. The Braided Chignon
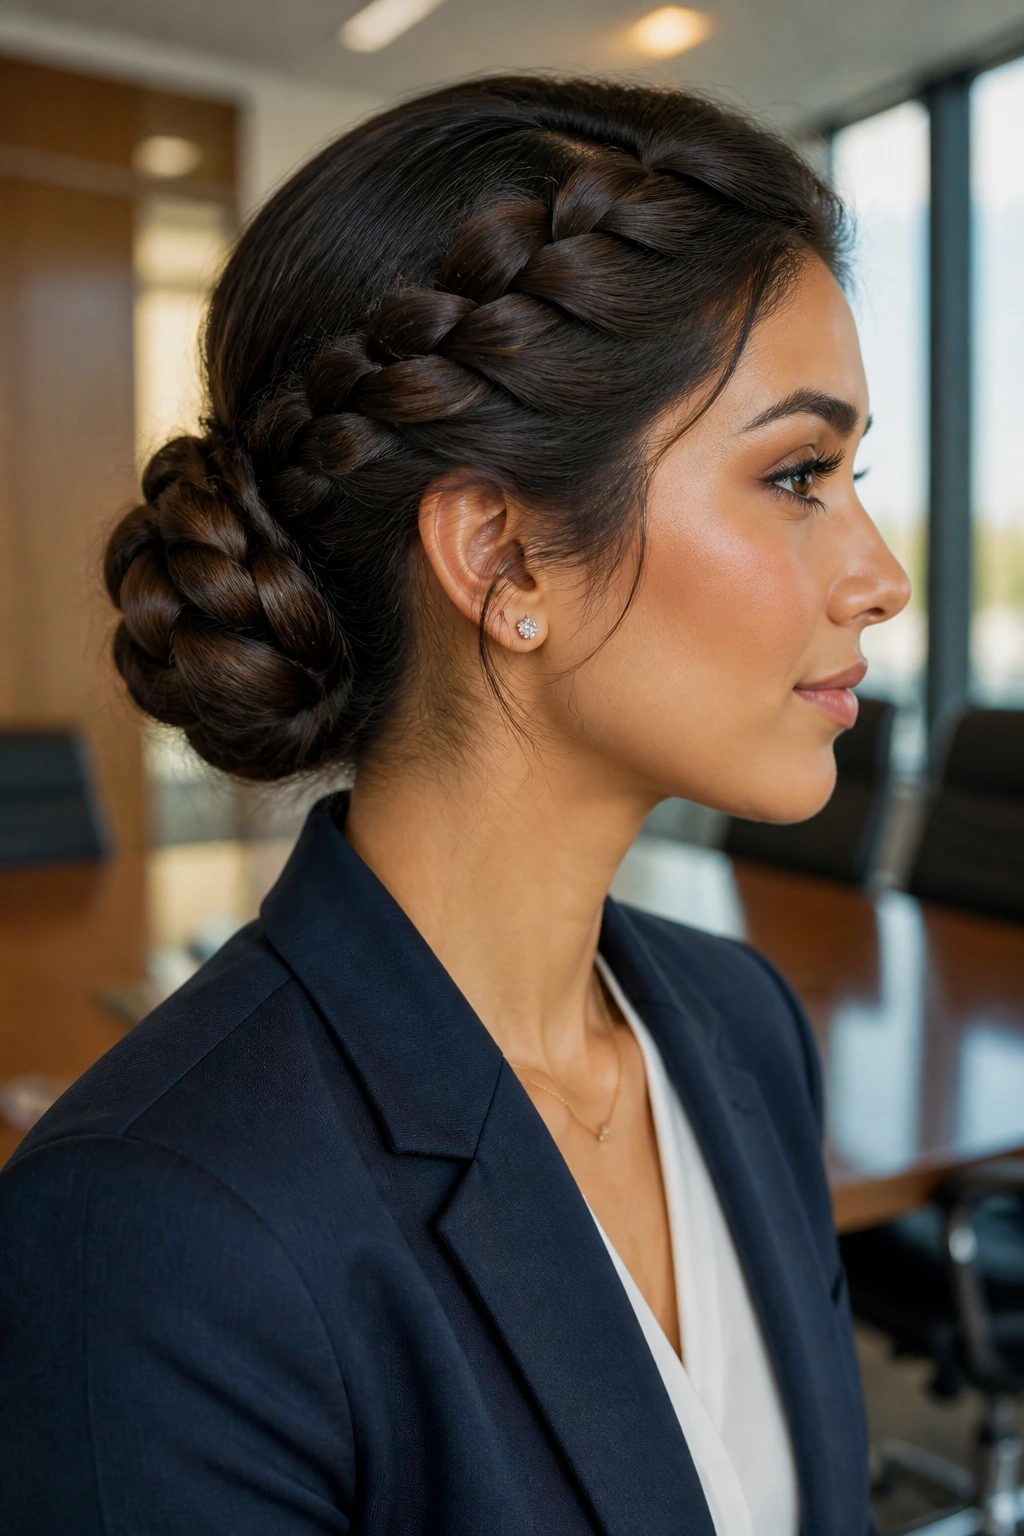
A chignon is a classic low bun, and by braiding the hair before pinning it into the bun, you add a layer of sophistication. It feels like you’ve put a lot of work into your appearance, even if the braid is just a simple three-strand variety. It is polished enough for a formal presentation but soft enough for a casual Friday.
Finishing the Look
Use a matte-finish hairspray rather than a shiny one. A shiny finish can sometimes make braided buns look synthetic or overly “prom-like.” A matte, medium-hold spray keeps the braid looking like natural, healthy hair while providing the structural integrity needed to survive the workday.
16. The Pull-Through “Faux” Braid
If you struggle with traditional braiding, the pull-through technique is your best friend. It’s actually a series of ponytails pulled through one another to create the illusion of a thick, complex braid. It looks much thicker than a real braid because the hair is doubled over itself. It is a fantastic office hack for those who want a dramatic look without the wrist fatigue of actual braiding.
The Advantage of Pull-Throughs
- No complex hand-coordination required; it’s all about elastics.
- You can make the loops as big as you want, guaranteeing maximum volume.
- It’s very easy to fix; if a section looks loose, you can just adjust the elastic.
17. The Twisted Top-Knot Braid
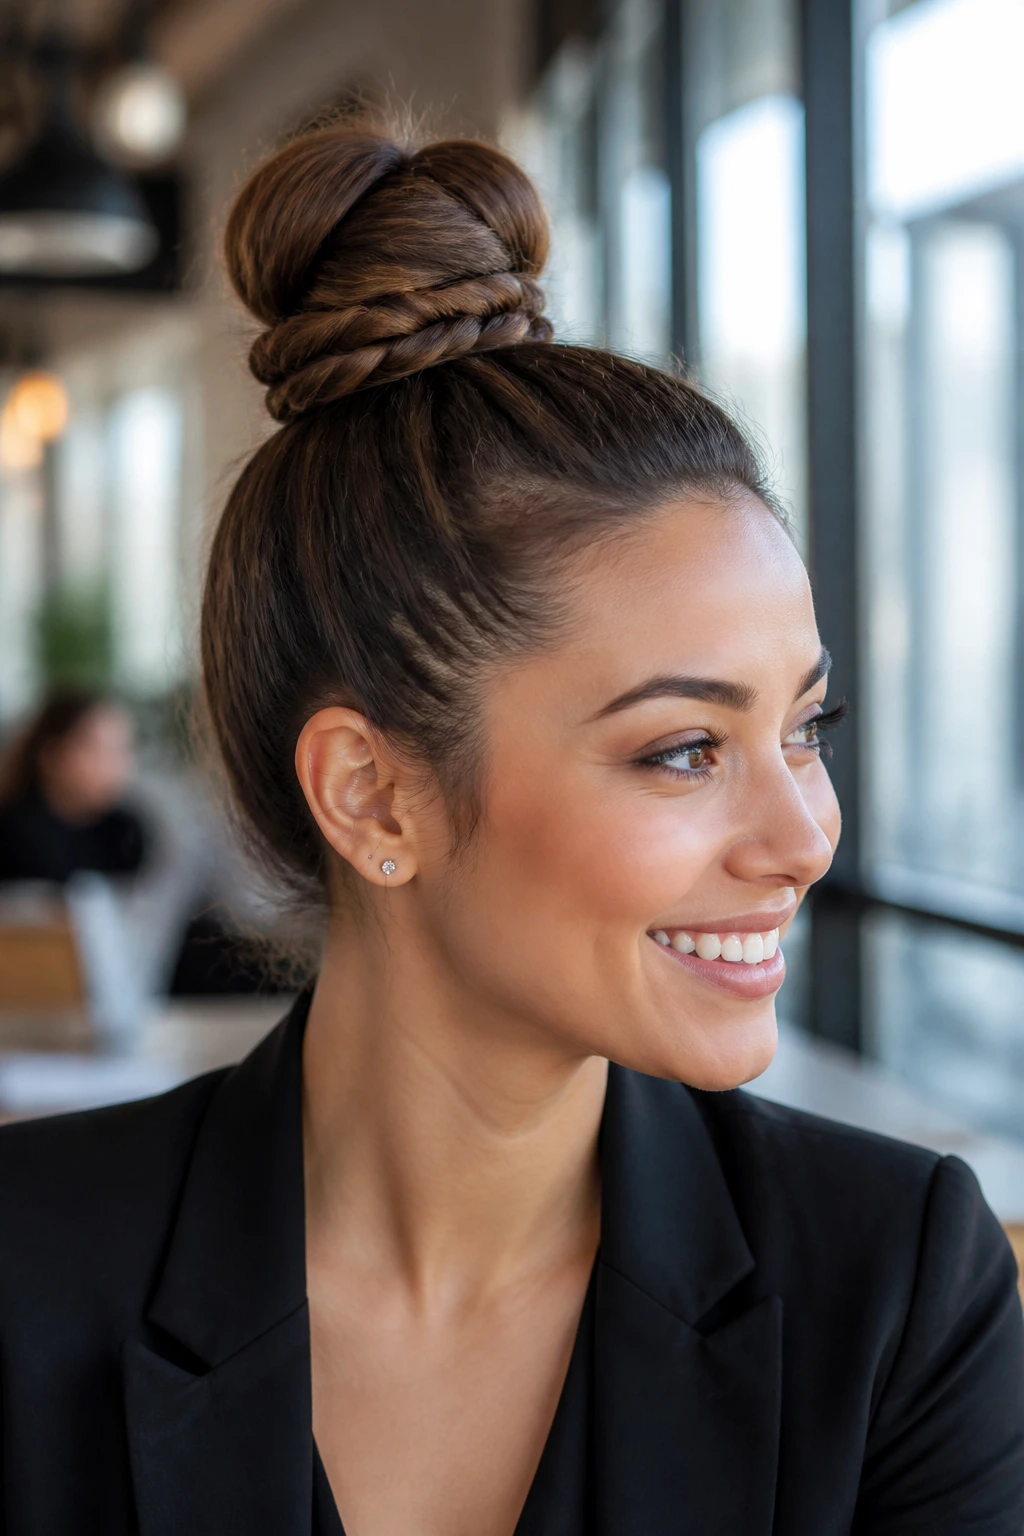
Take a high top-knot and incorporate a braid into the base. This is a very youthful, energetic style that keeps all hair off the neck. By braiding the hair before twisting it into the bun, you add visual interest to what is usually a very plain style. It’s perfect for summer office days or fast-paced work environments where you need to be hands-free.
Achieving Professionalism
Ensure the bun is centered perfectly on the crown of your head. A top-knot that sits too far forward or backward can look messy. Use two or three large pins to anchor the weight of the bun, ensuring it doesn’t droop. The braid at the base acts as a decorative element that ties the whole look together.
18. The Waterfall Half-Up with a Twist
This is a combination of a waterfall braid that feeds into a twisted bun at the back. It’s complex, beautiful, and shows a high level of attention to detail. This style is best for long hair that has enough length to allow the waterfall effect to really show off the transition from braid to bun.
The Final Touch
The secret here is the transition point. Where the waterfall braid ends, ensure it’s tucked neatly into the base of the twisted bun so that the join is invisible. This clean transition is what makes the style look professional rather than amateur. It’s a style that commands respect because it clearly demonstrates a high level of effort and skill.
Final Thoughts

The key to mastering these thick office braids is realizing that they are not just about hair—they are about setting a tone. When you choose a style that looks intentional, you carry yourself with a different kind of poise. The effort you put into your morning routine serves as a reminder that you are prepared for the challenges of the day, down to the smallest detail.
Do not be discouraged if your first attempt feels a bit loose or if you have to re-do a section. Braiding is a tactile skill, and like any other professional ability, it improves with repetition. Start with the simpler side-plaits and gradually work your way toward the more architectural stacked styles. Your workspace is a place for focus, but there is no reason your hair can’t be your signature accessory while you build your career.