Braids for medium-length hair are often misunderstood as a limitation, but they are actually a sweet spot in styling. If your hair hits somewhere between your collarbone and mid-back, you possess enough length to experiment with complex weaves, yet you are free from the sheer volume and weight that can make styling long hair a literal heavy lift. This length is the perfect canvas. It is manageable enough for a quick morning refresh but substantial enough to hold a variety of intricate patterns that would otherwise slip out of shorter strands.
When you are working with medium-length hair, the primary challenge is rarely the lack of length—it is usually the tapering ends or the tendency for layers to poke out of your sections. Mastering the art of the braid at this length means learning how to control those stray ends while maintaining a relaxed, intentional aesthetic. Whether you are aiming for a tight, protective style to get through a busy week or a soft, romantic crown for a specific occasion, the following list covers the most versatile, reliable, and visually striking options available for your specific hair length.
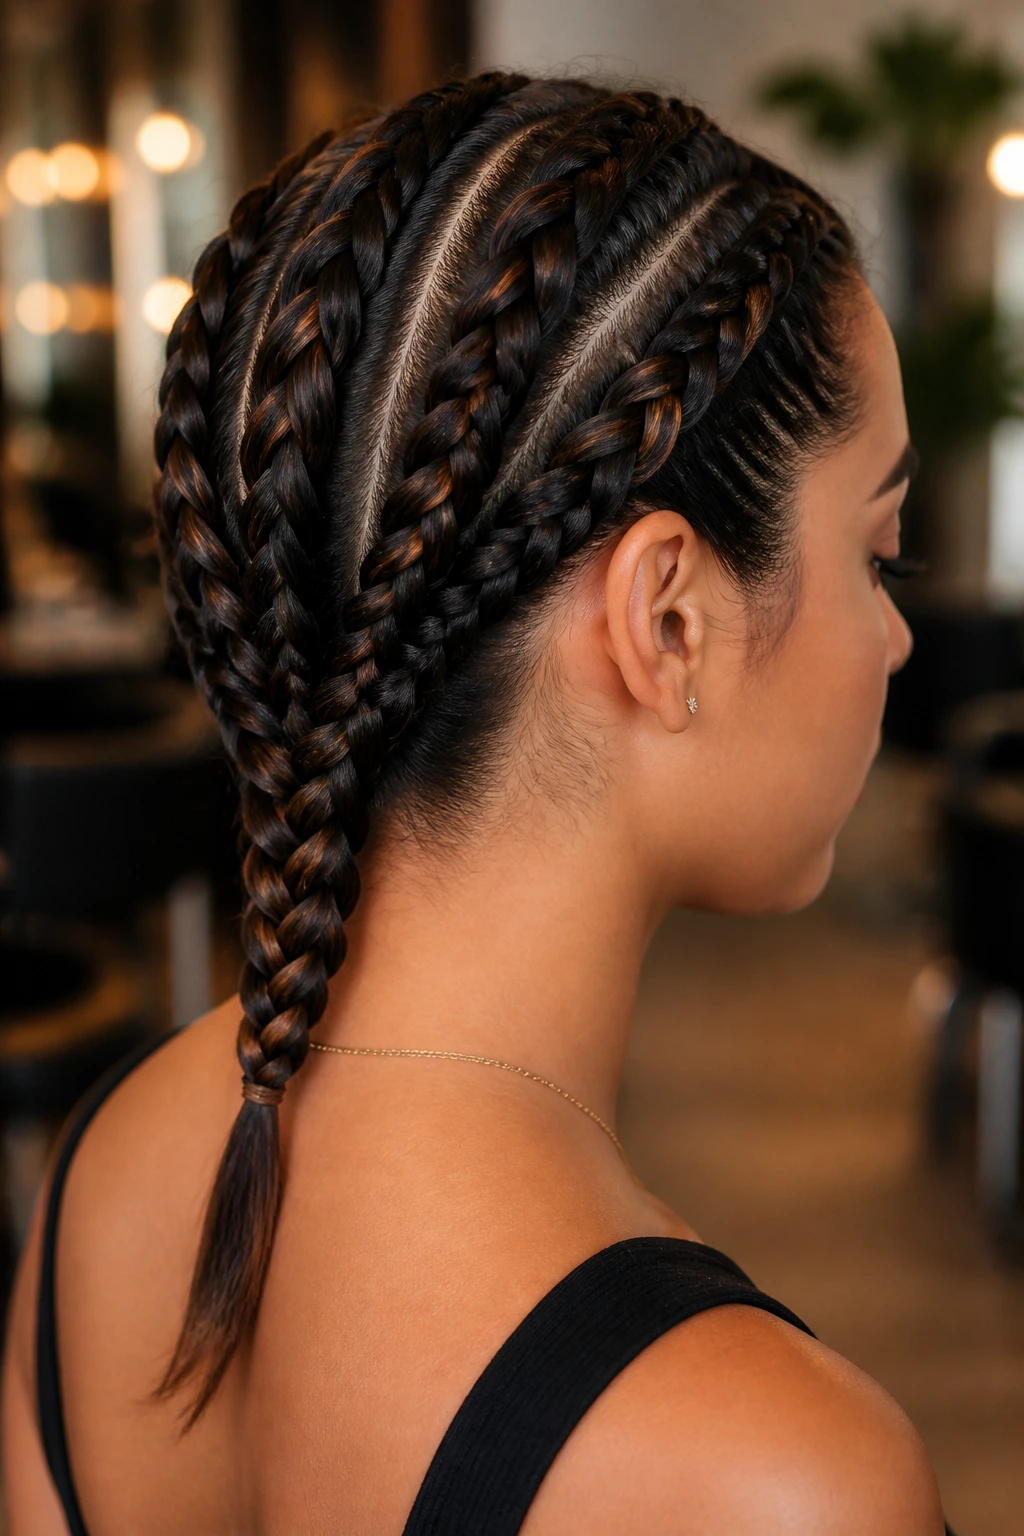
1. The Classic French Braid
The French braid is the foundational skill of all braided hairstyles, and it is arguably the most reliable look for medium hair. By weaving in new sections as you move down the scalp, you keep shorter layers secure and uniform. The result is a clean, polished look that stays put through commutes, wind, and movement.
Why It Works for Medium Lengths
Medium hair provides just enough tension to keep the braid tight without the ends becoming too thin or wispy at the bottom. Because the hair is not excessively long, you do not have to worry about the braid tangling upon itself as you reach the nape of your neck.
How to Achieve the Look
- Start by gathering a triangular section of hair at the crown, dividing it into three equal strands.
- Cross the right strand over the center, then the left over the new center.
- As you continue the pattern, incorporate a small section of loose hair into each strand before crossing it over.
- Secure the end with a small, clear elastic to prevent unraveling.
- Gently pull on the outer loops of the braid to create a fuller, lived-in appearance that looks less severe.
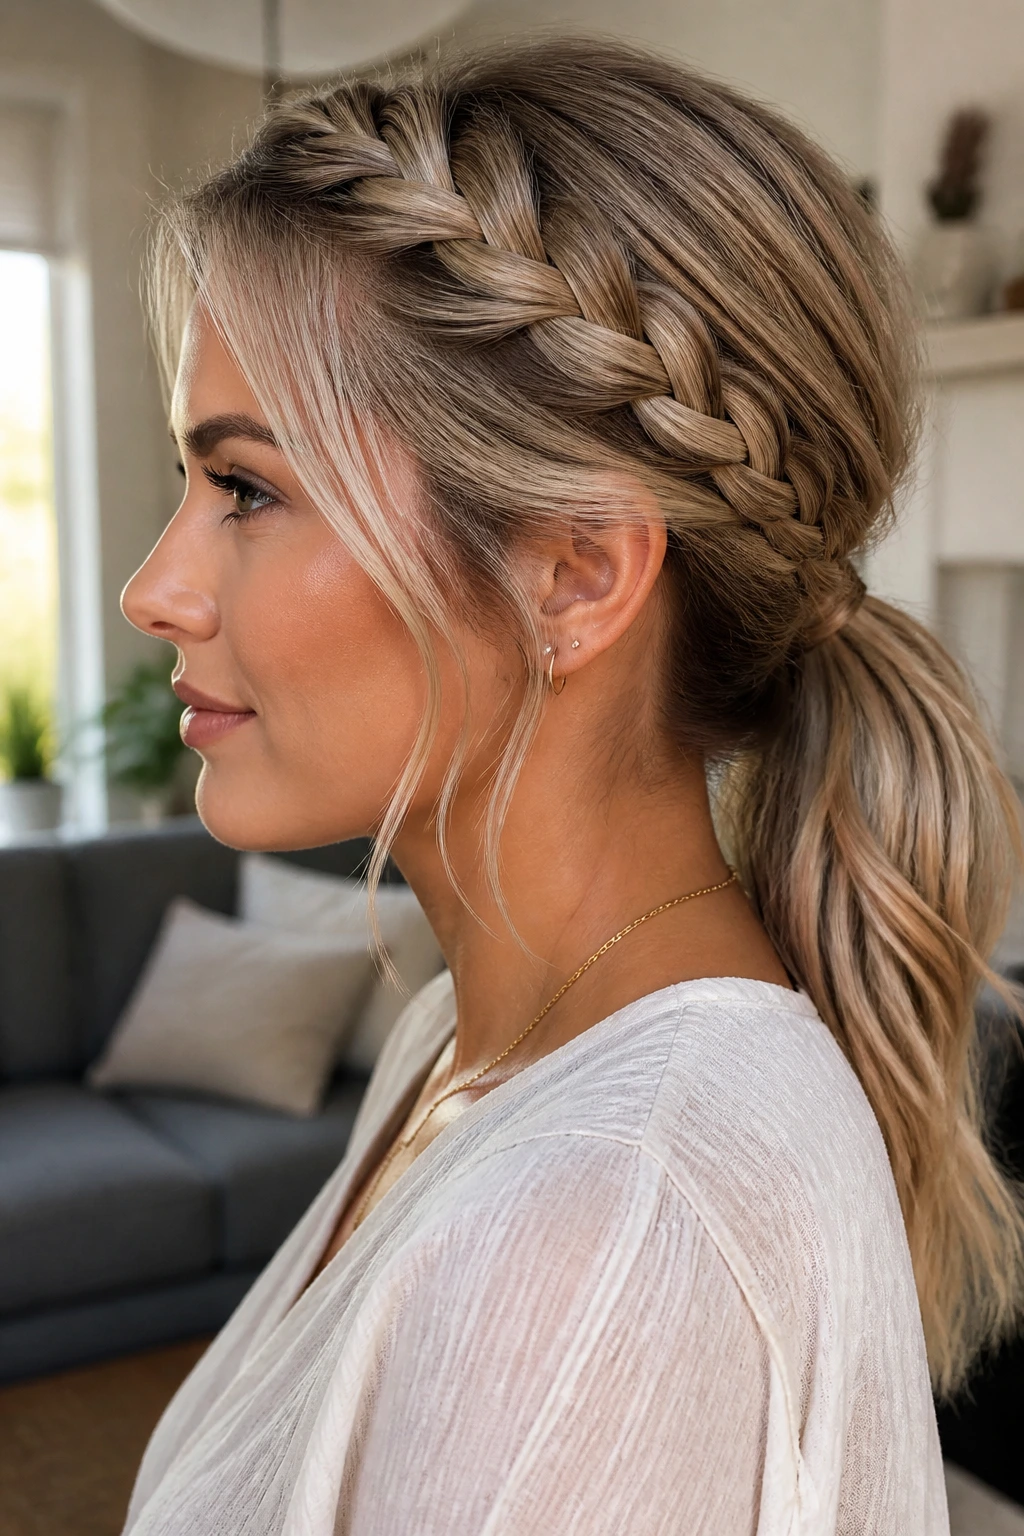
2. The Dutch Side Braid
If you prefer a braid that sits on top of the hair rather than blending into it, the Dutch braid is your go-to. Often called an “inverted” or “inside-out” braid, it creates a three-dimensional effect that adds volume, making it an excellent choice for those with finer hair textures.
The Mechanics of the Dutch Braid
Instead of crossing strands over the center, you tuck them underneath. This simple reversal changes the entire silhouette of the hairstyle. The braid appears to pop off the head, providing a structural contrast to the rest of your hair.
Styling Tips for Maximum Impact
- Use a light texturizing spray before you begin to give your hair extra grip.
- Focus on keeping your tension consistent; if you pull too hard, the braid will lay flat against the scalp.
- For a night-out variation, pull the braid apart significantly to create a “pancake” effect, which adds width and dramatic flair to the final look.
3. The Crown Braid
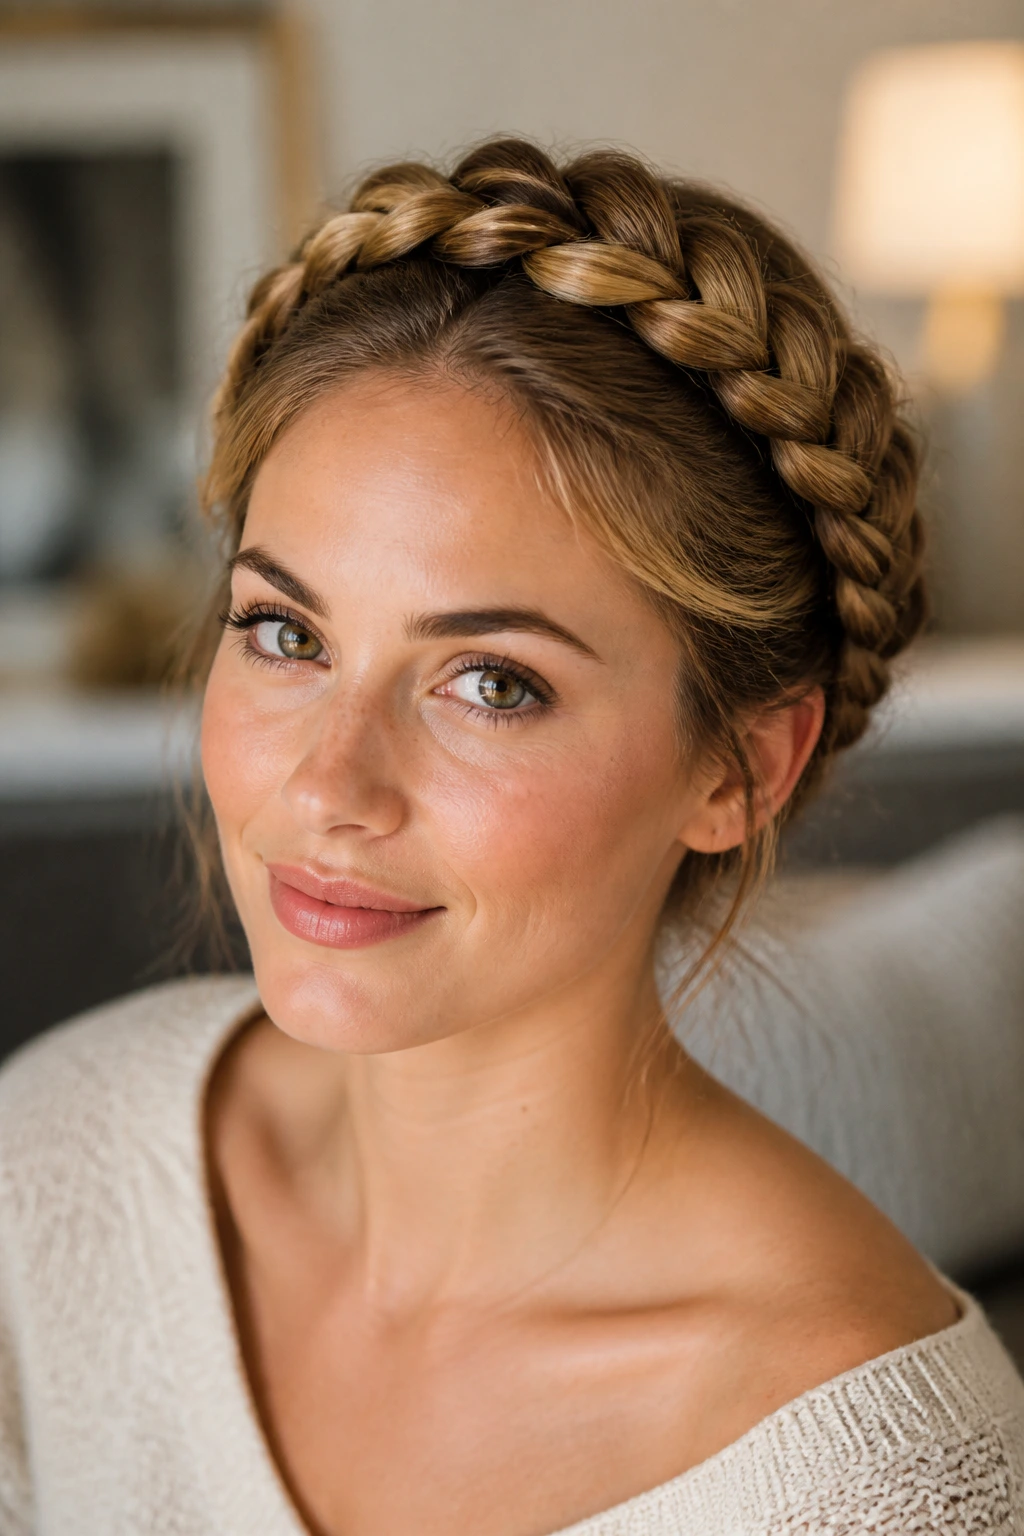
Crown braids are the ultimate solution for keeping hair off your face during warmer months or high-activity days. While they look incredibly complex, they are essentially two pigtail braids pinned together at the top, creating a halo effect.
Essential Tools and Techniques
You will need a stash of bobby pins that match your hair color. The secret to a long-lasting crown braid is not the braiding itself, but the securing process. Make sure to anchor the ends of your braids behind your ears, tucked neatly under the start of the opposite braid.
Best Occasions for This Style
- Daytime events where you need a style that stays pristine for hours.
- Second-day hair, as the natural oils provide the necessary grip for the braids to stay locked in place.
- Formal settings when paired with delicate hair accessories like gold pins or small floral accents.
4. Double Fishtail Pigtails

Fishtail braids have a reputation for being time-consuming, but when done in pigtails on medium-length hair, the process is quite manageable. The intricate, herringbone-like pattern of a fishtail braid stands out beautifully against the backdrop of shoulder-length locks.
Why Medium Hair Excels Here
Longer hair can make a fishtail braid look monotonous or overly heavy. On medium-length hair, the braid stops at a point that looks proportional to your shoulders, creating a youthful and balanced aesthetic.
Step-by-Step Execution
- Divide your hair into two equal sections down the middle.
- Take a tiny strand from the outer edge of the right section and cross it over to the left side.
- Repeat the process with the left side, crossing a small strand to the right.
- Continue this tight weaving pattern until you reach the ends.
- Pro tip: Use your fingers to loosen the braid from the bottom up to ensure the weave is uniform and not too tight.
5. The Half-Up Waterfall Braid
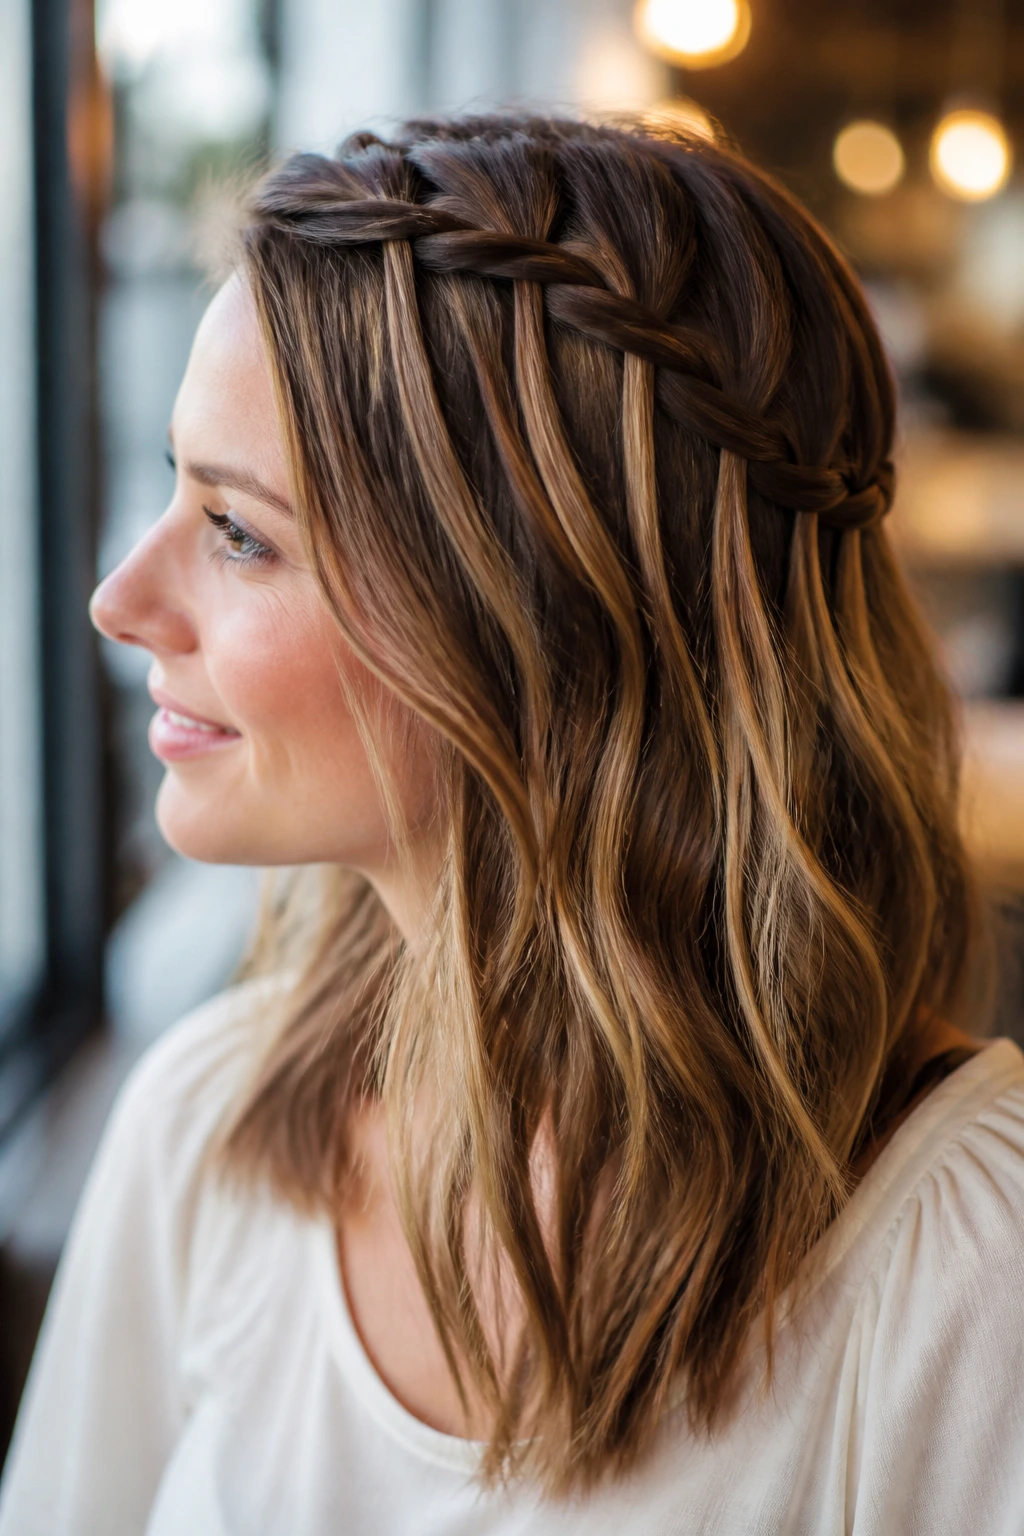
The waterfall braid is less about containment and more about decoration. It allows you to showcase the length of your hair while keeping the front sections neatly tucked away from your face. It is essentially a French braid where you drop one of the three strands after every cross, allowing it to “fall” like water.
Creating the Illusion
Because the strands are constantly being dropped and picked up, this style looks like a waterfall of hair draped across the back of your head. It is incredibly effective for medium lengths, where layers can otherwise look messy when left completely loose.
How to Style It
- Start a horizontal braid near your temple.
- After every crossing, drop the bottom strand and pick up a new piece of hair from the top to replace it.
- Work your way around to the back of your head and pin the braid securely under a section of your hair to hide the elastic.
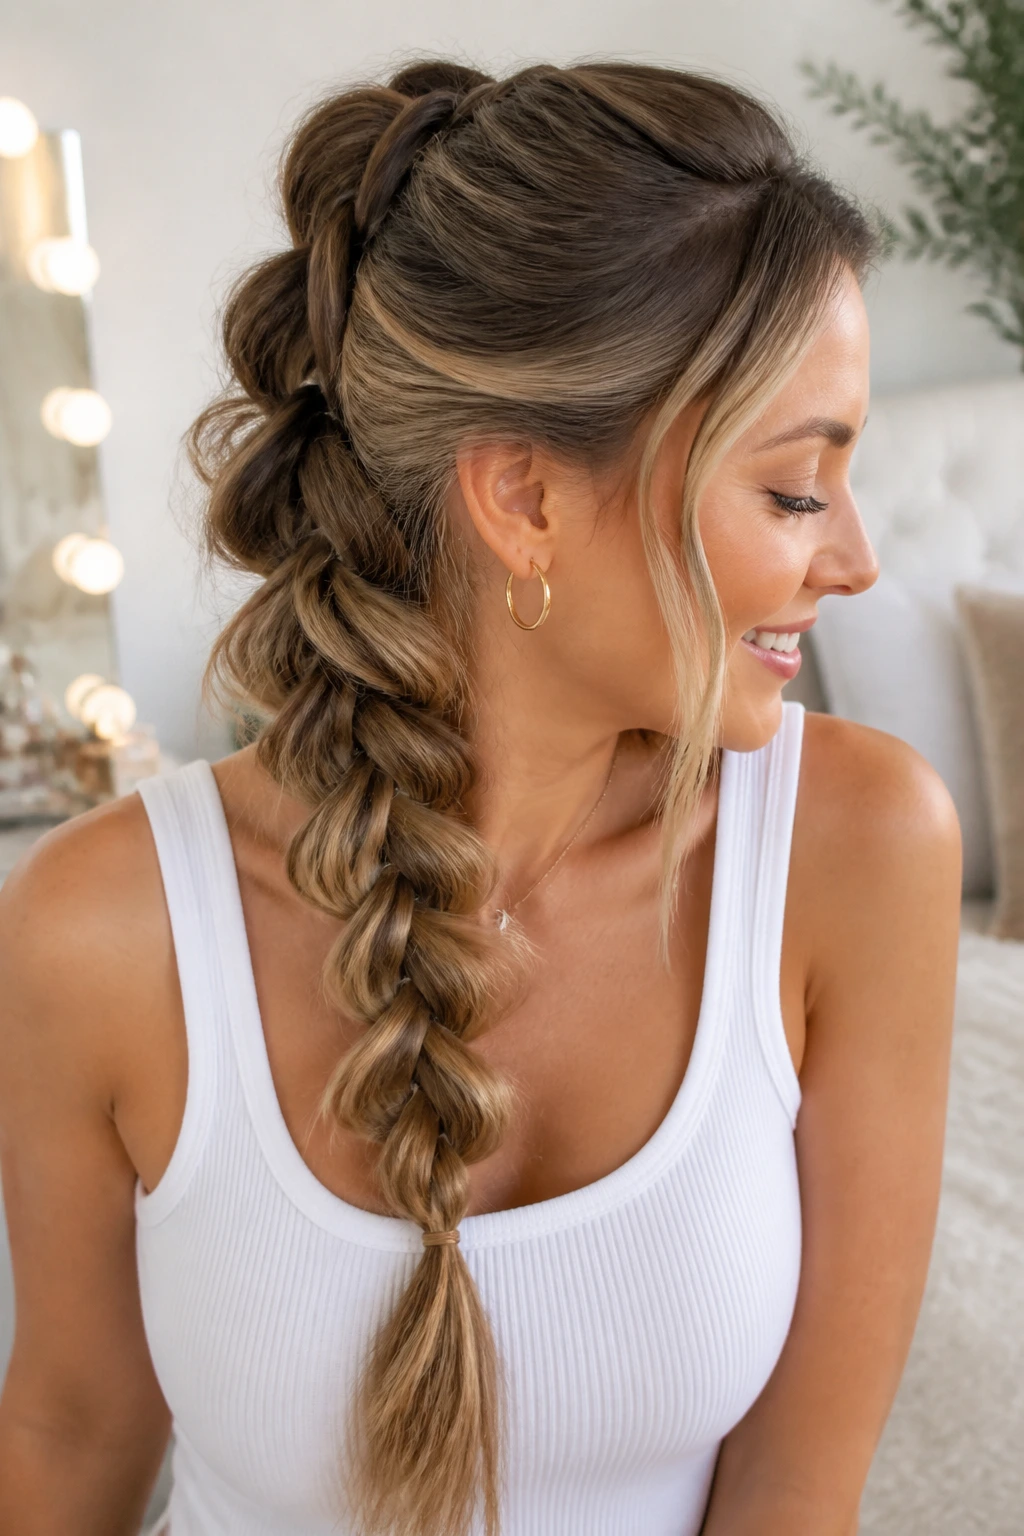
6. The Rope Twist Braid

Sometimes referred to as a “knotted” braid, the rope twist is a fantastic alternative for those who find traditional braiding techniques fiddly. It uses two strands instead of three, twisting them around each other to create a clean, modern spiral.
The Ease of Use
If you can twist two pieces of hair, you can master the rope braid. It provides a sleek, polished appearance that works well for office environments or more professional settings.
Maintaining the Twist
- Divide your hair into two sections.
- Twist each section tightly to the right.
- Cross the right section over the left, keeping the twists tight as you go.
- If the ends start to unravel, add a tiny bit of lightweight styling cream to your palms before you finish the final inches.
7. The Messy Boho Side Braid
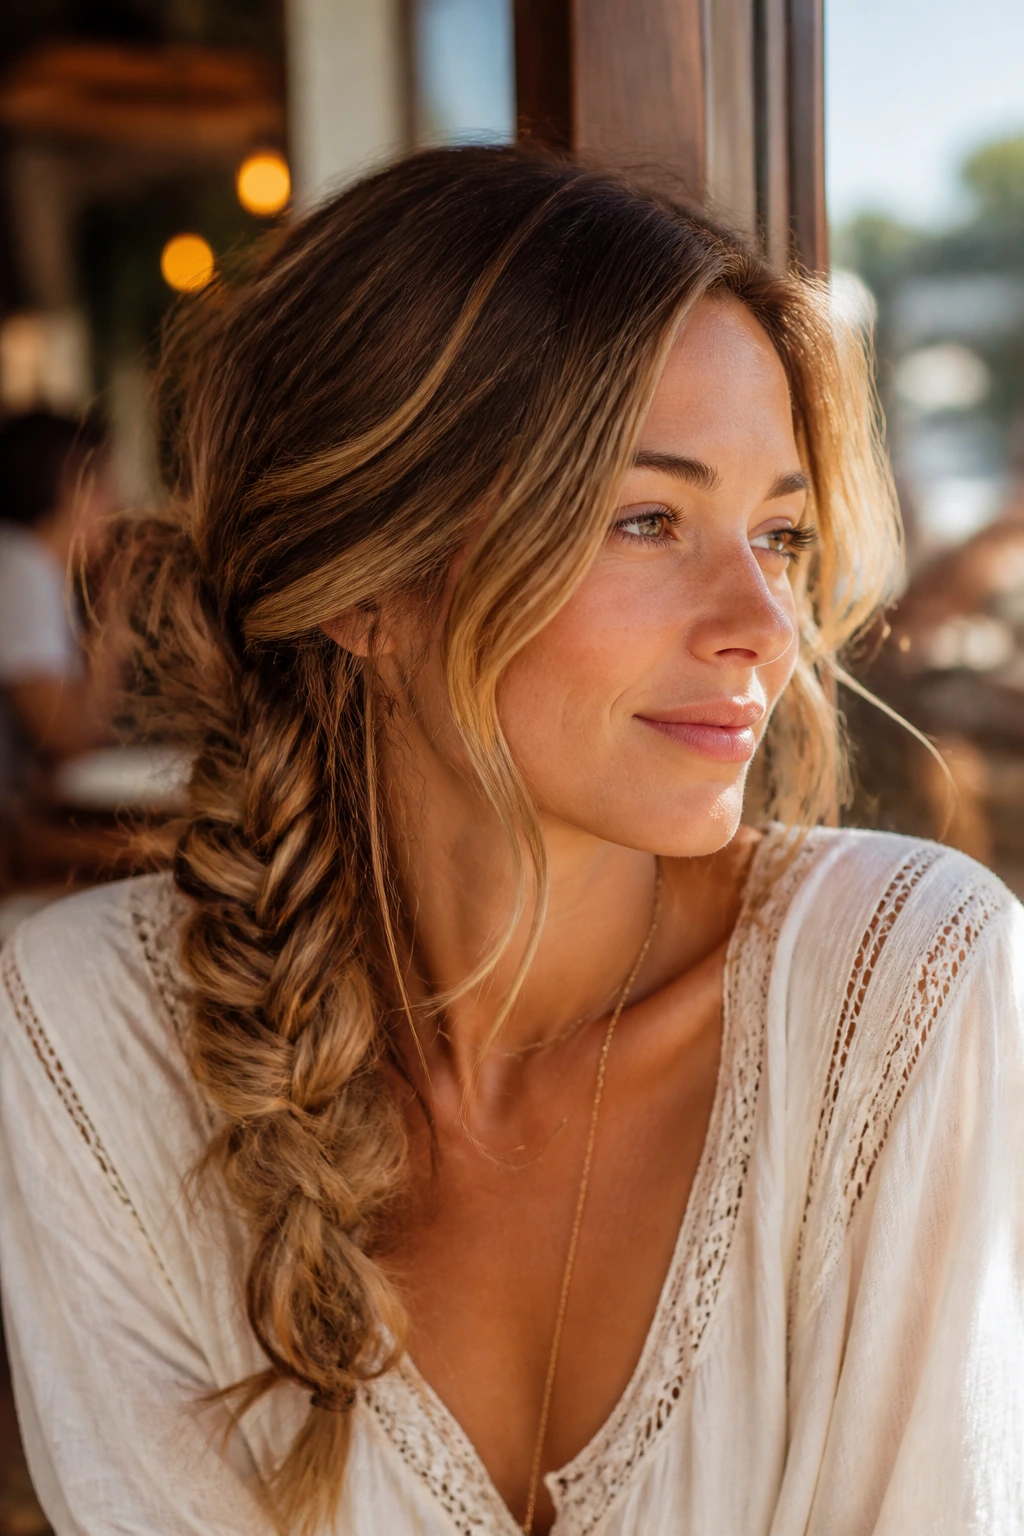
Boho braids are defined by their intentional imperfection. They look better the looser they get, which makes them very forgiving if your braiding skills are not yet perfected. This style is meant to look like you spent five minutes on it, even if it took slightly longer.
Embracing Texture
Start with wavy or curled hair to maximize the volume. The more texture your hair has, the easier it is to hide stray ends or layers that are common in medium-length cuts.
The “Pancaking” Technique
- Once the braid is finished and secured with an elastic, grab the edges of each loop.
- Pull them outward gently to stretch the braid to nearly double its width.
- This creates a soft, ethereal vibe that is perfect for casual weekend outings or brunch.
8. The Accent Braid into a Low Pony
This style blends a functional ponytail with a decorative braid. By incorporating a small braid into the front of your hairline, you elevate a standard low ponytail into something much more thoughtful.
Why This Style Works
It is a brilliant way to handle those awkward front layers that never quite reach a high ponytail. The braid acts as a tether, pulling those shorter pieces back smoothly into the base of your pony.
How to Assemble
- Section off a 2-inch piece of hair from your hairline.
- Create a tight Dutch or French braid along the side of your head.
- When you reach the desired length, incorporate the end of the braid into a low ponytail made with the rest of your hair.
- Wrap a small strand of hair around the elastic to hide it for a seamless, finished look.
9. The Pull-Through Braid
The pull-through braid is a “cheat” style that looks like a complex French braid but is actually a series of elastic bands. It creates incredible volume, which is a major advantage for medium hair that might be lacking density.
The Faux-Braid Technique
You are essentially creating a series of small, stacked ponytails and pulling the hair through them. Because there is no actual braiding involved, it is much easier to keep even and structured.
Keys to a Perfect Pull-Through
- Keep a pack of small, clear elastics on hand.
- Use a rattail comb to create even sections.
- Pull the hair out wide from each section to build the “braid” profile, making it look much thicker than it actually is.
10. The Milkmaid Braid
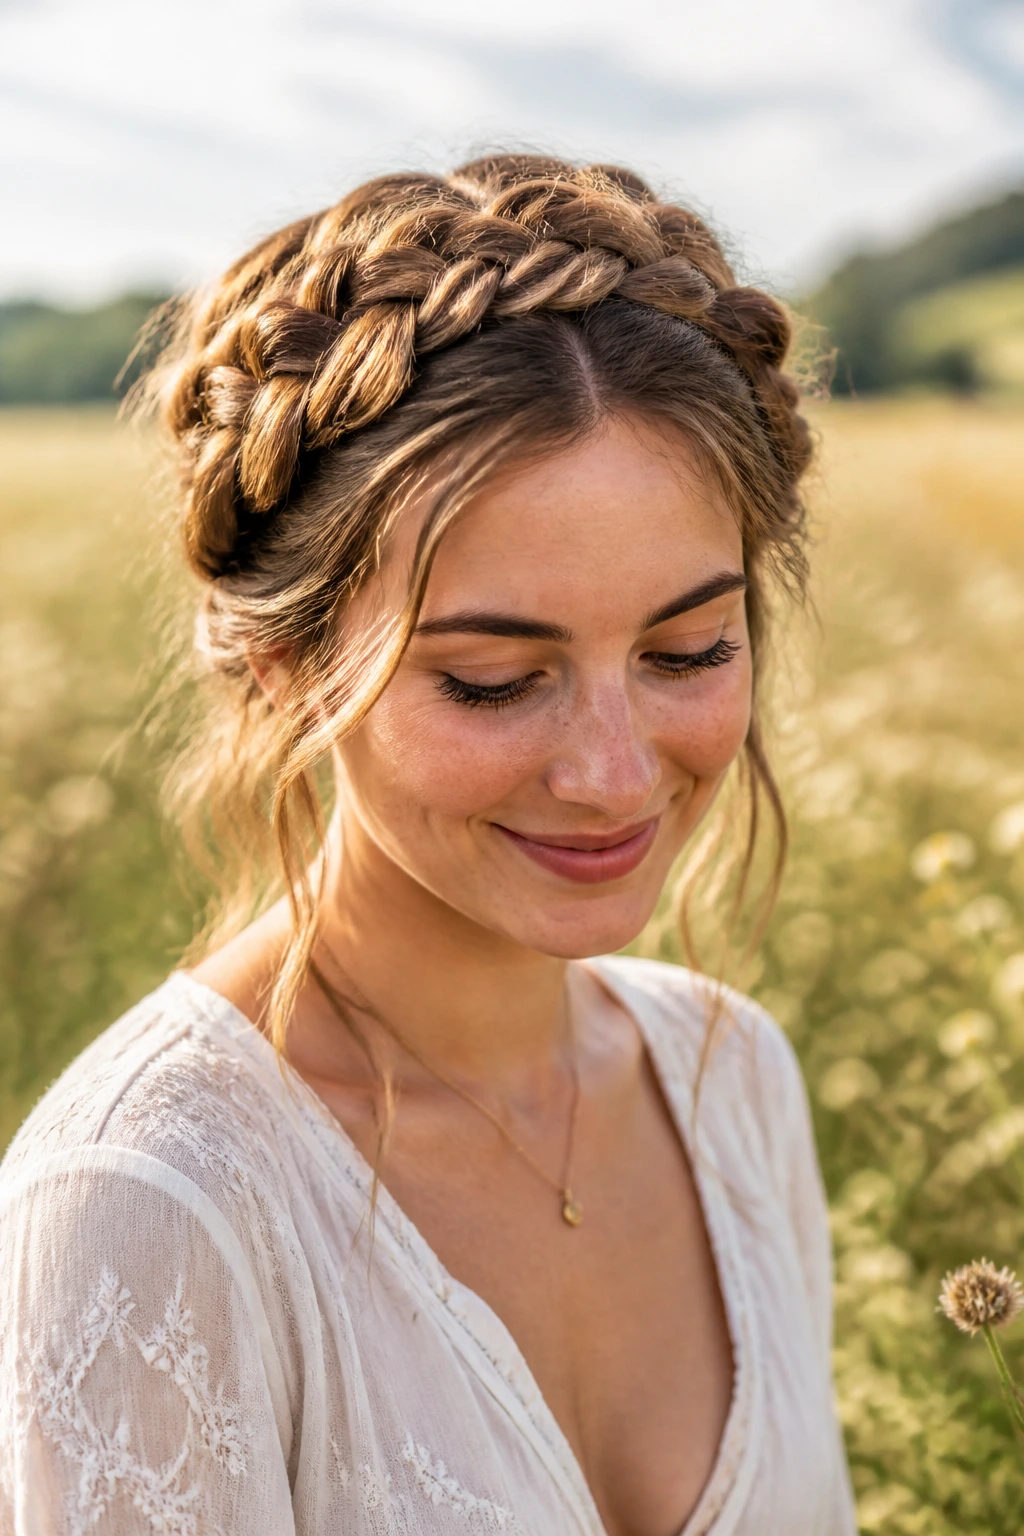
A cousin to the crown braid, the milkmaid braid is a bit more rustic and relaxed. It involves creating two pigtail braids and pinning them across the top of your head, overlapping them slightly at the center.
Achieving the Soft Look
Unlike the crown braid, which is often very structured, the milkmaid style is meant to have a few face-framing pieces left out. It is a charming, nostalgic look that pairs wonderfully with casual dresses or knitwear.
Styling for Medium Hair
- If your hair is on the shorter end of medium, you may need a few extra bobby pins to keep the ends tucked securely.
- Avoid using heavy waxes; stick to a light-hold hairspray so the hair remains soft to the touch rather than crunchy.
11. The Ladder Braid
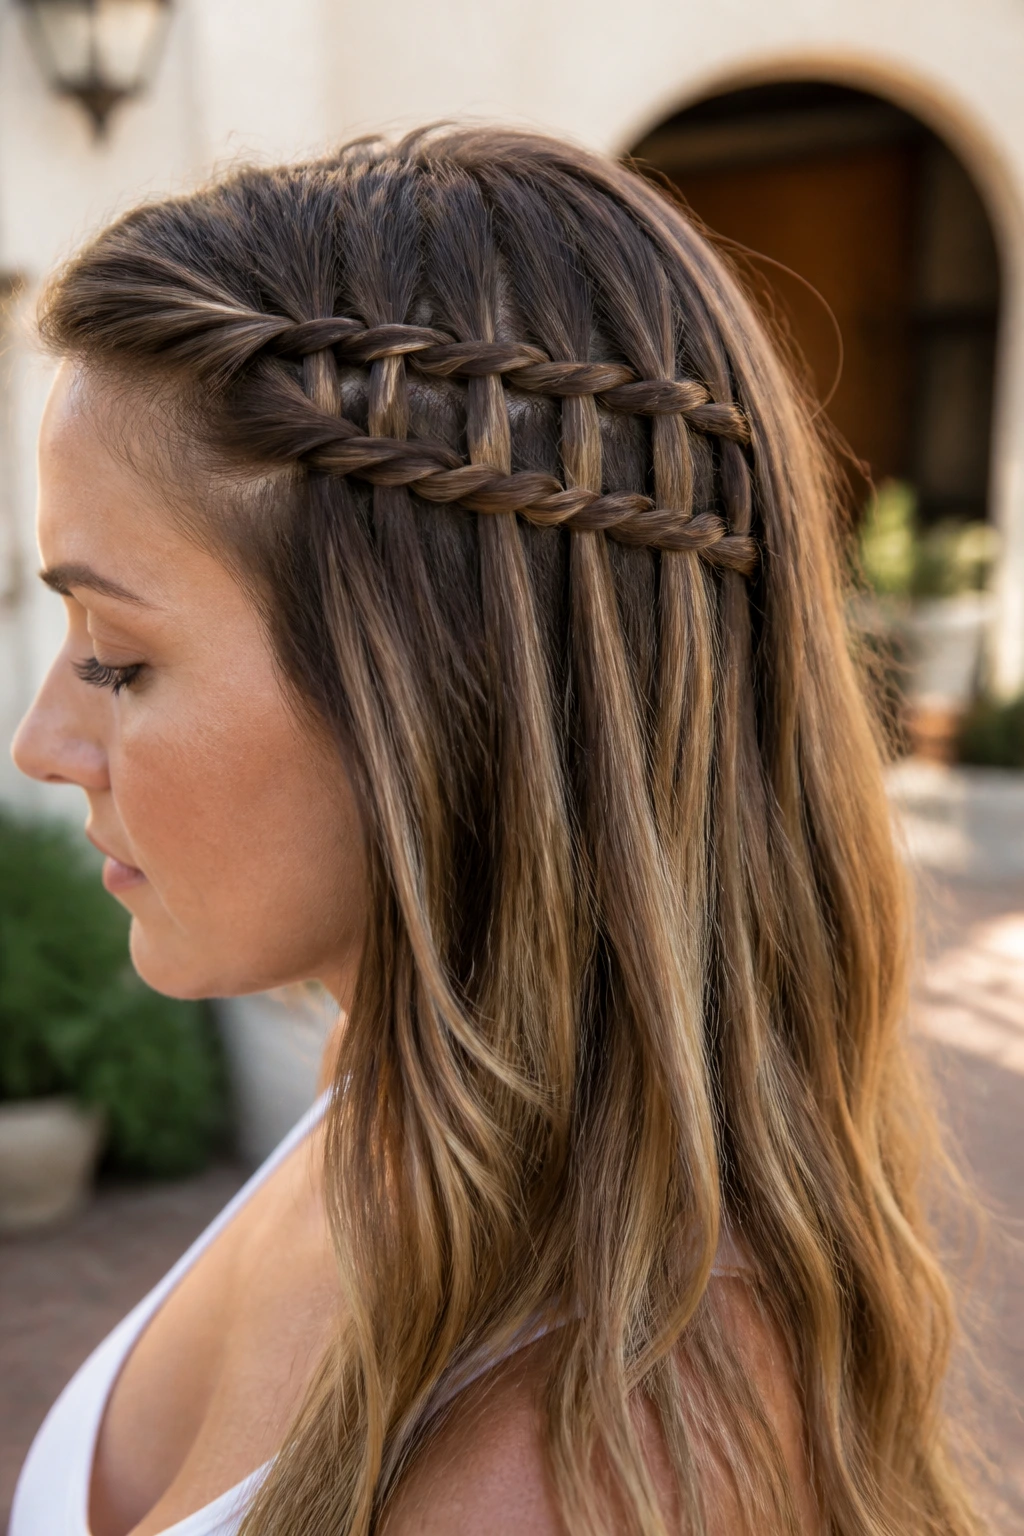
The ladder braid is a variation of the waterfall braid, but with a structural twist. It creates a horizontal line of “rungs” that look like a miniature ladder running across your head. It is a showstopper for those who want to try something a bit more technical.
The Visual Effect
This braid stands out because of the clear, horizontal bridges between the sections. It is one of the most visually impressive styles you can do with medium-length hair without needing to add hair extensions.
Essential Steps
- Start by creating two parallel French or Dutch braids on one side of your head.
- As you weave, take small sections of hair from the top braid and pull them through the loops of the bottom braid.
- It takes a bit of patience to get the tension right, but the result is architectural and unique.
12. The Braid-Wrapped Bun
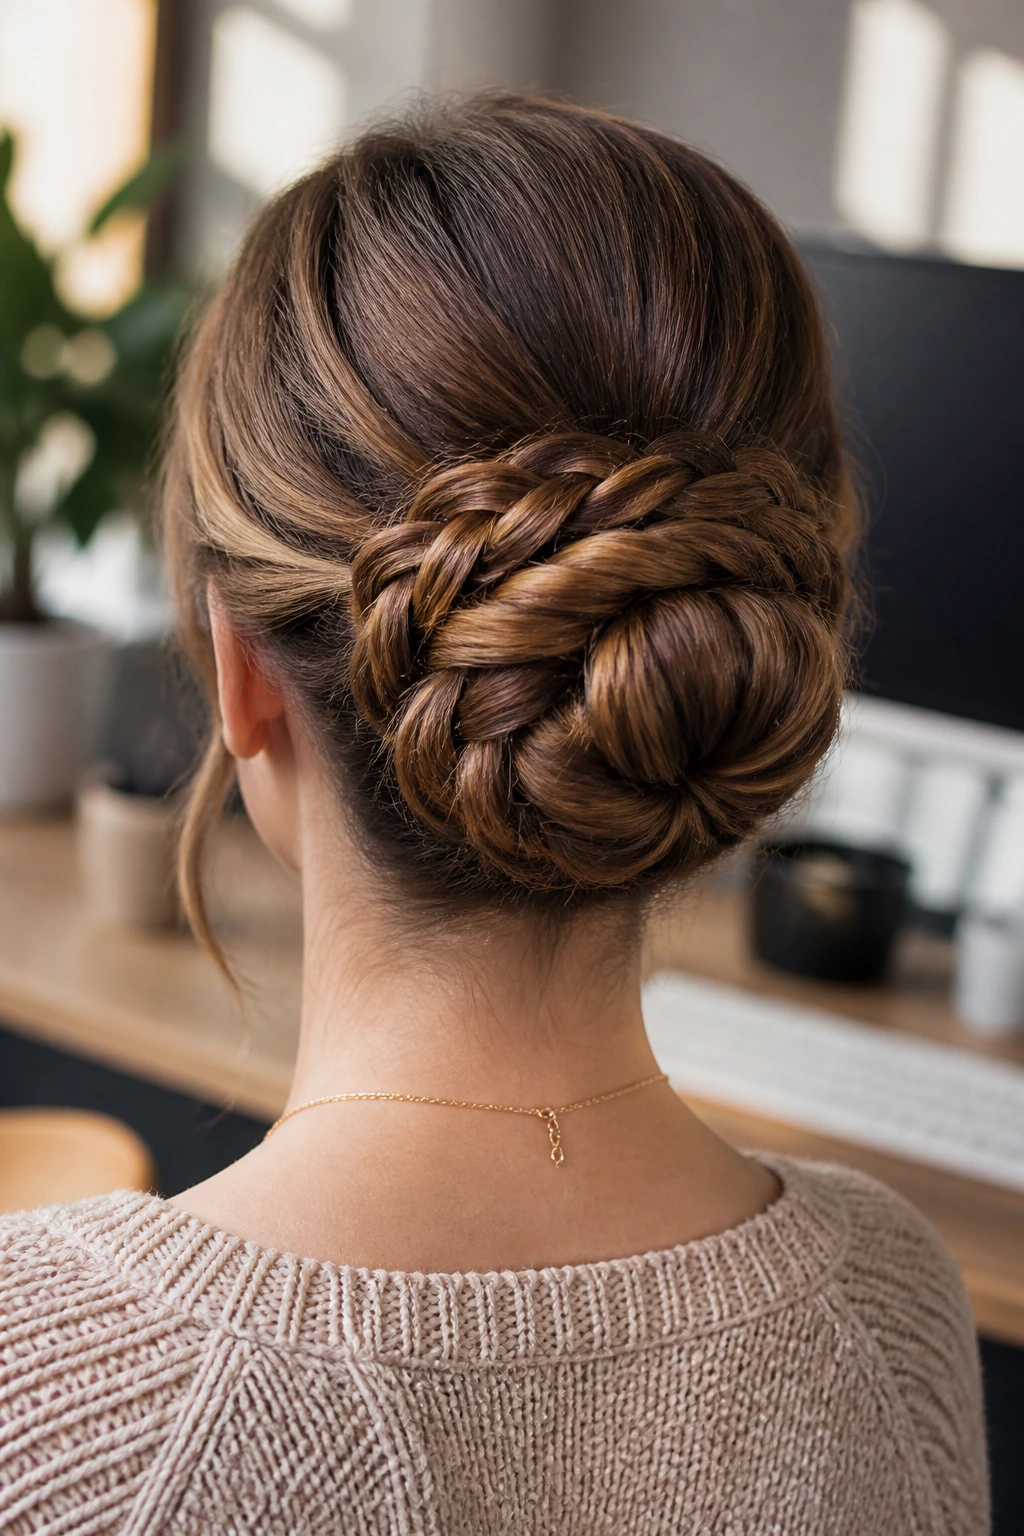
If you prefer your hair off your neck, a braided bun is the ideal middle ground between professional and relaxed. By braiding the hair before you wrap it into a bun, you add texture that a plain, slicked-back bun simply cannot provide.
The Benefits for Mid-Length Locks
Medium-length hair is often the perfect length for a mid-sized bun. You do not have to struggle with an excessive amount of hair that makes the bun feel heavy or likely to sag throughout the day.
Execution Plan
- Start with a high or mid-height ponytail.
- Braid the entire length of the ponytail.
- Wrap the braid around the base of the elastic, pinning as you go.
- Use a decorative hair stick or a vintage pin to secure the center, adding a touch of personal flair to the finished style.
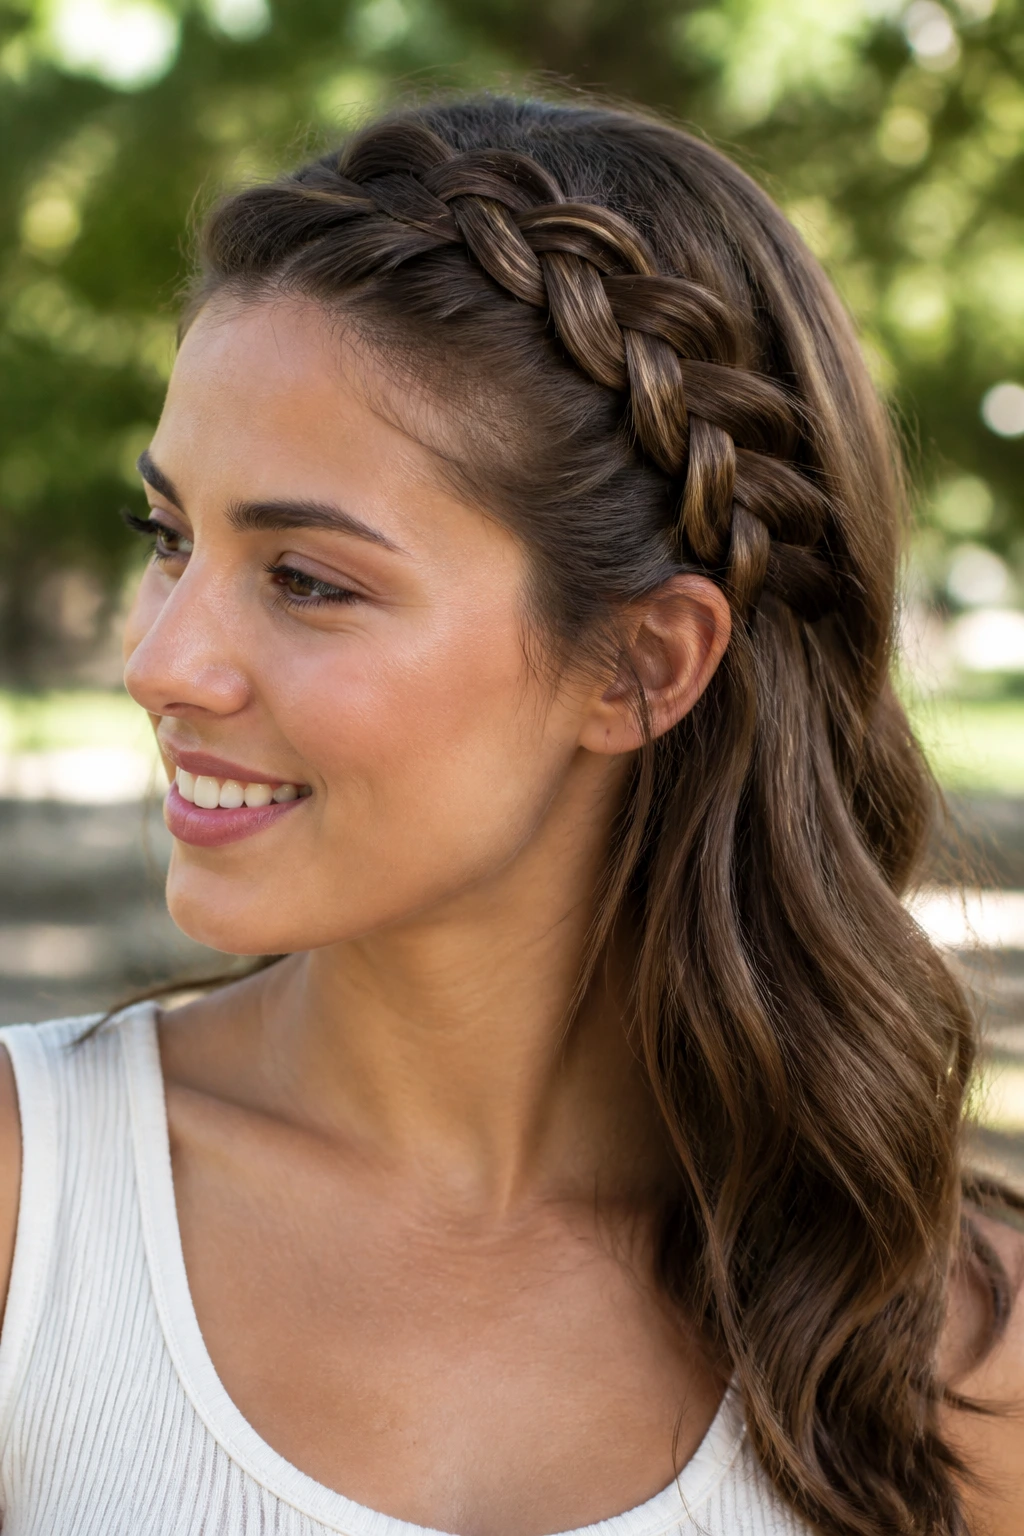
13. The Headband Braid
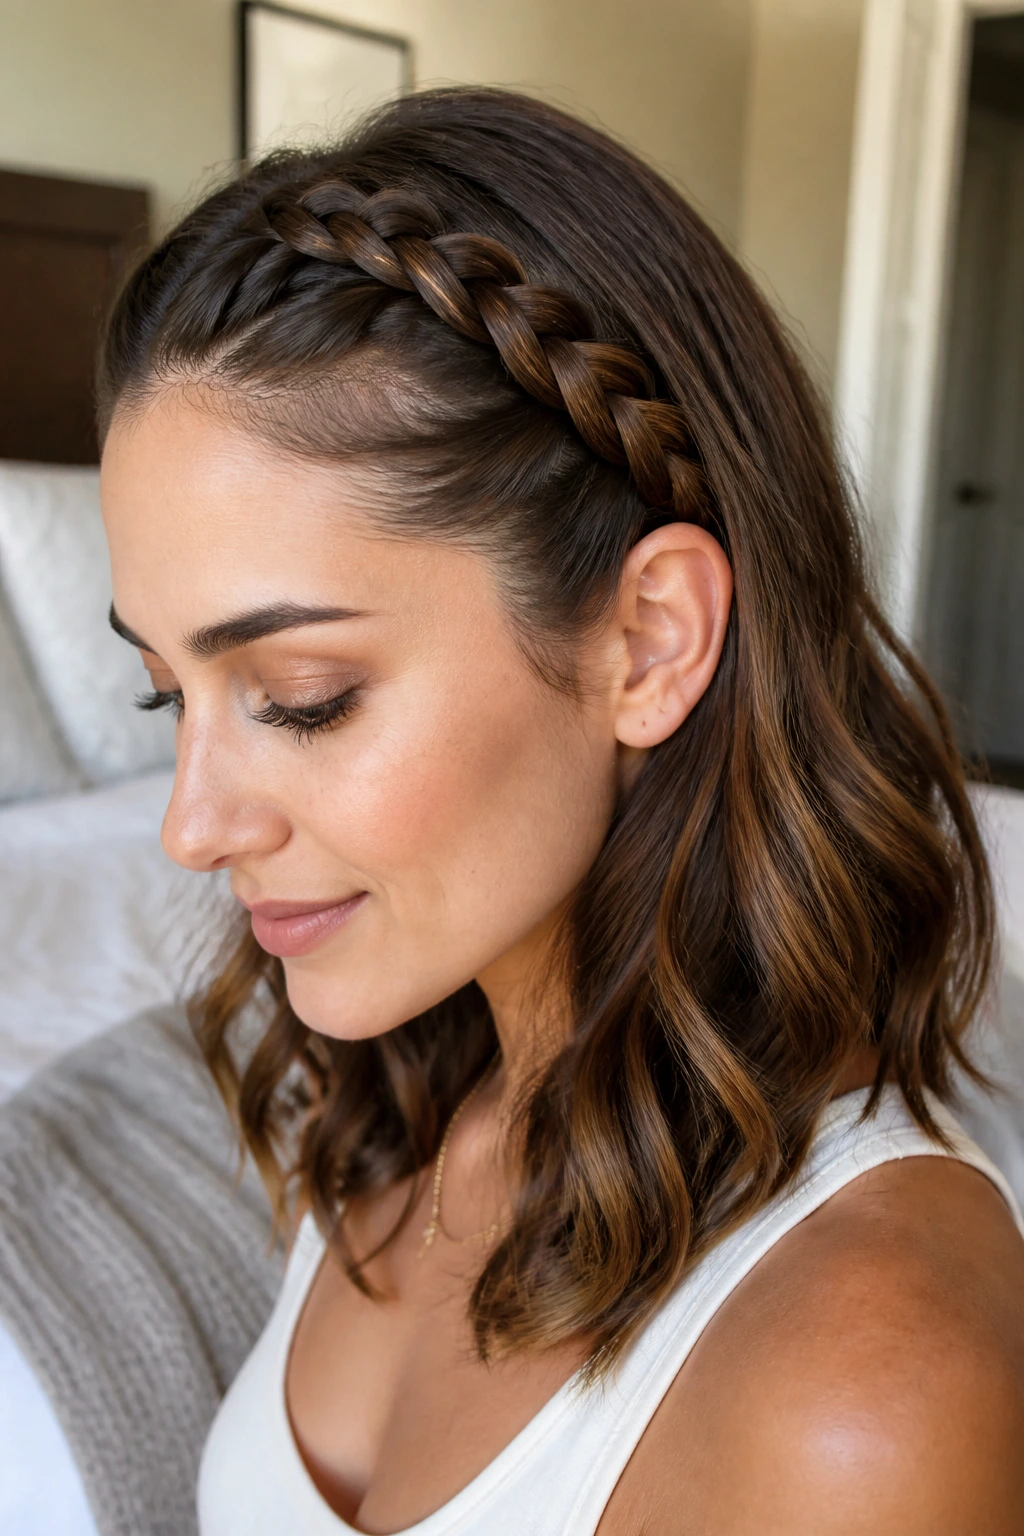
This is the ultimate “hair-saving” technique. If you have bangs or layers that you are tired of dealing with, a headband braid pulls them completely out of the way. It functions exactly like an accessory but is made entirely from your own hair.
Positioning the Braid
You want to start the braid right at the temple. The key is to keep it tight against the scalp so that it mimics the clean line of a plastic or fabric headband.
Tips for Success
- Braid in the direction you want the “headband” to sit.
- Secure the end of the braid behind your ear with a bobby pin, tucking the tail under the rest of your hair so it disappears.
- Leave the rest of your hair loose, curled, or straight, depending on your preferred style for the day.
14. The Triple-Threat Braid
This style involves creating three small, individual braids at the crown and then gathering them into a single, cohesive braid at the nape of the neck. It is a great way to manage layers that might be too short to incorporate into one single, large braid.
Mastering the Segments
By breaking the hair into three distinct sections initially, you gain better control over the shorter hairs near the hairline. This helps eliminate those annoying “flyaways” that often plague medium-length cuts.
Enhancing the Style
- Make the top three braids tight and precise.
- When you join them together, feel free to transition to a looser, more relaxed braid style for the length.
- The contrast between the tight top sections and the loose bottom section provides a high-fashion edge.
15. The Faux-Hawk Braid
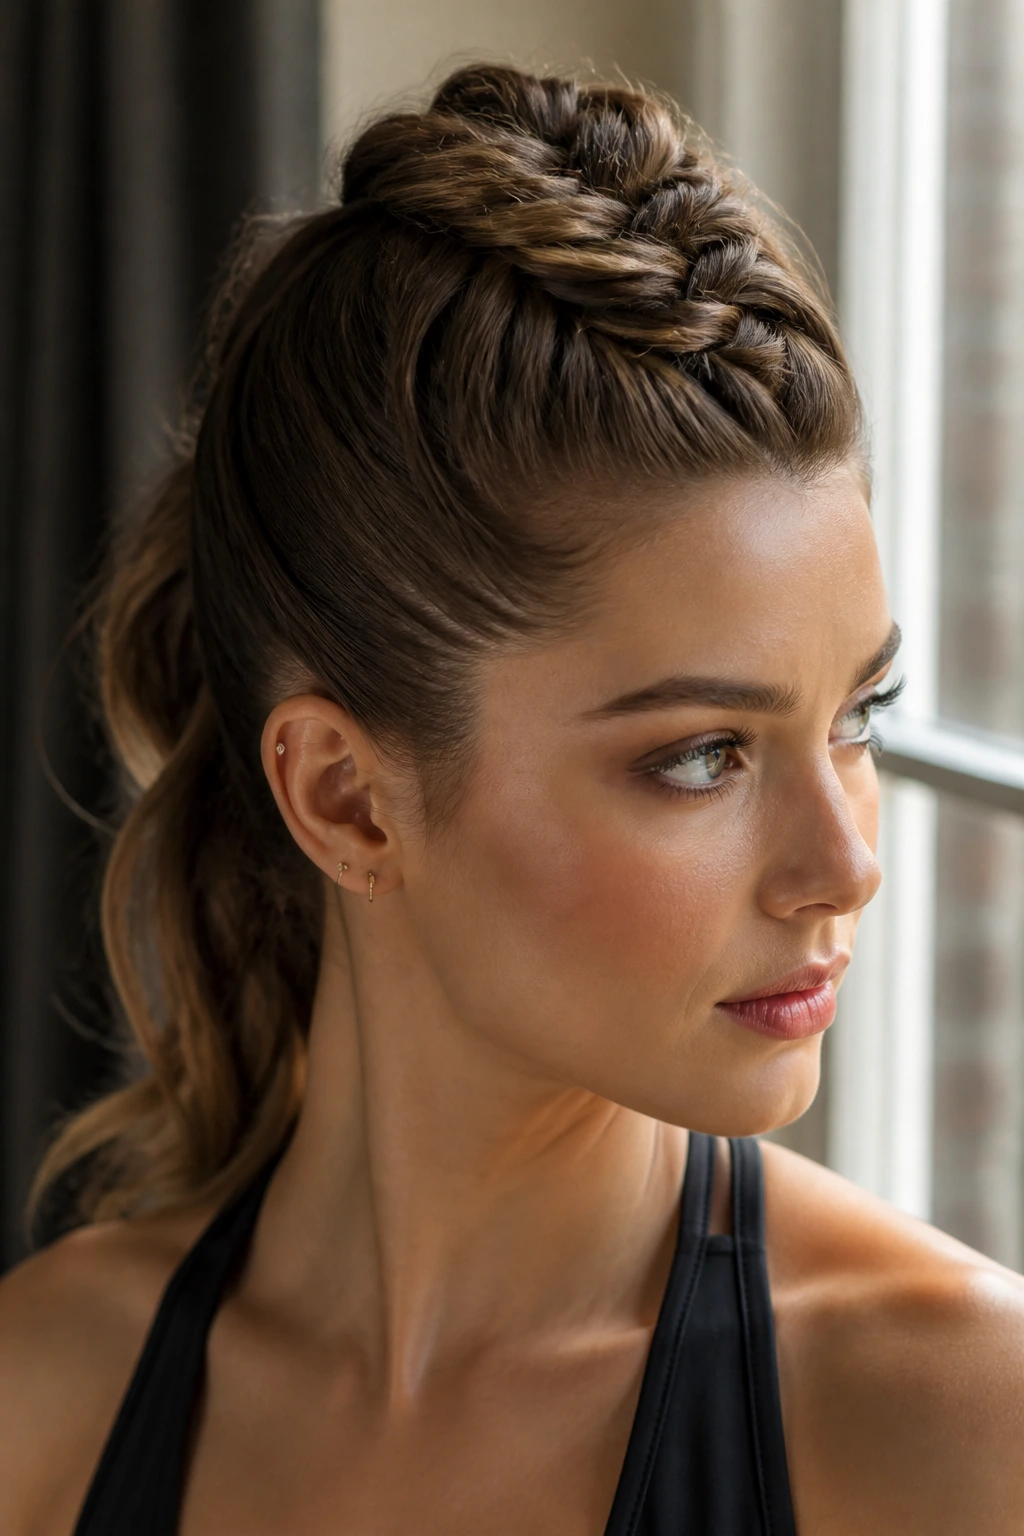
A faux-hawk braid is all about volume at the center of the head. It mimics the edgy look of a mohawk but remains entirely wearable for everyday life. This style works exceptionally well with medium-length hair because the volume stays concentrated near the roots.
Volume is Everything
You will want to tease the hair at the crown before you start braiding to provide a sturdy base. A dry shampoo or texturizing powder is your best friend here, as it adds the grit required to hold the “hawk” shape.
Finishing Touches
- After braiding a central section tightly, pull the loops apart vigorously.
- This creates the wide, voluminous effect that characterizes the faux-hawk look.
- Keep the sides of your hair smooth and tight to accentuate the height of the central braid.
16. The Twisted Ponytail Braid
Instead of a traditional braid, this style uses sections of hair that are twisted and then fed through each other. It looks sophisticated and complex but is surprisingly simple to achieve once you understand the rhythm of the twists.
Why It’s Unique
The rope-like quality of the twists gives the hair a different movement compared to the flat appearance of a standard three-strand braid. It feels more modern and less “traditional,” making it great for events where you want a sleek appearance.
How to Style
- Gather your hair into a ponytail.
- Take two small sections from the sides and twist them towards the center.
- Secure them with an elastic, then flip the ponytail through the space between the twists.
- Repeat this down the length of the ponytail for a cascading, twisted effect.
17. The Mermaid Braid

The mermaid braid is a combination of a smaller, tighter braid sitting on top of a looser, thicker braid. It’s a whimsical look that is popular for its high visual interest and its ability to make medium hair look much fuller than it actually is.
The “Hidden” Braid
The top braid acts as the skeleton for the style, while the bottom section adds the volume. It is one of the most effective ways to combine two different braiding techniques into one cohesive look.
Maintaining the Shape
- Use a fine-tooth comb to ensure your sections are clean and symmetrical.
- Use a lightweight hair oil to prevent frizz, which can make the layered look appear messy rather than intentional.
- If you have layers, pin any rogue ends into the base of the braid using tiny, discrete hairpins.
18. The Infinity Braid

As the name suggests, the infinity braid uses a figure-eight pattern. It looks like a complex, woven knot that travels down your head. It is incredibly secure and looks very sophisticated.
Understanding the Figure-Eight
- Start with two main strands and one smaller “traveling” strand.
- Loop the traveling strand in a figure-eight around the two main strands.
- The constant looping creates a very dense, intricate pattern that is essentially impossible to replicate with a standard French braid.
Why Medium Lengths Shine
Because the infinity braid is quite dense, it can become heavy on very long hair. On medium-length hair, the weight is perfectly distributed, ensuring that the braid remains comfortable to wear for an entire day.
19. The Side-Swept French Braid
This is the ultimate look for a formal event or a date night. By sweeping all your hair to one side and starting the French braid from the temple, you create a beautiful, asymmetrical frame for your face.
The Asymmetry Factor
The side-swept look is inherently more elegant and flattering than a central braid. It draws the eye toward your profile, highlighting your cheekbones and jawline.
Tips for a Clean Finish
- Use a smoothing cream on the side of your head that is being pulled back to ensure a sleek, bump-free finish.
- If you have face-framing layers, leave them loose and use a curling iron to add a soft, romantic bend before you begin the braid.
20. The Bohemian Top Knot Braid
This style merges a messy top knot with a braid leading into it. It is perfect for those days when you need to be active but still want your hair to look like it has been styled with care.
The Transition
The braid acts as a transition, taking the hair from the hairline up to the knot. It keeps everything tight and controlled while adding a decorative element to the top of your head.
The “Undone” Look
- Do not aim for perfection. The beauty of this style is in its relaxed, lived-in feel.
- If a few strands fall out, simply tuck them behind your ears or leave them to frame your face.
- Secure the top knot with a scrunchie or a heavy-duty elastic to ensure it holds throughout your busy day.
Final Thoughts
The real secret to mastering these twenty styles is not innate talent, but practice and the right prep work. Medium-length hair often requires a bit more texture than very long hair, so do not shy away from using dry shampoo, texturizing sprays, or a light hair oil to give your strands the grip they need to stay woven. Each of these styles offers a unique way to manage your hair, whether you are trying to hide layers, protect your ends, or simply change your silhouette for the day.
Remember that braids are not just about utility; they are a form of self-expression. The more you work with your own hair’s natural wave or straightness, the better you will get at choosing the right braid for your texture. Do not be afraid to pull at your braids to loosen them, or to use extra bobby pins for support; the best braids are the ones that feel secure enough to live in while looking like you put in all the time in the world. Stick with it, experiment with these patterns, and you will soon find that medium length is actually the most versatile length of all.