When you have naturally stick-straight hair, the struggle is almost always the same: finding a style that actually stays put without needing half a bottle of hairspray. You know the drill—you tuck a piece behind your ear, and it slides right back out. You try a loose curl, and it’s pin-straight by lunch. Braids are the secret weapon for straight-haired people because they provide the physical structure your hair lacks on its own, locking your strands into a design that survives the day.
The secret to making these styles work lies in texture preparation. If you try to braid hair that is freshly washed, conditioned, and perfectly smooth, the braid will unravel as soon as you turn your head. You have to cheat a little bit. A light dusting of dry shampoo or a texturizing powder at the roots adds the grit needed to give your fingers something to grip. When your hair feels slightly “dirty,” those braids won’t just sit on your head—they will actually hold their shape.
1. The Classic Half-Up Crown Braid
This style is the ultimate bridge between “I want my hair down” and “I need this out of my eyes.” It uses two small three-strand braids started at the temples and pulled back to meet in the center of the head. It is clean, minimalist, and works perfectly on fine, straight hair because it doesn’t require a massive amount of volume to look finished.
How to Get the Look
- Prep: Use a sea salt spray on dry hair for grip.
- Sectioning: Part your hair down the middle or on your natural side.
- Braid: Take a one-inch section near each temple and braid back.
- Finish: Connect the two braids at the back of your crown using a small, clear elastic.
Pro tip: Pull gently on the outer loops of the braid once it’s secured to make the weave look thicker and less “tightly wound.”
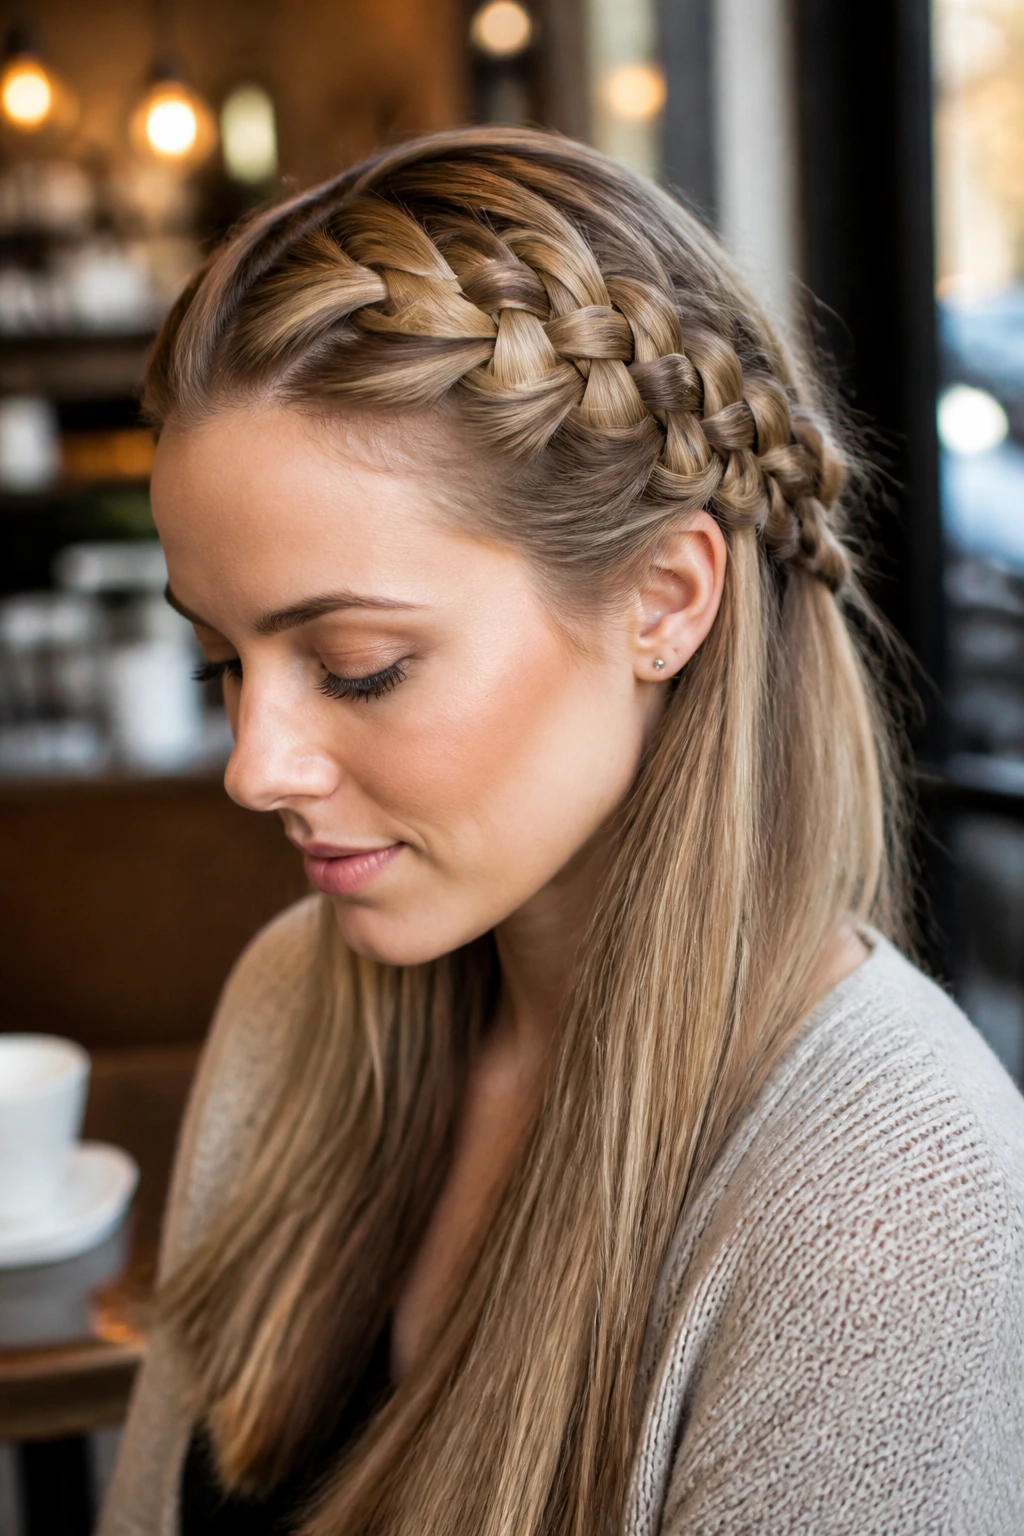
2. Dutch Braid Pigtails with Straight Ends
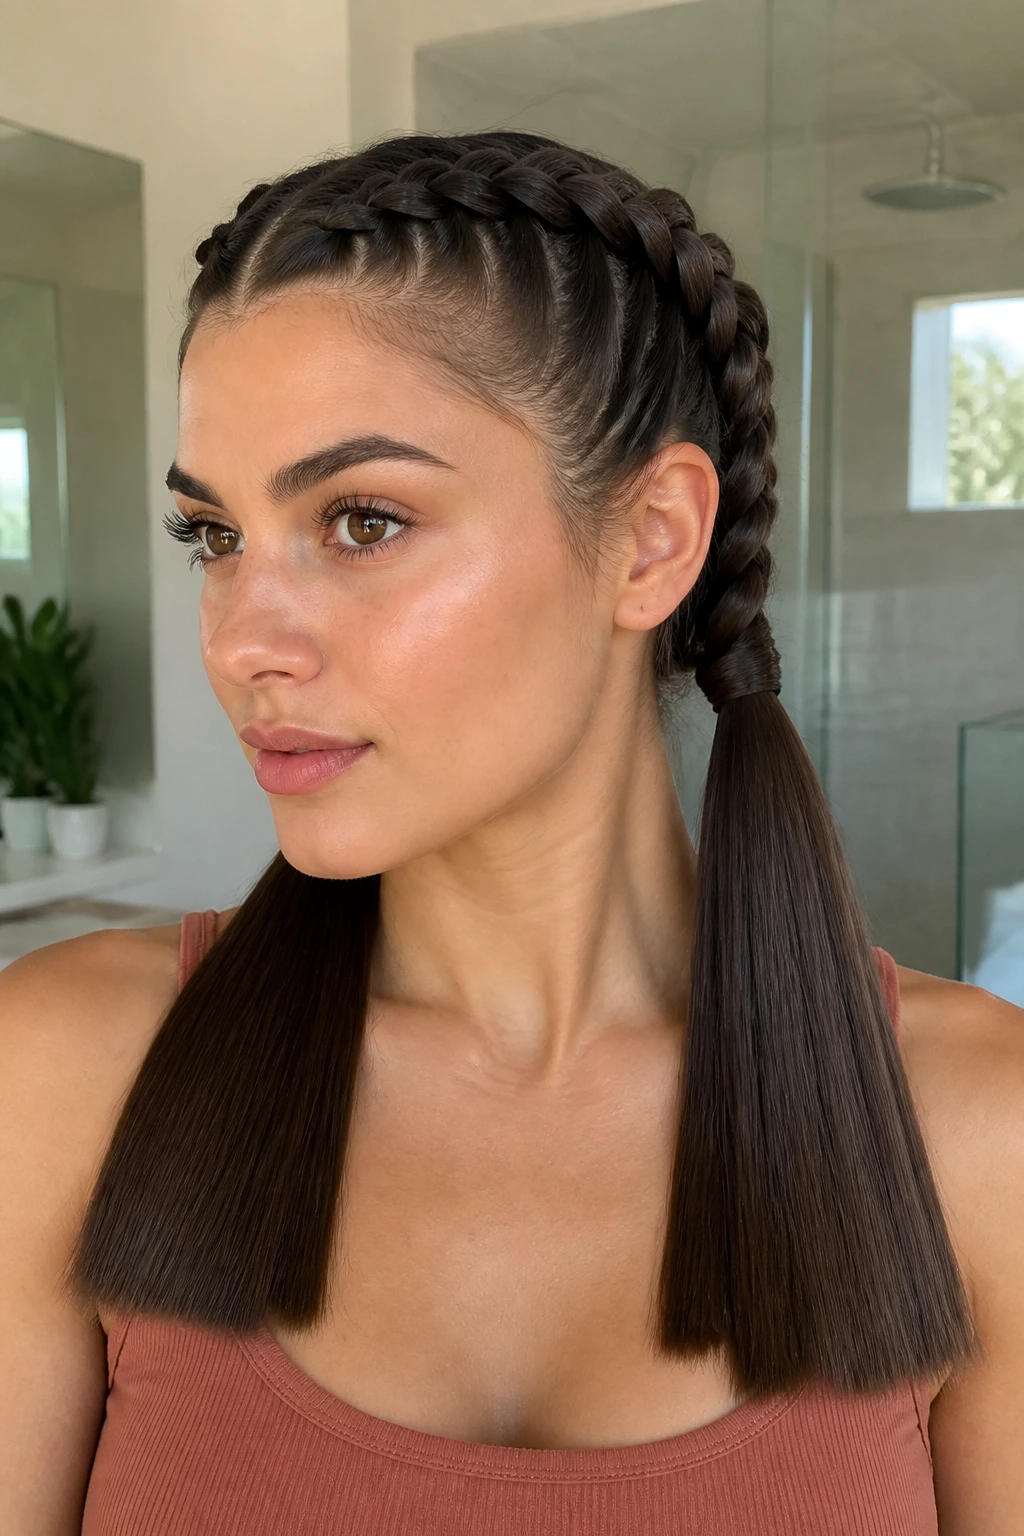
There is something undeniably retro about this style, but it feels surprisingly modern when paired with sharp, blunt-cut ends. Unlike French braids where you cross sections over, Dutch braids involve crossing sections under. This pops the braid out to the surface, making it look much larger and more defined against a flat base of hair.
The Science of the “Under” Technique
By crossing the outer strands under the middle strand, you create a 3D effect. For straight hair, this is beneficial because it creates a clear ridge that stays visible rather than blending into the scalp. You want to maintain a firm tension while braiding to ensure the braid doesn’t slip down the back of your head as you move through the day.
3. The Single Side-Swept French Braid

If you are running late and need a style that looks intentional but takes two minutes, this is your winner. By pulling all your hair to one side and weaving it into a French braid, you create a heavy, dense focal point that prevents the “stringy” look straight hair can sometimes have in a regular braid.
Why It Works for Straight Hair
- Weight: All the hair is gathered together, which adds visual density.
- Security: A side-swept braid is less likely to swing around or loosen during the day.
- Ease: You can see exactly what you are doing in the mirror, which makes it beginner-friendly.
4. Double Dutch “Space” Braids
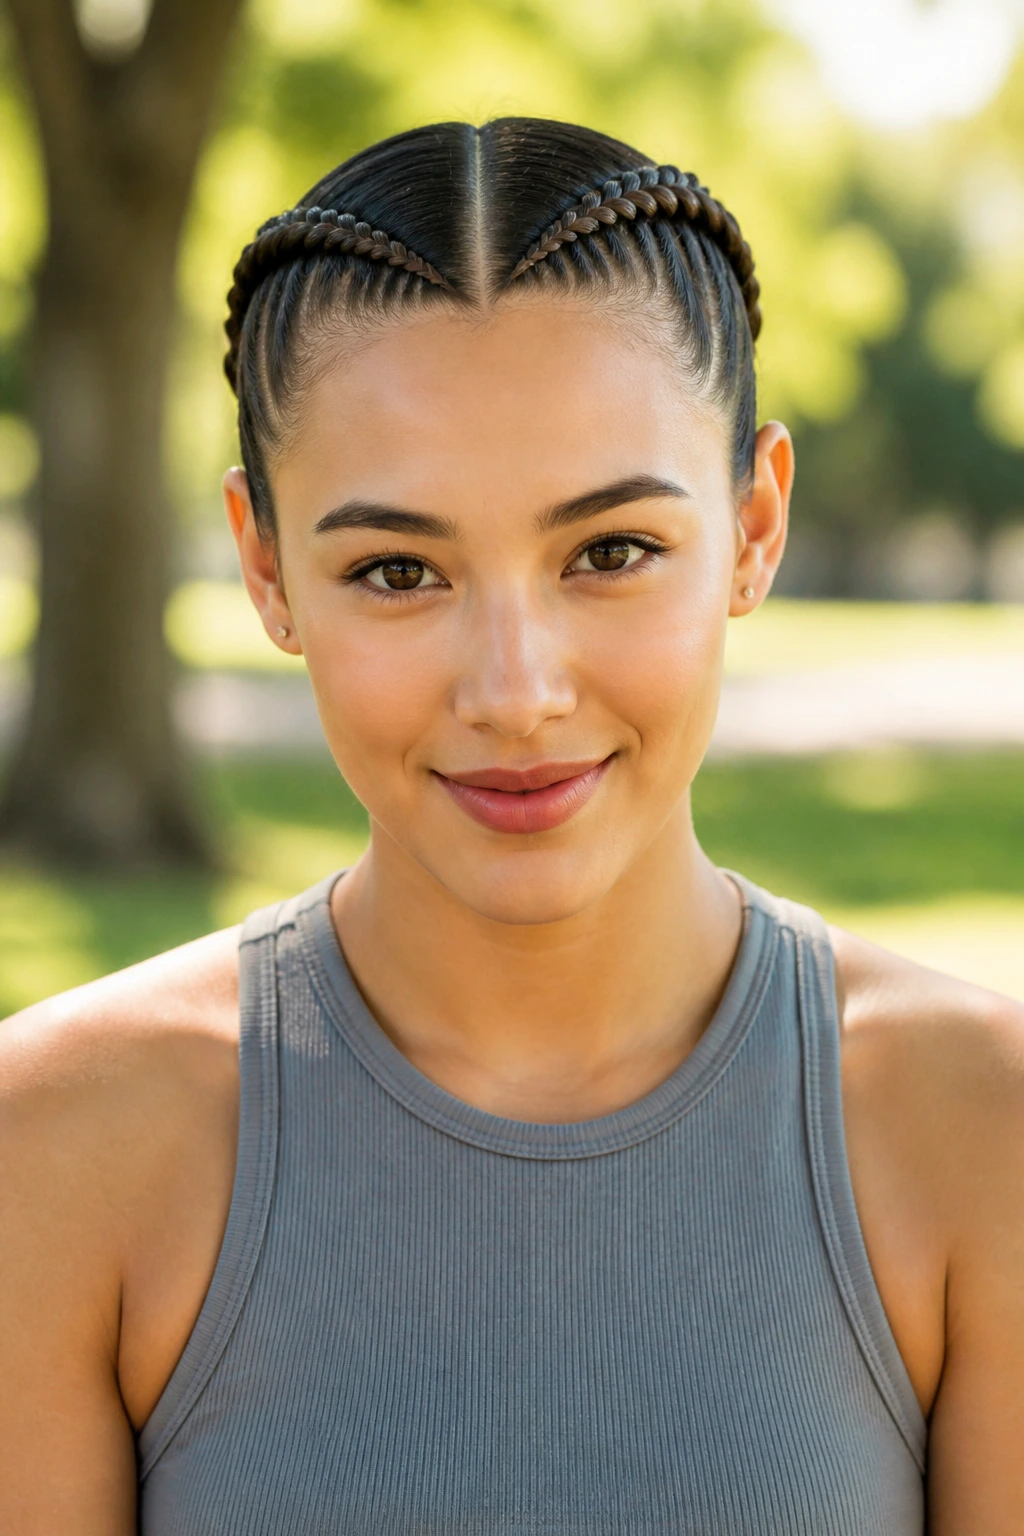
When you want to keep your hair completely off your neck, two Dutch braids that start at the forehead and end at the nape of the neck are incredibly practical. They are the go-to style for gym days or humid weather. Because straight hair is naturally smooth, these braids end up looking incredibly polished and sleek.
Maintaining the Sleek Look
Avoid using heavy pomades that can make straight hair look greasy. Instead, rely on a medium-hold hairspray. Mist your hands with the spray and run them over the surface of the braids before you secure the ends. This tames any flyaways that tend to pop up along the part line, which is the most common issue for those of us with thinner or very straight textures.
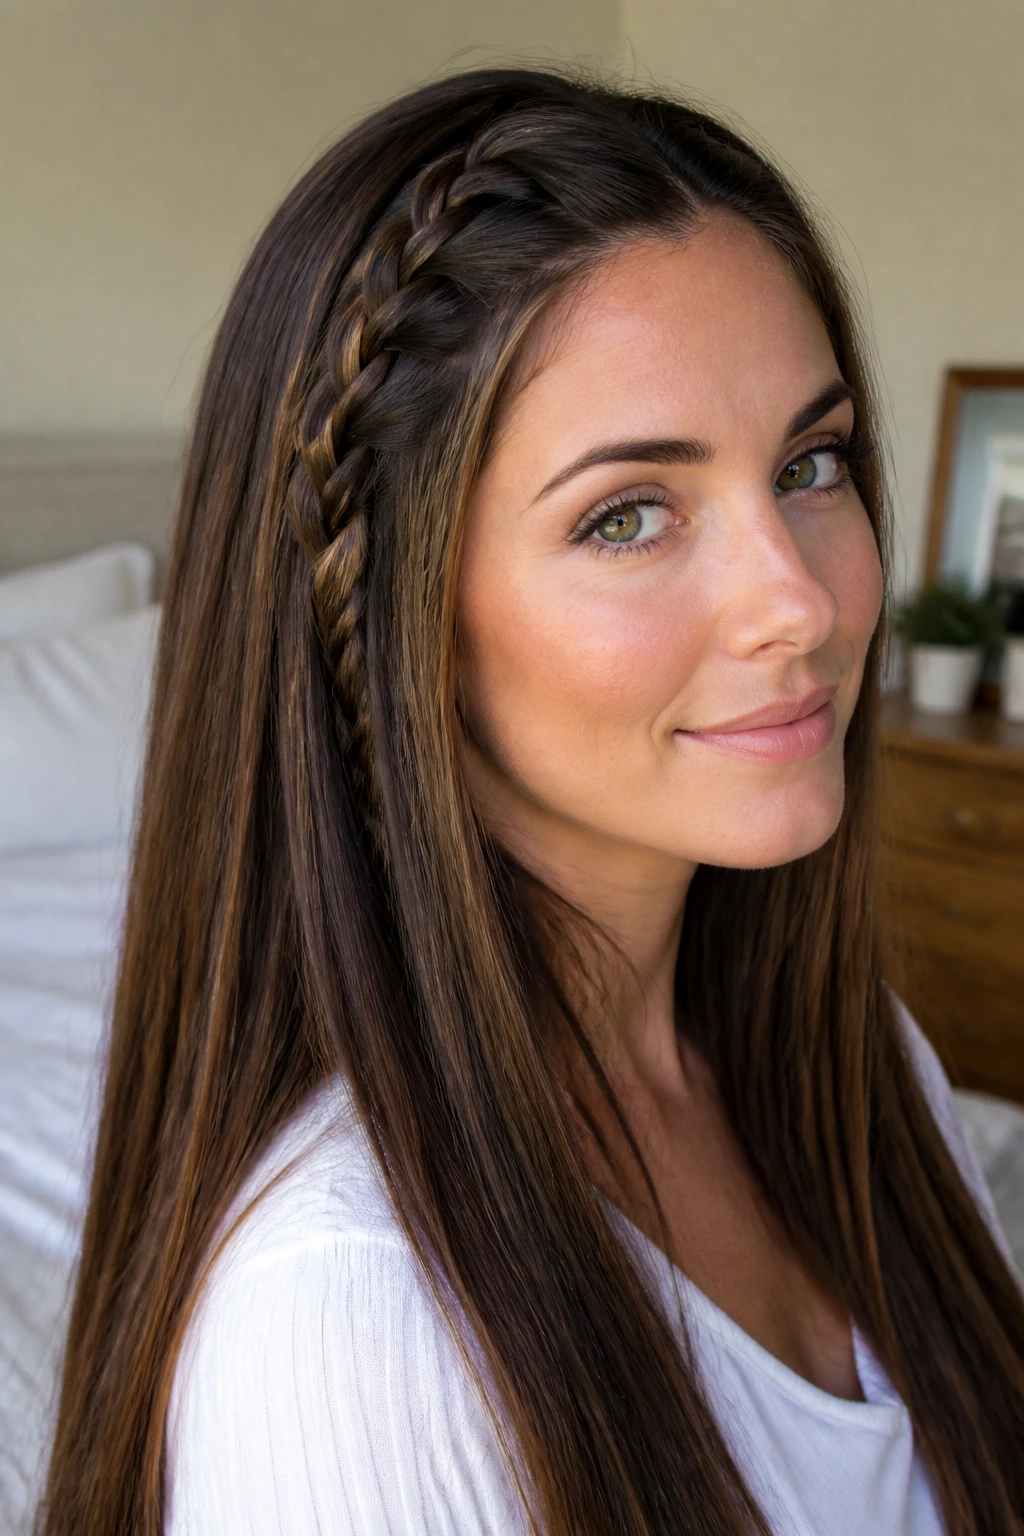
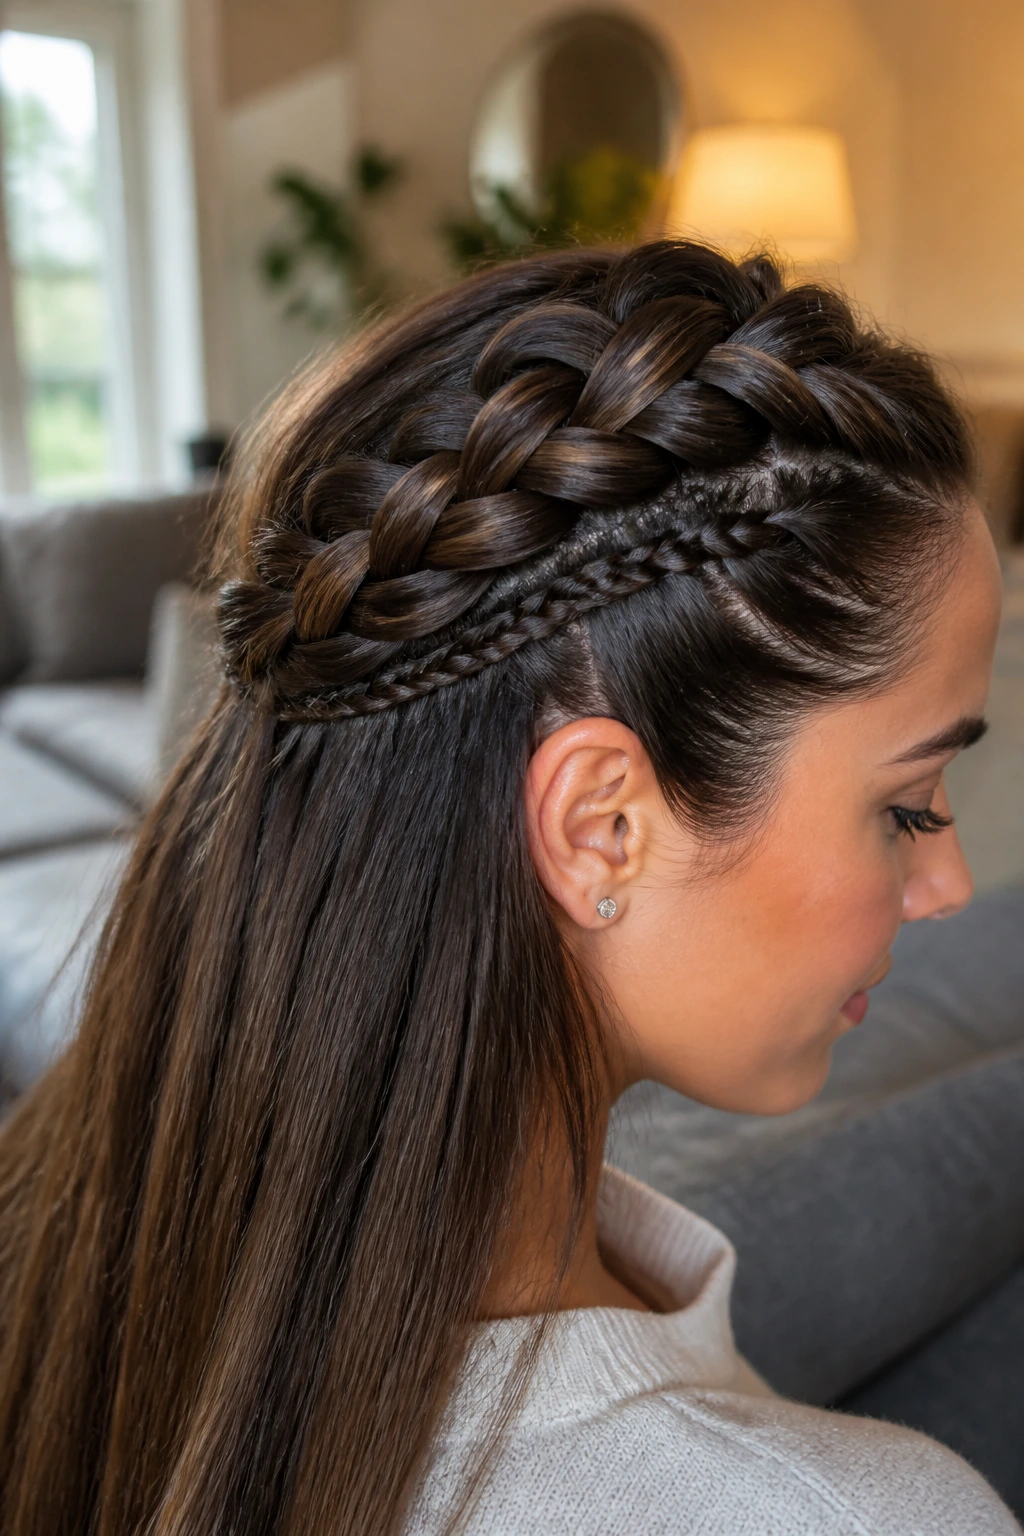
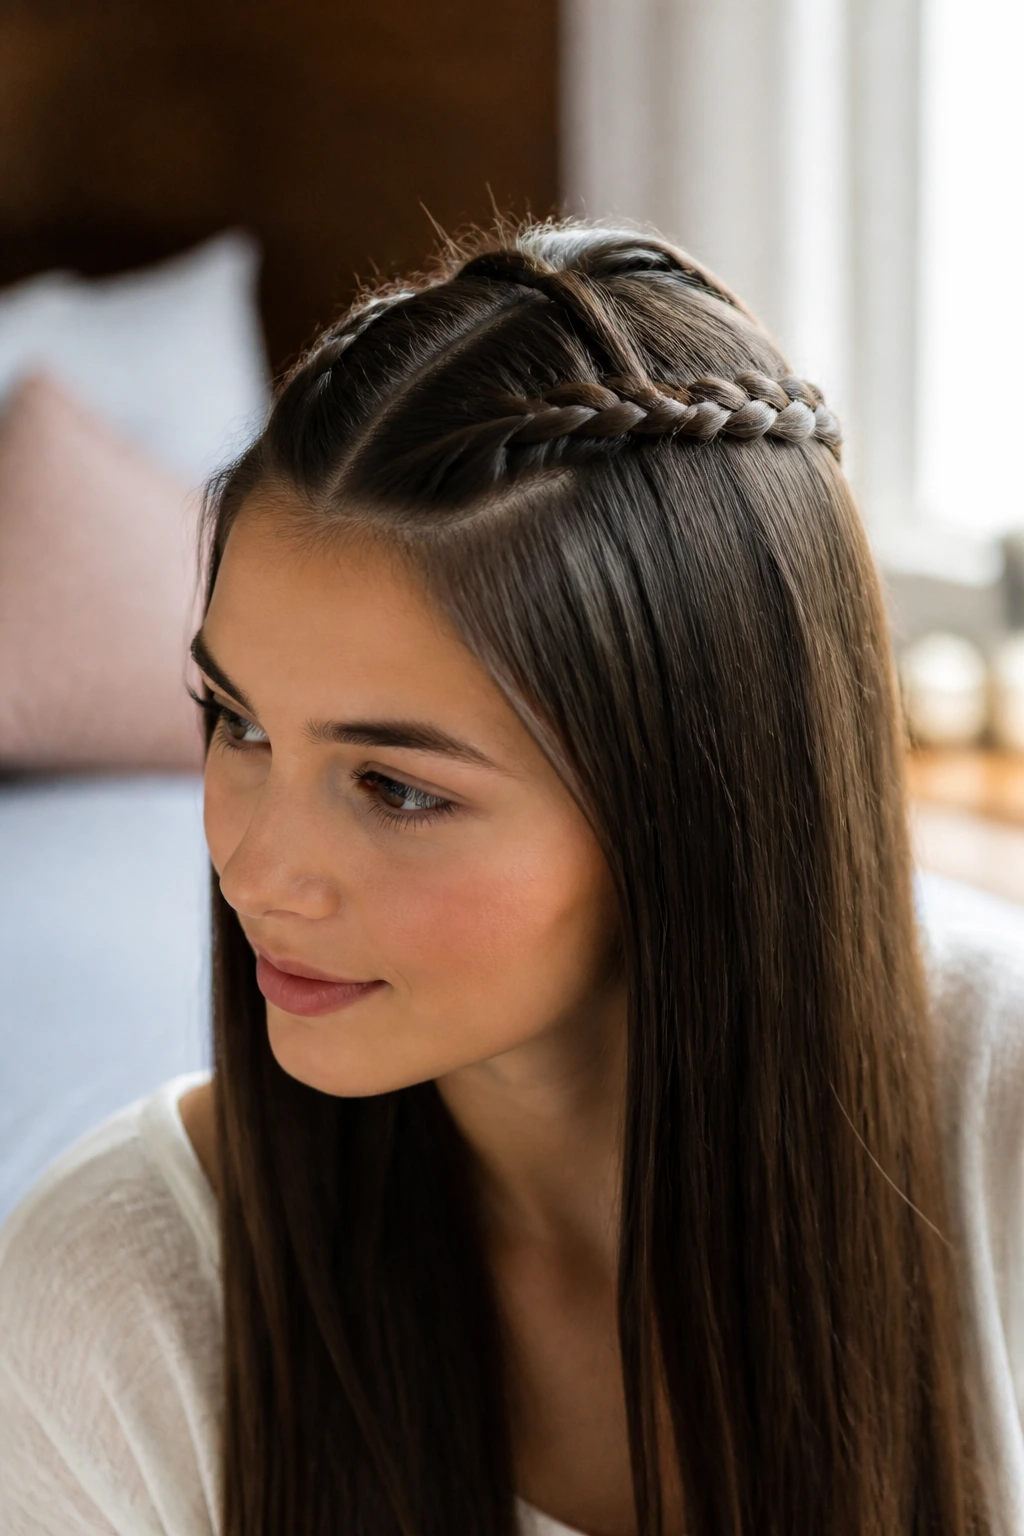
5. The Hidden Headband Braid
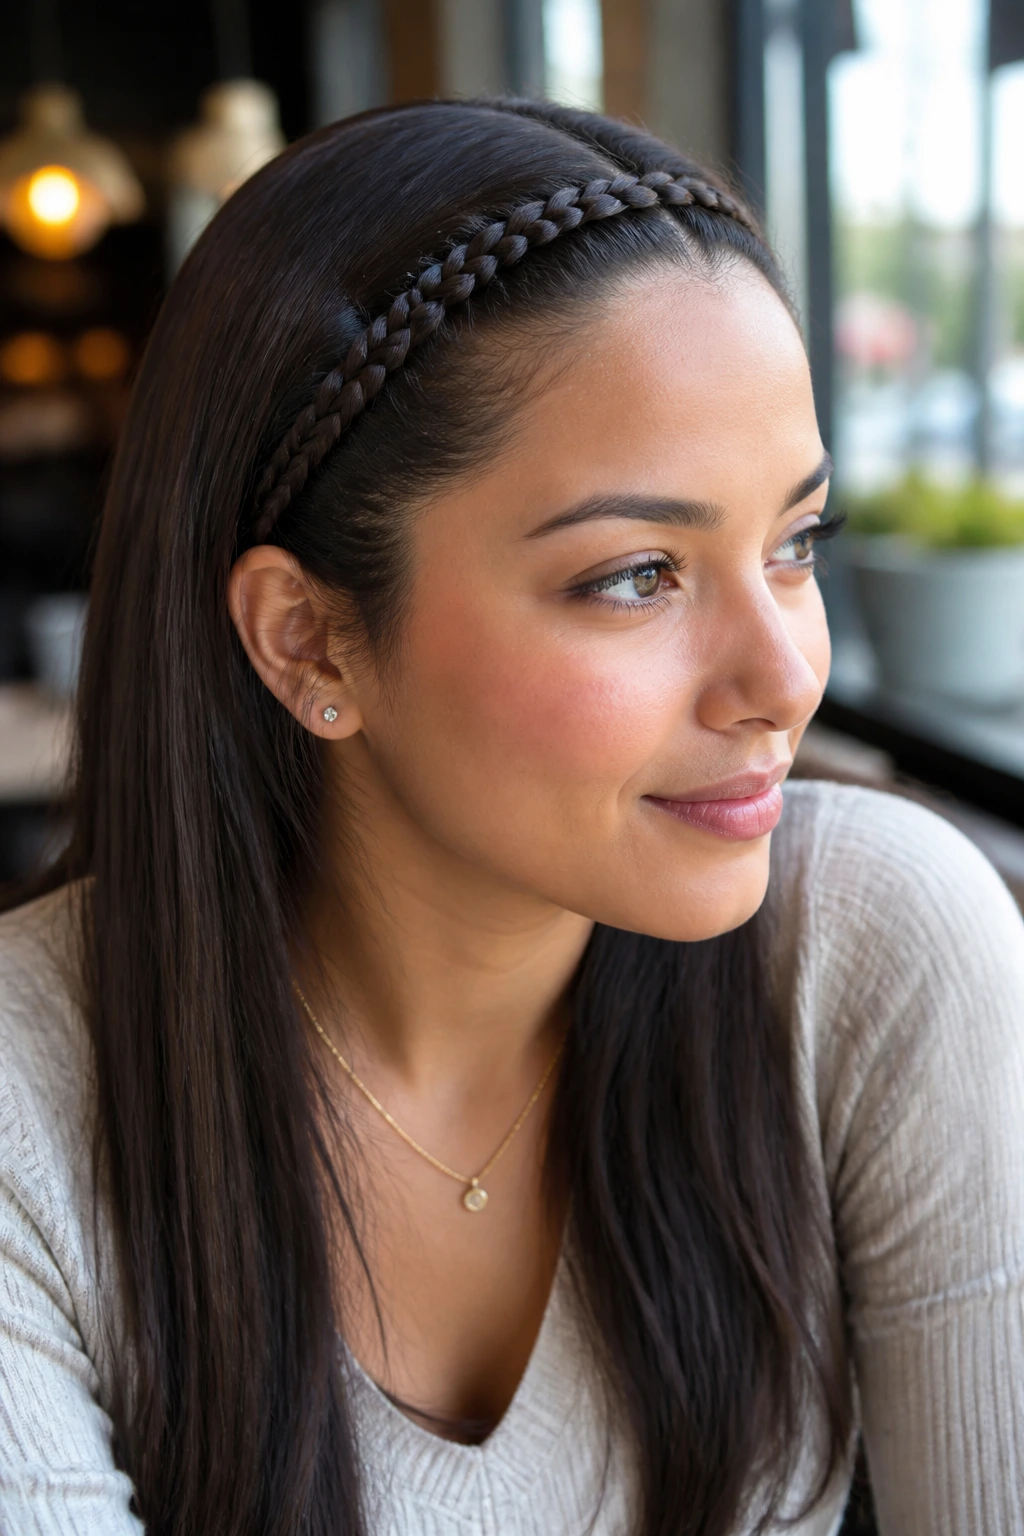
This is a sophisticated way to keep your hair pulled back without using an actual headband, which often slips off of straight hair anyway. You create a thin braid starting behind one ear and weave it across your hairline to the other side. It creates a natural, woven “band” that stays firmly in place because it is anchored into the rest of your hair.
Steps for Success
- Isolate a section of hair starting behind your ear.
- Braid it across your forehead, incorporating tiny sections of hair along the hairline as you go.
- Tuck the end of the braid behind the opposite ear and secure it with a bobby pin that matches your hair color.
- If the braid looks too stark, gently tug at the edges to soften the line against your face.
6. Fishtail Braid with a Modern Twist
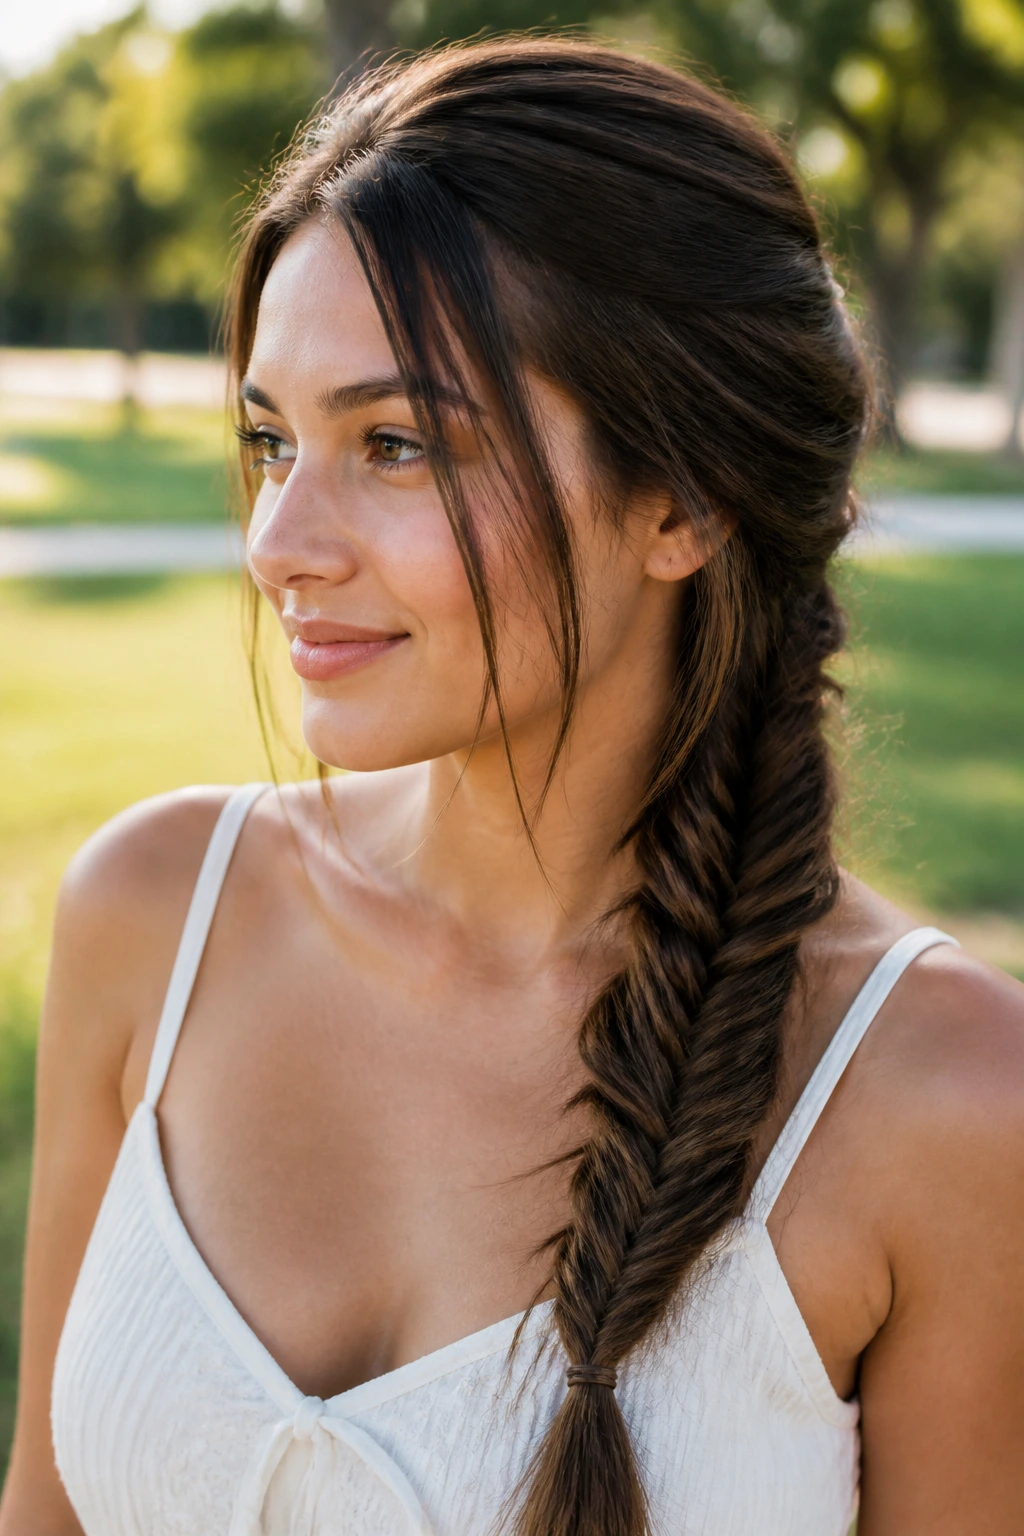
Fishtail braids look intricate and complicated, but they are actually repetitive and easy once you get the hang of the motion. They work exceptionally well on long, straight hair because the weave is fine and tight. A fishtail looks best when it isn’t too perfect; let a few strands escape near the face for a softer appearance.
Why the Fishtail Is Different
Unlike a three-strand braid, the fishtail relies on splitting your hair into two sections and pulling tiny pieces from the outside of one side to the inside of the other. It is a slow process, but the payoff is a beautiful, tight weave that mimics the look of a rope. It holds up impressively well on straight hair because the pattern is so dense.
7. The Messy Waterfall Braid
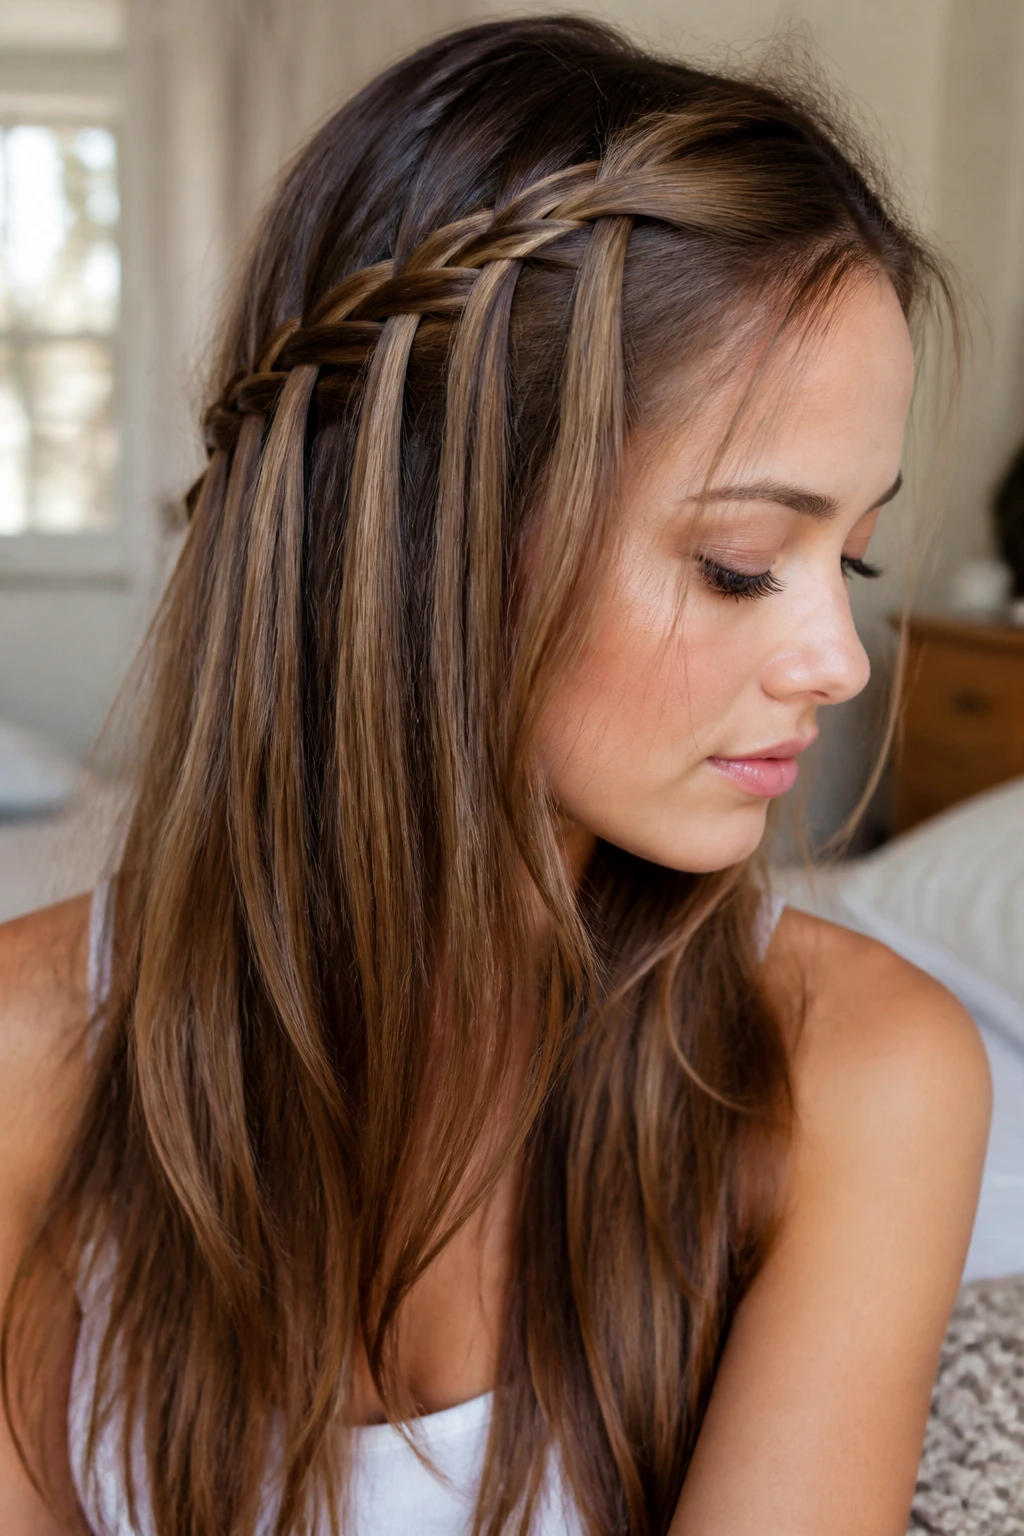
Waterfall braids are designed to show off the length of your hair while keeping the front sections secure. This style involves dropping a strand of hair as you cross it over, creating the illusion of hair “falling” through a braid. It is arguably the most romantic style for straight hair because it turns your hair into a cascade of layers.
Managing the Drop
The hardest part is remembering to drop the bottom strand and pick up a new piece from the base. If you lose your place, don’t worry—just pick up the next strand and continue. The “messier” you let this one be, the more natural it looks. Using a bit of texturizing spray before you start ensures the waterfall effect stays upright and doesn’t droop.
8. Five-Strand Accent Braid
If you have mastered the three-strand, a five-strand braid is the logical step up. It creates a wide, flat, lattice-like pattern that looks like a piece of art. On straight, fine hair, this braid can look a bit thin if you don’t “pancake” it—a technique where you gently pull at the outer edges of the braid to create volume after you have secured the end.
Key Technique: The Pancake
Pancaking is not optional if you want a high-impact look. Once your braid is secured, hold the base firmly with one hand. With the other, gently tug at the outside loops, starting from the bottom and working your way up. Do this sparingly. If you tug too hard, you’ll lose the structural integrity of the braid and end up with a frizzy mess instead of a voluminous one.
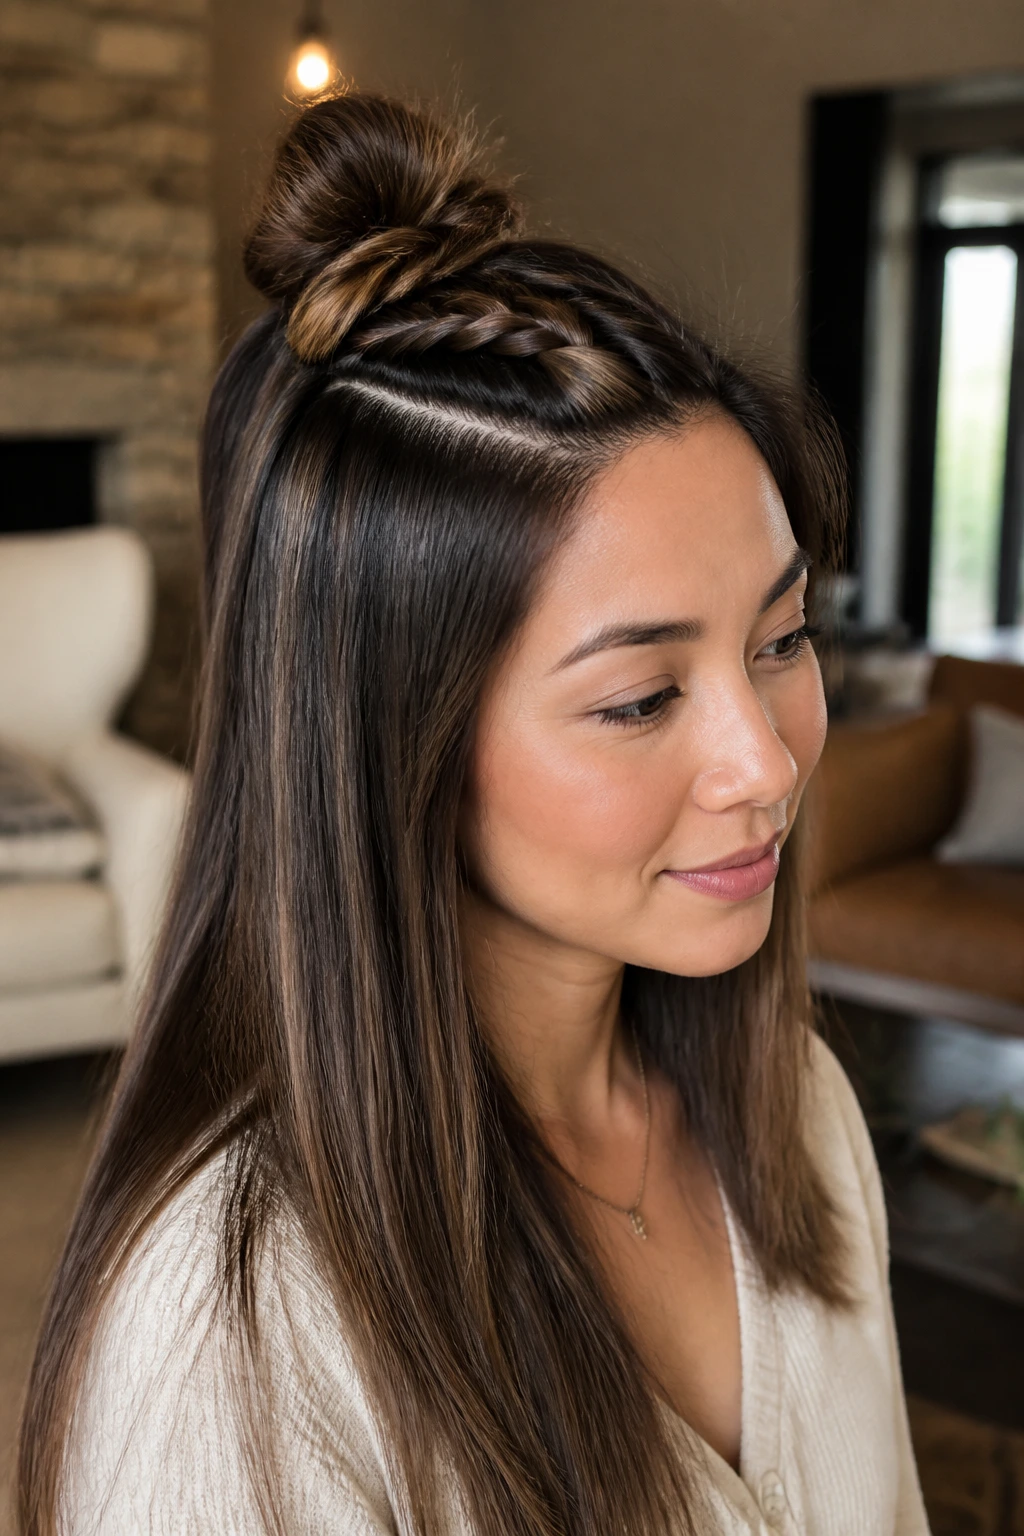
9. Braided Top Knot
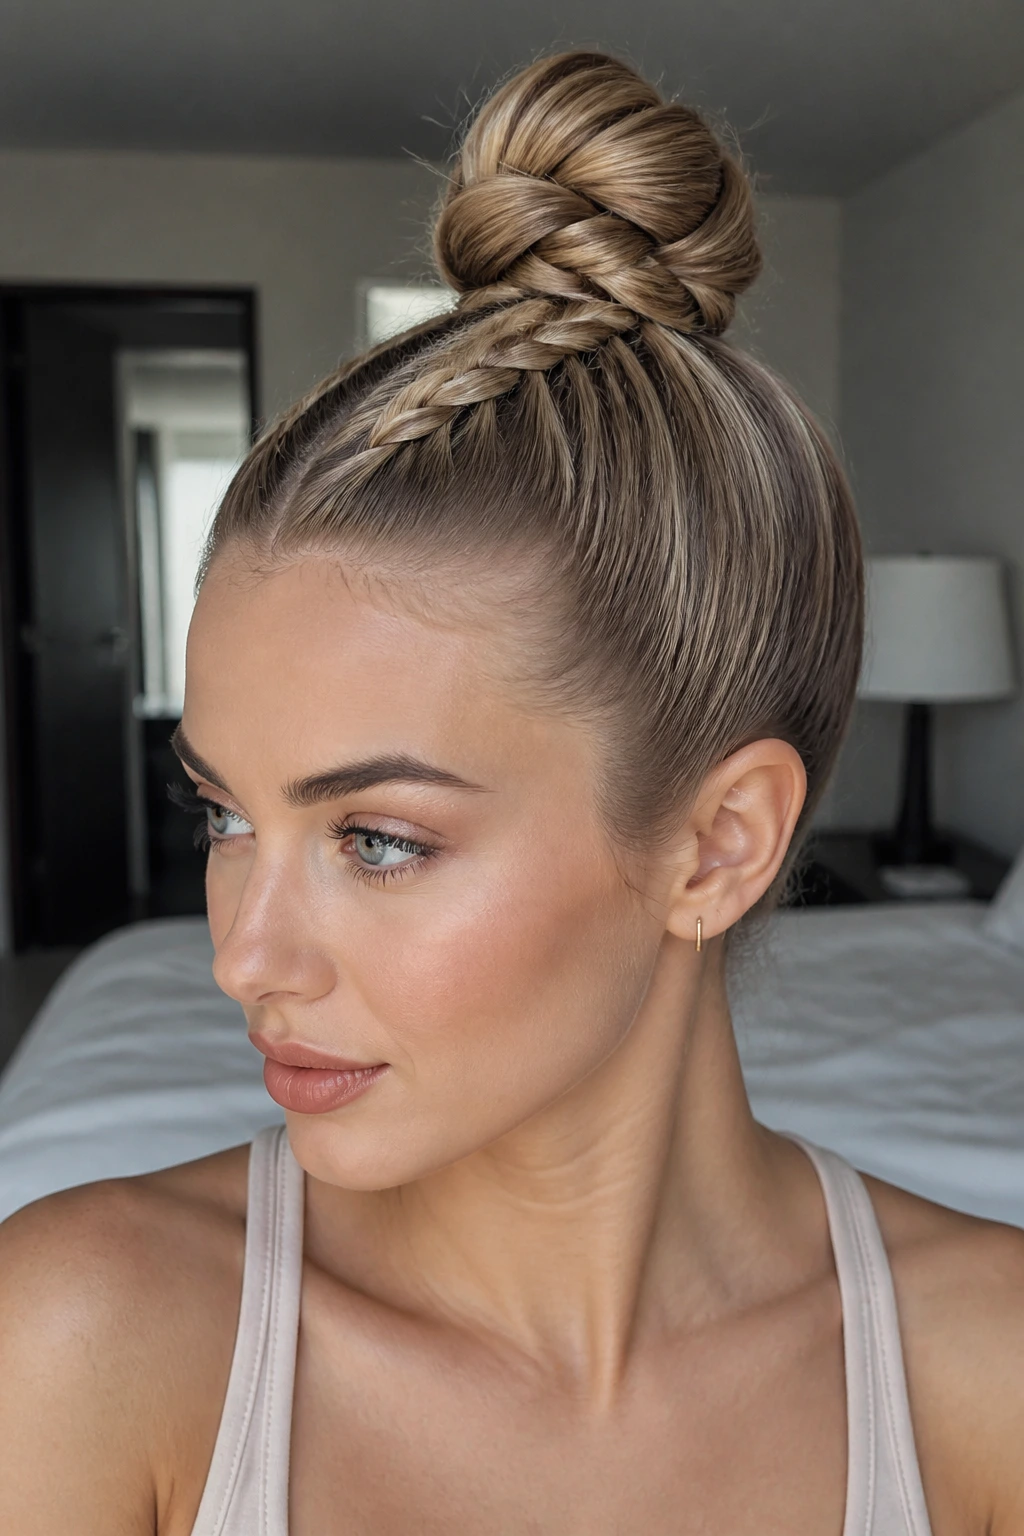
Combine your love for a high bun with the security of a braid. By braiding your hair into a ponytail first and then wrapping that braid into a bun, you ensure that even the shortest layers of your straight hair are locked into the style. This is a game-changer for people who struggle with “slippage” in their buns.
Building the Structure
- Gather your hair into a high ponytail and secure it with a strong elastic.
- Braid the ponytail from root to tip.
- Wrap the braid around the base of the ponytail, tucking the end underneath.
- Secure with heavy-duty hairpins, not just bobby pins, to ensure the weight of the bun doesn’t pull the elastic down.
10. The Mohawk Braid
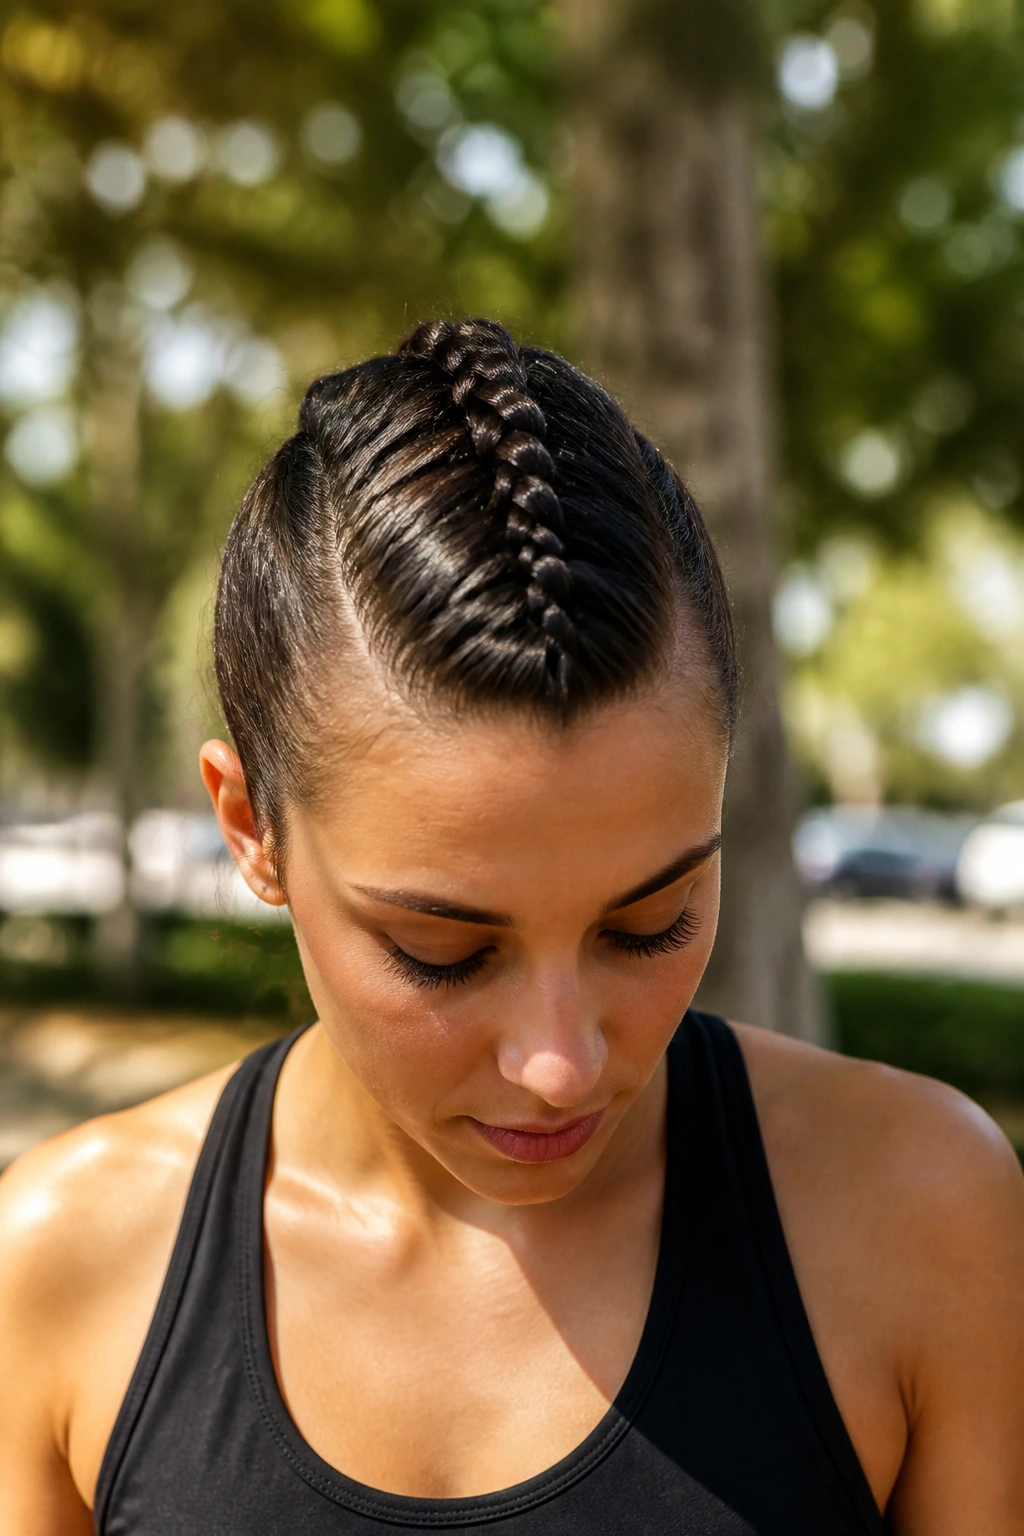
Yes, you can pull off a faux-mohawk without the need for clippers or commitment. This style involves a tight French or Dutch braid running straight down the center of your head. It’s edgy, cool, and keeps your hair completely out of your face. For straight hair, the tight contrast between the braid and the flat sides of the head is what makes this look so striking.
Achieving the Height
To get that “mohawk” lift, you need to pull your hair forward into the braid rather than pulling it tight against the scalp. As you weave, keep your hands positioned higher than your head. This pulls the roots up and away from the scalp, creating natural volume that wouldn’t exist if you braided it while looking straight down at your feet.
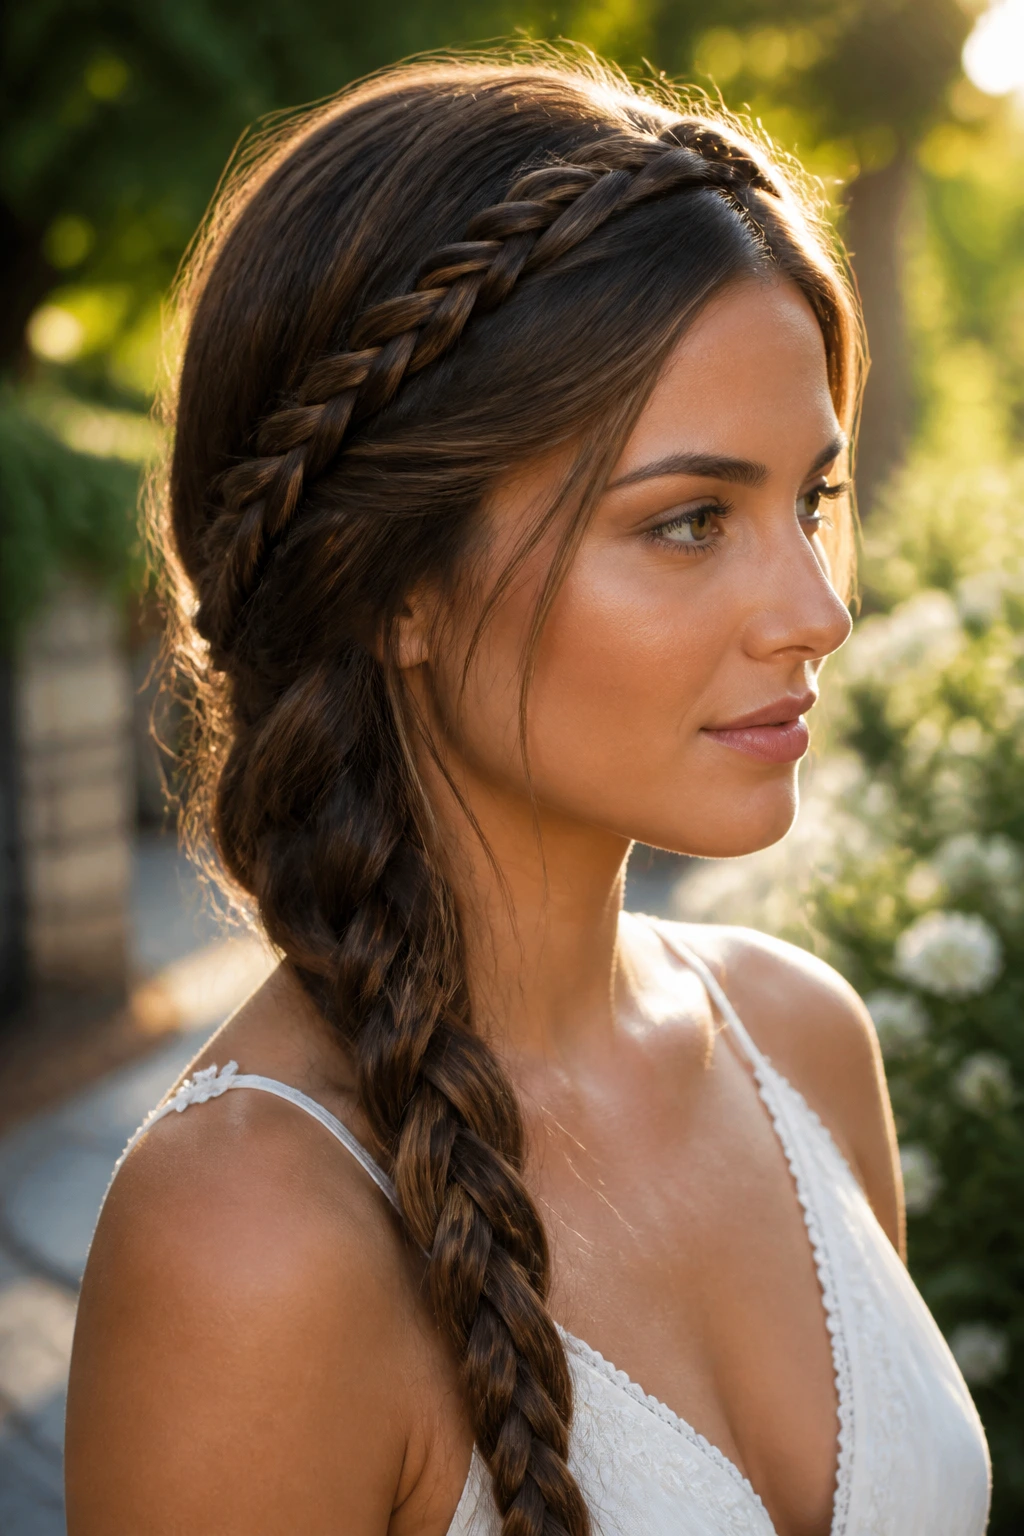
11. Rope Braids
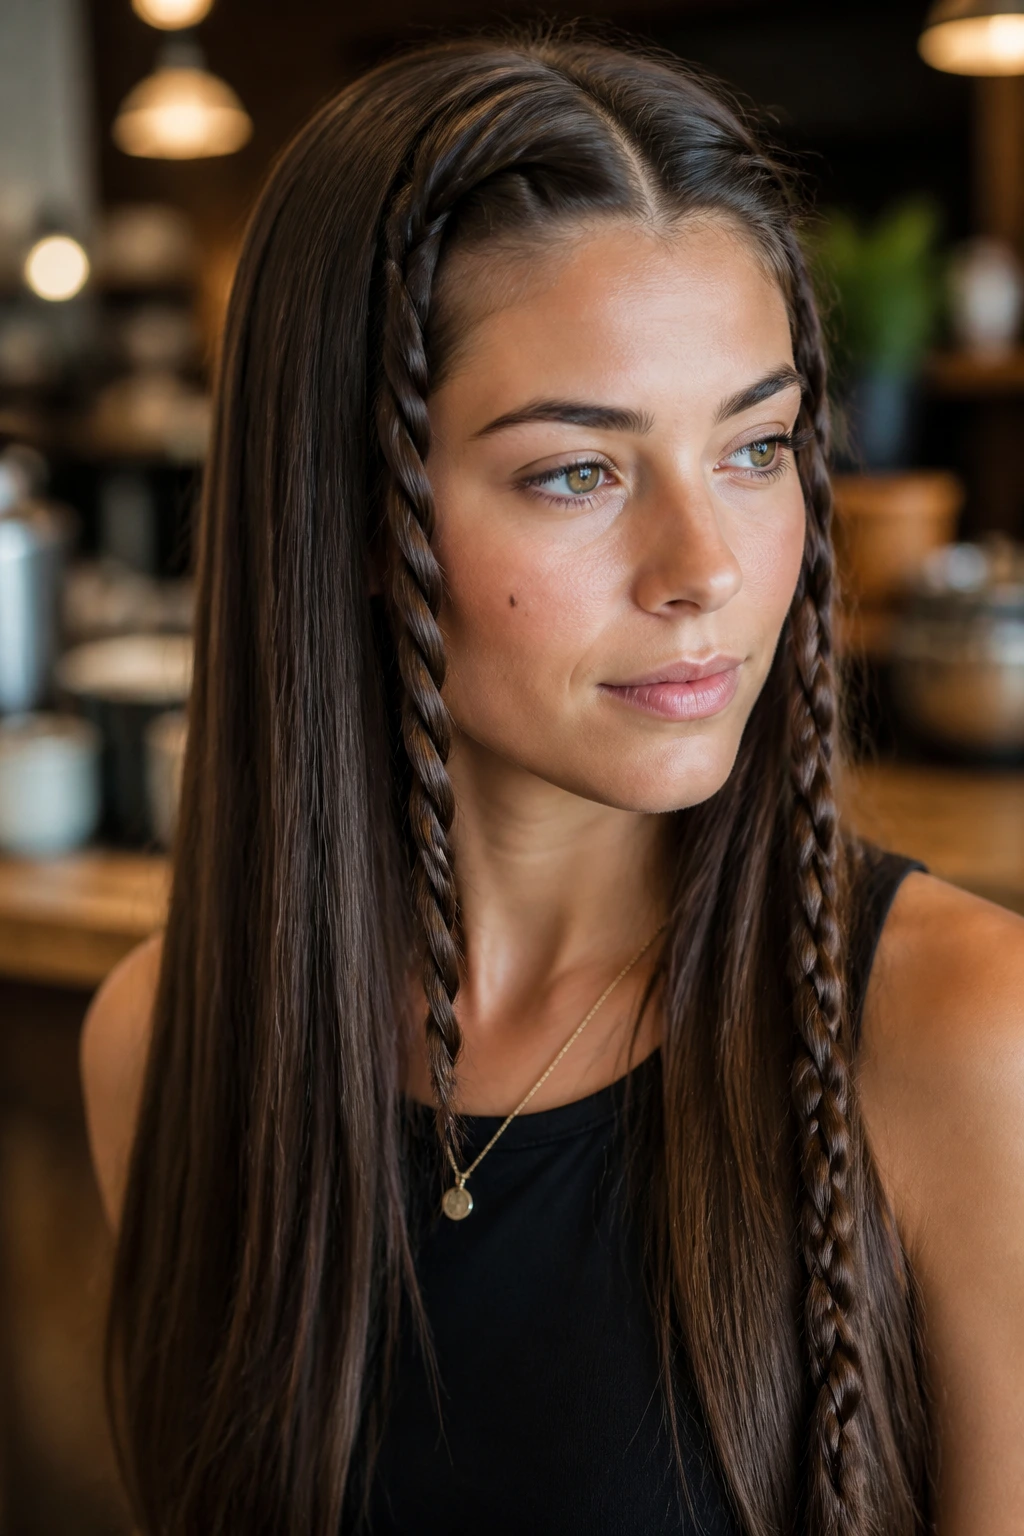
Rope braids are the simplest way to add texture to straight hair. You simply split your ponytail into two sections, twist each section individually to the right, and then twist the two sections together to the left. The opposing tensions keep the “rope” from unraveling. It’s a minimalist look that feels sophisticated and clean.
Why Straight Hair Loves This
Because straight hair has no natural curl, a traditional braid can sometimes look a bit “flat.” A rope braid, however, has a distinct, architectural shape that looks purposeful. It is the perfect style for a professional setting where you want to look put-together without appearing like you spent an hour on your hair.
12. Pull-Through “Braids”
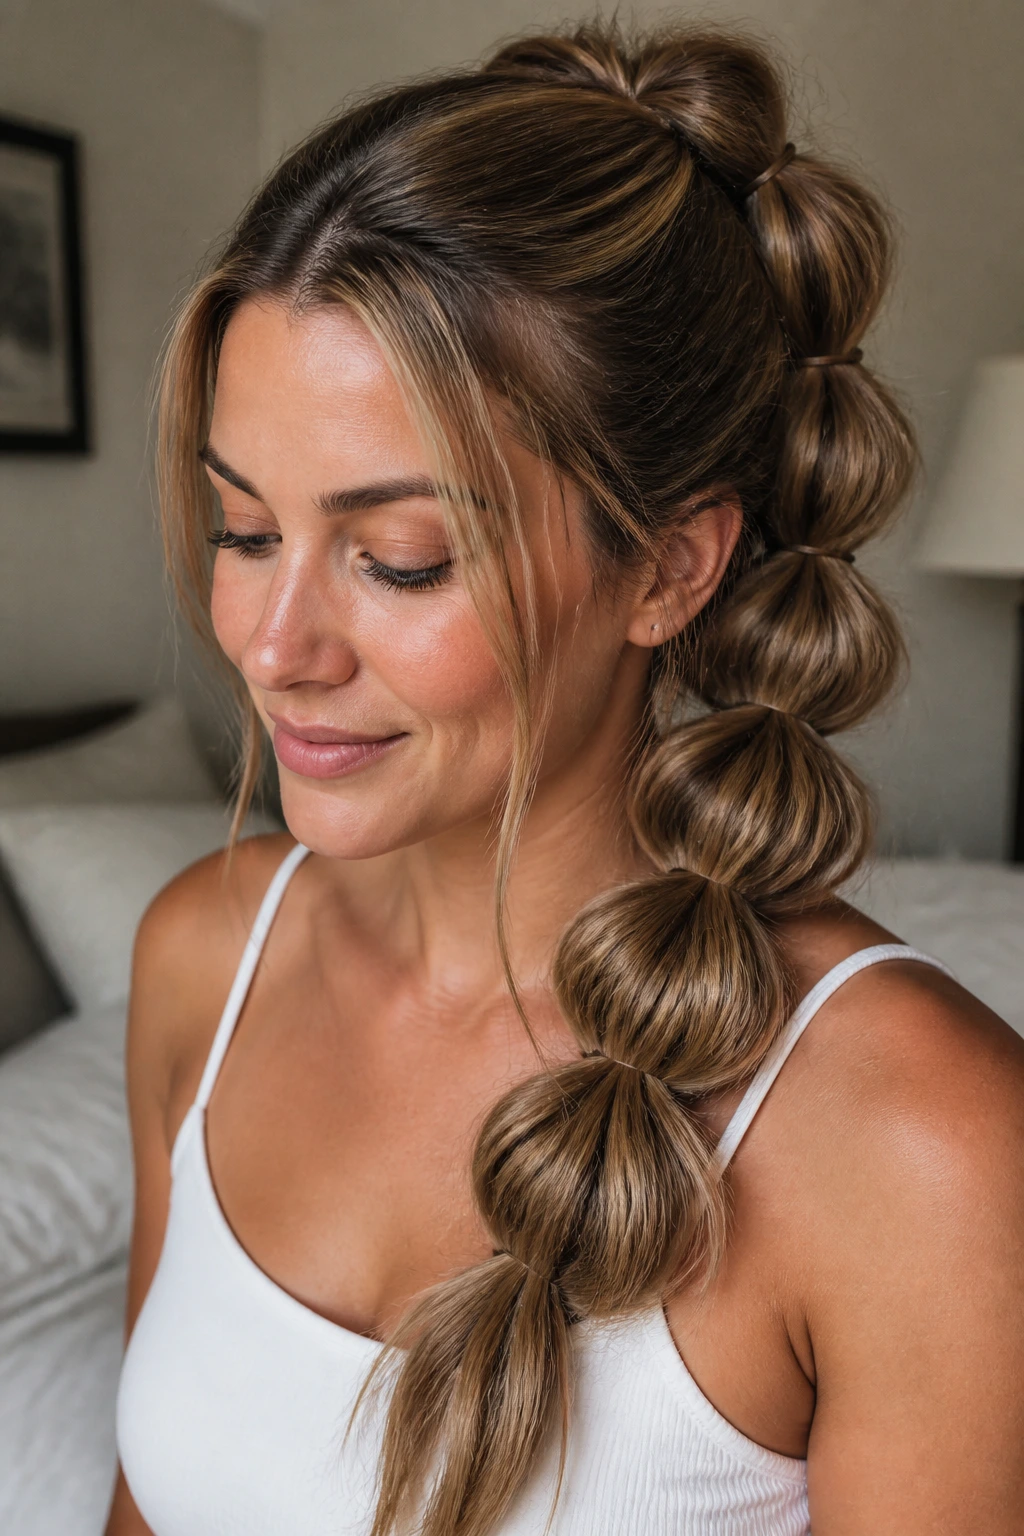
Technically, this isn’t a braid at all—it is a series of ponytails pulled through one another. It mimics the look of a thick, voluminous braid without requiring any actual weaving. This is the ultimate hack for straight-haired people who have trouble getting their fingers to stay in the right spot while braiding.
Why They Last Longer
- Individual Anchors: Each section is held by its own elastic, meaning one loose strand won’t ruin the whole style.
- Maximum Volume: You can pull and tease each section to be as big as you want without the braid falling apart.
- Durability: This style is nearly impossible to mess up, making it the perfect choice for long days when you can’t touch up your hair.
13. The Headband Crown
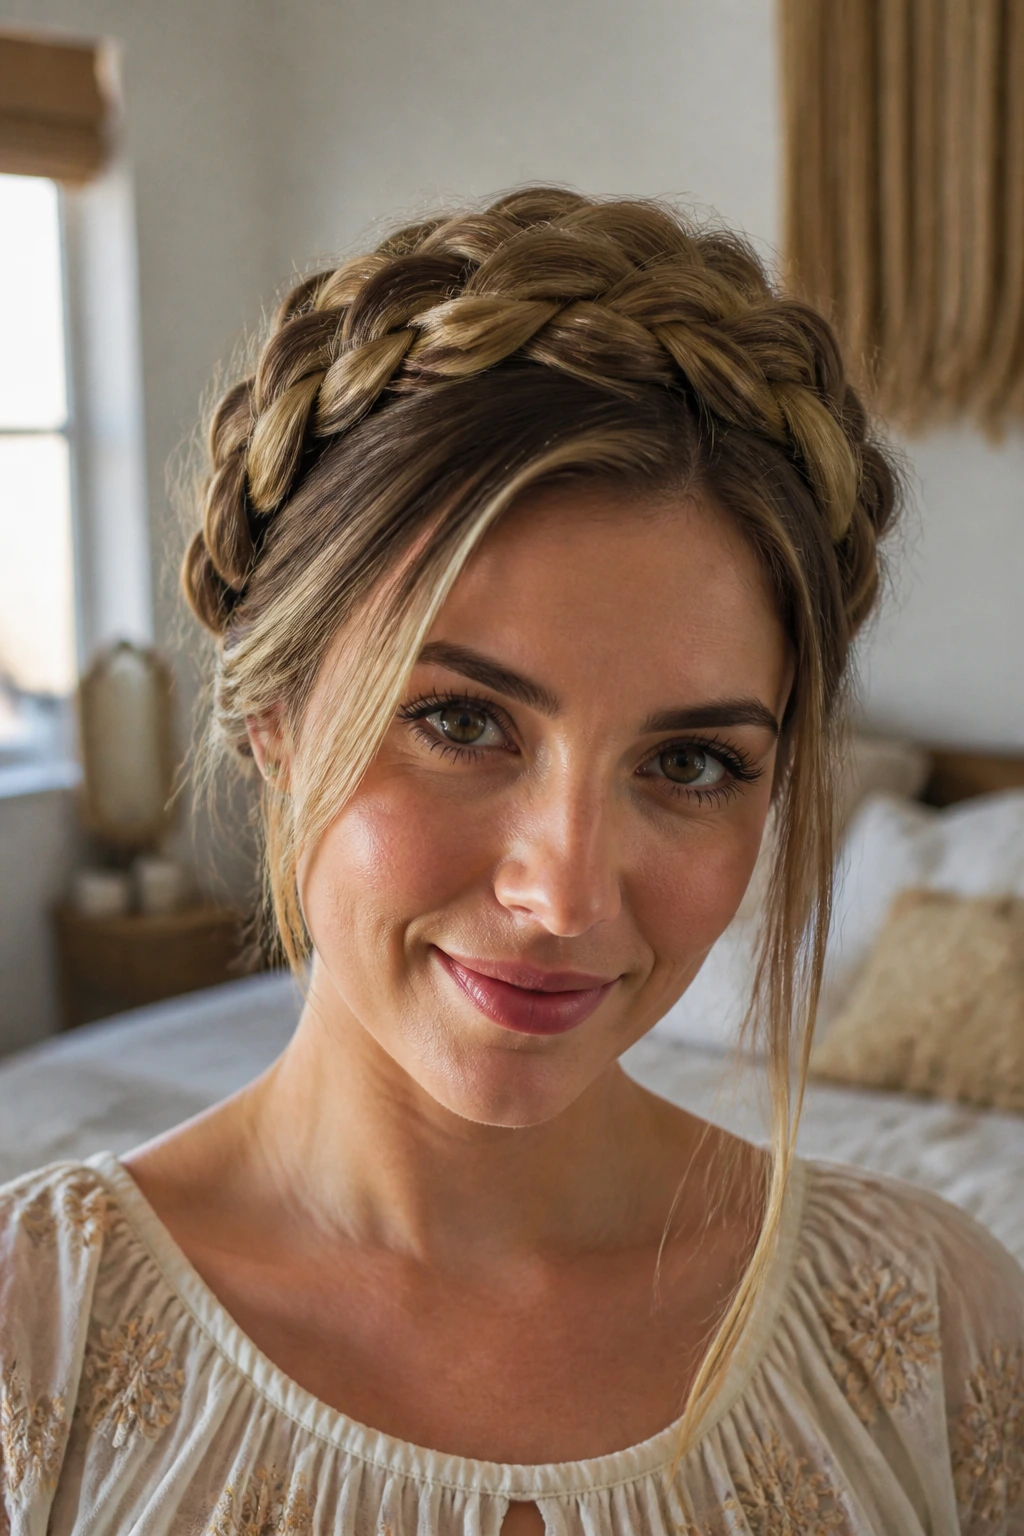
This is for when you want to feel like royalty but only have five minutes. You create two large braids starting near your ears and wrap them over the top of your head, pinning them down on the opposite sides. It hides the hairline and gives the illusion of a massive, thick crown of hair.
Choosing Your Pins
Don’t reach for the standard store-bought bobby pins. Invest in U-shaped hairpins, which are specifically designed to grip thick clusters of hair and hold them against the scalp. They are much less likely to poke into your head and cause discomfort throughout the day, which is a common complaint with traditional pins.
14. Micro-Braids on One Side
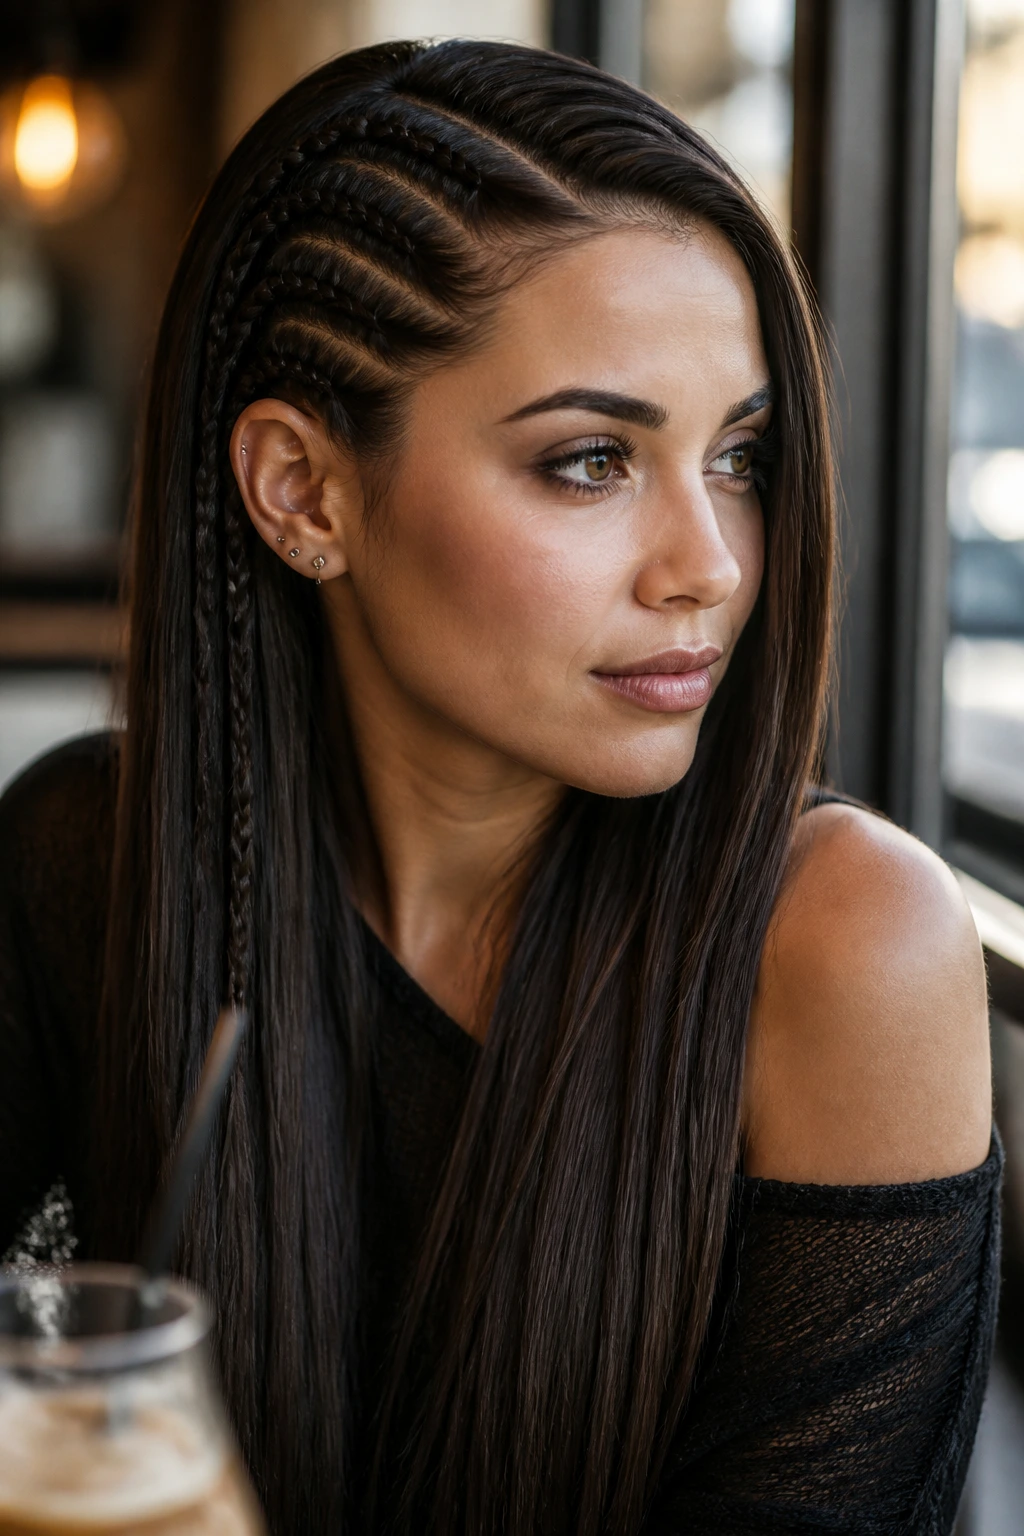
Sometimes, less is more. If you don’t want to commit to a full head of braids, try incorporating two or three micro-braids on one side of your head while leaving the rest of your hair straight and free. It adds a bit of “edge” to your everyday style and breaks up the monotony of stick-straight strands.
Balancing the Aesthetic
The trick here is to keep the micro-braids very tight—almost to the point of being stiff. When they are small and firm, they act almost like an accessory. If they are too loose, they just look like unkempt strands of hair. Use a tiny bit of pomade on your fingertips to ensure they look sharp and defined.
15. The Braided Half-Bun (Hun)
The “hun” (half-bun) has been a popular choice for years, but adding a braid to the top section takes it from casual to polished. By braiding the section you plan to pull into a bun, you add texture to the crown, which helps hide the part line and adds a bit of height to the top of your head.
The Best Way to Pin
Once you have formed your bun, use a clear elastic to secure it, then pin the base of the bun to your scalp. If you just leave it sitting there, the weight of the bun will eventually cause the elastic to sag, creating a “bubble” of loose hair between the bun and your head. Pinning it flush against the scalp keeps it tight all day.
16. Accent Braids in a High Ponytail

A high, sleek ponytail on straight hair is a power look, but it can look a little plain. Incorporating a small, tight braid that wraps around the base of the ponytail—or even a small braid that runs from the front hairline into the ponytail itself—adds visual interest without taking away from the sleekness of the style.
The Importance of the Base
When braiding the base of a ponytail, you have to be careful with your tension. If you pull too hard, you will create a bump in the ponytail base. Use a small clear elastic to secure the braid before you try to wrap it around the base of your ponytail. It makes the actual wrapping process much cleaner and keeps your fingers from getting tangled in the hair.
17. The Twisted Braid Headband
This is a variation of the classic crown braid, but it involves twisting sections of hair instead of weaving them. You pull small sections of hair from the front, twist them, and add them into a larger side braid. It creates a soft, ethereal look that is much more forgiving than a tight, traditional weave.
Why Twists Are Easier
If your hair is very straight and silky, traditional weaving can lead to strands slipping out of the braid. Twisting creates a natural friction that holds the hair in place more effectively. It is a more “organic” way to braid that doesn’t require you to maintain perfectly even tension across all three strands.
18. Braids into a Low Chignon
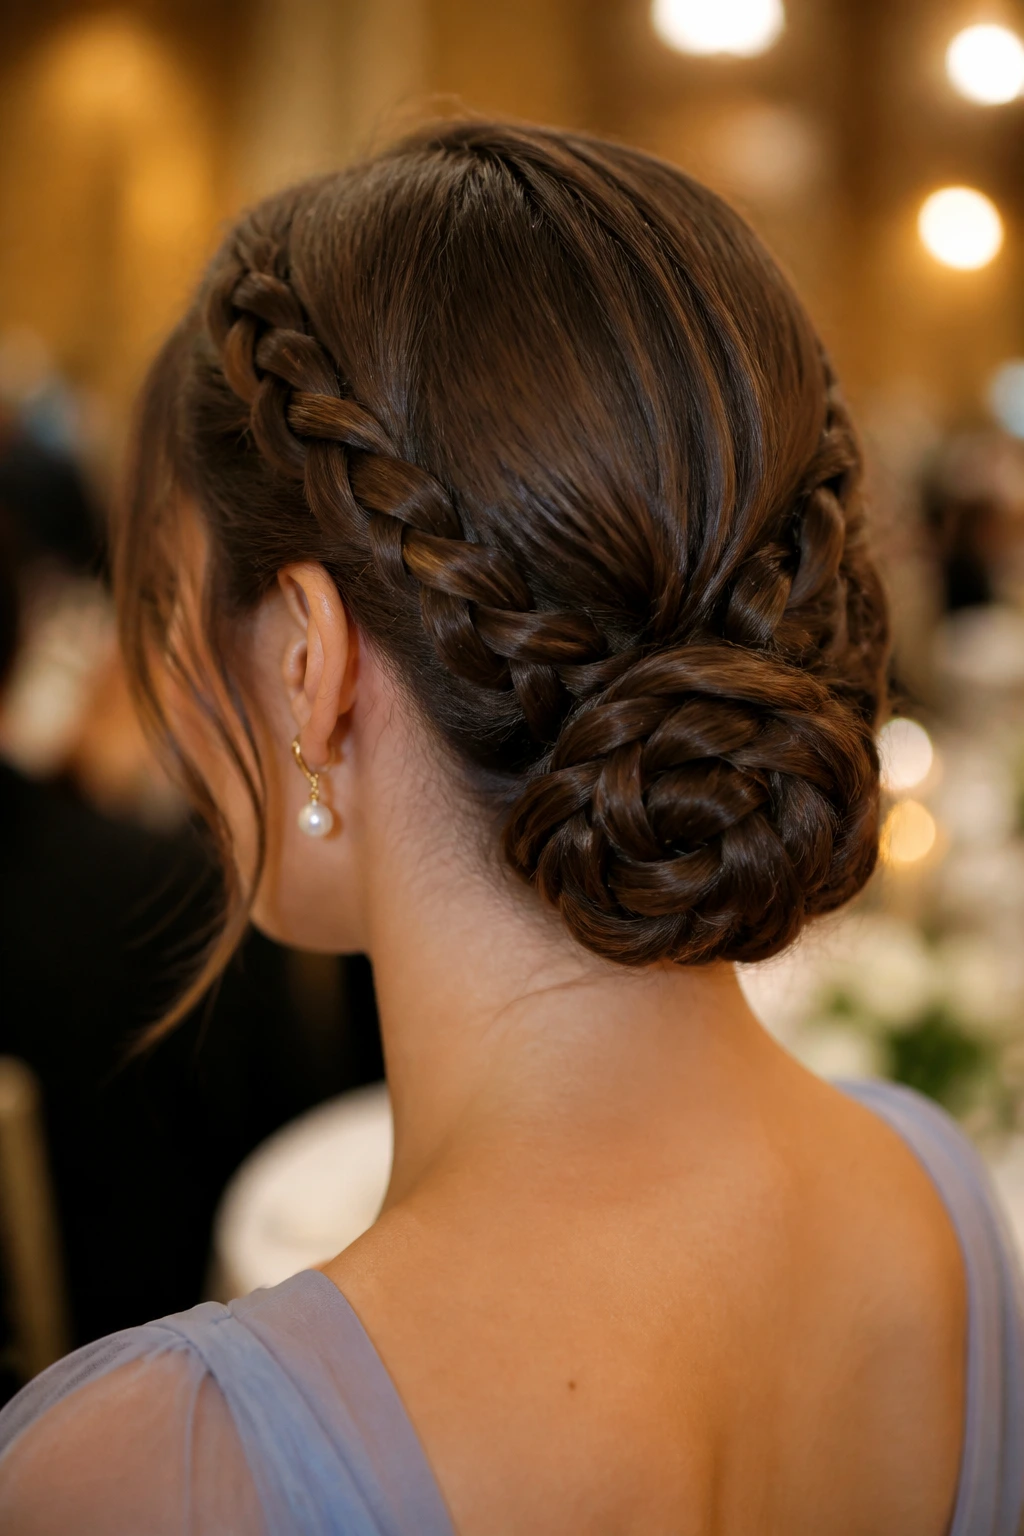
For events or formal settings, a low, braided chignon is the gold standard. It combines the structured look of a braid with the elegance of a classic updo. You start with two braids on either side of your head and gather them at the nape of the neck, tucking them into a messy bun or a clean chignon.
Setting the Style
Use a medium-hold setting spray before you start styling. It gives your straight hair the slight “tackiness” it needs to stay twisted and tucked. Once the chignon is secured with pins, a light mist of flexible-hold hairspray is enough to keep everything in place without making it look crunchy.
19. The “Inside-Out” Accent Braid
This braid is done in reverse (under instead of over) but only on one small section, creating a raised braid that sits on top of your hair rather than blending in. It acts like a highlight, drawing attention to your face and adding a bit of complexity to a simple straight hairstyle.
Positioning Your Fingers
When you braid “inside out,” you have to be conscious of your finger position. You aren’t pulling your hands toward your face; you’re pushing them away from your scalp. It takes a little practice to get the muscle memory down, but once you do, it creates a much sharper, higher-contrast braid that really stands out against straight hair.
20. Layered “Stacked” Braids
If you want to go all out, stack one braid on top of another. You create a thin, tight braid first, then layer a looser, thicker braid over the top of it. It’s a bold look that creates a massive amount of visual depth and works exceptionally well for long, straight hair that has plenty of length to play with.
The Secret to Stacking
Use two different techniques to make the layers distinct. For the bottom layer, use a tight French braid. For the top layer, use a looser Dutch braid. The contrast in the weaving technique will make the two layers look clearly separated, adding a sense of dimension that is usually impossible to achieve with flat, straight hair.
Final Thoughts
The beauty of braids on straight hair is that you get to define the texture yourself. You aren’t fighting your natural hair pattern, but rather using the braid as a tool to engineer the style you want. Whether you’re going for a tight, polished look or a soft, romantic crown, the key is always in the prep—a little bit of grit and a lot of practice will go further than any styling product on the shelf.
Don’t be discouraged if your first attempt at a Dutch braid feels messy or loose. Straight hair has a way of showing every mistake, but that’s also the beauty of it. A slightly loose, imperfect braid can look intentional and effortless if you own it. Next time you’re staring at your reflection and feeling like your hair is just “lying there,” just grab a section, start weaving, and see where the texture takes you.