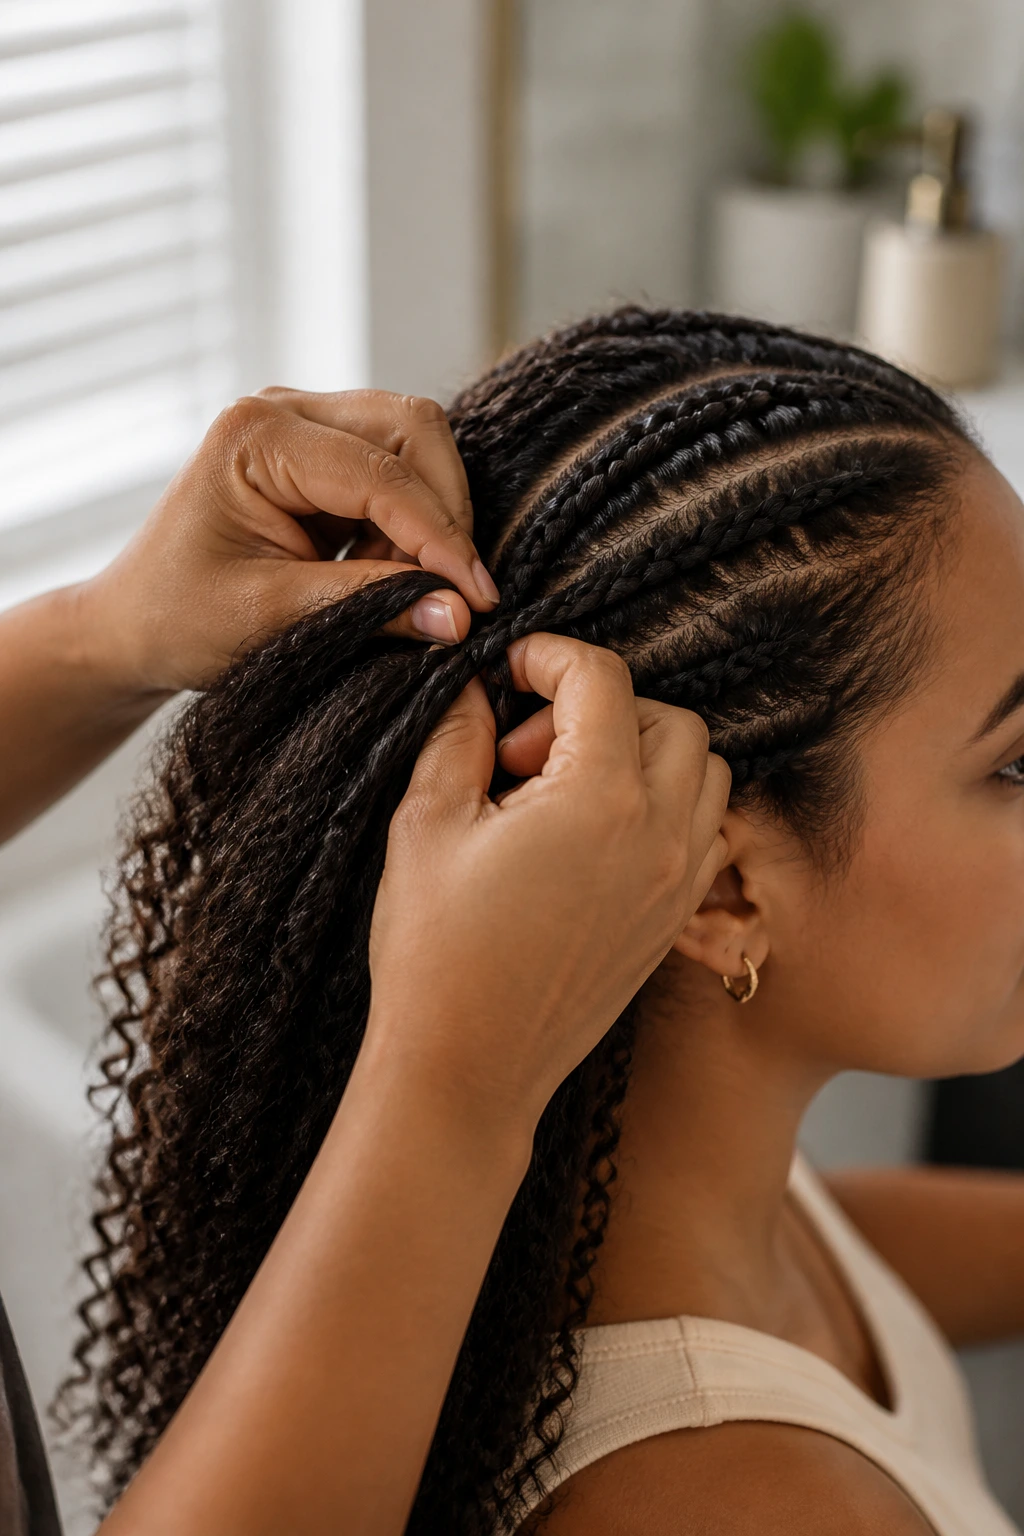
Braiding curly hair isn’t just about styling; it is an act of architecture. When you work with textured hair, you aren’t just weaving strands together; you are managing volume, fighting against the natural elasticity of the curl, and working with a canvas that has a mind of its own. Many people with tight coils or loose waves fear the braid because they worry about frizz or tension, but once you learn how to balance moisture and grip, curly hair becomes the best base for intricate styling. You get texture, hold, and volume that straight hair simply cannot achieve without a lot of expensive products.
The secret to a long-lasting curly braid usually starts long before your fingers touch your hair. It is about the prep. If your curls are too soft or slippery, the braid will unravel by lunch. If they are too dry, they will snap. You want that middle ground—a hydrated curl that has enough “tack” to stay put. Whether you are aiming for an elegant updo for an event or a messy, low-maintenance look for a long day of errands, the following styles prove that your natural texture is the ultimate accessory.
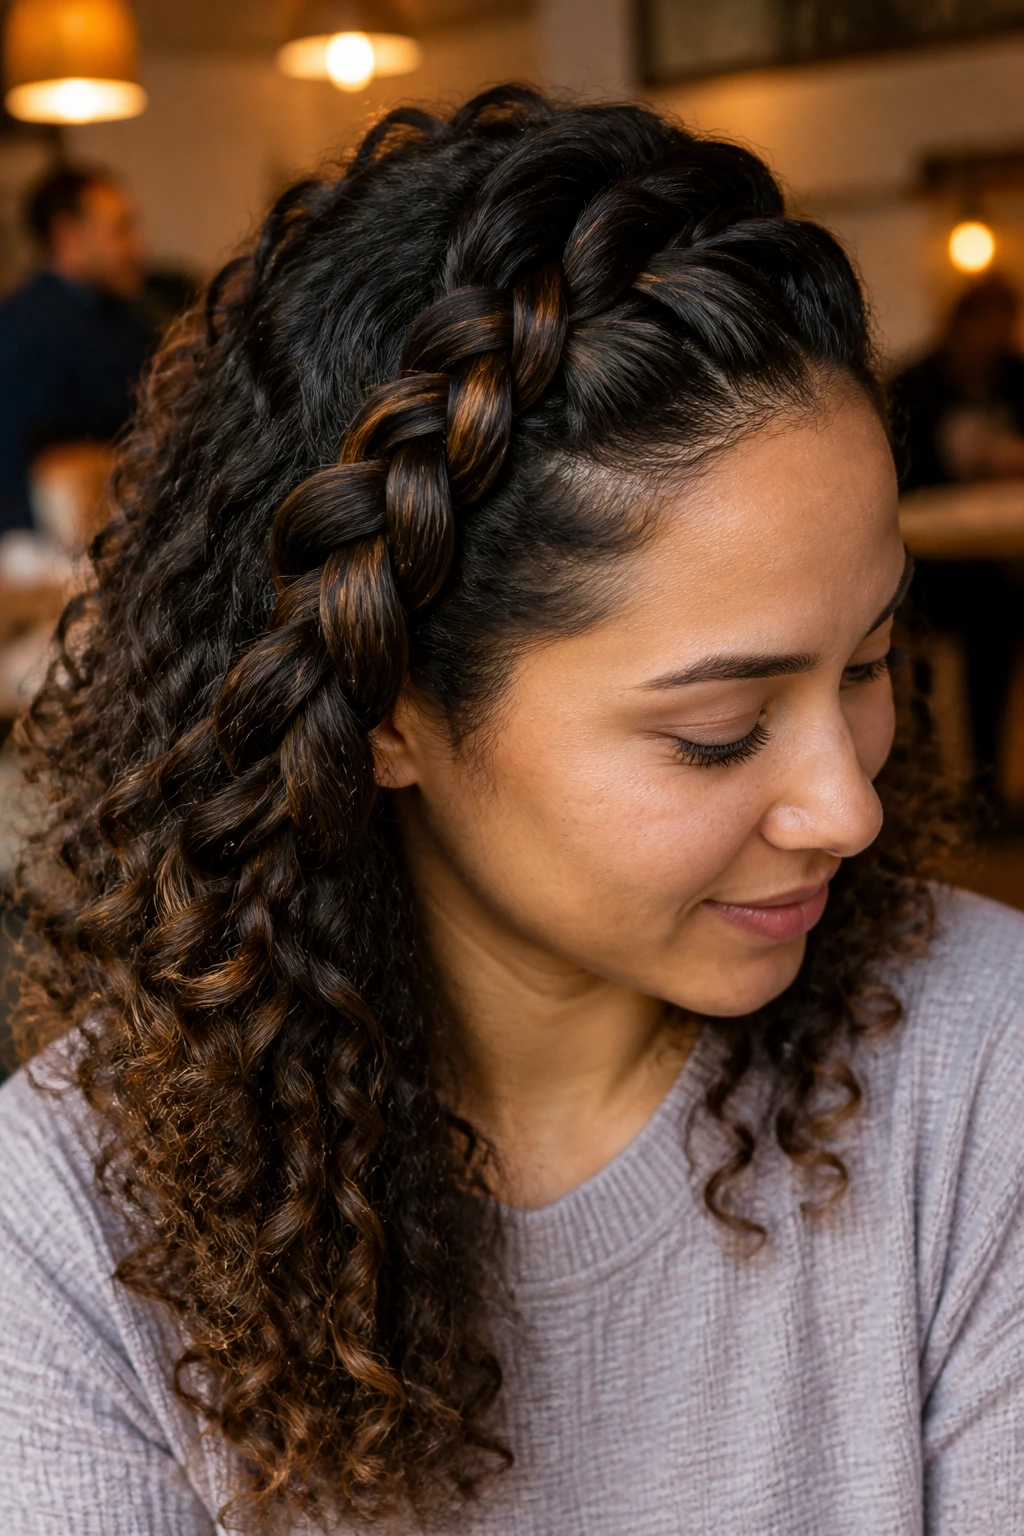
1. The Crown Braid for Loose Waves
This style is essentially a headband made of your own hair. It works best on hair that has been washed a few days prior, as the natural oils provide the necessary grip. You start by parting your hair down the center or slightly to the side, then you French braid along your hairline, moving toward the back.
Why This Works for Curls
The natural volume of curly hair means you don’t have to spend time “pancaking” or pulling at the loops of the braid to make it look full. It naturally has that romantic, lived-in feel.
How to Style It
- Part your hair in two sections.
- Create a Dutch braid starting at the temple.
- Keep the tension loose so you don’t pull on your hairline.
- Pin the ends at the base of your head using U-shaped hairpins, which are much gentler on curls than traditional bobby pins.
2. High Puff with Braided Detail
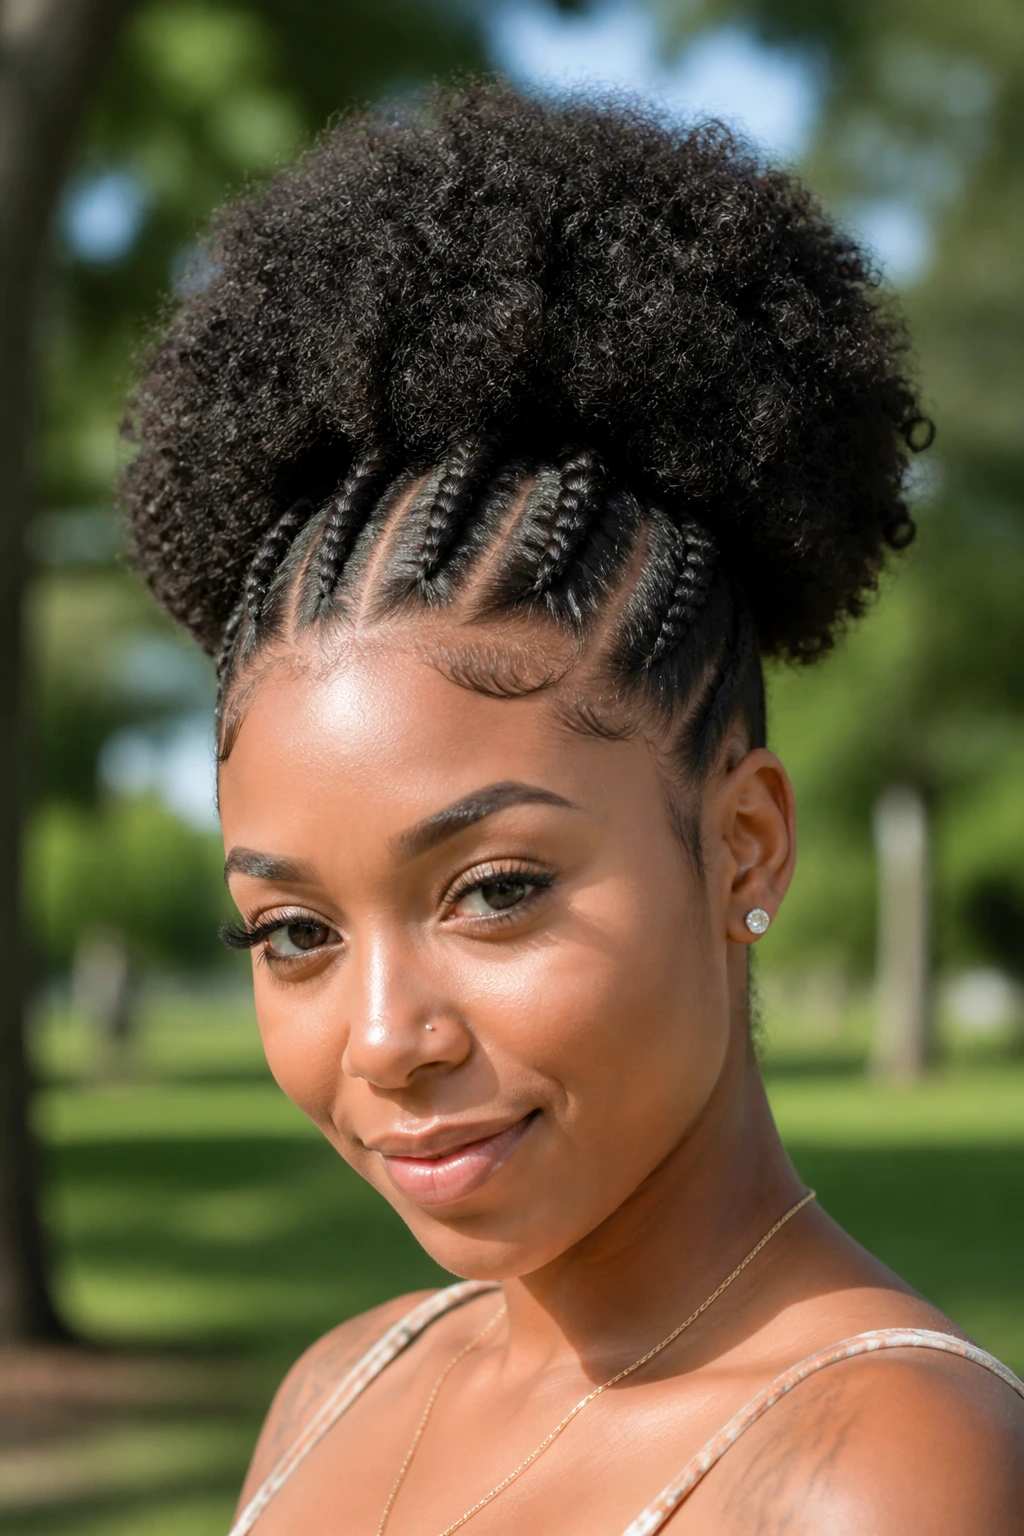
If you have tight coils, a high puff is a classic, but adding a few cornrows or a single thick Dutch braid along the front can turn a simple everyday look into something polished. You are essentially framing your face with structure while letting the back of your hair celebrate its natural, voluminous shape.
Techniques for Definition
You want your edges to look smooth while the rest of your hair maintains its body. Using a light-hold edge control gel is fine, but don’t over-saturate. You want the hair to breathe.
Keeping the Puff Alive
- Use a thick, fabric-covered elastic to secure the puff—avoid anything with metal clasps that might snag your curls.
- Wrap a silk scarf around the base for an extra touch of color and protection.
3. Side-Swept French Braid
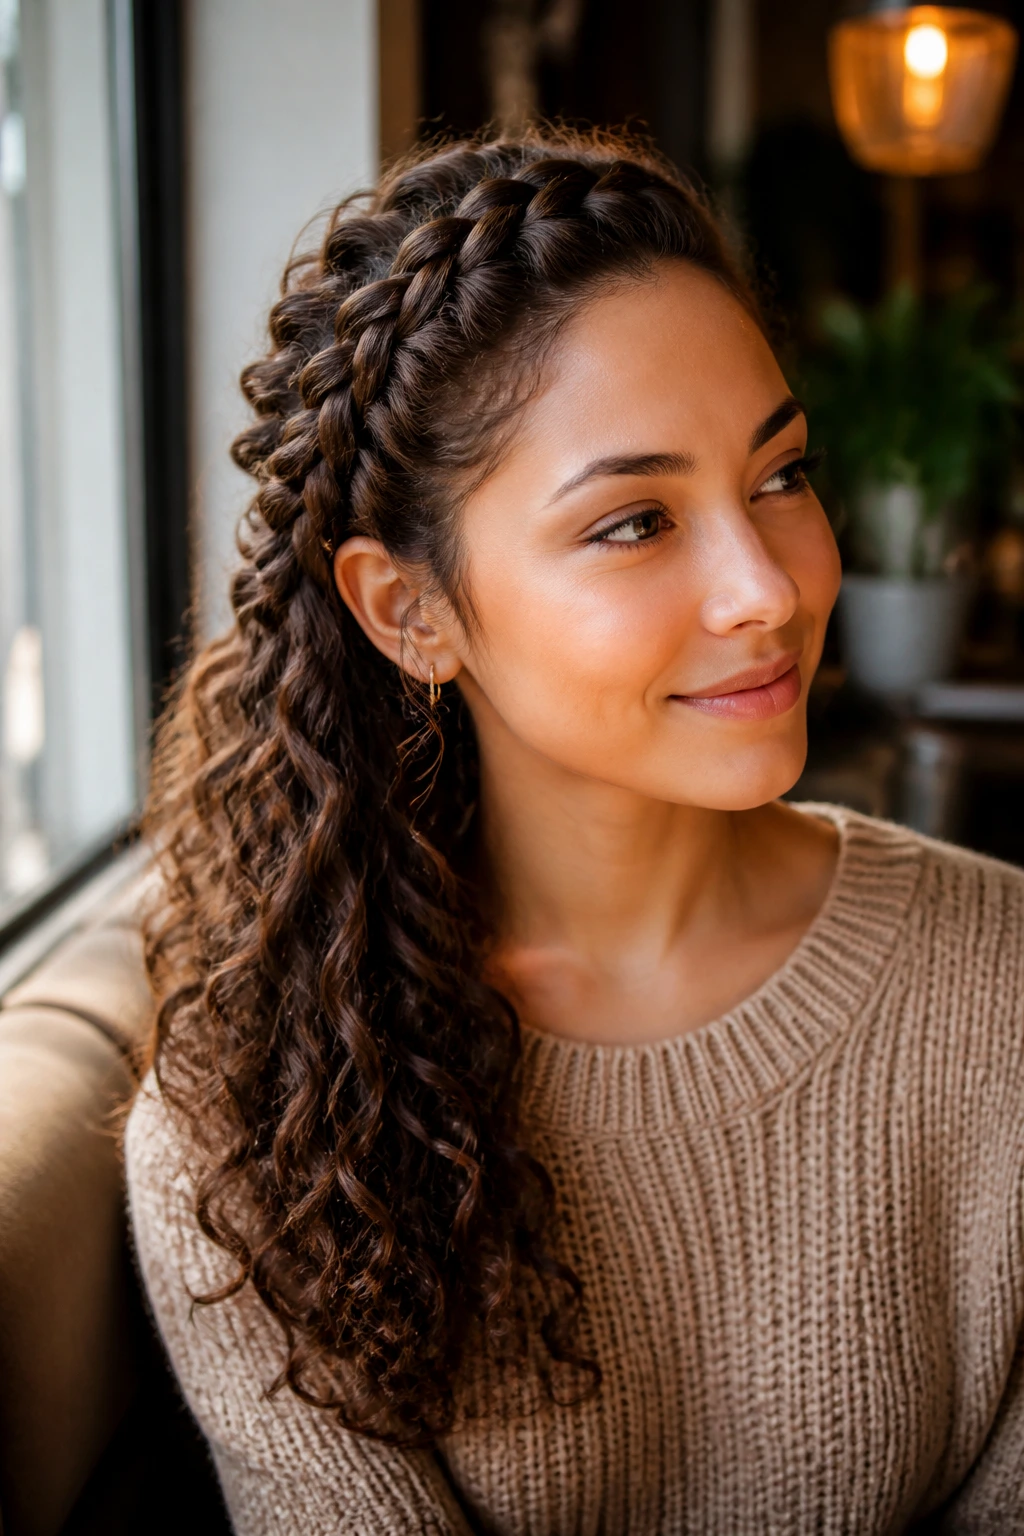
Sometimes you don’t want your hair entirely pulled back. A side-swept French braid allows you to control the frizz around your face while letting the rest of your curls hang loose over your shoulder. It is the perfect balance between a formal updo and a casual day-out look.
The Role of Moisture
Because you are exposing the length of your hair, make sure to use a leave-in conditioner before you start braiding. If the ends look dry, a small amount of oil—jojoba or argan work wonders—will seal the cuticle and give you that healthy shine.
When to Use This Style
This is an excellent option for windy days. The braid keeps the bulk of your hair anchored to one side, preventing that frustrating “hair in the mouth” situation.
4. Double Dutch Pigtails
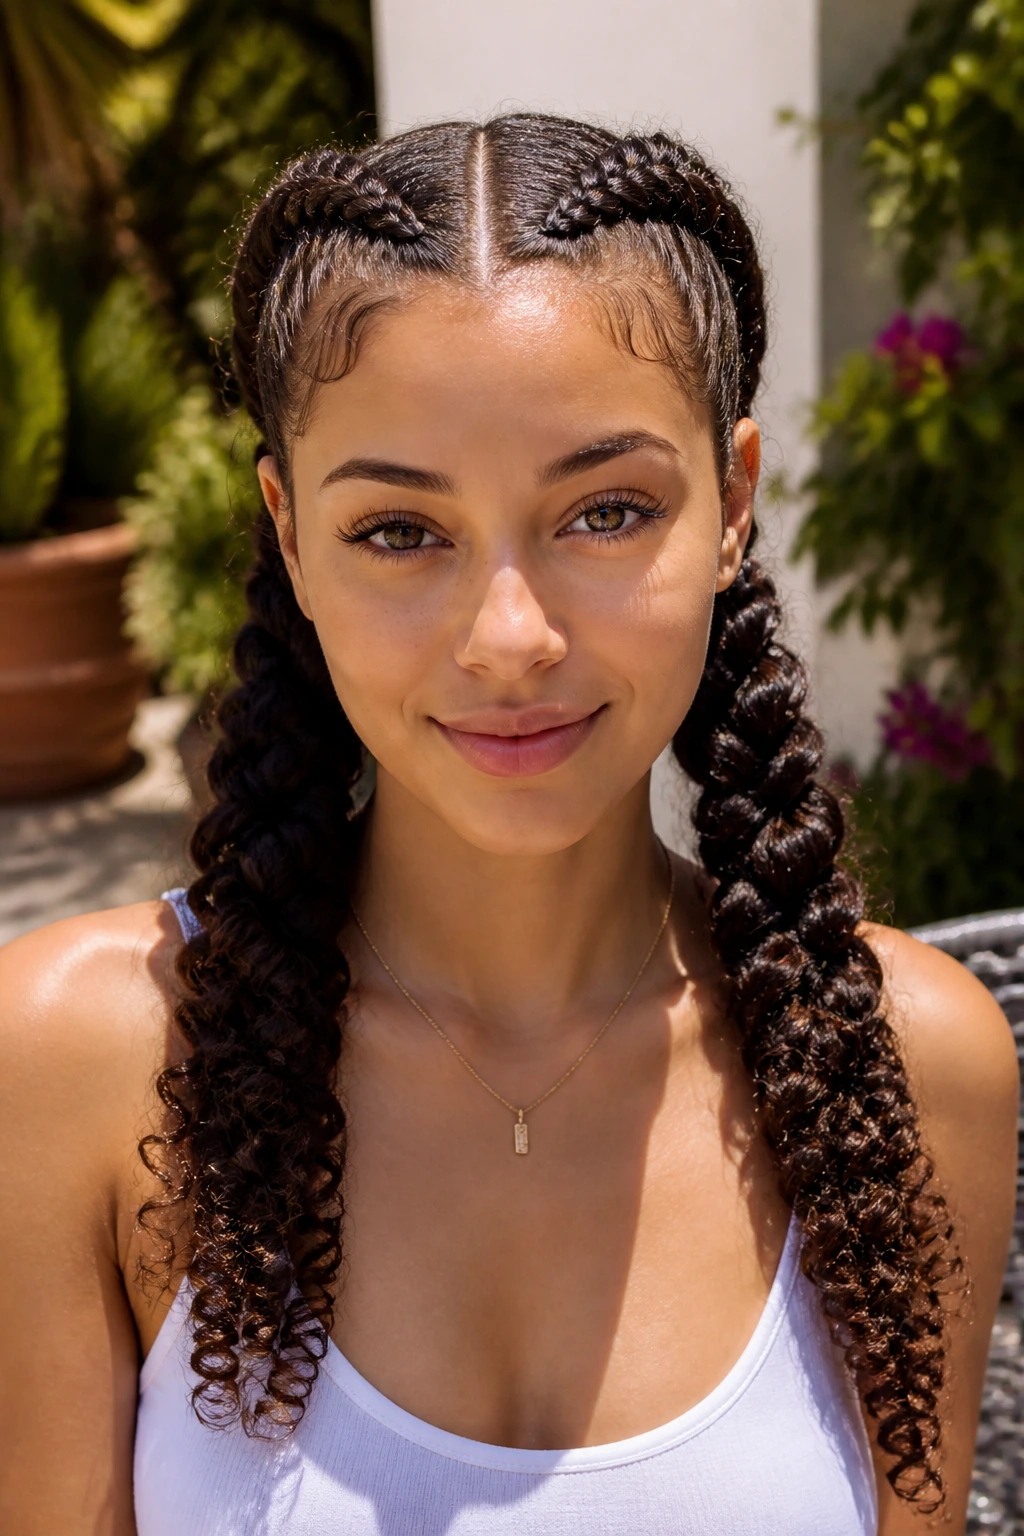
These are not just for children. When you Dutch braid your hair into two pigtails, you create a very secure style that can last for two or three days. It keeps your hair stretched out, which can actually help with length retention if you are trying to grow out your curls.
Achieving Symmetry
The hardest part is getting both sides to look identical. Start by using a rat-tail comb to get a perfectly straight part. If your hair is prone to tangling, start braiding while your hair is slightly damp—never soaking wet—with a bit of detangling cream.
Adding Volume to the Braids
Once the braids are secure, gently pull on the edges of each loop. This makes the braids look thicker and adds that soft, dreamy quality that looks great with curly hair textures.
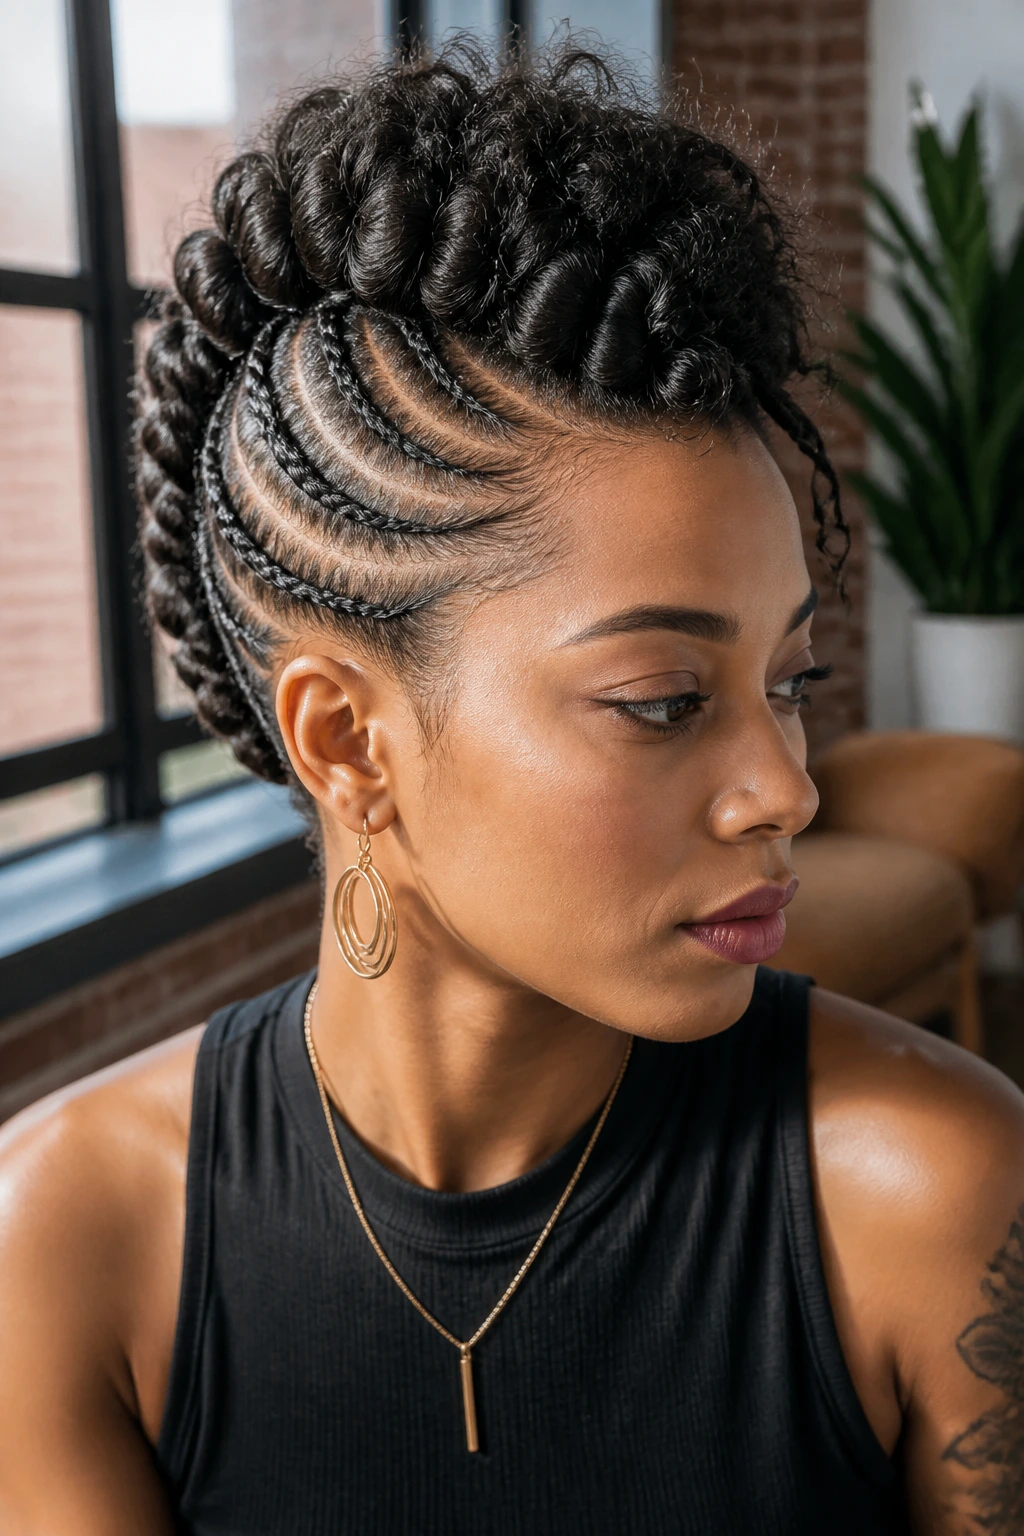
5. Braided Faux-Hawk
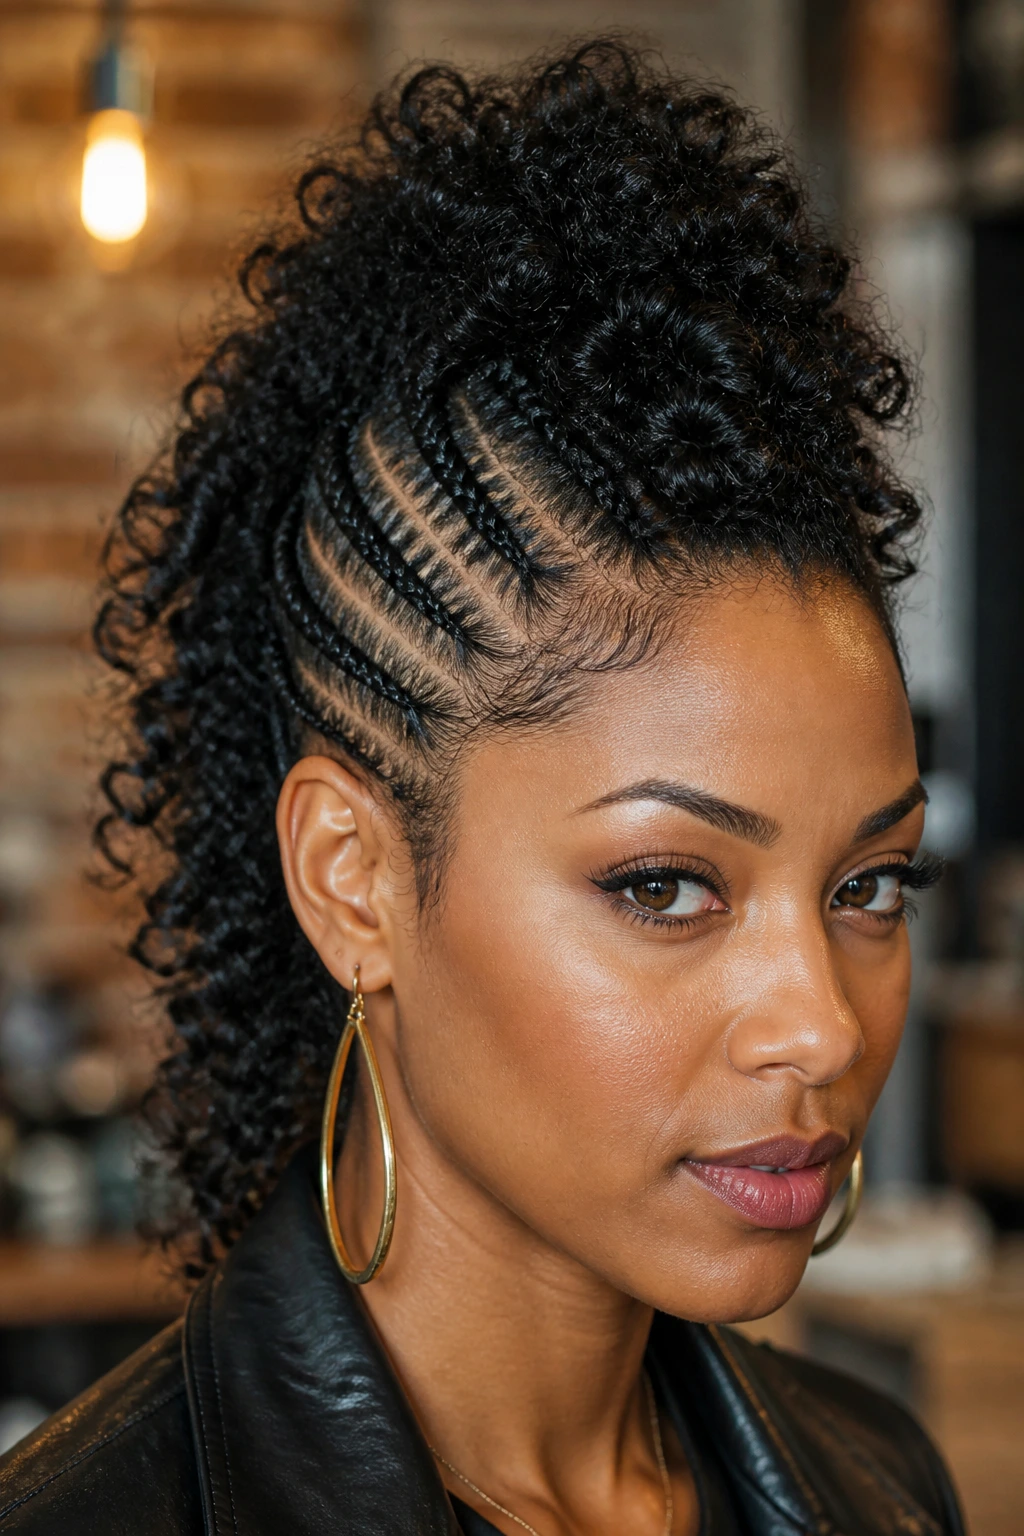
This is for those days when you want a bit of an edge. By cornrowing the sides of your head toward the center and letting the top curls spill over in a wild, defined heap, you create the illusion of a mohawk without ever touching the shears.
Managing the Sides
Use a firm-hold styling cream on the sides so the braids lay flat. You want the contrast between the tight, structured sides and the loose, explosive top section.
Maintaining the Shape
- Use a spray-on shine booster to keep the top curls looking fresh.
- This style can be sensitive to humidity, so a light-hold finishing spray is your best friend.
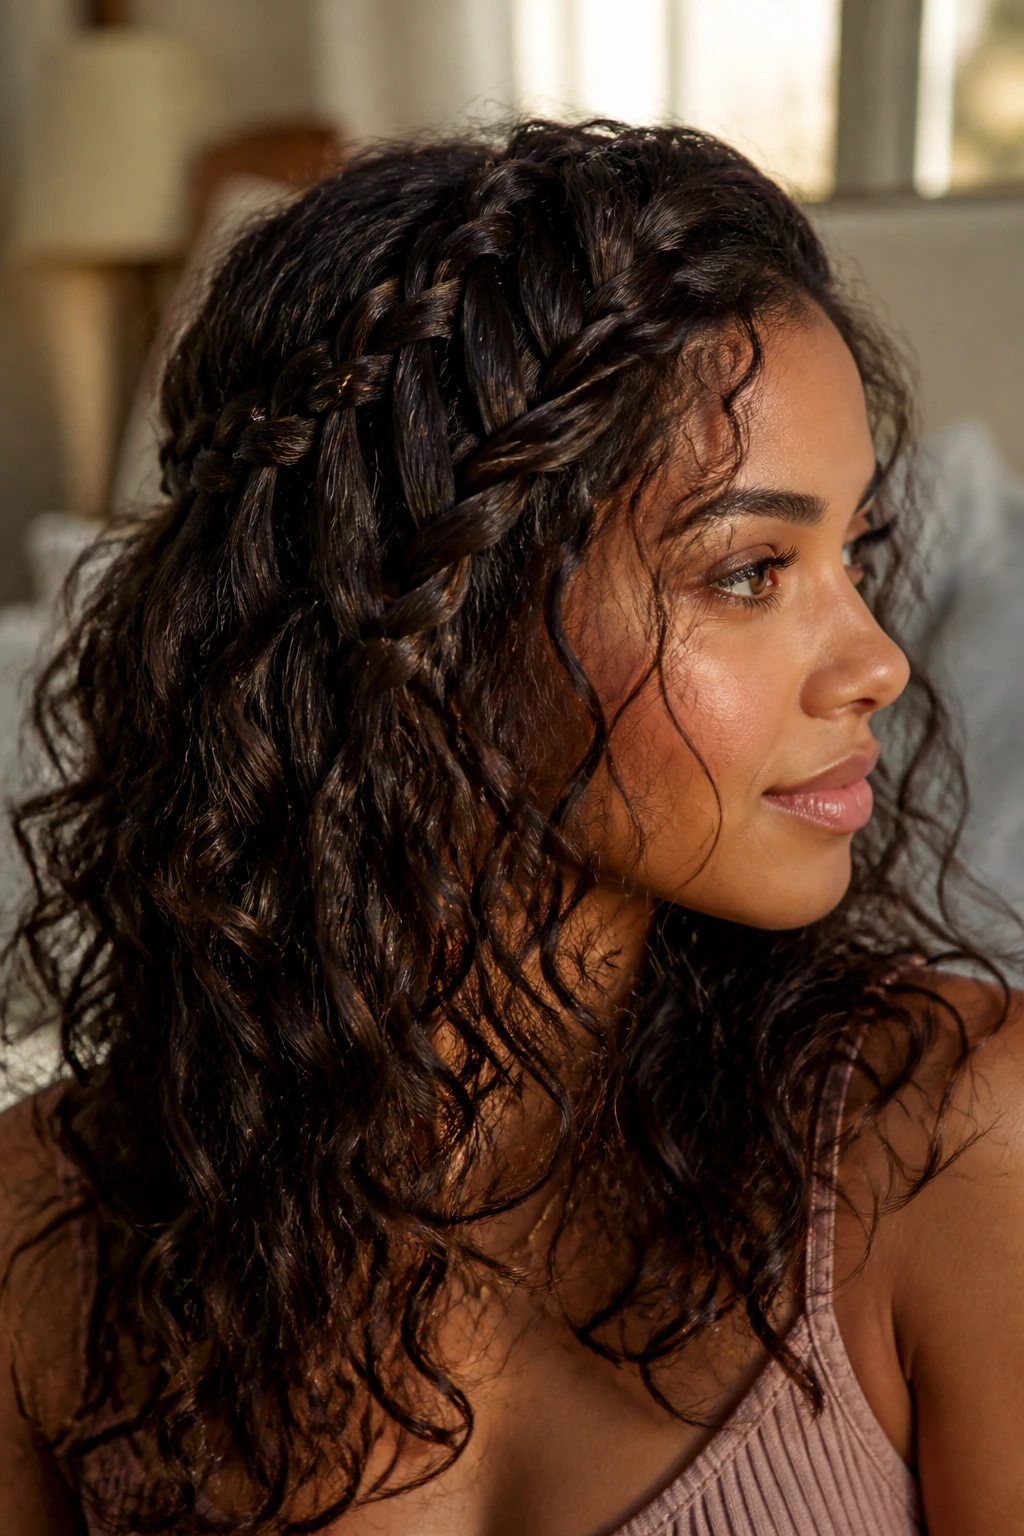
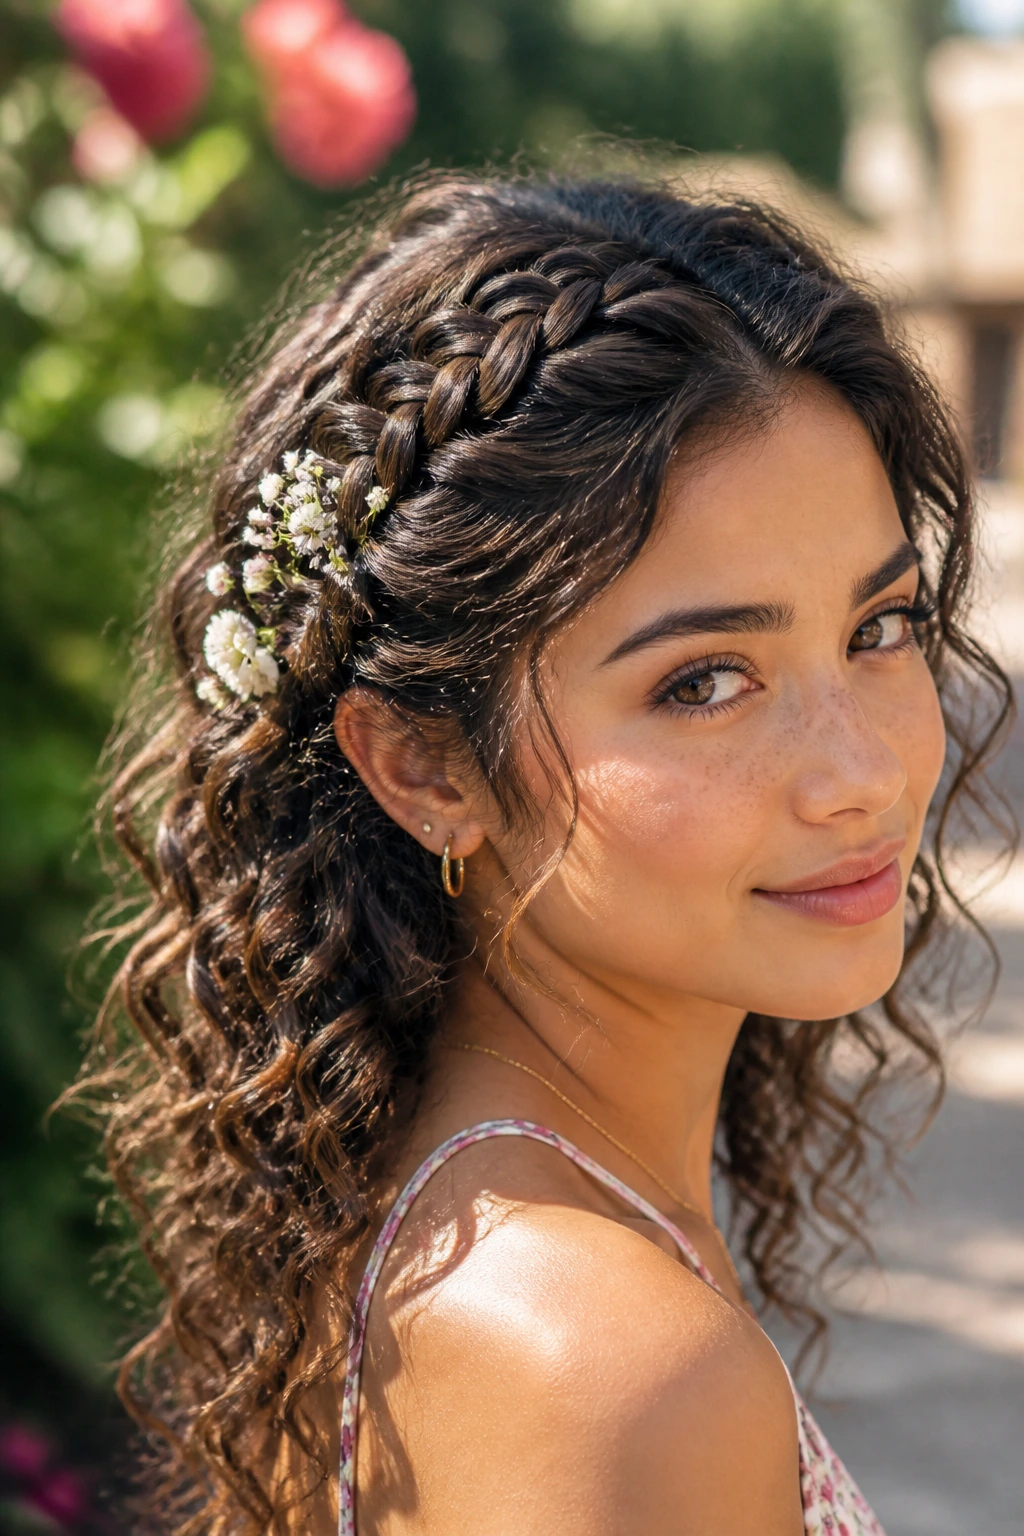
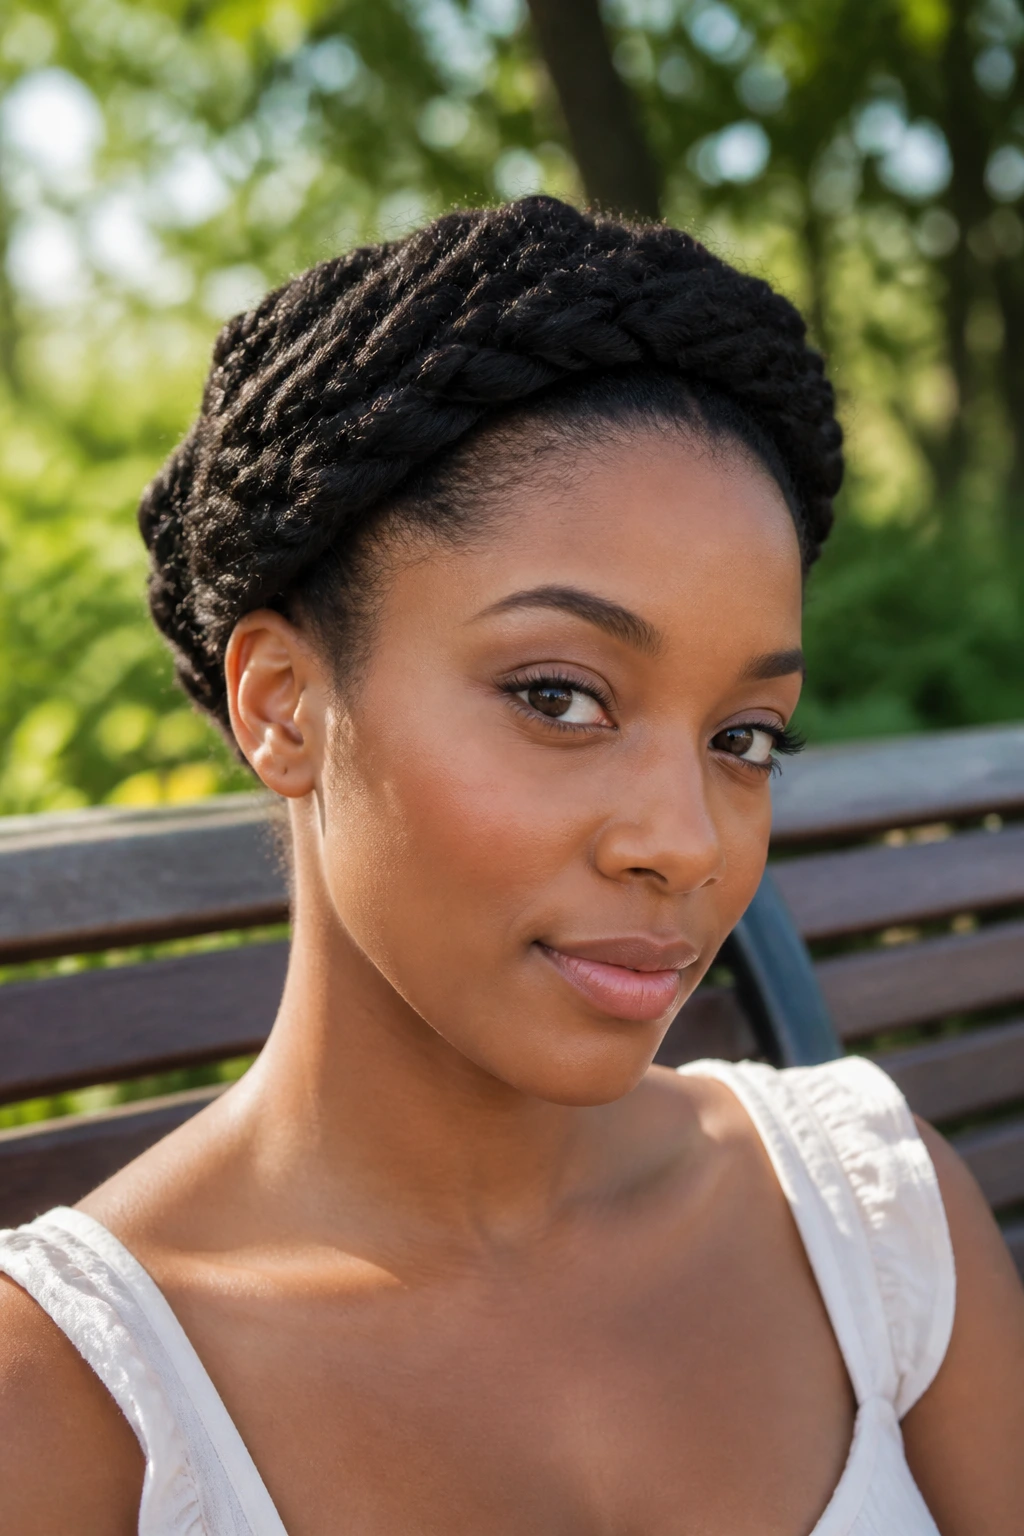
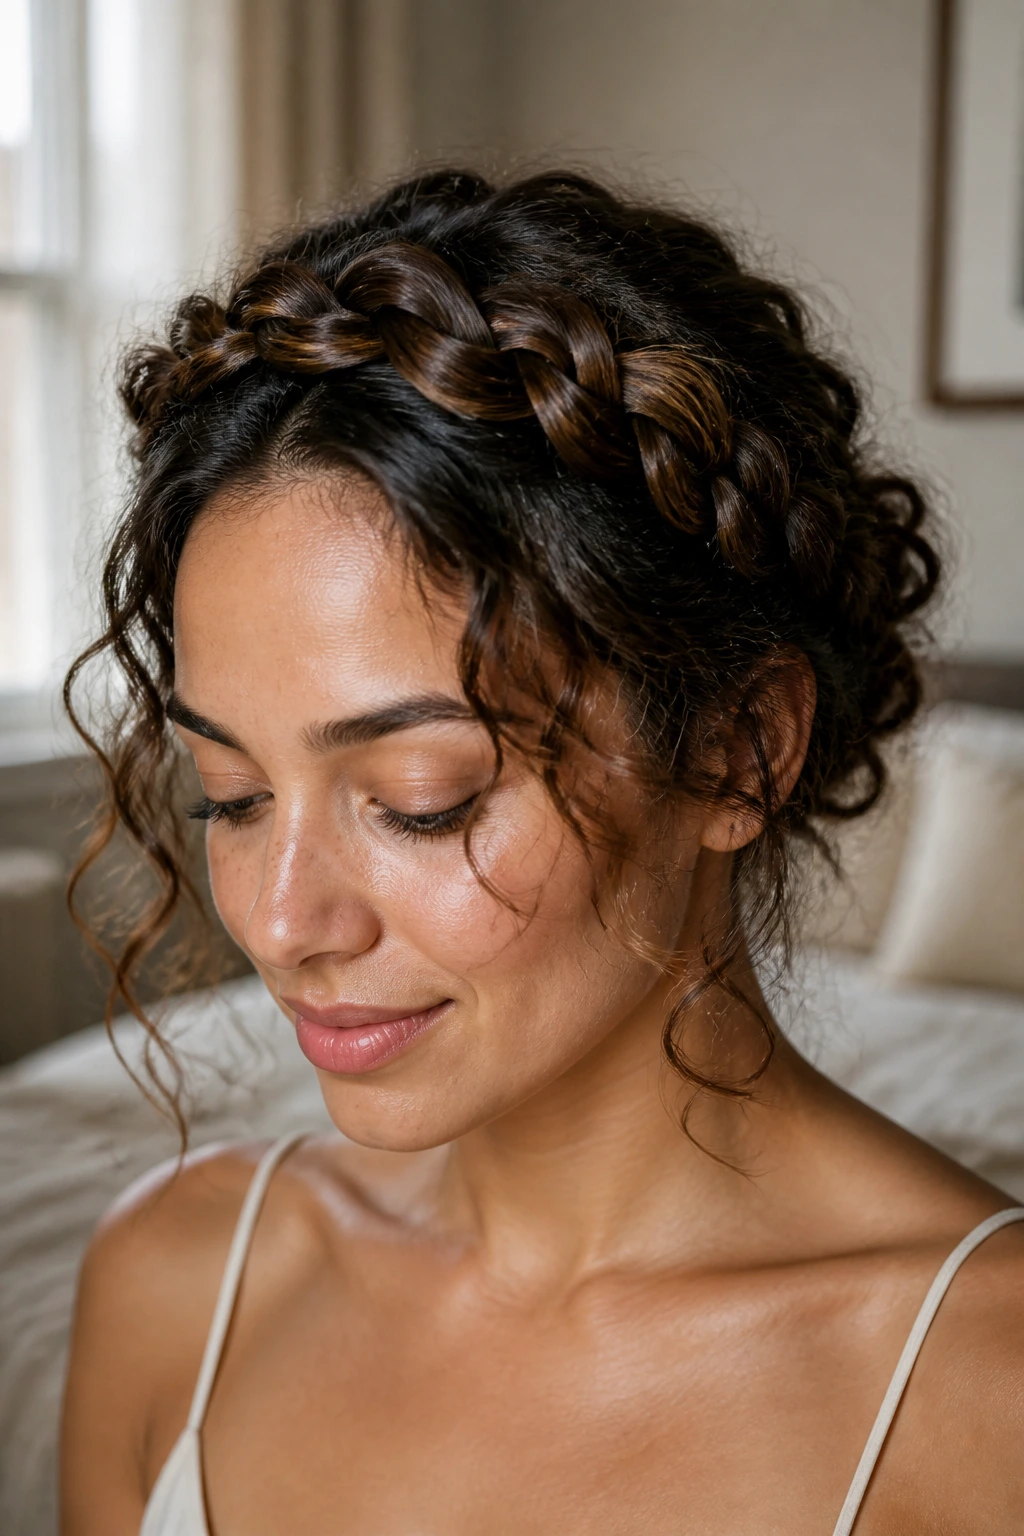
6. Half-Up Halo Braid

If you have medium-length curly hair, a full crown braid might feel like too much hair to handle. The half-up version gives you all the elegance of a crown but lets the length of your curls cascade down your back.
The Construction Process
Take a two-inch section from both sides of your temples. Braid them separately until they reach the back of your head. Tie them together with a small, clear elastic and tuck the ends underneath the crossing point.
How to Style the Rest
Use a curling wand on just the very top layer if you need to redefine a few pieces that got squashed during the braiding process. This is a common trick to make the whole style look intentional and fresh.
7. The Messy Waterfall Braid
The waterfall braid is notoriously difficult on straight hair because it has a tendency to slide right out. On curly hair, the texture acts like natural Velcro, holding the horizontal strands of the waterfall in place perfectly.
Why Texture Matters
The “holes” in the braid are held open by the width of your curls. This is a rare instance where you don’t want to use a heavy product, as it might weigh the curls down and make the “waterfall” look limp.
Pro Tips for the Waterfall
- Skip the gel entirely.
- Use a sea salt spray if your curls are very soft to give them that extra grit before you start.
- Secure the final crossing with a decorative hair clip to hide any small elastics.
8. Braided Space Buns
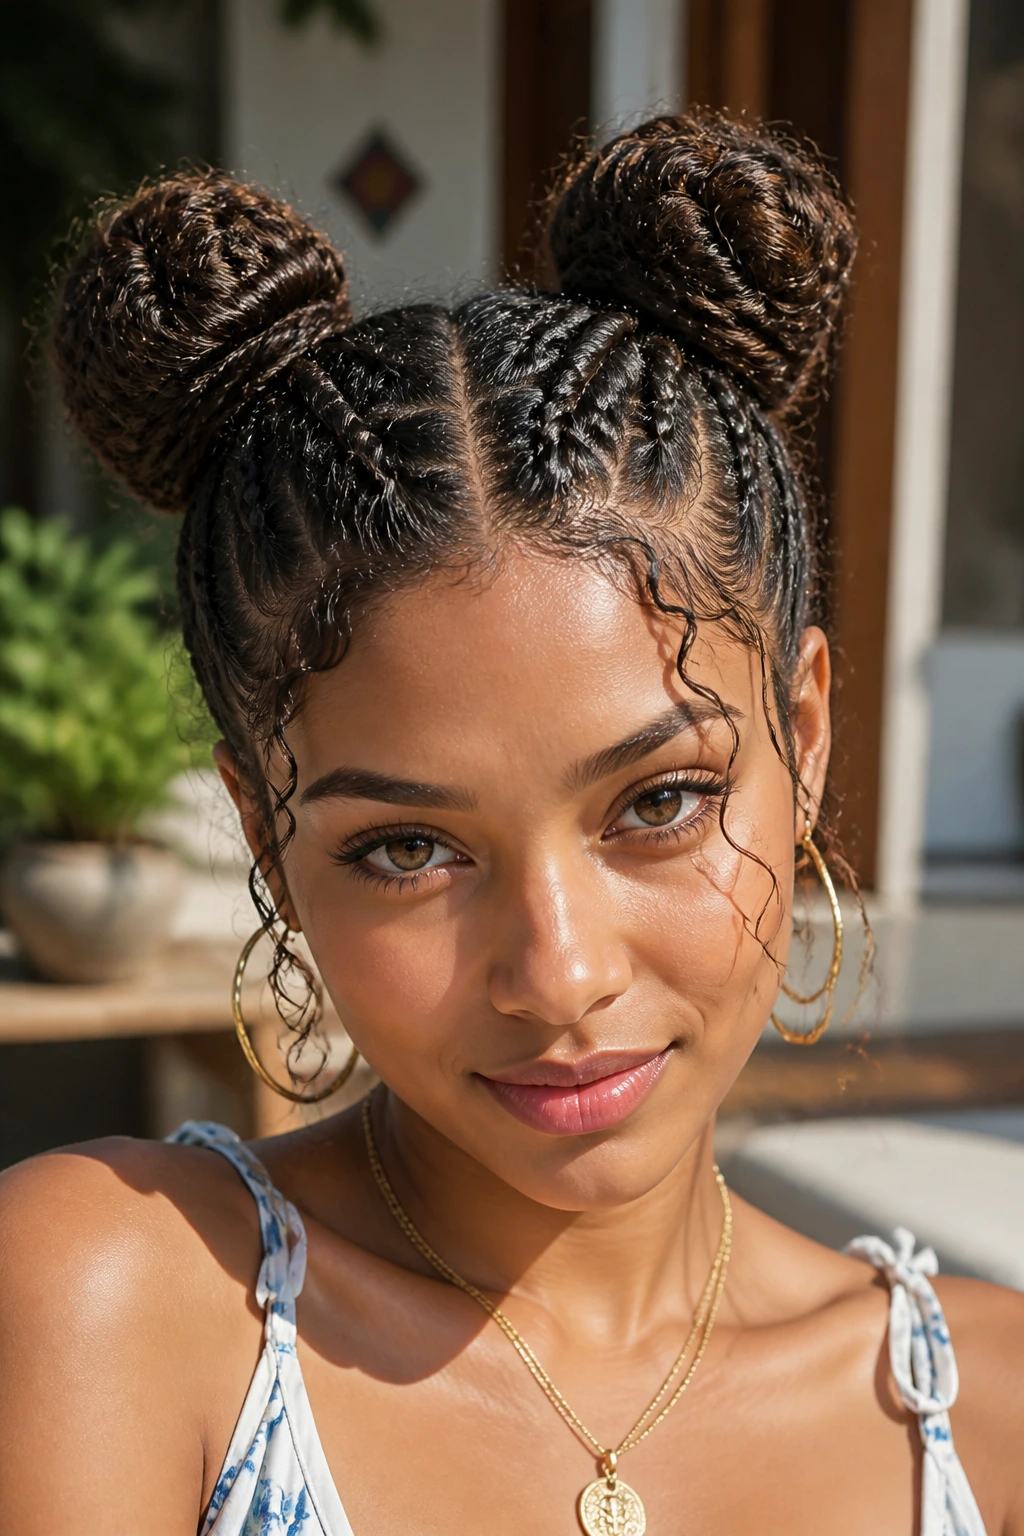
Taking two high pigtails and braiding them before wrapping them into buns adds a layer of intricate detail that simple buns lack. It turns a playful look into something that looks like it took an hour to create, even if you are a pro at doing it in ten minutes.
Securing the Style
Curly hair is heavy. Use heavy-duty pins to anchor the buns to your scalp, not just to each other. If the pins aren’t deep into the base, the weight of the braids will cause the buns to sag by the end of the day.
Customizing the Look
- Leave two tendrils out at the front to frame your face.
- Add small gold cuffs to the braids for a bit of metallic flair.
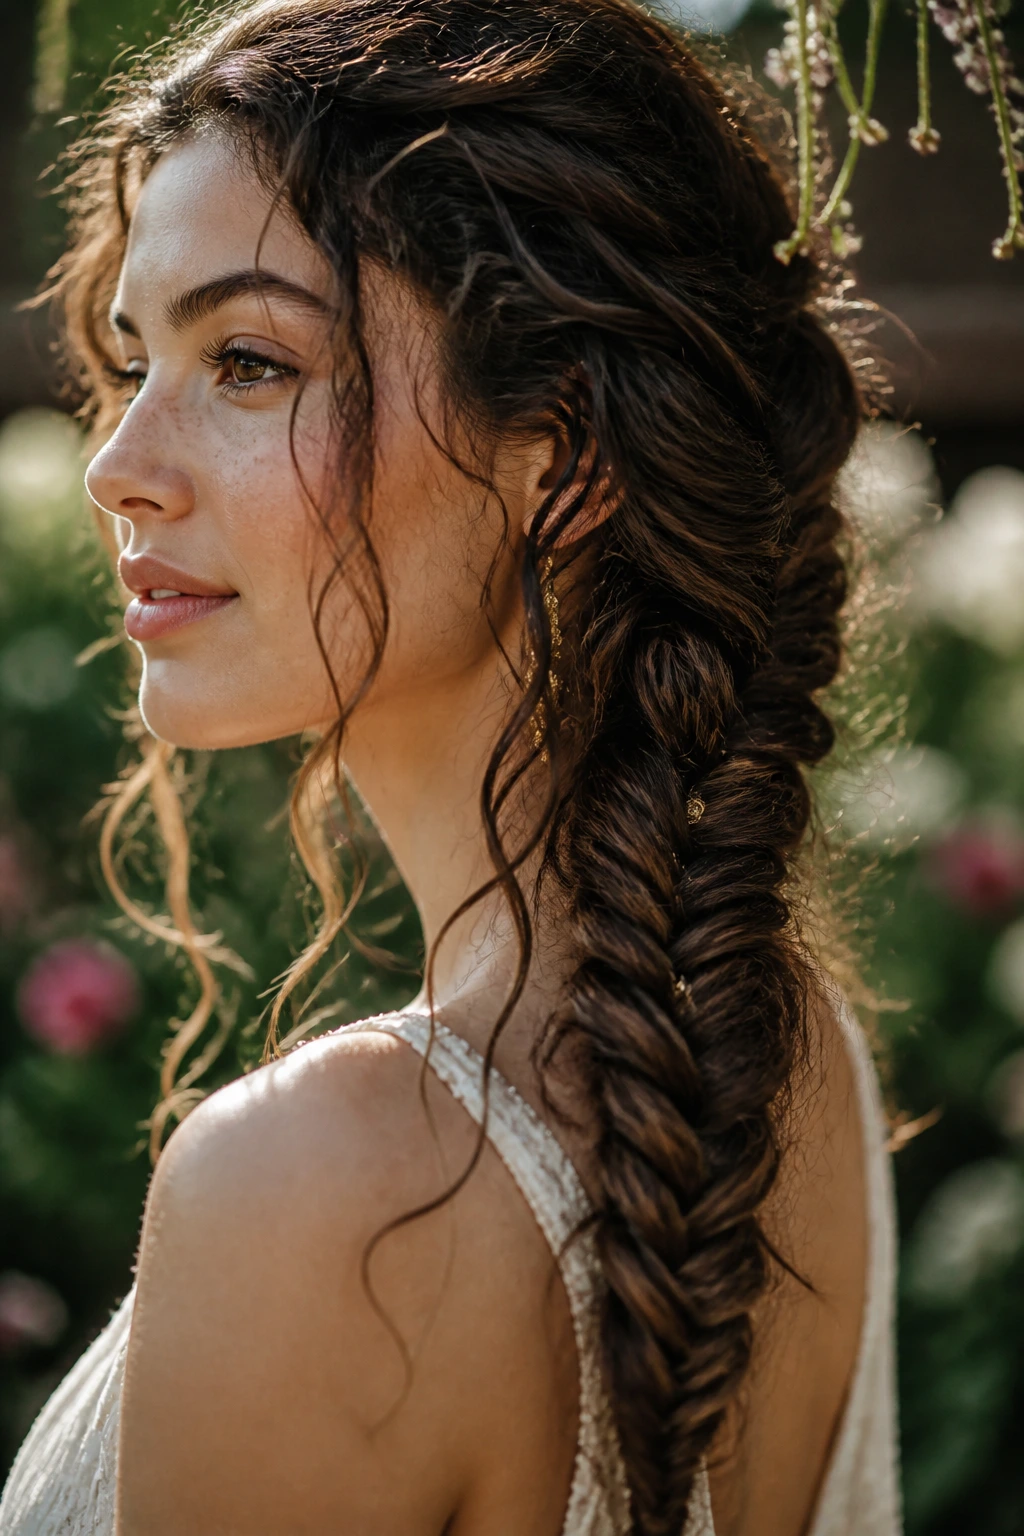
9. Single Chunky Side Braid
Sometimes, less is more. A single, thick three-strand braid starting from the hairline and moving back adds interest without requiring you to manage a full-head style.
Why This Is Perfect for Beginners
You only need to master one type of braid. If you can do a basic three-strand braid, you can do this. The key is in the sectioning—keep it neat, and ensure the braid isn’t so tight that it gives you a headache.
When to Wear It
This is a staple for second-day hair. If your curls are starting to lose their shape, a side braid masks the flattened parts perfectly.
10. The Elegant Low Braided Bun
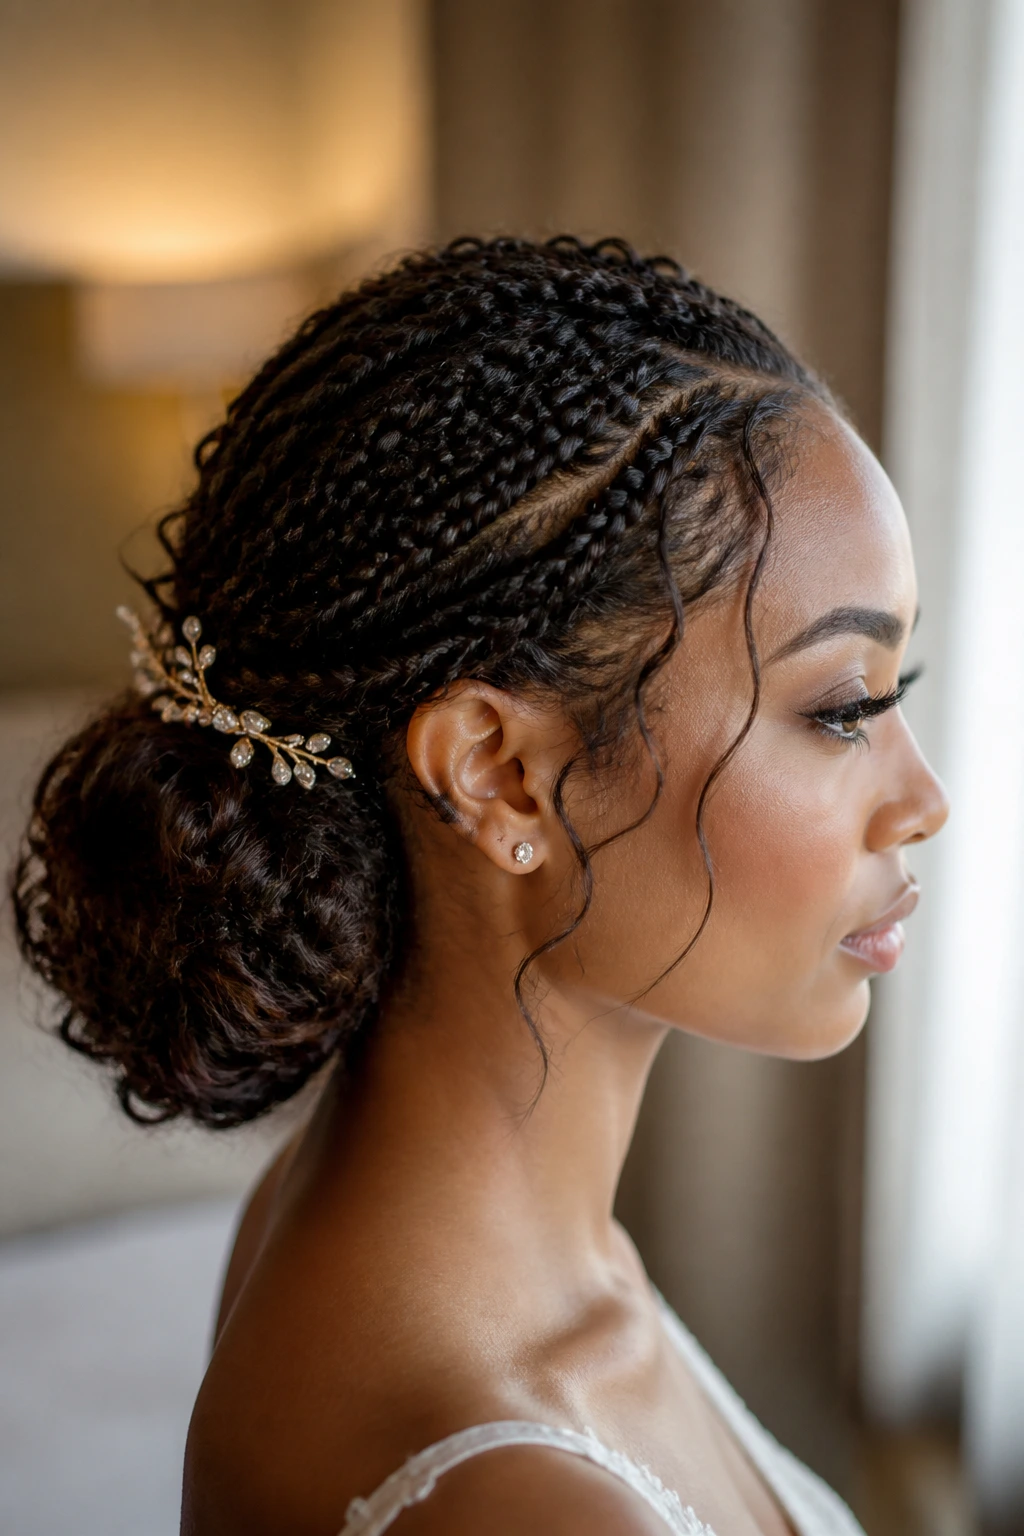
This is the go-to style for weddings or professional events. It involves creating several small braids at the front of the head and sweeping them into a low, messy bun at the nape of the neck.
Preparing the Base
You want the hair to be uniform. A light mousse applied when the hair is damp will give you the control you need to braid the front sections without the hair slipping out of your grip.
Finishing Touches
- Tuck the ends of the braids into the bun for a seamless look.
- Use a long, decorative pin through the center of the bun to hold everything in place securely.
11. Cornrows to a High Ponytail
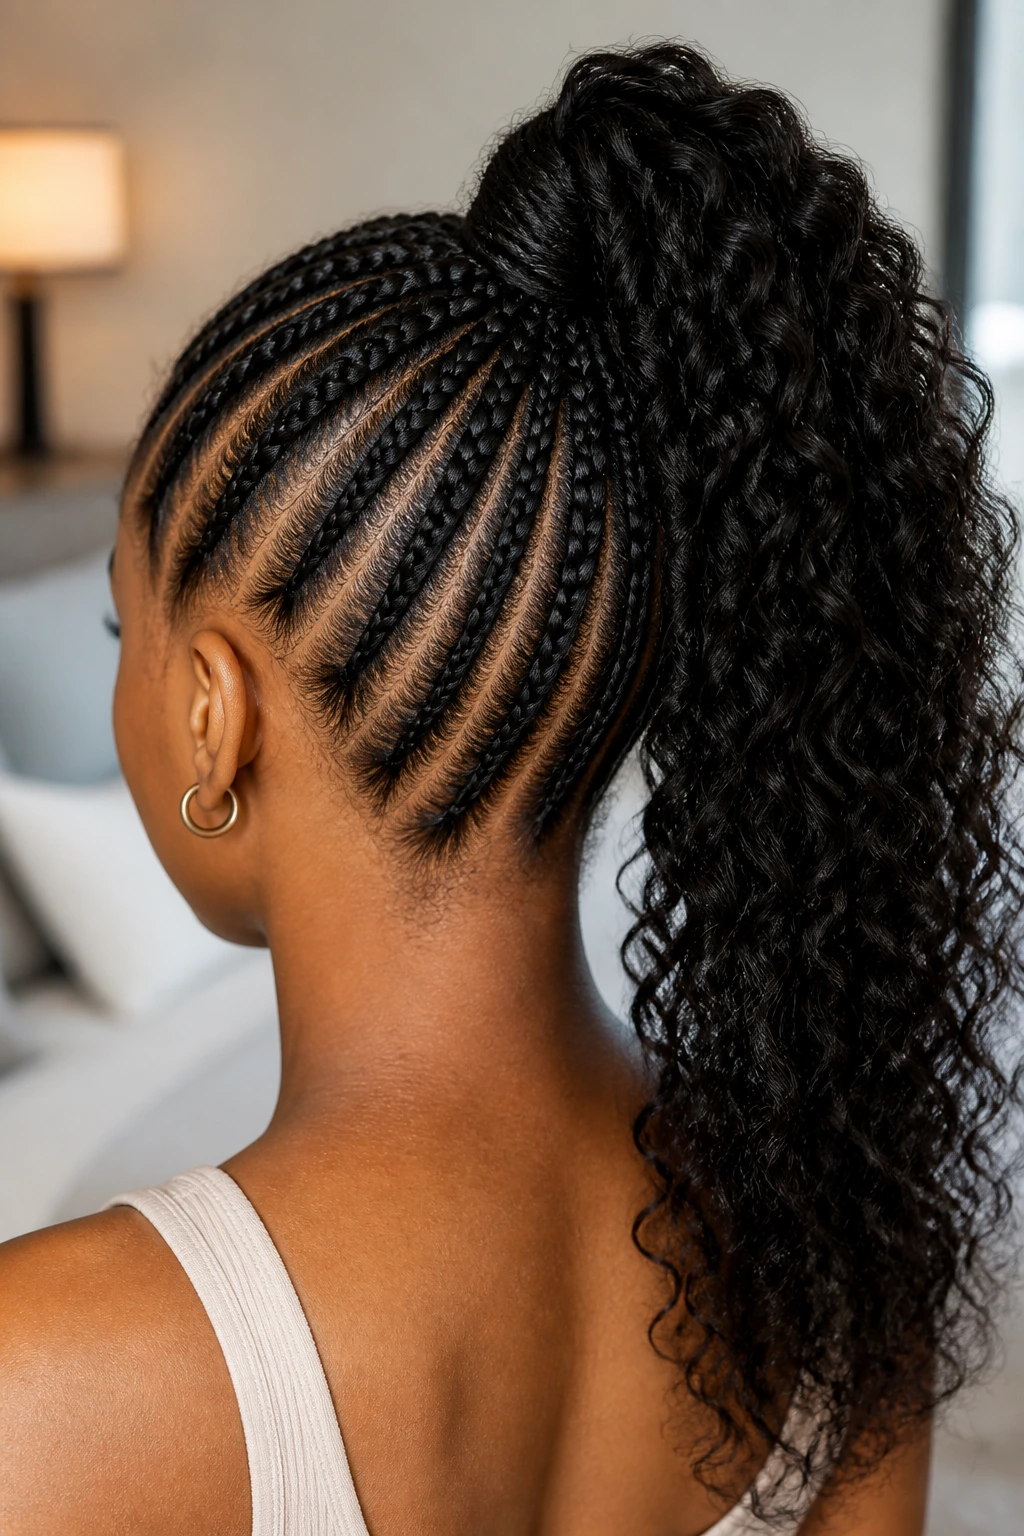
This is a protective style that is both functional and chic. By braiding the hair back into cornrows that meet at the crown, you can gather the rest of the hair into a high, defined ponytail.
Minimizing Tension
If you braid too tightly, you risk traction alopecia. Always make sure you can move the scalp slightly under the braid. If your skin feels pulled, redo it. It is never worth the damage.
Maintaining the Style
Sleeping with a silk bonnet is non-negotiable here. It keeps the braids from getting frizzy and helps your edges stay laid for longer.
12. Fishtail Braid with Loose Tendrils
The fishtail braid can be tedious, but on curly hair, it creates a beautiful, rustic look. Because curls are irregular, the braid won’t look “perfect” or “machine-made,” which is exactly the point.
The Texture Advantage
The irregular thickness of curly hair strands gives the fishtail a multidimensional appearance that straight hair just doesn’t get. Don’t try to make it uniform. Embrace the bumps and the stray flyaways—they add to the bohemian vibe.
How to Prevent Tangles
Fishtail braiding requires you to constantly pull small pieces from one side to the other. If you have tight curls, use a little bit of hair oil on your fingers to prevent knots as you work.
13. Braided Headband with Top Knot
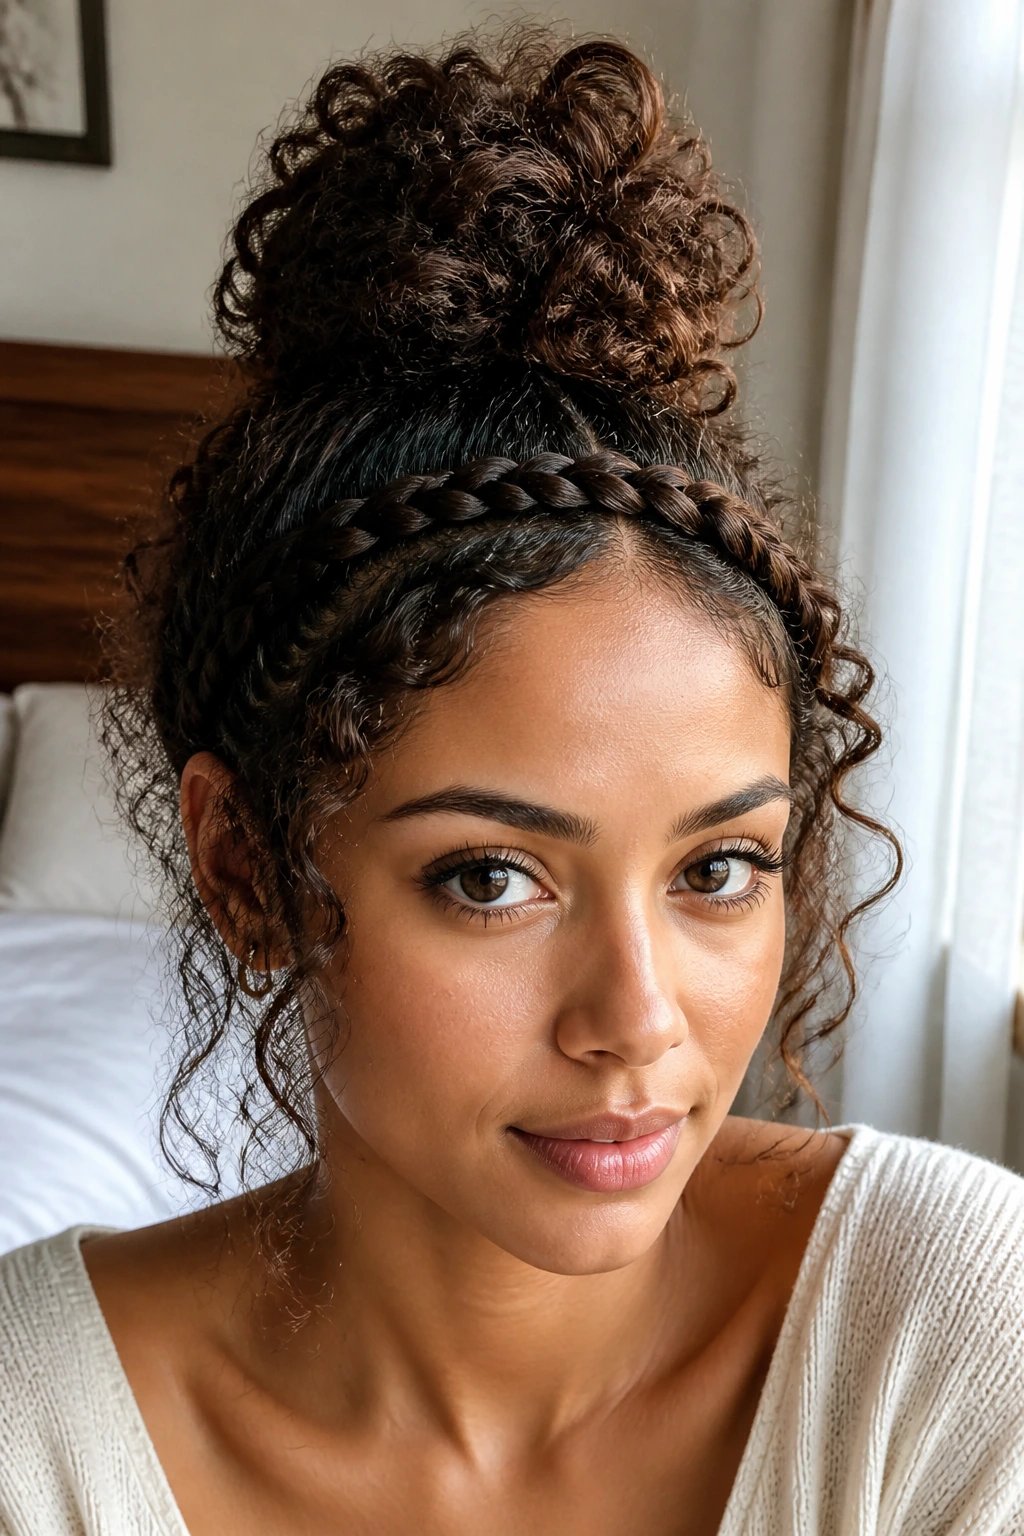
Combine two popular styles by braiding the front section of your hair like a headband and gathering the rest into a top knot. This keeps the hair away from your eyes and shows off your features.
Creating the Right Volume
If your top knot feels small, don’t worry. Use a “hair donut” or a smaller hair elastic to puff it out, then wrap your hair around it. This is a classic trick used by hairstylists to make buns look full and luxurious.
Keeping It Neat
Use a soft-bristled brush to smooth the hair going into the top knot, but avoid brushing the ends of the curls, or you will create a ball of frizz.
14. Bohemian Side-Part Braid
For a more relaxed, “off-duty” model look, create a deep side part and start a loose, Dutch-style braid along the hairline. Stop when you reach behind your ear and secure it with a tiny elastic hidden by a lock of hair.
The Importance of Direction
Aim the braid toward the back of the head, not down toward your cheek. This lifts the hair away from your face and keeps the style looking lifted and modern.
Adding Accessories
Small flowers or simple hair pins tucked into the braid make this look go from “gym hair” to “brunch hair” instantly.
15. The “Rope” Twist Braid
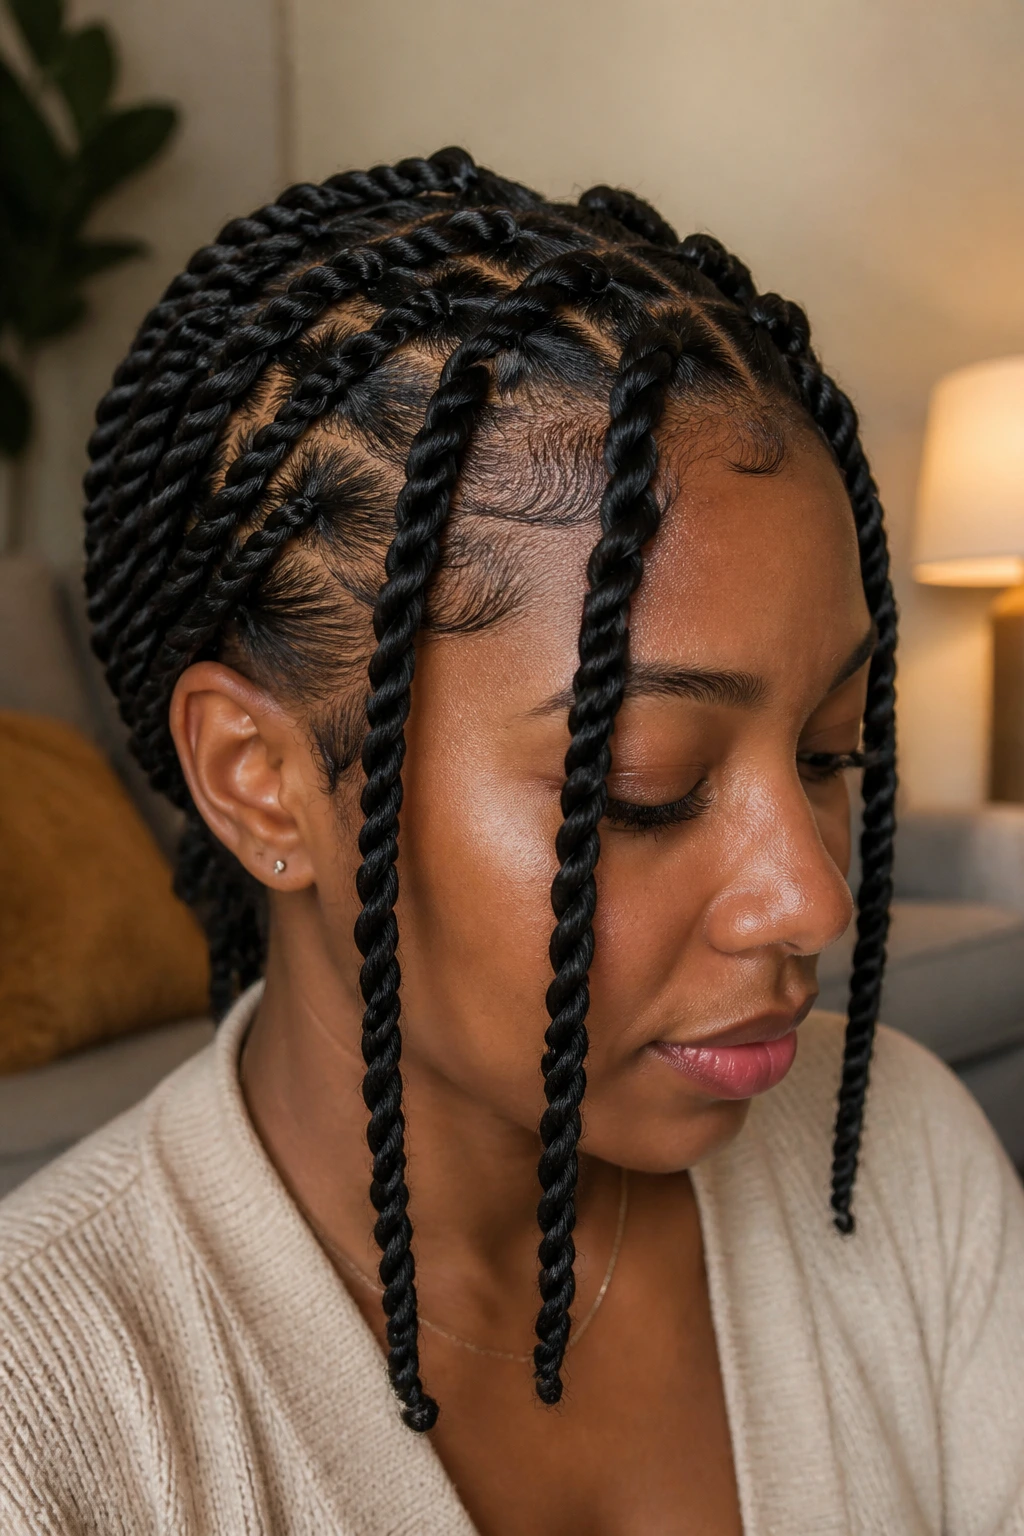
Rope twists are technically not braids, but they mimic the aesthetic and are often much faster to execute. You simply divide a section into two, twist them in opposite directions, and then twist them around each other.
Holding the Twist
These twists need a bit more product than traditional braids. A styling wax or a dense cream will help keep the “rope” shape defined. If you use a thin liquid spray, the twists will unravel quickly.
Style Versatility
You can do a single rope twist on the side, or you can do a full-head rope twist style for a very structured, artistic look.
16. Mohawk Braid with Undercut Illusion
If you aren’t ready to cut your hair into an undercut, this style provides the same look. Cornrow the sides very tightly toward the middle, leaving a wide section of hair in the center to braid into a single, thick, standing-up Dutch braid.
Why It Works for Curly Hair
The natural height of your curls provides the volume you need for the “hawk” portion. No teasing or hairspray required.
Maintenance
This style stays in better than almost any other. If you do it well, it can easily last three to four days with nothing more than a refresh of the edges.
17. The Twisted Crown
Instead of braiding, use two-strand twists to form a crown around your head. This is significantly easier if your hair is very prone to knotting, as twists are easier to undo than braids.
The Texture Match
Twists look particularly good on hair with tighter curl patterns (4A, 4B, 4C). The texture of the hair allows the twists to lock together without needing many pins.
Getting the Look
- Split the hair into two halves at the front.
- Twist each side toward the back.
- Pin them together at the nape of the neck or let them cross over each other like a headband.
18. Braided Back-to-Front Updo
This is for the advanced stylists. You flip your head over, French braid from the nape of the neck toward the crown, and then pull the remaining hair into a messy, high bun.
The Challenge
The upside-down nature of the braid makes it hard to see what you are doing. Use a secondary mirror placed behind you to help you gauge the tension of the braid.
Why Bother
It creates a clean, sophisticated line that looks professional from the back. It’s an unexpected detail that turns a basic bun into a “wow” moment when you turn around.
Tips for Braiding Success
Curly hair is a living, breathing thing. It changes based on the weather, your hydration levels, and the product you used two days ago. Never get discouraged if a braid looks “messy.” In the world of curly hair, messy is often just another word for “effortlessly chic.”
Always ensure your hair is fully detangled before you begin. Trying to braid through a knot is a recipe for breakage. Start at the ends and work your way up to the roots with a wide-toothed comb or a dedicated detangling brush. This will save your hair—and your sanity—during the styling process.
Final Thoughts
At the end of the day, the best braided style for your curly hair is the one that makes you feel like the best version of yourself. Whether you prefer the structure of a tight cornrow or the soft, romantic feel of a loose crown braid, the key is to work with your texture rather than against it.
Don’t be afraid to experiment with accessories, and remember that moisture is the foundation of every great look. If you keep your hair healthy and hydrated, the braids will look better, last longer, and hold their shape without needing a gallon of hairspray. Play with your parting, try new thicknesses, and don’t sweat the small stuff—your curls are doing the heavy lifting for you.