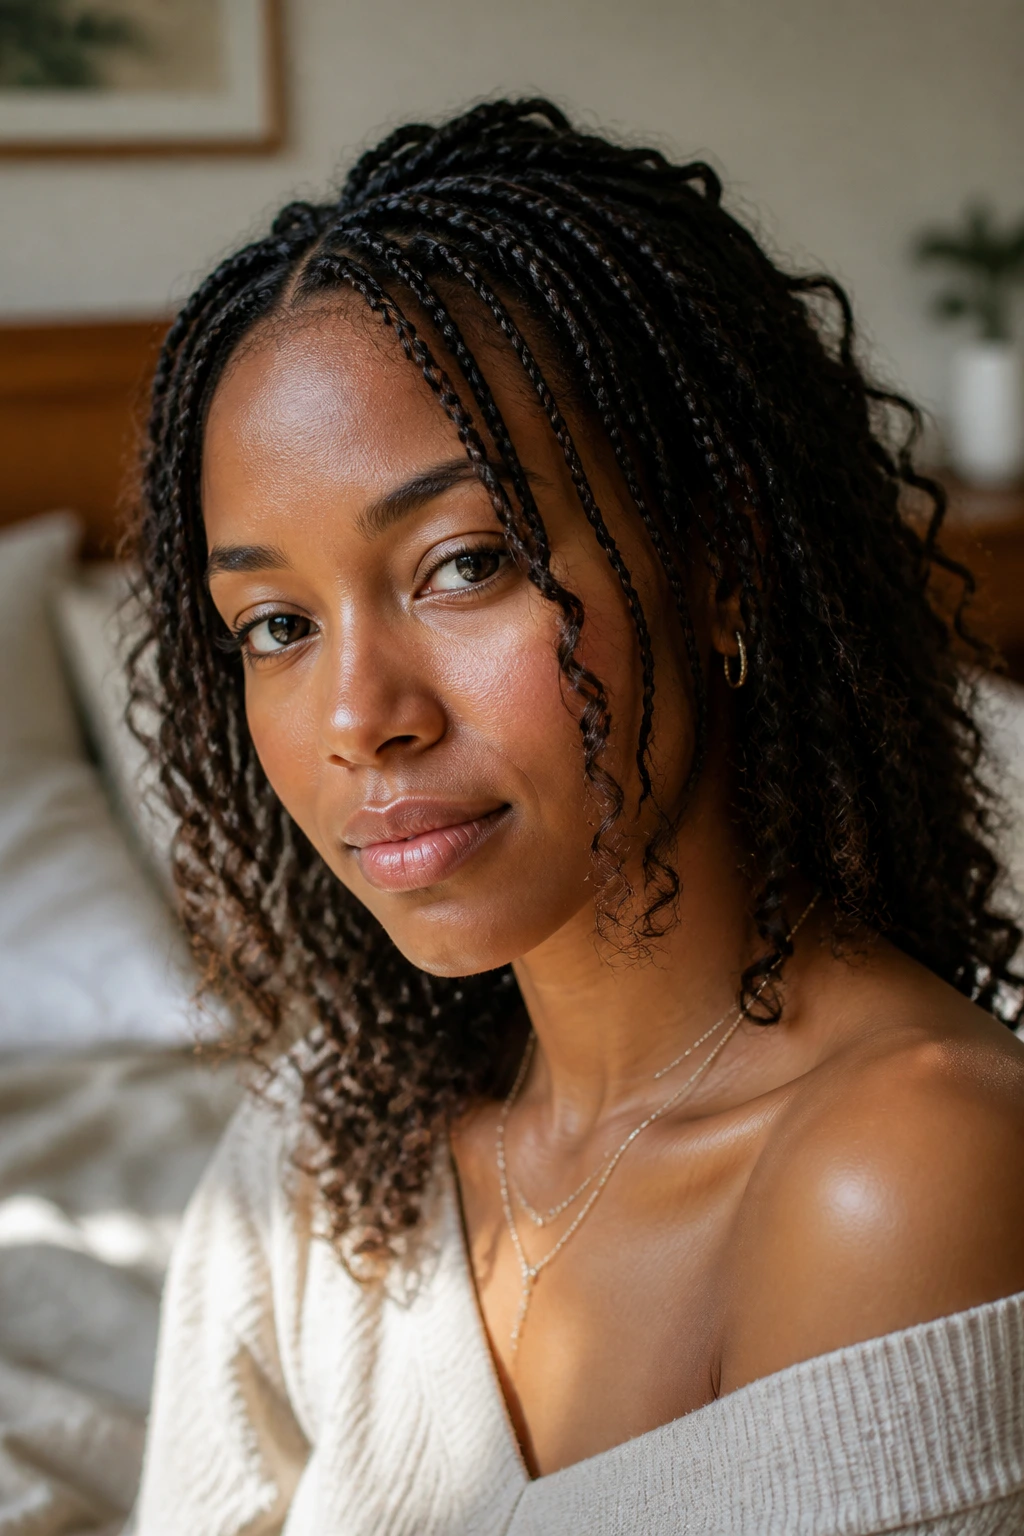
Curly hair is a wild, beautiful, and sometimes temperamental landscape to navigate. If you have spent any significant amount of time styling ringlets, coils, or waves, you know that the struggle often lies in balancing definition with longevity. We all want that perfect wash-and-go day, but by day three or four, the frizz usually begins its slow, inevitable takeover. This is where the magic of incorporating small braids comes in. These aren’t just decorative accents; they are structural lifesavers that protect your ends, manage volume, and add a layer of sophisticated texture that lasts far longer than a simple twist-out.
When you weave small, tight braids into a curly texture, you aren’t just styling—you are essentially locking a section of hair into a protective state. This technique bridges the gap between a protective style and an open, flowing look. Whether you are aiming to pull hair away from your face or looking to create a complex, bohemian aesthetic, these smaller, more intricate plaits offer a level of versatility that larger, chunkier braids often lack. They stay put, they hold their shape through humidity, and they provide an excellent foundation for up-dos or half-up styles that won’t lose their tension by lunch.
You might be worried about tension or breakage, which is a fair concern with fragile curly strands. The secret lies in the parting and the moisture content. Before you even think about sectioning your hair, ensure your strands are well-hydrated with a lightweight leave-in conditioner or a touch of argan oil. The goal is to make the hair pliable enough to grip without snapping. As we move through these various styles, keep in mind that the size of the braid dictates the final look. Smaller braids provide a finer, more precise appearance, while slightly larger versions of “small” braids offer a softer, more romantic vibe.
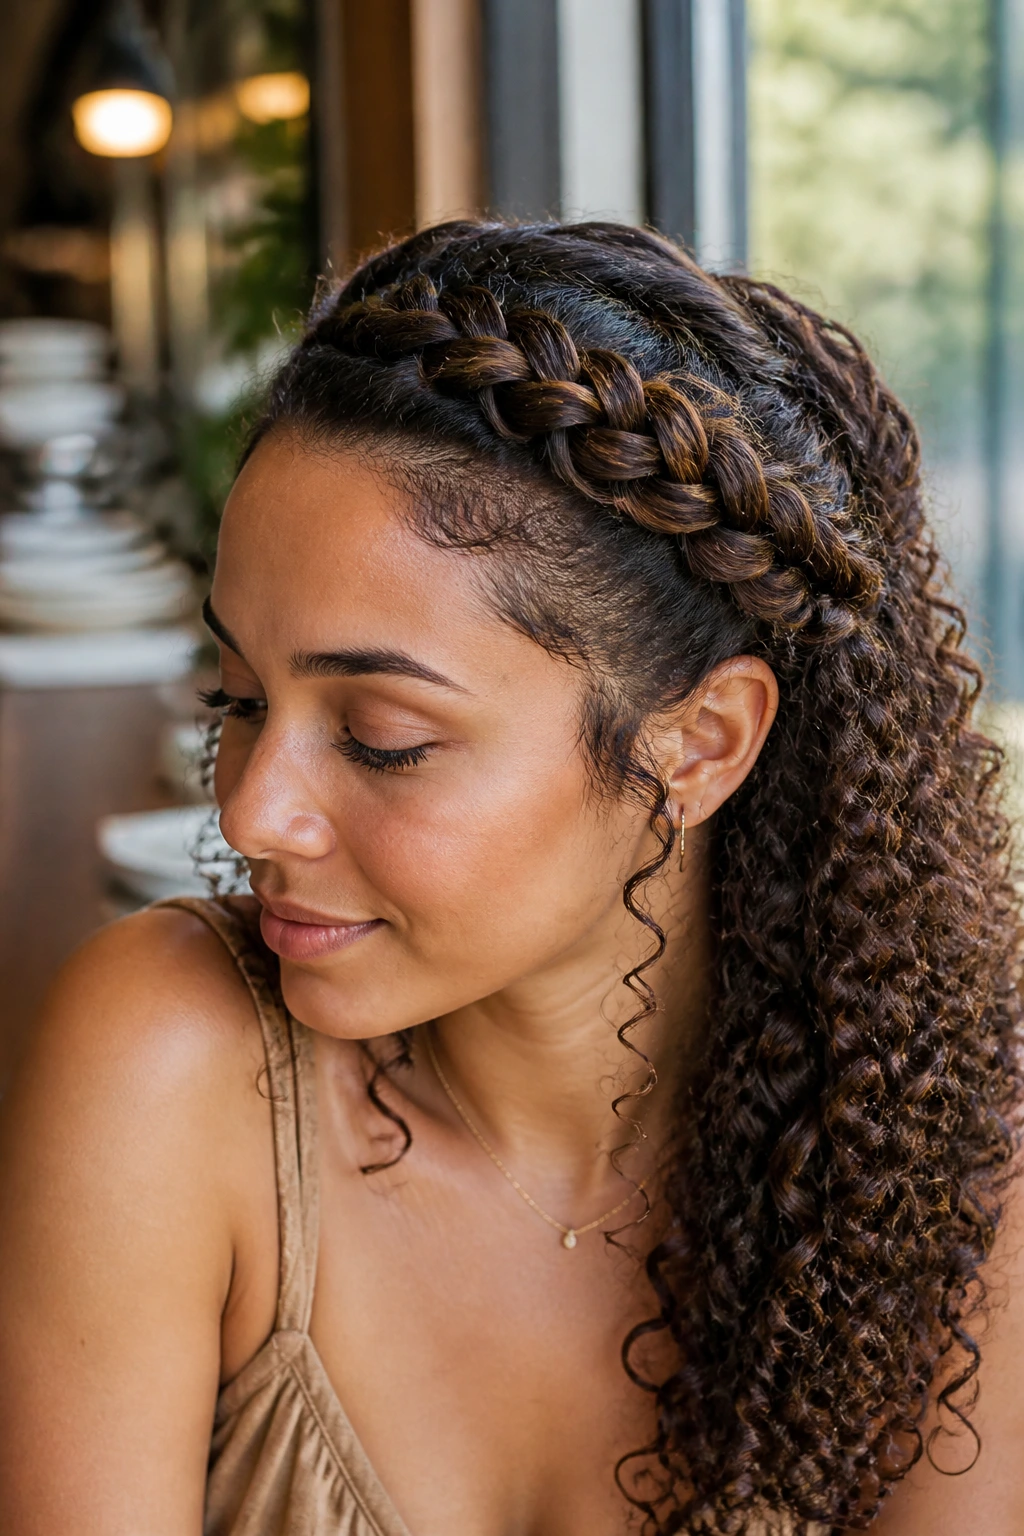
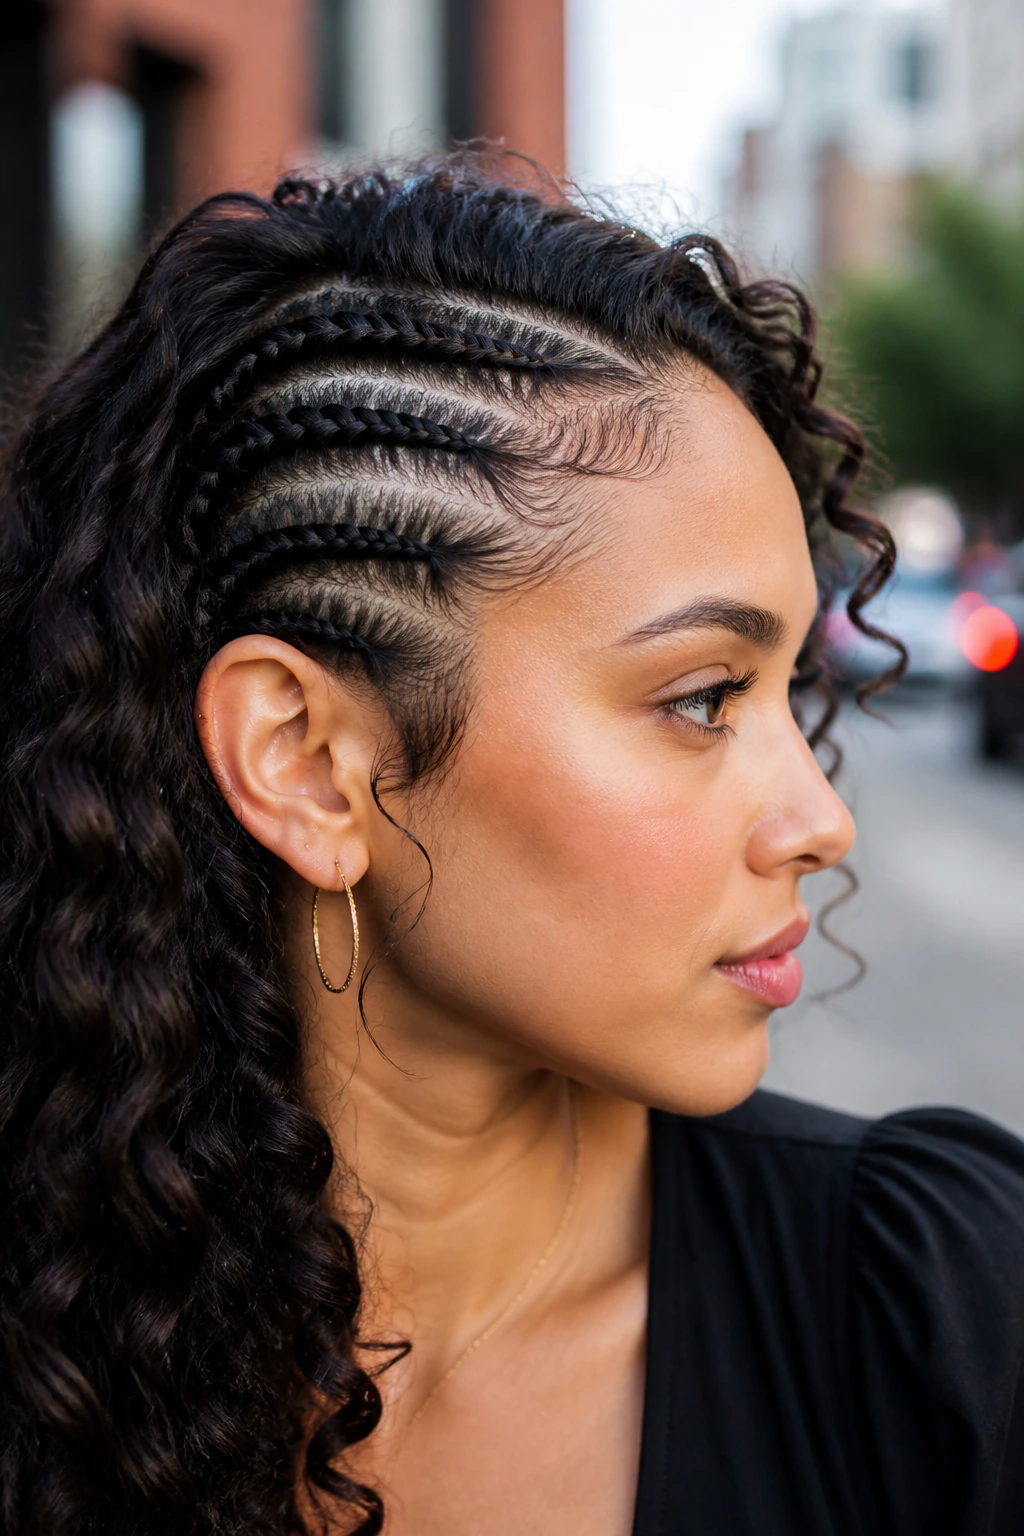
1. The Crown Micro-Braid Halo
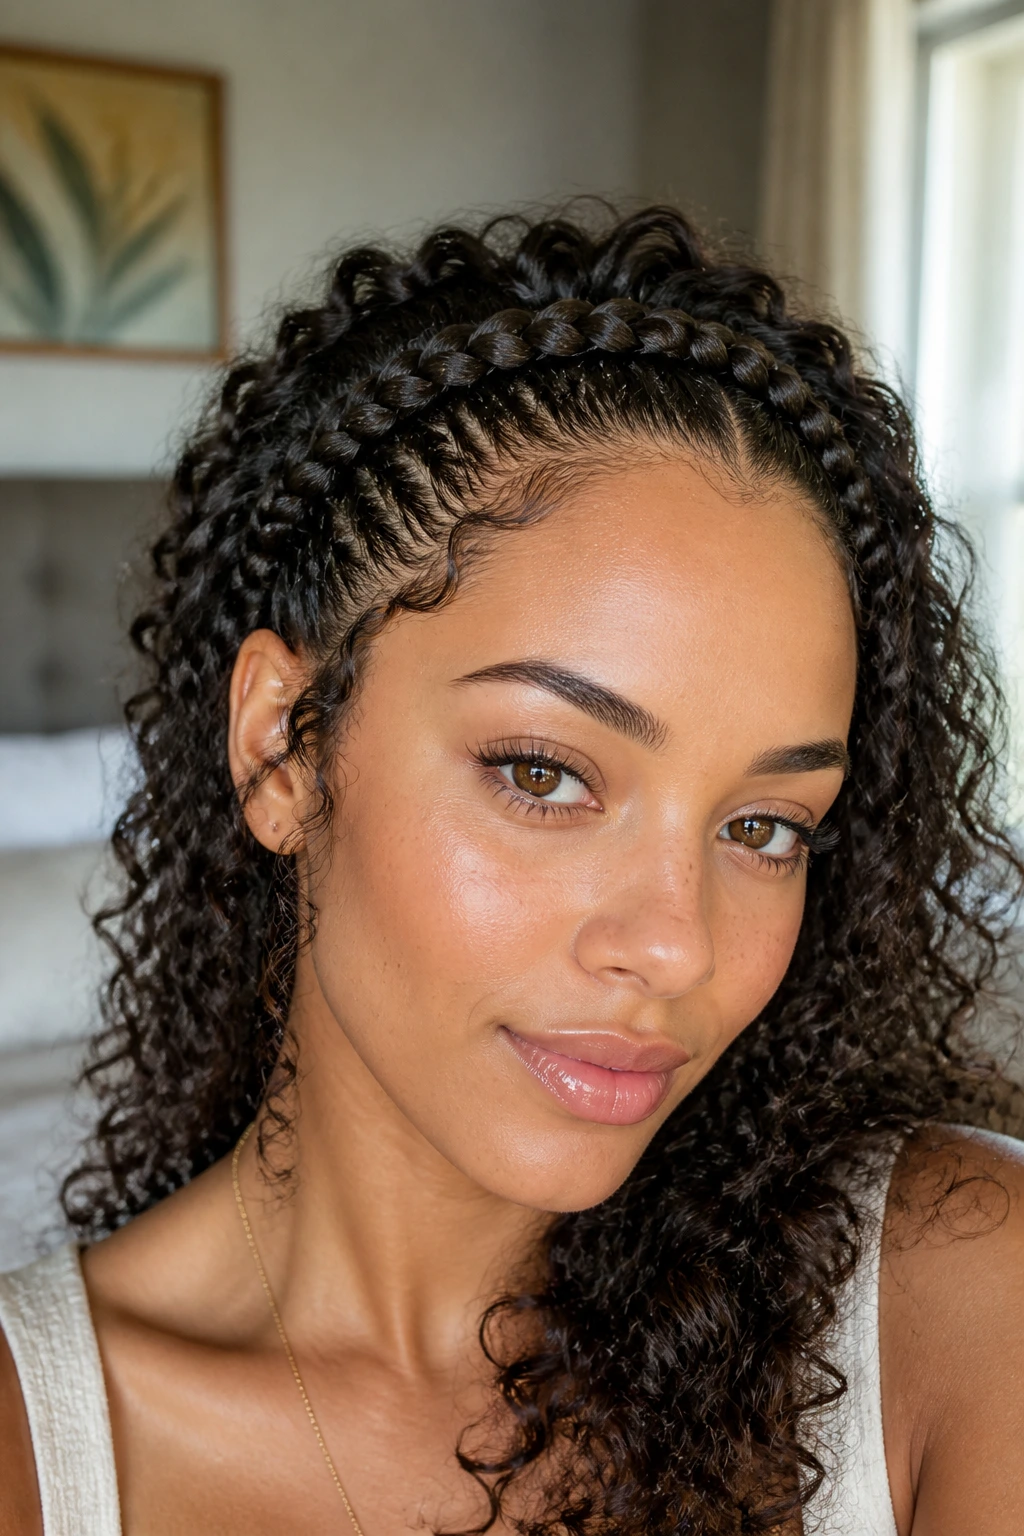
This is a classic for a reason. You are essentially creating a headband out of your own hair. The beauty here is that it keeps the hair around your hairline completely tucked away, preventing the dreaded “fuzzing” that happens when your front pieces rub against pillows or clothing.
How to Achieve the Look
Start by parting your hair from ear to ear across the top of your head. Isolate a one-inch section along the hairline. Divide this section into three tiny strands and begin a Dutch braid—meaning you cross the strands under one another rather than over—to keep the braid sitting on top of the scalp. As you move toward the back, continuously add small amounts of hair from the hairline to keep the braid tight.
Why It Works for Curly Textures
- Tension Control: Dutch braiding keeps the hair firmly anchored, which is ideal for tighter curl patterns.
- Heatless Styling: If you do this while your hair is slightly damp, the rest of your hair will dry in a lovely, voluminous shape once you let the curls down.
- Day-to-Night Versatility: You can pin the tail of the braid into a small bun at the nape of your neck for a sleek look, or leave it hanging for a more casual feel.
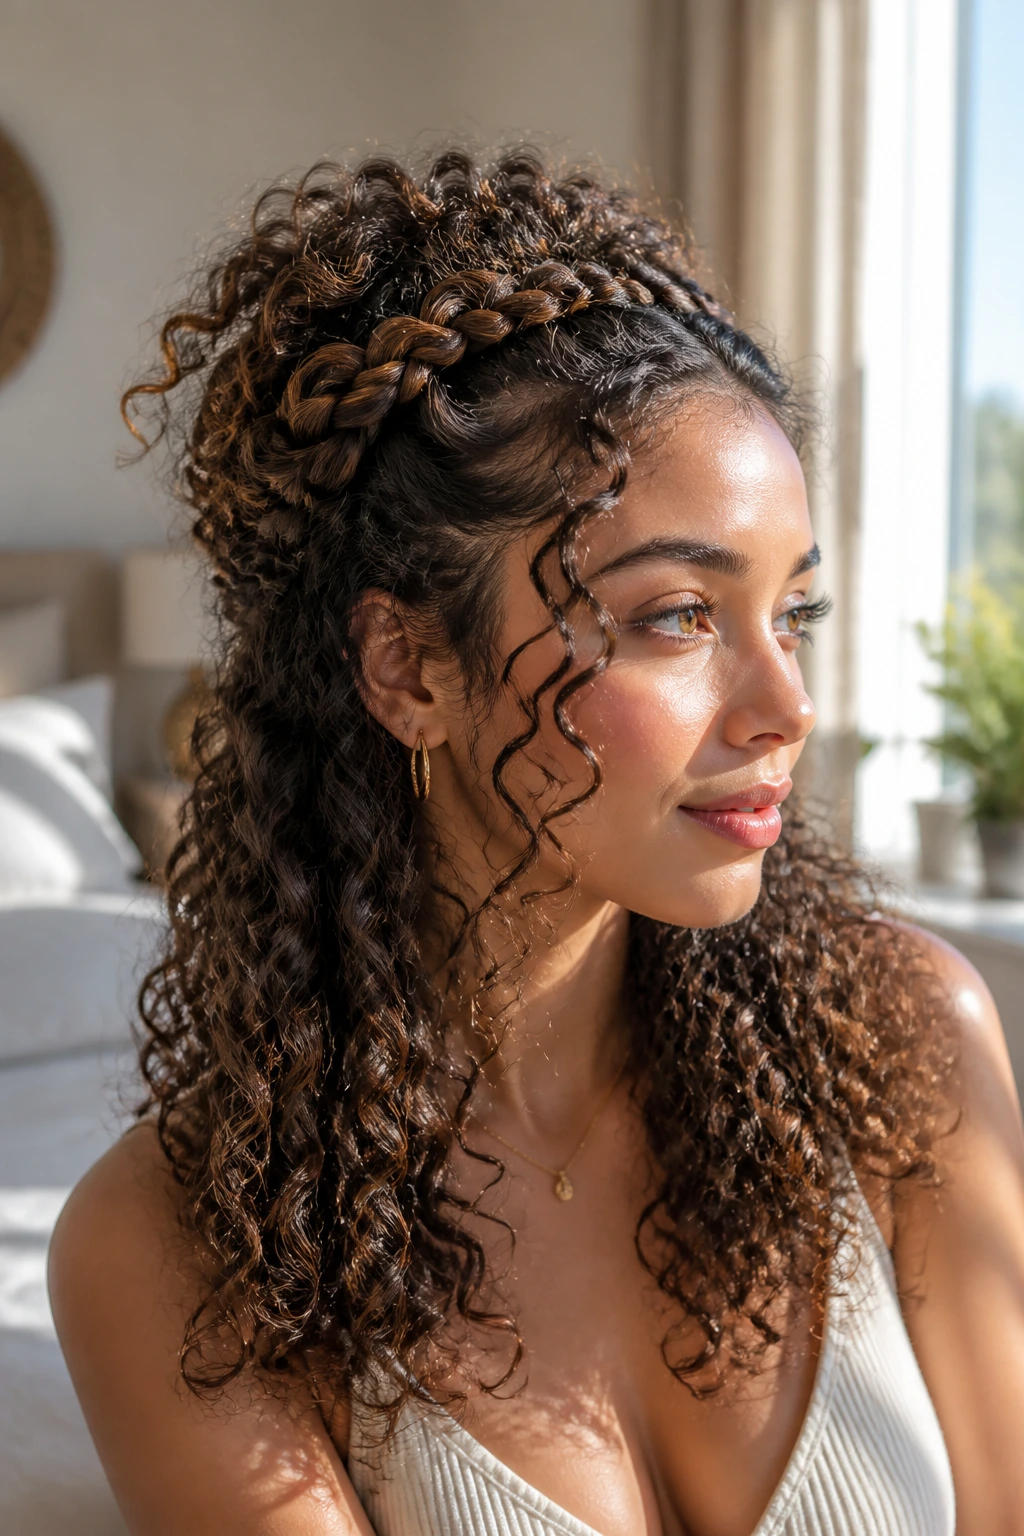
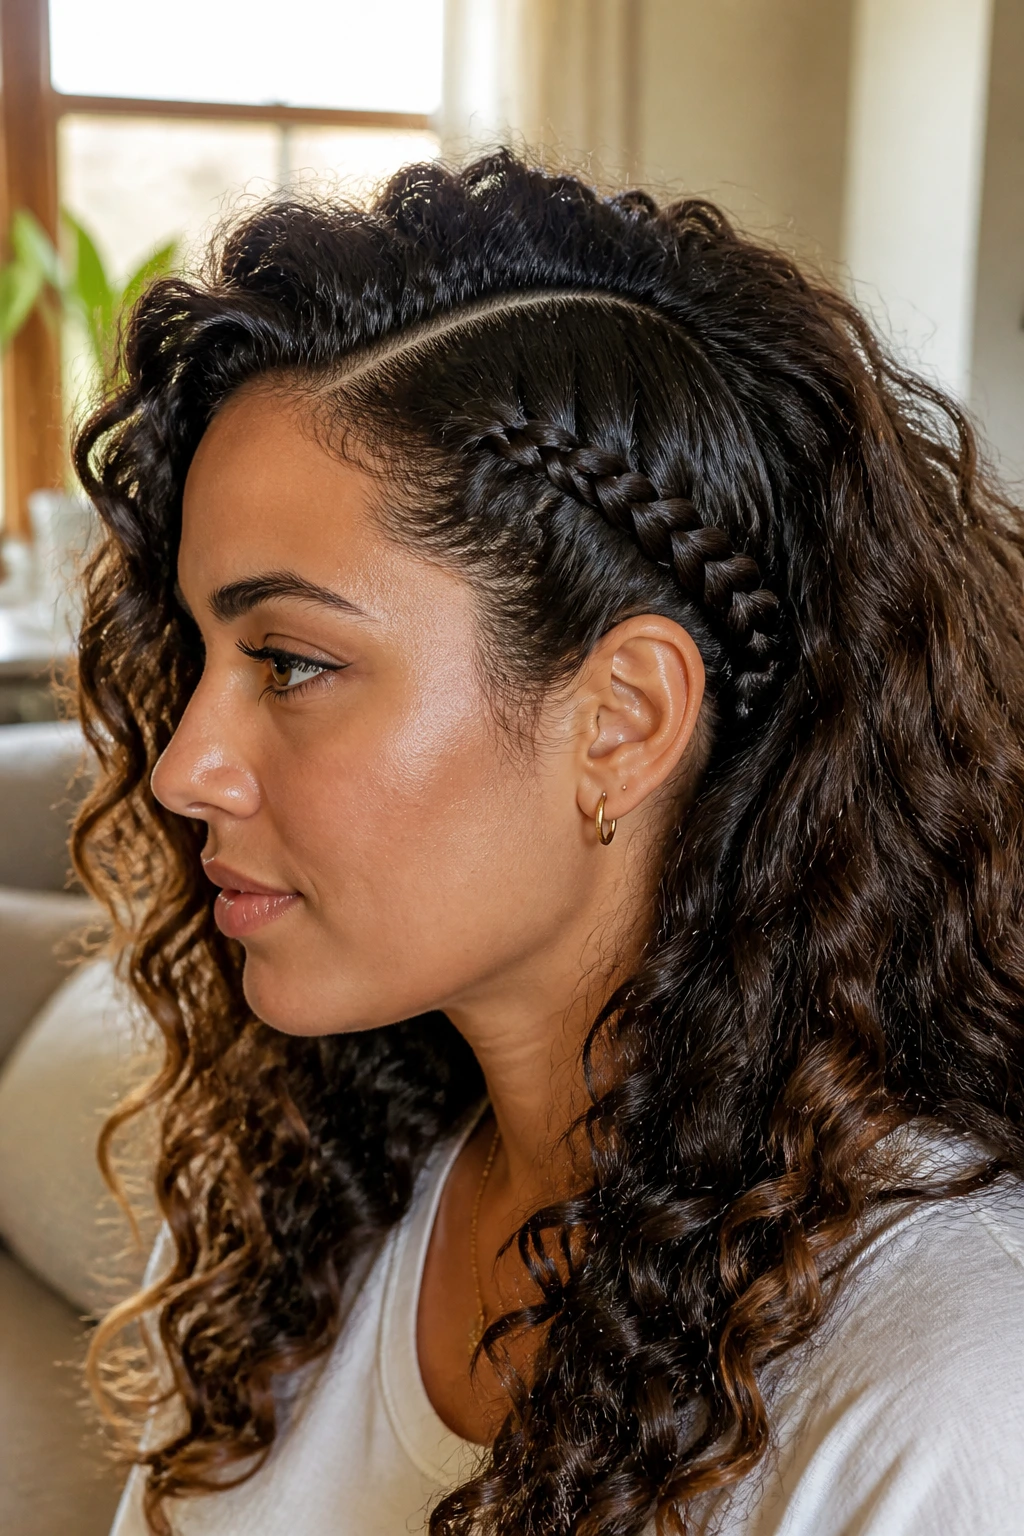
2. Face-Framing Micro-Plaits

Remember the nineties trend? It’s back, and it looks significantly better with natural curls. These two small, tight braids on either side of a middle part serve as a frame, drawing attention to your features while keeping the most prone-to-frizz sections of your hair under control.
The Technique
The key to this style is the “tightness” of the weave. If you braid too loosely, your curls will inevitably poke out and ruin the clean lines of the plait. Use a tiny bit of edge control gel or a firm-hold styling cream on the section before you begin. Start your braid as close to the root as possible, right at the part.
Styling Tip
Don’t feel like you have to stop at the ends. You can actually leave the last two inches of the braid unbraided and coil them around your finger with a bit of gel to create a perfect, tiny ringlet that hangs at the end of the plait. This adds a finished, intentional touch that makes the whole style look professional.
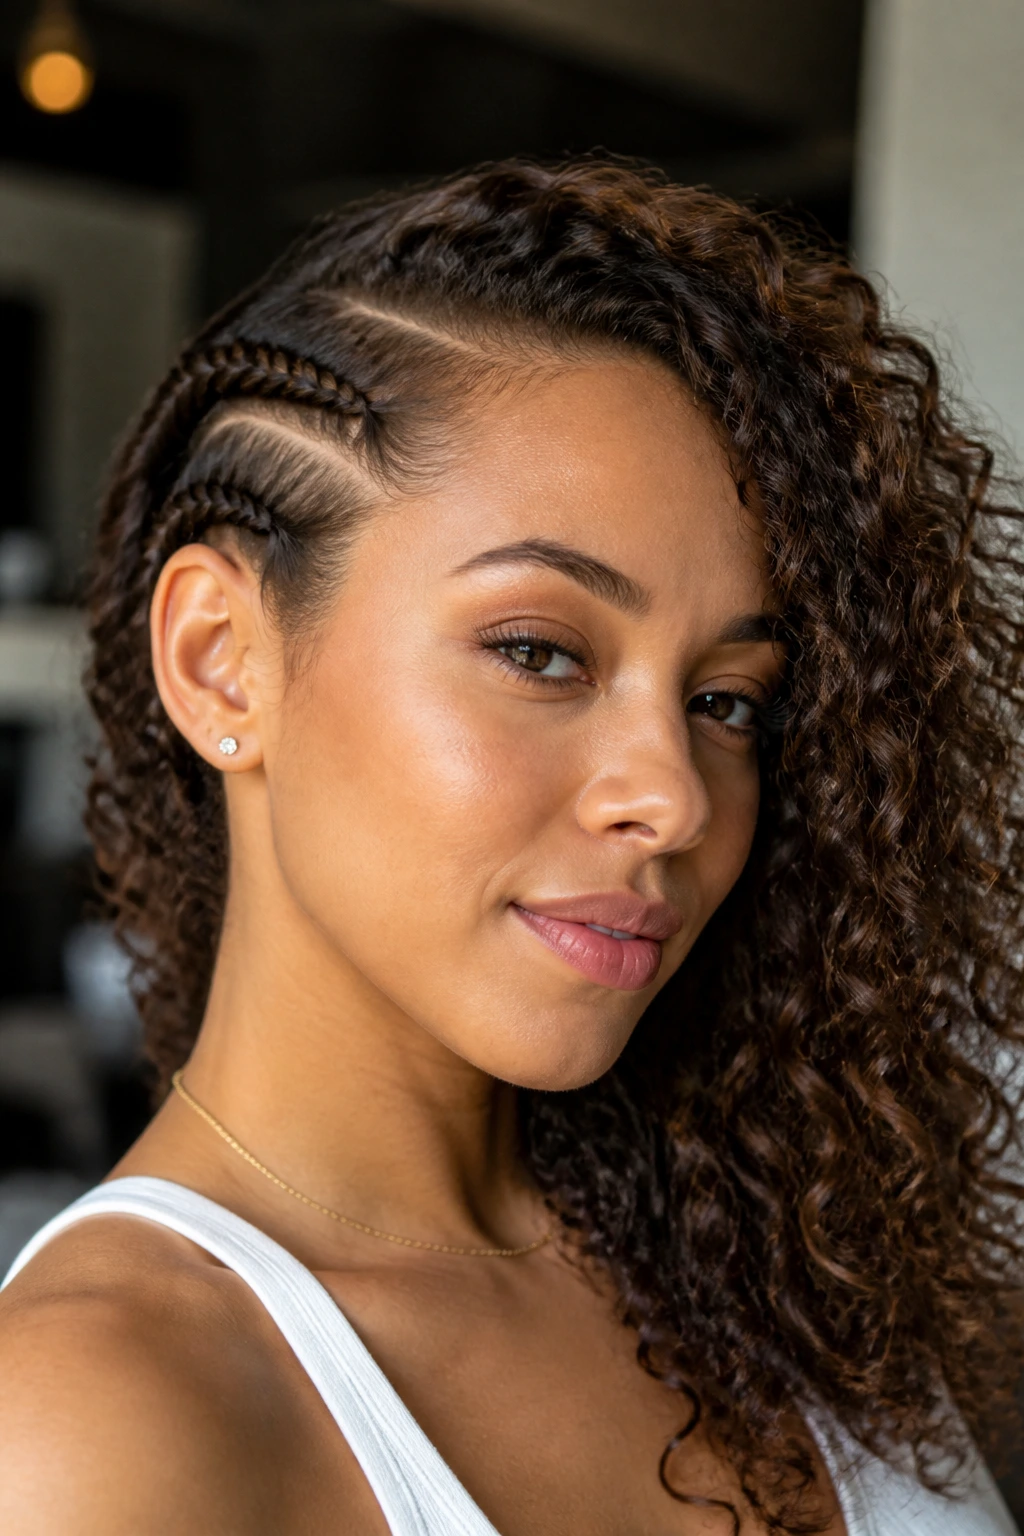
3. The Zig-Zag Parted Micro-Braid

Sometimes the interest isn’t in the braid itself, but in how you set the stage for it. A sharp, geometric part can completely modernize a simple style. By parting your hair in a zig-zag pattern and placing a small braid along the crest of each zig, you create an intricate, architectural look that screams precision.
Why This Style Lasts
Because you are working with small sections, there is less weight dragging on the scalp. This means you can keep these braids in for several days without the scalp soreness that usually accompanies heavier, bulkier protective styles. Make sure to wrap your hair in a silk or satin bonnet at night to keep the parts crisp and prevent the braids from unraveling.
4. Double-Dutched Side Braids
If you want to keep the bulk of your curly hair down but need to manage the volume on one side of your face, two tight Dutch braids running from the temple to just behind the ear are the perfect solution. This creates a “faux-sidecut” look without having to reach for the clippers.
Maintaining the Detail
The “Dutch” aspect is vital. Because you are crossing the hair underneath, the braid appears to “pop” off the head rather than sinking into the curls. This creates a high-contrast look between the tight braid and the voluminous, loose curls cascading on the other side. If your curls are very tight, you might find that using a fine-tooth comb for the initial parting helps get that super clean, sharp line.
5. The Criss-Cross Crown Braid
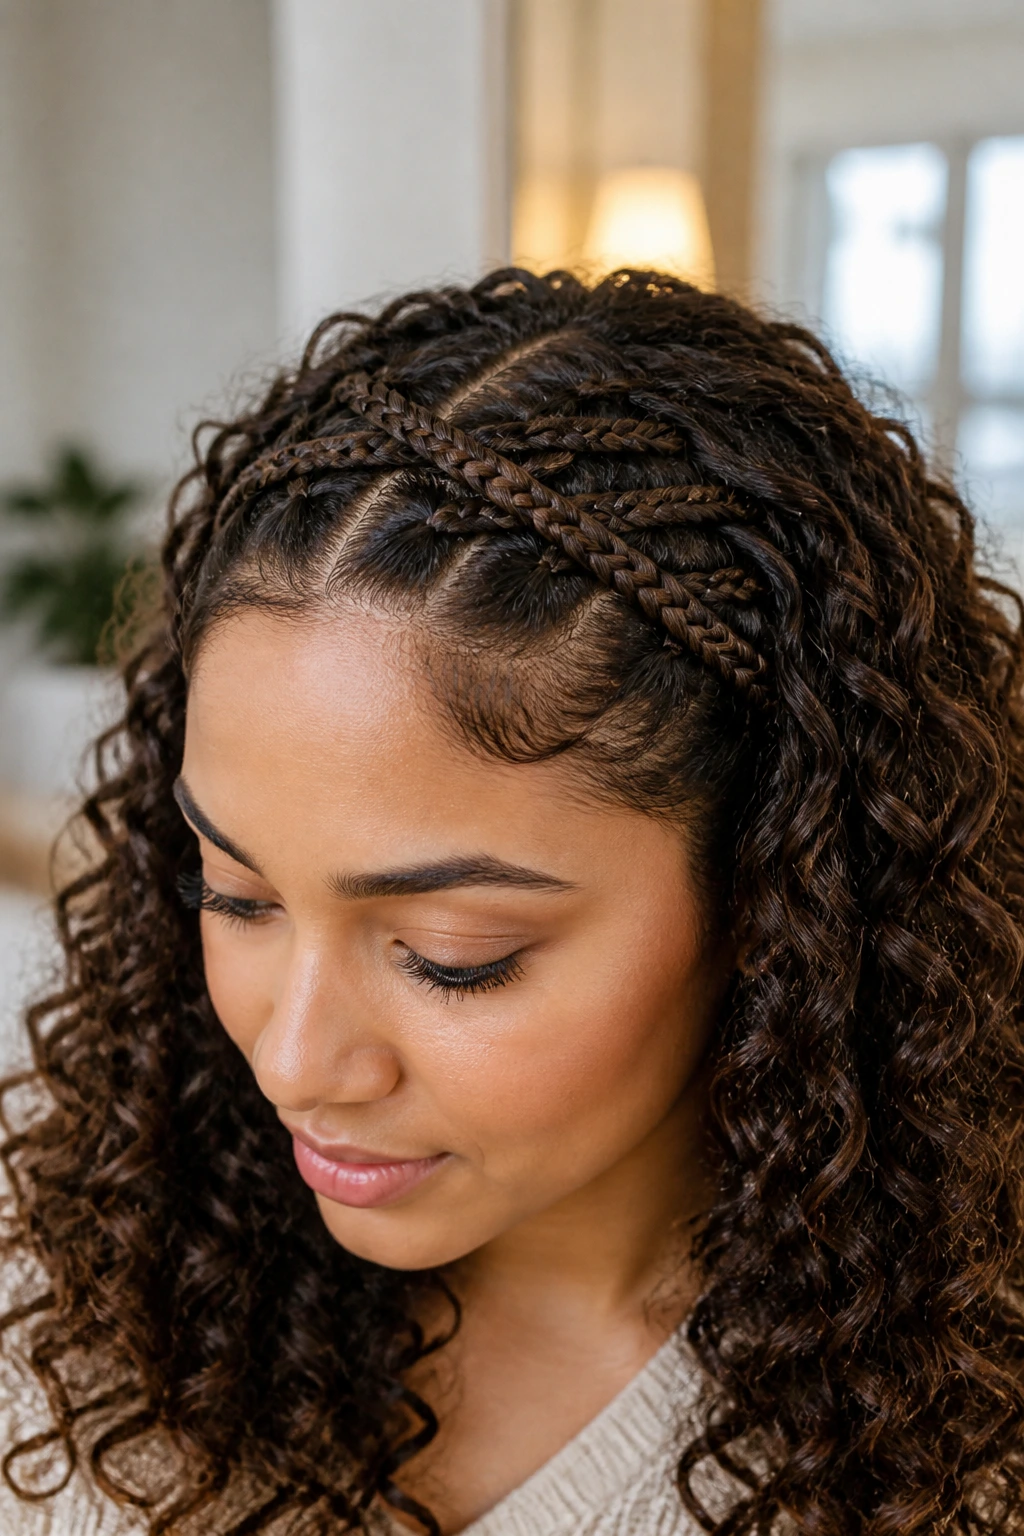
This requires a bit of patience, but the results are worth every minute. You are taking small sections from the front, braiding them back, and then crossing them over each other. It creates a lattice-work effect that looks far more complicated than it actually is.
Execution Strategy
Start by sectioning your hair into four small, square segments near the front of your hairline. Braid each segment backward for about three inches. Then, take the tail of the first braid and cross it over the second, securing the third with a small, clear elastic. Repeat this until you have a beautiful criss-cross pattern that spans the front of your head.
6. Micro-Braids with Gold Cuff Accents
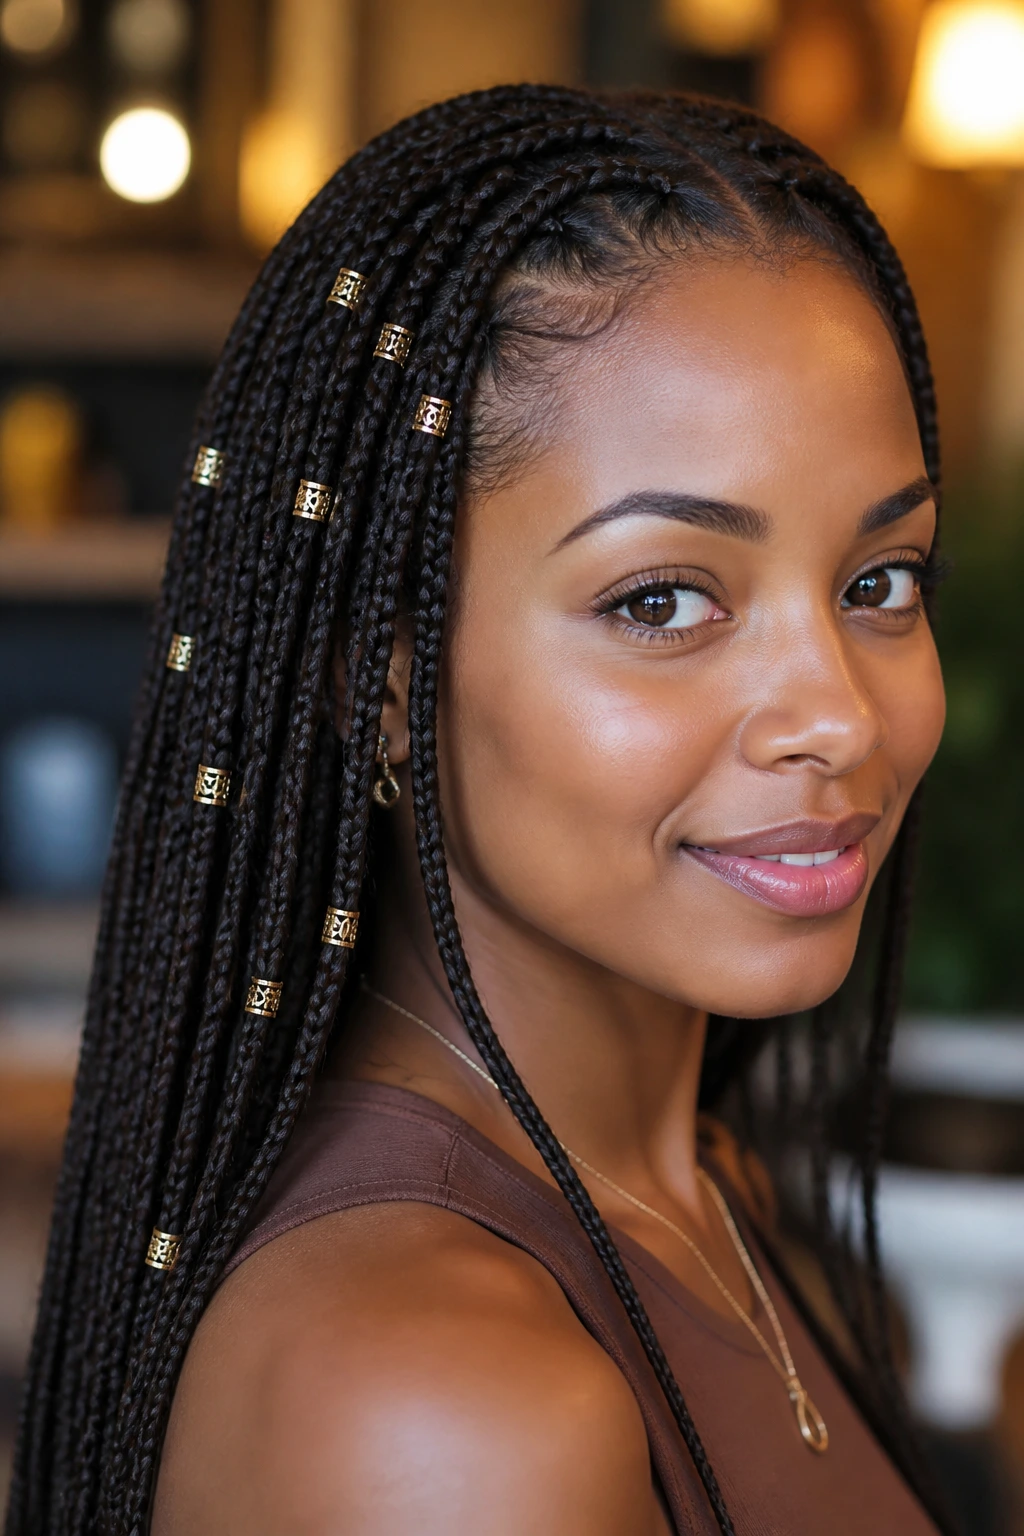
Sometimes, you just need a bit of hardware. Small braids are the perfect canvas for hair jewelry. You don’t need a complex style to make a statement—just add a few metallic gold or silver cuffs at different points along a single, thin plait tucked behind your ear.
Placement Matters
Do not crowd the braid. If you place cuffs every half-inch, it looks cluttered and heavy. Instead, space them out—maybe one near the root, one in the middle, and one near the end. This highlights the length of the braid and adds a subtle glimmer that catches the light whenever you turn your head. It is a fantastic way to elevate a casual, everyday look for an evening event.
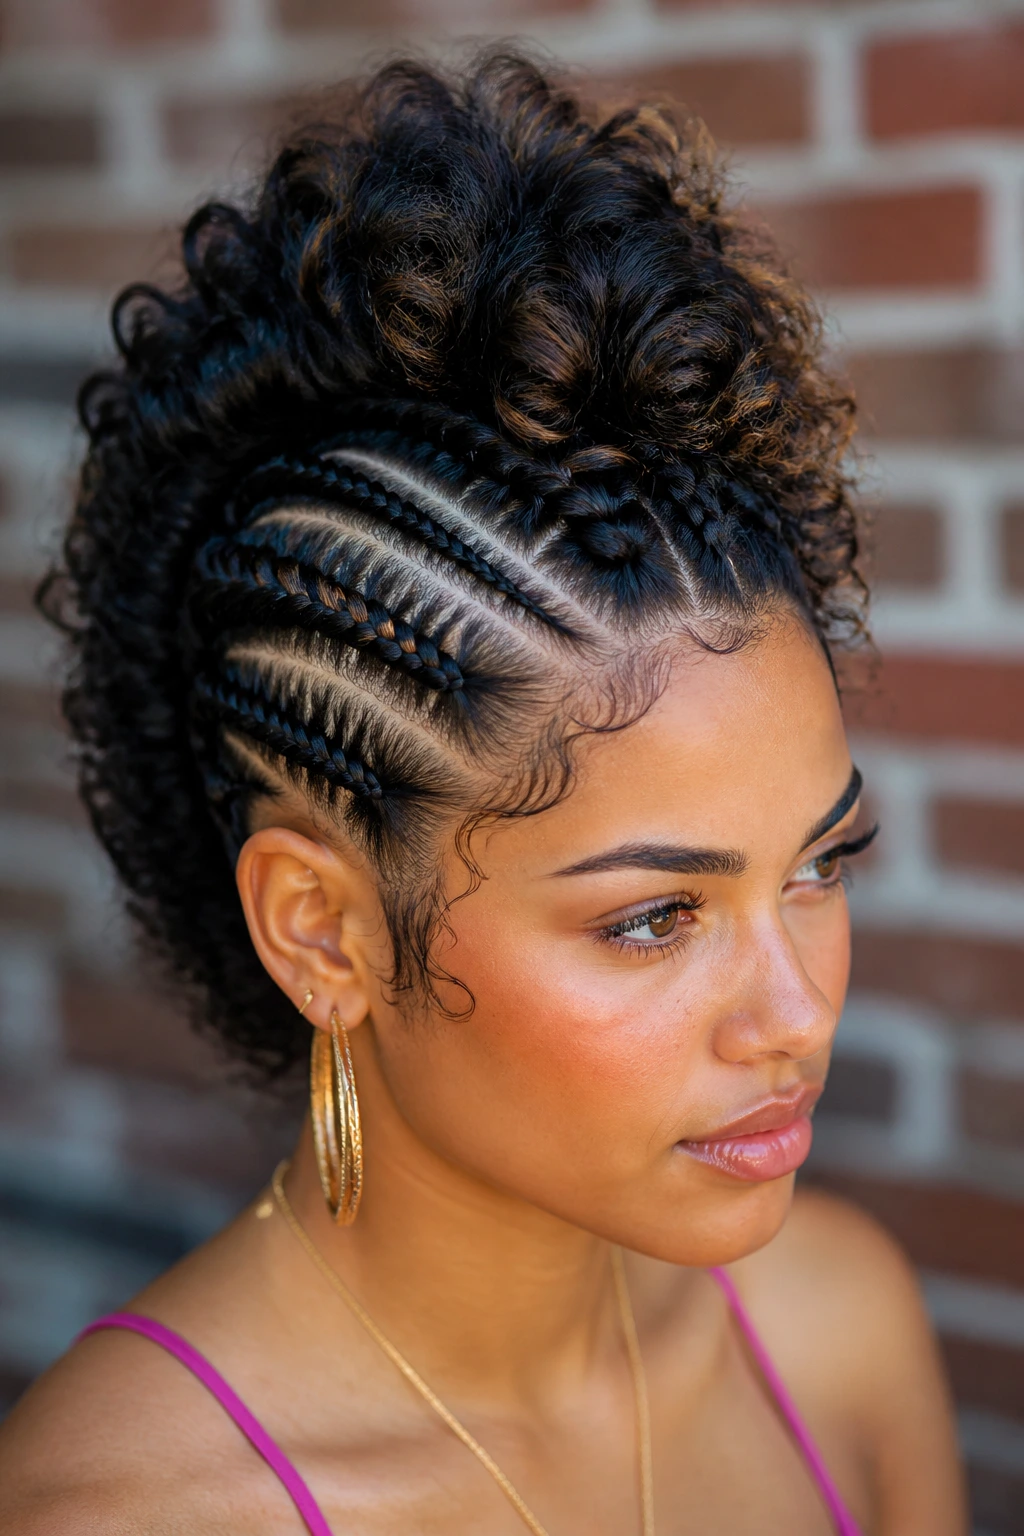
7. The Mohawk-Inspired Micro-Braid Row
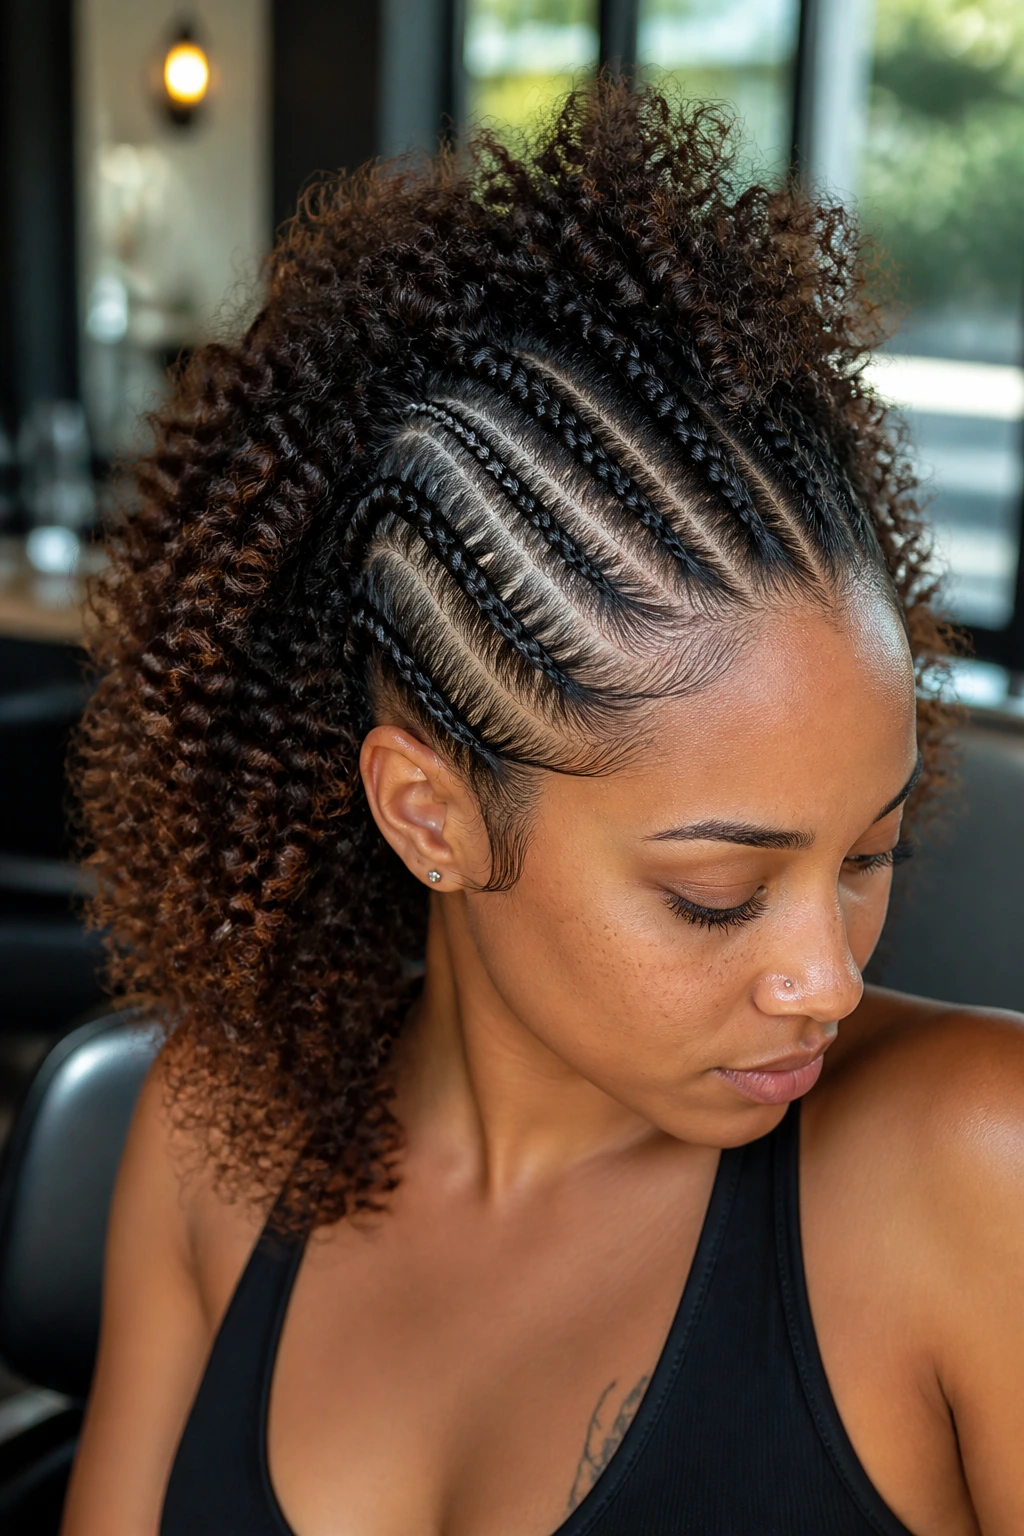
If you have ever wanted a mohawk but weren’t ready to commit to the fade, this is your answer. Create three to five very small, tight cornrow-style braids running from your forehead back toward the crown of your head. Leave the rest of your hair in its natural, voluminous curl pattern.
Texture Contrast
The contrast is everything here. You have the sleek, scalp-hugging lines of the braids sitting in the middle of a massive cloud of curls. Use a high-shine pomade on the braided sections to make them glisten. This makes the braids look like purposeful lines of light cutting through your natural hair.
8. The “Bubble” Braid Variation
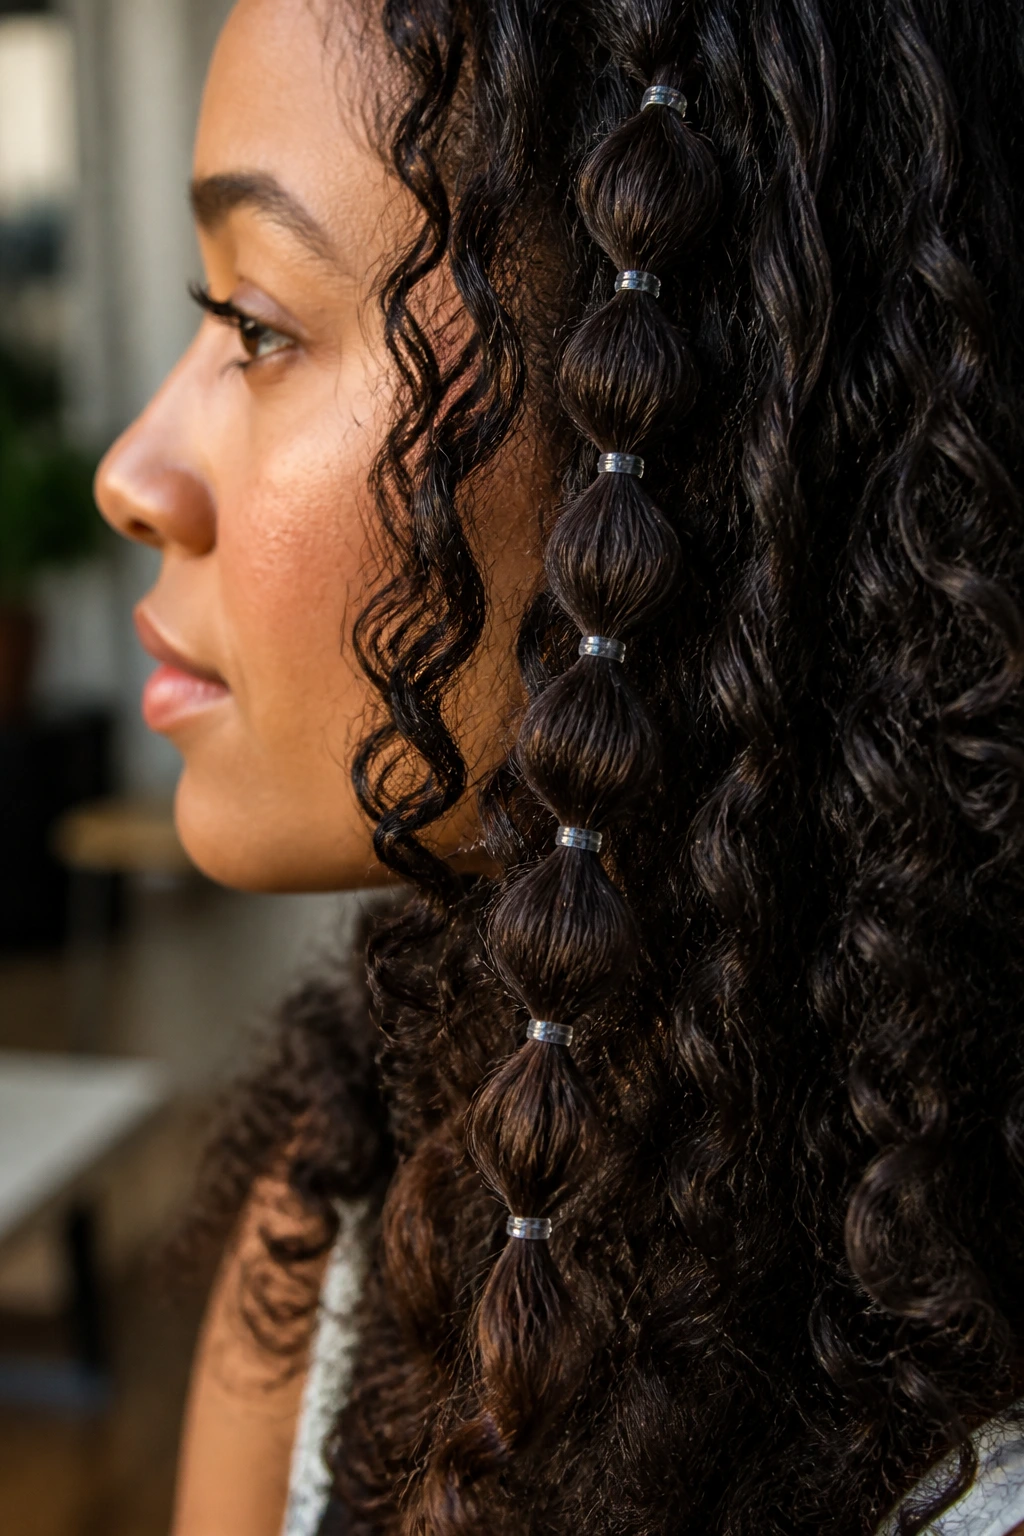
Technically, these aren’t traditional braids, but they mimic the aesthetic perfectly and are much faster to achieve. Use tiny clear elastics to “bubble” your hair down a small section. The result is a series of interconnected, rounded segments that look like a plait but don’t require the fine-motor skill of weaving strands.
The Secret to Longevity
If you have high-porosity hair, this style is fantastic because it doesn’t require manipulating the hair fibers through intense weaving. Simply secure and tug the sections slightly to create volume. It’s a low-tension way to get a stylized look that keeps your curls protected from friction.
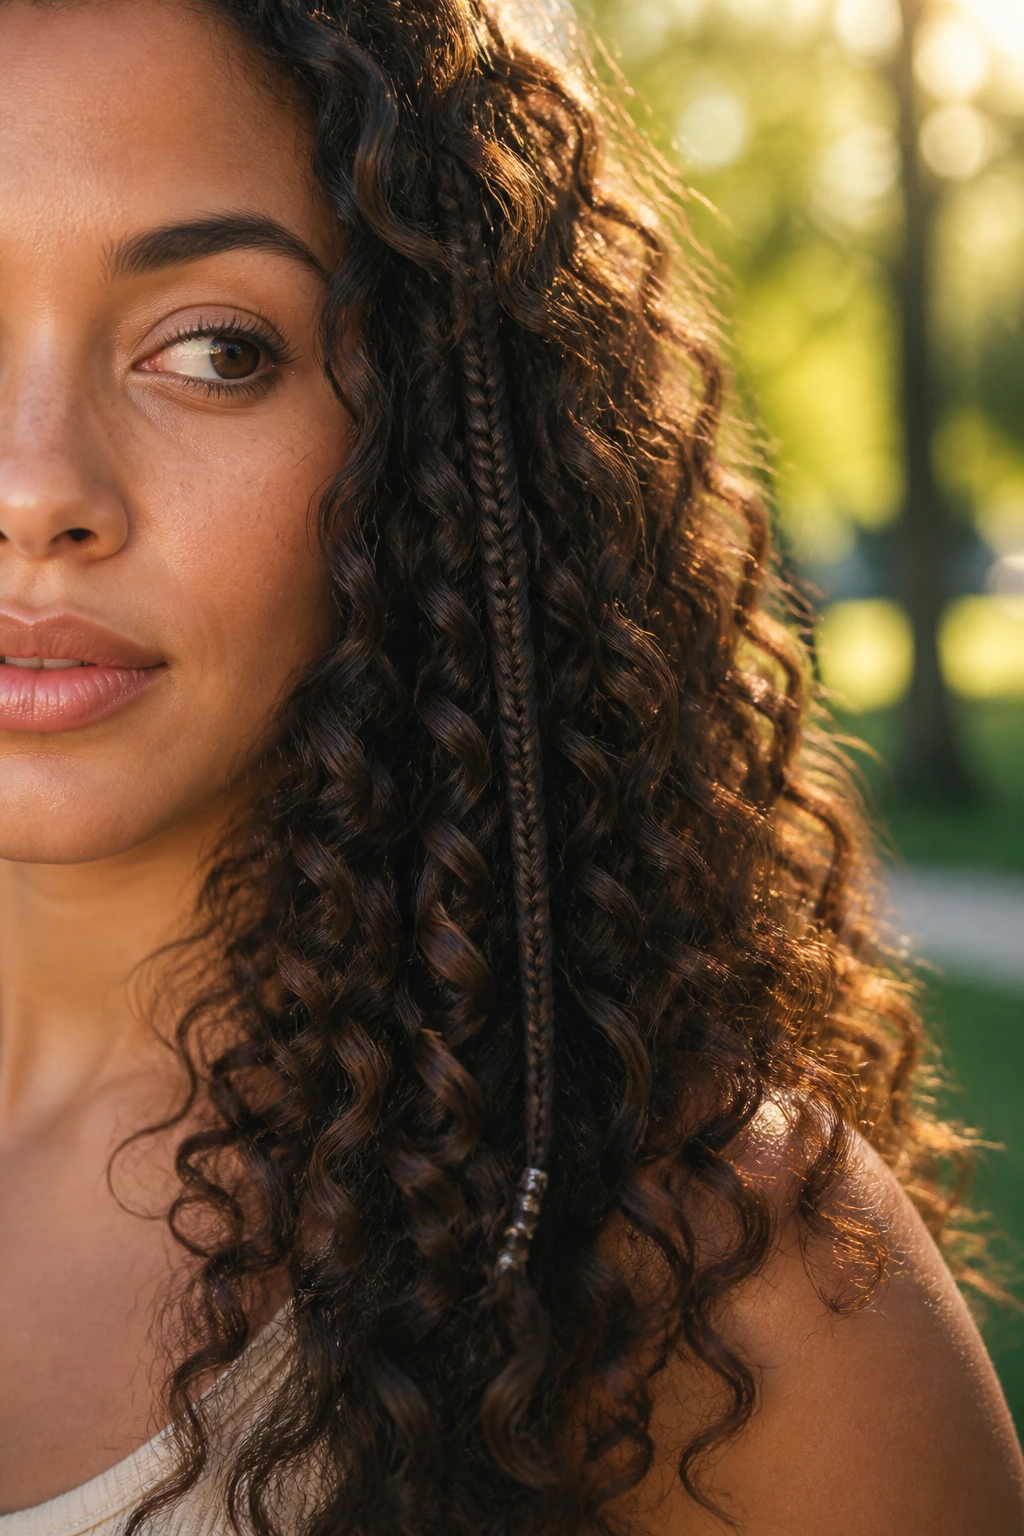
9. Twisted “Rope” Braids
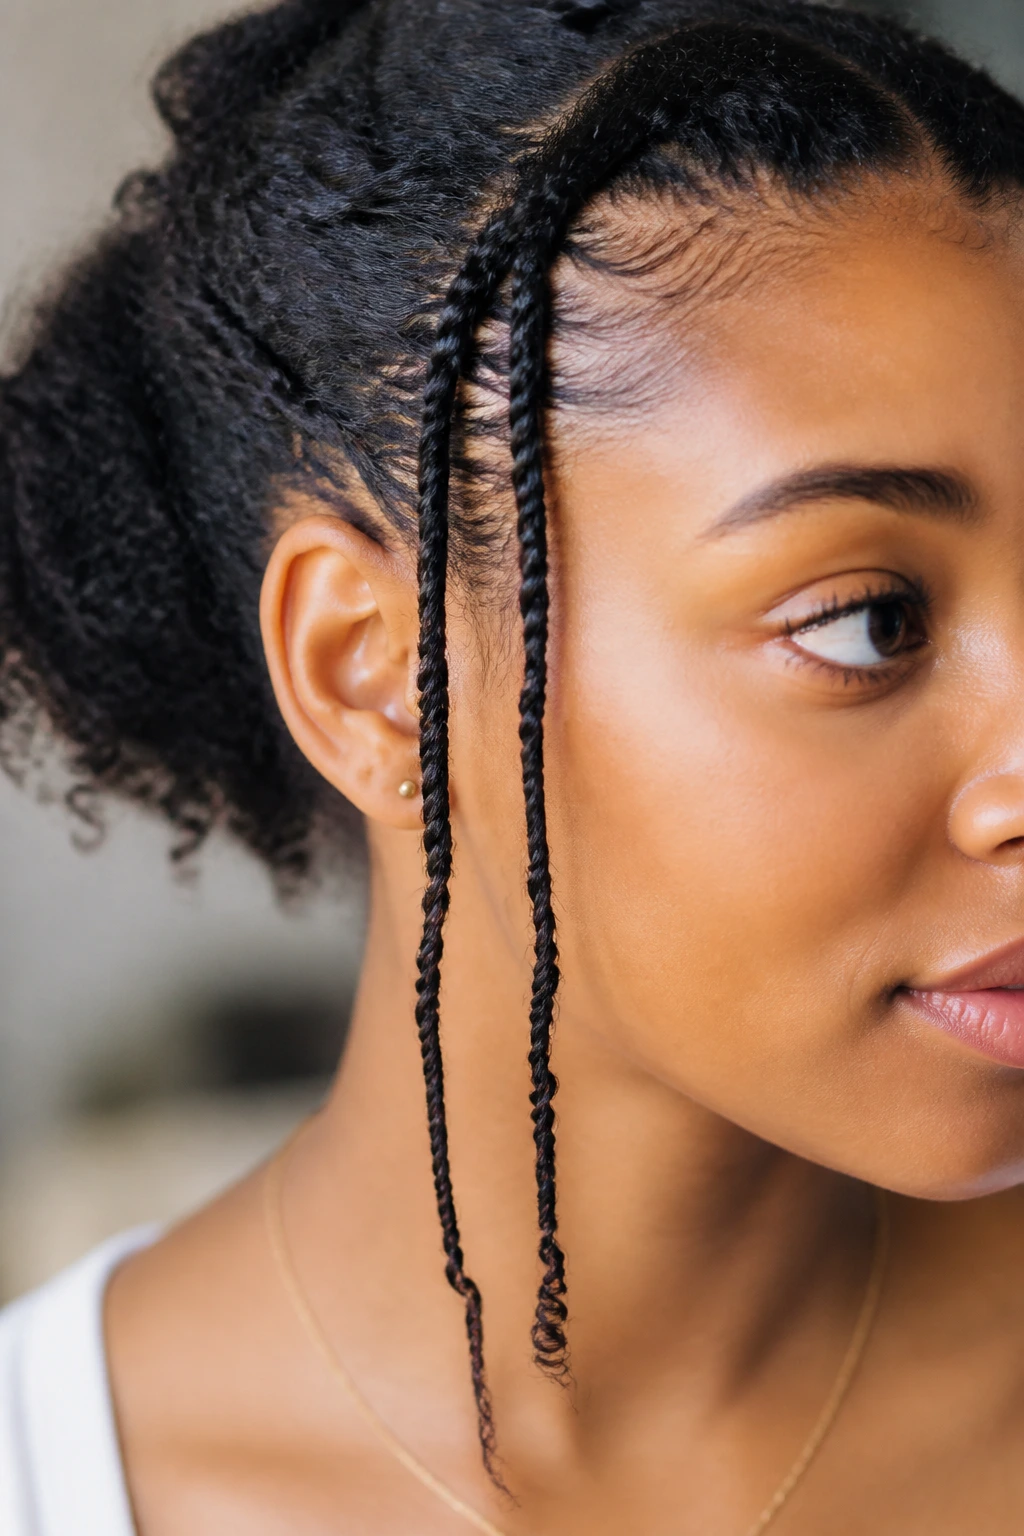
A rope braid is essentially two strands twisted around each other, but when you do it on a very small scale, it looks like a thick, sophisticated cord. This is much easier for beginners to master than a three-strand braid, and it holds up remarkably well in humid conditions.
The Twist Technique
Divide your section into two. Twist each strand to the right, then cross them over each other to the left. By twisting and crossing in opposite directions, you ensure that the “rope” remains tight and doesn’t unravel throughout the day. It’s an incredibly durable style for long, active days.
10. The Waterfall Micro-Braid
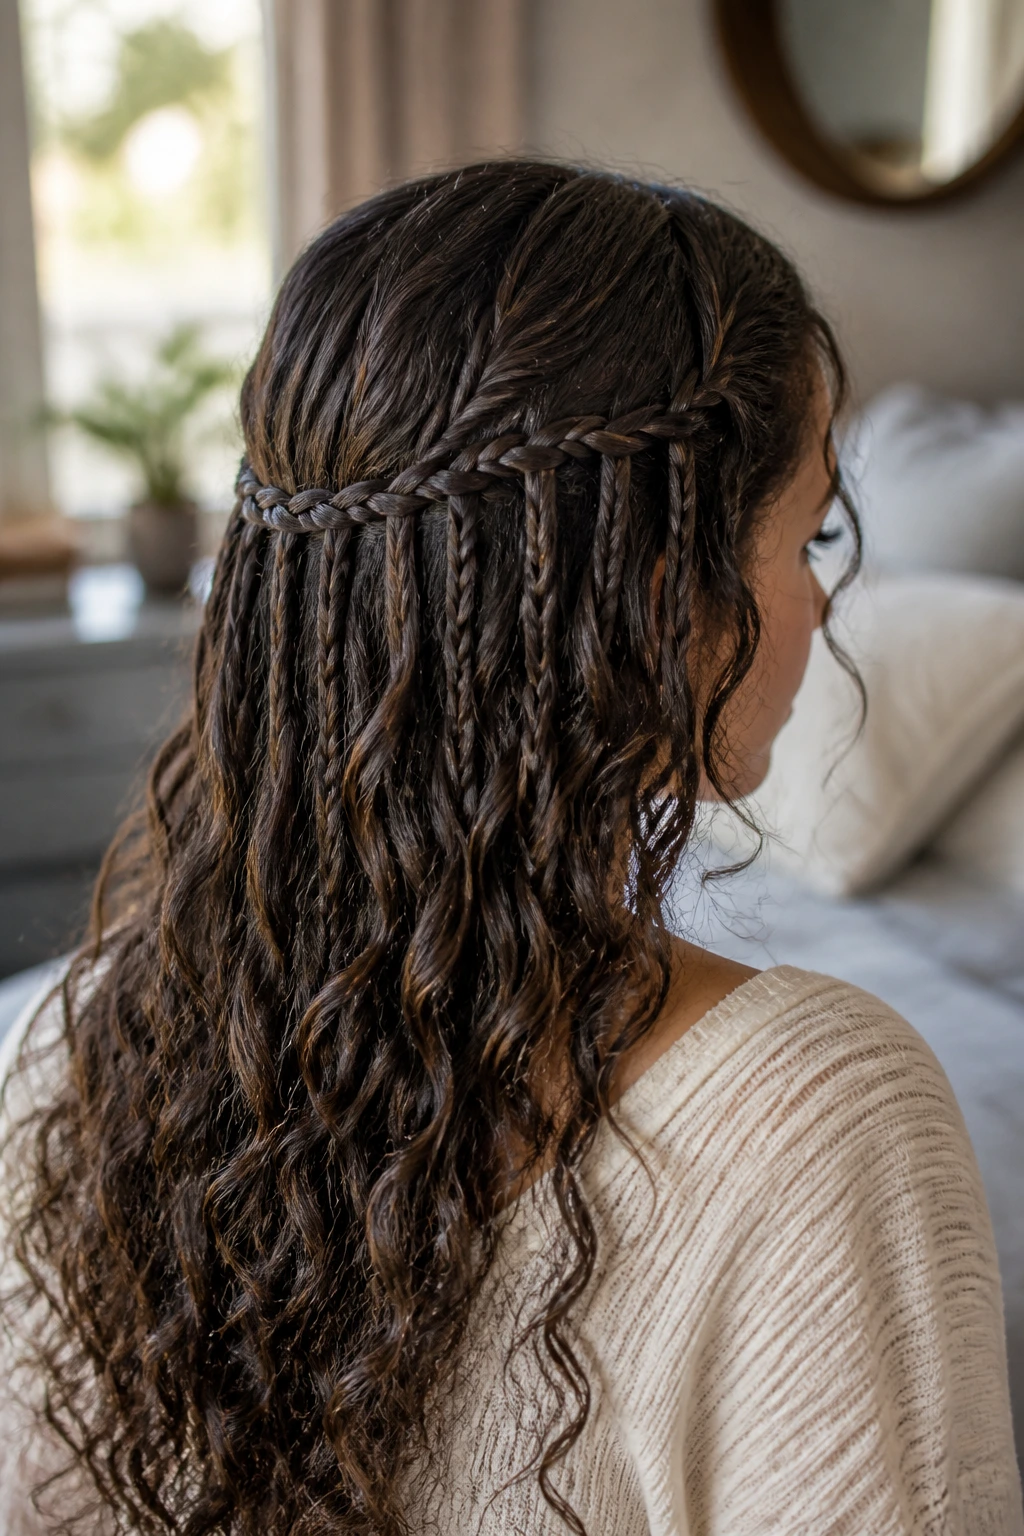
This is for those days when you want to show off the length of your curls while still keeping the front managed. You create a braid that travels horizontally across the back of the head, dropping strands of hair as you go, which creates the “waterfall” effect.
Why It’s Unique
This style is inherently soft. Because you are constantly dropping strands, the braid doesn’t pull on the scalp as much as a traditional cornrow. It is also one of the few styles that works exceptionally well on second or third-day hair, where your curls might be a little less defined. The braid itself acts as the focal point, masking any frizziness in the hair that you’ve “dropped.”
11. The Side-Swept Goddess Plait
Imagine a single, medium-sized braid that begins at one temple and travels in a gentle, sloping curve toward the opposite ear, collecting hair as it goes. This is a very elegant, Grecian-inspired look that works wonders for formal occasions.
Styling Tip
Because this braid is larger than a micro-braid, you have more room to “pancake” it. Once the braid is secured with an elastic, gently pull on the loops of the braid to make them look fuller and flatter. This adds a romantic, lived-in texture that pairs perfectly with loose, flowing curls.
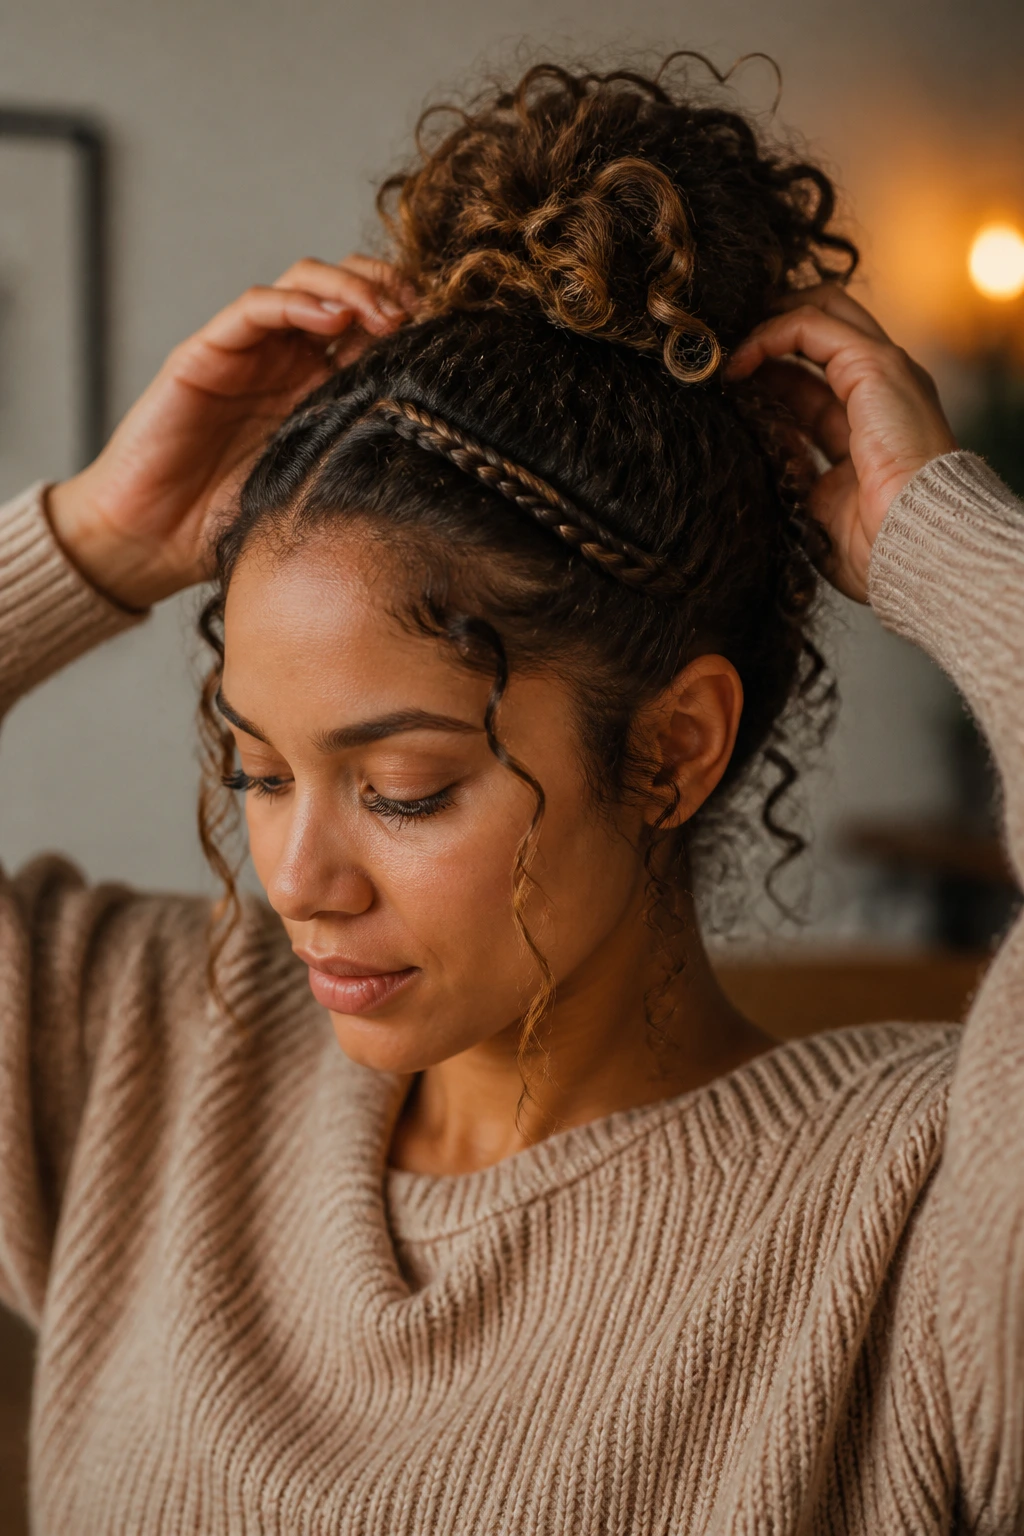
12. The Multi-Layered Top Knot Base
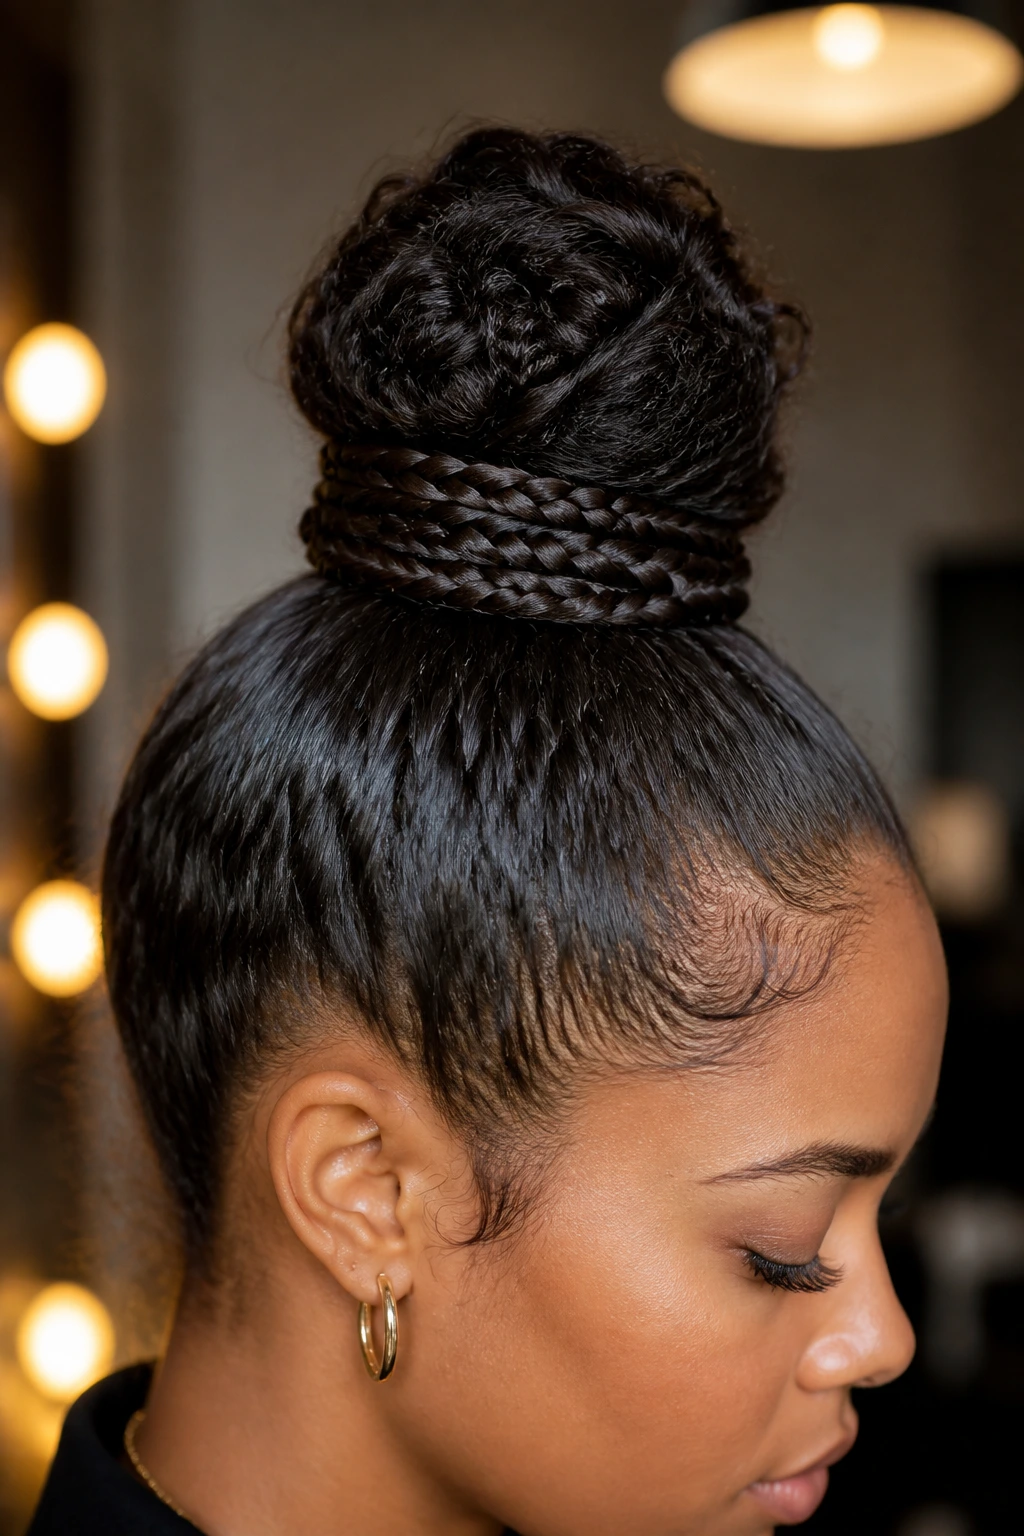
If you are doing a top knot or a high ponytail, you can use small braids as a decorative base. Instead of just wrapping hair around the elastic, braid two small sections and wrap those around the base of your ponytail. It makes the style look much more intentional and curated.
Enhancing the Finish
Use a tiny bit of lightweight styling wax to smooth down any flyaways on the wrapped braids. This provides a sleek, polished look that elevates the entire ponytail. It’s a very simple trick that takes thirty seconds but completely changes the silhouette of your up-do.
13. The Half-Up, Half-Down Braided Crown
This is the ultimate style for those who want the best of both worlds. Braid the top half of your hair into a circular crown, leaving the bottom half to hang in full, voluminous curls. It keeps your hair out of your eyes while highlighting your volume.
Managing the Transition
The most important part of this style is where the braid meets the loose curls. Use a bobby pin that matches your hair color to anchor the braid firmly against the scalp. You want the transition from the “braided” part to the “loose” part to feel seamless, rather than having a weird, bulky knot of hair in the back.
14. The Accent Braid in a Messy Bun
Sometimes, the best styles are the accidental ones. If you are throwing your hair up into a quick, messy bun, try braiding just one small section at the front before you pull everything up. That single, tiny plait adds a layer of deliberate styling to an otherwise chaotic look.
Why It Works
It breaks up the silhouette of the bun. Instead of just a large mound of curls on your head, you have a visual line—a path—leading to the bun. It is sophisticated, easy, and looks like you spent much more time on your hair than you actually did.
15. The Triple-Threat Side Braids
Combine three very small, tight braids on the side of your head. Start them at different points along the hairline and run them parallel toward the back. The effect is a layered, textured side profile that looks very modern and fashion-forward.
Texture and Hold
These need to be tight. Use a dab of firm-hold styling cream on your fingers before you start. Because you are doing three, you want them to be very uniform. If one is thicker than the other, the whole visual balance will be off. Consistency is the key to this style’s success.
16. The “Hidden” Braid Within the Curls
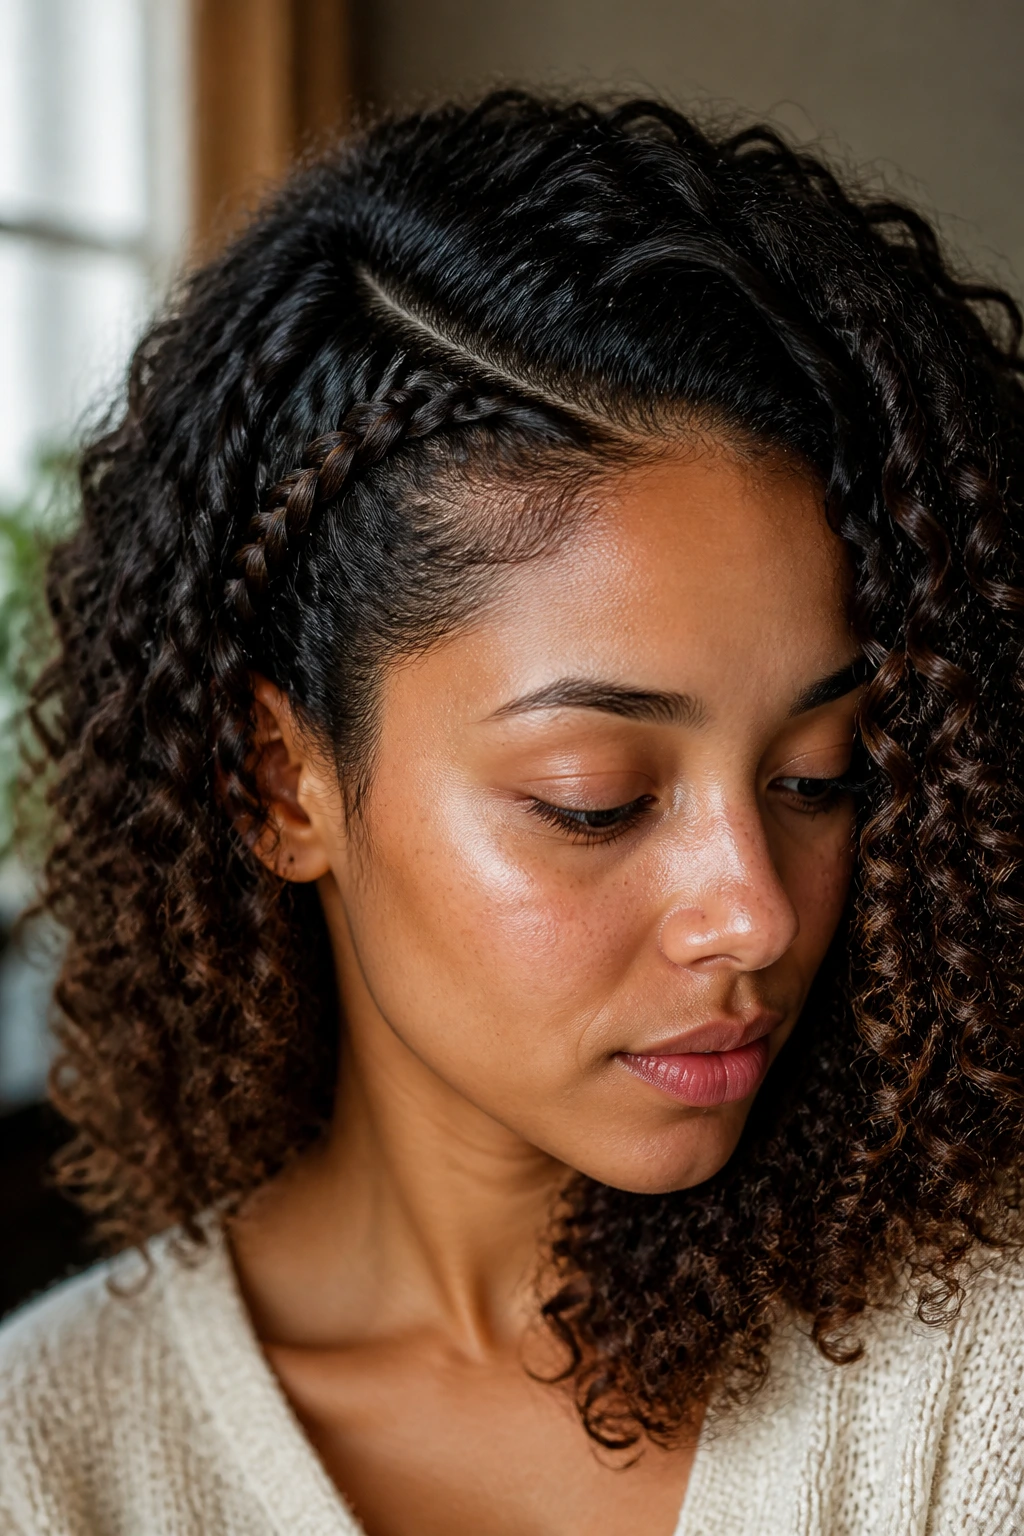
If you want to keep your hair completely down but want to prevent the front pieces from falling into your eyes, try a “hidden” braid. Part a small section right at the hairline, braid it back, and tuck the end behind your ear, pinning it so the rest of your hair covers the end of the braid.
The Invisible Benefit
It keeps your face clear while the rest of your hair looks like a natural, wild mane. This is a brilliant way to handle hair that is just reaching the “in-between” stage where it is long enough to get in your face but not quite long enough to stay behind your ears on its own.
17. The Twisted Mohawk Crown
Combine a center-parted crown braid with a twisted mohawk section in the middle. You are effectively mixing two different techniques—braiding and twisting—to create a center point of interest that draws the eye upward.
Mastering the Balance
This is a high-volume style. It is not for the faint of heart. If you have very dense hair, make sure you section very carefully. Use clips to keep the sections you aren’t working on out of the way. If you don’t keep your sections neat, the whole style will become a tangled mess before you even finish the first row.
18. The Fishtail Micro-Braid
The fishtail braid is notorious for being time-consuming, but when done on a tiny, one-inch section of curly hair, it is manageable and looks incredibly intricate. It creates a tightly woven, herringbone-like pattern that stands out even against the busiest curl textures.
Technique Nuance
You don’t need a lot of hair for a good fishtail. Just two thin strands. Take a tiny piece from the outer edge of one strand and bring it over to the other. Repeat. It’s tedious, yes, but because the section is so small, you can finish it in just a few minutes.
19. The “Snake” Braid

A snake braid is a specific technique where you leave the middle strand of a three-strand braid stationary and push the other two strands up. It looks like a zig-zagging snake sliding through your hair. It is a fantastic accent for a half-up style.
Execution Strategy
Do not pull the braid tight. You want the “snake” to be loose and flexible. This style works best on hair that has a bit of grip, so it is actually easier to do on second-day hair rather than freshly washed, super-slippery curls.
20. The Wrapped High Ponytail
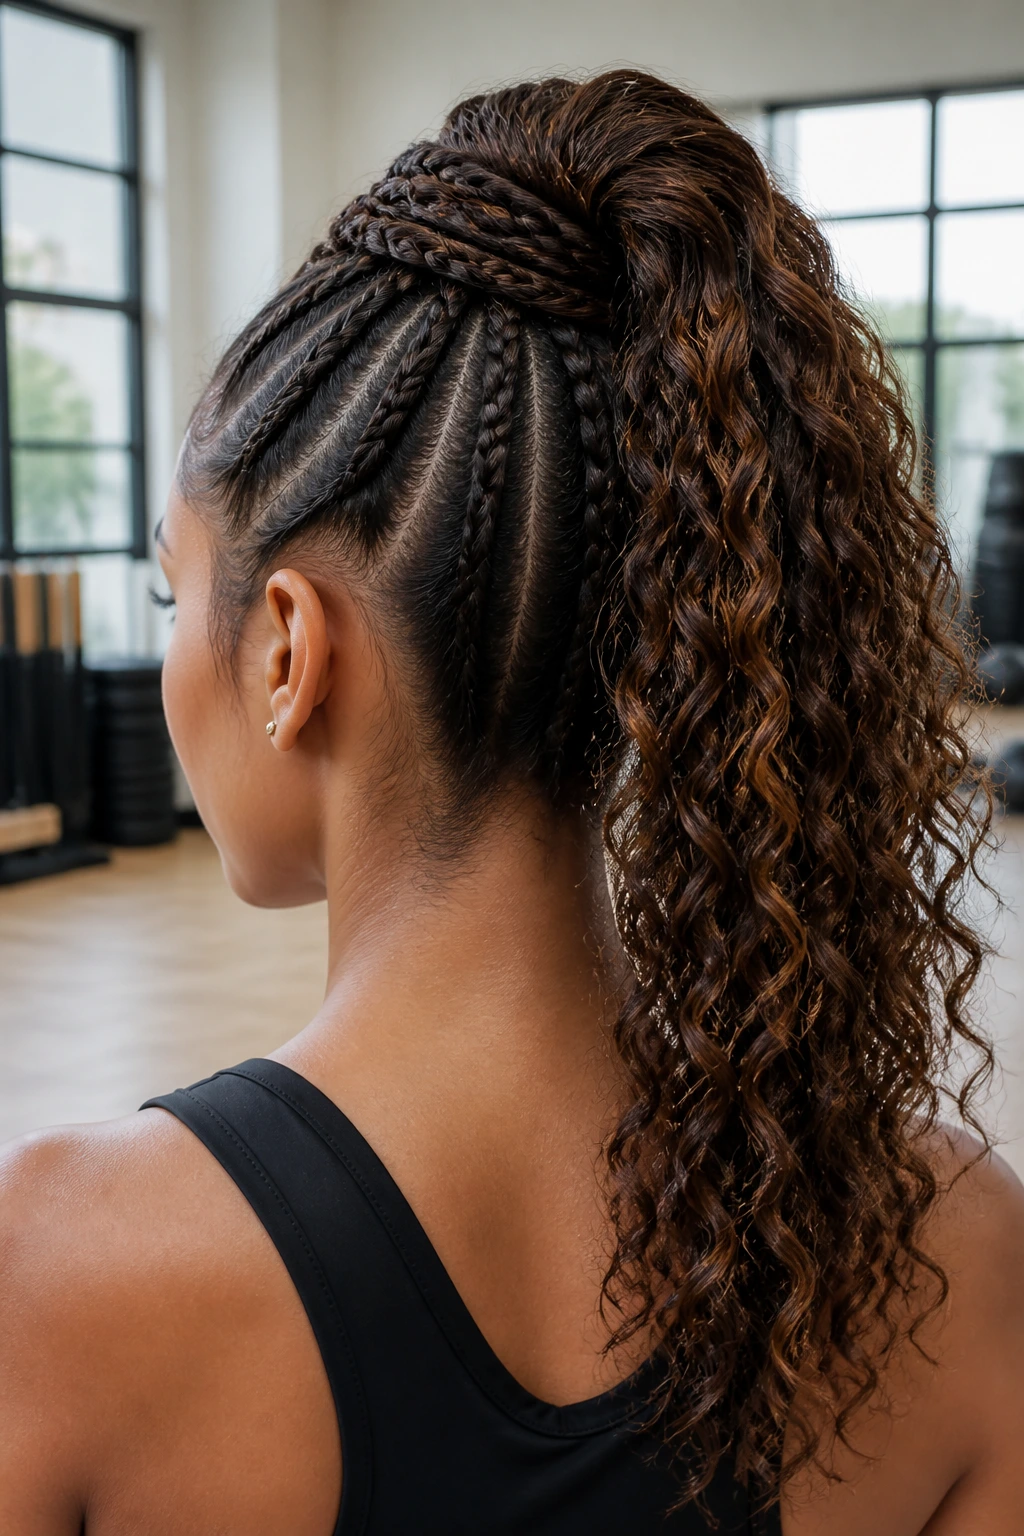
Braid the entirety of a high ponytail. It sounds simple, but the look is powerful. It turns a standard, sporty ponytail into a structural piece of art. The small, tight braids hold the curls in place, creating a unique texture that moves with you.
Why It Holds Up
By braiding the length of the ponytail, you are preventing the hair from rubbing against your back, which is the primary cause of friction-induced frizz in long curly styles. This style will last from your morning workout through your entire workday without needing a single touch-up.
21. The Side-Parted Braid-and-Tuck
Part your hair deep on one side. Braid the smaller side tightly against the scalp. Tuck the end of the braid behind your ear and let the rest of your hair flow over it. This creates a hidden anchor that keeps your hair out of your eyes while maintaining the illusion of a full, loose style.
The Anchor Point
The secret is the bobby pin placement. Make sure you cross two pins in an “X” shape at the end of the braid to ensure it stays put. If you only use one pin, the weight of your curls will eventually pull the braid loose as you move throughout the day.
22. The Crown-to-Nape Micro-Braid
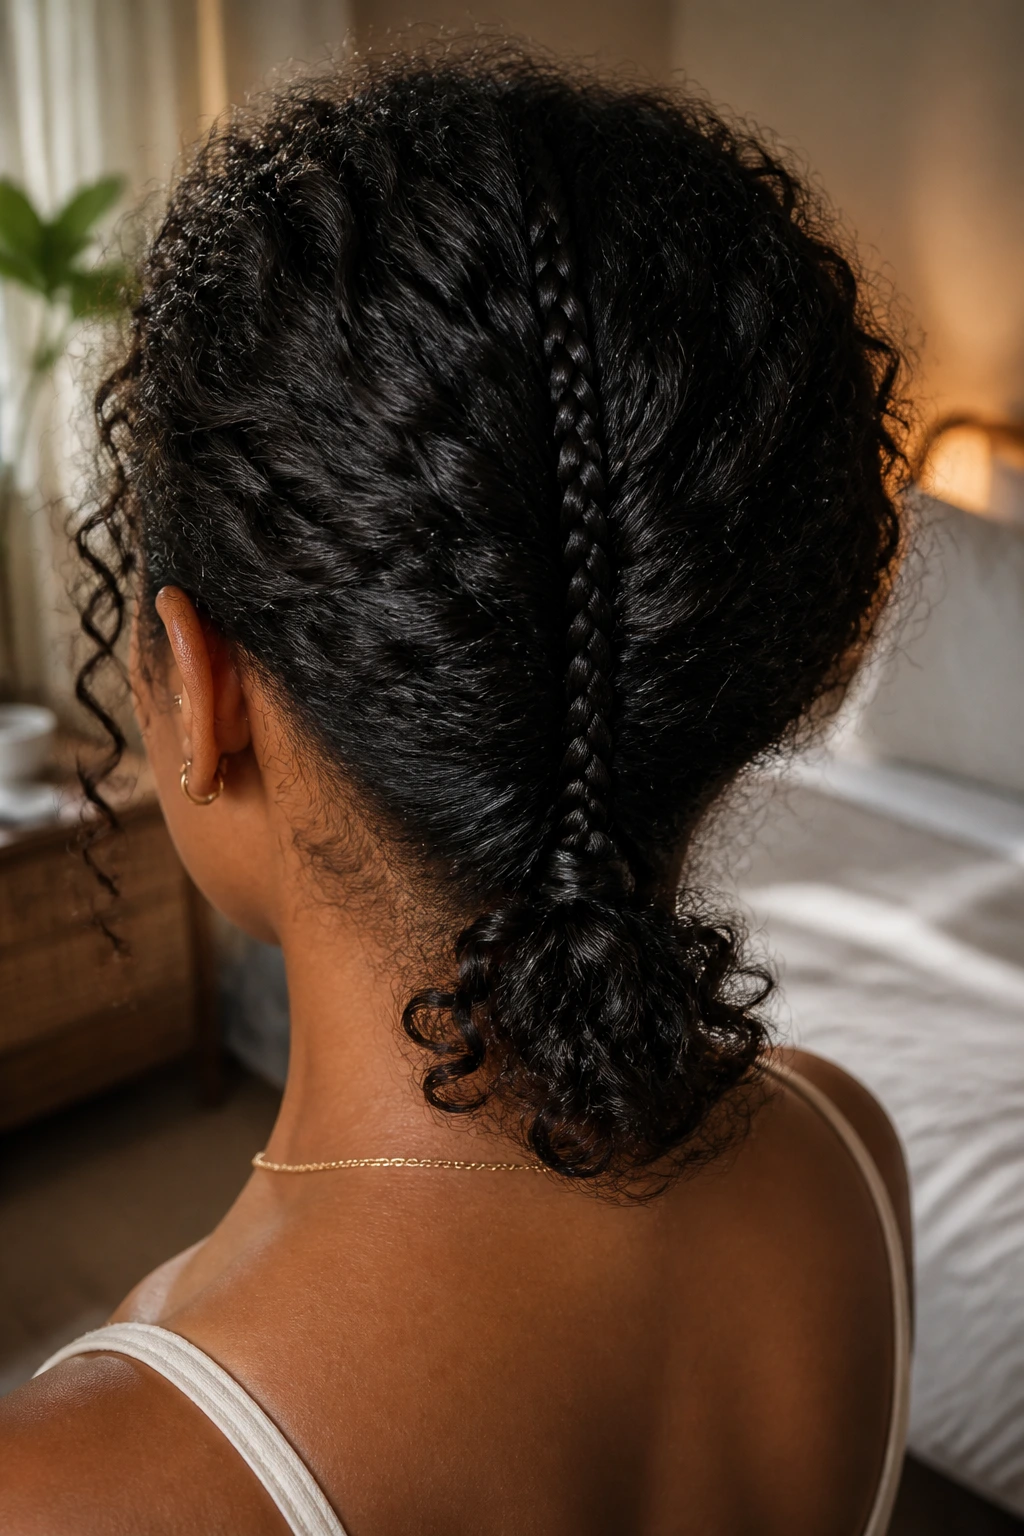
Starting at the crown of your head, create a single, small, tight braid that runs straight down the center to the nape of your neck. It’s a clean, minimalist style that acts as a spine for your curls. It’s sleek, it’s modern, and it keeps the bulk of your hair feeling managed without sacrificing your length.
Finishing the Look
Once you reach the nape, you can gather the braid and the rest of your hair into a low ponytail, or you can keep the rest of your hair loose. It is incredibly versatile. For an extra touch of polish, leave a few tendrils out around your face to soften the look, ensuring you don’t feel too “tightly pulled” or severe.
Final Thoughts
Working with curly hair requires a shift in mindset; you are not fighting the texture, but rather finding ways to give it structure. Small braids are the ultimate tool for this. They allow you to define sections of your hair without losing the volume or the character that makes curly hair special.
The most successful styles are the ones where you prioritize the health of your hair. Never pull too hard, always keep your sections clean, and remember that a little bit of moisture goes a long way in ensuring your braids look smooth rather than frayed. Play with these ideas, mix and match them, and don’t be afraid to leave some curls loose while tucking others away. Your hair is the most versatile accessory you own—have fun with the texture.