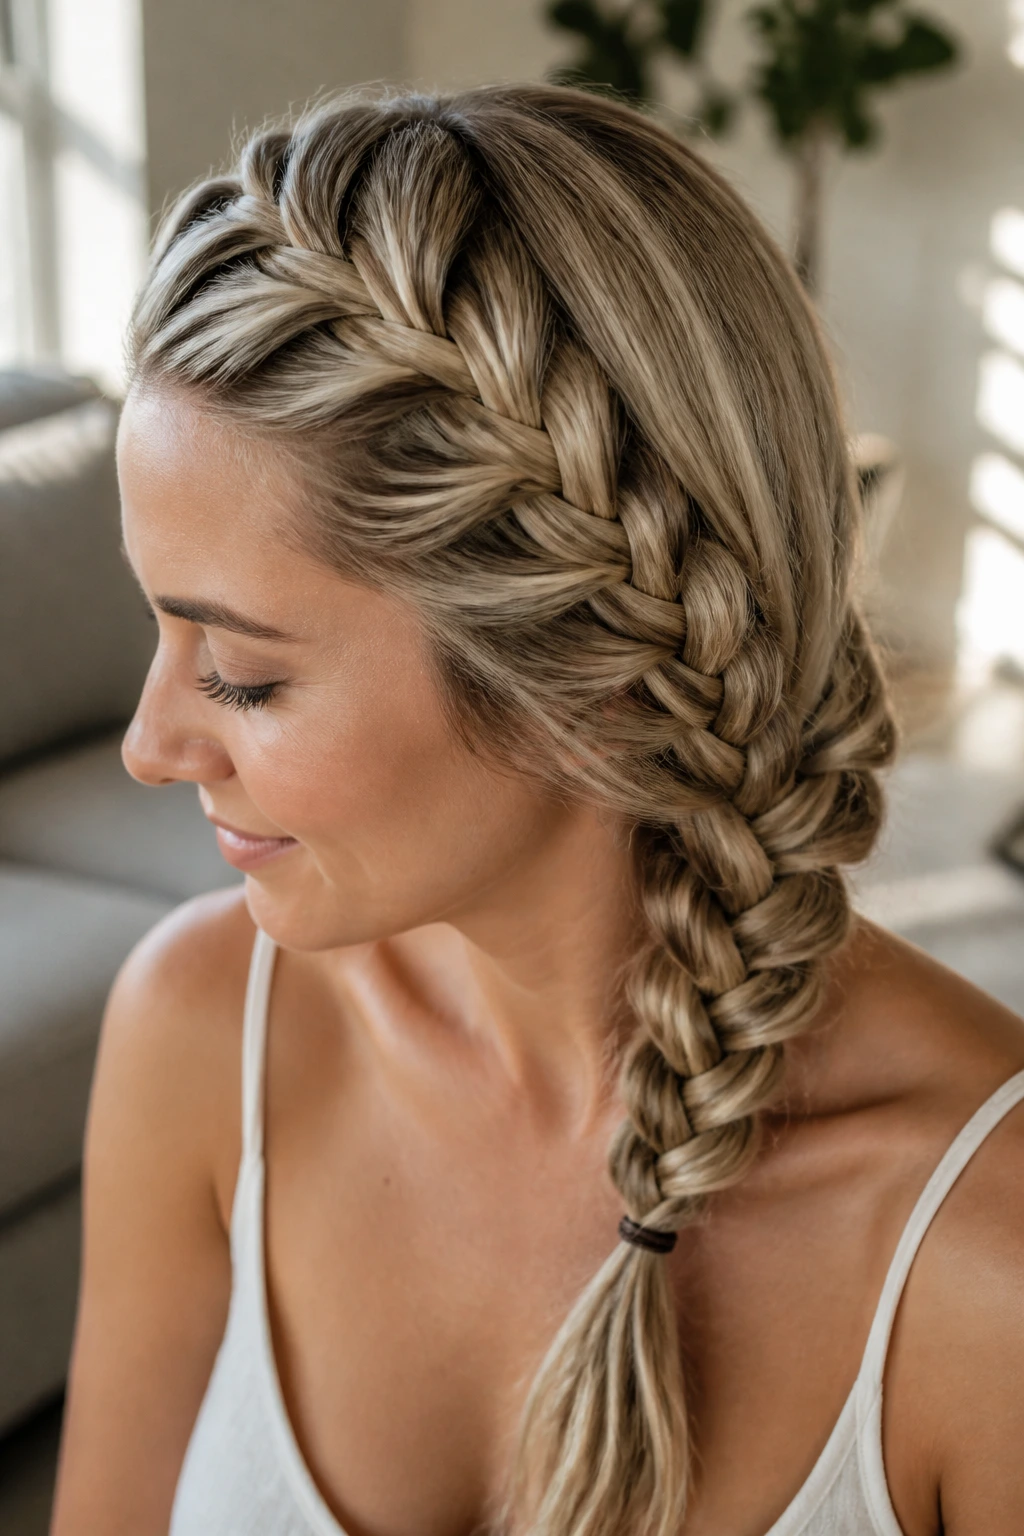
Braiding is one of those timeless skills that sits perfectly at the intersection of utility and artistry. If you have medium-length hair—that sweet spot where your ends hit anywhere between your collarbone and mid-back—you are in the ideal position to master the Dutch braid. It is not just about keeping hair out of your eyes during a workout or a humid day; it is about creating a structural piece of design that adds volume, texture, and a sense of deliberate polish to your everyday look. Unlike the French braid, where you tuck strands over each other, the Dutch technique requires you to cross them under, creating an inverted, 3D effect that sits proudly on top of the scalp.
Mastering this technique opens up a catalog of styles that look far more complicated than they actually are. Because your hair is not dragging down with excessive weight, these braids hold their shape beautifully, maintaining their crisp definition from early morning until you finally undo them before bed. Whether you want a sleek, tight look for a professional setting or something loose and bohemian for the weekend, the following styles prove that medium-length hair is the most versatile canvas for intricate plaits.
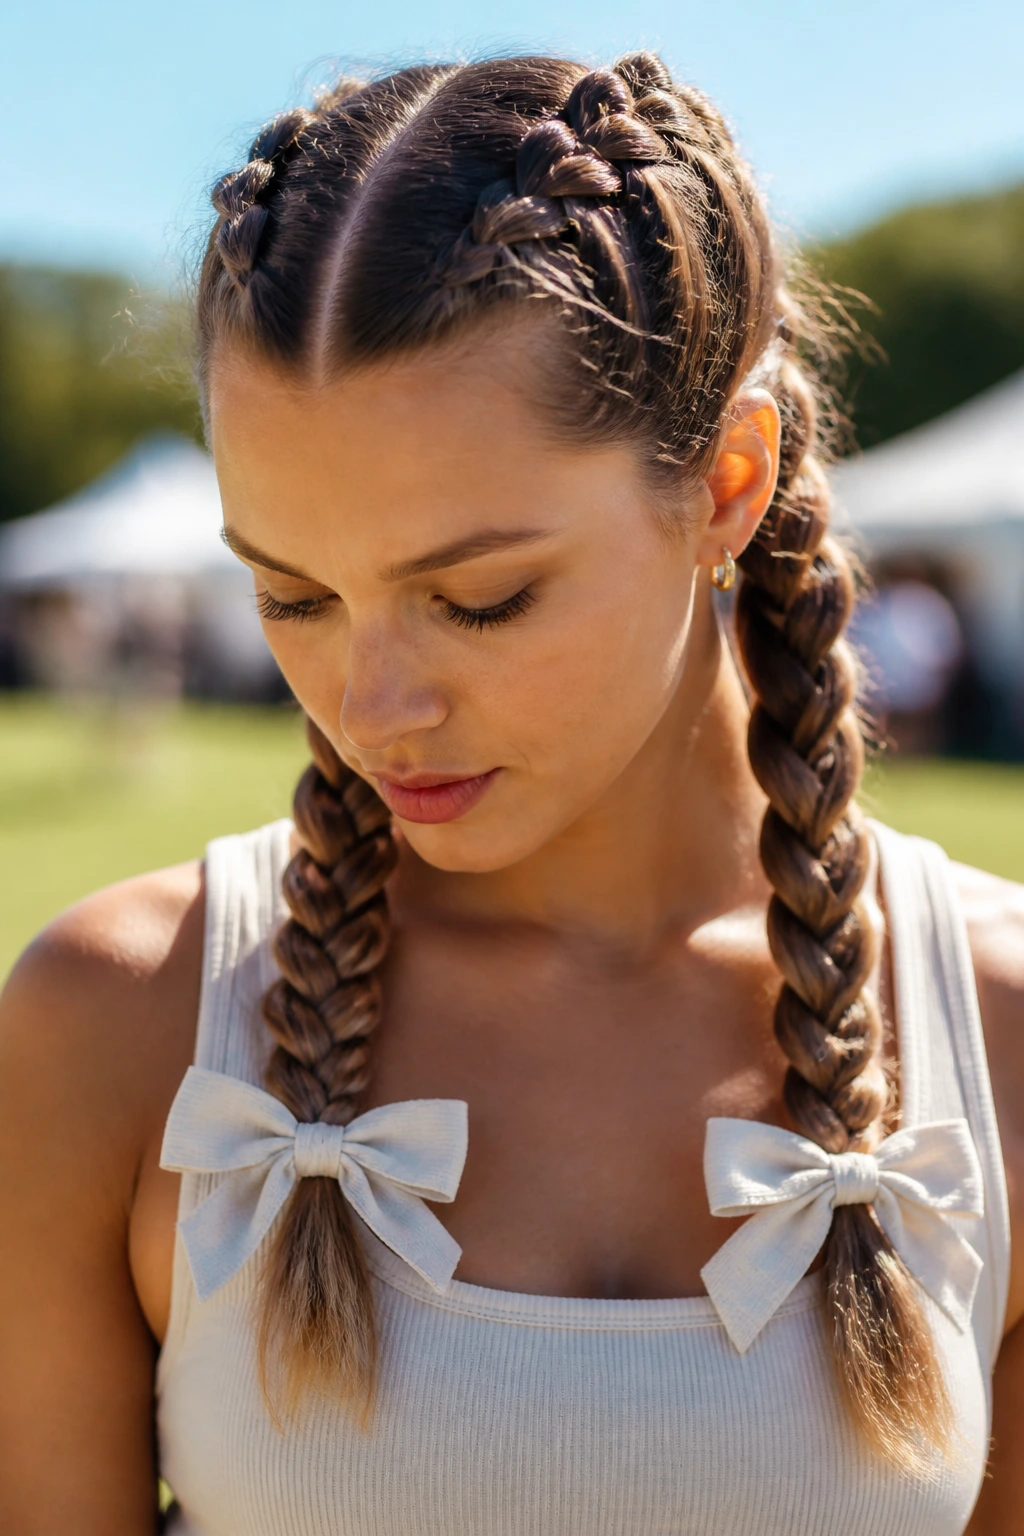
1. Classic Dual Dutch Braids
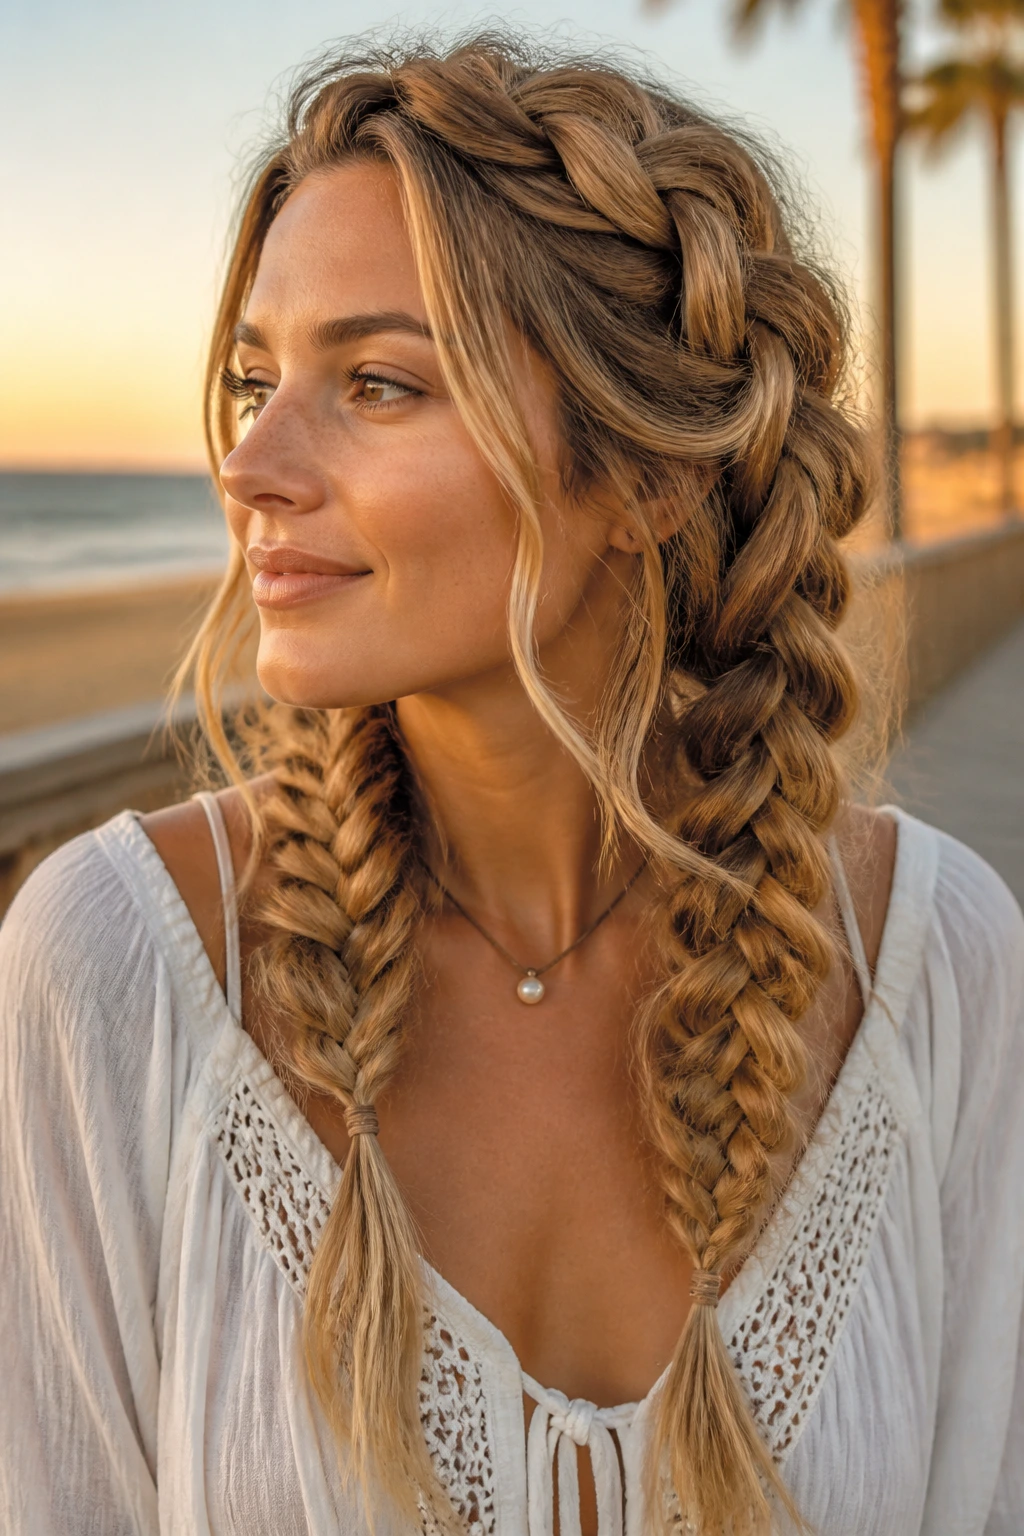
The foundation of every good Dutch braid journey starts with the iconic double-braid look. This style is practical because it keeps every single strand secure, making it a reliable choice for active days or high-intensity tasks. Start by parting your hair down the center from your forehead to the nape of your neck, securing one side with a clip while you focus on the other.
Begin at your hairline, taking a small triangular section and splitting it into three equal pieces. As you cross the outer strands under the middle strand, pull in a small section of loose hair from the side before completing the next stitch. The key to that “puffed” look you see on social media is to gently tug at the outer edges of the braid once you have finished. Do this while holding the end secure with your other hand. This process, often called pancaking, transforms a tight, utilitarian braid into a soft, voluminous style that adds the illusion of thickness to finer hair types.
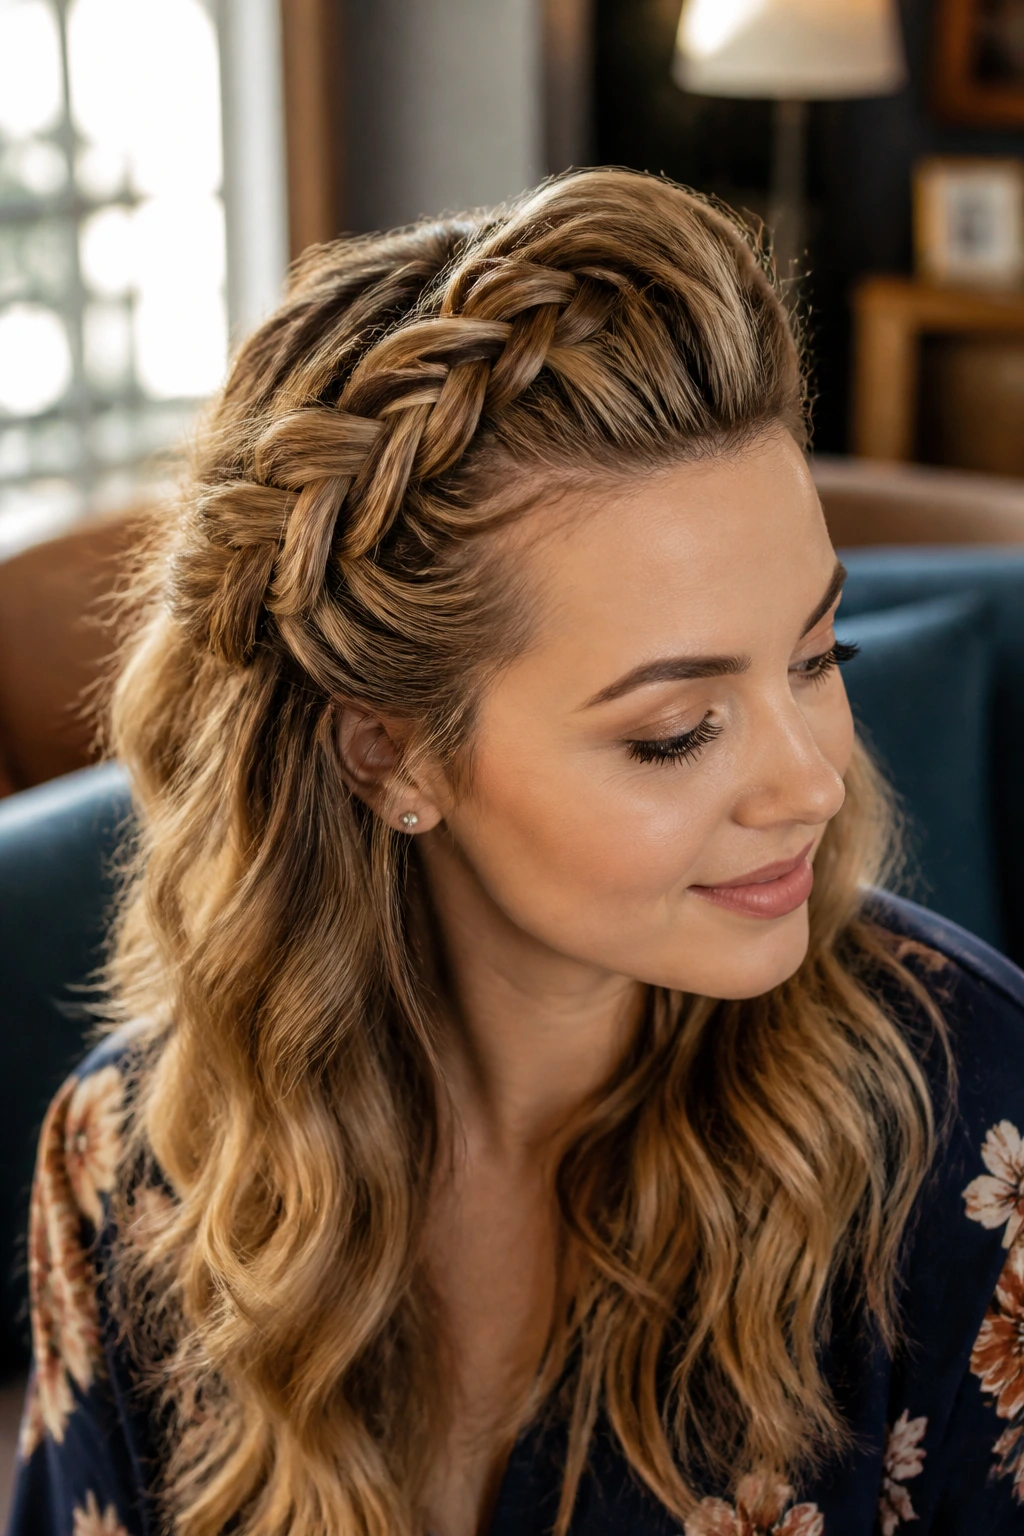
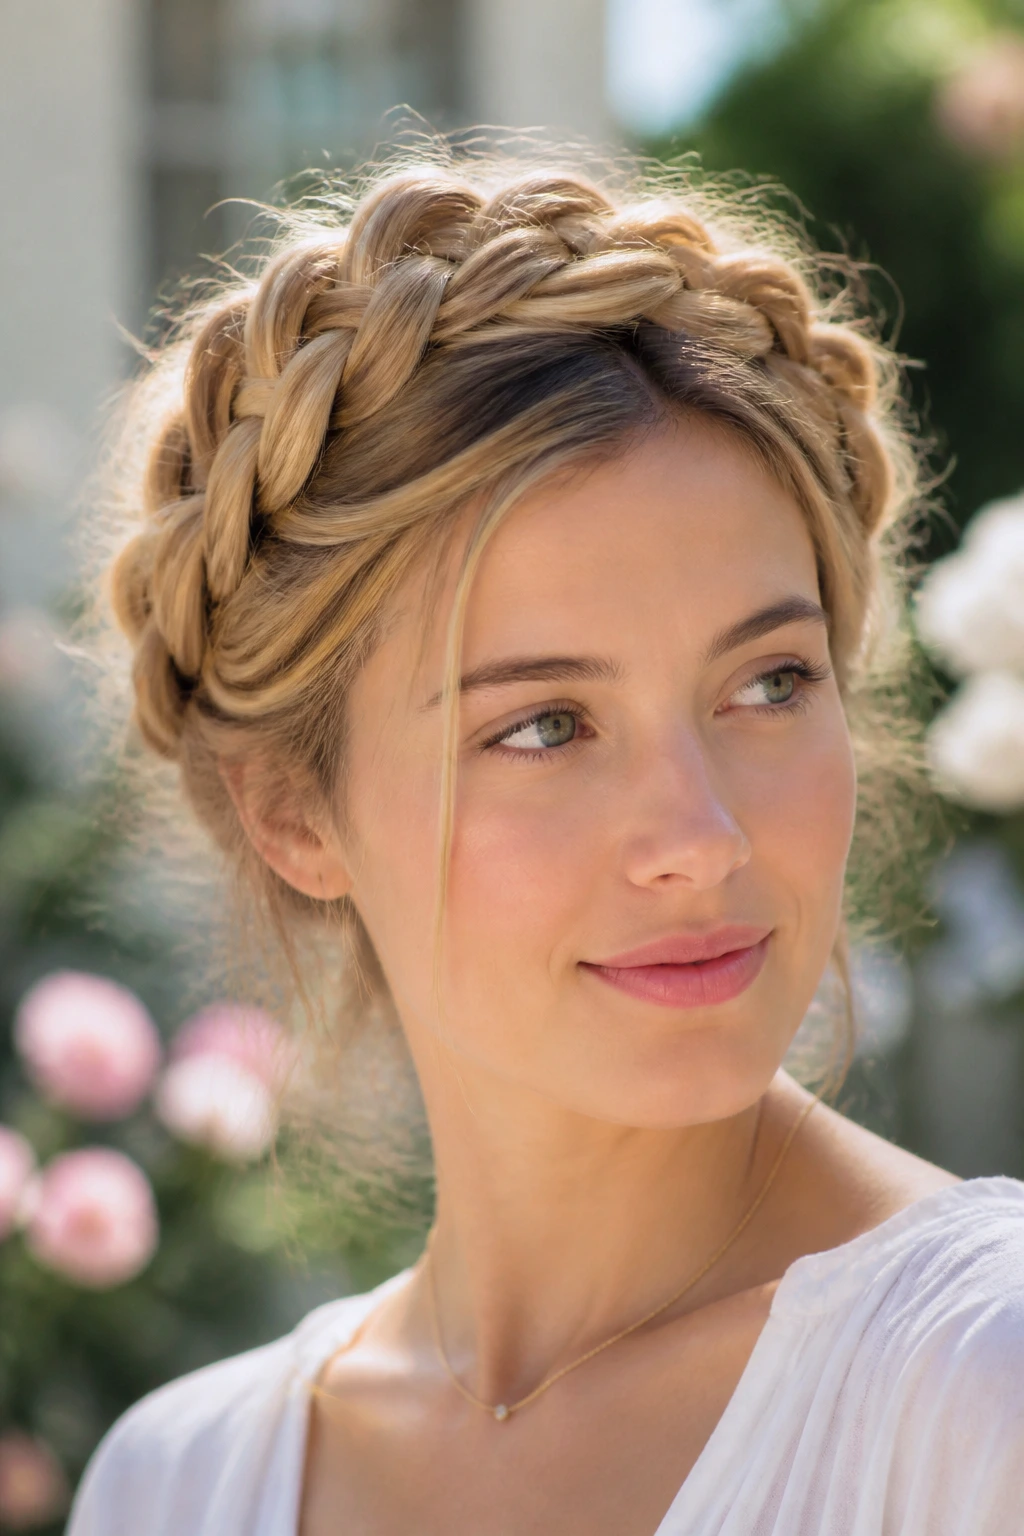
2. Dutch Braid Crown
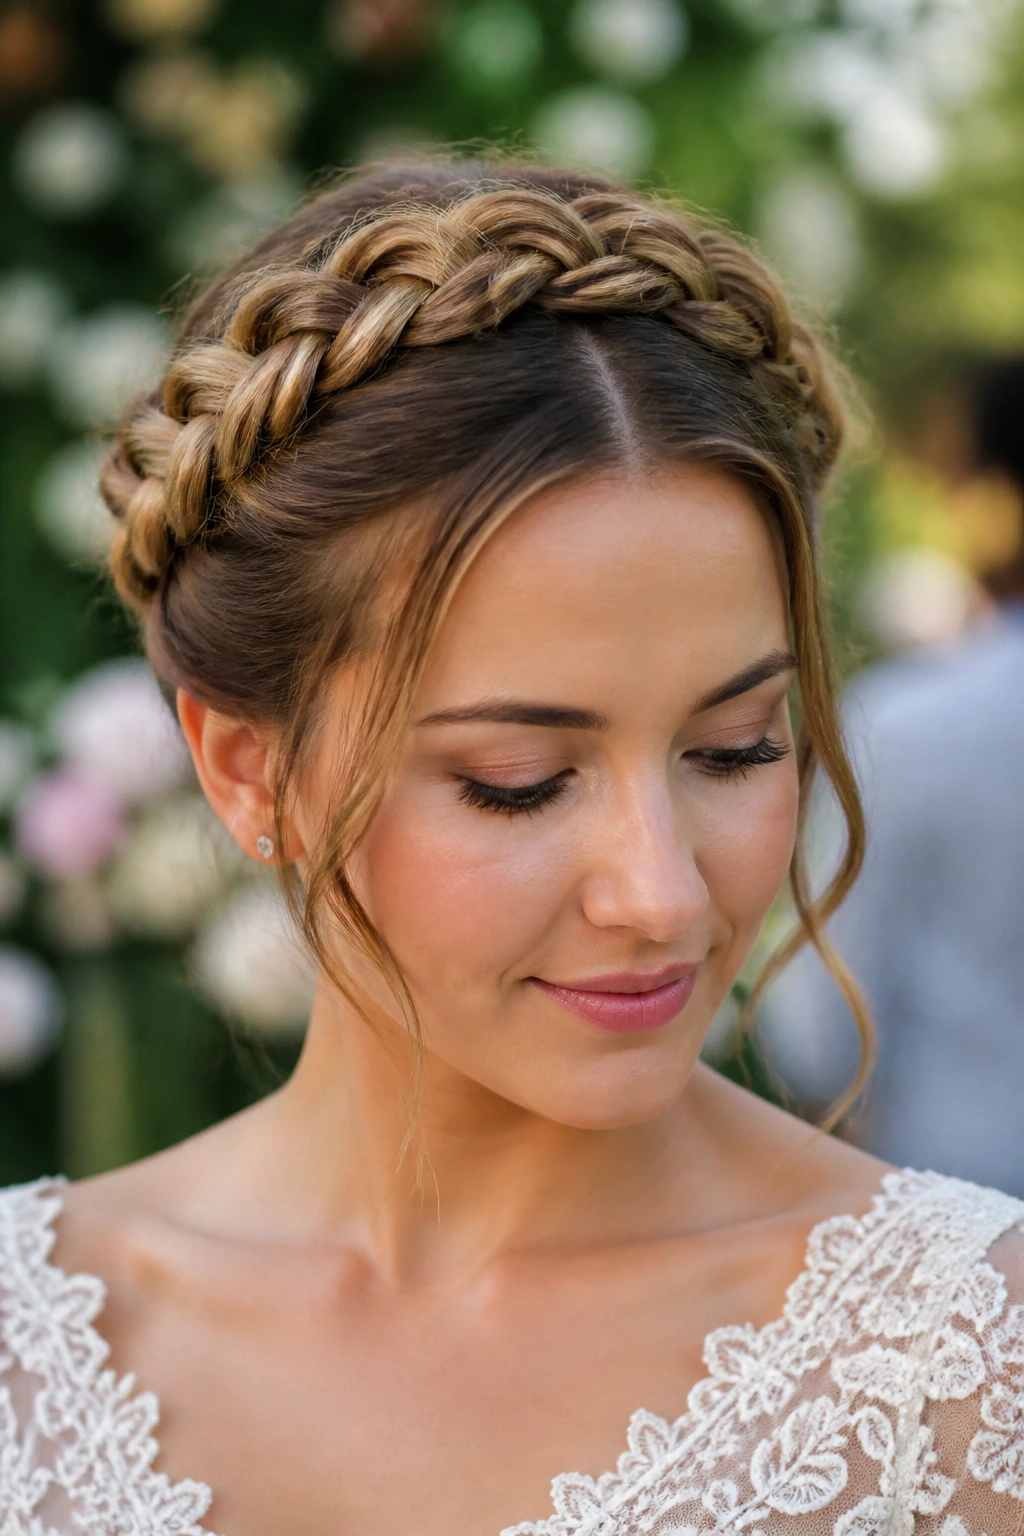
When you want to keep your hair completely off your face and neck, a wrap-around crown braid is the ultimate solution. This style starts behind one ear and travels around the head like a headband. It is surprisingly effective for medium hair because the length is sufficient to complete the circle without leaving too many short, frizzy ends poking out at the nape.
Focus on maintaining consistent tension as you move from the temple toward the back of the head. If the braid starts to feel loose, you will find it difficult to anchor it securely later. Once you reach the opposite side, tuck the tail of the braid underneath the starting point and use two or three bobby pins to lock it in place. Make sure the pins are the same color as your hair, or use decorative gold ones if you want to turn the hardware into an accessory. This is a favorite for weddings or outdoor events where the weather might be unpredictable.
3. Half-Up Dutch Braid Top Knot
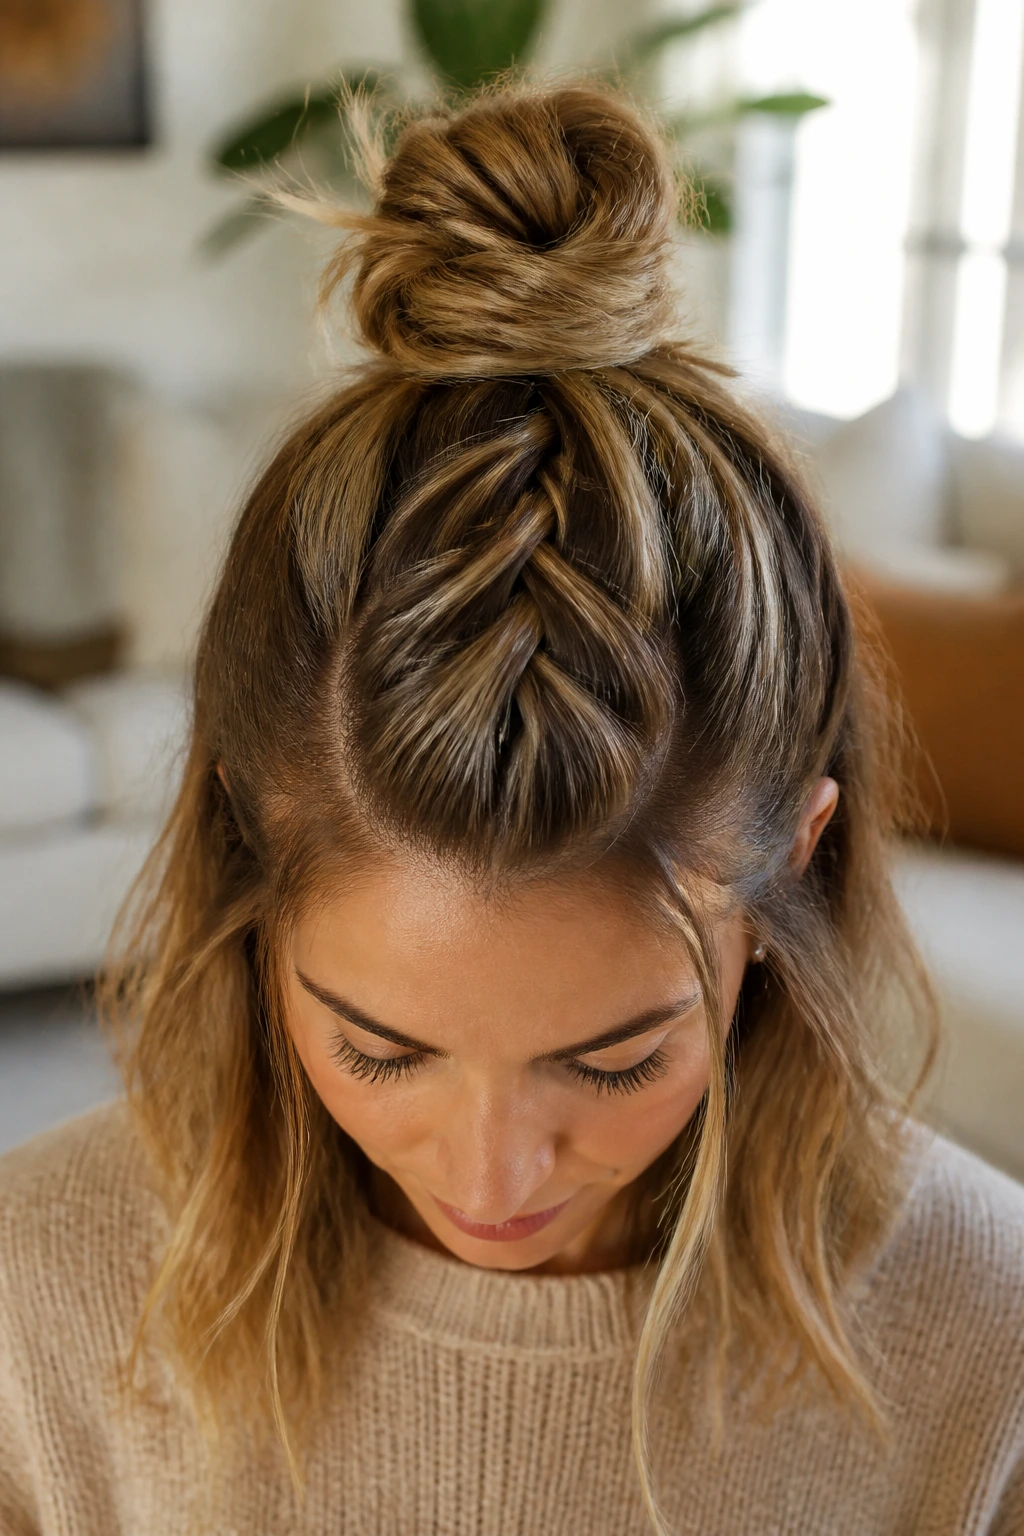
Combining a braid with a messy bun is a shortcut to looking put-together on those days when you have hit the snooze button one too many times. Take a section of hair from your hairline back to the crown and create a single Dutch braid that runs directly down the center. When you reach the crown, stop adding hair from the sides and secure the braid with a clear elastic.
Gather the remaining hair, including the tail of your braid, into a high ponytail and twist it into a bun. Pull at the loops of the braid to give it a relaxed, lived-in feel. This style works exceptionally well for medium hair because you have enough volume to make the bun look substantial without needing heavy extensions. It keeps the hair at your temples tucked away while allowing the rest of your hair to hang loose and natural.
4. Side-Swept Dutch Braid
If you have a deep side part, a side-swept Dutch braid frames the face beautifully and highlights your bone structure. Start at your part line and work the braid toward your temple, pulling in hair mostly from the hairline to keep the braid tight against your face. Once you clear the temple, allow the braid to travel diagonally toward the back of your head.
You can stop the braid at the nape of your neck and pull the rest of your hair into a low, loose ponytail or continue braiding down to the ends. This style is particularly flattering if you have layers, as the shorter pieces will naturally soften the edges of the braid, preventing it from looking too rigid. Use a light-hold texture spray before you begin to give your fingers more grip on the strands, which makes the Dutch technique significantly easier to control.
5. Dutch Braid Into a Bubble Pony
For a look that feels more modern and playful, marry the structure of a Dutch braid with the volume of a bubble ponytail. Create two Dutch braids that start at the forehead and meet at the center of the crown. Secure them together with a small, discreet elastic. From that point downward, gather the rest of your hair into a ponytail.
Add additional elastics every two inches down the length of the pony. After each elastic is placed, gently tug on the hair between the bands to create those iconic “bubbles.” This style is fantastic for medium hair because it distributes volume across the length of the ponytail, making it look much fuller than a standard tail would. It is a high-impact style that handles movement exceptionally well, perfect for a long day of errands.
6. Loose Boho Dutch Braids
The goal of this style is not technical perfection but a soft, whimsical aesthetic that looks like you just returned from a coastal getaway. Start your Dutch braids as you normally would, but keep your grip much lighter than usual. You are aiming for a lower tension, allowing the braid to sit slightly elevated from the scalp rather than pressed tight against it.
Once you secure the ends, spend an extra minute pancaking the loops aggressively. Pull the strands out until they look almost undone. This style benefits from accessories; weave a few small metal cuffs or delicate beads into the sections of the braid. If you have any face-framing pieces or bangs, leave them out before you begin braiding to ensure the look stays soft and natural.
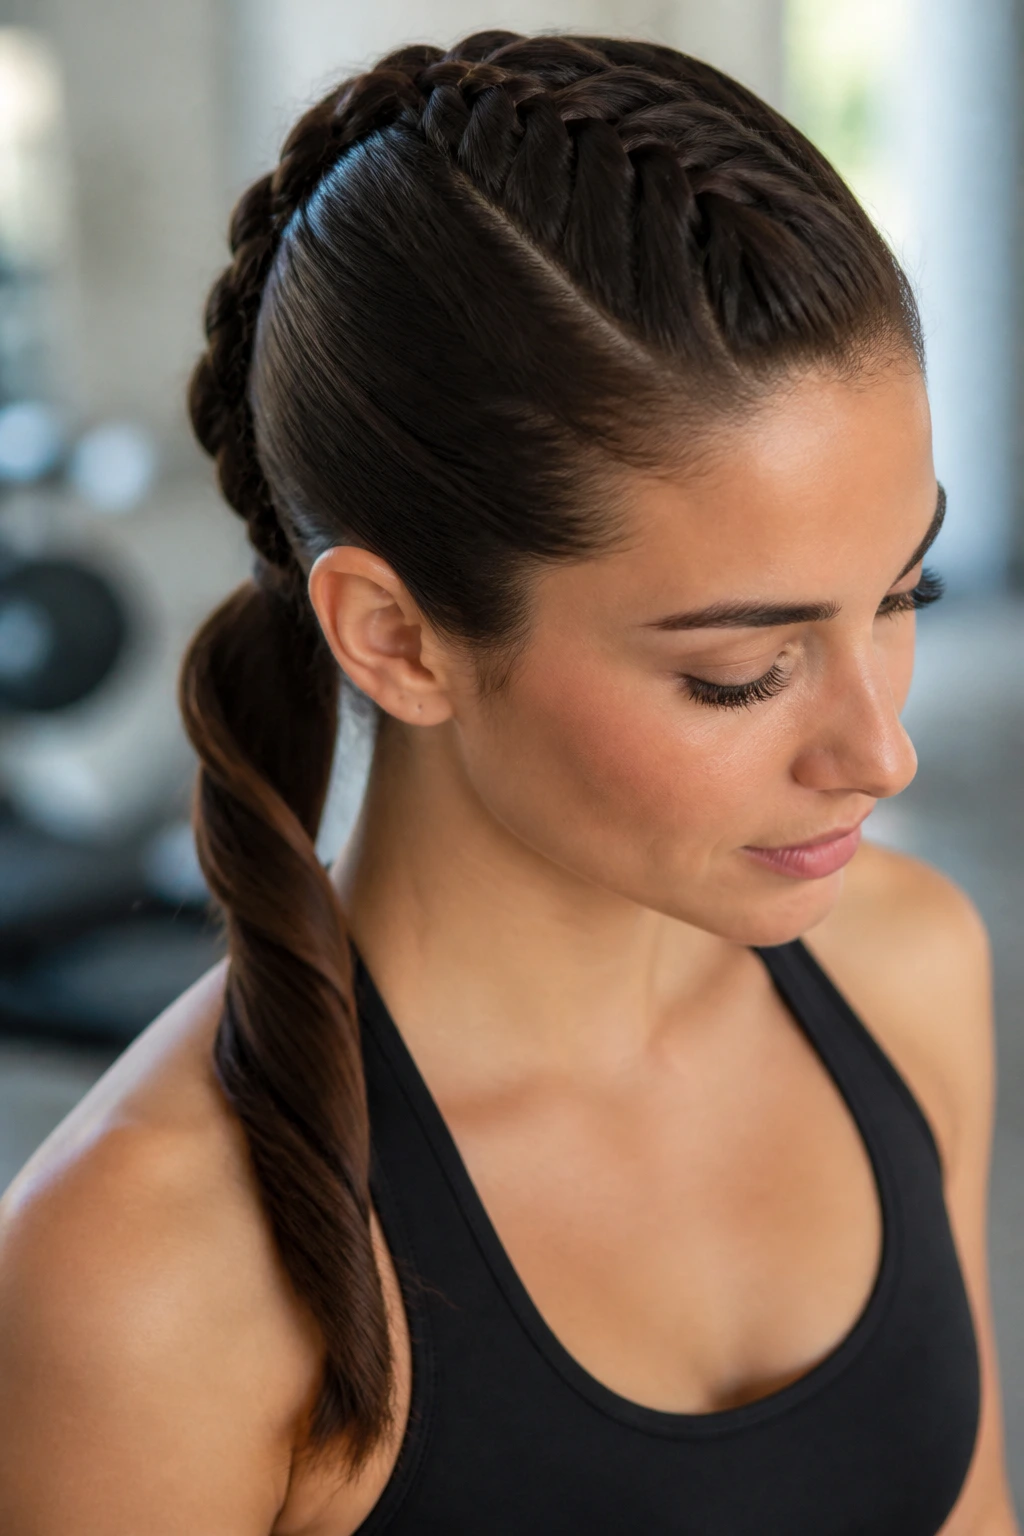
7. Dutch Braid Faux-Hawk
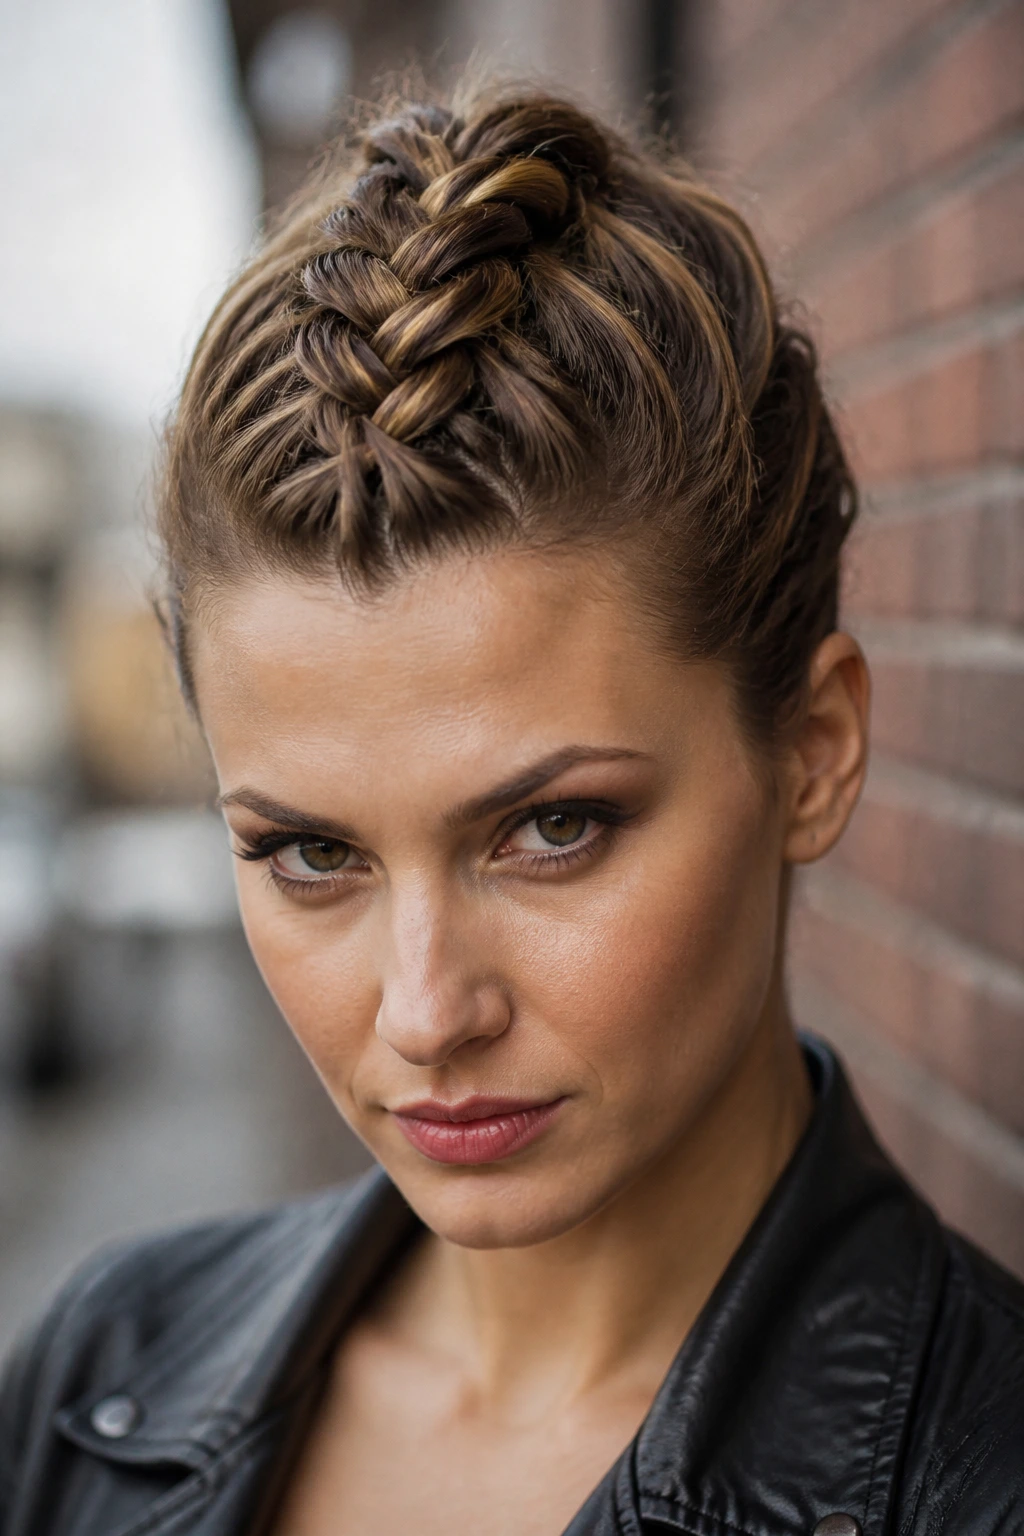
If you want an edgy look without reaching for the hair clippers, the Dutch braid faux-hawk is your best friend. The secret here is to create a very narrow, high-tension Dutch braid that runs vertically from the front hairline to the nape. Because the braid is narrow, it naturally pushes the surrounding hair upward, creating that coveted rock-and-roll silhouette.
Gather the hair on either side of the braid and pin it neatly to the head, or leave it slightly messy depending on the occasion. This style works best on straight or slightly wavy medium hair. If your hair is naturally curly, use a light smoothing cream to manage the flyaways before you start the braid to keep the center line crisp and defined.
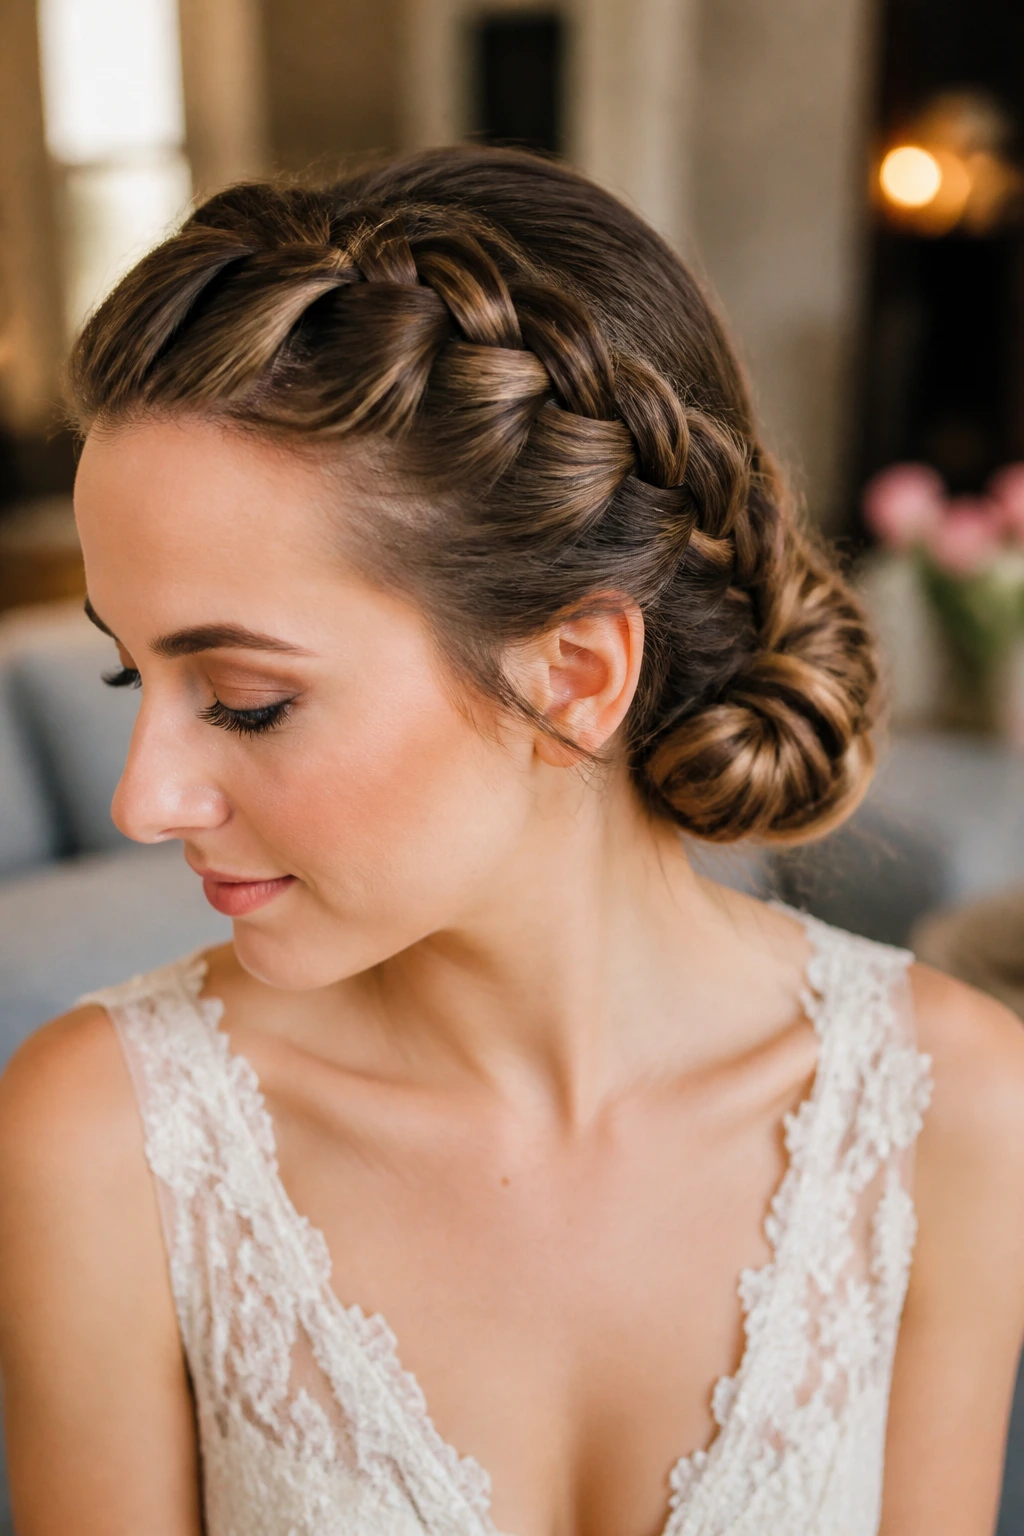
8. Dutch Braided Low Bun
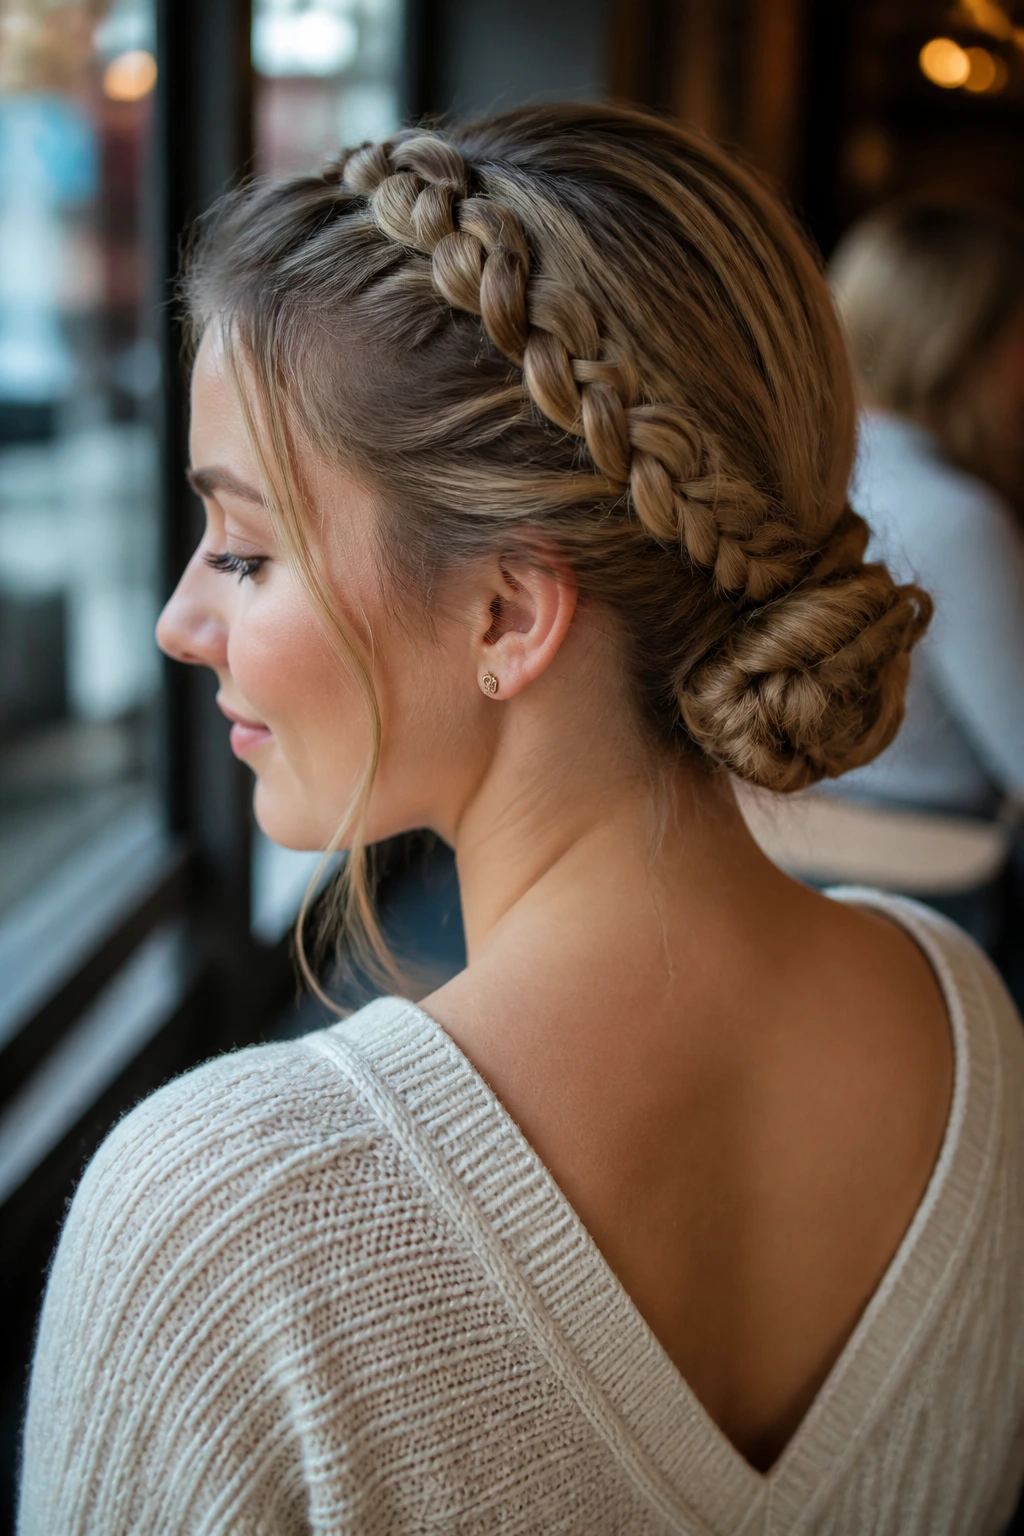
This is perhaps the most elegant style on the list, suitable for everything from a day at the office to a black-tie event. Begin with two Dutch braids starting at the front hairline, working backward until you reach the mid-back of your head. Join the two braids together at the center and secure them with a clear elastic.
Twist the remaining loose hair into a low, nape-hugging bun, tucking the braided tails around the base of the bun to conceal the elastic. Pin it thoroughly. Because this style keeps the hair gathered, it is incredibly secure, meaning you will not have to worry about your style unraveling as the day progresses. It is the definition of understated sophistication.
9. Waterfall Dutch Braid
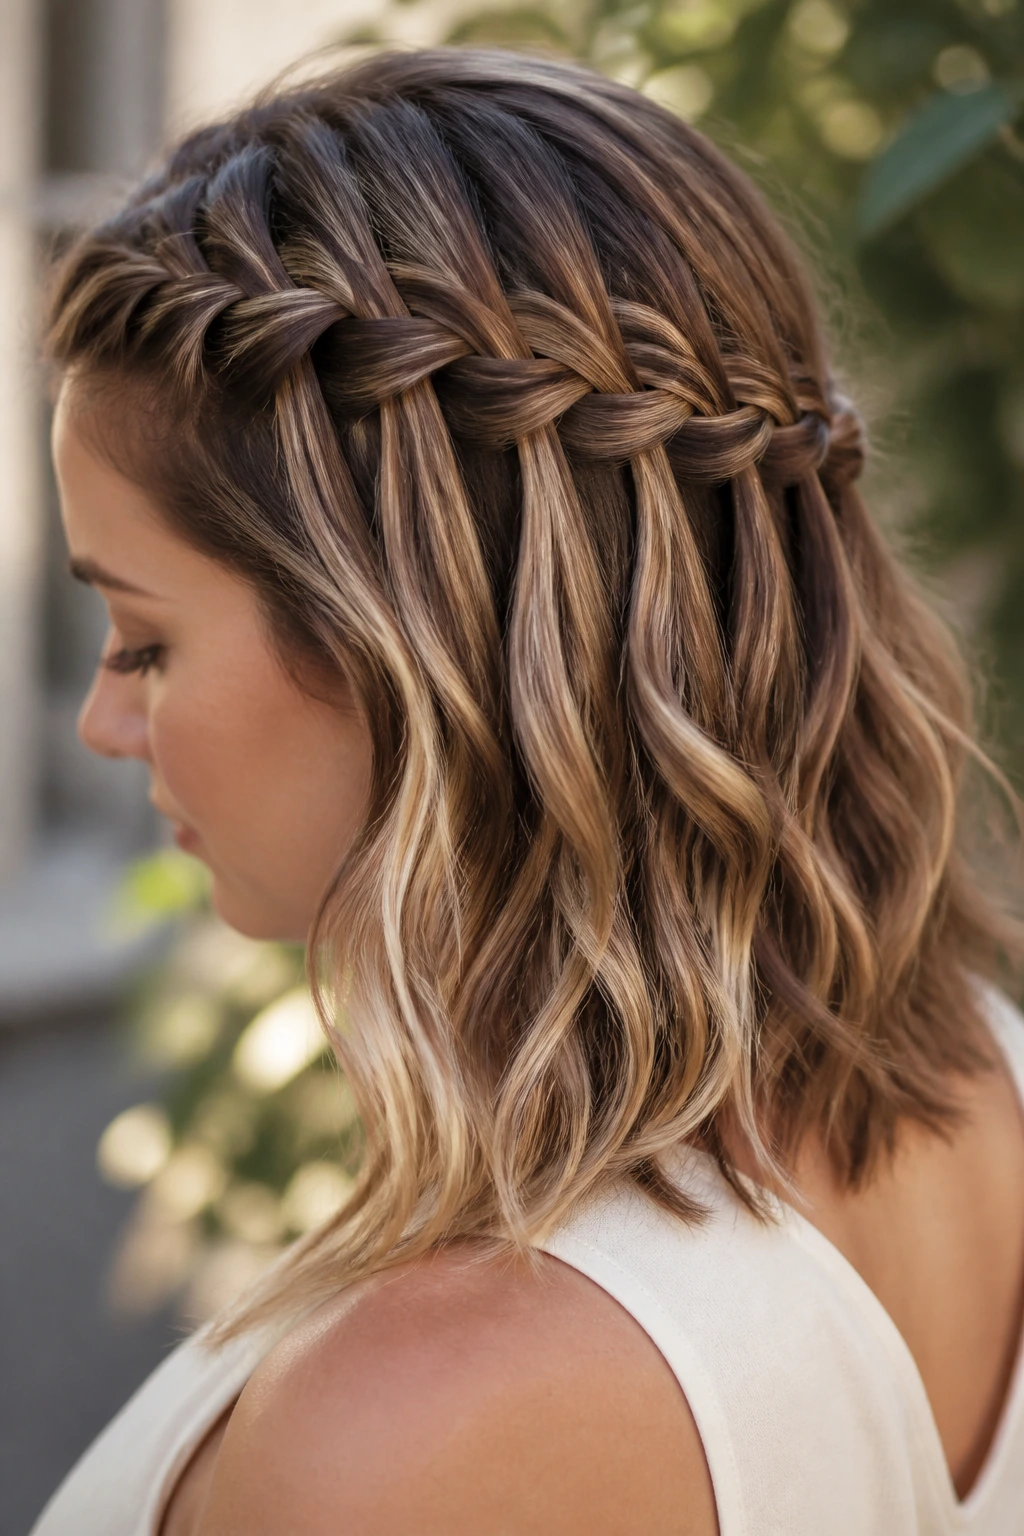
The waterfall braid is a deceptive style—it looks complex, but once you understand the rhythm, it becomes second nature. Instead of pulling all your hair into the braid, you leave one strand of each stitch “dropped” to hang loose. A Dutch waterfall braid follows this same logic but uses the inverted cross-under technique to make the braid pop out more prominently.
Start at one side of your head and braid horizontally across the back. Each time you would normally pull in a new section to cross under, drop the current middle section instead and pick up a new piece of hair from underneath to continue the plait. It creates a stunning effect where the hair appears to cascade through the braid. This is an excellent way to style medium hair if you want to keep the length loose but need to keep your bangs or front layers pinned back.
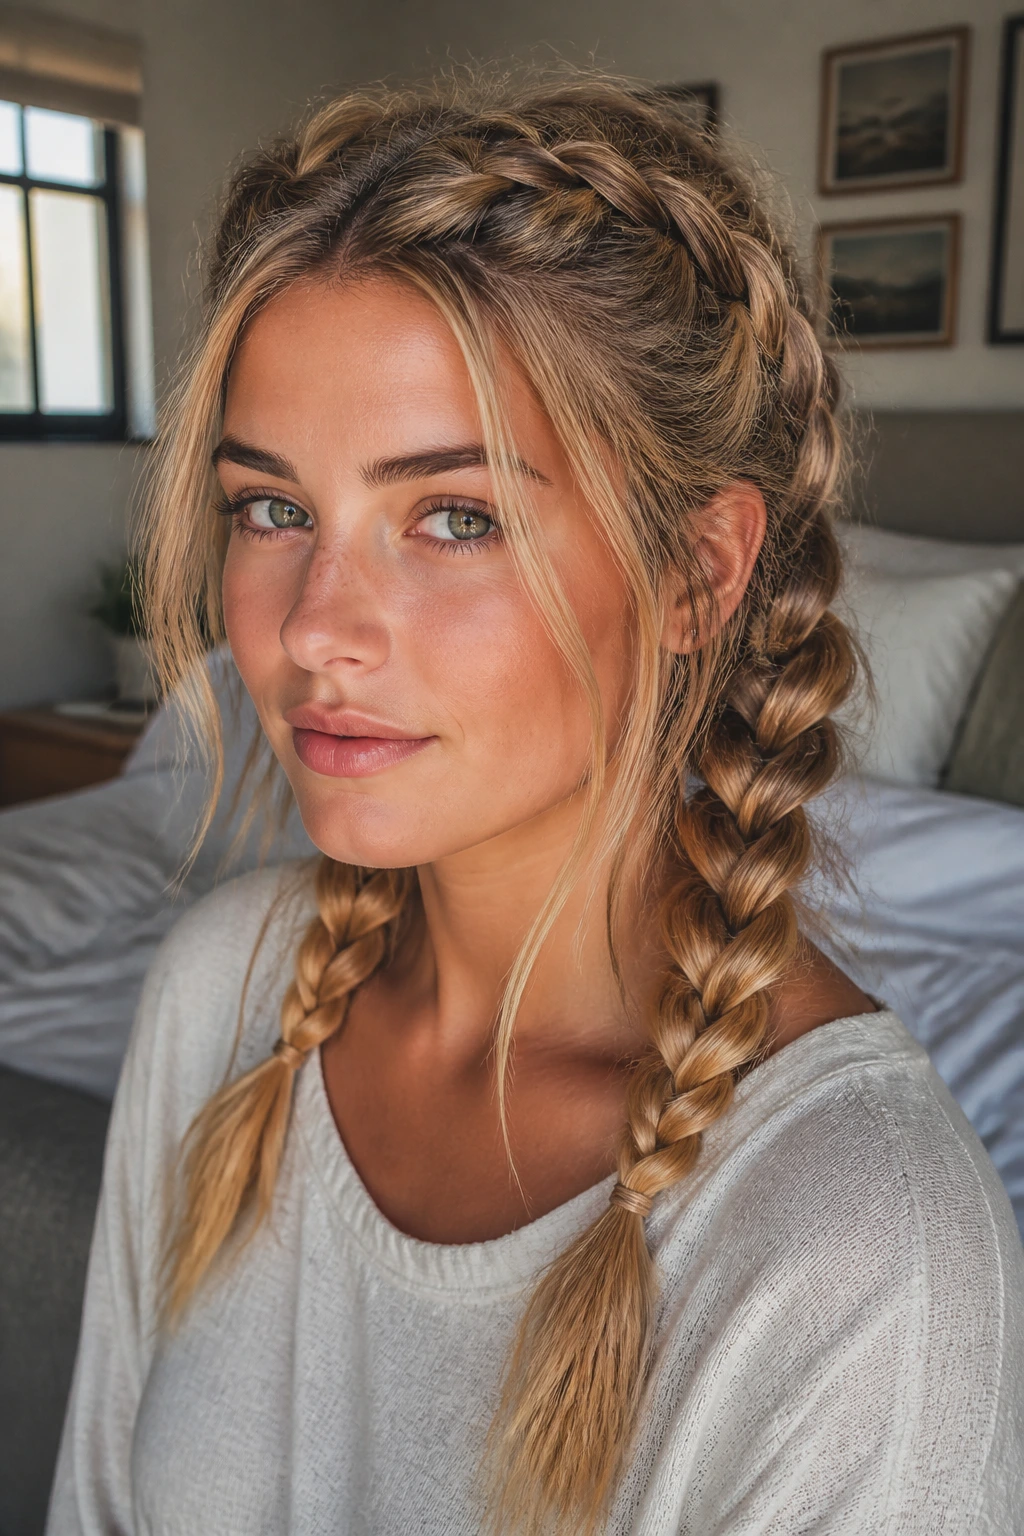
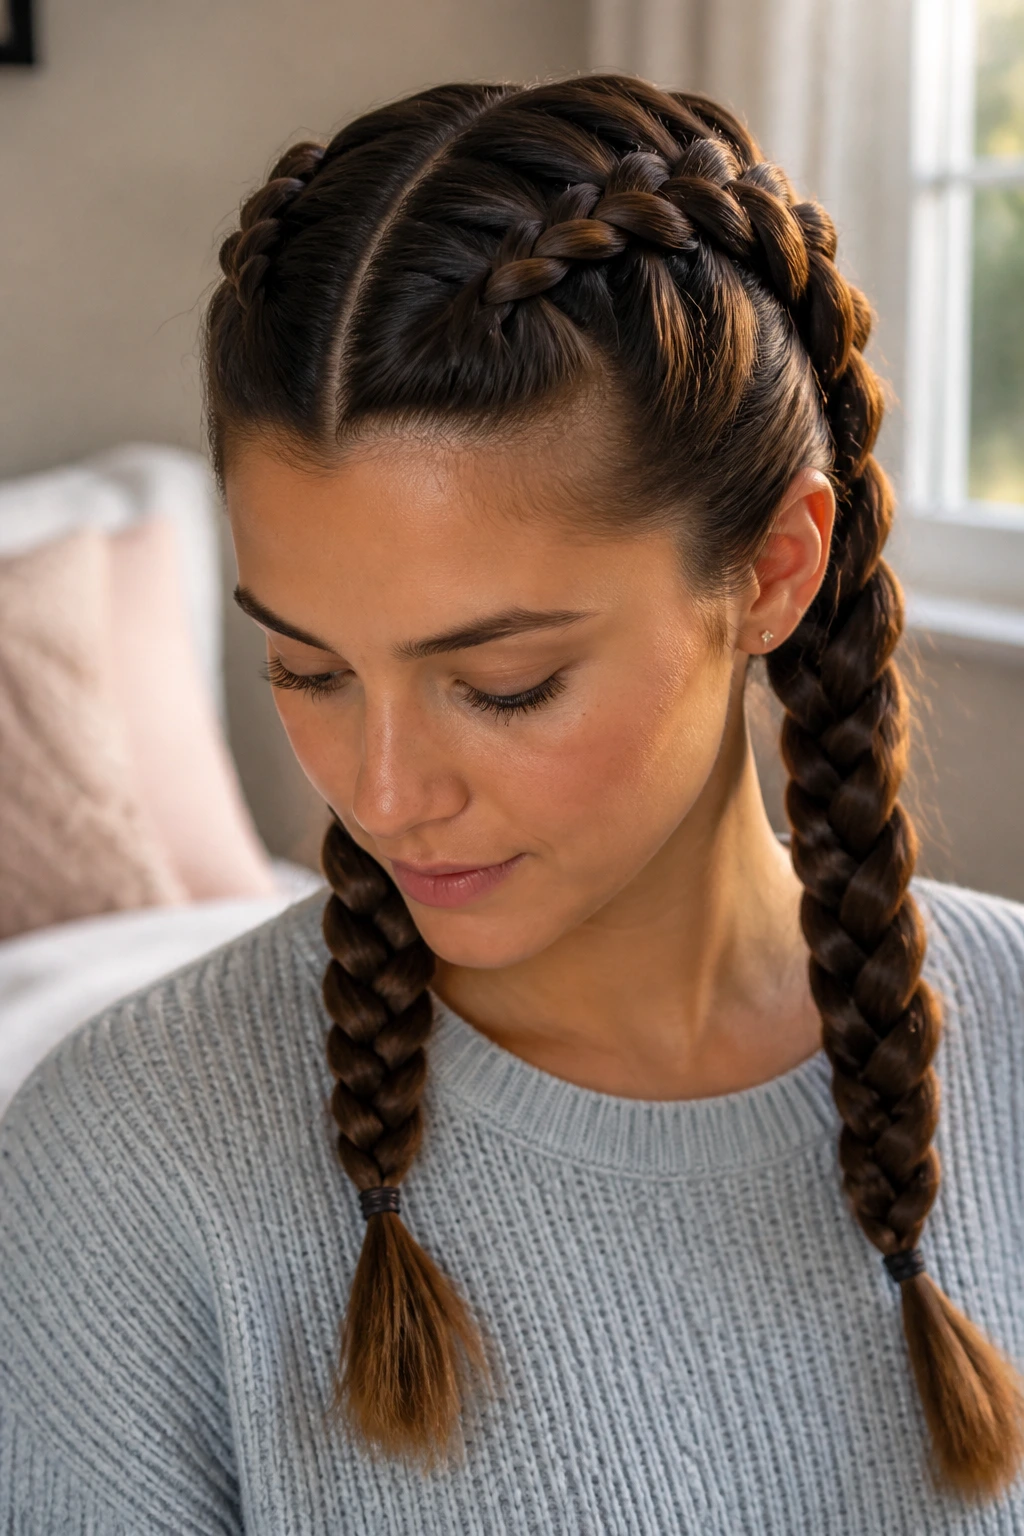
10. Dutch Braid Pigtails with Bows
Pigtails do not have to look like a school uniform. When you use the Dutch technique, the resulting pigtails have a high-fashion, athletic feel. Start with a sharp center part, then create two Dutch braids that travel from the forehead all the way to the ends. Secure each with a fabric-covered elastic.
To elevate the look, tie a velvet or silk ribbon around the base of the elastic. This small detail instantly makes the style feel intentional and polished. This is a very youthful, energetic look that is perfect for warmer months or outdoor gatherings. The Dutch technique ensures that the braids stay neatly centered and do not migrate toward the back of the ears, which often happens with simpler braids.
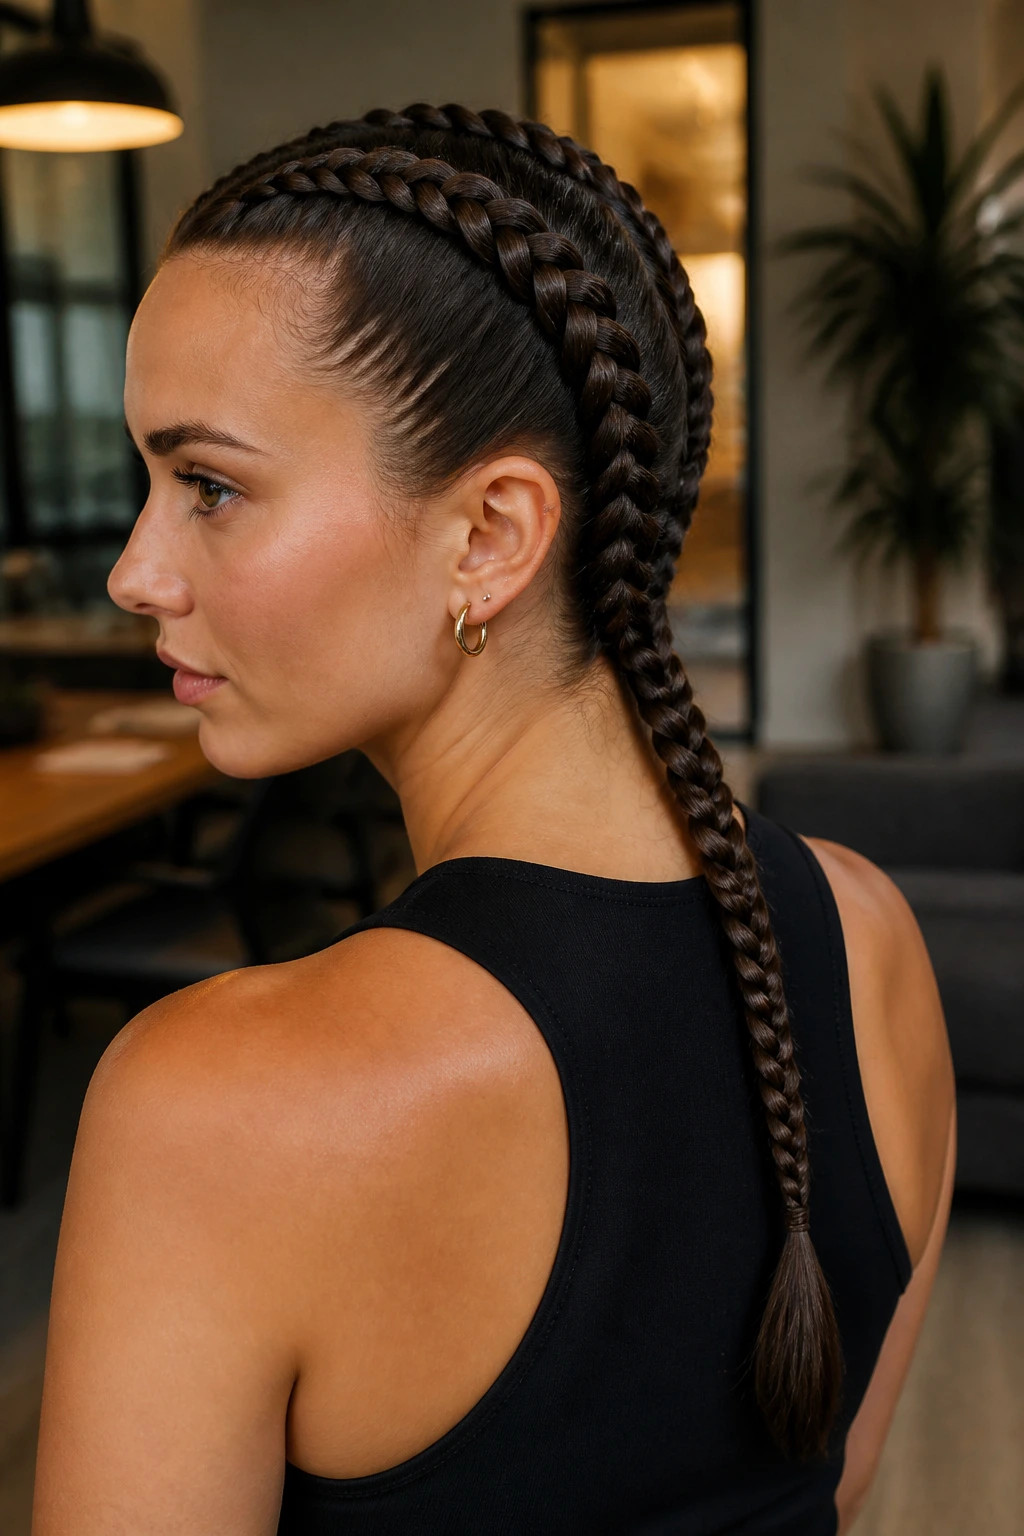
11. Three-Strand Dutch Braid Ponytail
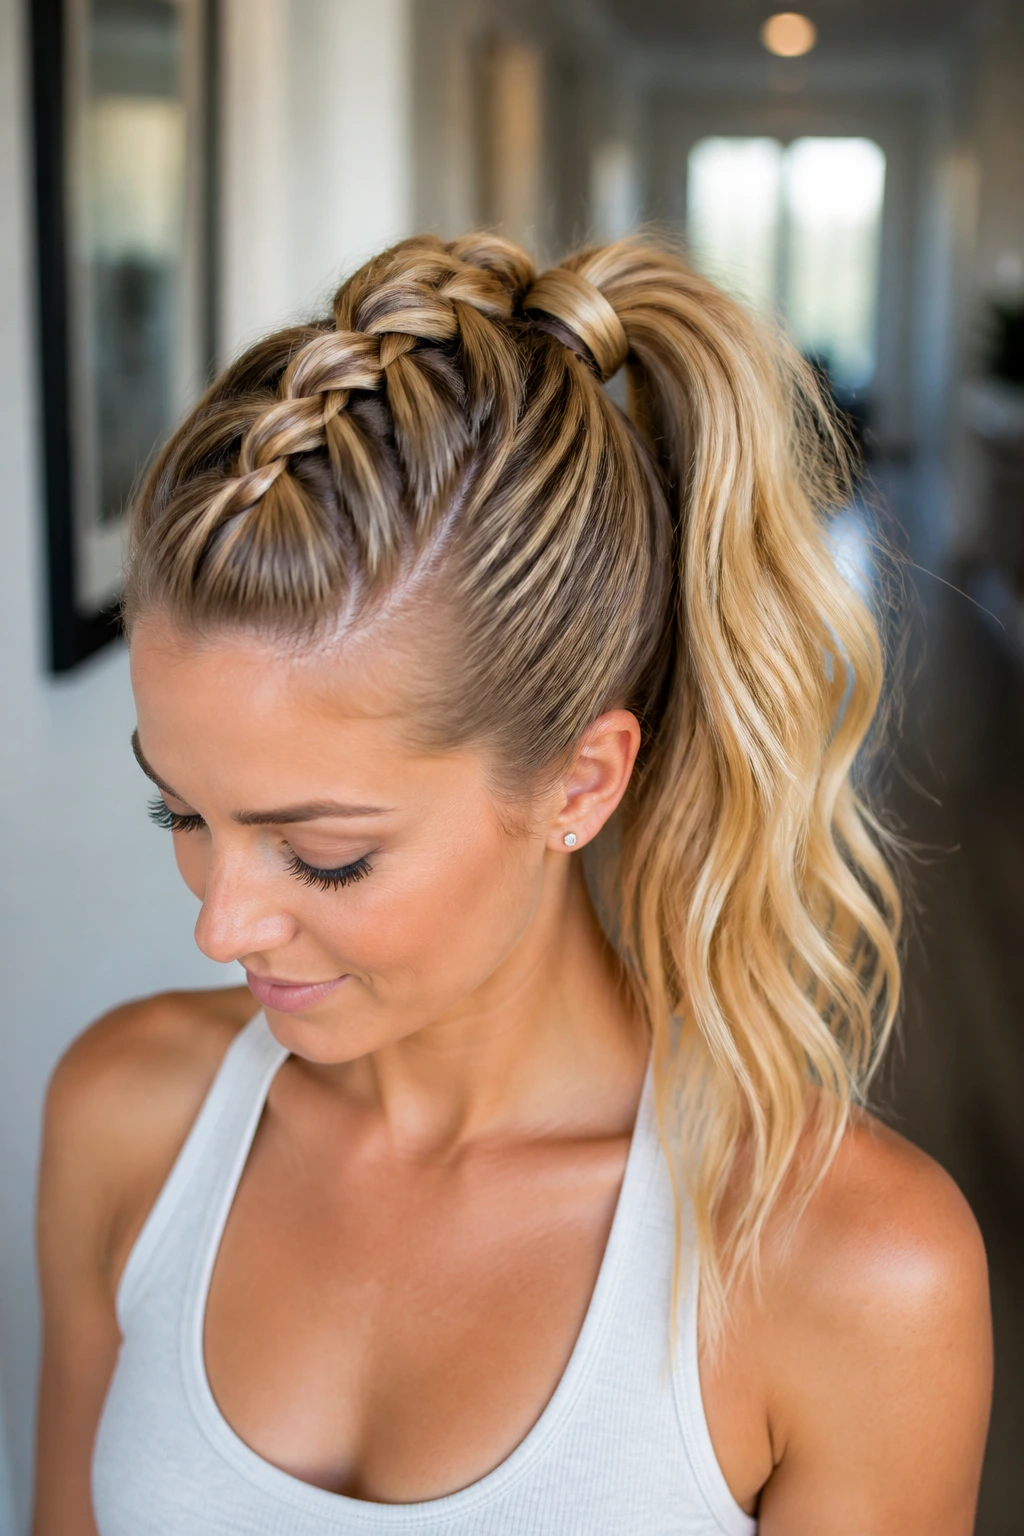
Instead of a single braid or two, try a centered, high-volume look by incorporating a single Dutch braid into a high ponytail. Gather the front third of your hair and create a Dutch braid that stops at the crown. Secure it, then combine the tail with the rest of your hair to form a high, sleek ponytail.
Wrapping a small strand of hair around the elastic—what stylists call a hair wrap—will hide the band and make the transition from the braid to the pony look seamless. This style is great for showing off hair color, as the depth of the braid and the movement of the ponytail showcase different tones and highlights. It is a high-energy look that feels very secure.
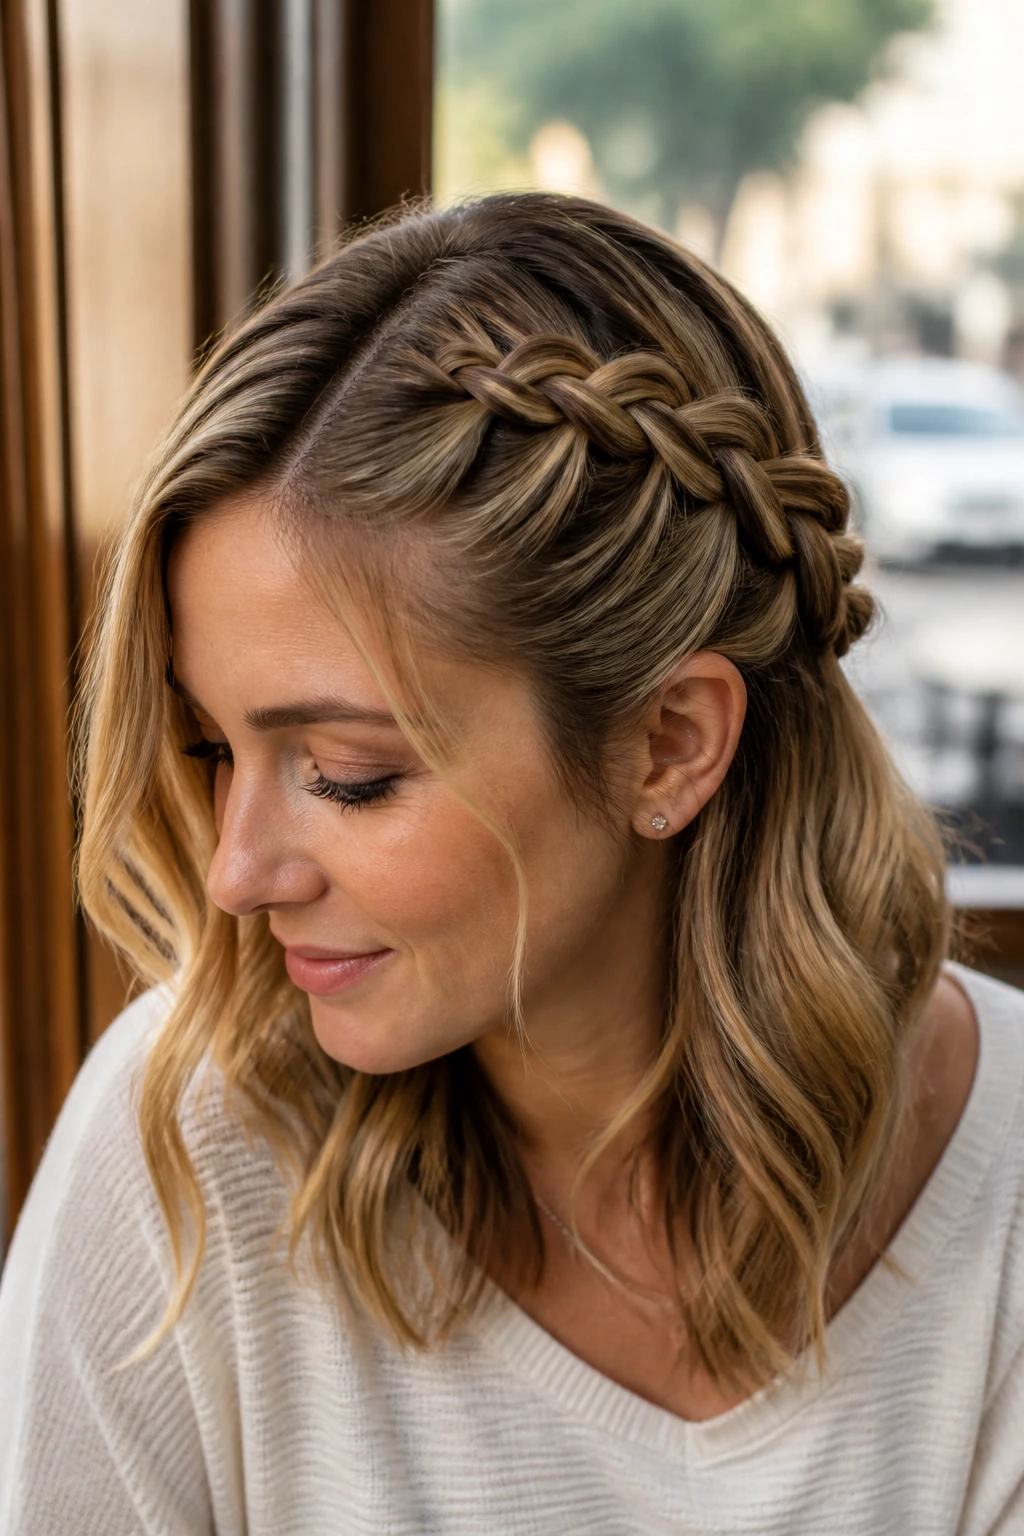
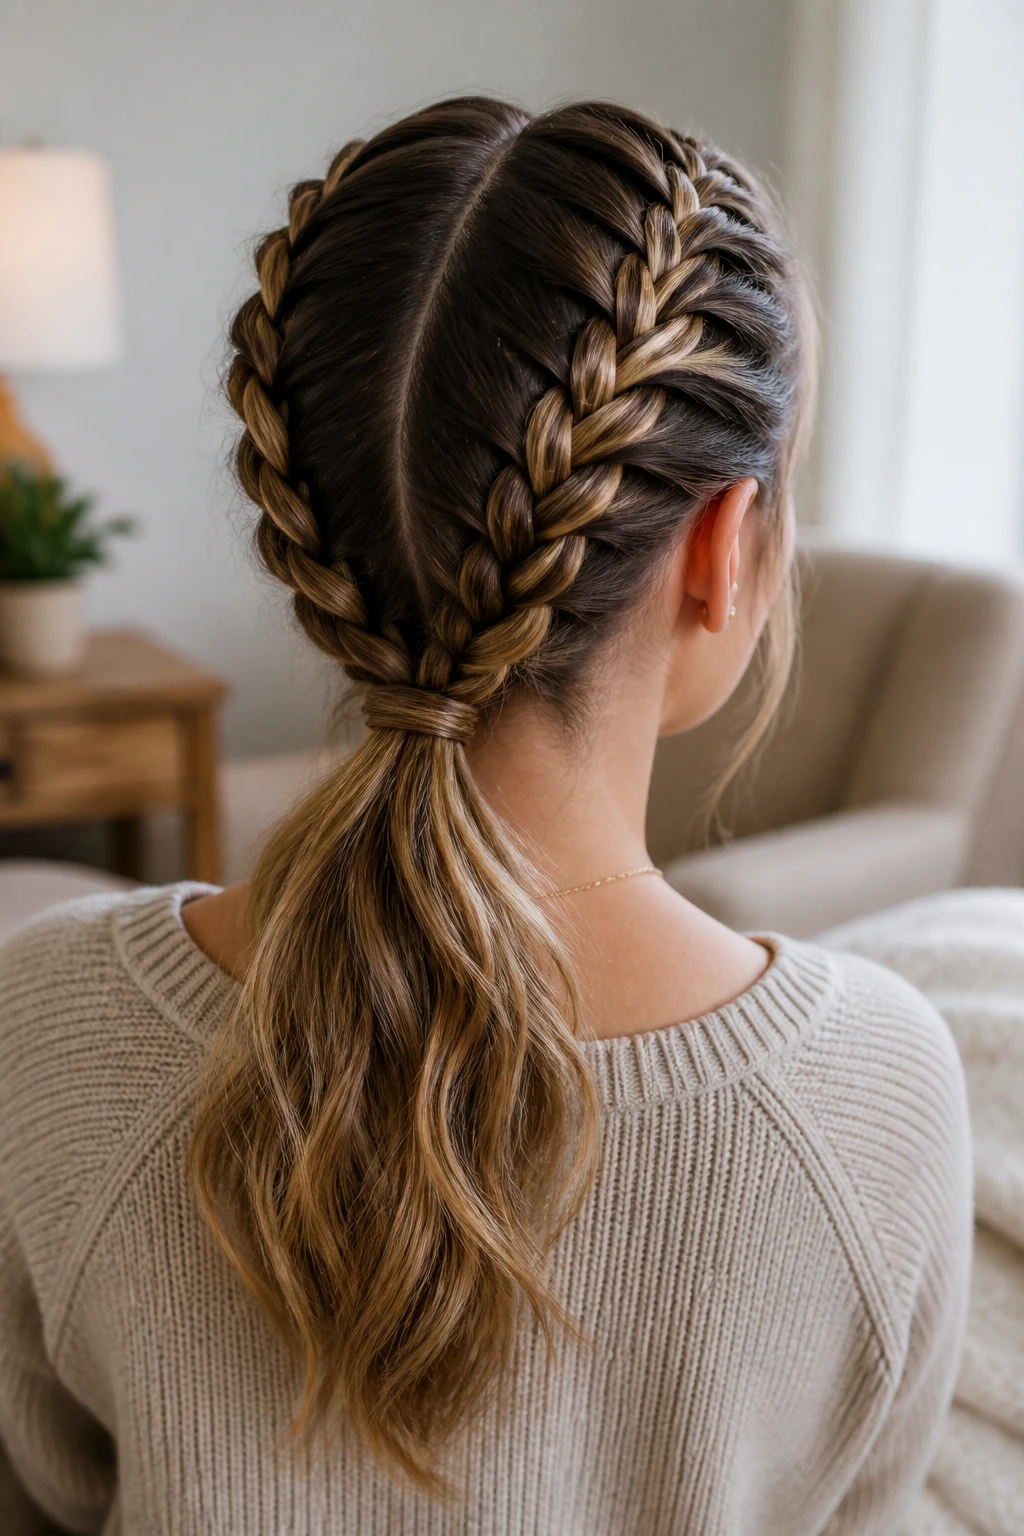
12. Double Dutch Braid Headband
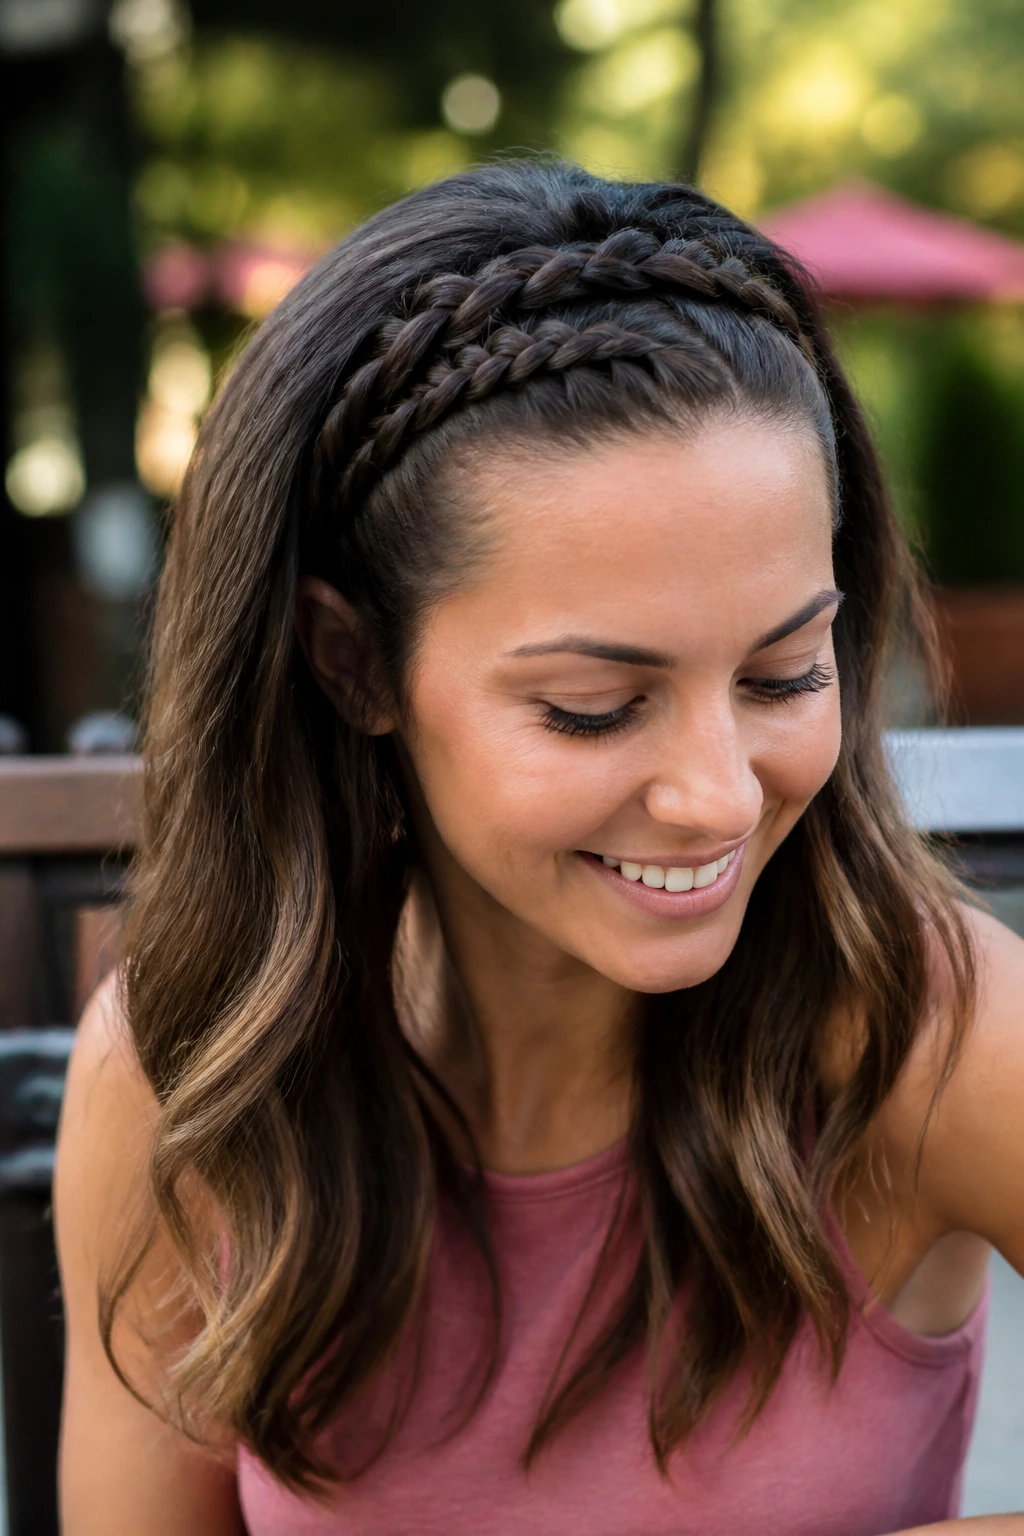
If you want to keep your hair down but feel like it is constantly falling in your face, a double headband braid is the perfect compromise. Start by creating a Dutch braid just behind your hairline, running from one temple to the other. Right behind it, create a second, smaller Dutch braid running parallel to the first.
Secure the ends of both braids behind your ears with small bobby pins, tucked underneath the rest of your hair. The rest of your hair can then be worn down, curled, or straightened. This style acts as a functional accessory, essentially replacing the need for a headband while looking much more intricate and curated. It is a fantastic option for medium-length hair that has a bit of natural wave.
13. Dutch Braid into a Twisted Chignon
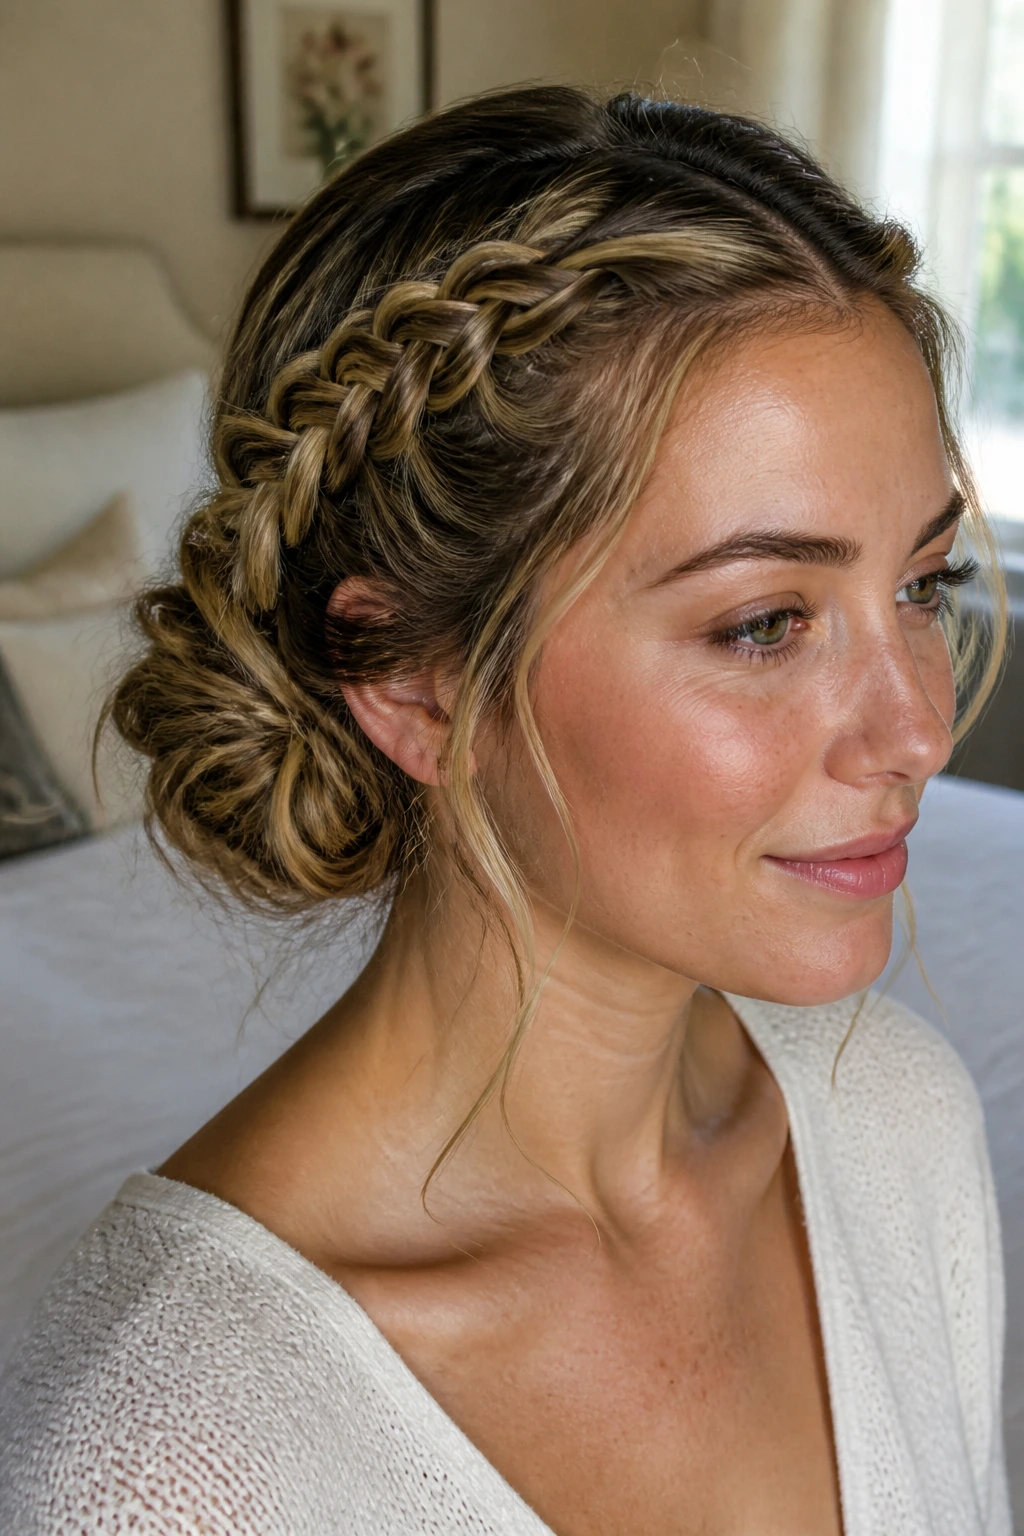
Chignons are synonymous with classic grace, but adding a Dutch braid adds a layer of modern texture that prevents the look from feeling too dated. Start with two side Dutch braids that pull hair away from the face. Meet them at the back of the head and secure them into a low ponytail.
Instead of a simple bun, twist the ponytail into a loose, soft chignon by looping the hair around itself and pinning it in place. The braids act as a frame, drawing the eye toward the chignon. Because your hair is medium length, the chignon will be a manageable size—it won’t be overly heavy, which helps it stay pinned to your head without requiring excessive amounts of hairspray.
14. Upside-Down Dutch Braid Bun
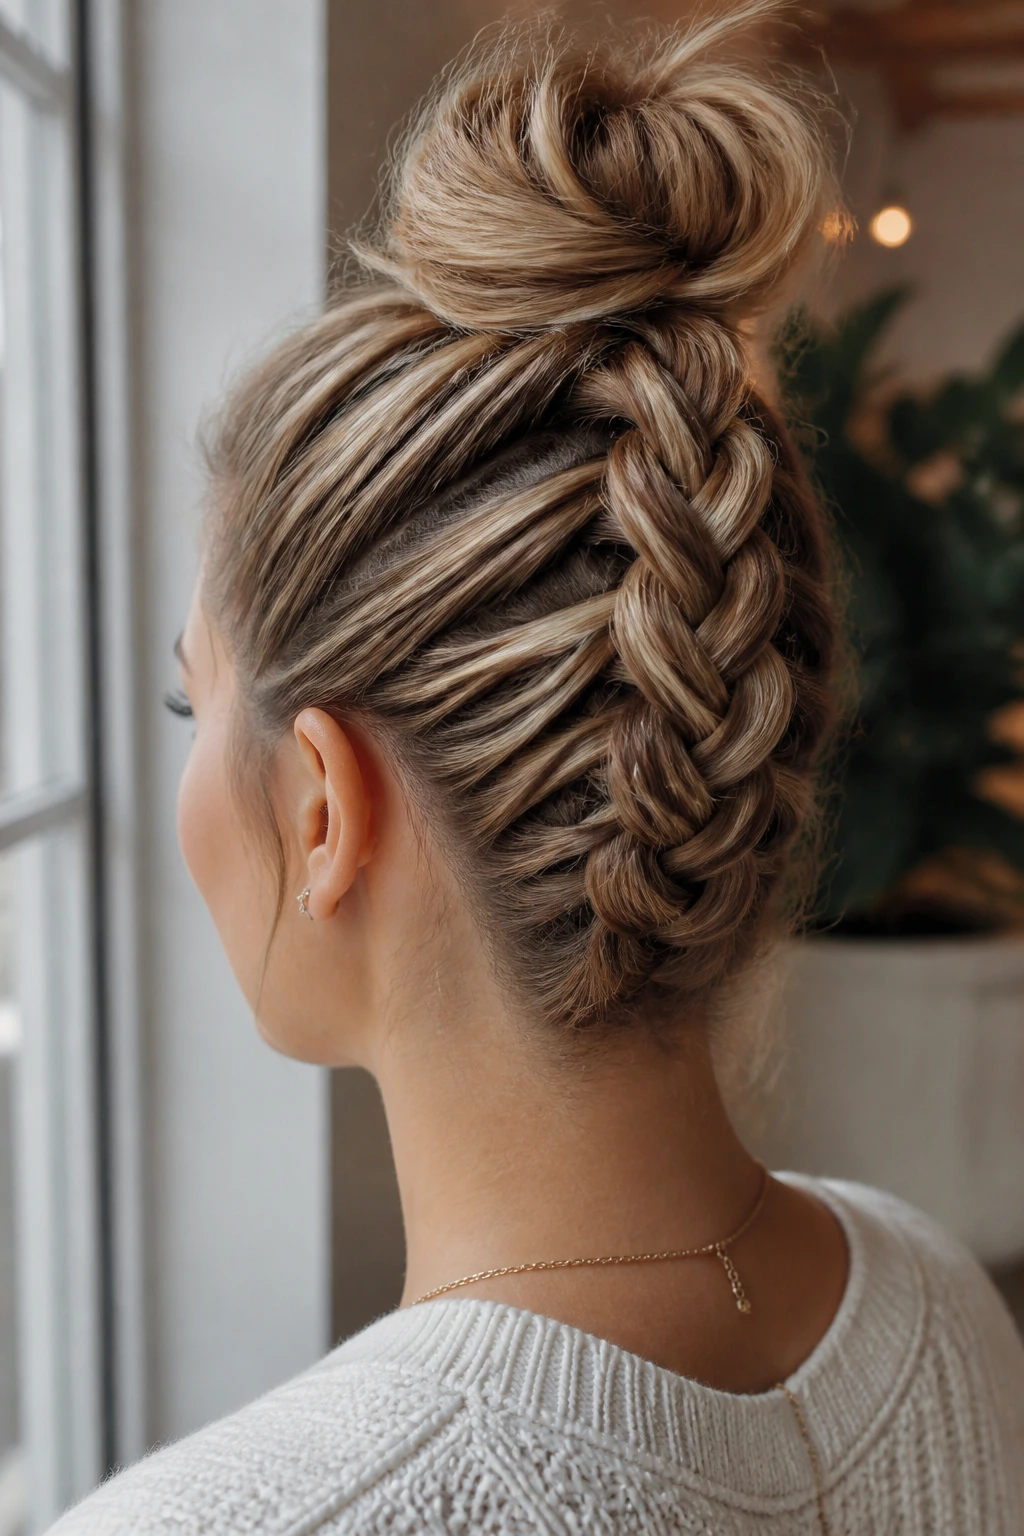
This is an advanced move, but it is one of the most rewarding styles to master. Flip your head forward and start your Dutch braid at the nape of your neck, working upward toward the crown. It is tricky at first because your hands are moving in a slightly awkward position, but the result is a striking, gravity-defying plait that ends in a high bun.
When you reach the top of your head, secure the braid, flip your head back up, and gather the rest of your hair into a top knot or high bun. It looks like the braid is literally climbing up your head. This style is perfect for medium hair because it keeps the shorter hair at the nape of your neck firmly in place, preventing those annoying little hairs from falling out throughout the day.
15. The Wrapped Dutch Braid
This style is all about creating a focal point. Create one large Dutch braid that starts at your temple and winds around your head, but keep it very loose. As you add hair into the braid, try to pick up larger sections than you normally would. This creates a bold, chunky braid that stands out significantly from the rest of your hair.
Once you have circled the head once, tuck the end into the start of the braid and pin it. Pull the individual loops out quite far to create a “bloom” effect. This is a very romantic, almost Renaissance-inspired style that works incredibly well if you have highlights or lowlights, as the chunky loops will show off the dimension of your hair color perfectly.
16. Dutch Braid and Fishtail Hybrid
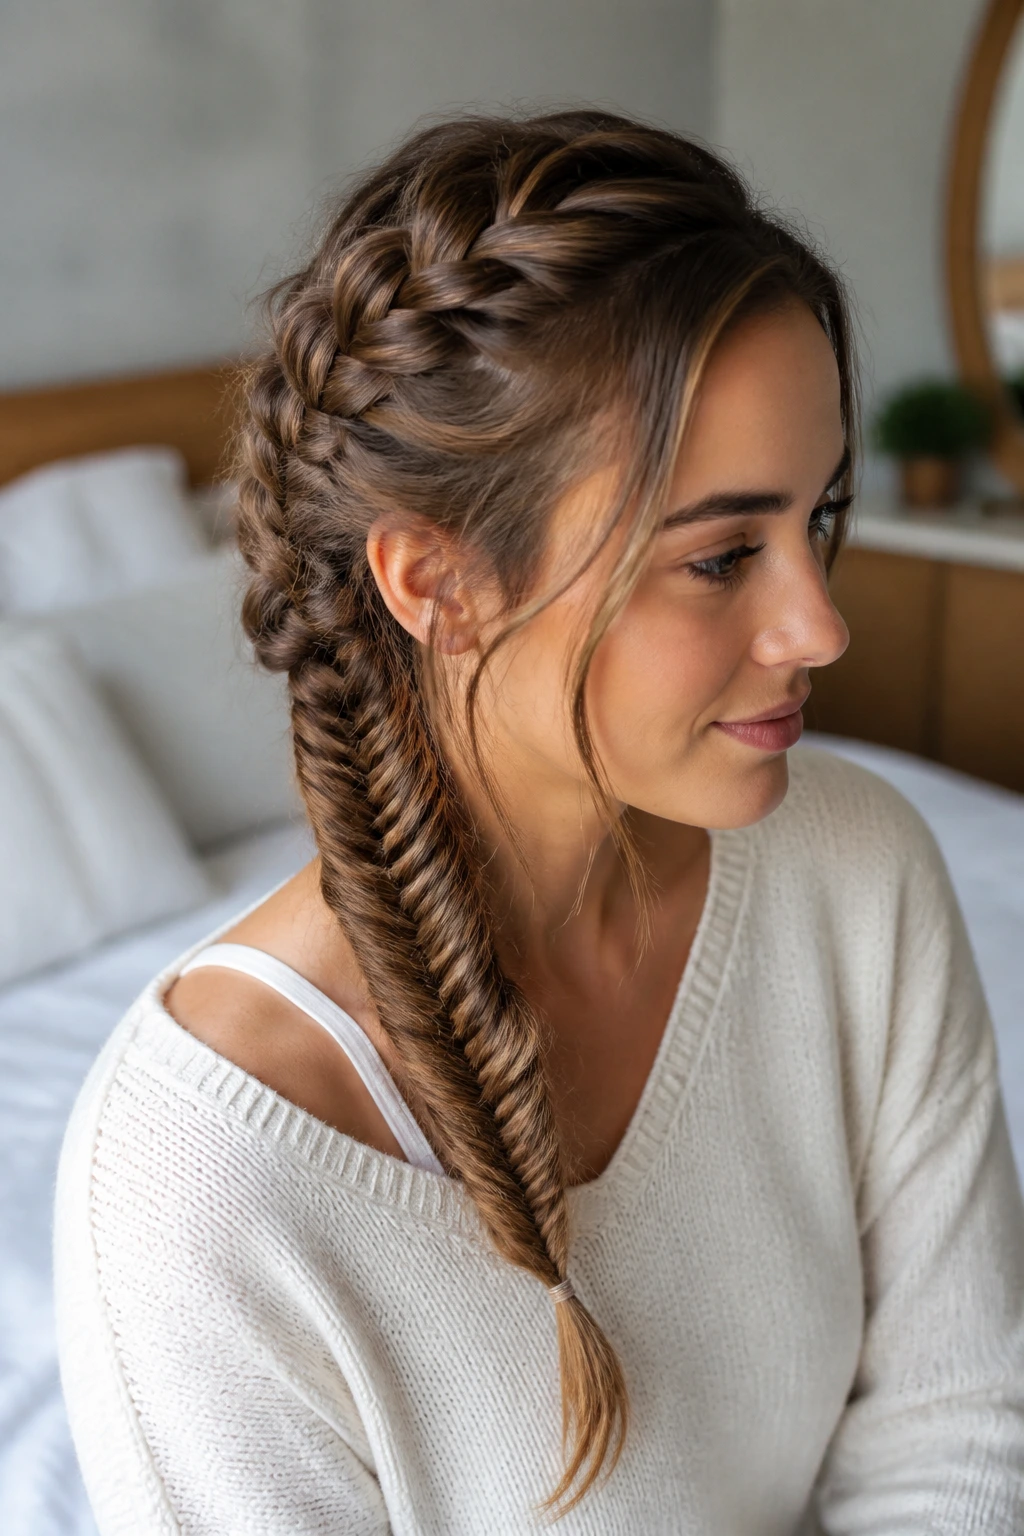
If you are comfortable with two different types of braids, mixing them creates a professional-level look. Start with a Dutch braid at the crown, but only braid about four inches down. Once you reach the center of the head, stop the Dutch technique and transition the hair into a fishtail braid.
The contrast between the thick, puffy Dutch stitches and the fine, intricate weave of the fishtail is visually captivating. Because fishtail braids take longer to complete, doing it for only the latter half of the style saves time while still delivering an impressive result. This hybrid style is excellent for medium-length hair because the fishtail braid is typically quite slim, which helps manage the ends without adding unwanted bulk.
17. Diagonal Dutch Braid
A diagonal braid adds a geometric interest to the hair that is uncommon and eye-catching. Start your Dutch braid at the top left side of your forehead and work it across your head toward the bottom right. As you go, keep the tension consistent so the braid does not sag.
Once you reach the bottom, you can secure it into a side ponytail or continue the braid down the length of your hair. This is a very flattering style for those with rounder face shapes, as the diagonal line breaks up the symmetry of the face. It is also quite easy to do on yourself since you are braiding across your field of vision rather than purely behind your head.
18. Dutch Braid with Scarf Integration
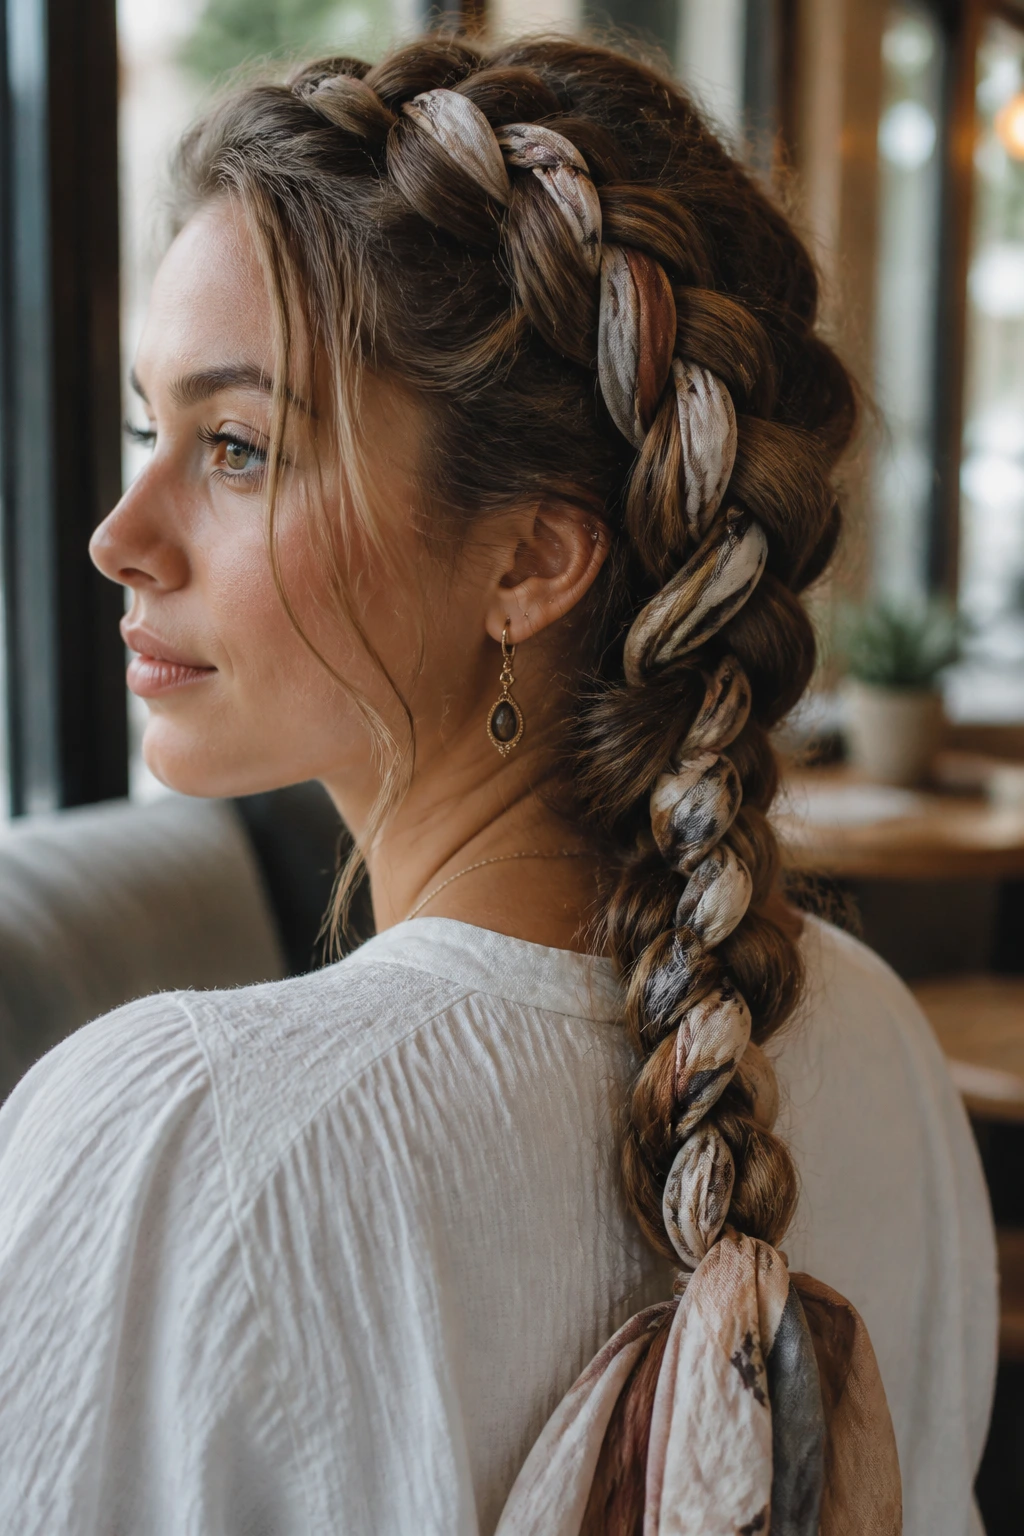
Adding a fabric accessory is the quickest way to change the personality of a Dutch braid. Before you begin your braid, tie a thin silk scarf to one of your three sections. As you braid, the scarf will be woven into the fabric of the plait, adding color and volume.
Because your hair is medium length, the scarf will likely be longer than your actual hair, which provides a beautiful, flowing aesthetic at the end of the braid. This is an ideal style for travel or vacation, where you want your hair to look styled with minimal effort. The scarf also protects your hair from excessive friction, making this a healthy, low-manipulation styling choice.
19. Messy Dutch Braid Pigtails
Sometimes, a “messy” look actually requires more effort than a clean one. To achieve this, start with clean, straight hair and give it a quick spritz with sea salt spray to add grit. Create your two Dutch braids as usual, but do not worry about keeping the part perfect or the sections uniform.
Once finished, use a small-tooth comb to gently tease the hair at the roots before braiding. Pull strands of hair loose around your ears and temples to frame your face. This is the ultimate “relaxed weekend” look. It’s supposed to look lived-in, so do not stress if it starts to frizz slightly by the end of the day; that just adds to the aesthetic.
20. Dutch Braid Pompadour
If you love a vintage-inspired aesthetic, the pompadour braid is a sophisticated option. Gather the hair at the front and create a Dutch braid that starts at the hairline, lifting the hair upward and backward to create a slight “bump” or volume before the braiding begins.
Secure the braid at the crown and let the rest of your hair hang in loose, soft waves. This style gives you the height of a pompadour with the security of a braid. It works exceptionally well for medium hair because you have enough length to create the lift but not so much weight that the style flops over after an hour.
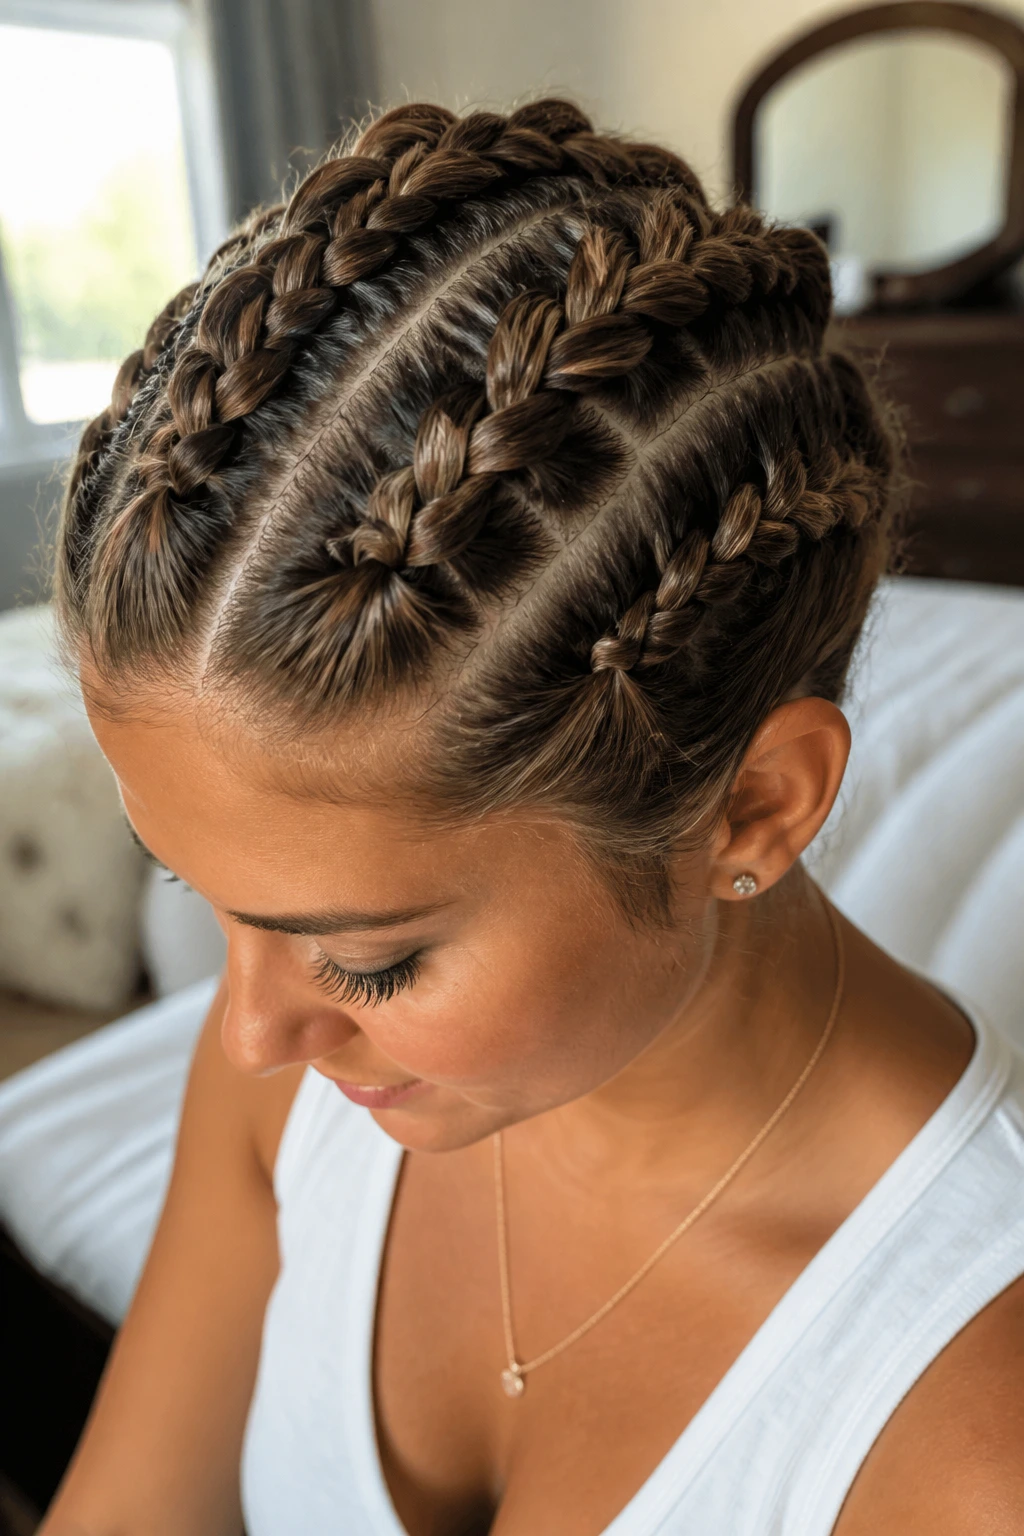
21. Multi-Strand Dutch Braid
This requires a bit more coordination, but the visual reward is high. Instead of dividing your hair into three sections, divide it into four or five. As you Dutch braid, you will alternate crossing the outermost strands under the middle strands in a specific pattern.
It creates a wider, flatter braid that looks almost like a woven belt. This style is surprisingly stable and feels very secure against the scalp. Because it uses more strands, it is an excellent way to make thin or medium hair appear thicker, as the width of the braid covers more surface area on the head.
22. Dutch Braid into a Twisted Ponytail
This is a sleek, modern look that relies on precision. Create a Dutch braid starting at the forehead and ending at the crown. Secure it with a small elastic. Next, gather all your hair, including the tail, into a ponytail at the back.
Take the entire ponytail and twist it tightly, then secure it at the end with a second elastic. The contrast between the tight, intricate Dutch braid at the top and the smooth, twisted ponytail below creates a structured look that is very popular for high-intensity gym sessions or professional settings where you need your hair to stay perfectly in place for eight hours straight.
23. Double Dutch into Low Ponytail
This is a classic for a reason—it is functional, flattering, and fast. Part your hair down the center and create two Dutch braids that start at the hairline and meet at the nape. Combine them into a single low ponytail.
The beauty of this style lies in its simplicity. Use a fabric scrunchie to hide the elastic and add a bit of personality. Because your hair is medium length, the ponytail will likely hit just above or below your shoulder blades, which is a very manageable length that won’t get caught in scarves or jacket collars during colder months.
24. Dutch Braid with Pearl Accents
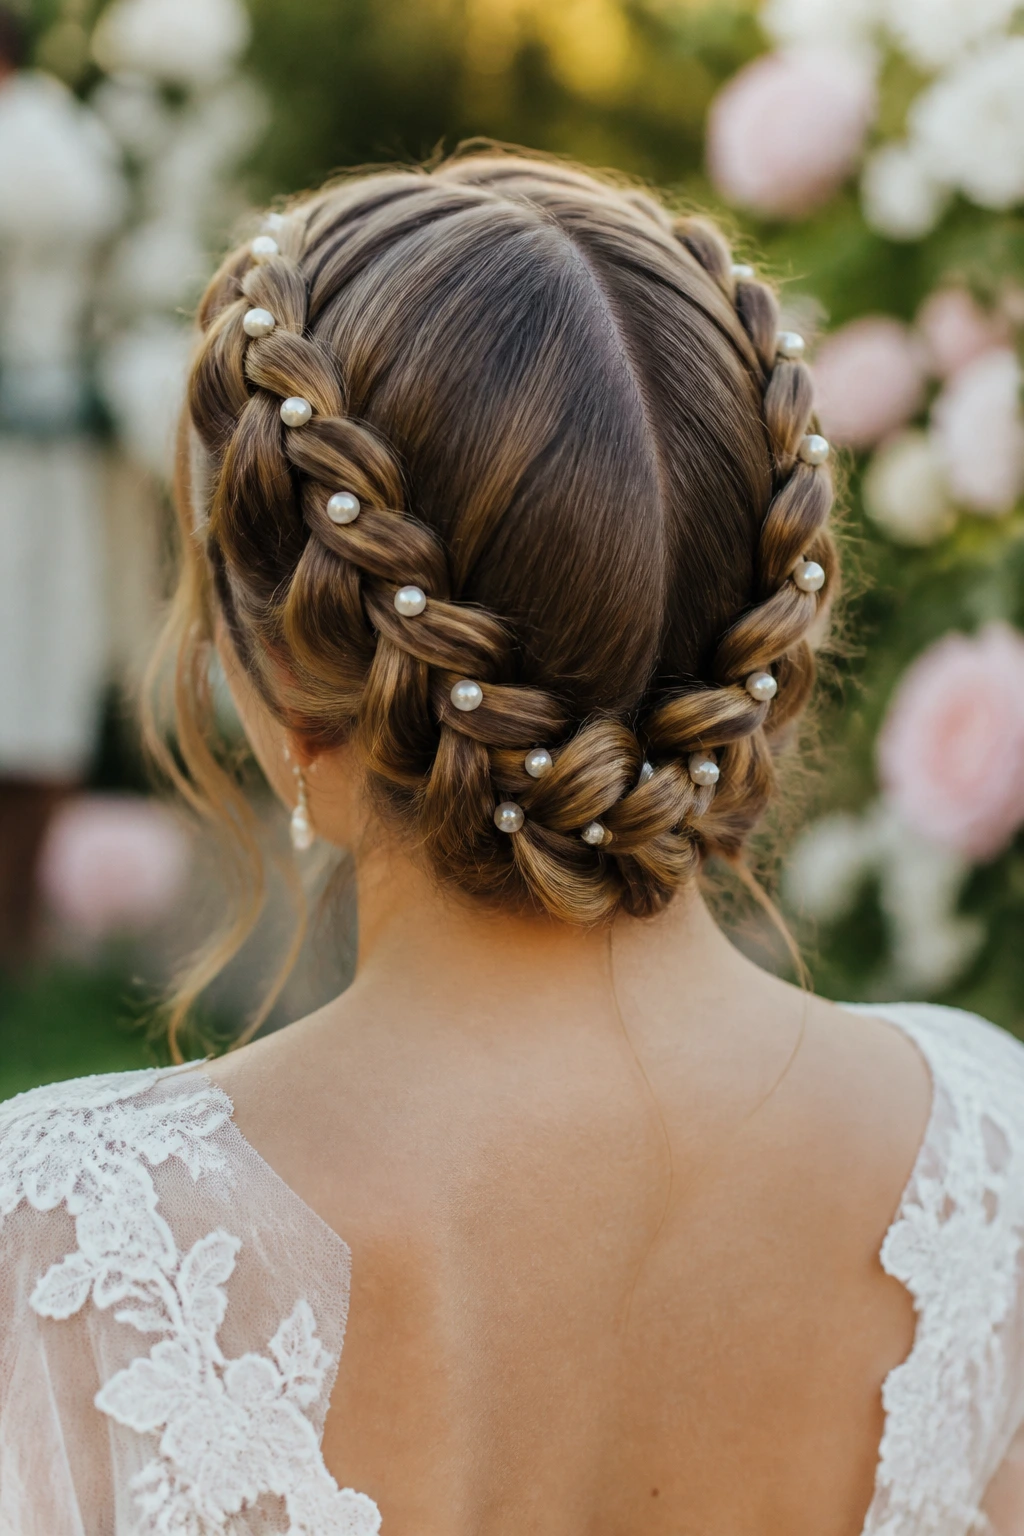
For weddings or formal events, turn your Dutch braid into a piece of jewelry. Style your hair into two side Dutch braids that meet at the back of the head. Once the braids are secure, pin small, individual faux pearls throughout the stitches of the braid.
The pearls add a classic, refined look to the texture of the Dutch technique. This is a very popular choice for bridesmaids or those attending garden parties. The key is to keep the braid relatively tight so the pearls have a stable base to sit on. If the braid is too loose, the pearls might shift or fall out.
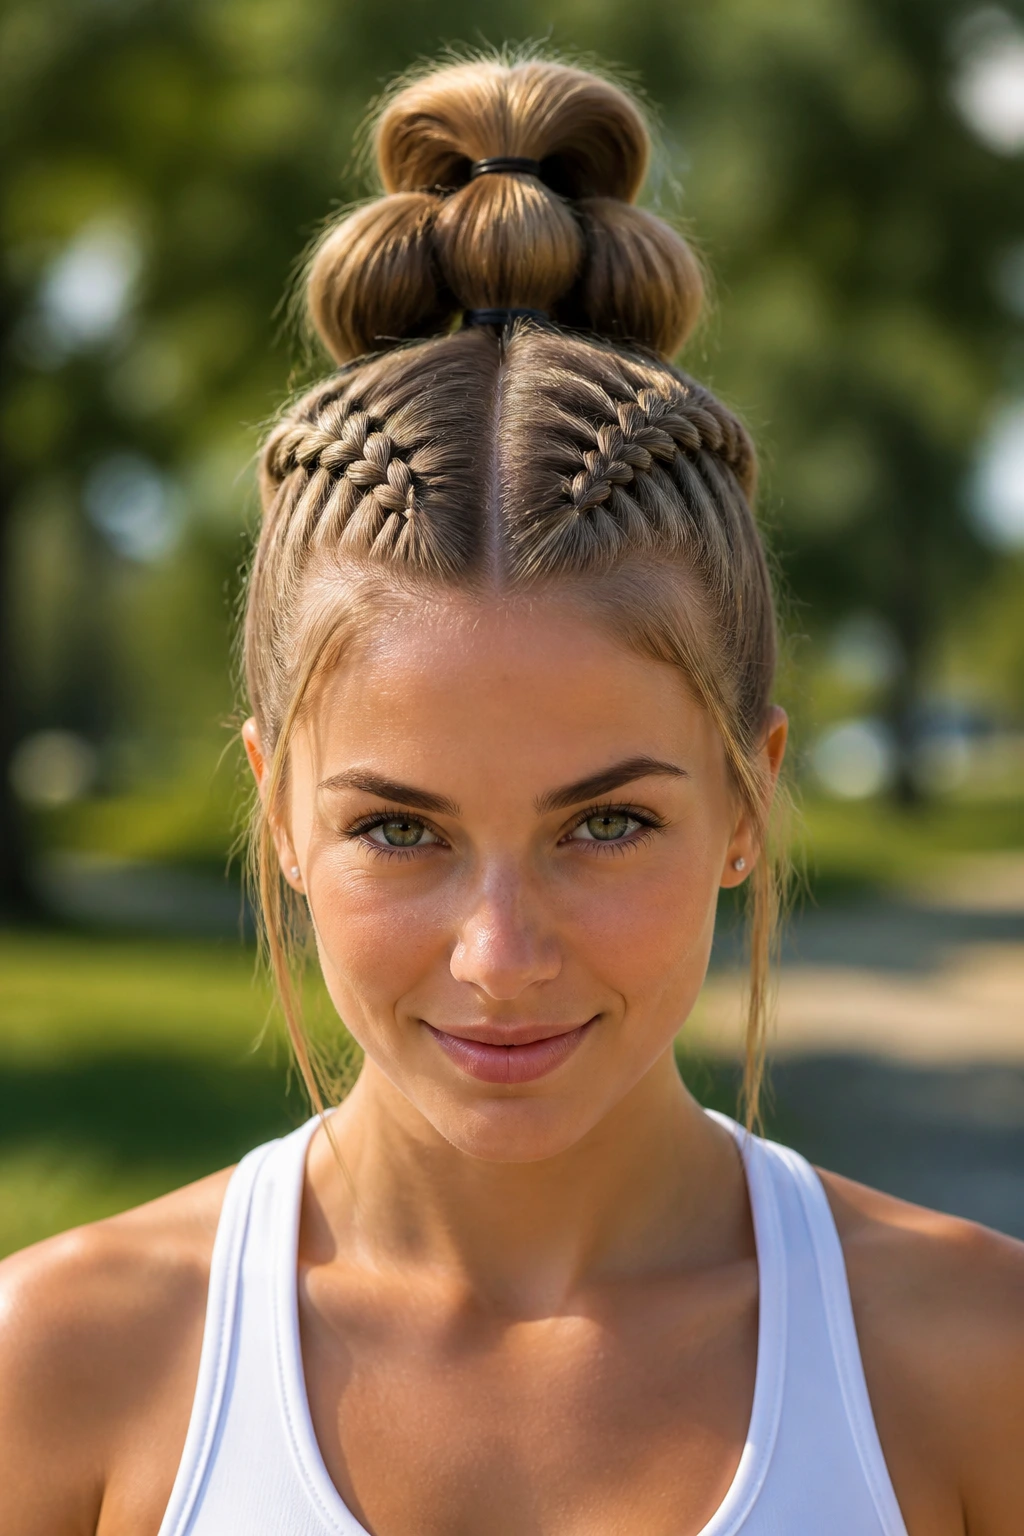
25. Triple Dutch Braid
Why stop at two? Create three parallel Dutch braids starting at the forehead and traveling toward the nape. You will need to be very precise with your sectioning to ensure the braids are equal in width.
This style is visually stunning because it looks like a cage of hair. It is also one of the most secure styles possible; because you are sectioning the hair into three distinct paths, there is very little room for hair to slip or lose its place. It is perfect for long days where you know you will be active and do not want to worry about fixing your hair.
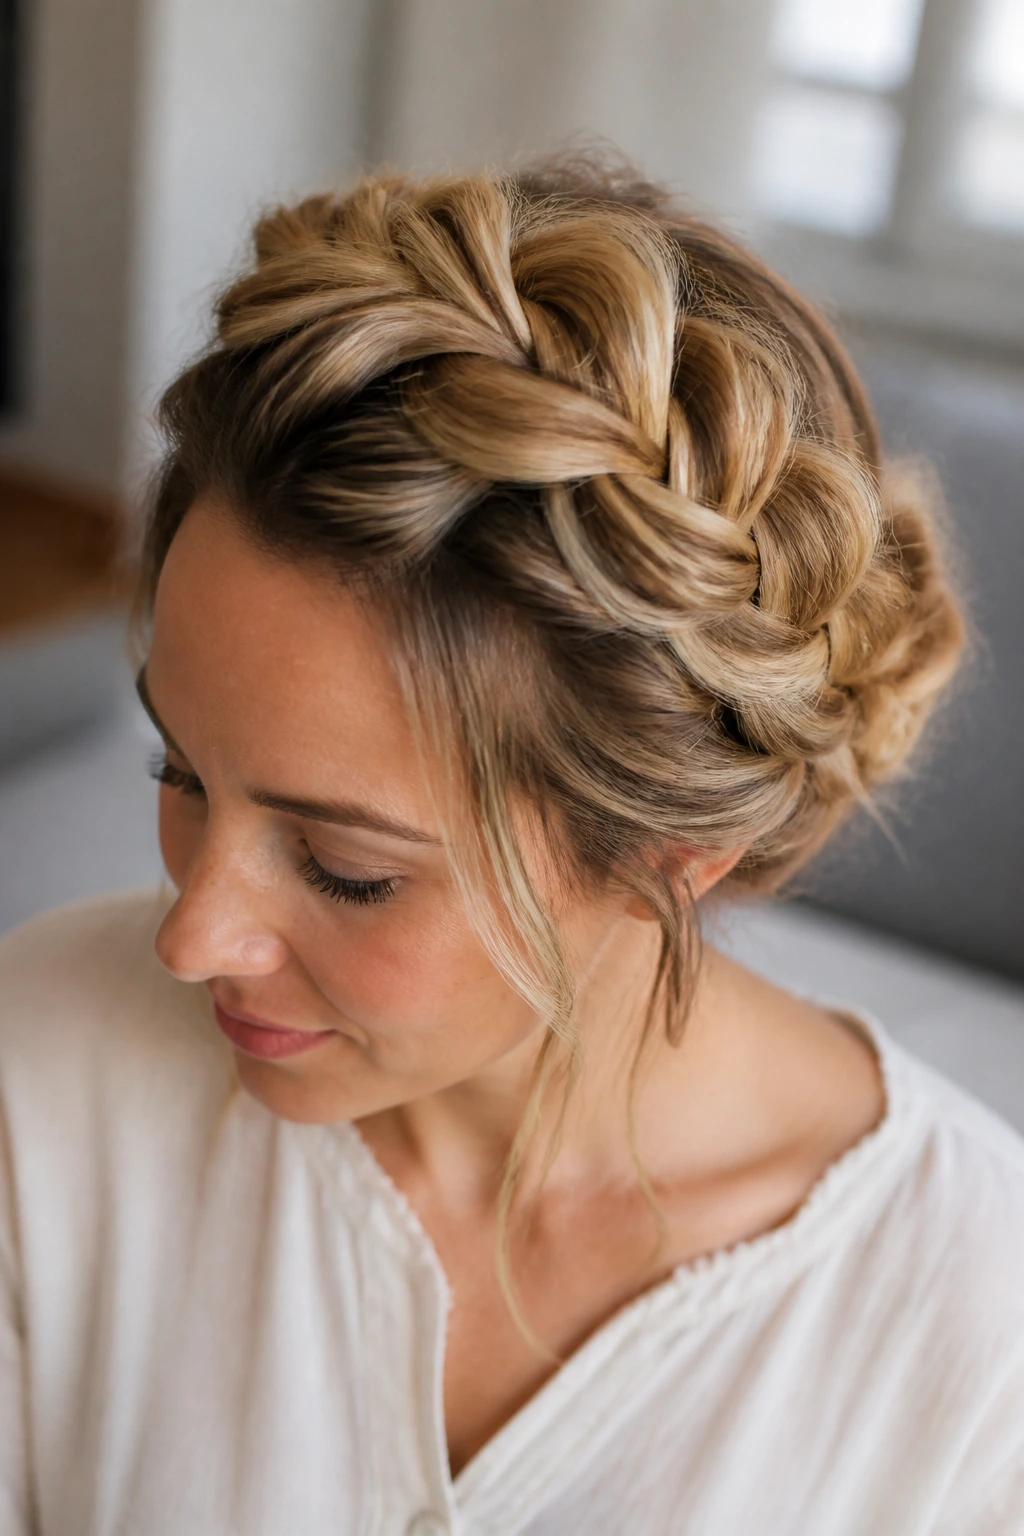
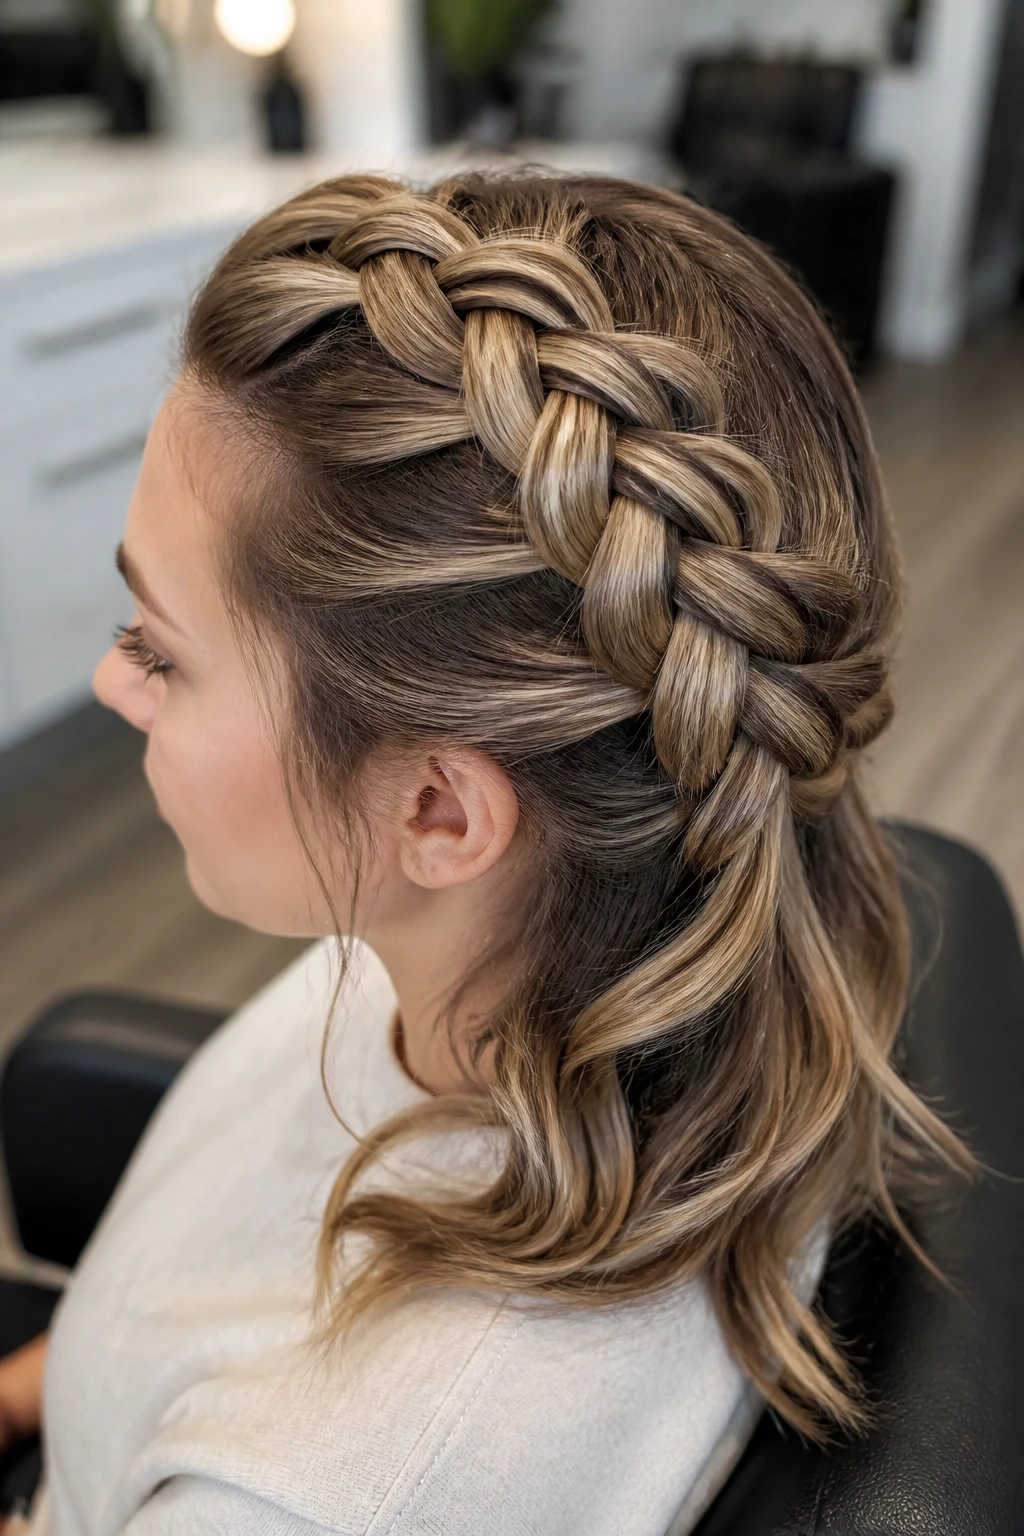
26. The Halo Dutch Braid
Similar to the crown braid but executed with more volume, the halo braid is designed to sit wide and frame the entire head. Use the Dutch technique to braid along the hairline, picking up larger sections of hair to ensure the braid is thick and prominent.
As you circle the head, pull at the loops to create a large, airy halo. This style is incredibly flattering for all face shapes as it frames the face symmetrically. Because you are working with medium-length hair, you will find it easier to keep the braid uniform in size compared to those with extremely long, heavy hair that can become difficult to manage halfway through the circle.
27. Dutch Braid to Side Bun
This style uses a single Dutch braid that runs diagonally from one side of the head to the other. Start at the right temple and work toward the bottom left. Once you reach the nape, sweep the hair into a bun situated just behind your left ear.
This is a very elegant, asymmetrical style that works well with formal evening wear. It’s easier to execute than a centered braid because you can see your work in the mirror for the majority of the process. The bun at the side adds a level of visual interest that makes the whole look feel very intentional.
28. Tight Dutch Braid with Sleek Ends
If you have naturally straight hair, this is a look that highlights your hair texture beautifully. Create two very tight Dutch braids that start at the forehead and stop at the nape. Leave the hair at the nape of the neck loose in the braids but keep them tight for the first few inches.
Then, transition to a very tight, three-strand plait for the rest of the length. By keeping the tension high throughout, the braid will look almost like a piece of rope. This is a very clean, modern, and minimalist look. It is an excellent choice for a professional environment where you want to look polished and serious.
Final Thoughts
Working with medium hair is all about leveraging your texture and using the right amount of tension. The Dutch braid is your most effective tool for adding volume where it is lacking and creating structure where you need it. Remember that the “pancaking” step—gently pulling on the loops of the braid—is the secret to making your hair look fuller and more deliberate.
Do not be discouraged if your first attempt feels clumsy; the Dutch technique is physically different from the French braid and takes a moment for your muscle memory to adjust. Start with the dual braids to get the feel of the under-hand motion, and once you are comfortable with that rhythm, the rest of these styles will follow quite naturally. Focus on clean sectioning and consistent tension, and you will find that you can transform your hair in just a few minutes.